Microsoft Teams allows its users to deliver outbound calls to users who use a PTSN service. However, users want to know how to show their Teams caller ID when dialing an outbound number in Microsoft Teams. Here, I will show you the steps to show your caller ID when dialing an outbound number in Microsoft Teams.
To show Teams caller ID, you first need to have admin permissions available so you can go into the Microsoft Teams admin section and then assign a caller ID policy. You can then click on the option for Voice in the Microsoft Teams admin section and add a new policy that allows you to display your caller ID when dialing an outbound number.
- Firstly, open Office 365.
- Now click on the launcher.
- You need to click on the option for “Admin.”
- Select “Teams” from the Admin centers section.
- After that, you need to click on the option for “Voice.”
- Now select the option for “Caller ID policies.”
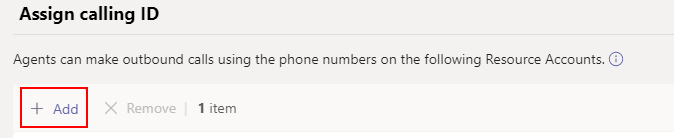
- Click on the option for “Add.”
- Change the “Replace the caller ID with” to “User’s number.”
- Press “Save” to complete the process.
Once you have completed the steps above, you will have managed to display your caller ID to outbound calls in Microsoft Teams. That means your caller ID will be in the form of a number when you deliver an outbound call using Microsoft Teams. Unfortunately, Microsoft Teams does not give users the option to display the caller ID as the user’s name.
An in-depth guide on how to show Teams caller ID when dialing outbound numbers
We have provided an in-depth guide to help you navigate the more complex steps. If you come across a step you cannot complete correctly, try using the screenshots to help you through the process.
- Firstly, open Office 365.
Admin permissions must be granted by the global admin members of the network. To begin the process, you must first open Office 365 and sign in with your login credentials. You must ensure that you have admin permissions enabled.
- Now click on the launcher.
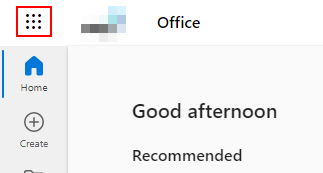
Nine dots illustrate the launcher in the Office 365 dashboard in the top left-hand side display; click on it to continue the process.
- You need to click on the option for “Admin.”
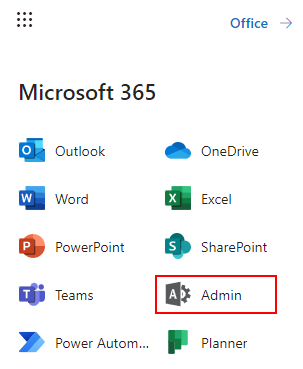
If you do not have admin permissions, you will be unable to access the admin dashboard to make the necessary changes to your caller ID section. Global admin permissions can grant you admin credentials, allowing you to assign policies or edit user information in the admin section.
- Select “Teams” from the Admin centers section.
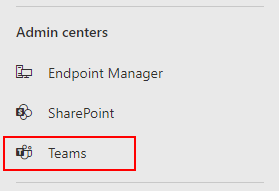
You will need to select the one called “Teams” from the list of Admin centers available in the Microsoft Teams admin dashboard.
- After that, you need to click on the option for “Voice.”
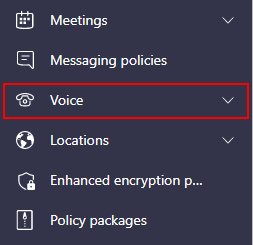
There will be a list of different options available on the side menu. From here, you will need to select the one called Voice.
- Now select the option for “Caller ID policies.”
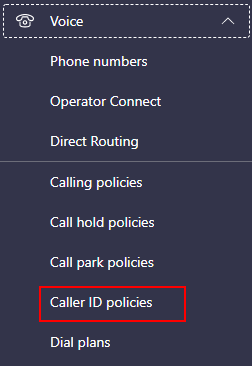
Teams will need to set up a caller ID policy to assign a caller ID to outbound calls in Microsoft. You can access the Caller ID policies section under the Voice category.
- Click on the option for “Add.”
- Change the “Replace the caller ID with” to “User’s number.”
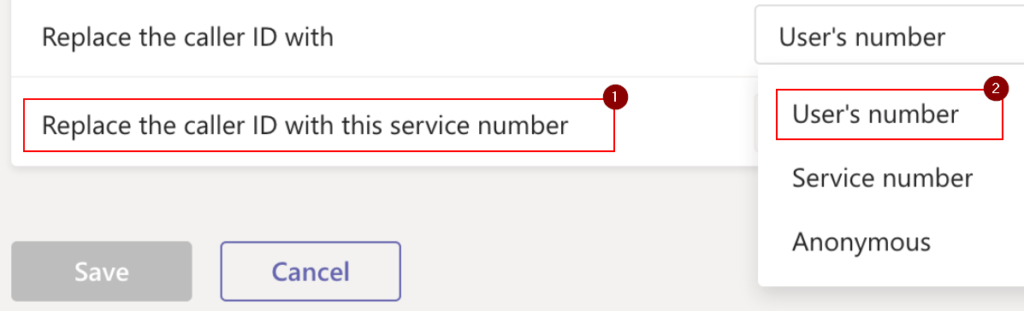
Anonymous: Will does not display any caller ID information; instead, it will display the text “Anonymous” to the outbound calls
Service number: This option allows you to display a service number instead of your main Teams number.
User’s number: This is your main Teams number, allowing you to display your Team’s caller ID when needed. You must select this option to display your caller ID to outbound calls.
- Press “Save” to complete the process.
A caller ID will be displayed on the user’s device when you deliver an outbound call. Microsoft Teams allows you to display your caller ID in the form of a number or a service number assigned to Microsoft Teams. If you choose a service number as your caller ID in Microsoft Teams, you will also have the option to display the service number you require.
The other sections allow users to block incoming caller IDs or override caller ID policies designed to help users manage their incoming calls. These options are optional; however, you can choose the “override caller ID policies” option. What this does is it allows users to have the option to display their caller ID when they are calling you in Microsoft Teams.

Conclusion
Thank you for reading our content on how you can show your caller ID when delivering a call to an outbound number in Microsoft Teams. I have provided the steps on how you can achieve this as well as an in-depth guide if you require further assistance with those steps.
The process includes no lengthy input or output of information figures, you only need to toggle a few settings, and you will have managed to complete the steps. If you require further assistance with the steps provided, you can drop a comment below, and we will address your issues.