Retention policies are a useful feature available to Office/Microsoft 365 users. They can help you comply with regulations, as well as rapidly and automatically clean up your mailboxes. In this blog post, I’ll demonstrate how to apply retention policies to individual mailboxes as well as how to bulk apply retention policies in the Exchange admin center.
Here’s a step-by-step process for applying a retention policy to a mailbox in the Exchange admin center [EAC]:
- Navigate to Office.com and sign in using your Microsoft credentials
- Open the app launcher and click Admin
- Click Exchange to open up the Exchange admin center
- Under recipients, click mailboxes
- Select a mailbox and click the pencil icon [edit]
- Click mailbox features
- Open the retention policy dropdown and select the policy you want to apply
- Click Save
If you want to apply a retention policy to multiple mailboxes at the same time, follow steps 1 – 4 above and then:
- Select one mailbox, hold the CTRL key while clicking each mailbox to select numerous at the same time
- Click More options in the bulk edit menu then click Update… under Retention Policy
- Select the retention policy you want to assign then click Save
Please note you will need to be a global admin in Office/Microsoft 365 to follow the steps outlined above. If you’re not, ask your admin to assign your user the appropriate permissions or ask them to apply the retention policies on your behalf.
I’ll demonstrate the steps above with screenshots throughout the rest of this post, so please follow along!
How To Apply A Retention Policy To Mailboxes In The Exchange Admin Center: Step-by-step With Screenshots
If you’ve created retention tags and then a retention policy, you need to apply it to your mailboxes for it to take effect.
If you haven’t created a retention policy yet, I recently wrote a blog post that explains how you create retention tags and policies in Exchange Online [the guide is also applicable to other versions of Exchange]. You can read that blog post by clicking here.
But anyway, on with the walkthrough. I’ll first explain the process for applying a retention policy to one mailbox, then explain the process for bulk applying retention policies afterwards.
How To Apply A Retention Policy To A Mailbox In Exchange
The steps below will guide you through applying a retention policy to a mailbox in Exchange. As you will see, it is a relatively painless process:
- Navigate to Office.com and sign in using your Microsoft credentials
- Open the app launcher and click Admin
- Click Exchange to open up the Exchange admin center
- Under recipients, click mailboxes
- Select a mailbox and click the pencil icon [edit]
- Click mailbox features
- Open the retention policy dropdown and select the policy you want to apply
- Click Save
1. Navigate to Office.com and sign in using your Microsoft credentials
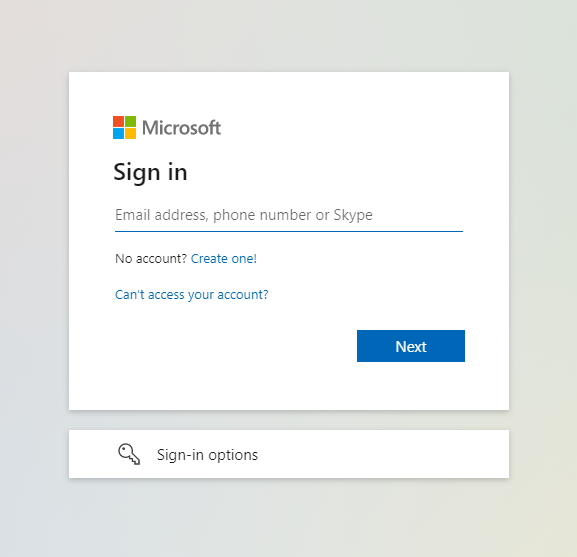
As I mentioned before, your user will need the appropriate permissions to follow these steps. You must be a global admin to apply retention policies to mailboxes in the Exchange admin center.
2. Open the app launcher and click Admin
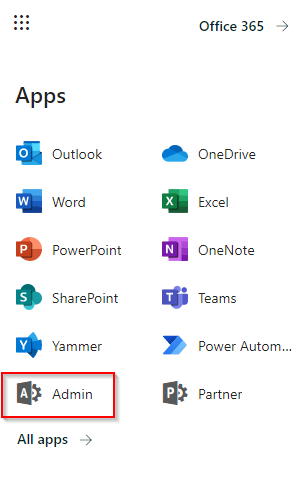
If the Admin application isn’t showing in the app launcher, it likely means your user doesn’t have the right permissions assigned.
If another user has recently assigned you the permissions — perhaps you requested them so you could follow this guide — it can sometimes take time for the permissions to synchronise and be fully reflected in the Microsoft services. Wait around 30 minutes and the Admin application should appear.
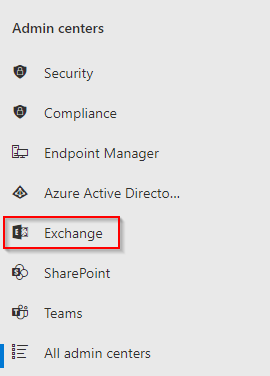
3. Click Exchange to open up the Exchange admin center
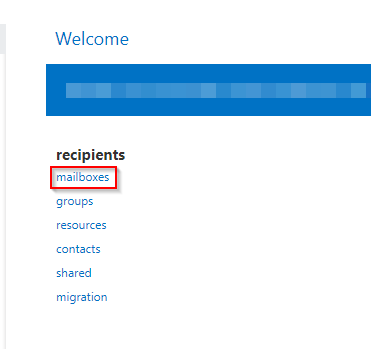
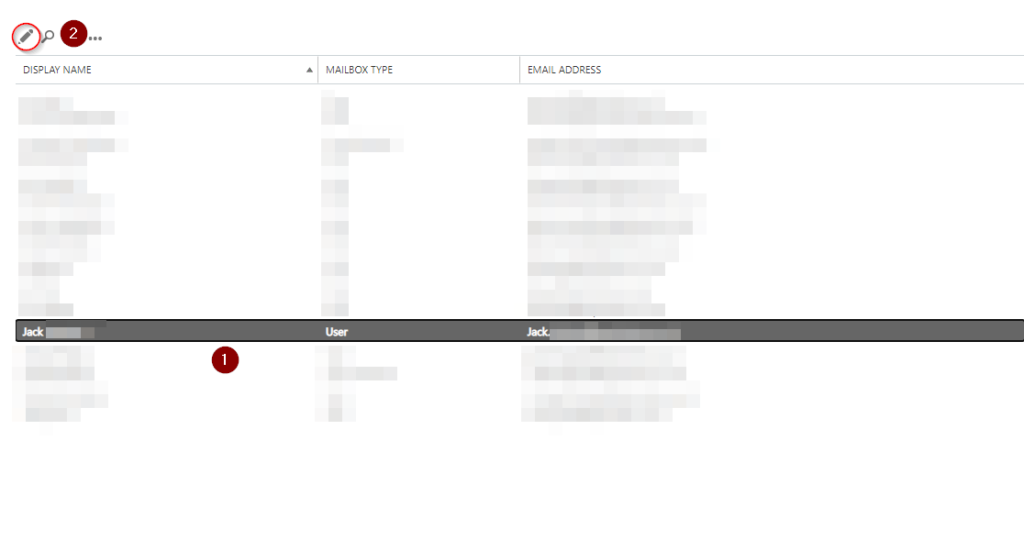
4. Under recipients, click mailboxes
5. Select a mailbox and click the pencil icon [edit]
In the next section of this guide, I explain how to bulk apply retention policies. If you want to bulk apply policies, click here to skip to that section of the post.
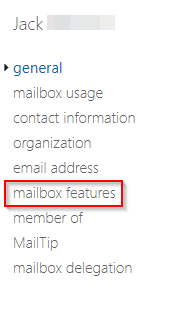
6. Click mailbox features
7. Open the retention policy dropdown and select the policy you want to apply
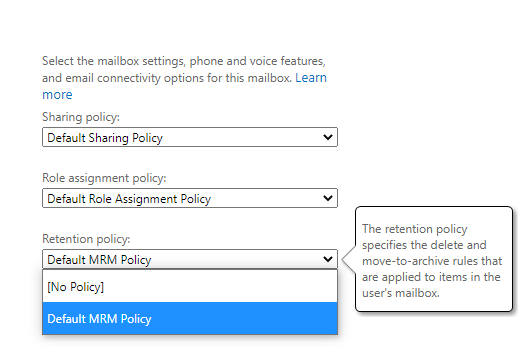
If you’ve created a retention policy, it will show here. The policy titled ‘Default MRM Policy’ is created automatically by Microsoft and may not meet your requirements.
If you haven’t created a retention policy yet, I wrote a blog post that walks you through the entire process from creating retention tags to creating a policy. You can read it by clicking here.
8. Click Save

Voila — you’re all done! The retention policy will be applied to the mailbox in question and begin functioning according to the tags you applied to the policy.
If you want to bulk apply retention policies, keep reading — I’ll walk through that next.
How To Bulk Apply Retention Policies To Mailboxes In Exchange
In the previous section, I already demonstrated signing into Exchange and locating the mailboxes page. So in this section, I’m just going to demonstrate how you bulk apply retention policies once you’re on the mailboxes page.
This can save you a lot of time if you’re wanting to apply the same policy to a ton of accounts.
Follow the steps below to bulk apply retention policies to mailboxes in Exchange:
- Select one mailbox, hold the CTRL key while clicking each mailbox to select numerous at the same time
- Click More options in the bulk edit menu then click Update… under Retention Policy
- Select the retention policy you want to assign then click Save
1. Select one mailbox, hold the CTRL key while clicking each mailbox to select numerous at the same time

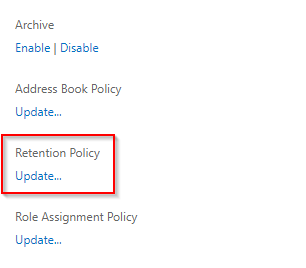
2. Click More options in the bulk edit menu then click Update… under Retention Policy

The ‘More options…’ link is virtually hidden, right at the bottom of a long list. It’s certainly easy to miss if you don’t know where to look.
Once you’ve clicked More options…, click Update… under Retention Policy. This will let you bulk apply the retention policy to the mailboxes you selected before.
3. Select the retention policy you want to assign then click Save
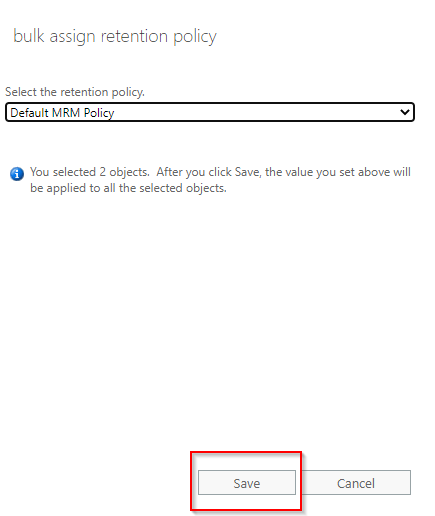
Select the retention policy you want to apply and then click Save.
If you haven’t created a retention policy yet, my blog post How To Create Retention Tags And Policies In Exchange walks you through the entire process. You can read it by clicking the button below.
Thanks for reading this post! If you need any help, please feel free to leave a comment below.