Microsoft Teams has exploded in popularity. Teams are popular among users because it allows them to develop tools without having to go via IT (if self-service is enabled, that is). And IT departments prefer it when their users utilize a technology that has been approved by the firm. You’ll certainly wind up having a lot of Teams workspaces in your environment as you use Teams to manage projects and interact with your coworkers. While some Teams may remain operating, the bulk of Teams are likely to be put up for one-time tasks or activities. That is to say, you will eventually quit utilizing a certain Team for communication and file management. However, you should keep the Team for historical considerations. You’d also like to make sure that once the project is finished, the material in the Team can’t be altered or erased. Fortunately, we now have the ability to archive MS Teams, and I’d want to show you how to do so as well as what occurs behind the scenes. Follow through for more information on how to archive a team.
Step by step process – How to archive a team
- Firstly, open the MS Teams app.
- Now click on “Teams” in the left-hand corner.
- Now click on “Manage Teams” (Gear icon on the bottom left of the screen).
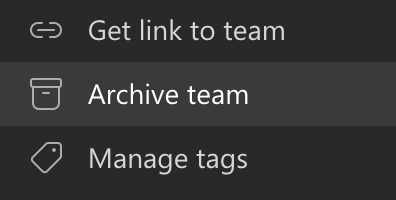
- Choose the team you want to archive and click on the three dots.
- Now click on “Archive Team”.
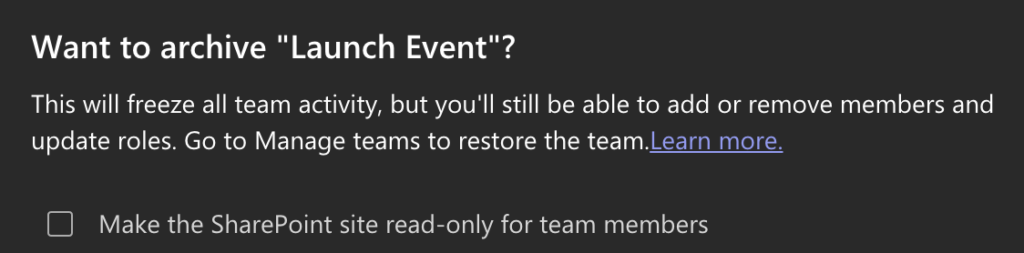
- A pop-up will show, select the checkbox if you want to set read-only mode.
- Finally, click on “Archive”.
Teams will now automatically, archive the team and it will essentially be put in storage without the ability to be edited. Make sure you let users know of any changes that will be made to their productivity. When you archive a team, it no longer has any activity. When you archive a team, you also archive the team’s private channels and any related site collections. You may still add and delete members, change responsibilities, and see all of the team’s activity in regular and private channels, files, and conversations. Teams that have been archived can be revived, however, teams that have been removed cannot be restored. Consider archiving the Team first, then deleting it when you’re certain you don’t need it anymore.

Microsoft Teams’ retention policies
Retention rules are generally your best choice if compliance is a major priority for your company.
They’re created to meet a certain compliance obligation by preserving or deleting data after the specified expiration date. Retention may be used when a team is still active, thus keeping things tidy isn’t the primary purpose.
Because each team’s workloads span several Microsoft 365 products, the content of each team is kept in multiple locations. You may use retention depending on the sort of material you wish to keep.
Organization-wide: Applied to your whole renter, including the goods listed below:
- Send and receive emails (Exchange Online Plan 2 license needed)
- Sites in SharePoint
- Accounts on OneDrive
- (Applies to information in the group’s email, site, and documents) Microsoft 365 Groups
- Public folders should be shared.
To Microsoft 365 products in particular: Specific groups, sites, user mailboxes, and OneDrive accounts can all be included or excluded. It’s worth noting that Teams has its own retention policy, therefore they’re not covered by the retention regulations that apply to Microsoft 365 Groups.
Admins can create two different types of retention rules for Teams in the Security & Compliance Center:
- Preservation: You may want to ensure that data is saved and available in eDiscovery for compliance reasons, regardless of what occurs in the end-user tools. These policies keep your data safe for a set amount of time, after which the policy can decide whether to keep it or delete it.
- On the other side, you may wish to erase data so that it is no longer a liability. You may set an expiration date for your data, just like you do with preservation rules.
These Teams retention restrictions only apply to Teams chat and channel messages, and they may only be implemented tenant-wide, not to particular teams. More information on Teams retention may be found in Microsoft’s official literature.
Retention policies are, at the end of the day, intended to ensure compliance. Only a timeline may be used to create regulations, which may or may not be tied to actual usage. Retention can be done while a team is still active, thus it won’t necessarily clean up your Team on its own.
Restore a team from archives
Steps 1 and 2 are the same as before. Then, in the Archived list of teams, locate the name of the team you wish to restore, click More choices, and then Restore team.
Check out the official Microsoft support literature for complete step-by-step instructions on archiving, recovering, and searching through old team material.
What is the most significant disadvantage of this method? What Microsoft calls “archiving” isn’t truly archiving in the classic meaning of the word—that is, moving data to another location. Conversations and files from an archived team will still be available and searchable; however, team members will not be able to alter them. This won’t work if the purpose is to declutter Teams and make them easier to traverse.
Using the Teams Admin Center, you may archive MS Teams
If you’re fortunate enough to work as a Teams Administrator in your organization, you may archive any team that exists in your tenancy, whether or not you’re a member of it.
- To get started, go to the “Office 365 Admin Center.”
- Select “Teams Admin” from the “Admin centers” menu.
- Choose “Manage” under “Teams” once you’re in the Teams Admin Center.
- Select “Archive” from the top ribbon, then the “Archive button” after checking the box next to the team you wish to archive.
- The team has been archived.
In-depth – Step by step process – How to archive a team
- Firstly, open the MS Teams app.
- Now click on “Teams” in the left-hand corner.

- Now click on “Manage Teams” (Gear icon on the bottom left of the screen).

- Choose the team you want to archive and click on the three dots.

- Now click on “Archive Team”.
- A pop-up will show, select the checkbox if you want to set read-only mode.
- Finally, click on “Archive”.

That’s it for this Blog thank you for taking time out to read our content, please feel free to email our team about how it went if you followed the steps or if you need more help with the questions we answered in this Blog.