For many workplaces, SharePoint is at the core of how employees access and share files. Therefore, if you are unable to log into your SharePoint, it can heavily impact your ability to work. Firstly, it is important to ensure that you are logging in using the correct credentials. Make sure that caps lock is not on if it doesn’t need to be, and ensure that you are spelling words correctly when entering your Microsoft credentials. If the issue still persists after you are certain that you’re entering the correct login details, the issue may be within your browser. Fortunately, there are a few other simple steps you can take to log into your Sharepoint. This blog post will highlight how to clear your browser history, empty temporary files in your browser, and how to add the URL for your SharePoint server as a trusted site in your browser with detailed screenshots for you to follow. For the purpose of this tutorial, I will be using Chrome to demonstrate how to do this. The process for other browsers should be similar to Chrome.
Clearing browser history to log into SharePoint:
- Open up Chrome and click on the three dots at the top of the page
- Click on ‘Settings’
- From the left hand side panel, select ‘Privacy and Security’
- Select ‘Clear browsing data’
- Select your desired time range
- Select all the relevant data you’d like to clear
- Click on ‘Clear data’

Emptying temporary files to log into SharePoint:
Follow the same steps as clearing browser history, and ensure that ‘Clear web browser cache’ is selected. This is the option that clears all temporary internet files that are stored in Chrome.
Adding the URL for your SharePoint server as a trusted site to log into SharePoint:
- Open up Chrome and click on the three dots at the top of the page
- Click on ‘Settings’
- From the left hand side panel, select ‘Privacy and Security’
- Select ‘Site Settings’
- Select ‘Javascript’
- In the section for ‘Allowed to use Javascript’ click on the ‘Add’ button.
- Copy and paste the SharePoint server URL into the box
- Click on ‘Add’
It is also worth noting that in order to access SharePoint, you must log in to Office.com using your work/ school email (in this case work email). You cannot access SharePoint if you attempt to log in using your personal email.
Step by step process to clear browser history to log into SharePoint:
- Open up Chrome and click on the three dots at the top of the page

Open up the Chrome browser menu by clicking on the three dots in the top right hand corner of the page.
- Click on ‘Settings’
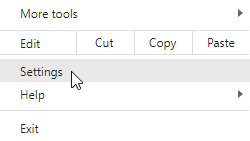
When the menu appears, click on ‘Settings’ from the options.
- From the left hand side panel, select ‘Privacy and Security’

A new window for browser settings will appear. Go to ‘Privacy and security on the left hand side panel.
- Select ‘Clear browsing data’

From the list of actions under the ‘Privacy and security’ settings, select ‘Clear browsing data’
- Select your desired time range

You can choose the time range from when you would like to clear the data. For the purpose of this tutorial, I have selected ‘Last 4 weeks’.
- Select all the relevant data you’d like to clear

Browsing data, Cookies, and Cached files are the three main types of data to clear, however you may select other types of data to clear as well if you would like to.
- Click on ‘Clear data’

Once you have changed the settings to what you would like to clear, click on ‘Clear data’ at the bottom of the window.
Step by step process to empty temporary files in browser to log into SharePoint:
Follow the same steps as clearing browser history, and ensure that ‘Clear web browser cache’ is selected, as demonstrated in the screenshot below. This is the option that clears all temporary internet files that are stored in Chrome.
Step by step process to add the URL for your SharePoint server as a trusted site to log into SharePoint:
- Open up Chrome and click on the three dots at the top of the page
Open up the Chrome browser menu by clicking on the three dots in the top right hand corner of the page.
- Click on ‘Settings’
When the menu appears, click on ‘Settings’ from the options.
- From the left hand side panel, select ‘Privacy and Security’
A new window for browser settings will appear. Go to ‘Privacy and security on the left hand side panel.
- Select ‘Site Settings’

From the list of actions, select ‘Site settings’
- Select ‘JavaScript’

When the new page appears, scroll down to the ‘Content’ section and select the option for ‘JavaScript’
- In the section for ‘Allowed to use JavaScript’ click on the ‘Add’ button.

Under the section for ‘Custom behaviours’, there is a section called ‘Allowed to use JavaScript’. Click on the ‘Add’ button located next to it.
- Copy and paste the SharePoint server URL into the box

In another browser tab, go to your Sharepoint server and copy the URL. Then paste the URL into the box to add the site.
- Click on ‘Add’
At the bottom of the window, select ‘Add’. this will save the changes and add your SharePoint server as a trusted site.
Once you have completed all these steps, you should now be able to log into your Sharepoint account.
Thanks for reading. If you have any further questions about this blog post, then feel free to leave a comment below and we’ll be happy to help.