 Key Takeaways
 Workspaces in Microsoft Loop are hubs for project management and ideation. They contain pages like a notebook in OneNote, which helps you to organize the project and manage the workflow efficiently. [More…]
 You can add members to a workspace, which grants them access to all pages and components contained within it. [More…]

The Microsoft Loop app contains workspaces, which are similar to notebooks in OneNote. The workspaces contain pages, which teams can use to organize their projects. In this guide, we’ll tell you everything you need to know about workspaces in Loop, including how to add members and how to embed them into a Teams channel.
What are Microsoft Loop Workspaces?
Microsoft Loop workspaces serve as project management and ideation hubs. Within them, you can create pages and components and track the progress of your projects in real time. You may also control who has access to each workspace, which is ideal when working on projects across multiple departments.
In Loop, you can jumpstart your creativity using AI, which suggests content based on the title of your workspace. Overall, a Loop workspace is a powerful creative and collaborative environment that you can utilize through all stages of the project’s lifespan.
We’ve also created a video to help explain what workspaces are:
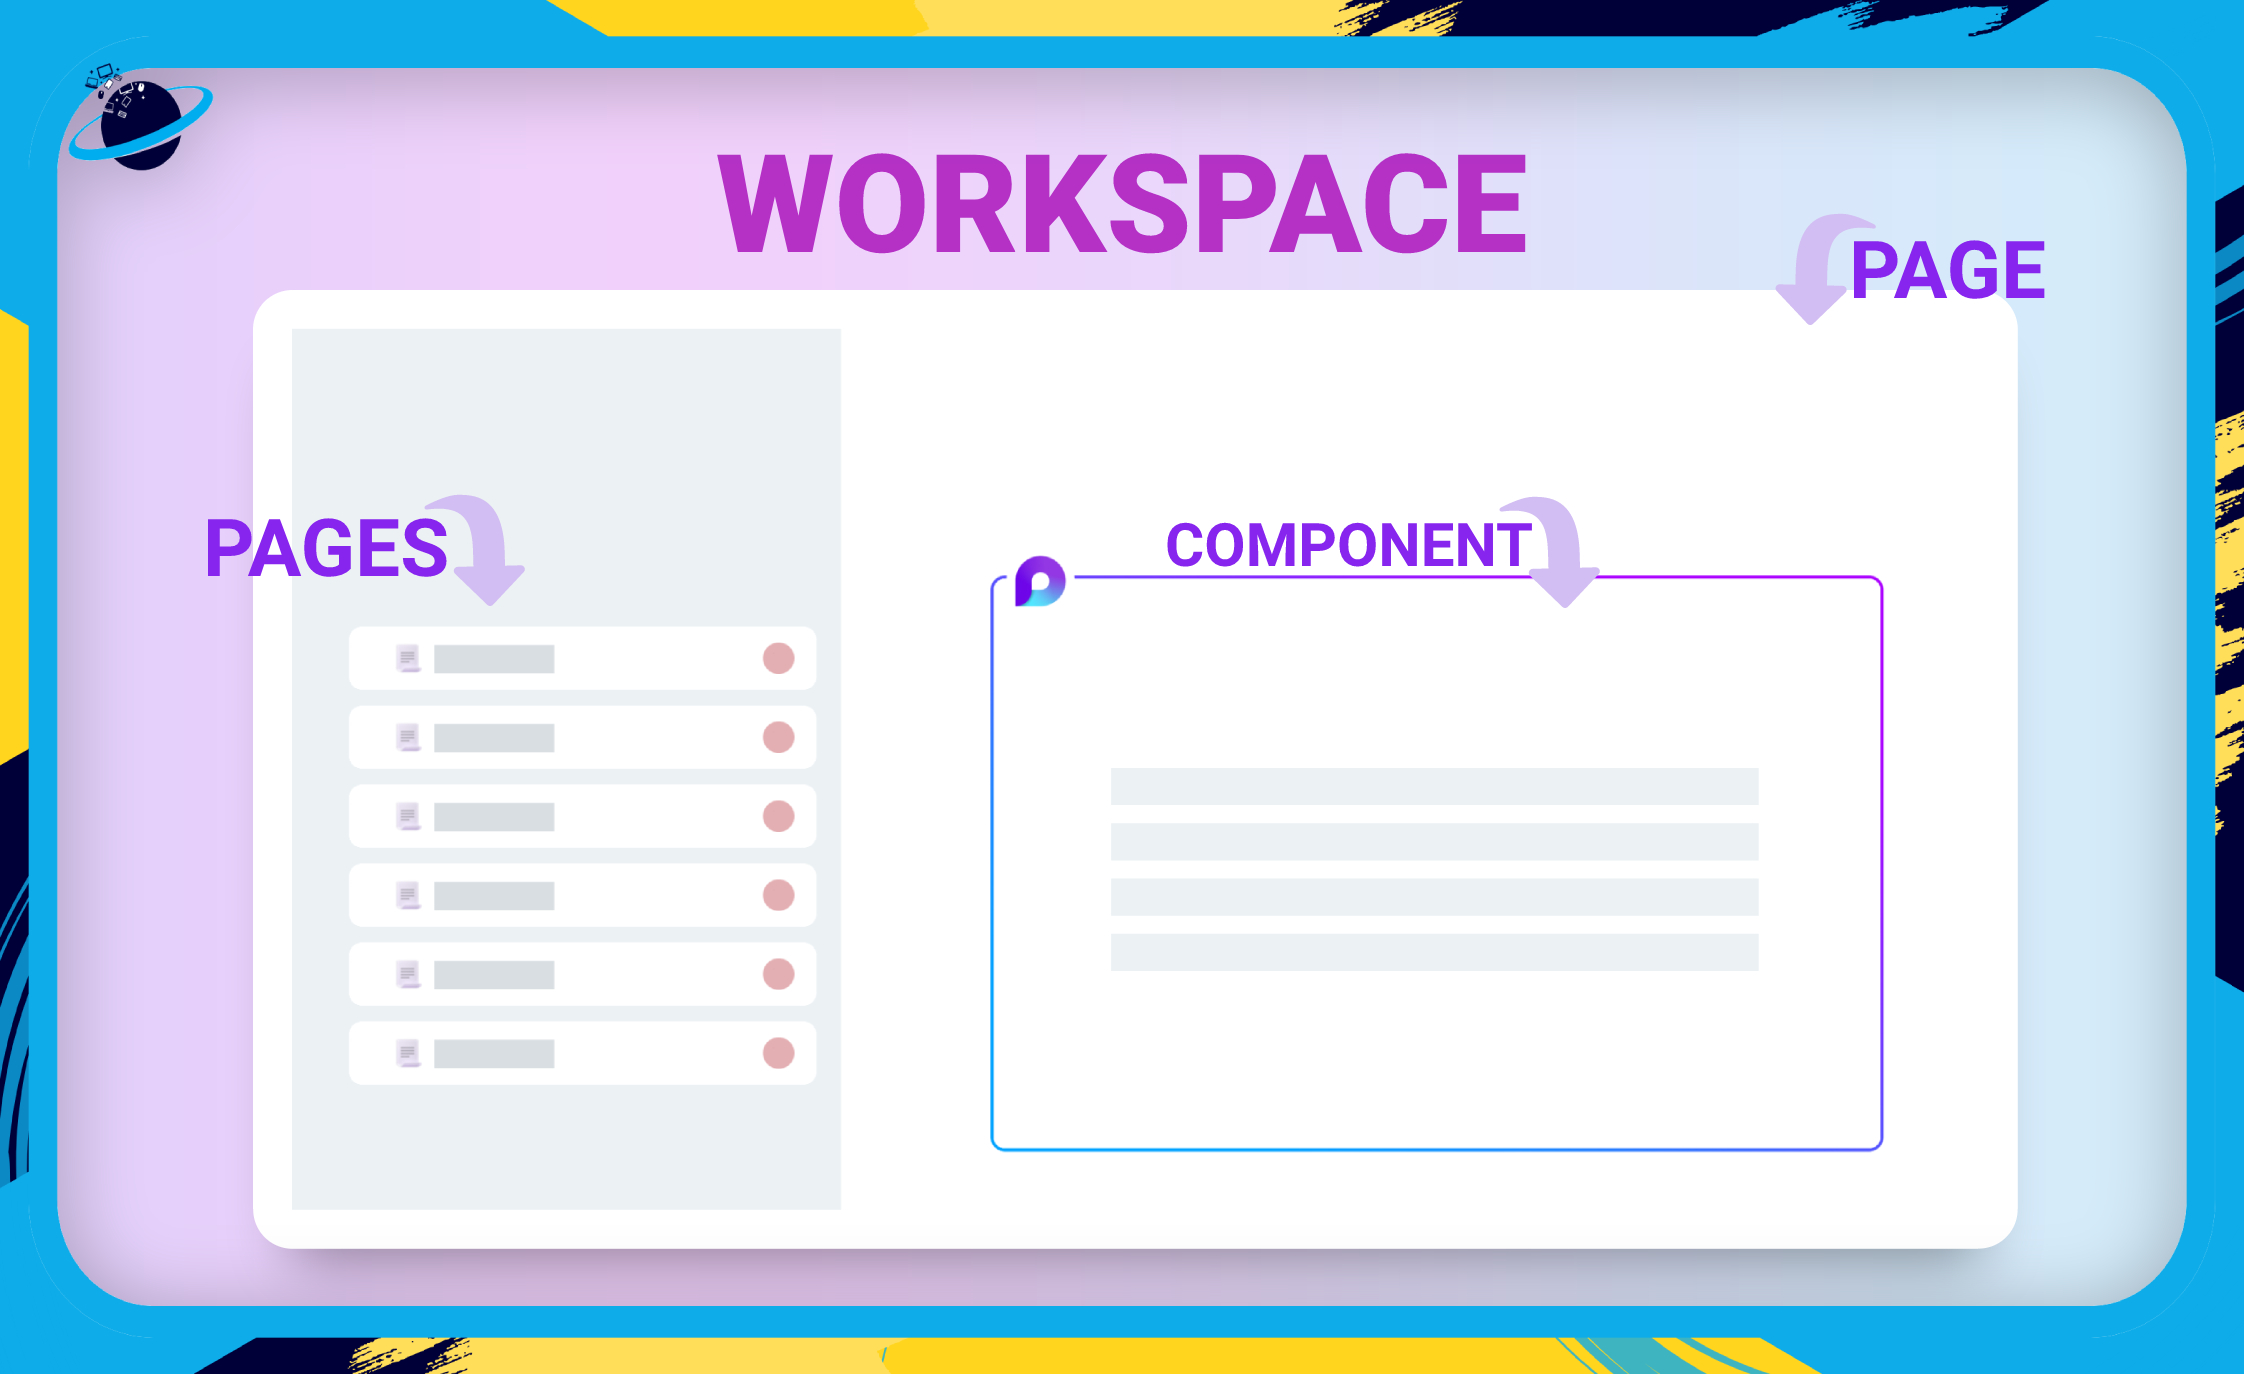
 Overview: What are the three key parts of Microsoft Loop?
Microsoft Loop is a real-time collaboration tool that allows teams to work on projects from different locations within the Microsoft 365 suite. The shared pages and components will automatically update across all instances, so that updates can be viewed by everyone, no matter where the components are located.
The three key parts of Microsoft Loop are:
- Workspaces.
- Pages.
- Components.
In this guide, we’ll be focusing on workspaces. We’ll discuss what they are, how to create and share them, and how to embed them in different locations.

 What are Microsoft Loop Workspaces?
In Microsoft Loop, workspaces can be viewed as a project hub, or like a notebook in OneNote. The workspaces contain pages, which, in turn, contain components and subpages.
How to create a workspace in Microsoft Loop
In this section, we’ll show you how to create a workspace and how to enable or disable the jumpstart feature.
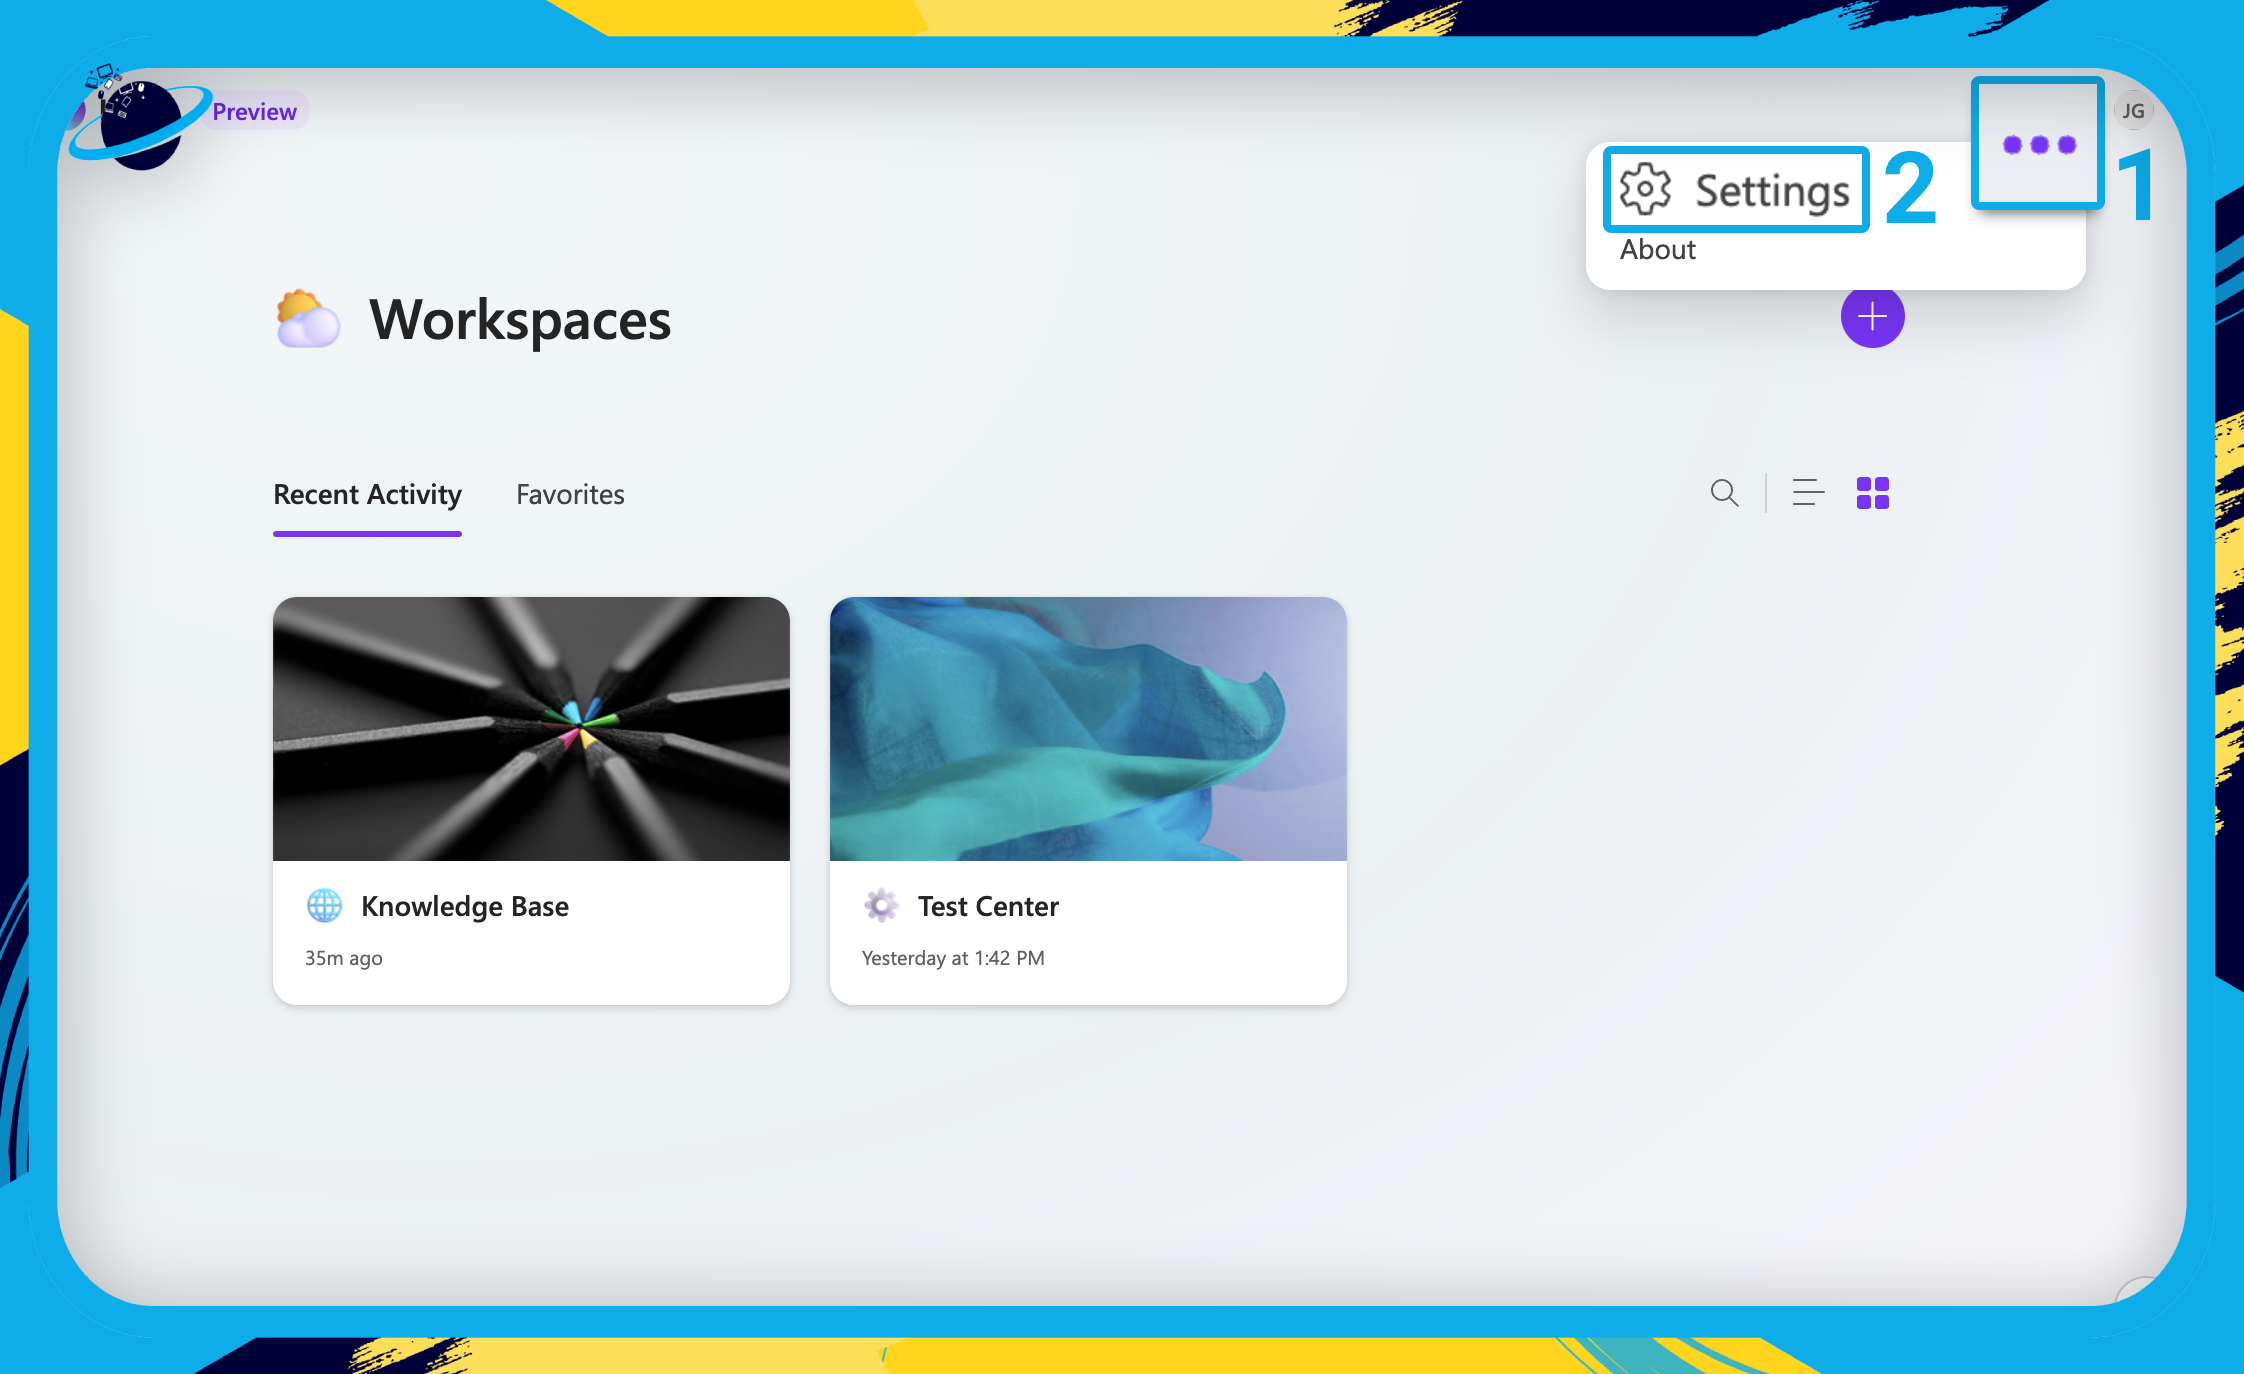
- Before creating a workspace, click the
 three dots in the top right. [1]
 - Then select
 “Settings” from the dropdown. [2]
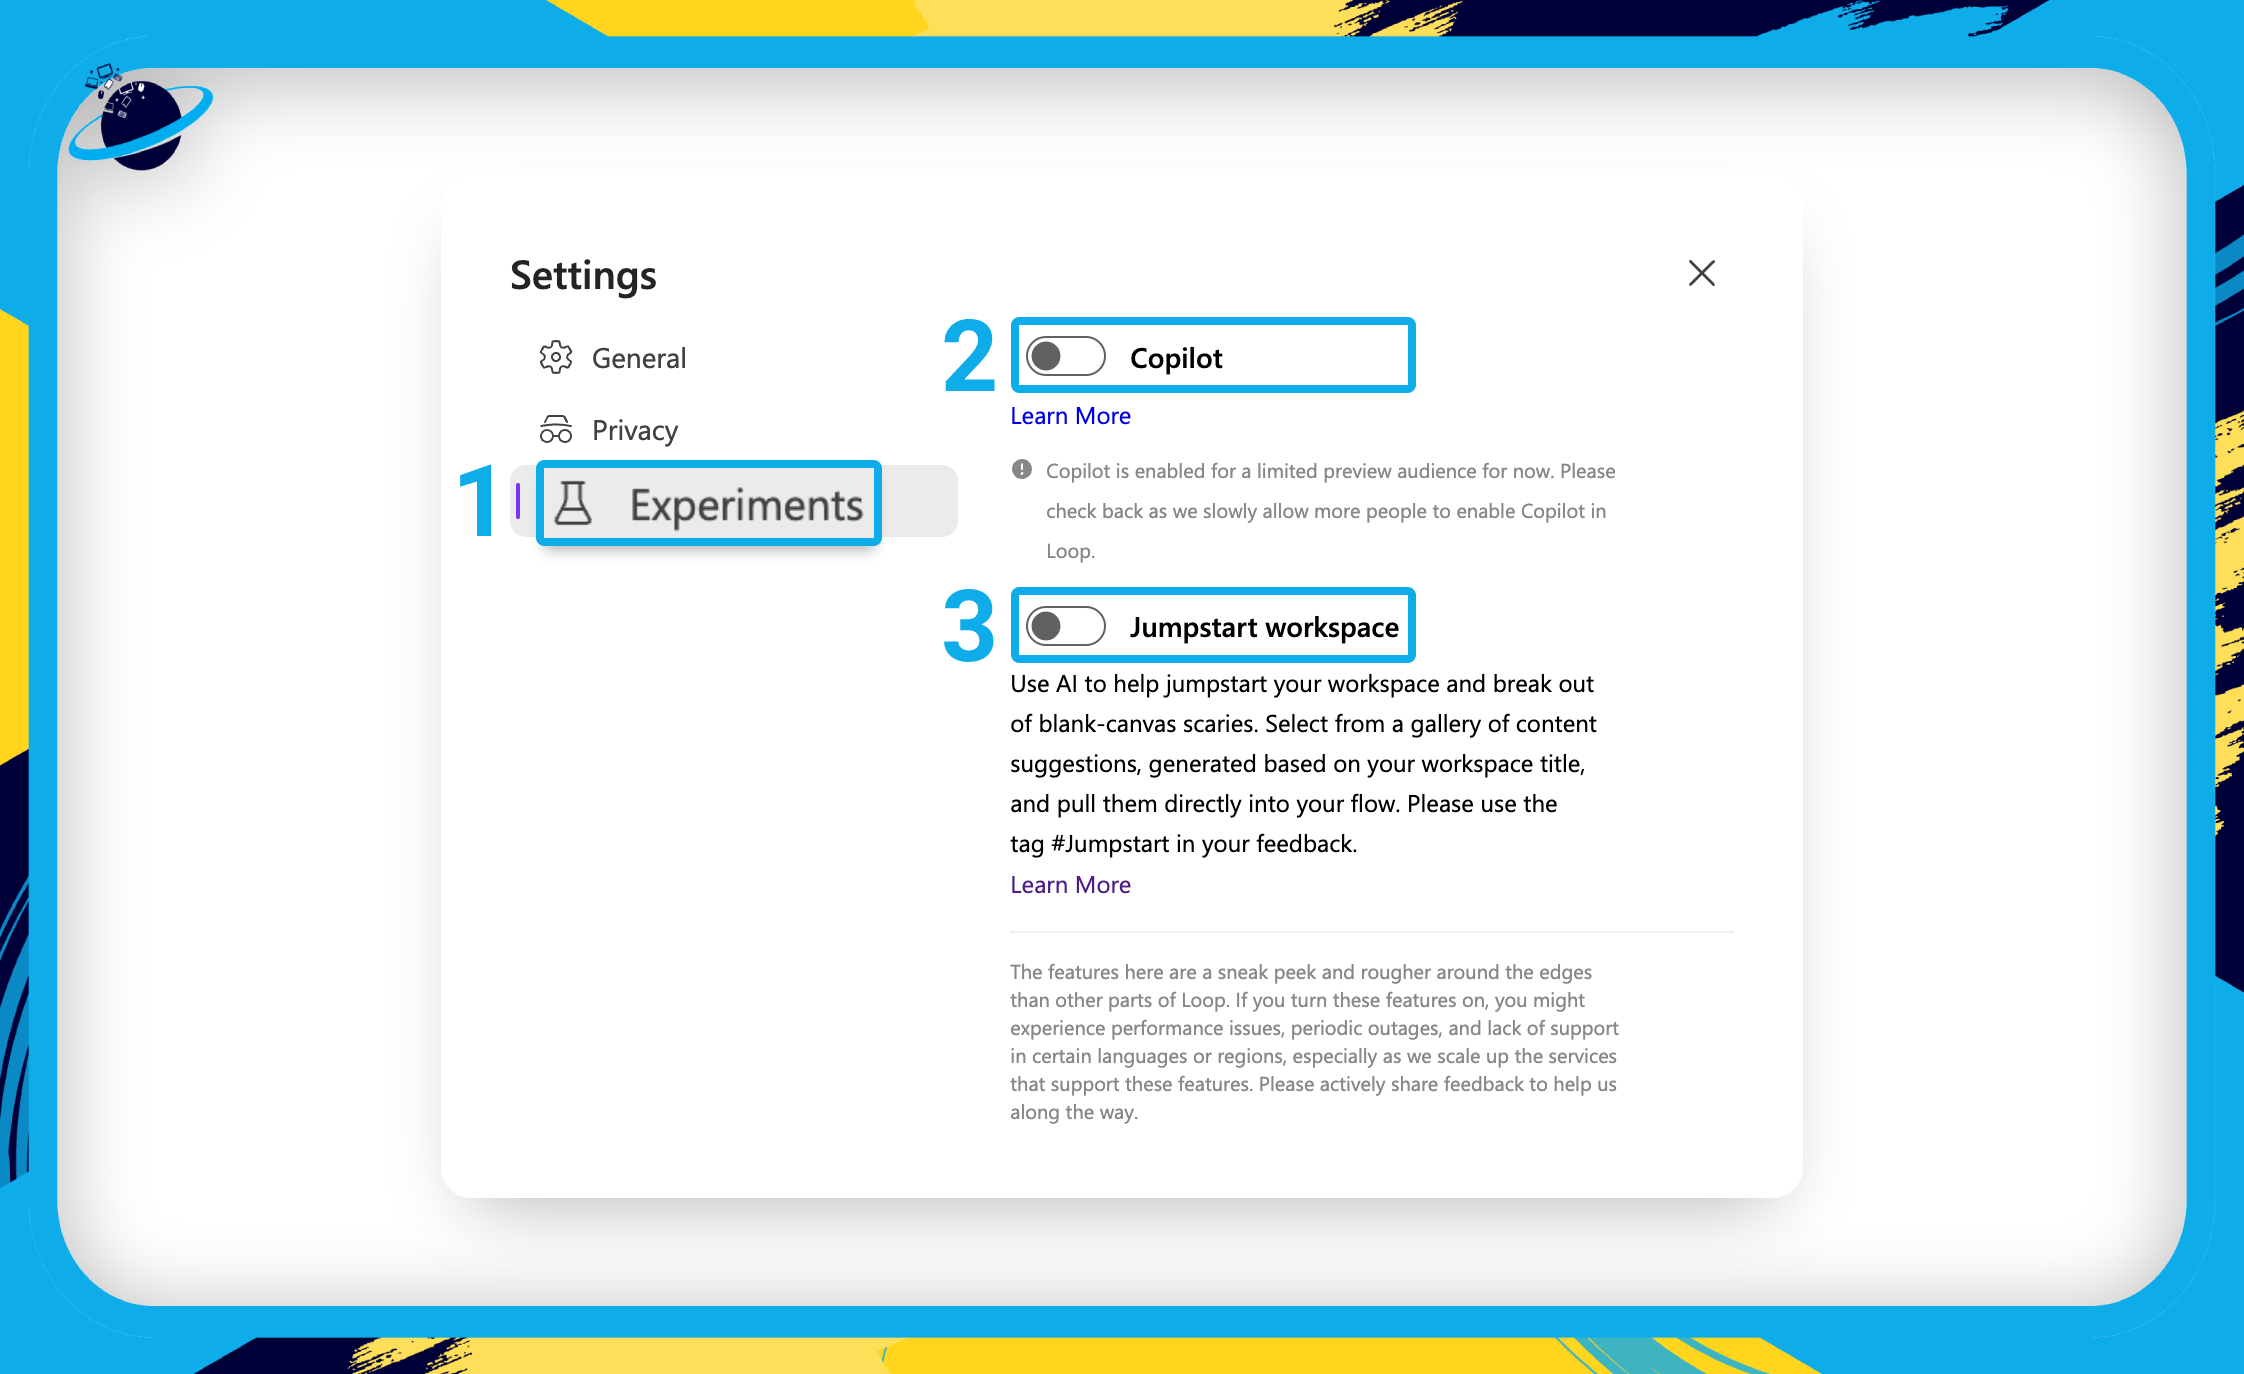
- Go to
 “Experiments” in the left menu. [1]
 - Toggle on
 “Copilot.” [2]
 - Toggle on “Jumpstart workspace.” [3]
![]() Note: Copilot is currently unavailable for users outside of North America.
Note: Copilot is currently unavailable for users outside of North America.
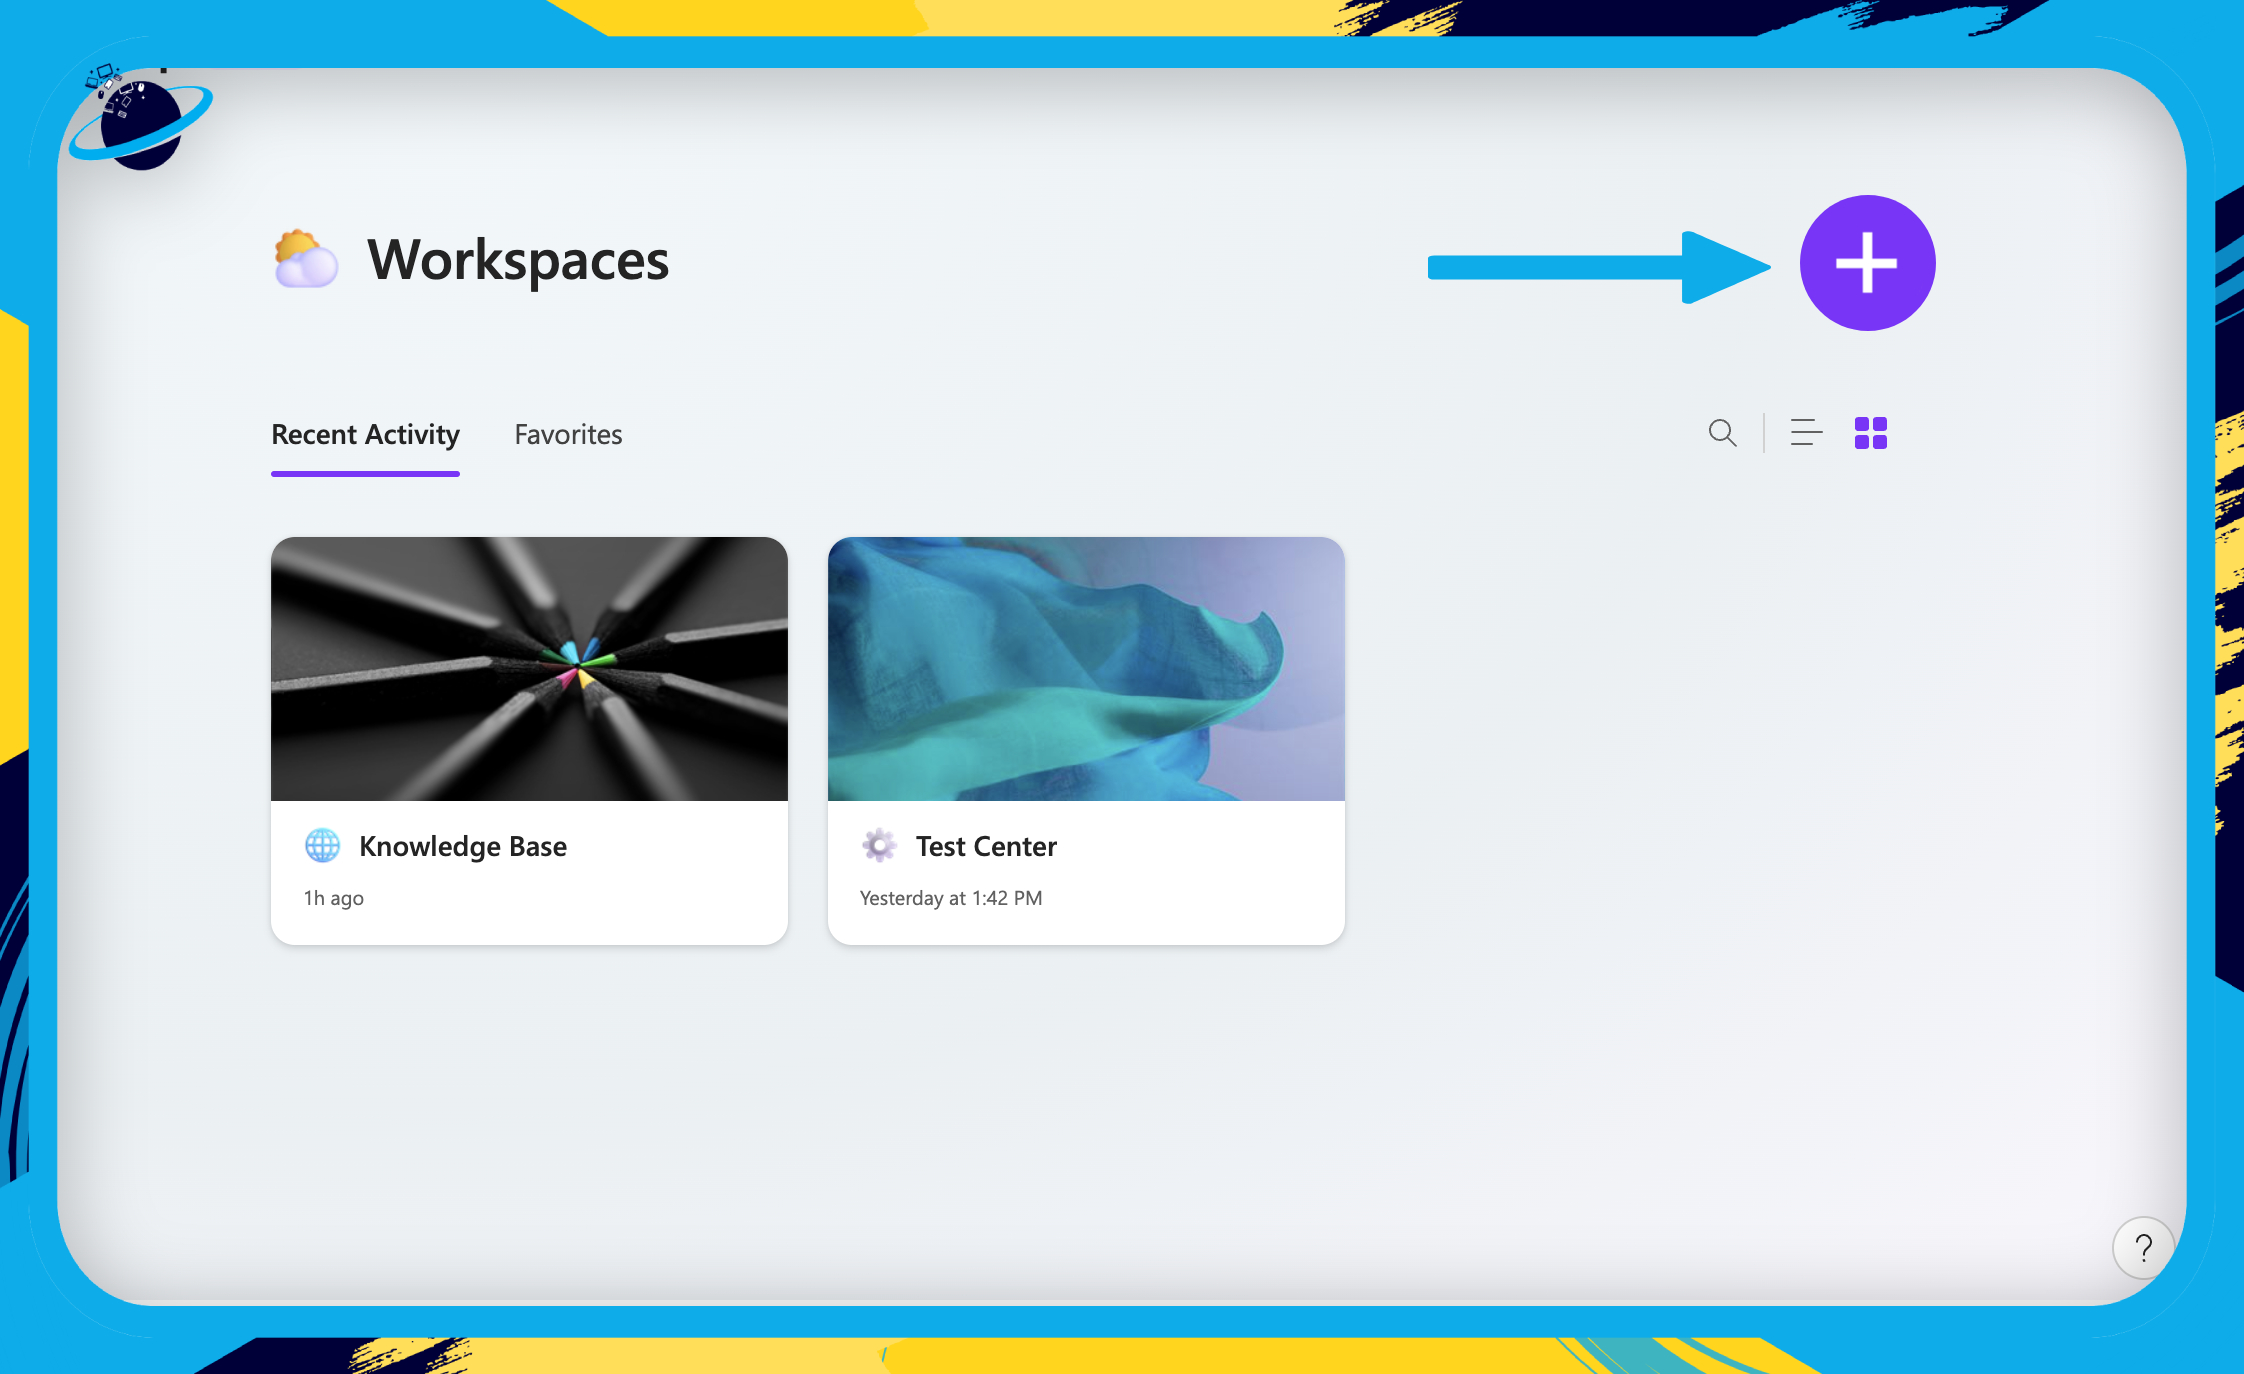
- Now close the settings and click the
 circular plus icon on the Loop home page.
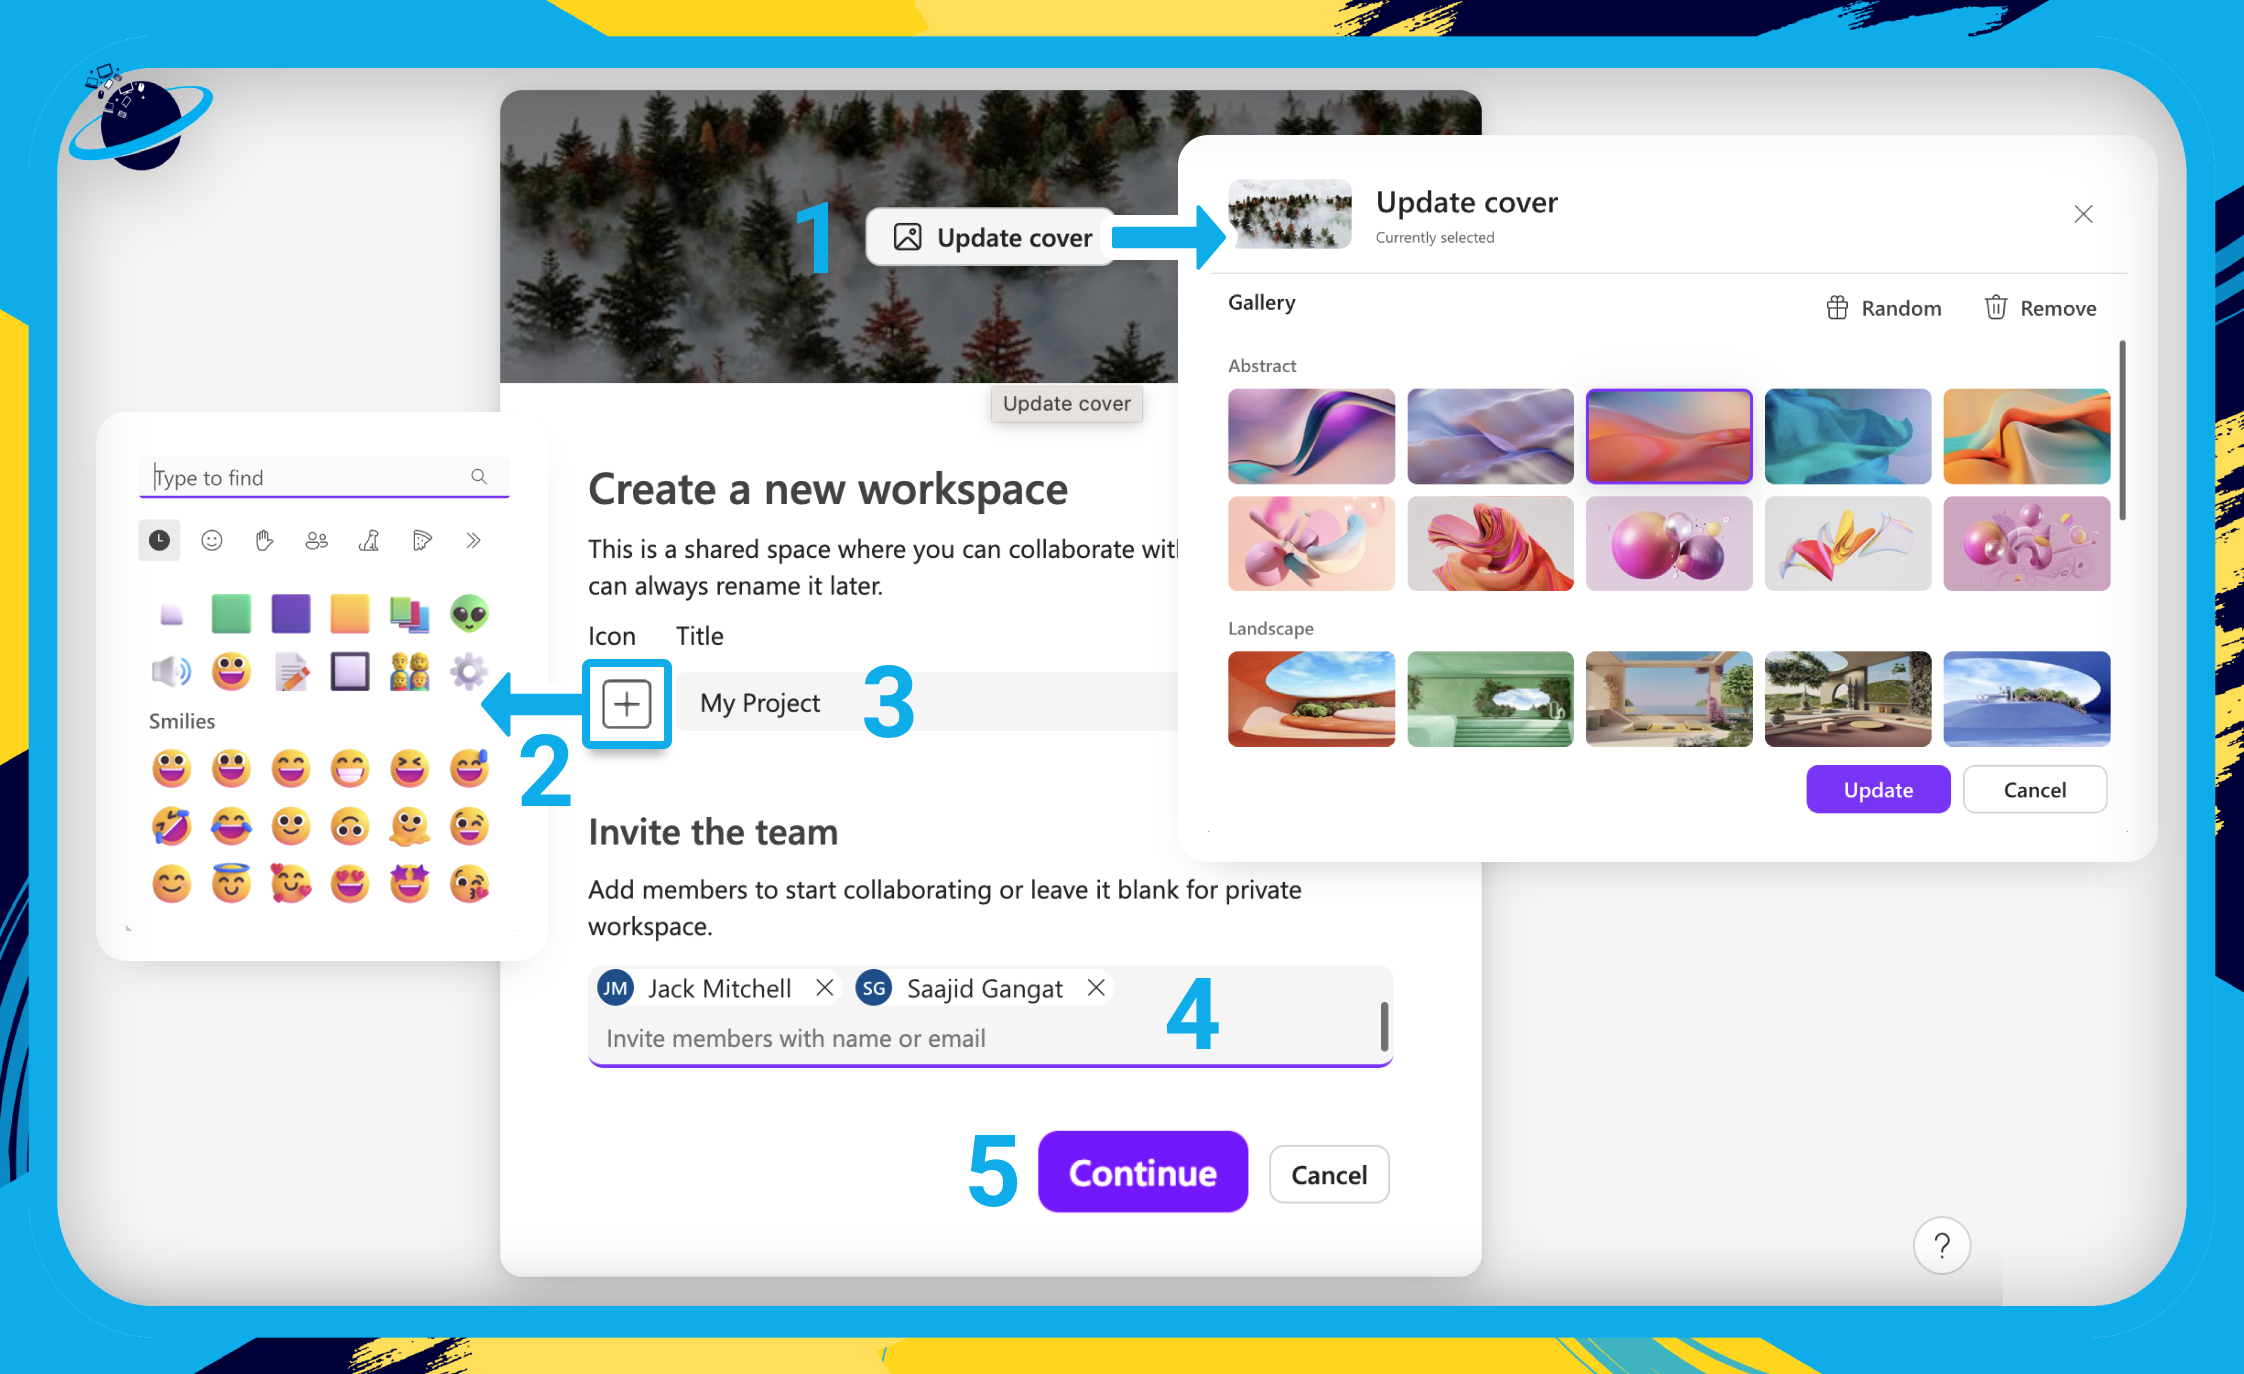
- Hover over the image at the top and click
 “Update cover” (optional). [1]
- There, select a cover image and click “Update.”
- Click the
 plus icon to select an icon (optional). [2]
 - Add a title for your workspace — Jumpstart uses the title to generate suggestions. [3]
- Add team members to the workspace (optional). [4]
- Click the “Continue” button. [5]
If you have Jumpstart enabled, you will have the opportunity to select content from a list of suggestions. The suggestions will be derived from the title of your workspace. However, you can add more keywords to generate more suggestions.
The content you select will be added to your workspace as a page. Loop files will be integrated into the page, while other filetypes will be converted to links.
- Type a keyword into the input box and press enter. [1]
- For each keyword you add, a new tab will appear next to “All Suggestions.” [2]
- You can select multiple content suggestions, or none. [3]
- When you’re ready, hit the “Create” button. [4]

Once you create your workspace, you’ll be taken to an “Untitled page” where you can begin creating components.
![]() Note: To learn more about how to create components, please read our dedicated blog post:
Note: To learn more about how to create components, please read our dedicated blog post:![]() Microsoft Loop Components: A complete guide on how to use them
Microsoft Loop Components: A complete guide on how to use them
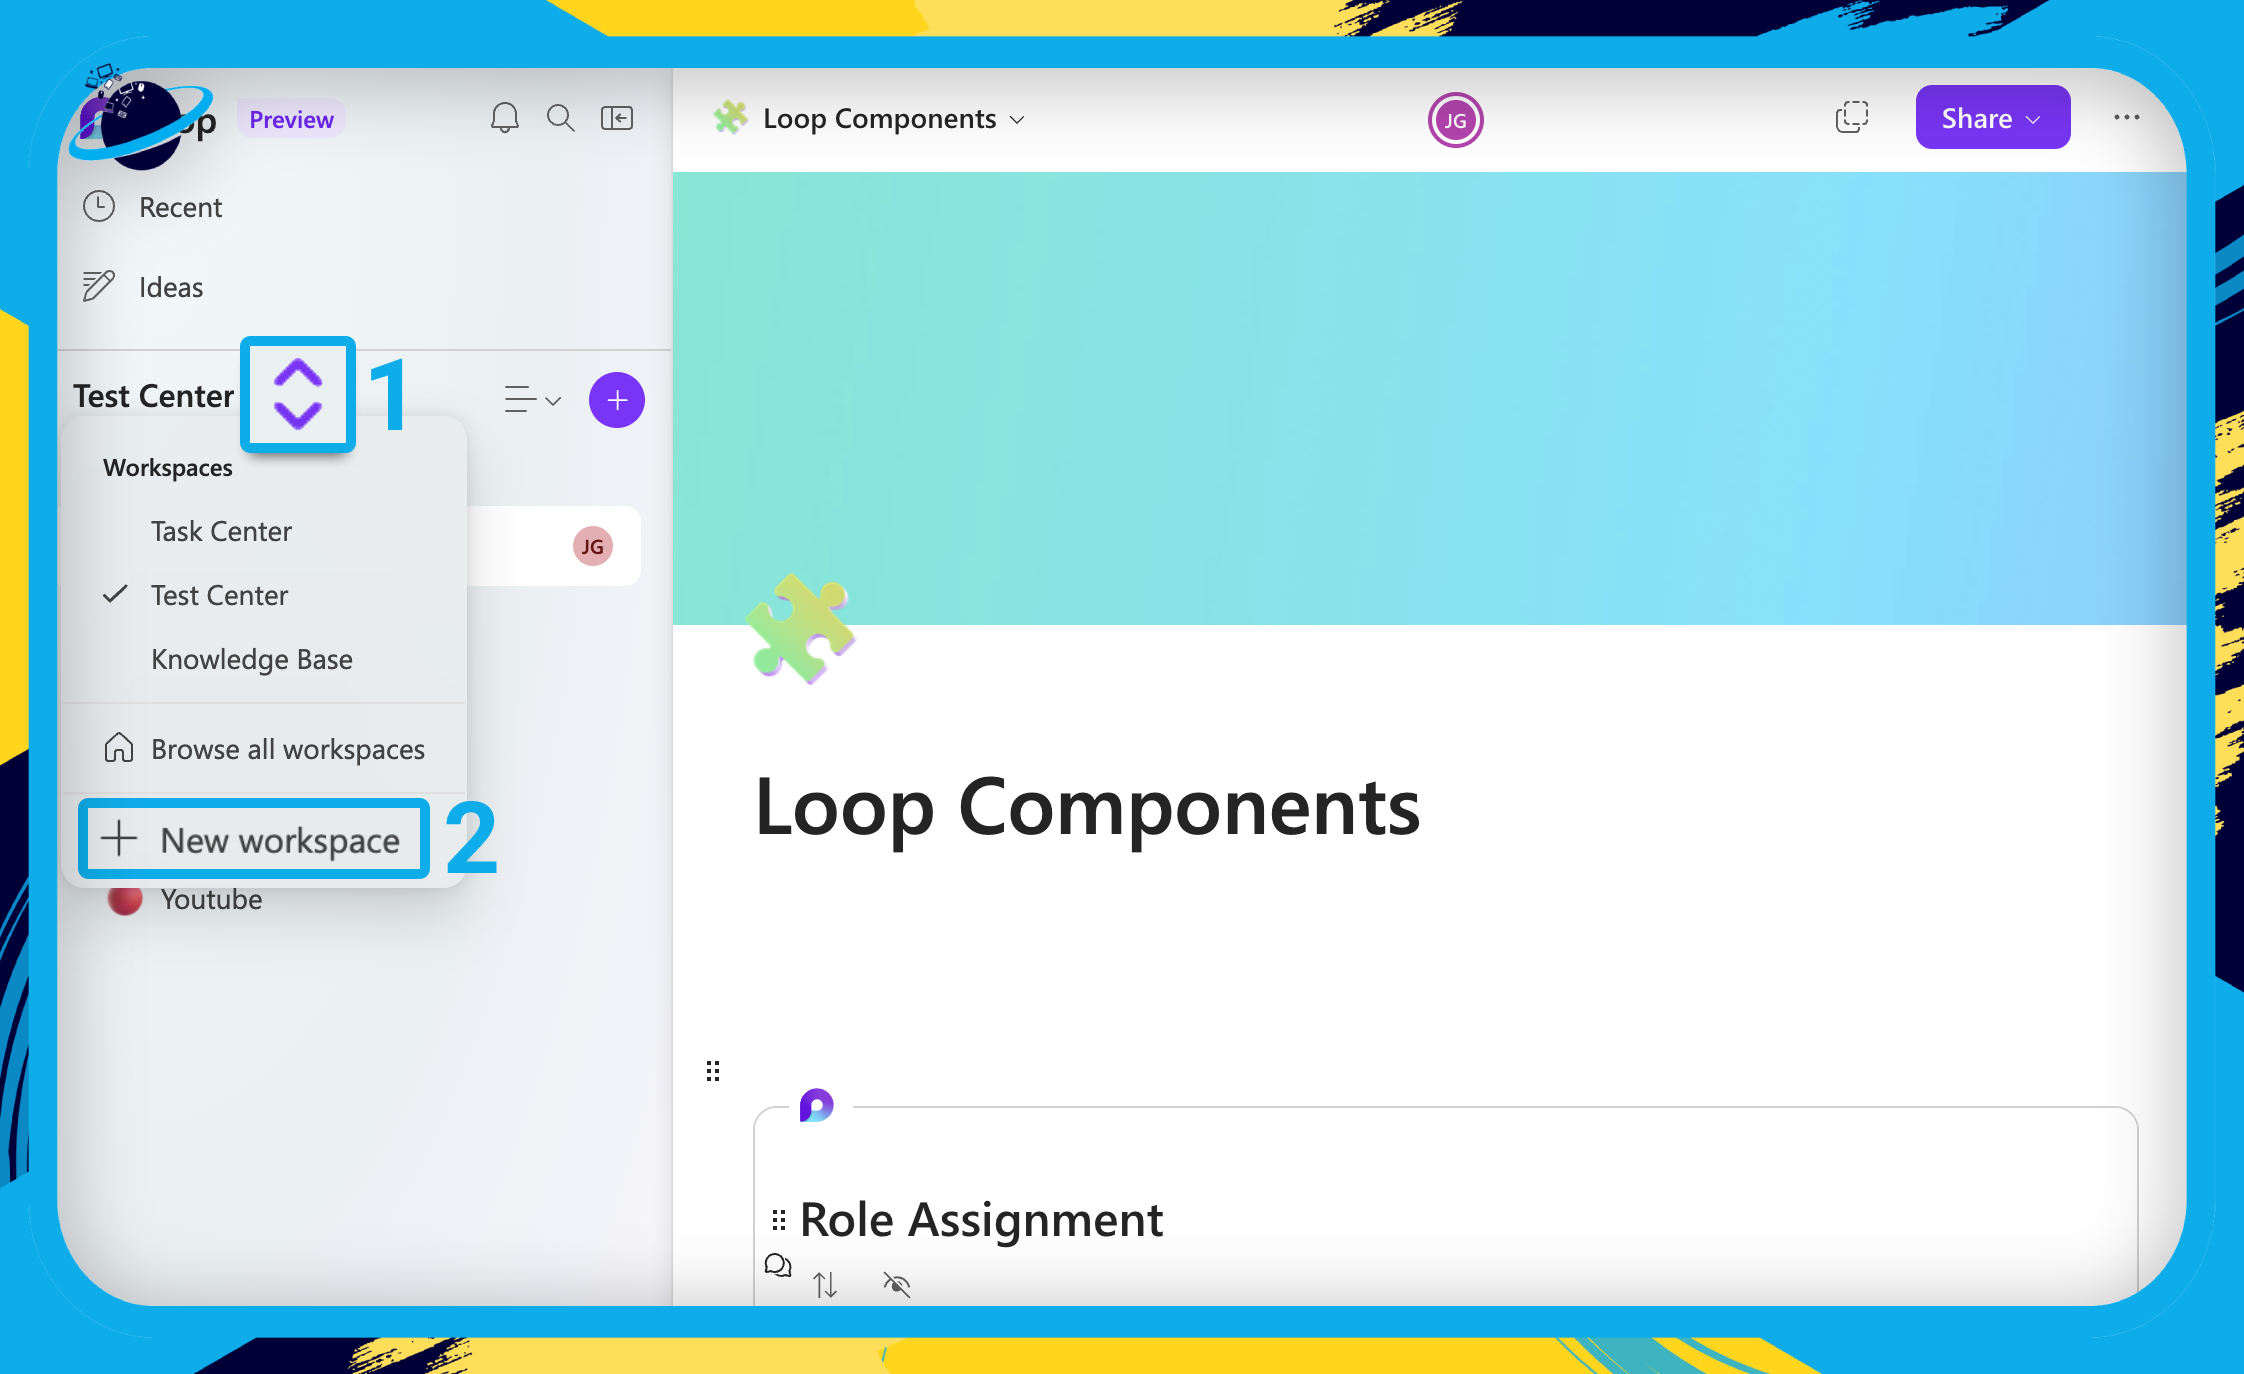
You can also create a new workspace from inside an existing workspace.
- To do that, click the
 “Workspace switcher” icon or the workspace name. [1]
 - Then select
 “New workspace” from the dropdown. [2]

How to Modify a workspace in Microsoft Loop
In this section, we’ll show you how to modify a workspace, including how to rename and style.
Workspaces in Microsoft Loop are highly flexible, so if you make a mistake at any point during the creation of your workspace, you can easily amend it from the home page.
Rename and style:
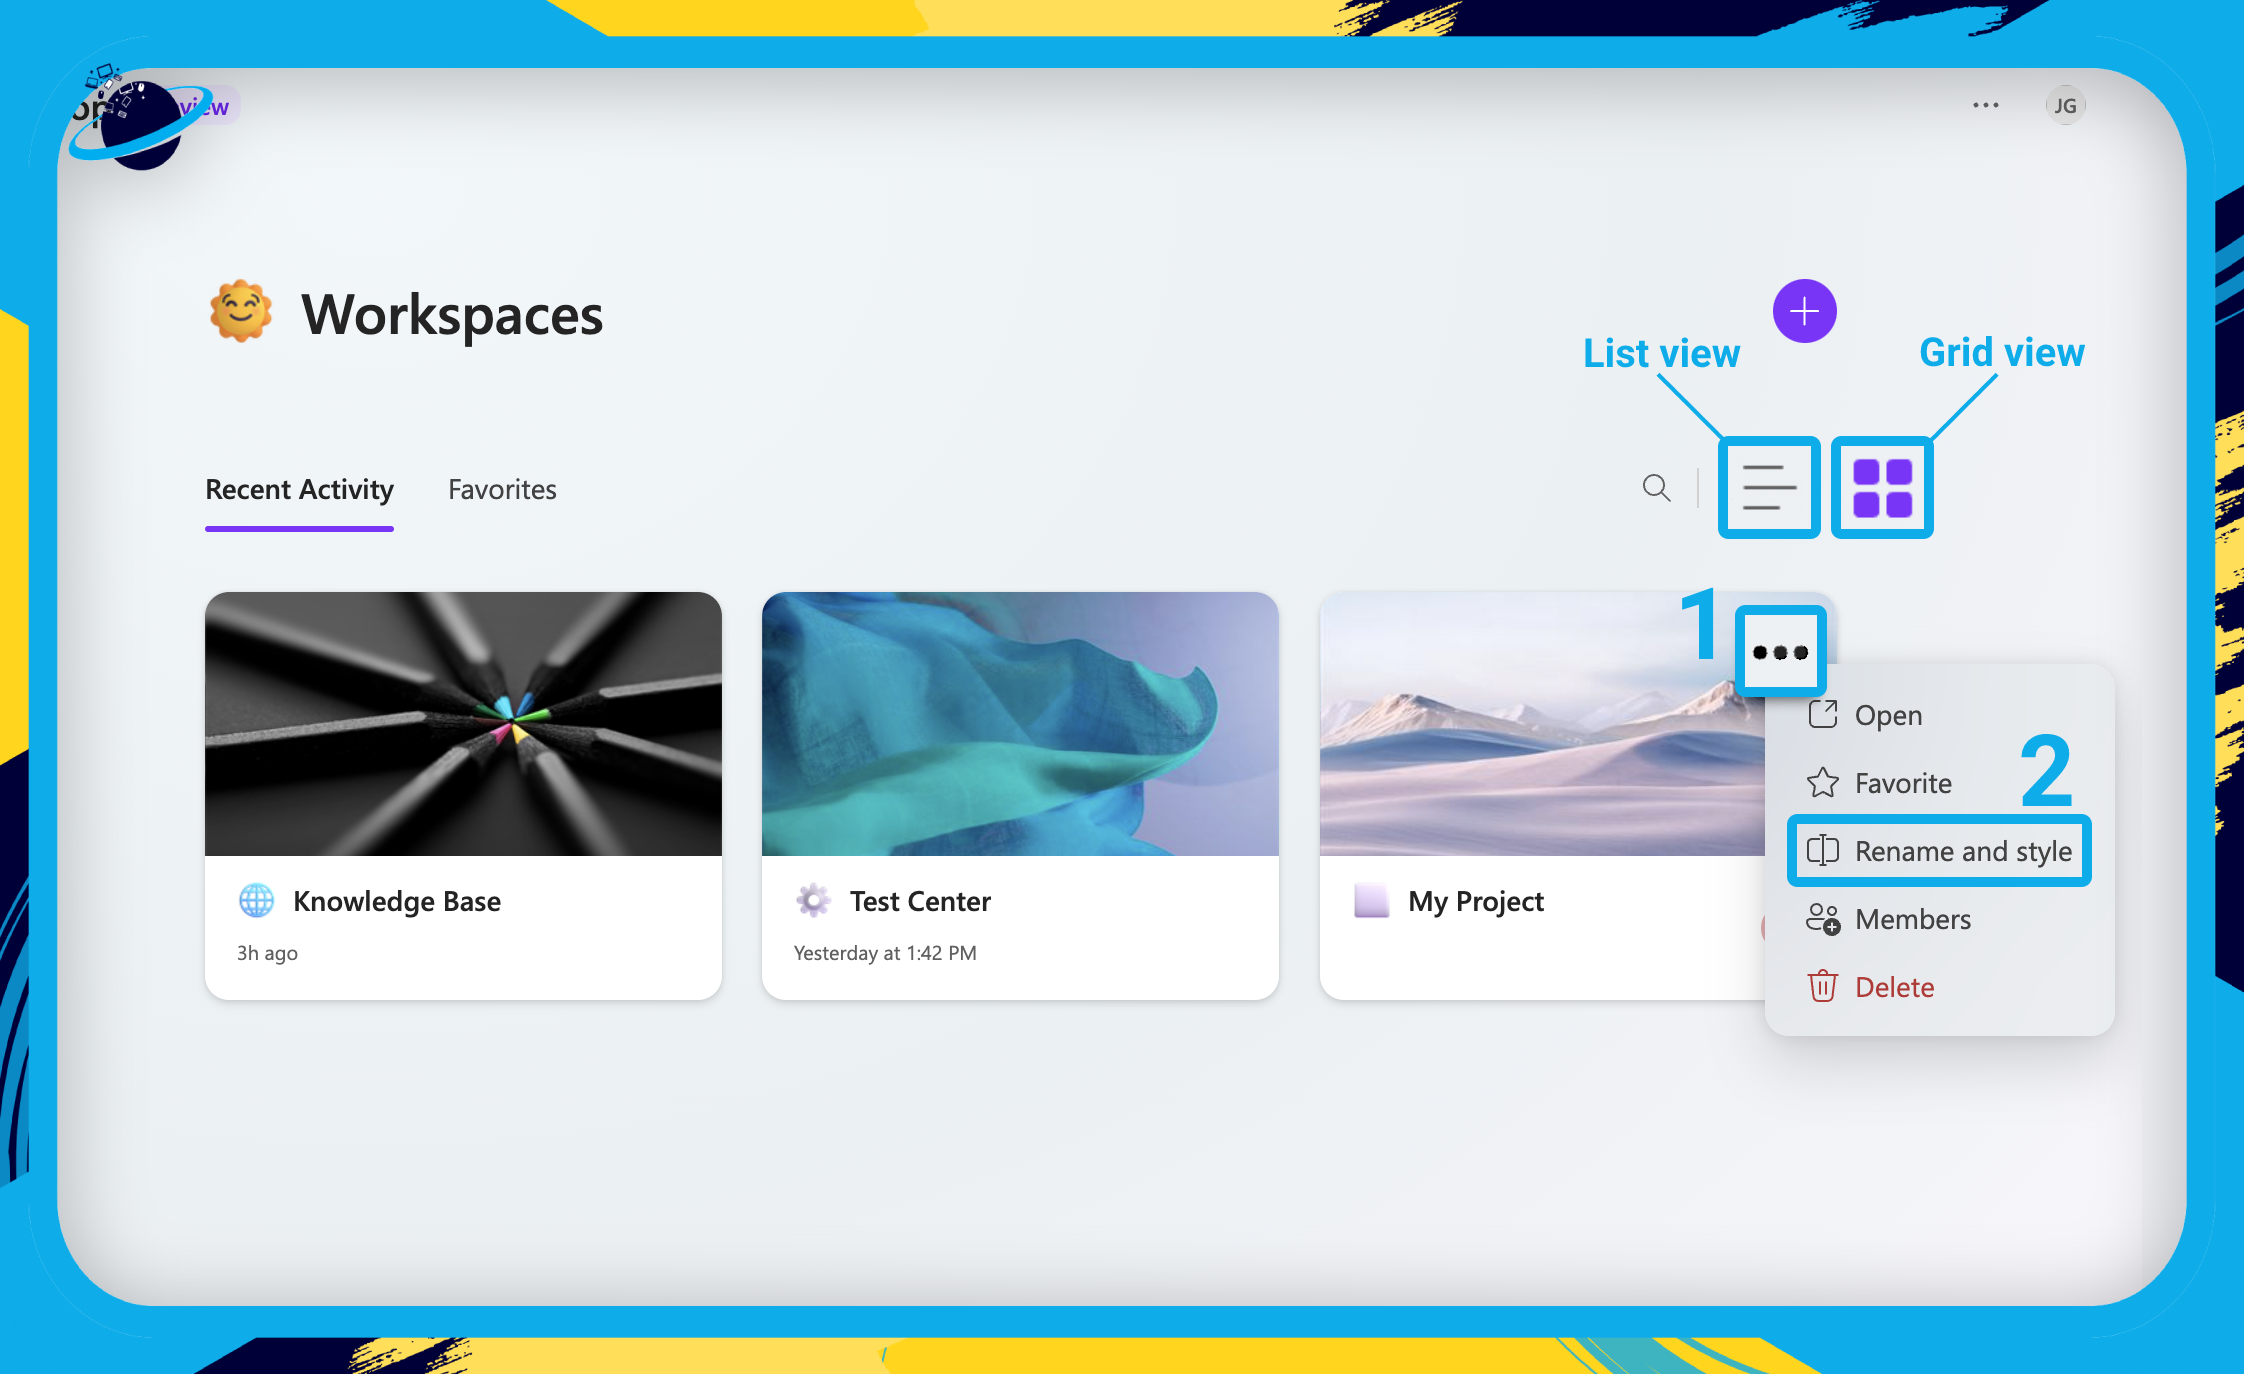
- Wether in List or Grid view, hover over your workspace and click the three dots.
- Then select
 “Rename and style” from the dropdown.
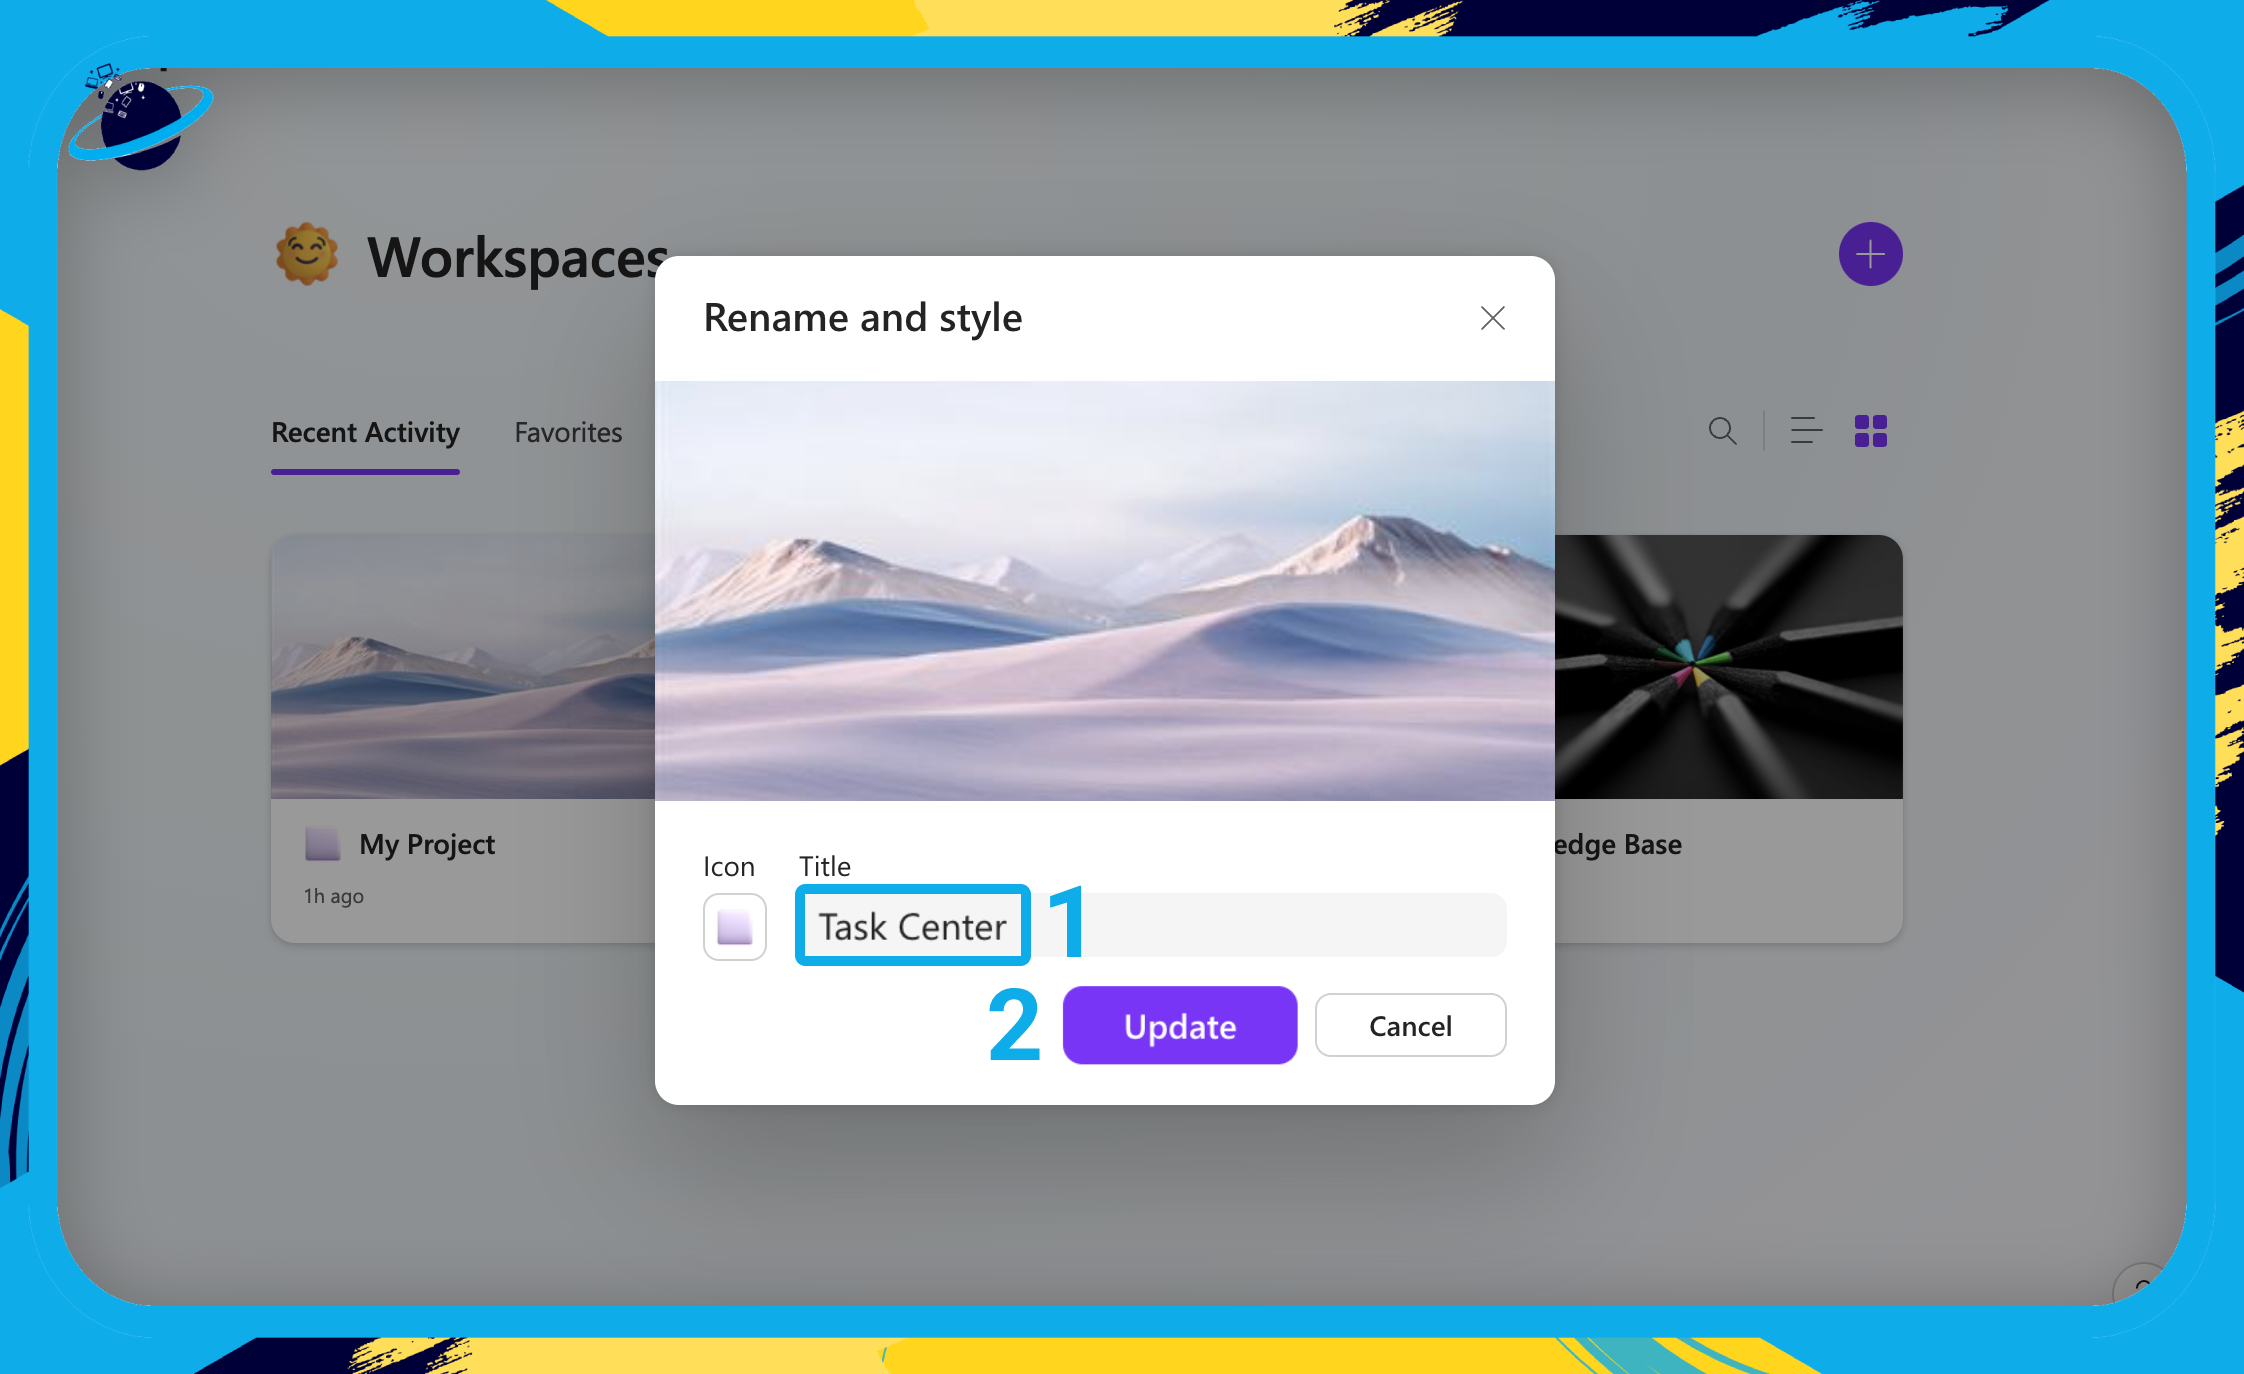
- Edit the workspace name [1], then click the “Update” button. [2]
![]() Note: The workspace title can contain a maximum of 255 characters in Microsoft Loop.
Note: The workspace title can contain a maximum of 255 characters in Microsoft Loop.
Delete the workspace:
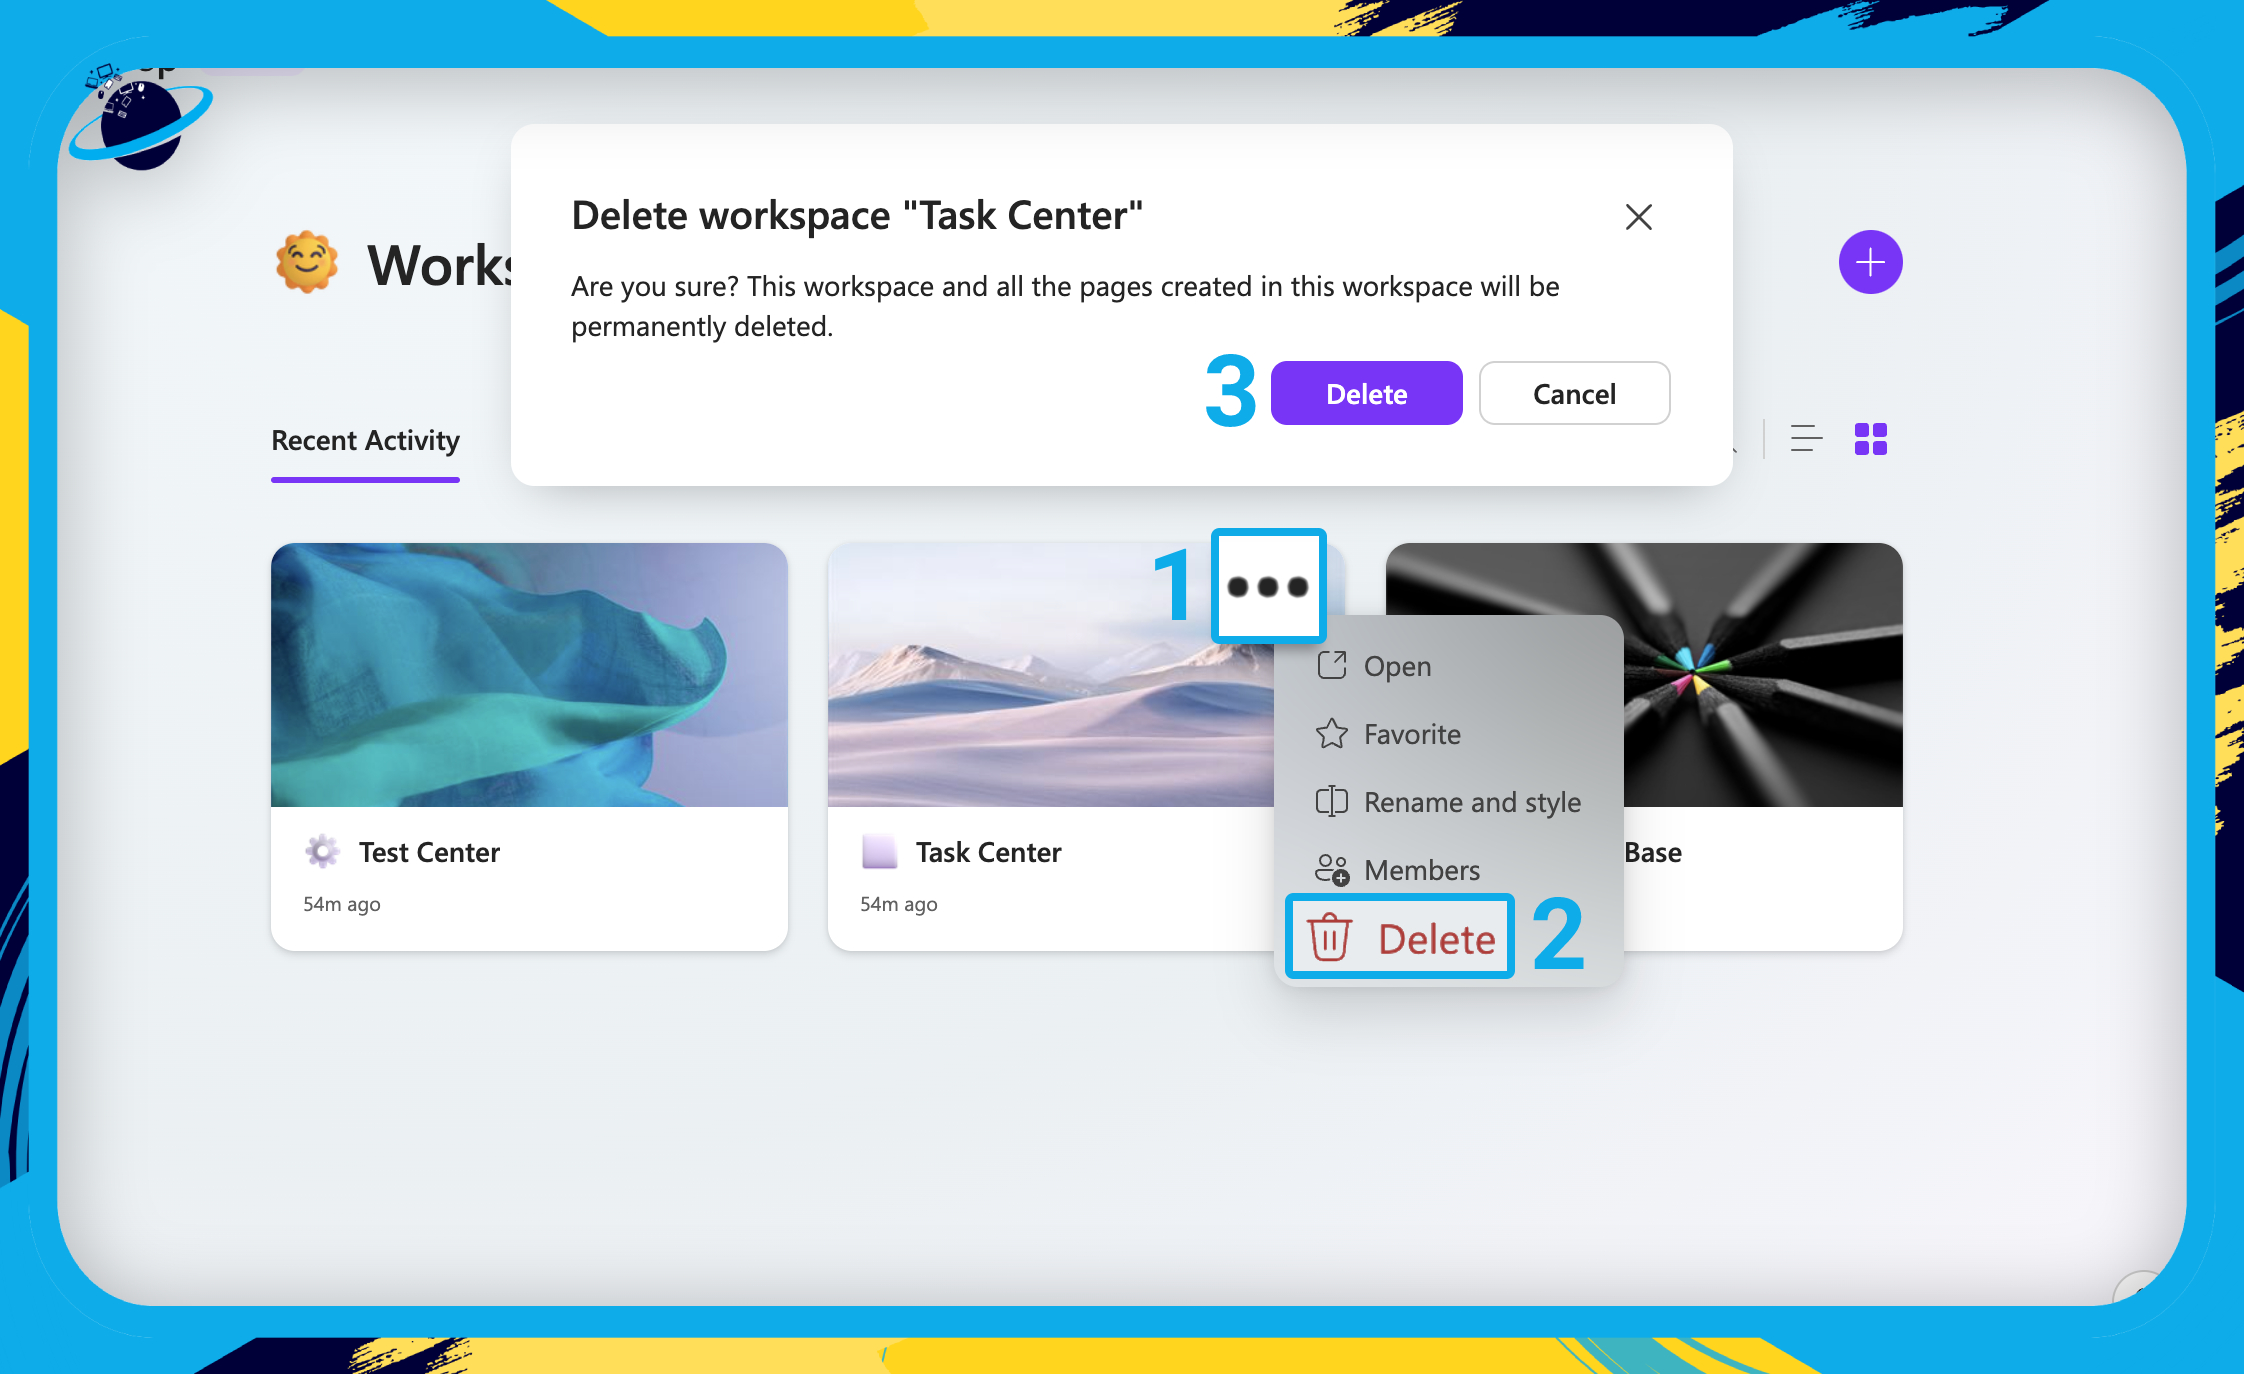
- To delete a workspace, head to the homepage and hover over the workspace you want to delete.
- Click the three dots. [1]
- Select
 “Delete” from the dropdown. [2]
 - Then click “Delete” in the dialog box to confirm. [3]
Add ideas to the workspace:
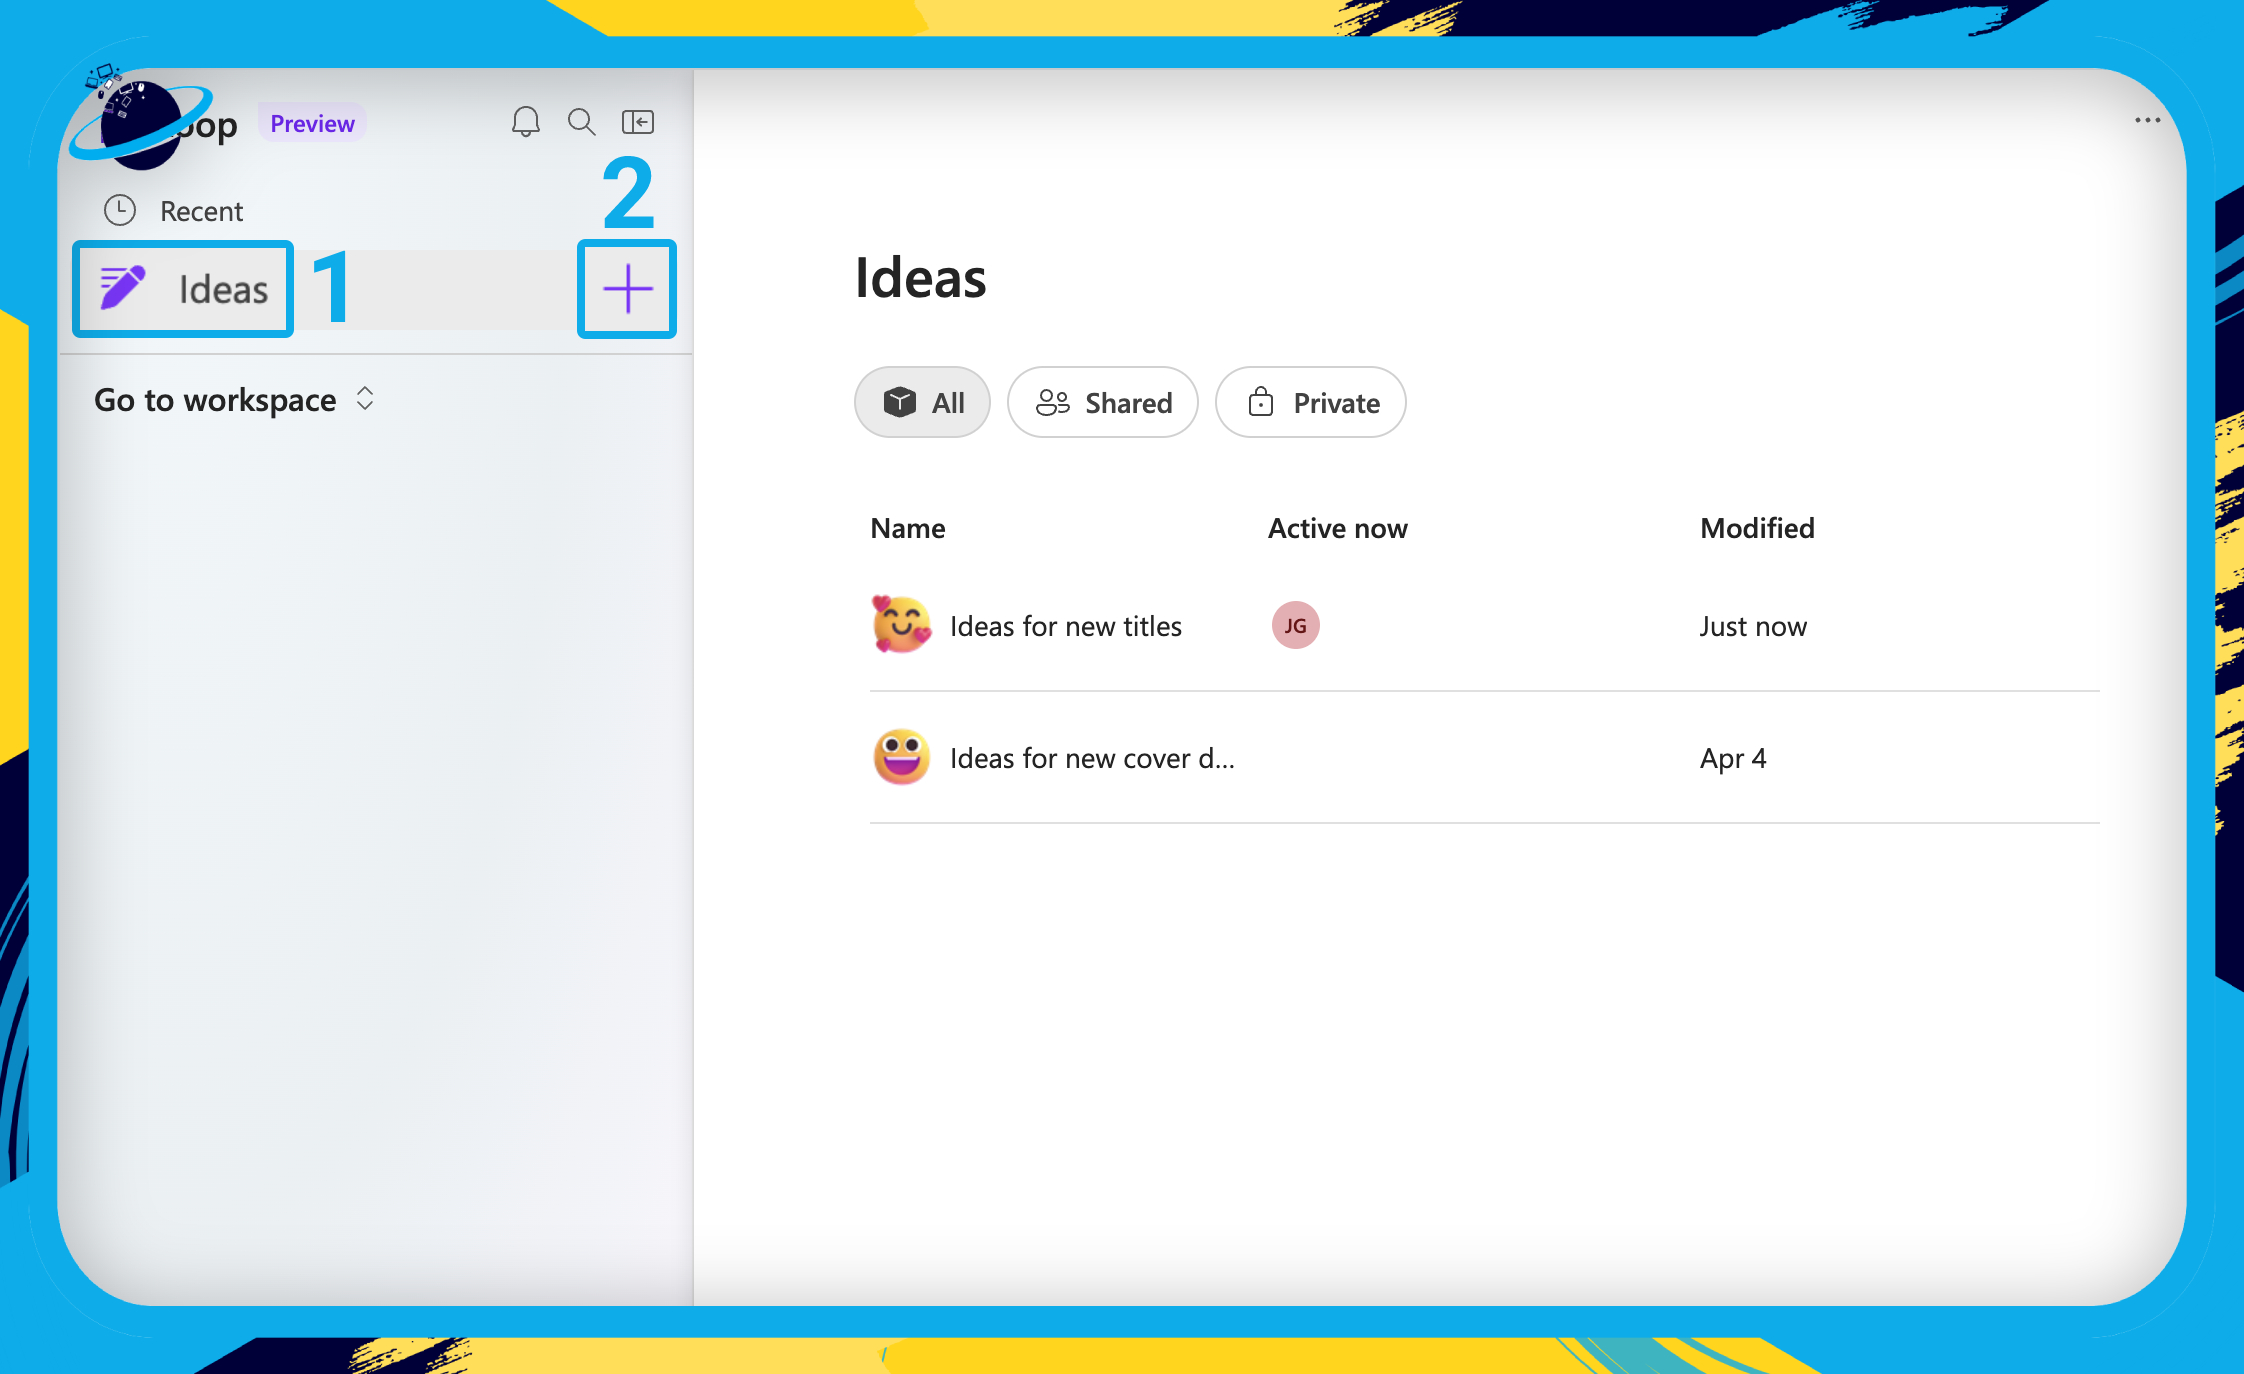
Each workspace links to an ![]() “Ideas” page. You can access the ideas page on the left, above the workspace name. [1] The page contains a list of ideas created within all workspaces, which you can add to by clicking the
“Ideas” page. You can access the ideas page on the left, above the workspace name. [1] The page contains a list of ideas created within all workspaces, which you can add to by clicking the ![]() plus icon. [2]
plus icon. [2]

How to add members to a workspace in Microsoft Loop
In this section, we’ll show you how to add members to a workspace from the homepage and from the workspace.
Adding members to a workspace will grant them access to all pages and components contained within the workspace. Your members can interact with and modify the pages and components, and they will also receive email notifications whenever you @ mention them.
You can add members when you create the workspace as described in the first section. However, you can also add members to an existing workspace from the Loop homepage or from inside the workspace.
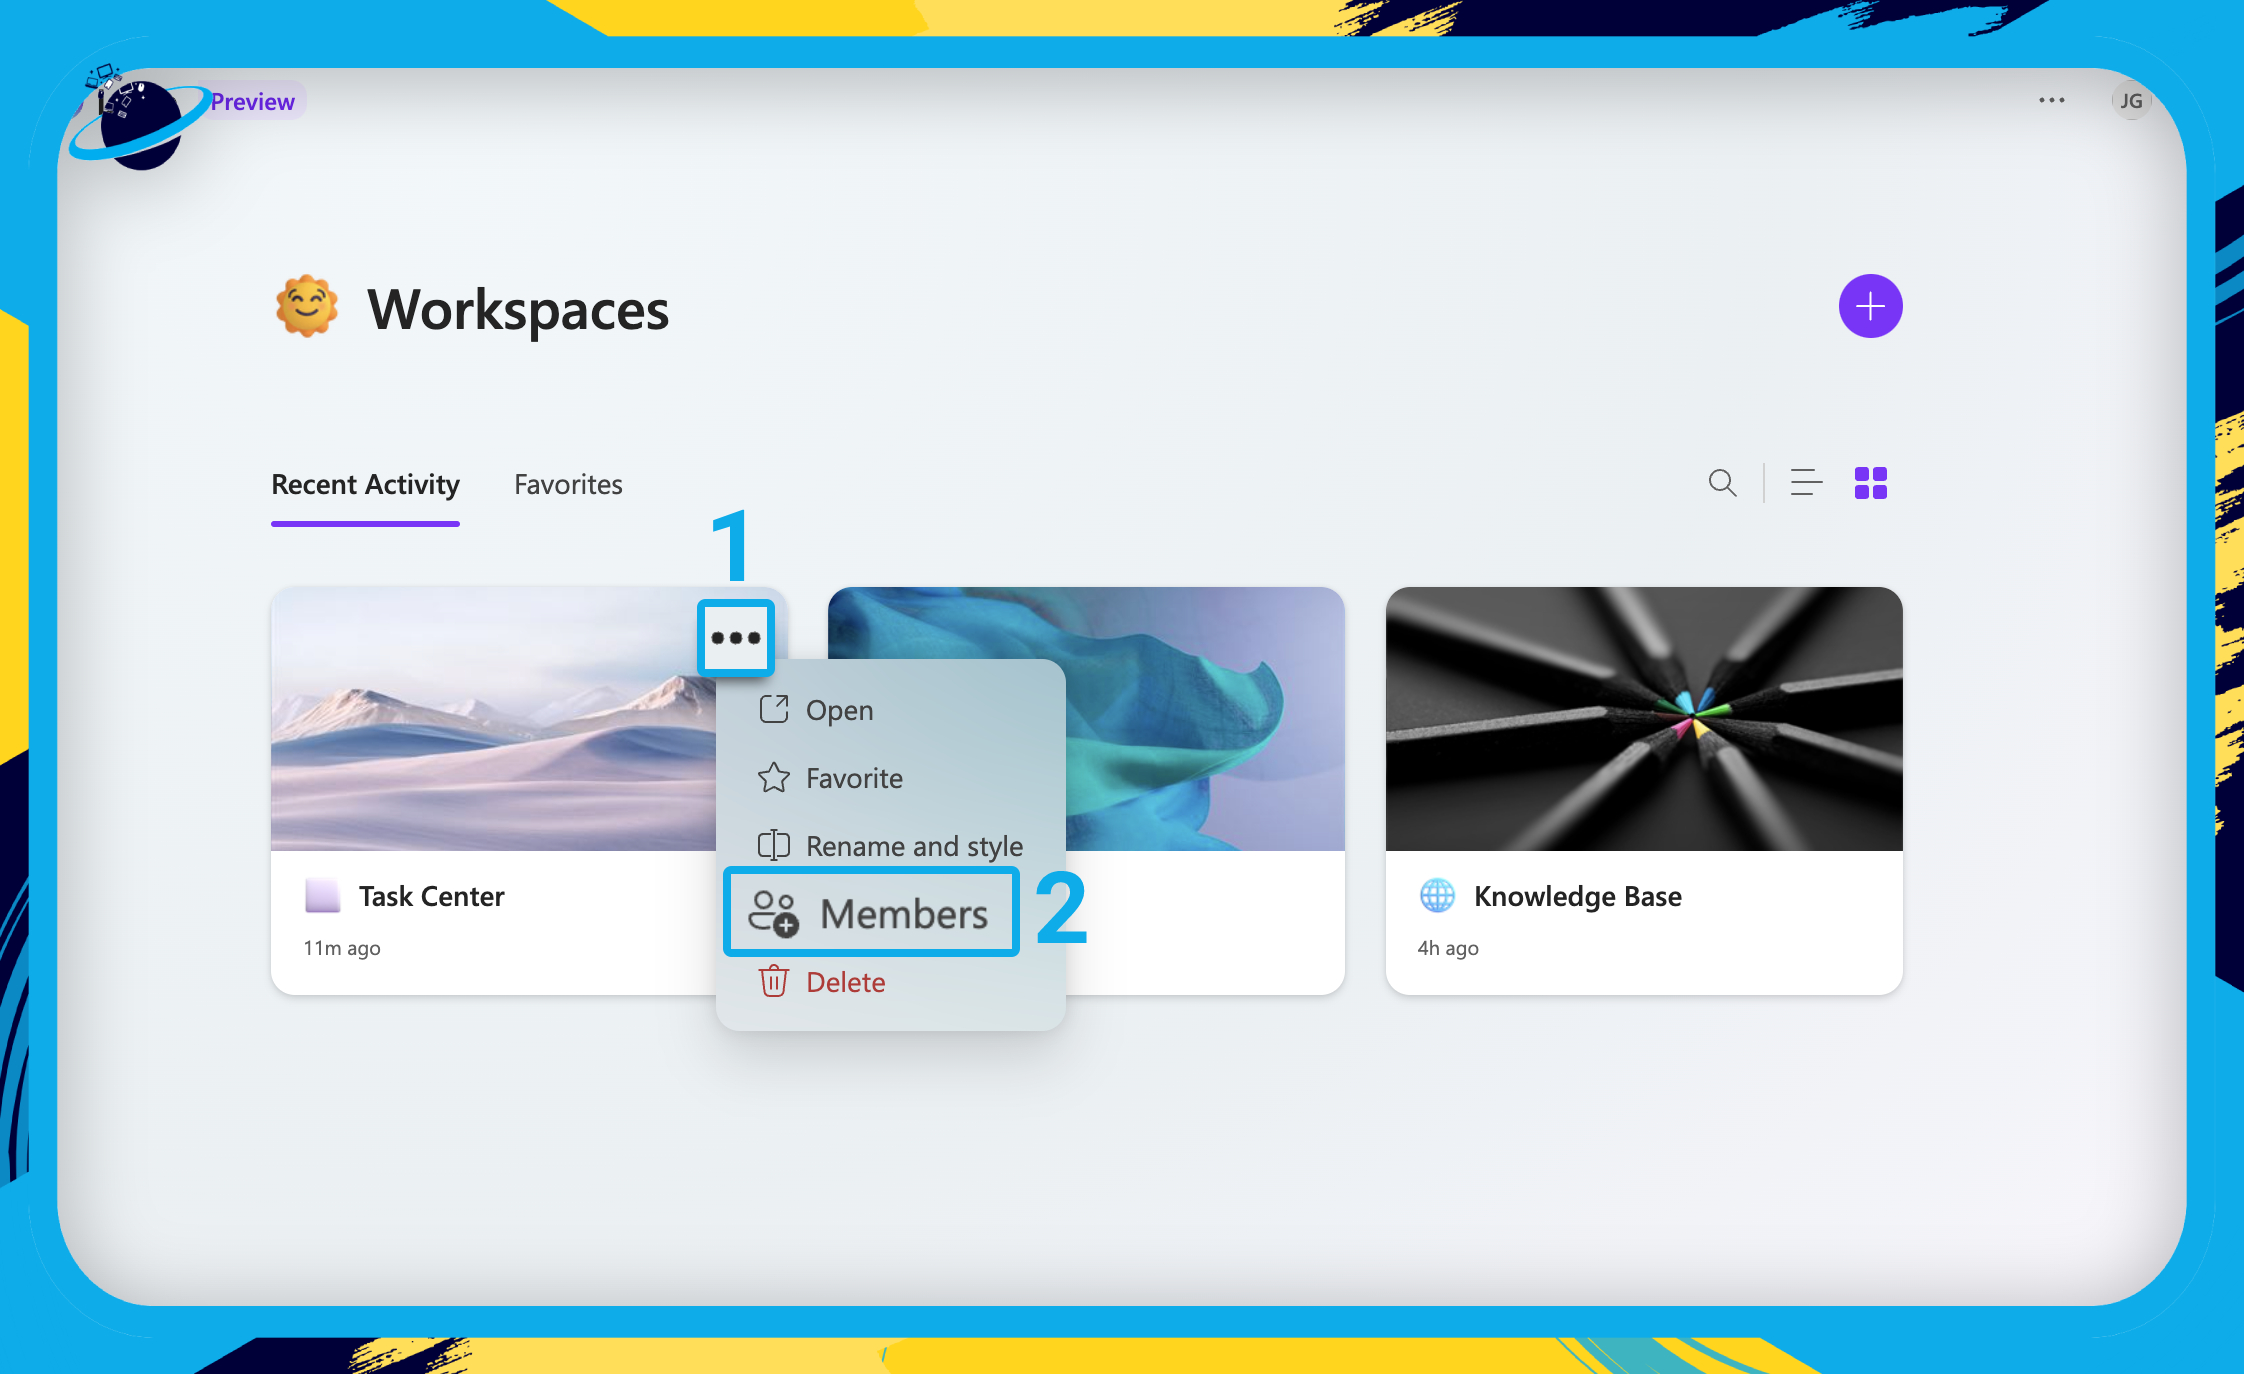
- From the homepage, hover over the workspace and click the three dots. [1]
- Then select
 “Members” from the dropdown. [2]
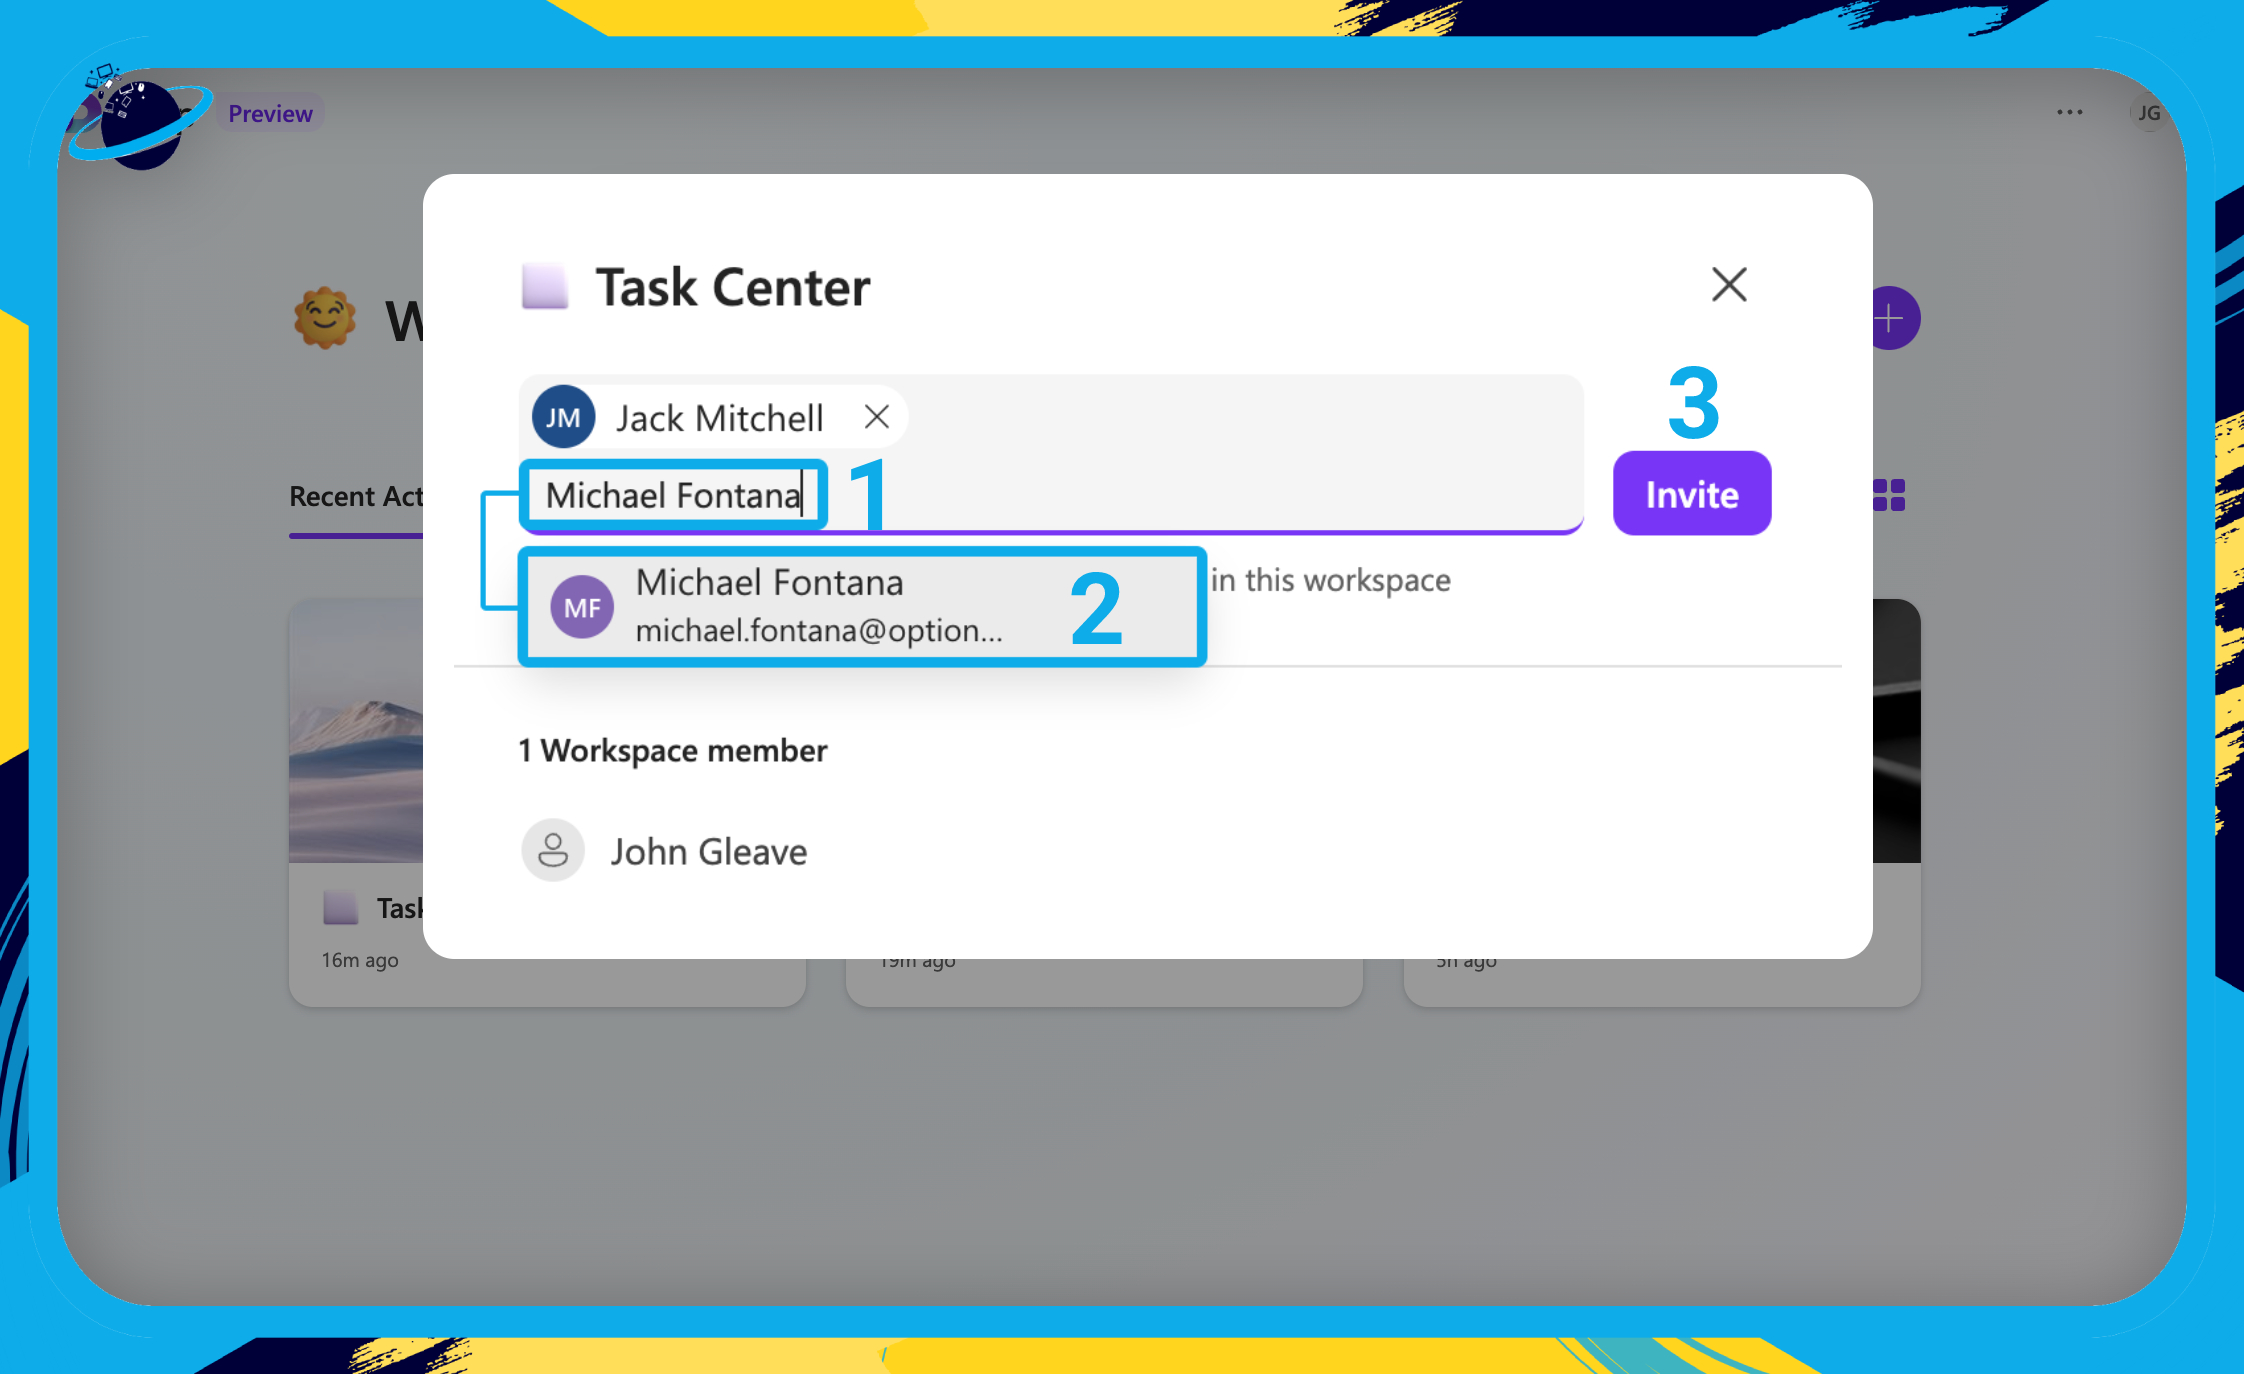
- To invite members, type their name into the input box. [1]
- Then select them from the dropdown. [2]
- Once you’ve added your members, click the “Invite” button. [3]
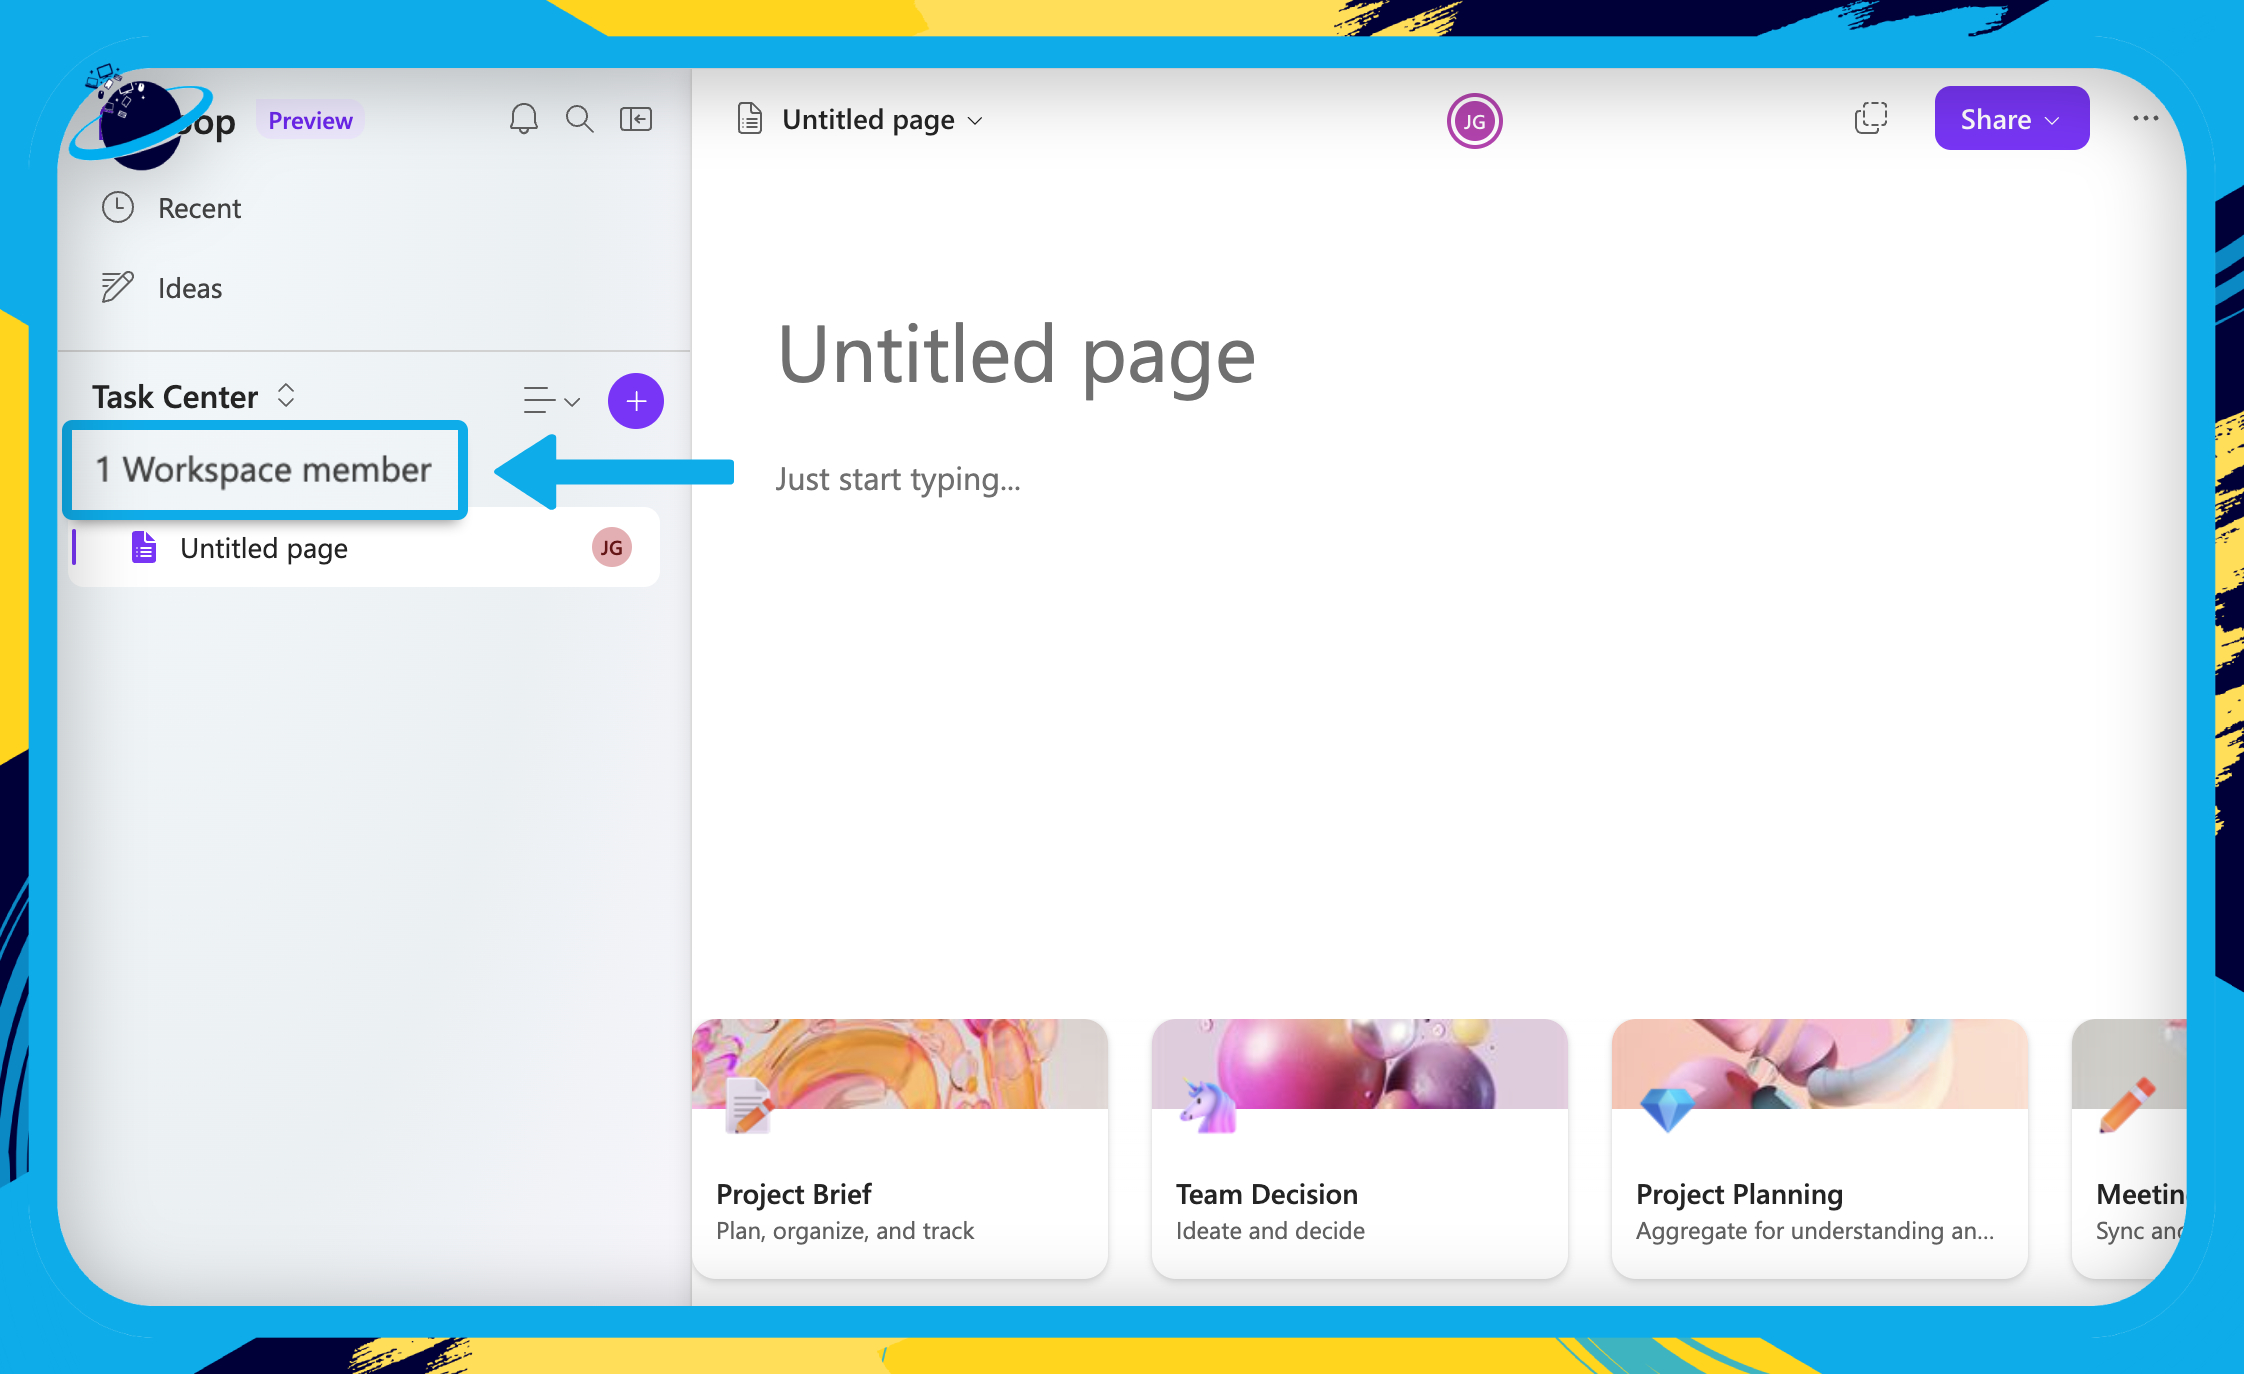
From inside the workspace, click “…workspace member(s)” located on the left below the workspace name. You can then invite members as shown in the previous image.

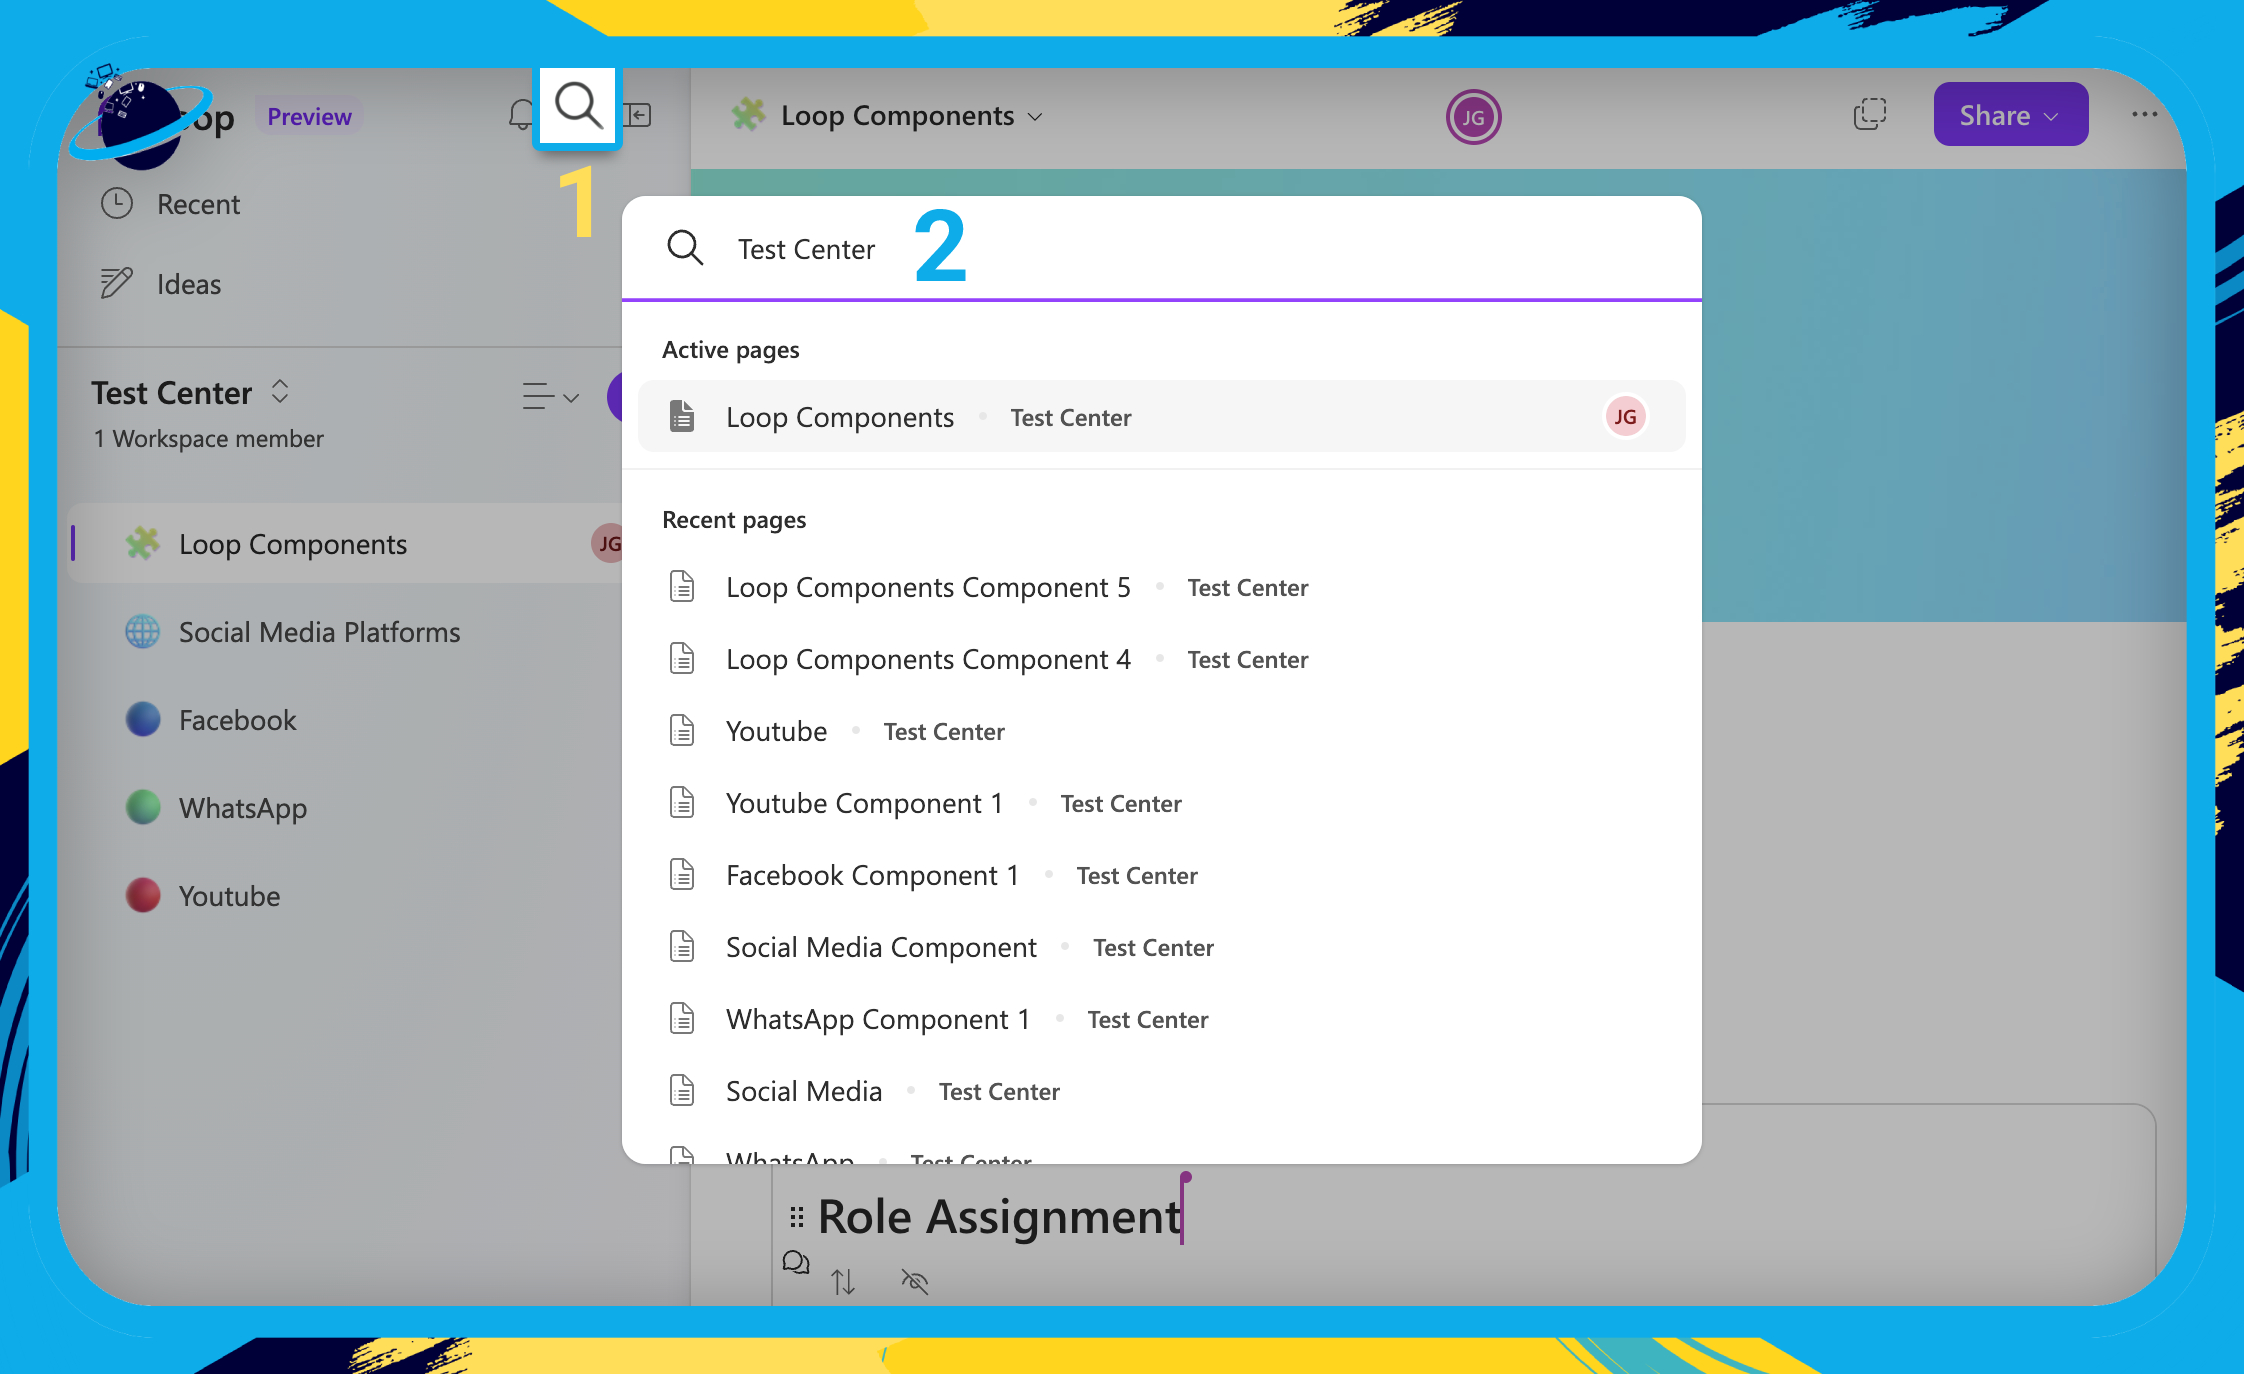
How to search a workspace in Microsoft Loop
In this section, we’ll show you how search a workspace, including how to bring up pages within a specific workspace.
If you’ve created a lot of pages and workspaces, you may find it difficult to track down a specific component. Fortunately, there’s a simple way to search within a particular workspace.
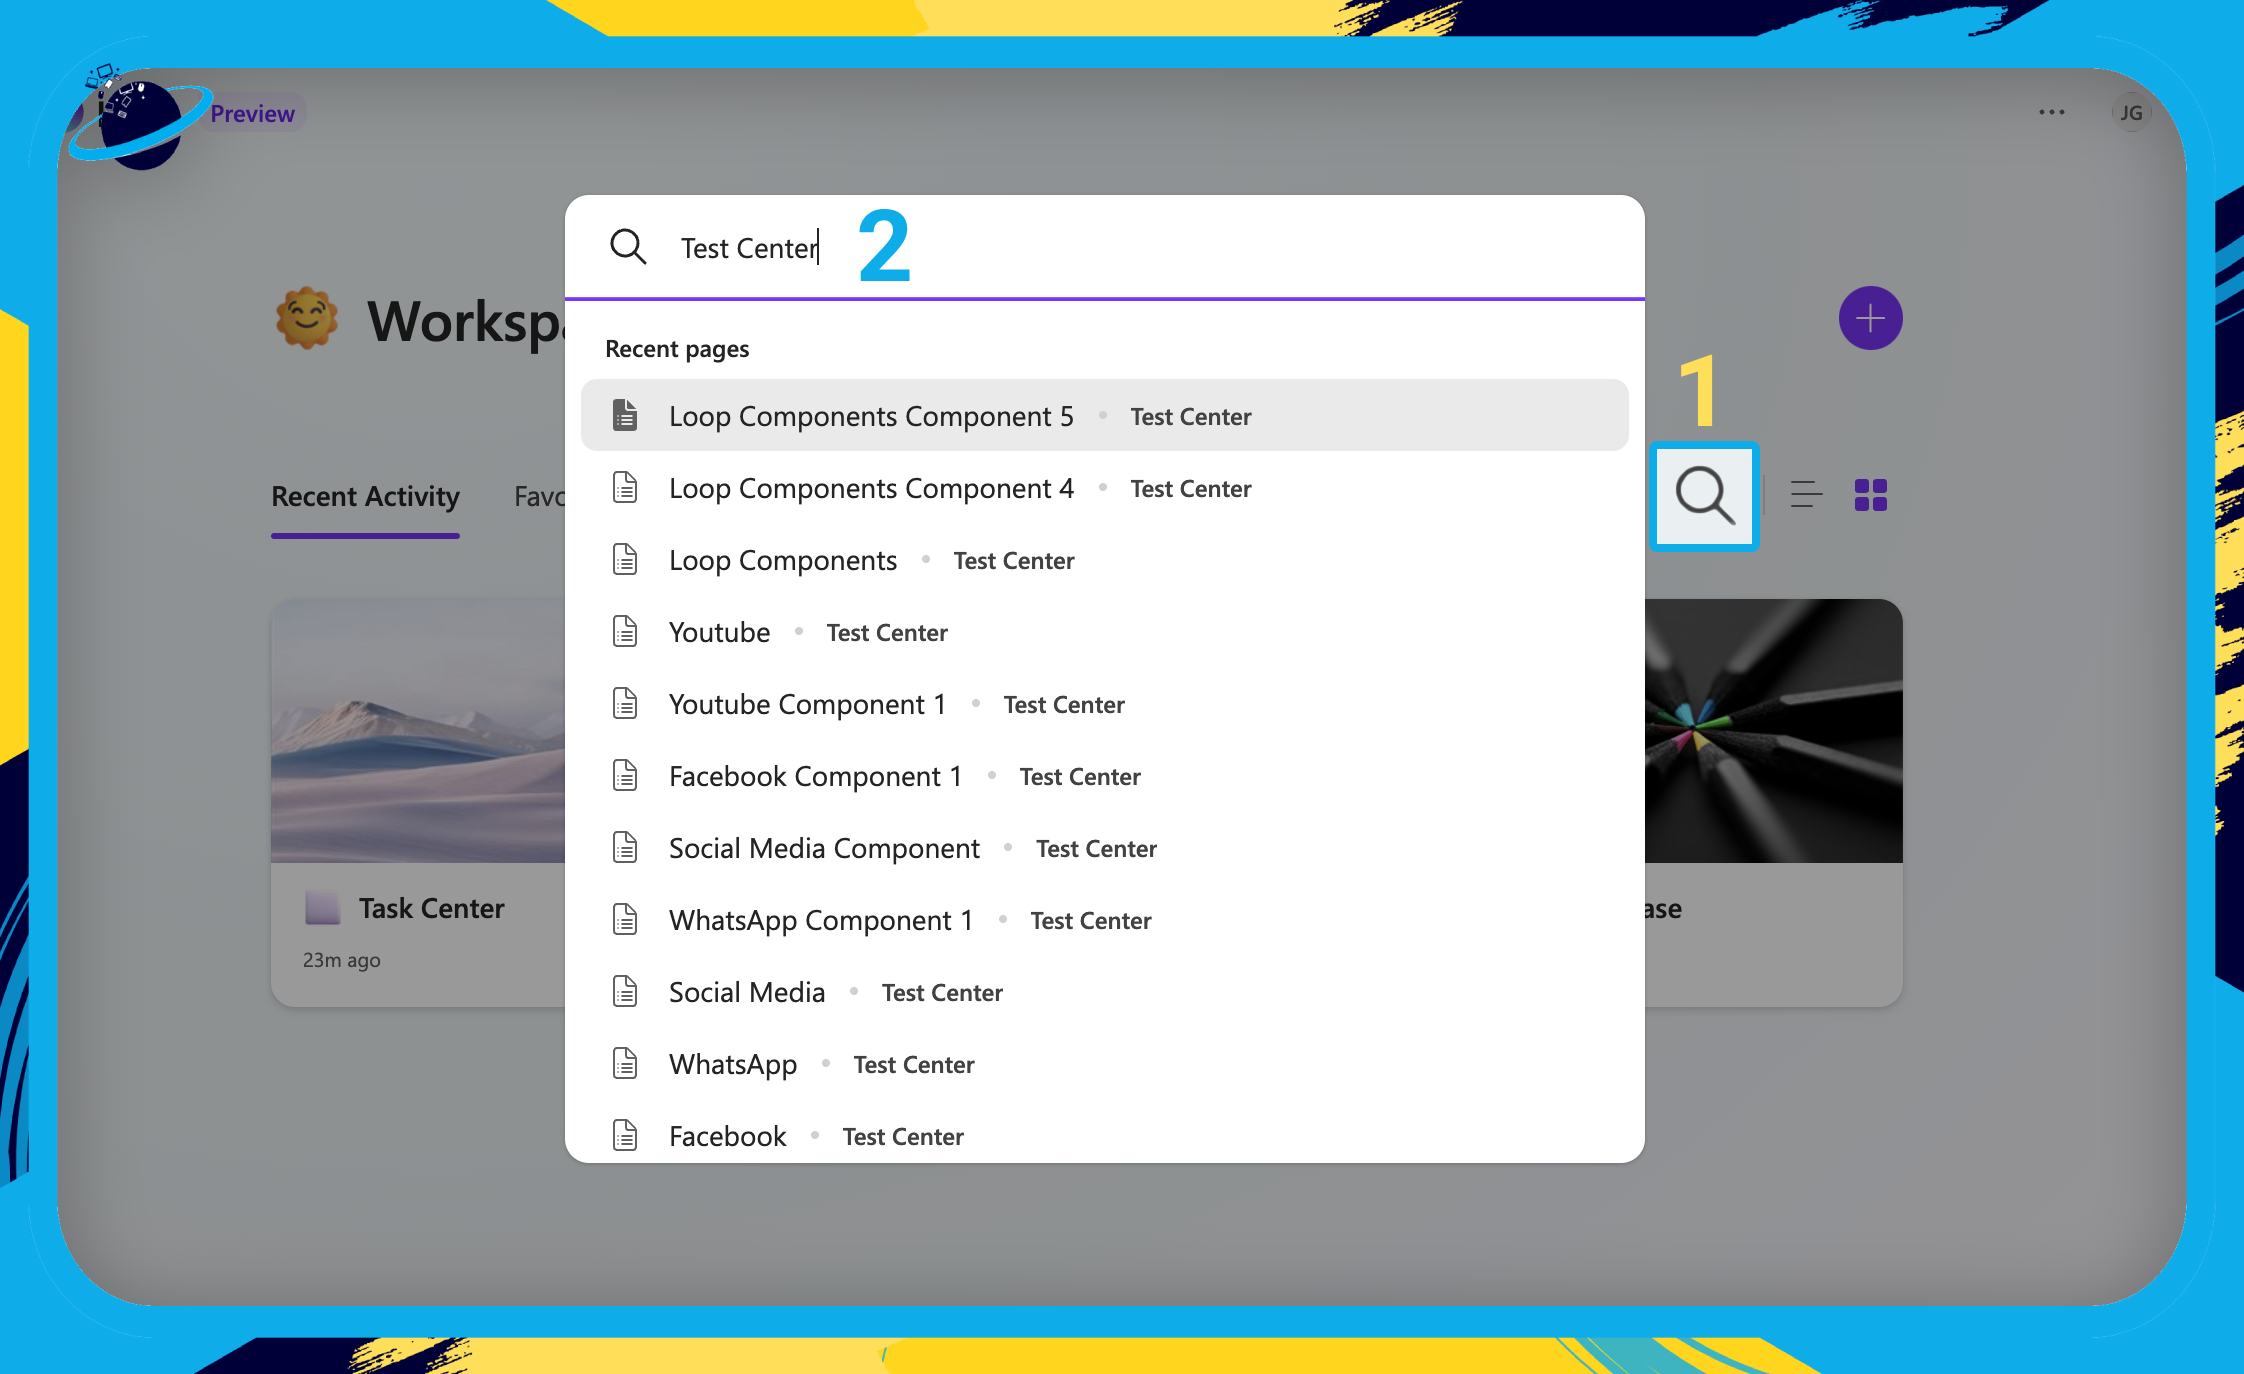
- From the homepage, click the
 search icon or press Ctrl/command + J on the keyboard. [1]
 - Then enter the name of the workspace you want to search. [2]
- Alternatively, enter the name of the page or component that you’re looking for.
![]() Note: To search for text on the page, type an asterisk * before your search term.
Note: To search for text on the page, type an asterisk * before your search term.
- From the workspace, click the search icon or press Ctrl/command + J on the keyboard. [1]
- Then enter the name of the workspace you want to search. [2]
- Alternatively, enter the name of the page or component that you’re looking for.

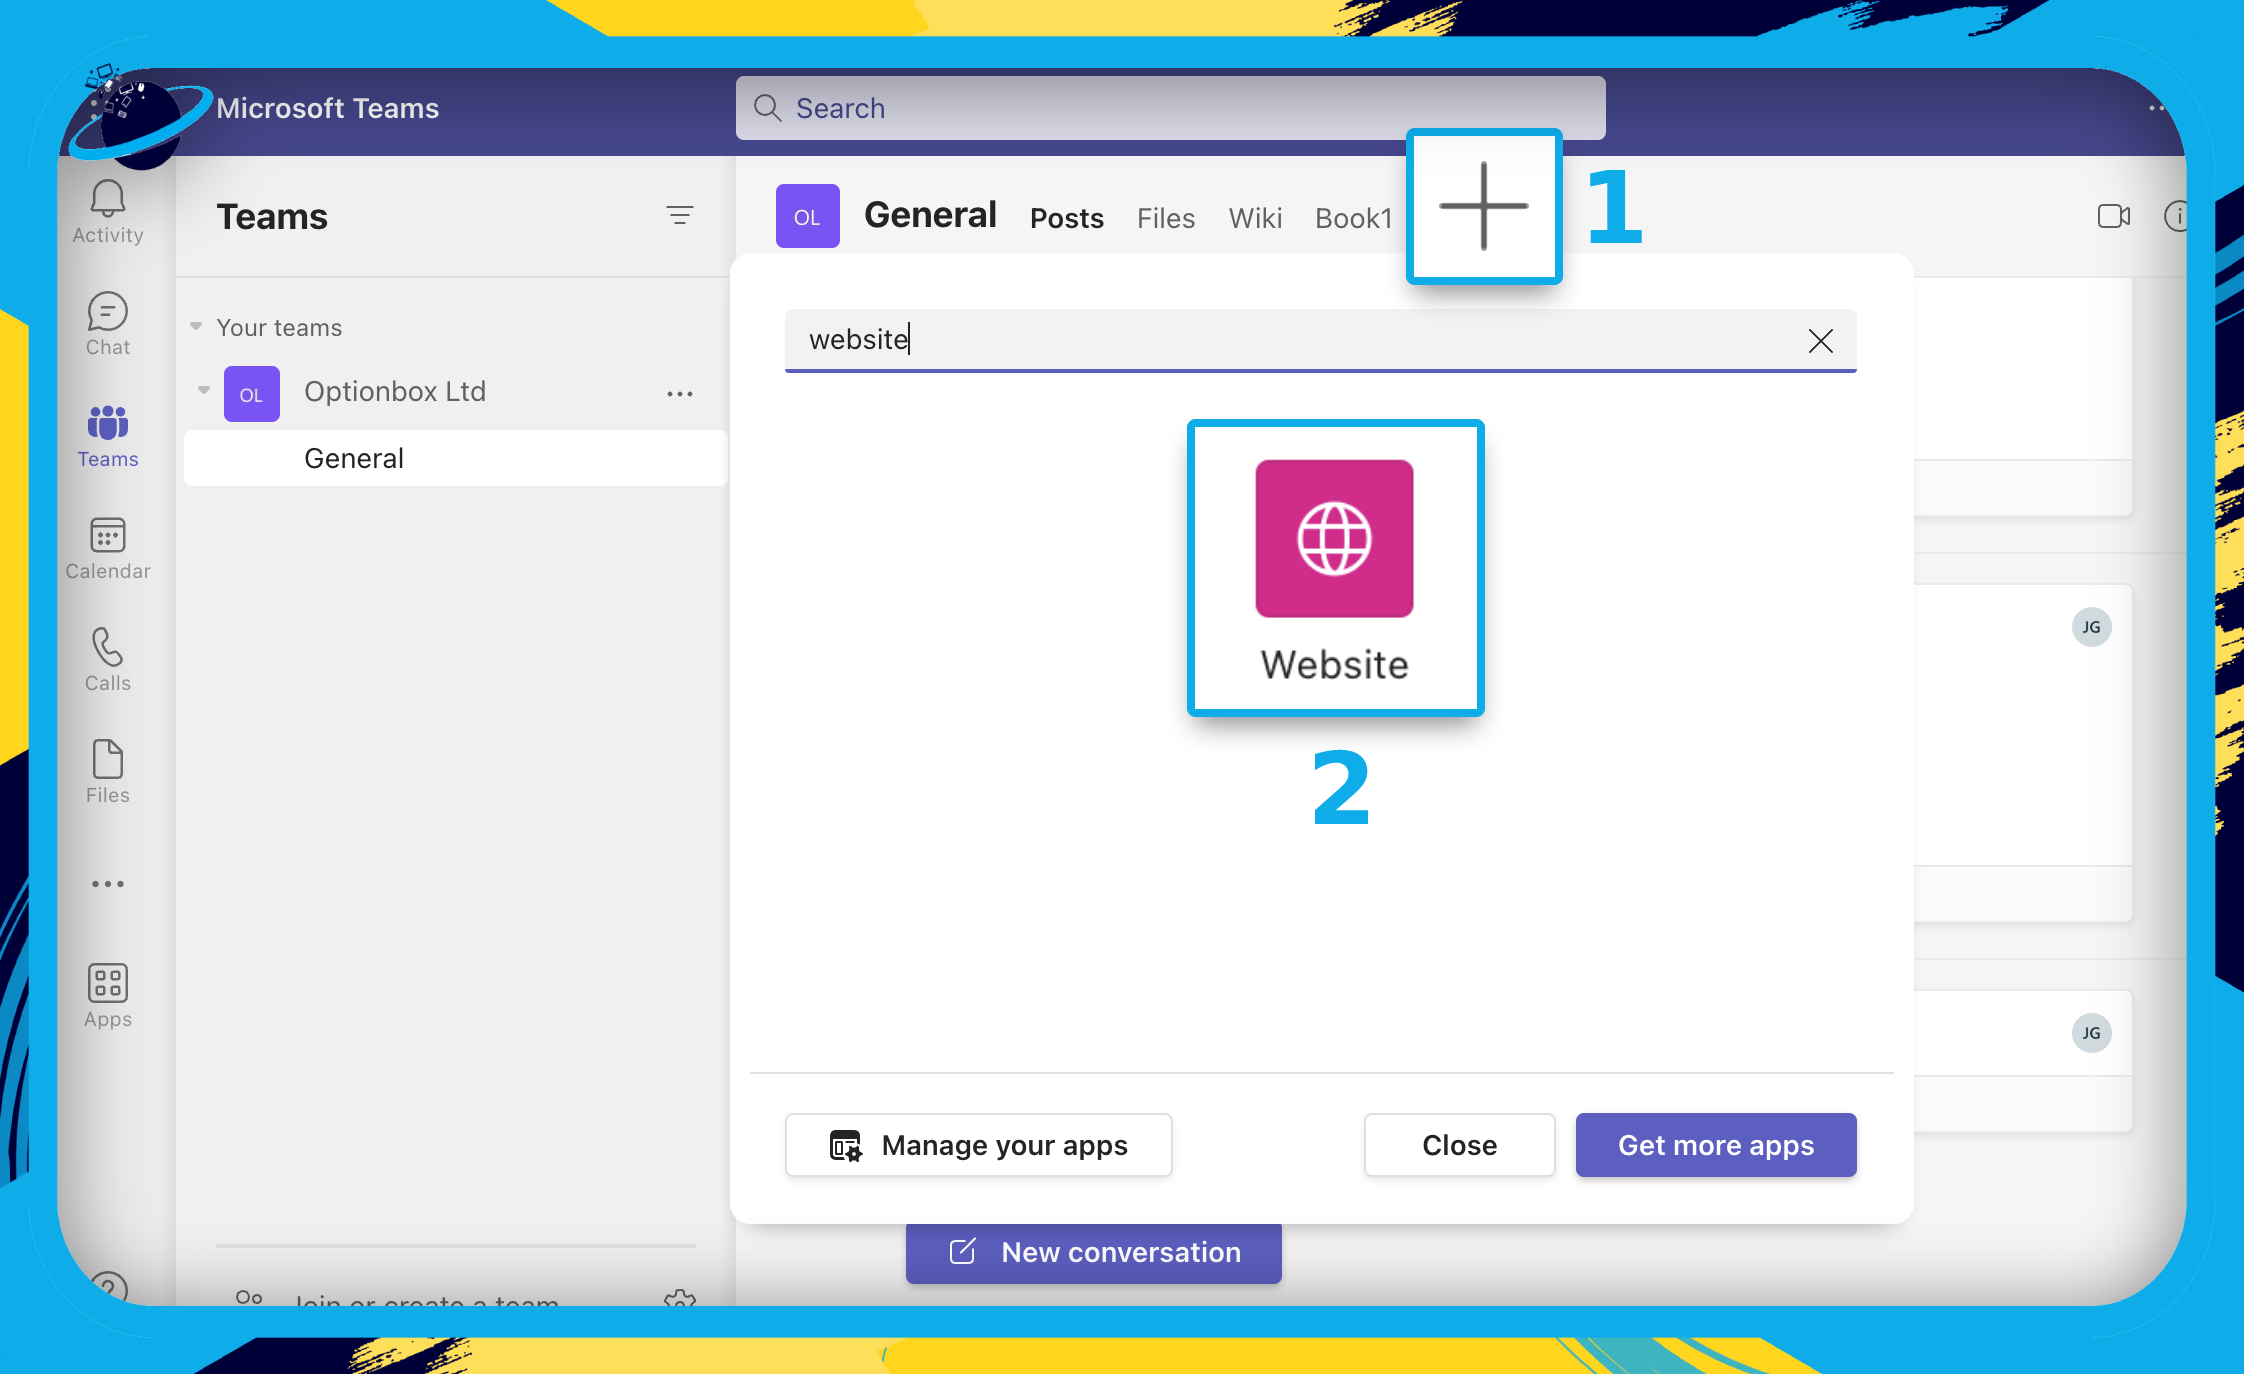
How to embed a workspace into Microsoft Teams
In this section, we’ll show you how to embed a workspace into a Microsoft Teams channel.
If you don’t want to load the Loop app in your browser, a simple solution is to embed Microsoft Loop into a Teams channel using a website tab. This solution is particularly useful because Loop components are not currently supported in Teams channels.
- Start by opening a Teams channel and clicking the plus icon at the top. [1]
- Then select “Website” from the list of apps. [2]
- If you can’t see the Website app, type “Website” into the search bar.
- Next, enter a name for the website tab, such as “Loop.” [1]
- Then type “https://loop.microsoft.com” into the URL bar. [2]
- Finally, click “Save.” [3]
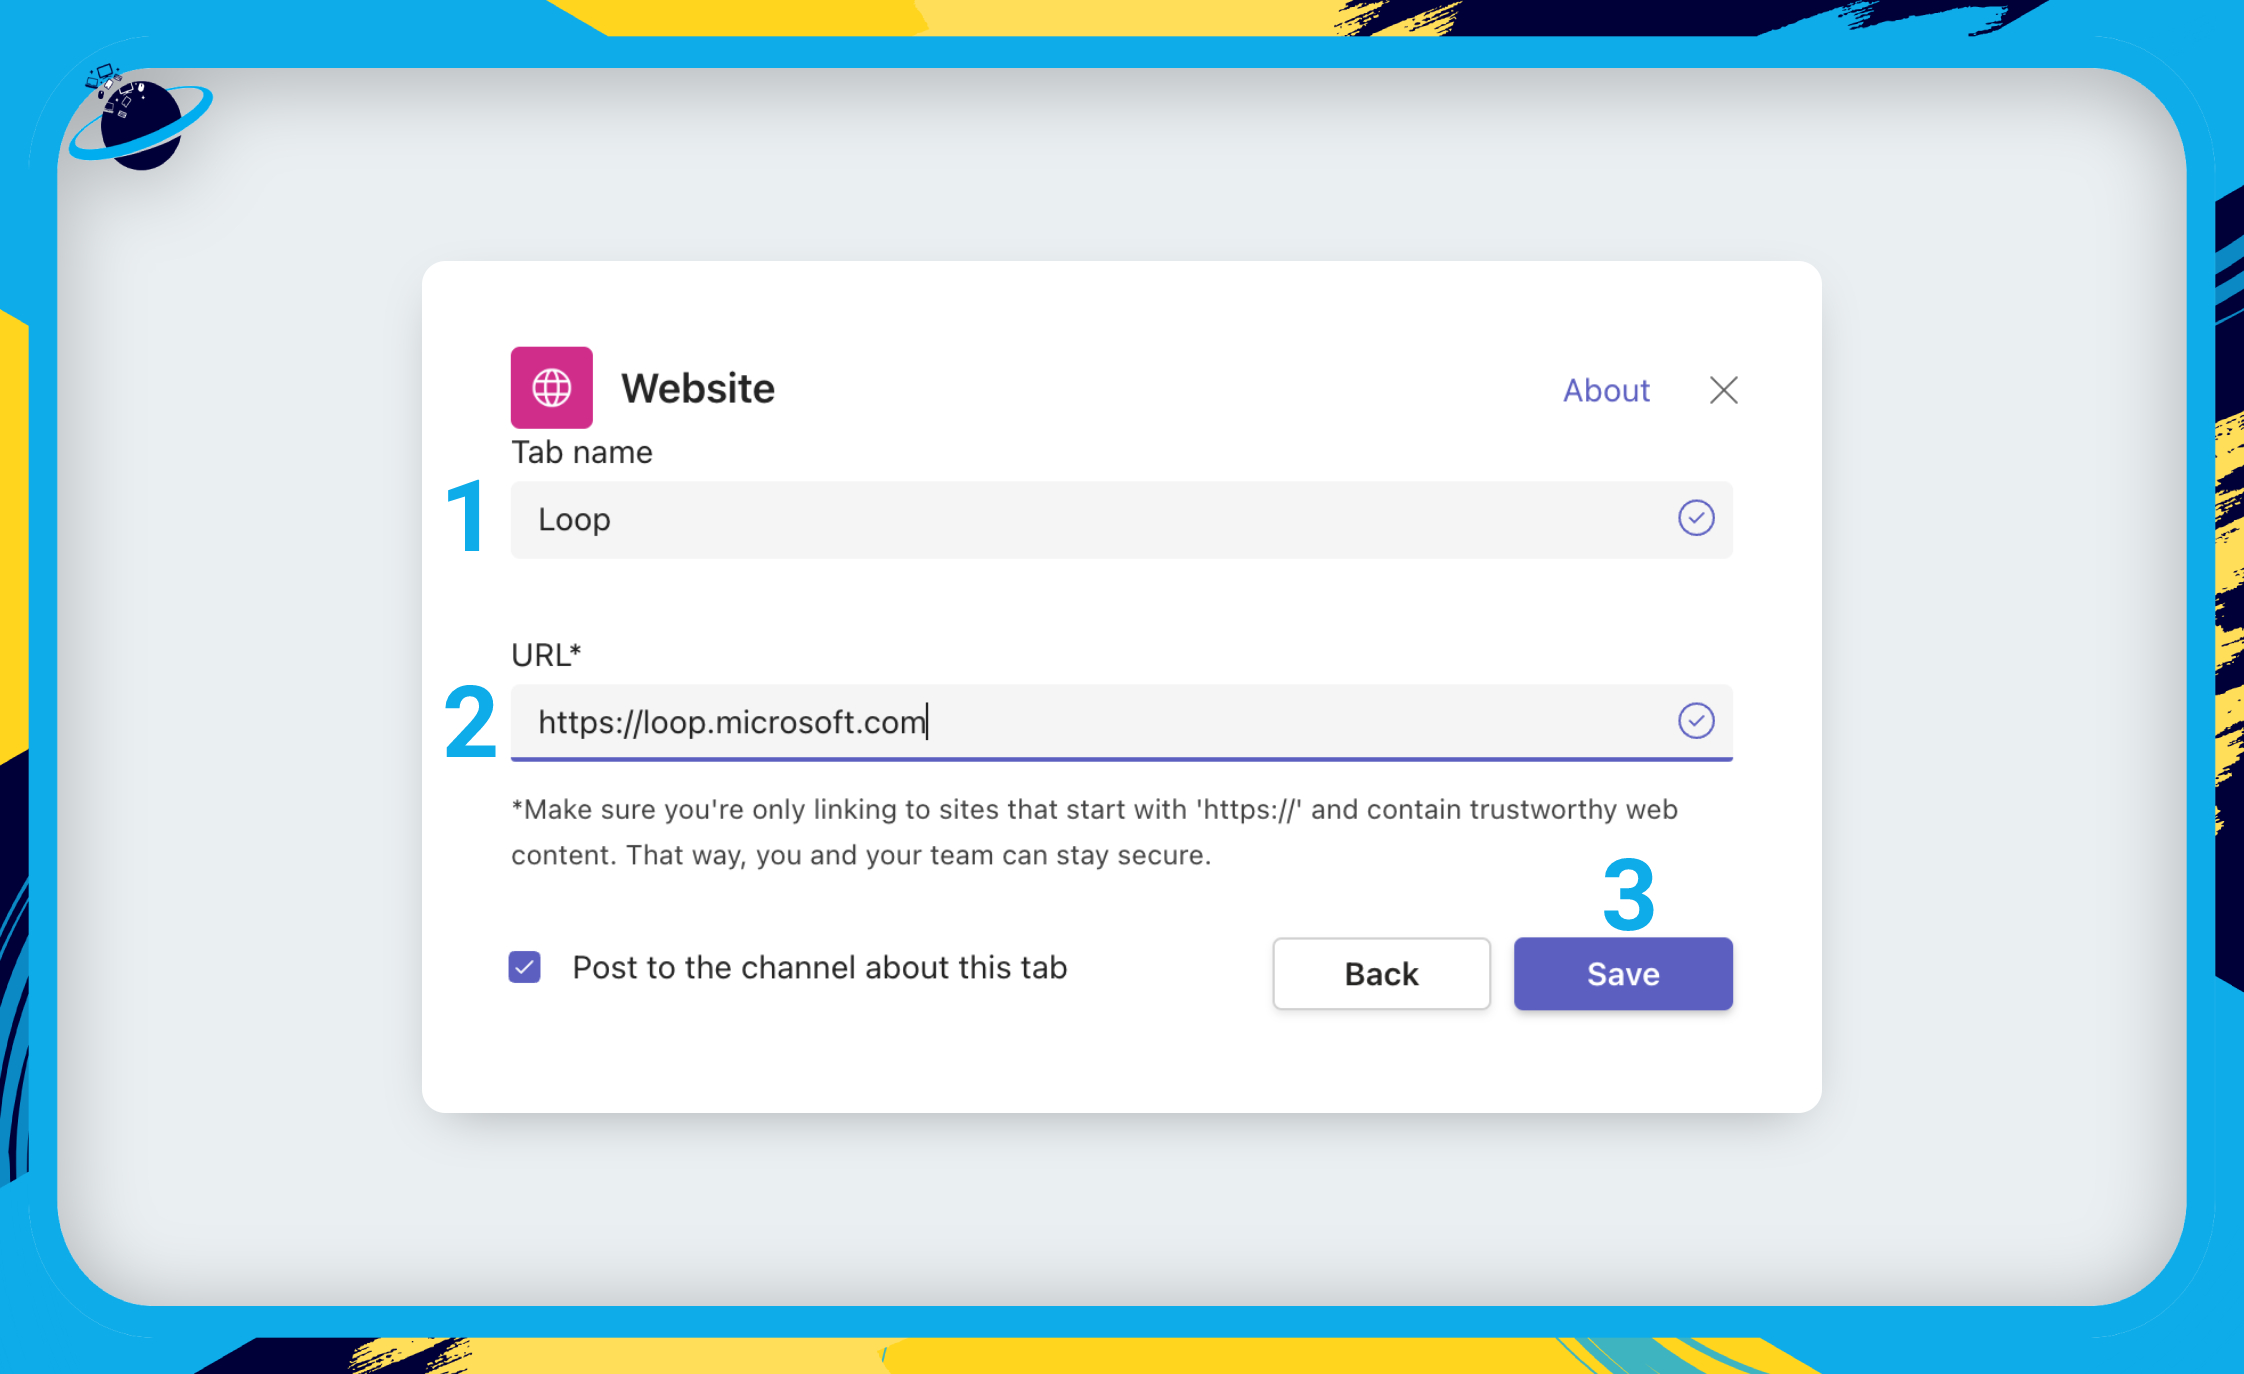
Your Team members can now access their workspaces directly from the Team’s channel!
Frequently Asked Questions (FAQ)
 Can you download a Loop workspace?
No, Microsoft Loop is currently available exclusively via a web browser. You can download Loop components, but to use them, you will need to upload them to OneDrive, as Loop relies on the SharePoint architecture for all its collaborative features.
What is the release date for Loop workspaces?
Microsoft Loop entered the Public Preview phase in March 2023. However, it’s unknown precisely when the application will be finally rolled out for general availability.
To stay updated with Loop’s progress check the ![]() Microsoft Roadmap.
Microsoft Roadmap.

 Conclusion
Microsoft Loop workspaces are similar to notebooks in OneNote. Like notebooks, they contain pages. However, Loop differs from OneNote in that Loop pages contain sharable, collaborative components.
Your workspaces will remain private unless you share them. You can share them by inviting members, which will grant them access to all the pages and components contained within.
If you want to access your workspaces without loading the Loop app, add a website app to a Teams channel and set the URL to https://loop.microsoft.com.
Thanks for reading!