If you use Microsoft Teams regularly, you may be familiar with your profile’s “do not disturb” status. This functionality ensures that you are not disturbed when you are engaged in an active task or meeting. However, what does setting Teams to “do not disturb” do within the program, have a read-through and see what setting Teams “do not disturb” feature does.
What does setting Teams to “do not disturb” do?
The “do not disturb” function in Microsoft Teams ensures that you are not disturbed while in a meeting or an active task. If any messages need to be sent to you, they will be held until the “do not disturb” status has been cleared. You will need to set the “do not disturb” manually as the Teams algorithm can’t do this automatically.
How to change your status to “Do not disturb” in Microsoft Teams:
- Firstly, open your Microsoft Teams
 web app or desktop app.
 - From there, click on your profile picture.
- Now click on the dropdown next to your current status.
- Finally, click on “do not disturb.”
Once the steps above have been completed, you will have now been able to set the status update as “do not disturb.” From this point onwards, you will no longer receive notifications, calls, and any prompts from applications that could potentially disturb you.
How to change your status to “Do not disturb” in Microsoft Teams
If you need more assistance with the steps illustrated above, you can use the guide illustrated below to help complete the process. The points shown here include screenshots that will allow you to complete the process without issues. If you require further assistance with the points illustrated above, you can use the in-depth guide and the screenshots to navigate the process.
- Firstly, open Microsoft Teams web app or desktop app.
To begin the process, you need to first open Microsoft Teams; you can either open the desktop version of the program or the browser. The process illustrated here will be the same for both the platforms you use for Microsoft Teams.
- From there, click on your profile picture.
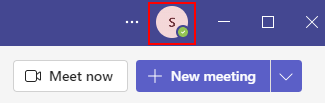
The profile picture is home to all your settings and notification updates. If you need to make some setting changes to your Teams account, you can do so when you click on the profile picture. To proceed with the steps illustrated here, you must click on the profile picture.
- Now click on the dropdown next to your current status.
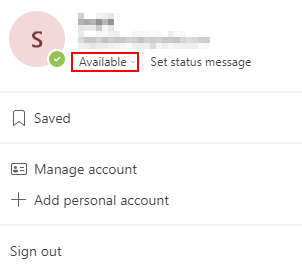
Next to your current status, you will see a small dropdown arrow; when you click on the arrow, you will be presented with an expanded list with all your status updates. Here you can change your status update to what you require. You will need this panel open to proceed with the steps illustrated below.
- Finally, click on “do not disturb.”

The final step is to click on the “do not disturb” button, which will set your default status to “do not disturb.” When you have the “do not disturb” function
The in-depth guide will give you more context on the steps illustrated at the top. If you have any issues navigating through the UI, you can proceed with the in-depth guide for more assistance. The process will allow you to set the Microsoft Teams status updates to “do not disturb.” When you do proceed to turn your status update to “do not disturb,” you will no longer receive notifications or calls when you are on Microsoft Teams. These changes are made to ensure that you don’t get disturbed in the presence of a meeting or important task you are aiming to complete.

What happens when you change your status to “do not disturb” in Microsoft Teams?
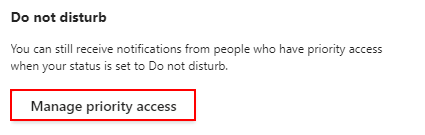
There are some exceptions to who can send you notifications in Microsoft Teams. If you set your settings to “do not disturb,” you will not receive calls, notifications, and meeting prompts when you are scheduled for one. Members who have priority access to send you notifications will still have the ability to send messages, and you will receive the notification for it.
Members that don’t have priority access to your account will still be able to send messages within the program; however, you will not be notified of those messages reaching your account. If you have some time available, you can still view messages when you go to the chat inbox for those users. However, what if you have a member who requires priority access, or you need to remove members from the priority access section. Have a read-through and see what you need to ensure an up-to-date priority section in Microsoft Teams.
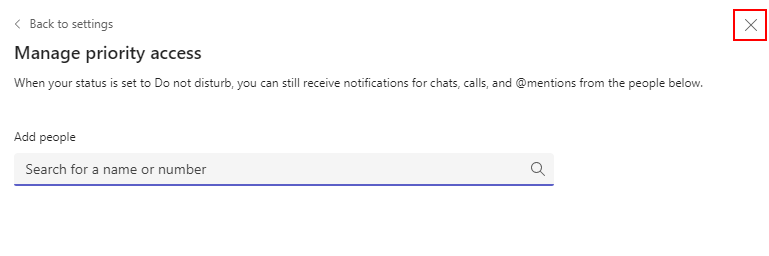
How to “Manage priority access” in Microsoft Teams to let people contact you while in “do not disturb”
Here is a guide on giving members priority access to your account. If you need to give members access to your account, you can do so with the below steps. The steps will allow you to “manage priority access” in your account.
- Firstly, open your Microsoft Teams web app or desktop app.
To begin the process, simply open Microsoft Teams, the process illustrated here will work for both the desktop version of Microsoft Teams and the browser.
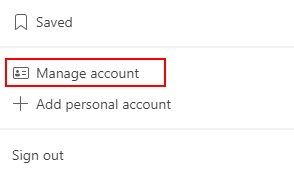
- Now click on your profile picture.
- From there, click on “Manage Account.”
- After that, you need to click on “Privacy.”
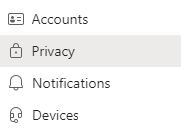
The functions to ensure you have the correct members added to your priority access section will reside here. You will need to proceed with the steps illustrated here to ensure the priority access section is up-to-date.
- Now click on “Manage priority access.”
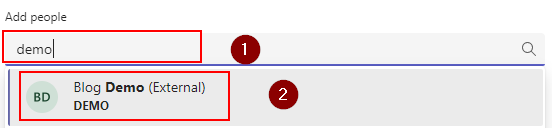
- Type out the members you want to give priority access to, then select the member.
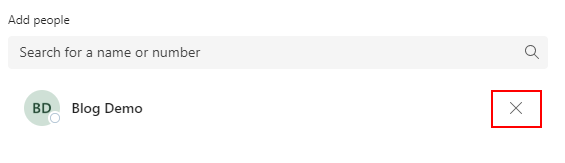
- Simply click on the cross next to their name to remove a member.
- Finally, close the setting panel.
When the steps are complete, you will now be able to set priority access for members that require it. You can also remove priority access for members who do not have any requirements. When a member has priority access, you will receive notifications from any messages they may send to you.
Conclusion
That concludes the blog; we appreciate your reading about what occurs when you set your status to “do not disturb.” Set this status to if you don’t need interruptions when working on projects or attending meetings. If you require further assistance with the information shown above, please leave a message below, and we will respond as soon as possible.