If you’re typing in Word, or opening up files you’ve saved or been sent by someone else, you may have experienced a situation where words within keep disappearing and then reappearing. Why is that and what causes this seemingly random glitch within the program? There could be multiple reasons — some easy to fix and others quite a bit harder. Regardless of the situation, we have the advice to assist you in resolving it. For more details on how to fix text disappearing and reappearing in Word, read on.
Above are some of the most effective approaches you can take to resolve the issue of words randomly disappearing and reappearing in Word. Follow through and see which of the listed solutions above has an impact on fixing the issue.
Clear cached data to fix words randomly disappearing and appearing
Cached data is information that programs and browsers store to help process information better next time. However, in a program like Word, this context keeps on updating quite frequently. This increases the chances of the cached files becoming oversaturated with unnecessary bits of information. This may cause seemingly random glitches as the cached files are quite oversaturated it becomes increasingly difficult for Word to process information. Follow through for more information on how to clear cached data.
I have included a guide to clear cached data on Word for both Mac and Windows, follow-through for the most relevant approach.
Process for Windows
- Microsoft Teams and Word must be completely closed and ensured that it is not still operating in the toolbar at the bottom right of Windows.
- In a File Window, go to “%appdata%/Microsoft/Word”.
- Everything in the Cache folder should be selected.
- Delete the cache files
- Open Word and wait for the necessary files to download in the cache.
Once you’ve completed the procedures above and the bin has been cleared, all extraneous content in Word cached files will be removed. You’ll need to return to the application and wait for the relevant bits of data to be reintroduced back into work. So don’t be concerned if there is a slight delay in loading.
If you’re having trouble following along, don’t worry; I’ve included an in-depth guide below with visual screenshots to help you understand what’s required.
An in-depth guide to clearing cached data on Word for Windows
- Firstly, close your Microsoft Word application.
- Open File Explorer and type in “%appdata%/Microsoft/Word” into the address bar at the top.
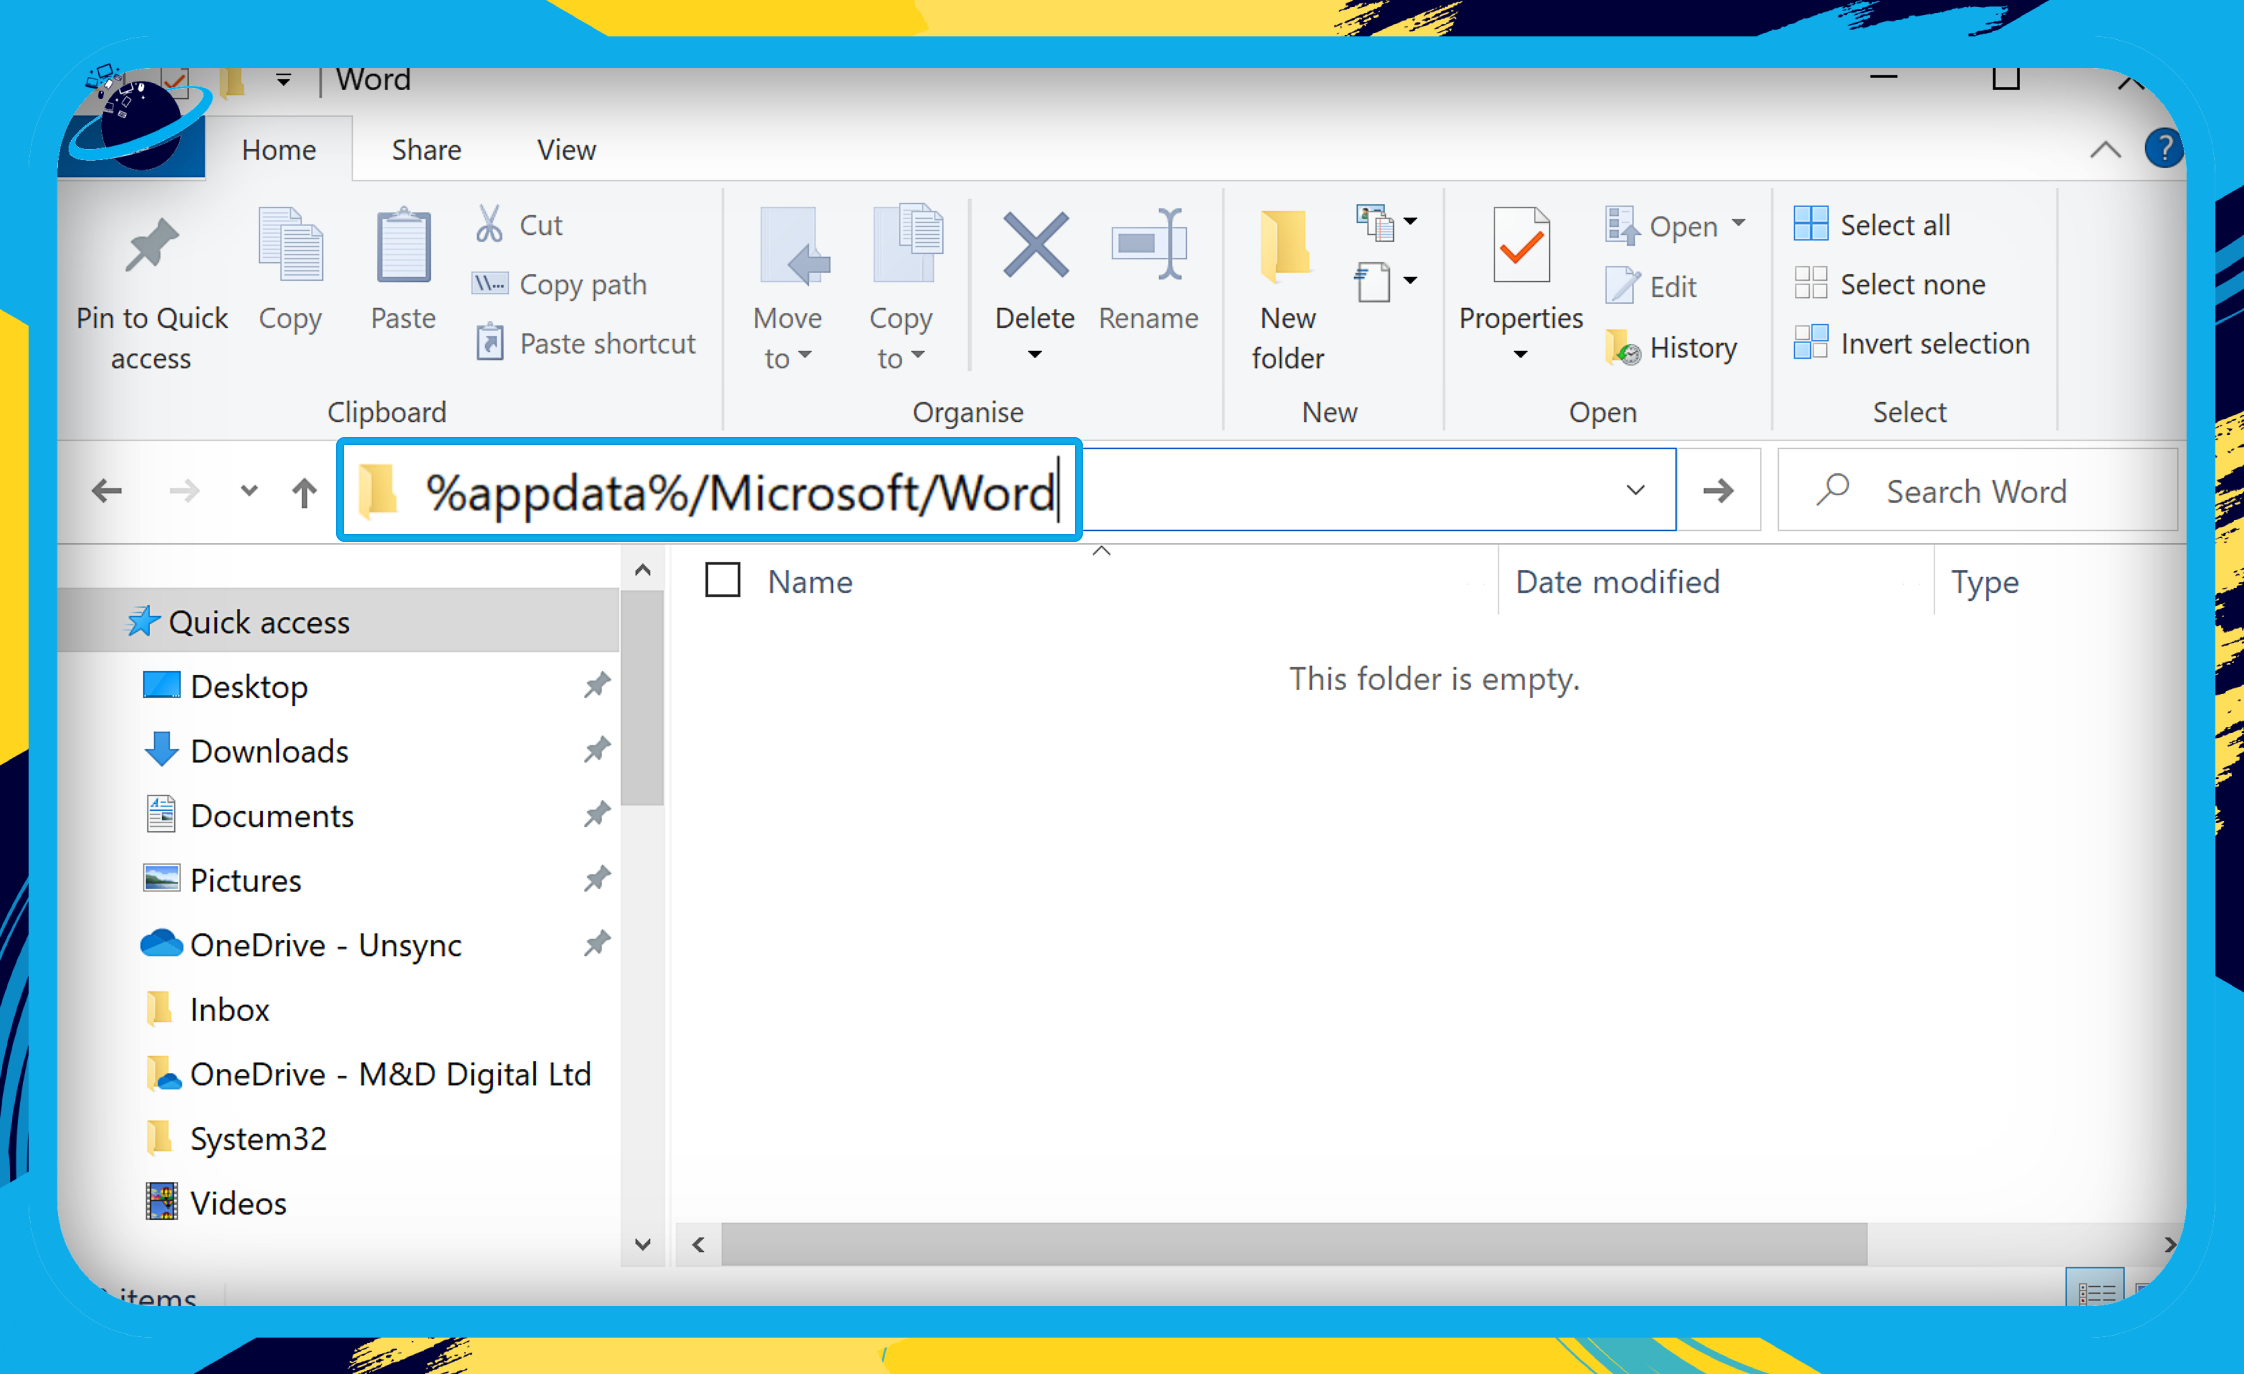
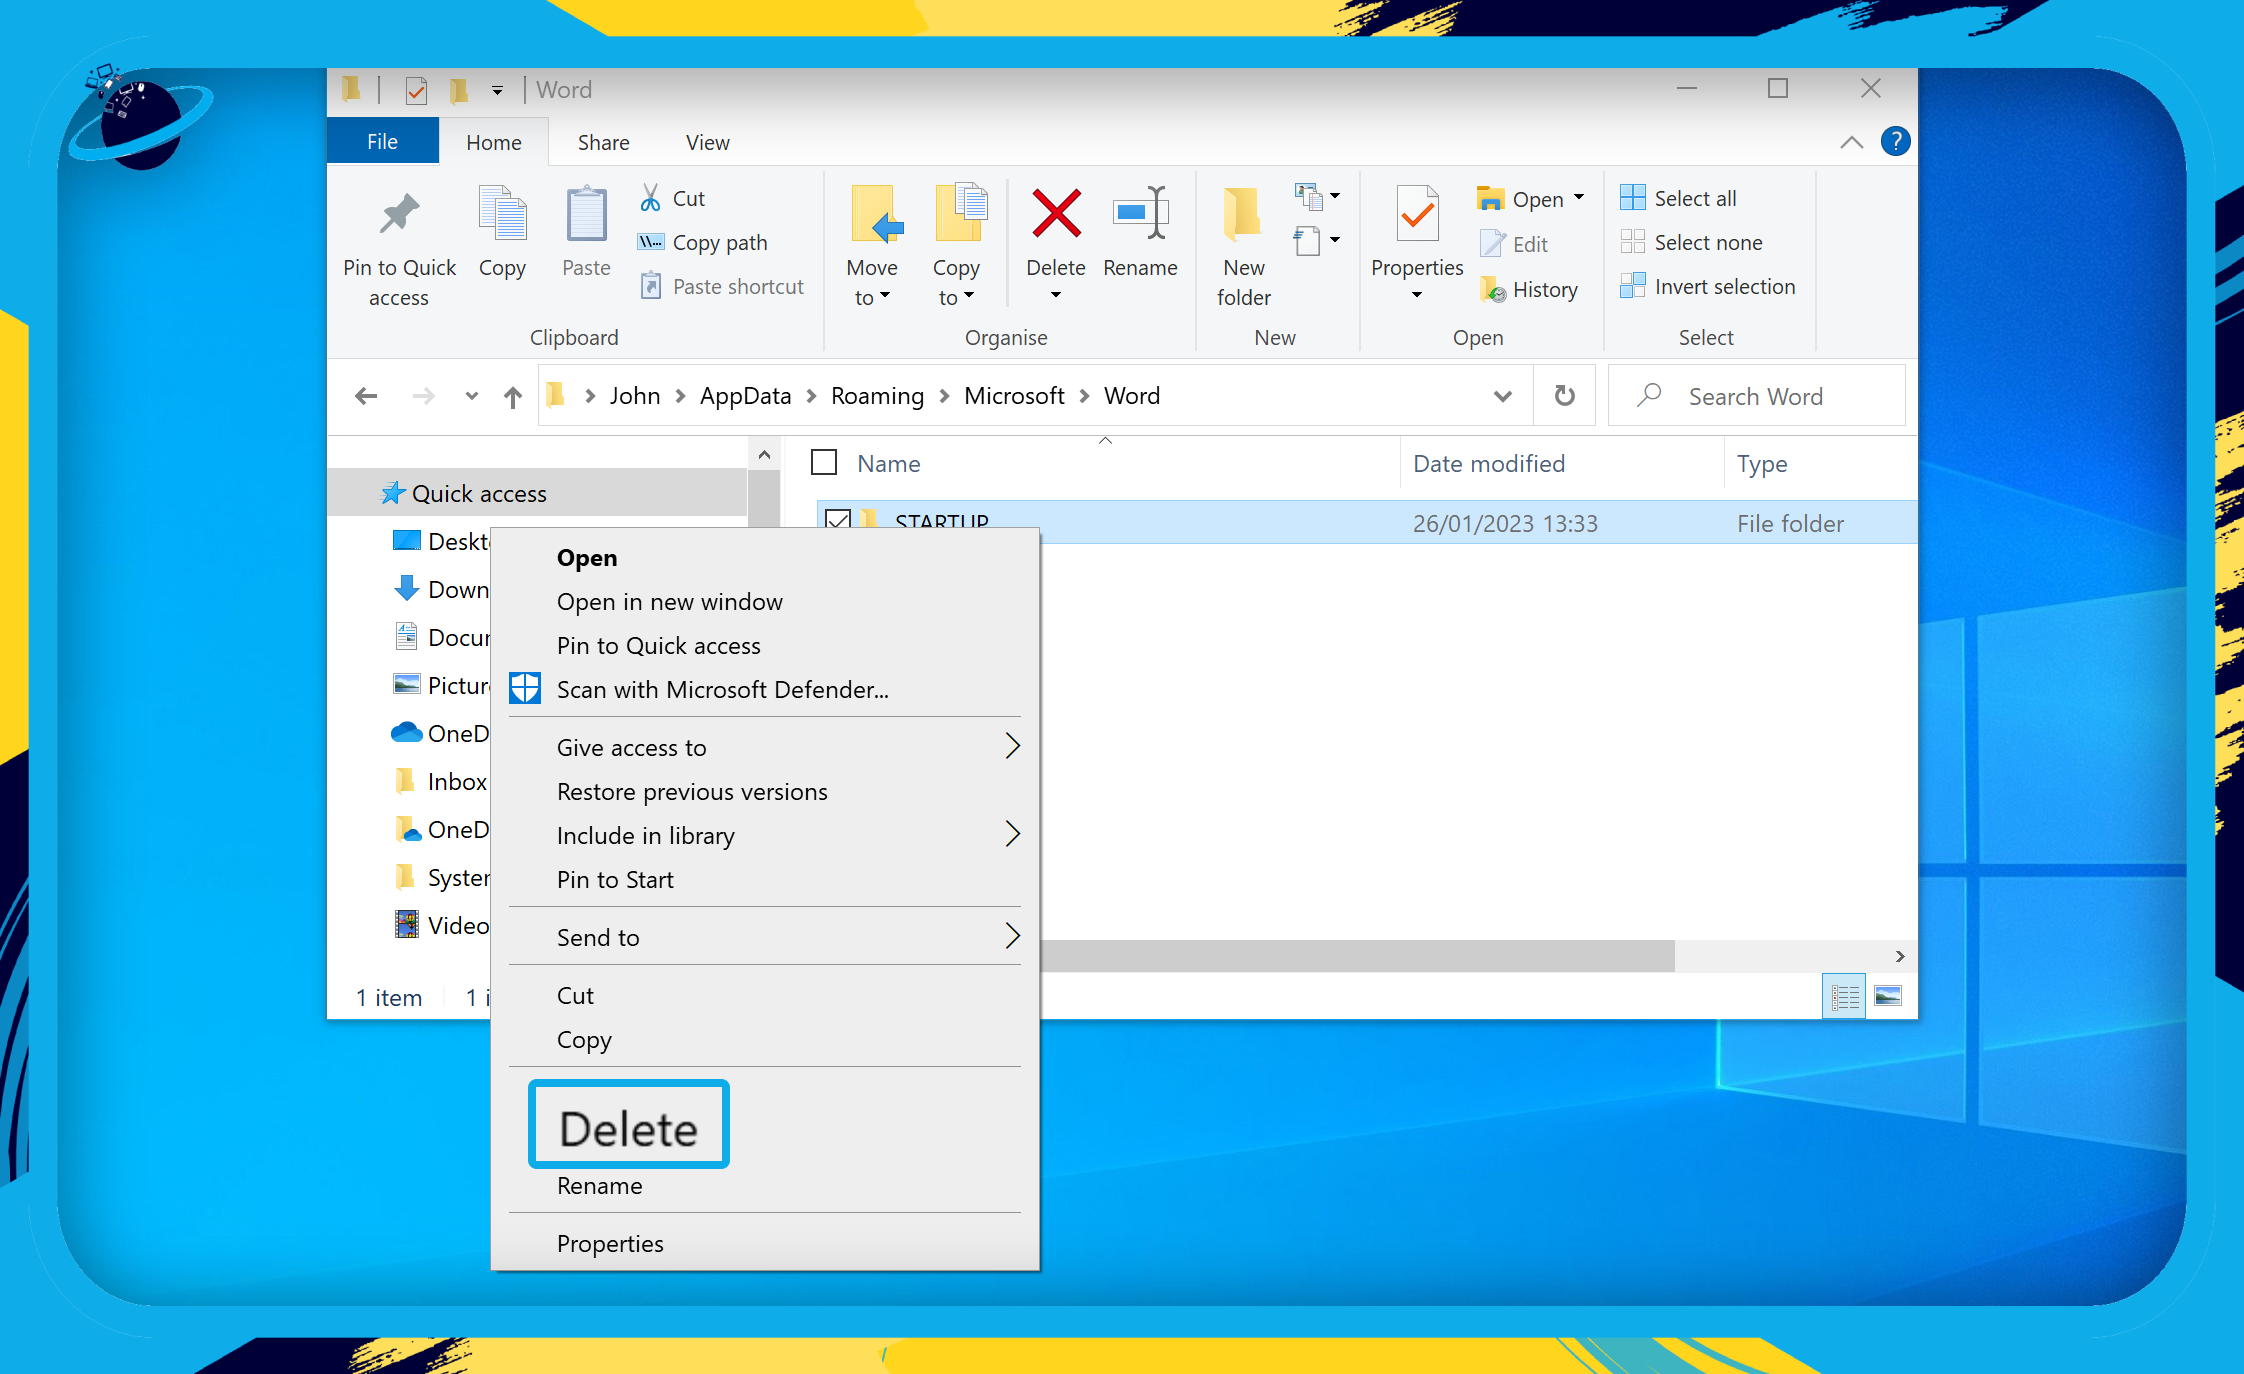
- Select all items inside the folder.
- Right-click any of the selected items.
- Select “Delete” from the dropdown menu.
- Open Word and wait for the necessary files to download in the cache.
That’s it, once the cached data has been cleared you will now be able to use Word without any residual cached data causing an issue with your account. Words should now display all word-based content without repetitive disappearances.
Process for Mac
- Firstly, on your Mac desktop click on “Go” in the top banner.
- Now click on “Go to Folder”.
- Now type in “~/Library/Caches”
- Locate the folder called “Microsoft” or “com.microsoft.word”.
- Move the folder to “Bin”.
- Finally, open and clear the bin.
Once the steps above have been implemented and the bin has cleared the Word cached files will be cleared of all unnecessary content, you will need to go back to the application and wait for the necessary bits of data to be reinstated back into work. So if there is a loading delay don’t worry this is normal.
If you are stuck following along, don’t worry, I will provide an in-depth guide below with visual screenshots so you are more aware of what is required.
An in-depth guide to clearing cached data on Word for Mac
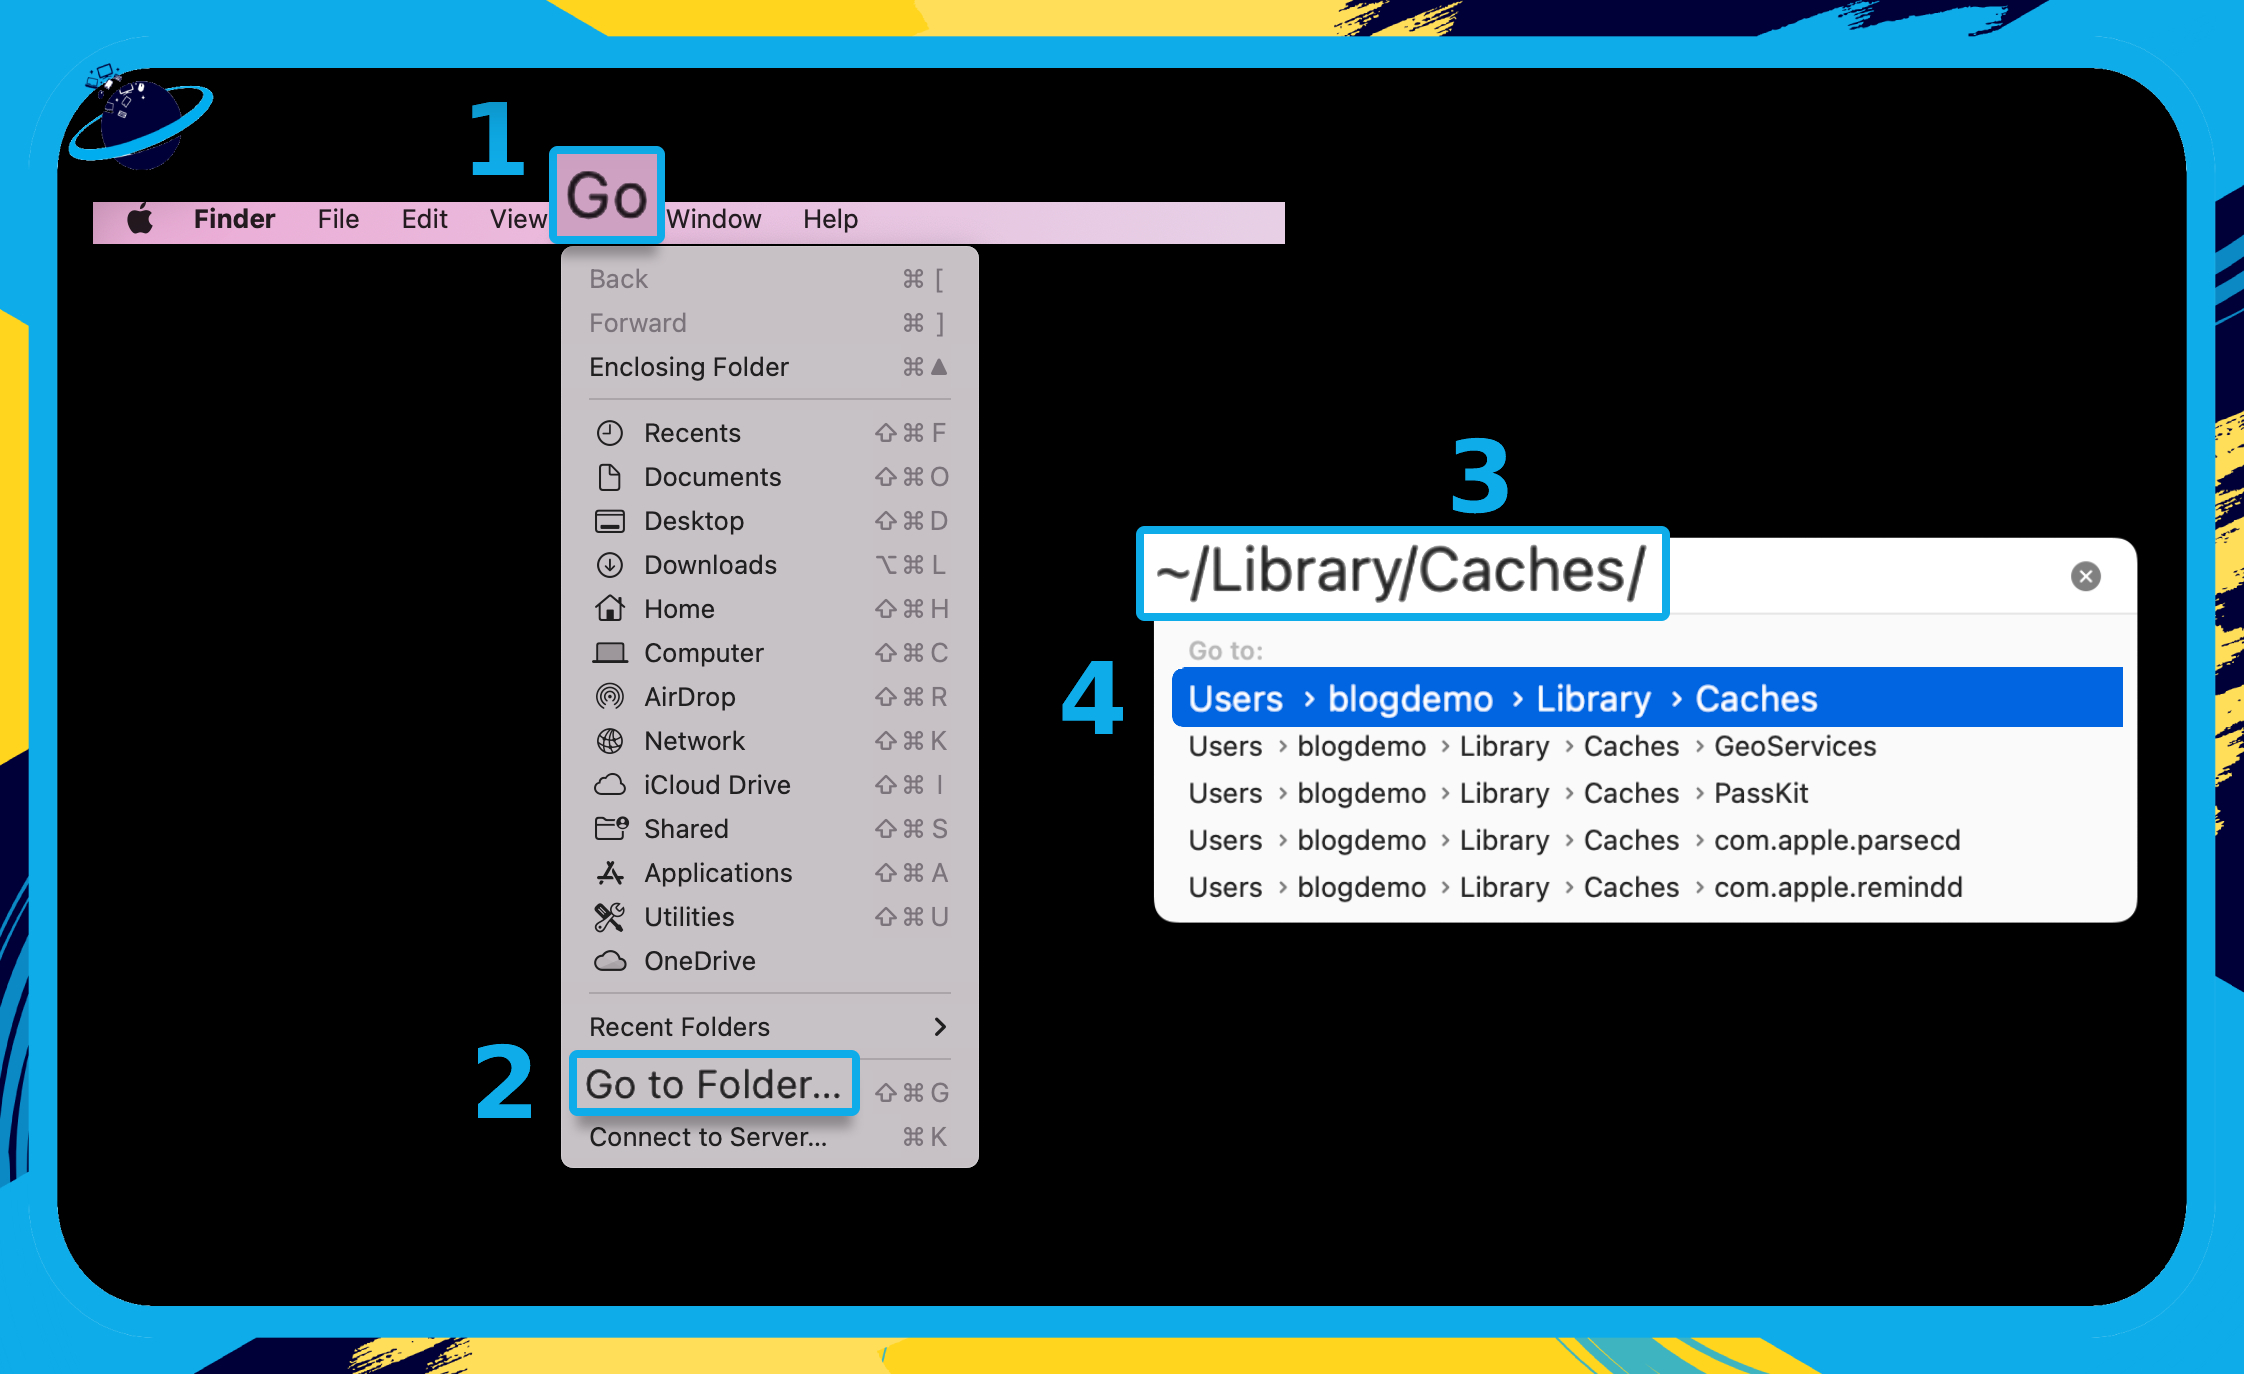
- First, click “Go” at the top. (1)
- Select “Go to Folder” from the dropdown menu. (2)
- Type or paste “~/Library/Caches/” into the search bar in the popup dialog box. (3)
- Then double-click “Users > [Username] > Library > Caches.” (4)
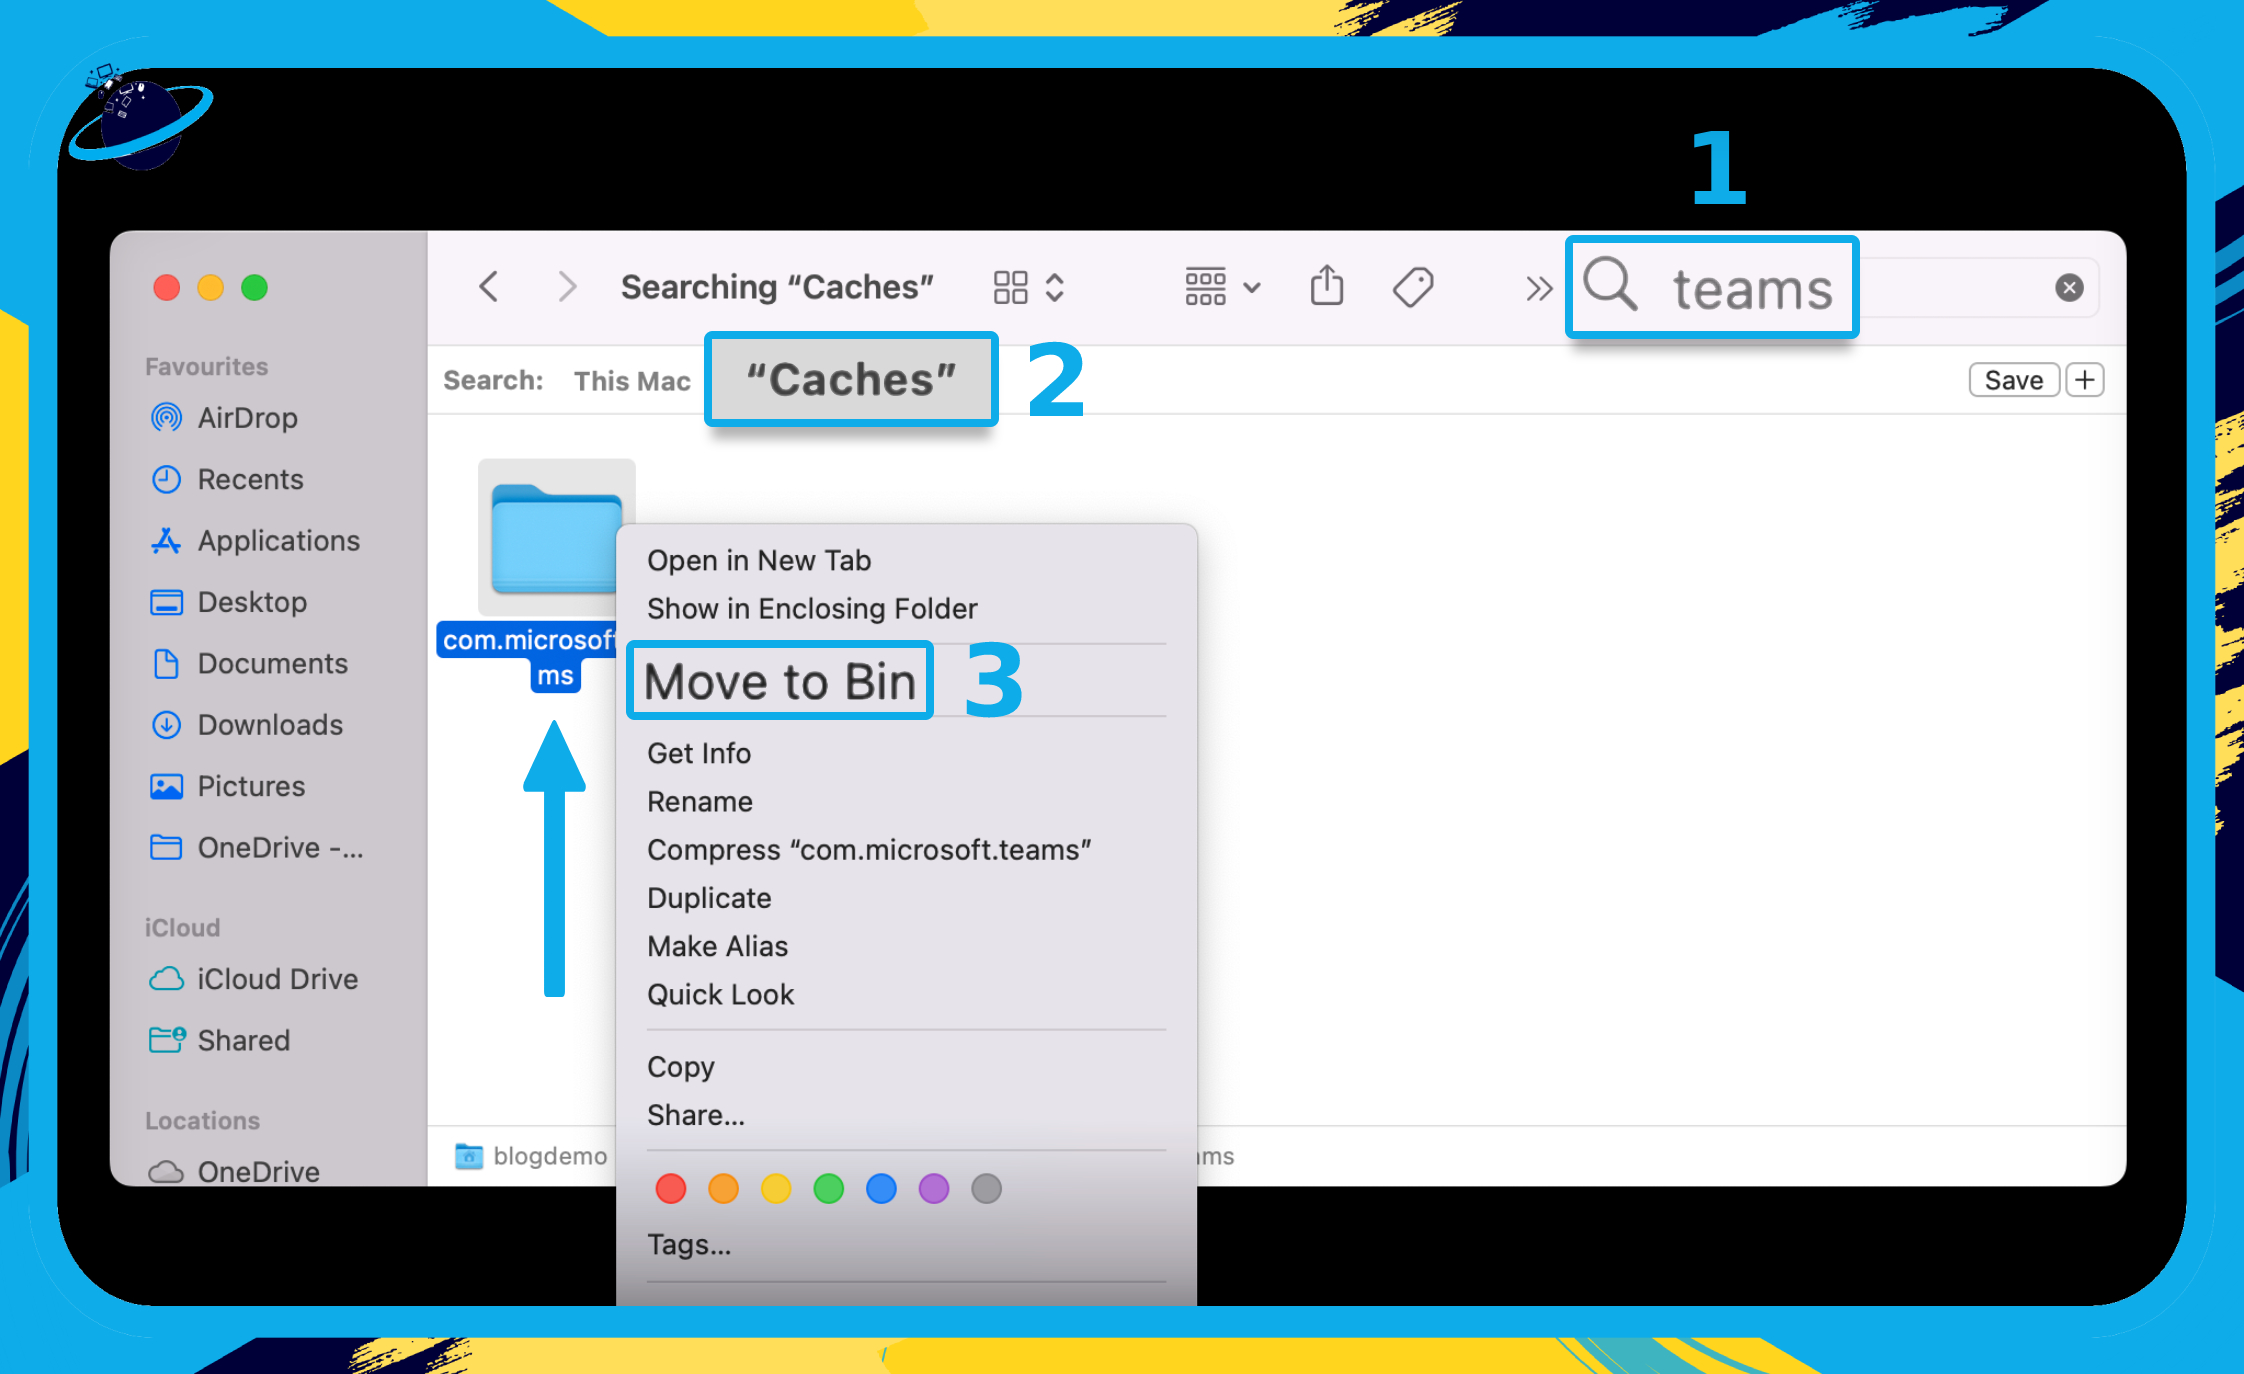
- Next, type “Teams” into the search bar at the top of the Caches folder. (1)
- Click on “Caches” to search within that folder. (2)
- Locate and right-click the “com.microsoft.teams” folder and “Move to Bin.” (3)
That’s the steps with accompanying screenshots follow through. See if you can resolve the issue using the illustrated methods above. If you use Windows follow the steps below and well illustrate a method to fix the problem for Windows.

Disable overtype mode to fix words randomly disappearing and appearing
When you type in Overtype mode, the letters in your Word documents may vanish. In this mode, anything you type replaces text instead of inserting new text. Through the Options dialogue box in Word, you can disable Overtype mode. Follow through for more information on how you can achieve this.
- Firstly, click on “File”.
- After that click on “Options”.
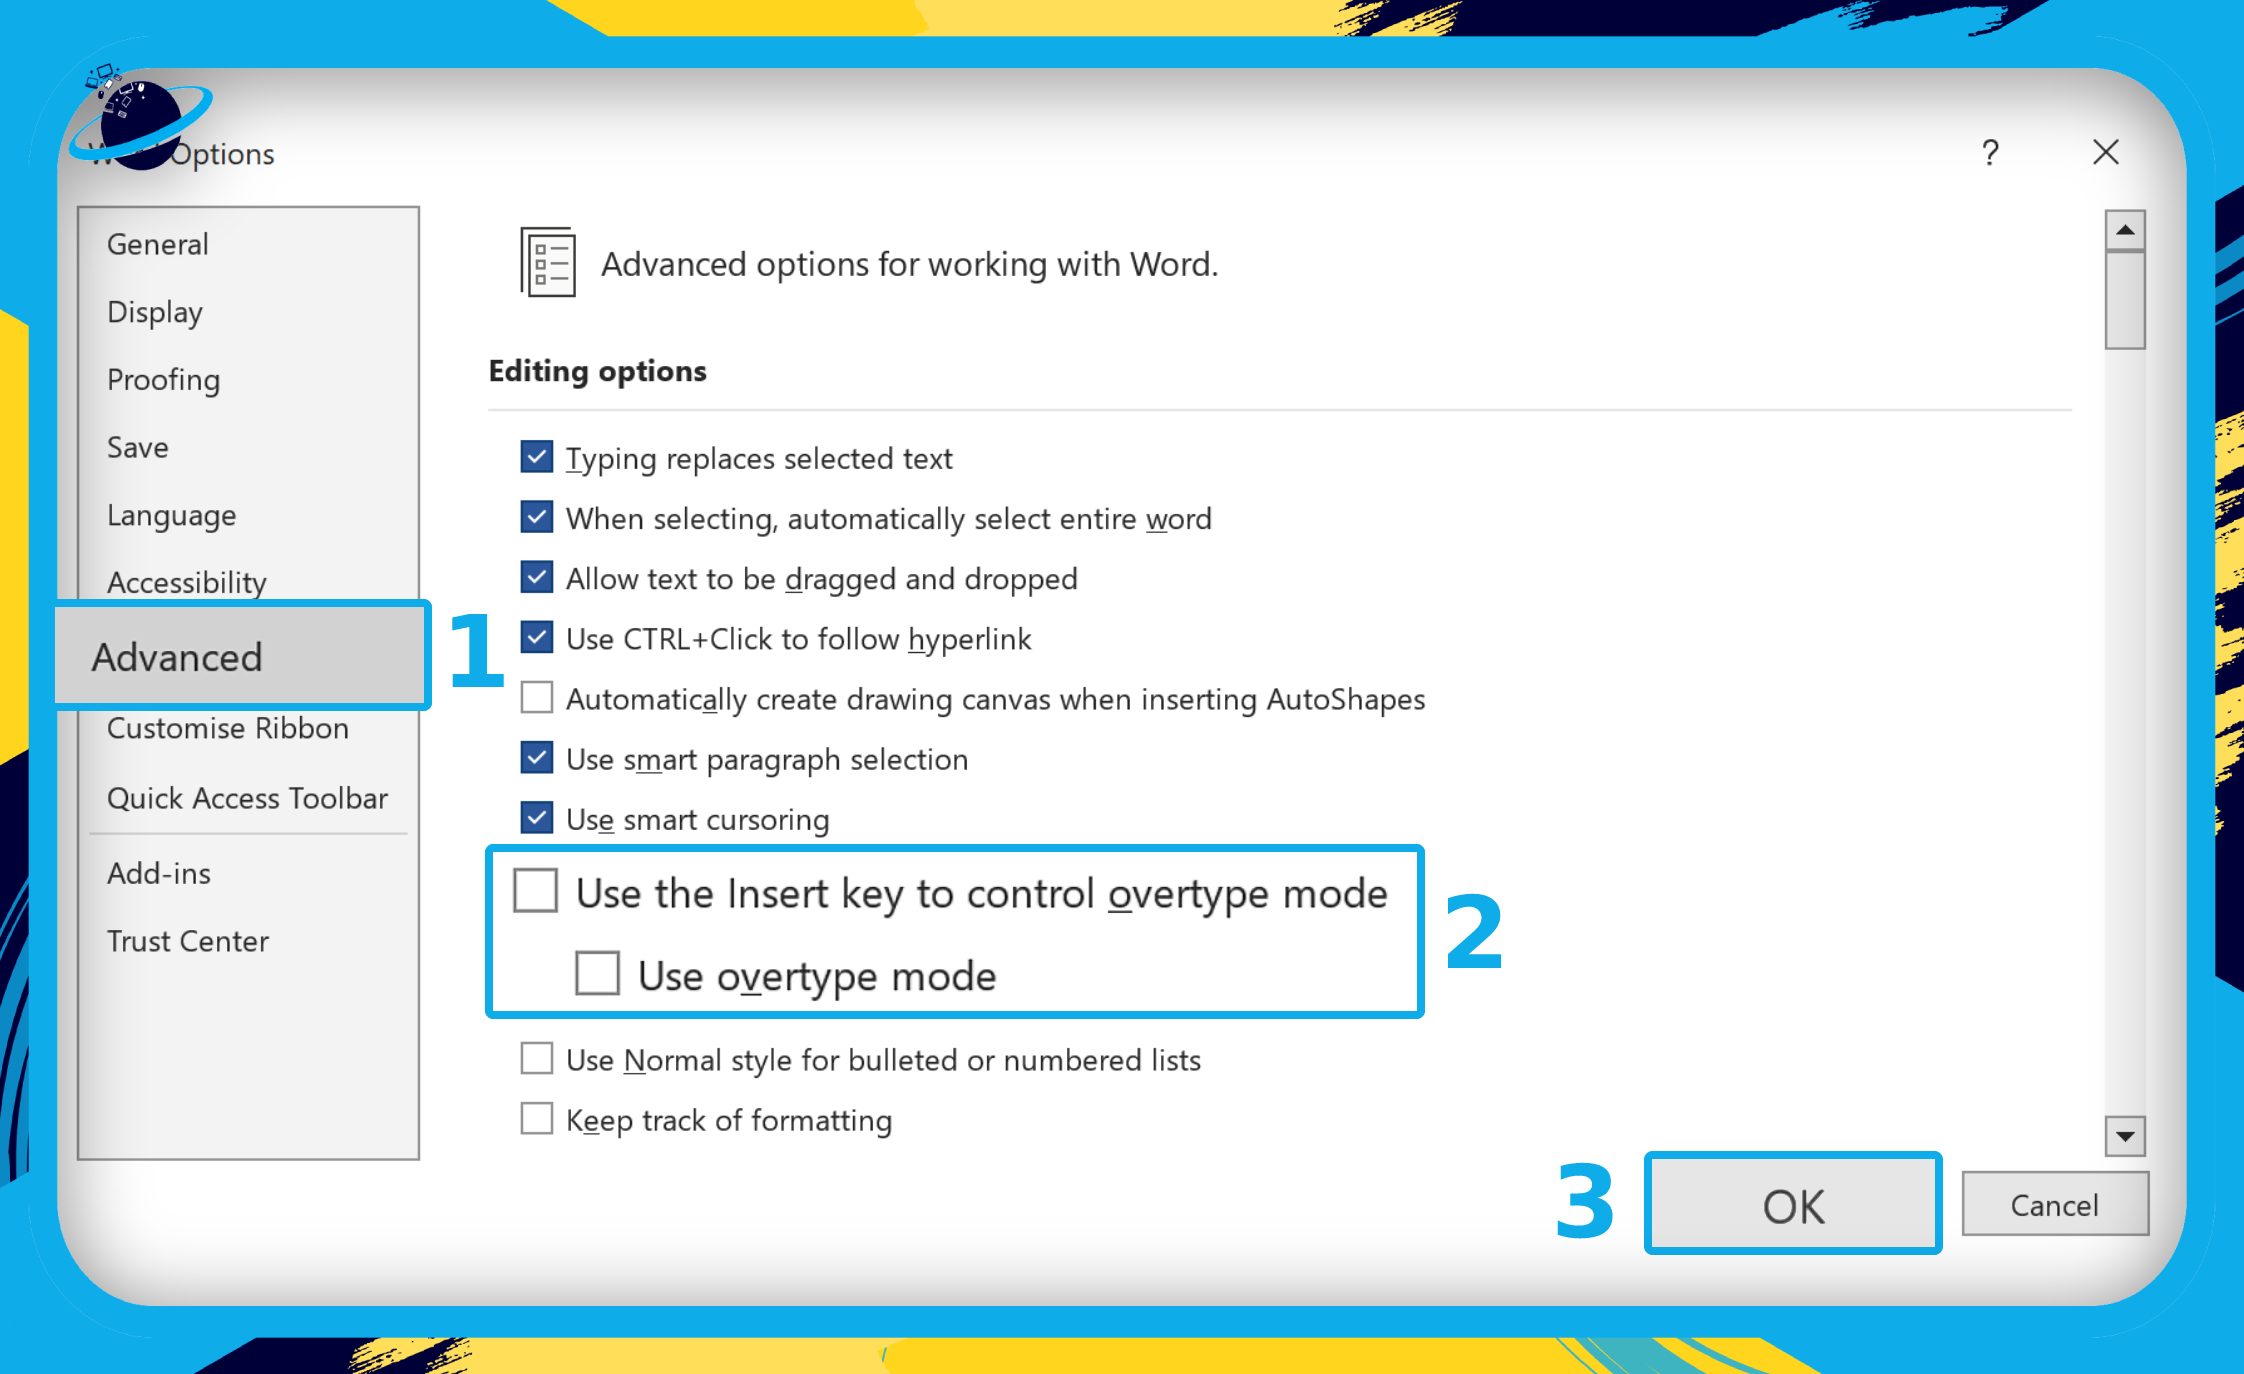
- Now click on “Advanced”.
- Clear the checks for “Use the Insert key to control overtype mode” and “Use overtype mode” under “Editing options.”
The process above will help to disable overtype and allow you to process your Word documents without persistent errors annoying you. Follow through for a more in-depth guide on how you can disable overtype mode in Word documents.
In-depth step by step process – Disable overtype mode
- Firstly, open a Word document and click “File” in the top left.
- Then go down and click “Options” at the bottom of the left menu.
- Go to the “Advanced” tab on the left. (1)
- Uncheck “Use the Insert key to control overtype mode.” (2)
- Uncheck “Use overtype mode.” (3)
Move your word files to a new location to fix words randomly disappearing and appearing
The issue may not even be persistent with Word it could be more associated with where the files are locally stored. Online locations such as OneDrive or Google are prone to issues surrounding sync and connectivity issues, if you ever come across sync issues with the program it can often impede your ability to properly use files or even access them at all. Follow the steps below and see if you can resolve issues around Word causing bits of text to disappear and then reappear.
To move files across to a new location follow the steps below
- Firstly open your File explorer or file finder tab.
- Now navigate over to where your file is stored.
- From there move the file over to a new location, preferably a local drive.
Once you have completed the steps above return to OneDrive and see if the process above has resolved the issue.
That’s it for this Blog thank you for taking time out to read our content, please feel free to email our team about how it went if you followed the steps or if you need more help with the questions we answered in this Blog.