Microsoft Word is a widely recognized and frequently utilized tool for documentation. It offers various functions that enhance user productivity and ensures high-quality document-based work. Microsoft Word also allows you to switch between languages. To learn how to change the language in Microsoft Word, refer to the guide below for a clear understanding of the process.
How to change text language in Word:
- Firstly, open the desktop version of Microsoft Word.
- Now click on “File.”
- From there, you need to click on “Options.”
- Now choose the option for “Language.”
- Firstly, open Microsoft 365.
- Then click your profile image in the top right.
- Select “View account” from the dropdown.
- Next, choose “Security and privacy.”
- Then, select “Display language” in the “Language and Region” tab.
- Afterward, you should click on “Change display language.”
- Choose one of the desired languages.
- Finally, click on the option for “Select” to conclude the process.
Below are the different methods to change the language in Microsoft Word. As shown earlier, the process is quite different for desktop and web versions. Read the guide below to better understand how you can change the language of the text in Microsoft Word for both the desktop and the web.
How to change text language in the desktop version of Word
You can edit the language preferences in the Options section using the desktop version of Microsoft Word. Microsoft Word has actively installed the language feature within the program, so you can change it depending on your language. The software is much more personalized to your specifications, depending on your desktop. Microsoft Word has implemented these certain features to help improve the program’s functionality.
![]() Note: if you don’t have the Word desktop application, you need to buy a license. Once you have a license, sign into microsoft.com with the Microsoft 365 account you purchased the license with. Then click “Install apps” on the home page (top-right), and select “Premium apps” from the dropdown.
Note: if you don’t have the Word desktop application, you need to buy a license. Once you have a license, sign into microsoft.com with the Microsoft 365 account you purchased the license with. Then click “Install apps” on the home page (top-right), and select “Premium apps” from the dropdown.
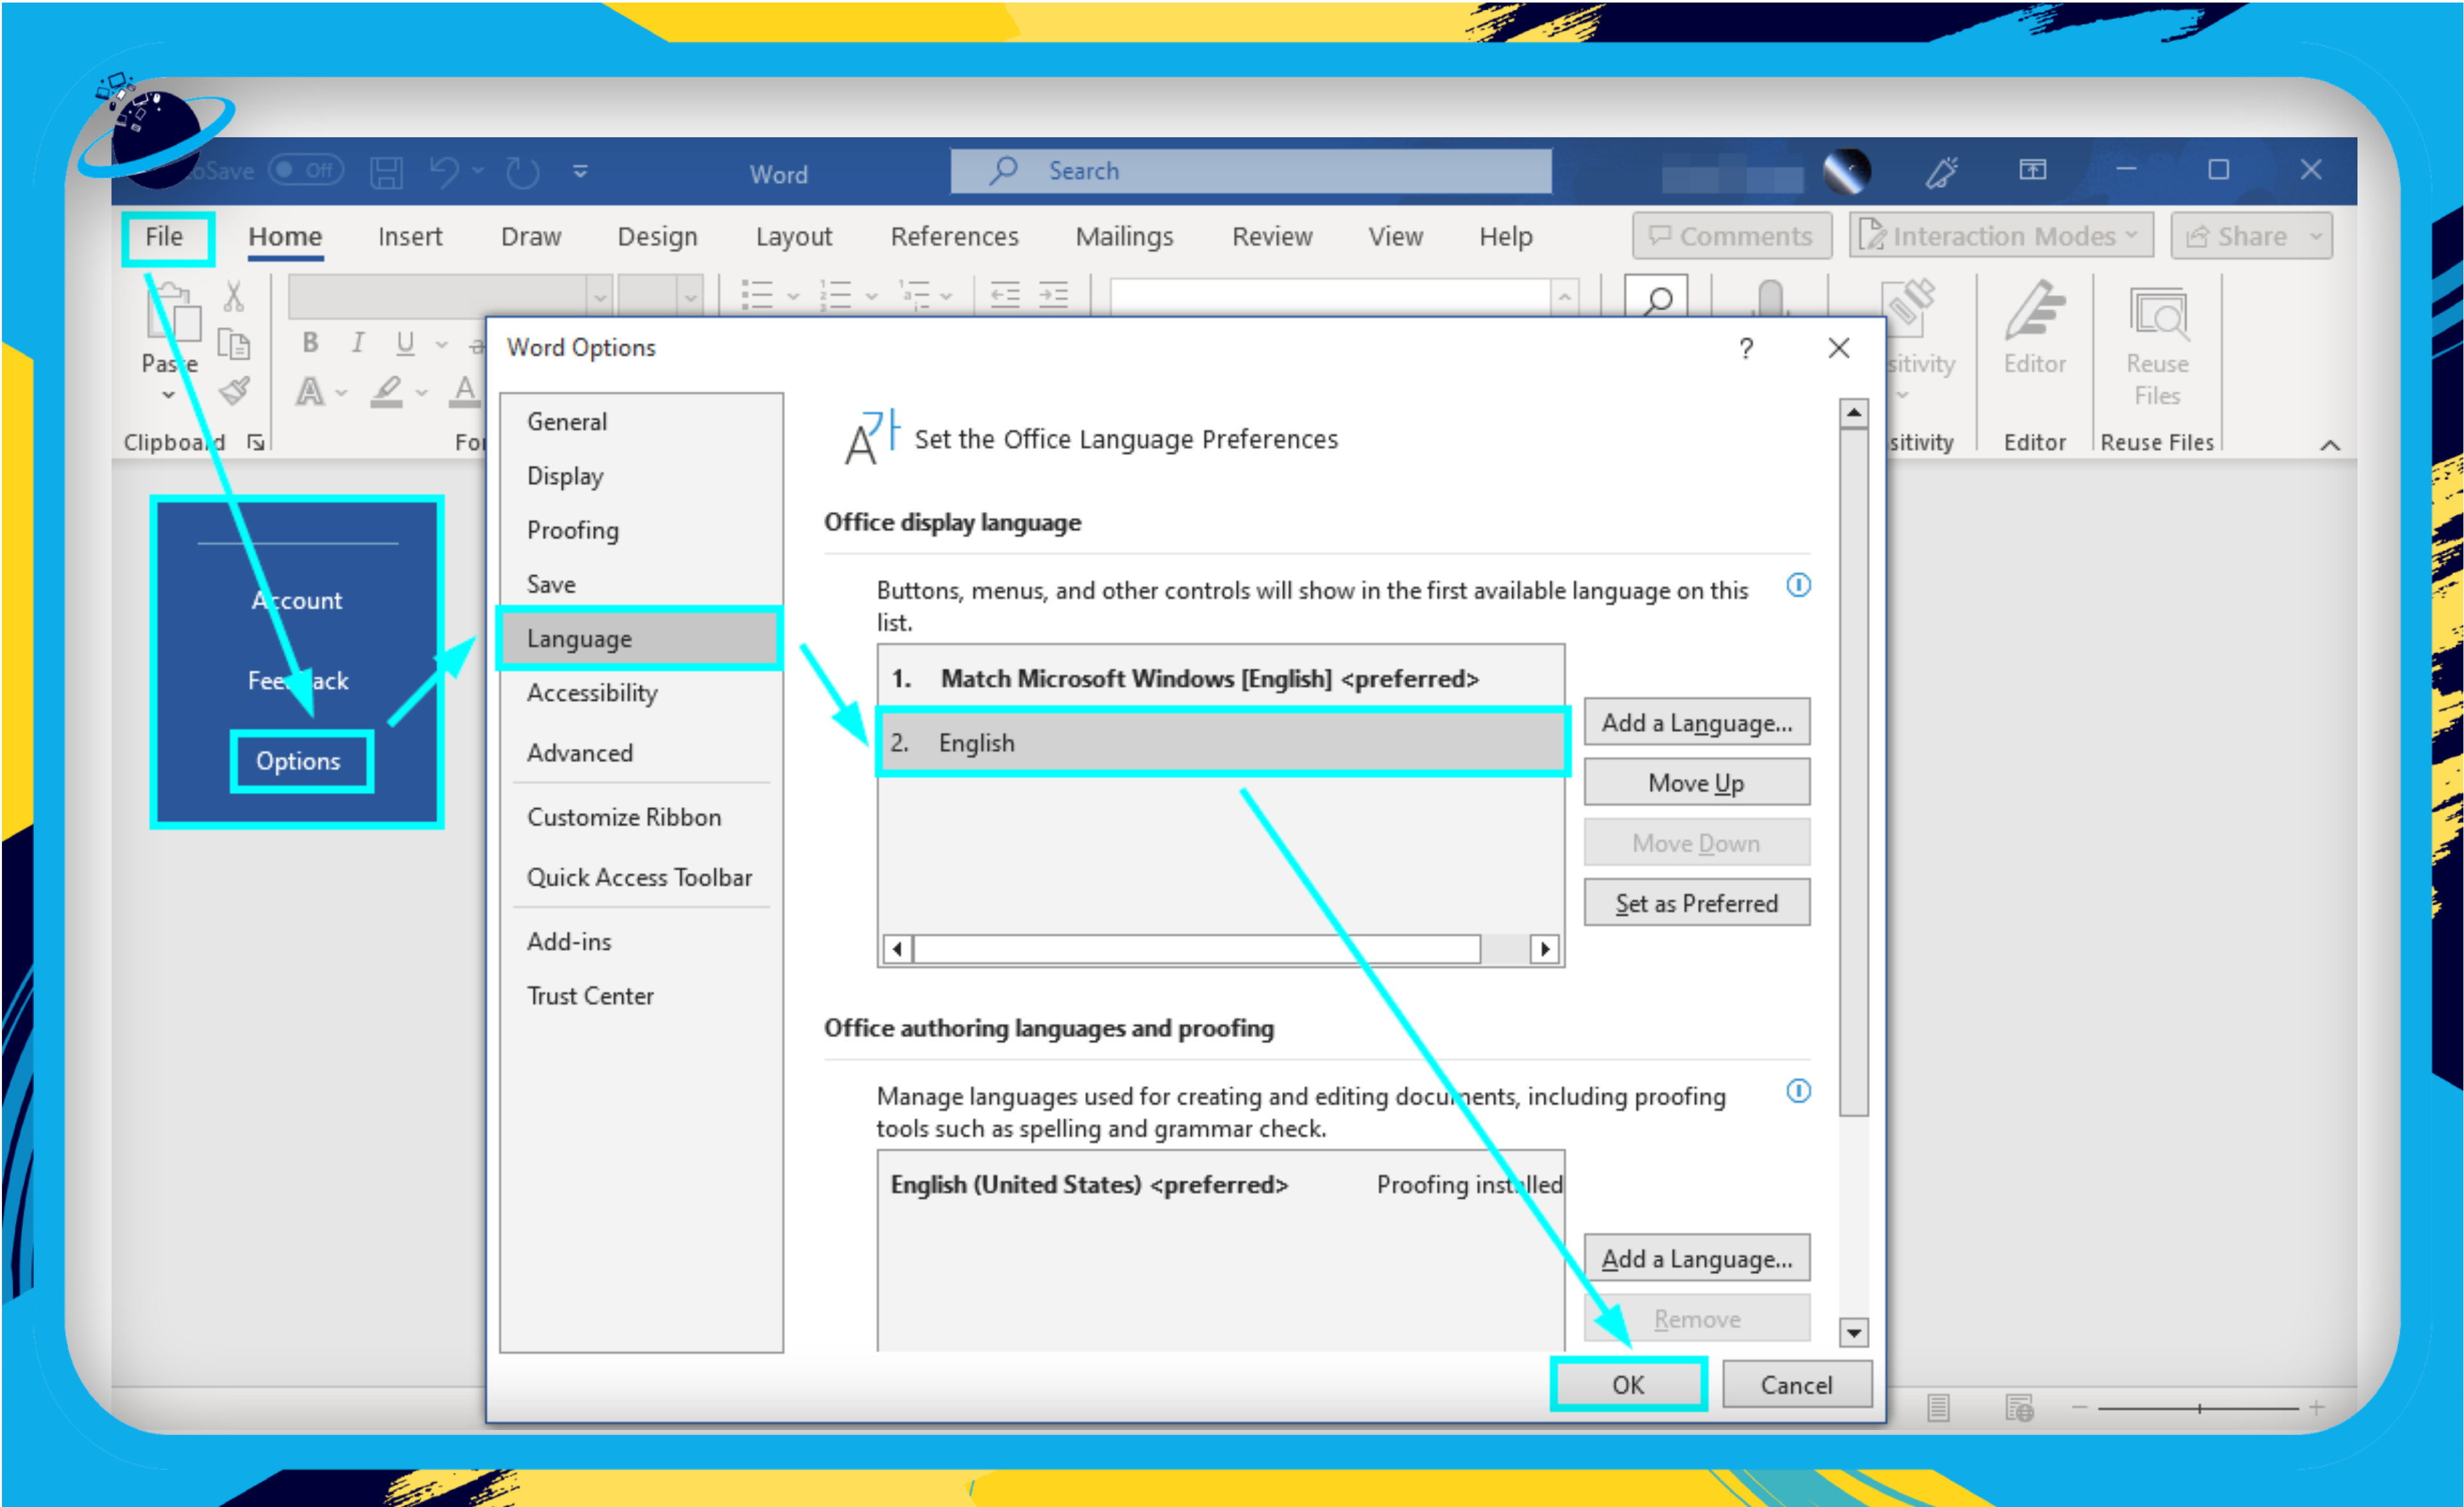
- Firstly, open the desktop version of Microsoft Word.
- Now click on “File.”
- From there, you need to click on “Options.”
- Now choose the option for “Language.”
- Select your preferred language.
- If your preferred language is not in the selection, you can simply click on “Add a language,” and then you will be able to add a new language. You can add a new language from the Microsoft directory, which includes all the additional languages that may not be default popular.
- Click on “OK” to complete the process.
After completing the necessary steps, you’ll be able to modify the language in Microsoft Word. The software will automatically adapt to the language you’ve selected. As you start typing in Word, you’ll be using your selected language.
If you need to switch back to the initial language, just repeat the same steps used to change the language. Moreover, you can add another language based on your needs. If the language you’re searching for isn’t listed by default, simply click “Add a language,” and you’ll be able to choose a new language from the provided options.

How to change text language in the web version of Word
If you’re using the web version of Microsoft Word or don’t have the desktop version, this guide can help you change the language. The process is similar to the one mentioned above, effectively translating your content into your chosen language. If your text isn’t in the desired language, use the following method on your document. For more information on altering the language of a Word document on the web, please refer to the guide below.
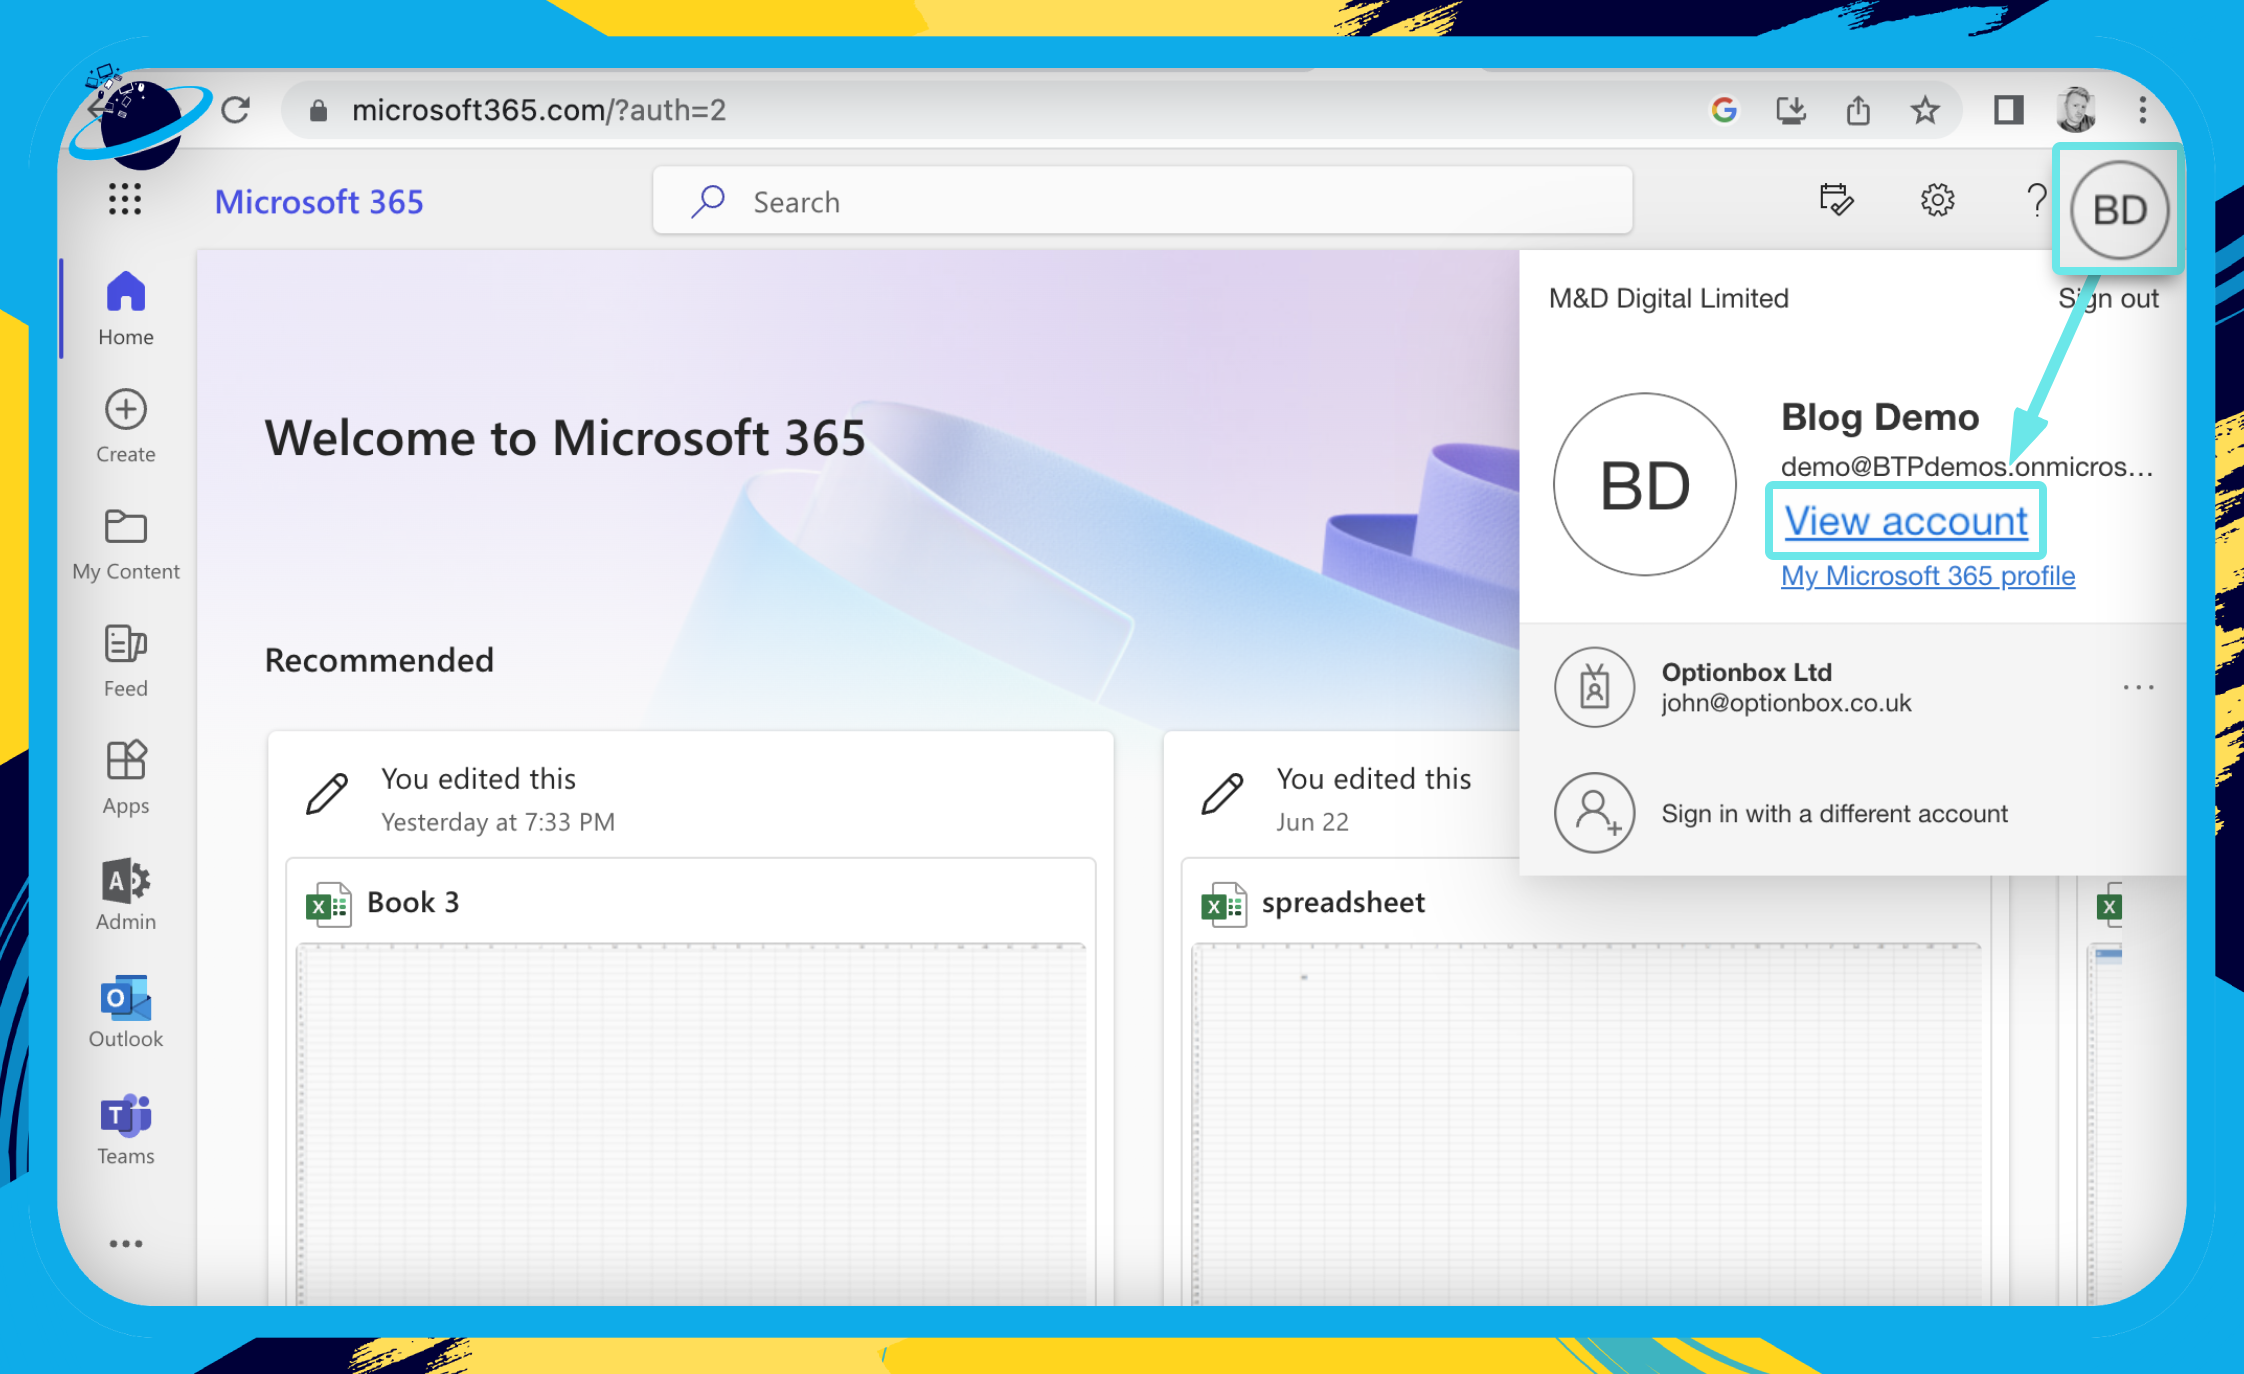
- Firstly, open Microsoft 365.
- Then click your profile image in the top right.
- Select “View account“ from the dropdown.
- Next, choose “Security and privacy.”
- Stay in the “Language and Region” tab.
- Click on “Display language.”
- Afterward, you should click on “Change display language.”
- Choose one of the desired languages.
- Finally, click on the option for “Select” to conclude the process.

Once you’ve finished the necessary procedures, you will have successfully altered the language of your text in the web version of Microsoft Word. However, it’s important to note that, unlike the desktop version, the web version of Microsoft Word lacks a direct language change feature within the app itself.
To modify the language in the web version, you must utilize the outlined method and OneDrive. After completing these procedures, you’ll have chosen your preferred language. This method ensures you select a language you fully understand, offering a more effective solution.
Keep in mind that these changes will affect all display-based content, transforming the language to your selected preference. Remember that these adjustments to the display language are universal, meaning they will impact your entire Office account.
Conclusion
Thank you for engaging with our guide on altering the text language in Microsoft Word.
We’ve outlined the procedures to switch languages for both the desktop and web versions of Microsoft Word. It’s crucial to note that these processes significantly differ.
For the desktop version, you have the ability to immediately adjust the language to your preference. On the other hand, in the web version, it’s necessary to use the translation process we’ve outlined.
Once you’ve executed the given steps, you will have effectively modified the language based on your specific needs.
If you encounter any challenges while following the instructions, please leave a comment below, and we’ll be sure to address them.