Whether you are connecting a brand new company device or starting in a new company and need to set it up on your network, it can be tricky to figure out what you need to do. Still, it can either be done during the computer set up or found in the computer settings. This guide will cover how you can do it for either method.
Follow the steps of this guide below to find out how to connect a Windows PC to Azure Active Directory, this is a Windows-only method as it requires you to use a Windows OS, and it can only be done in the “Settings” menu.
- To start, sign into the computer with your login details, then search or go to “Settings.”
- Next, go to “Accounts.”
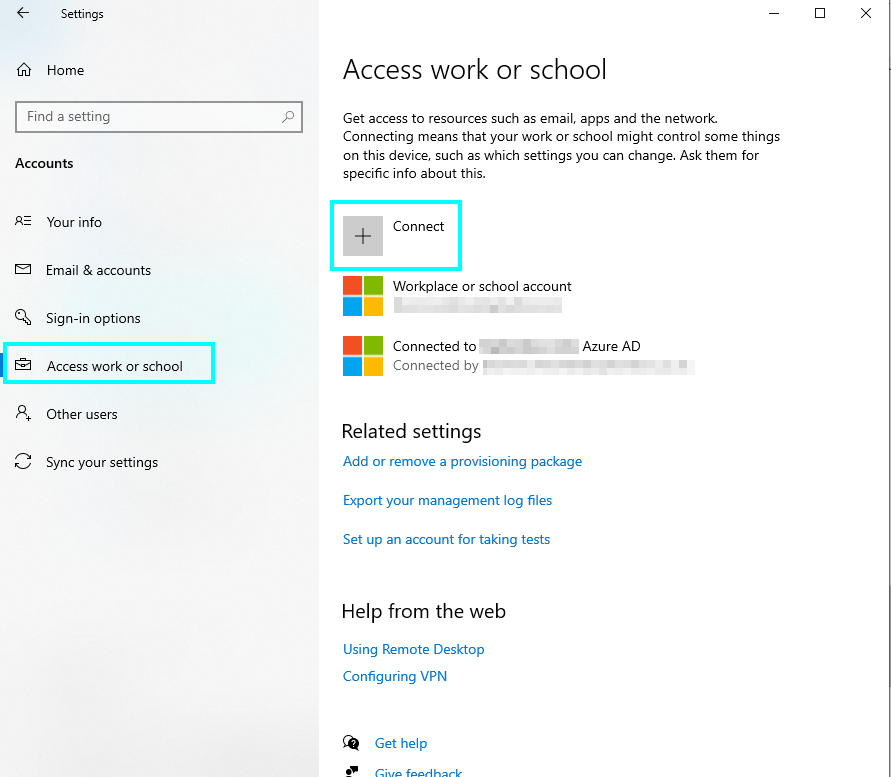
- After this choose “Access work or school,” then click on “Connect.”
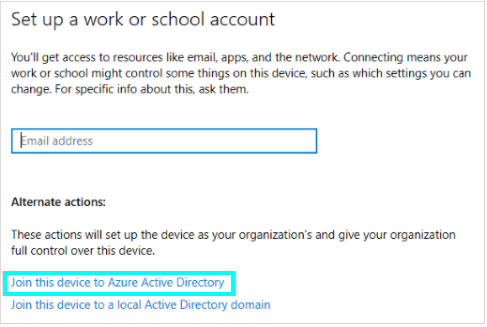
- Now, when it says “Set up a work or school account”, choose the option “Join this device to Azure Active Directory.”
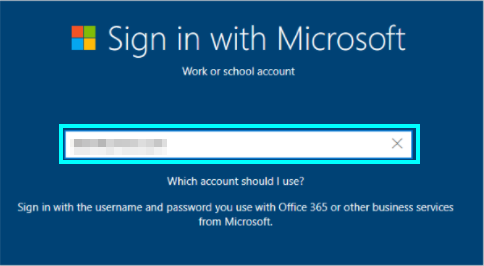
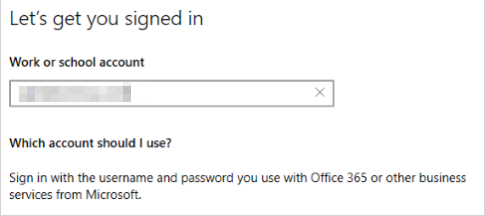
- At this stage, you need to enter the work/school email address you want to connect, then press next.
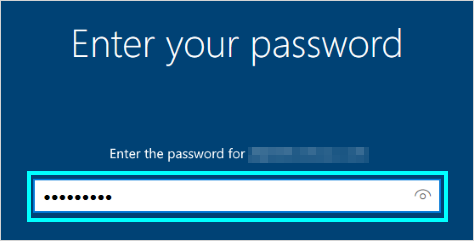
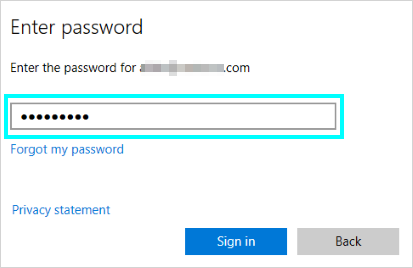
- Next, enter your password and click Sign in
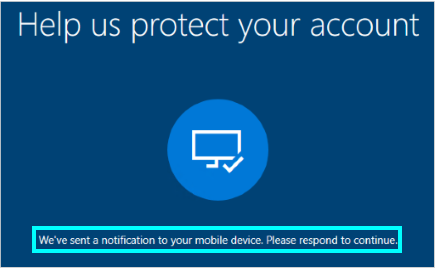
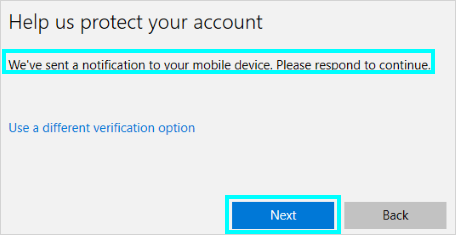
- Using your mobile phone, you need to approve the sign in to continue, or click “use a different verification option.”
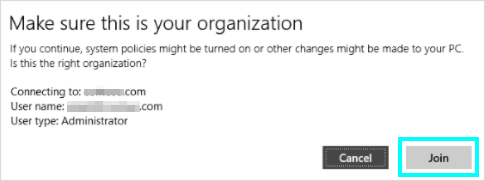
- While on the “Make sure this is your organisation” page, check all the information including where it is connecting to, the username and the user type is correct.
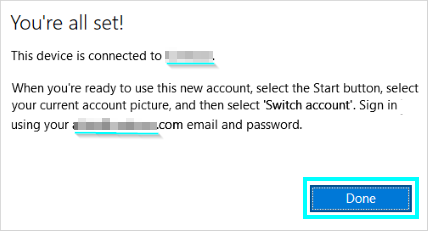
- Finally, press “Done” on the “You’re all set!” screen.
Throughout this blog post, I’ll explain more about what Azure Active Directory is and what it allows you to do.
Content List
- What is Azure Active Directory
- Who is Azure AD made for?
- What is the difference between Azure AD and Active Directory Domain Services?
- How to connect a Windows PC to Azure AD (step-by-step with screenshots)
- Conclusion
What is Azure Active Directory?
Azure Active Directory is a cloud-based Microsoft software tool that is an access management service. Azure AD is one of the more essential background features of the Office 365 system. Azure AD lets your staff access external resources that they usually wouldn’t. For instance, other than Microsoft 365, the Azure Portal, and SaaS applications (these are known as “Software as a Service”). Some examples of these include “Dropbox,” “Canva,” “Google Apps,” and “Zoom.” Another thing that Azure Active Directory gives you is access to internal resources, such as apps on your intranet and local network or any cloud-based apps that your company has created.
Before I go any further with Azure AD, I should go over “Active Directory.” Active Directory is a set of services but mainly a database that allows users to connect with resources they need for the job on the network. Azure Active Directory is a cloud-based Microsoft software tool that is an access management service. Azure AD is one of the more essential background features of the Office 365 system; Azure Active Directory is a cloud-based Microsoft software tool and access management service; Windows AD is also the precursor to Azure AD, released in 2000.
The AD database contains data and information that is essential to your environment. The database contains data on your business environment that includes things like the linked equipment, such as the number of computers on the system, its users, their privileges, and what they have access to. This could be, for example, a list of 20 people and their accounts that showcases their details as well as their contact lists and their permissions.
This service affects most of the content you can access on a windows device. It checks that the person using the software has the correct permissions and they are who they say they are. It does this by checking that the ID and password are correct and they have authorization for it.

Who is Azure AD made for?
Azure AD is mainly meant to be used by a few demographics, primarily based in a business; these include subscribers to Microsoft 365, Azure, Office 365, and Dynamics CRM Online. Azure AD is also meant for App Developers and IT admins. These types of users will all use it in different ways to each other for example; an IT admin would use it for more in-depth and managerial purposes than someone who is just subscribed to Office 365 and wouldn’t use it as much.
The different types of users and how they make use of Azure AD.
- Subscribers to Microsoft and Office 365, Dynamic CRM Online and Azure – If you are a subscriber to any of these software/services then you are already making use of Azure Acitve Directory; because every person that has a subscription to these is a tenant to Azure AD. This means that from the moment you start a subscription to one of these, you can then begin to control your access over the cloud applications you have integrated.
- IT admins – If you an IT administrator, then Azure AD can benefit you as it will let you manage your access over the apps you have and the app resources, depending on what requirements you have for your business. One example of this the ability to make it so that all members of staff must use two factor authentication or multi-factor authentication whenever they need to access resources like signing into an app or software. An IT admin can also set it up so certain people have access to content that others don’t depending on their position or if they need to access it. Another important feature of Azure AD is the ability to allow its users to set it automatically to protect peoples identities and sign in details.
- App developers – Finally, if you are an App developer then you can make use of it as it one of Azure AD’s functions is to add the “SSO” or Single sign-on function to your application, which lets it sign in with just the users pre-establied login details. Another feature that app developers can use is the use of “API”s, also known as Application Programming Interface, this allows users to build an app to be more personalised by using current data that your business has.
How to connect a Windows PC to Azure Active Directory — with Screenshots
When you are using a new Windows 10 device at work or school, registering it onto the local network will give you access to the resources on your account. It will then allow your device to join the network so you can use your credentials to sign in. If you are using a brand new Windows 10 device that needs to be set up, the next step is to use the “Windows Out of Box Experience,” You can make your device join your network. There are only a few steps to do this, but you will need to make sure that it is done after you have completed it.
- Firstly, power on your new device and start the “WOOBE” process.
- Next, enter your school or work email address
- Then you’ll need to “Enter your password” for your account
- Now, using a mobile device you will need to approve the sign in to allow it access to your account.
- Finally, complete the rest of the “WOOBE” experience, this includes privacy settings as well as Windows Hello, if you choose to. After you have followed these steps your device will be connected to the network.
Read after the following method for “how to check if your account is connected.”
How to connect a configured device to Azure AD – with screenshots
If you are on a Windows 10 device already set up, this is the following method.
- To start, sign into the computer with your login details, then search or go to “Settings.”

- Next, go to “Accounts.”

- After this choose “Access work or school,” then click on “Connect.”
- Now when it says “Set up a work or school account”, choose the option “Join this device to Azure Active Directory.”
- At this stage you need to enter the work/school email address you want to connect, then press next.
- Next, enter your password and click sign in
- Using your mobile phone, you need to approve the sign in to continue, or click “use a different verification option.”
- While on the “Make sure this is your organisation” page, check all the information including where it is connecting to, the username and the user type is correct.
- Finally, press “Done” on the “You’re all set!” screen.
That is the method for setting your account on your Windows 10 device, now to make sure that everything is entirely correct, and for both methods, here is how you to check that the methods worked.
How to make sure that your account and device has joined Azure AD
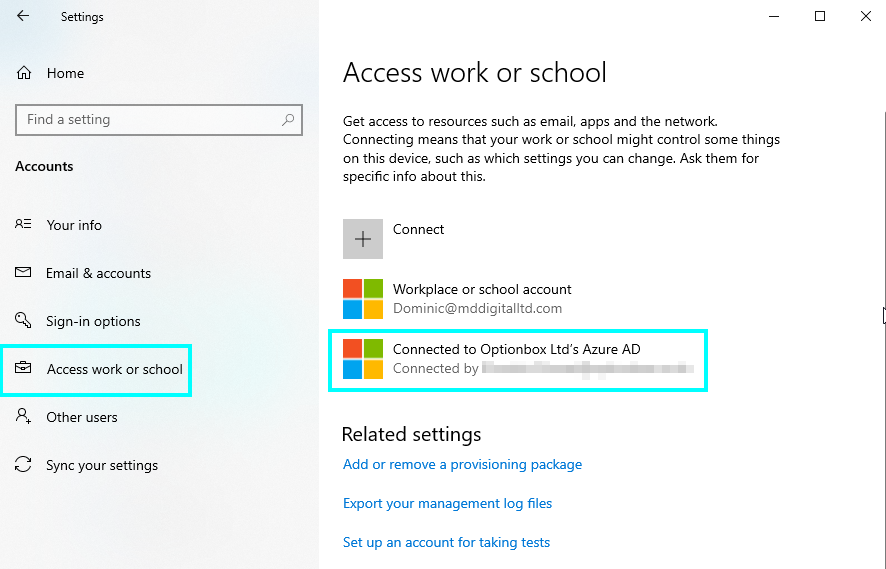
- To start, go to “Settings”, then accounts.
- Then go on “Access work or school,” and on the right if the steps have worked, it will say”Connected to (name of your organisation)’s Azure AD.”
Conclusion
Azure AD as a database can perform different tasks depending on what the user needs to gain from it. While it may sound confusing at first, Azure AD and AD perform essential background tasks when you need them to, so it is worth it to connect your account to it. This function can be done with a new or already signed-in device.
Thank you very much for taking the time to read through this guide. If you have reached the end, feel free to contact our staff if you have any questions or queries about this or other topics, we also have a wealth of other articles and guides for you that could solve any other tech problems you may have.