 Key Takeaways
 Office error 0-2054 is sometimes encountered when using Office Deployment Tool (ODT) to install Microsoft Office. To avoid the error, try
 ![]() installing Office from your account.
installing Office from your account.
 If you want to continue using ODT, ensure that old Office installations have been uninstalled. And ensure that your firewall or antivirus are not preventing the installation. [More…]

Error code 0-2054 is associated with a problem during the installation of Microsoft 365. And the error can prevent users from gaining access to all their Office products. So, in this article, we will discuss what causes error 0-2054, the potential risks, and how to resolve the error.
How to fix Office 365 error code 0-2054
- Use your Microsoft 365 account to install your Office products
- Add the Office installer to your antivirus exclusions
- Temporarily disable your firewall to fix error 0-2054
- Delete the Office folder in AppData\Roaming\Microsoft
- Use Registry Editor to fix error 0-2054
Please continue reading for a visual step-by-step guide on fixing Office 365 error code 0-2054. We have also created a video to help guide you through the process:

What causes the Office 365 error code 0-2054?
You may sometimes run into the 0-2054 error while using the ![]() Office Deployment Tool (ODT) to install Microsoft 365. Some common causes include a firewall blocking the installation, network issues, or a pre-existing Office installation that is corrupted or incorrectly installed.
Office Deployment Tool (ODT) to install Microsoft 365. Some common causes include a firewall blocking the installation, network issues, or a pre-existing Office installation that is corrupted or incorrectly installed.
If you are using ODT, you could remove the tool from your device and proceed with a manual installation of your Microsoft 365 software by ![]() signing into your Microsoft 365 account. But if you wish to continue using ODT, we have some effective solutions for you to try.
signing into your Microsoft 365 account. But if you wish to continue using ODT, we have some effective solutions for you to try.
How to fix Office 365 error code 0-2054
We’ve put together a list of the most effective solutions for the 0-2054 error in Microsoft 365. If the first solution doesn’t work, please proceed to the next solution.
![]() Important: before you begin, please ensure that any existing Office 365 installations are uninstalled. To uninstall Office, go to
Important: before you begin, please ensure that any existing Office 365 installations are uninstalled. To uninstall Office, go to ![]() Start >
Start > ![]() Settings > Apps.
Settings > Apps.
 Solution 1: Use your Microsoft 365 account to install your Office products
If you want to continue using the ODT to install Microsoft 365 products, please proceed to the next solution. Otherwise, please continue with the steps below to install your Microsoft software using an alternative method.
- First,
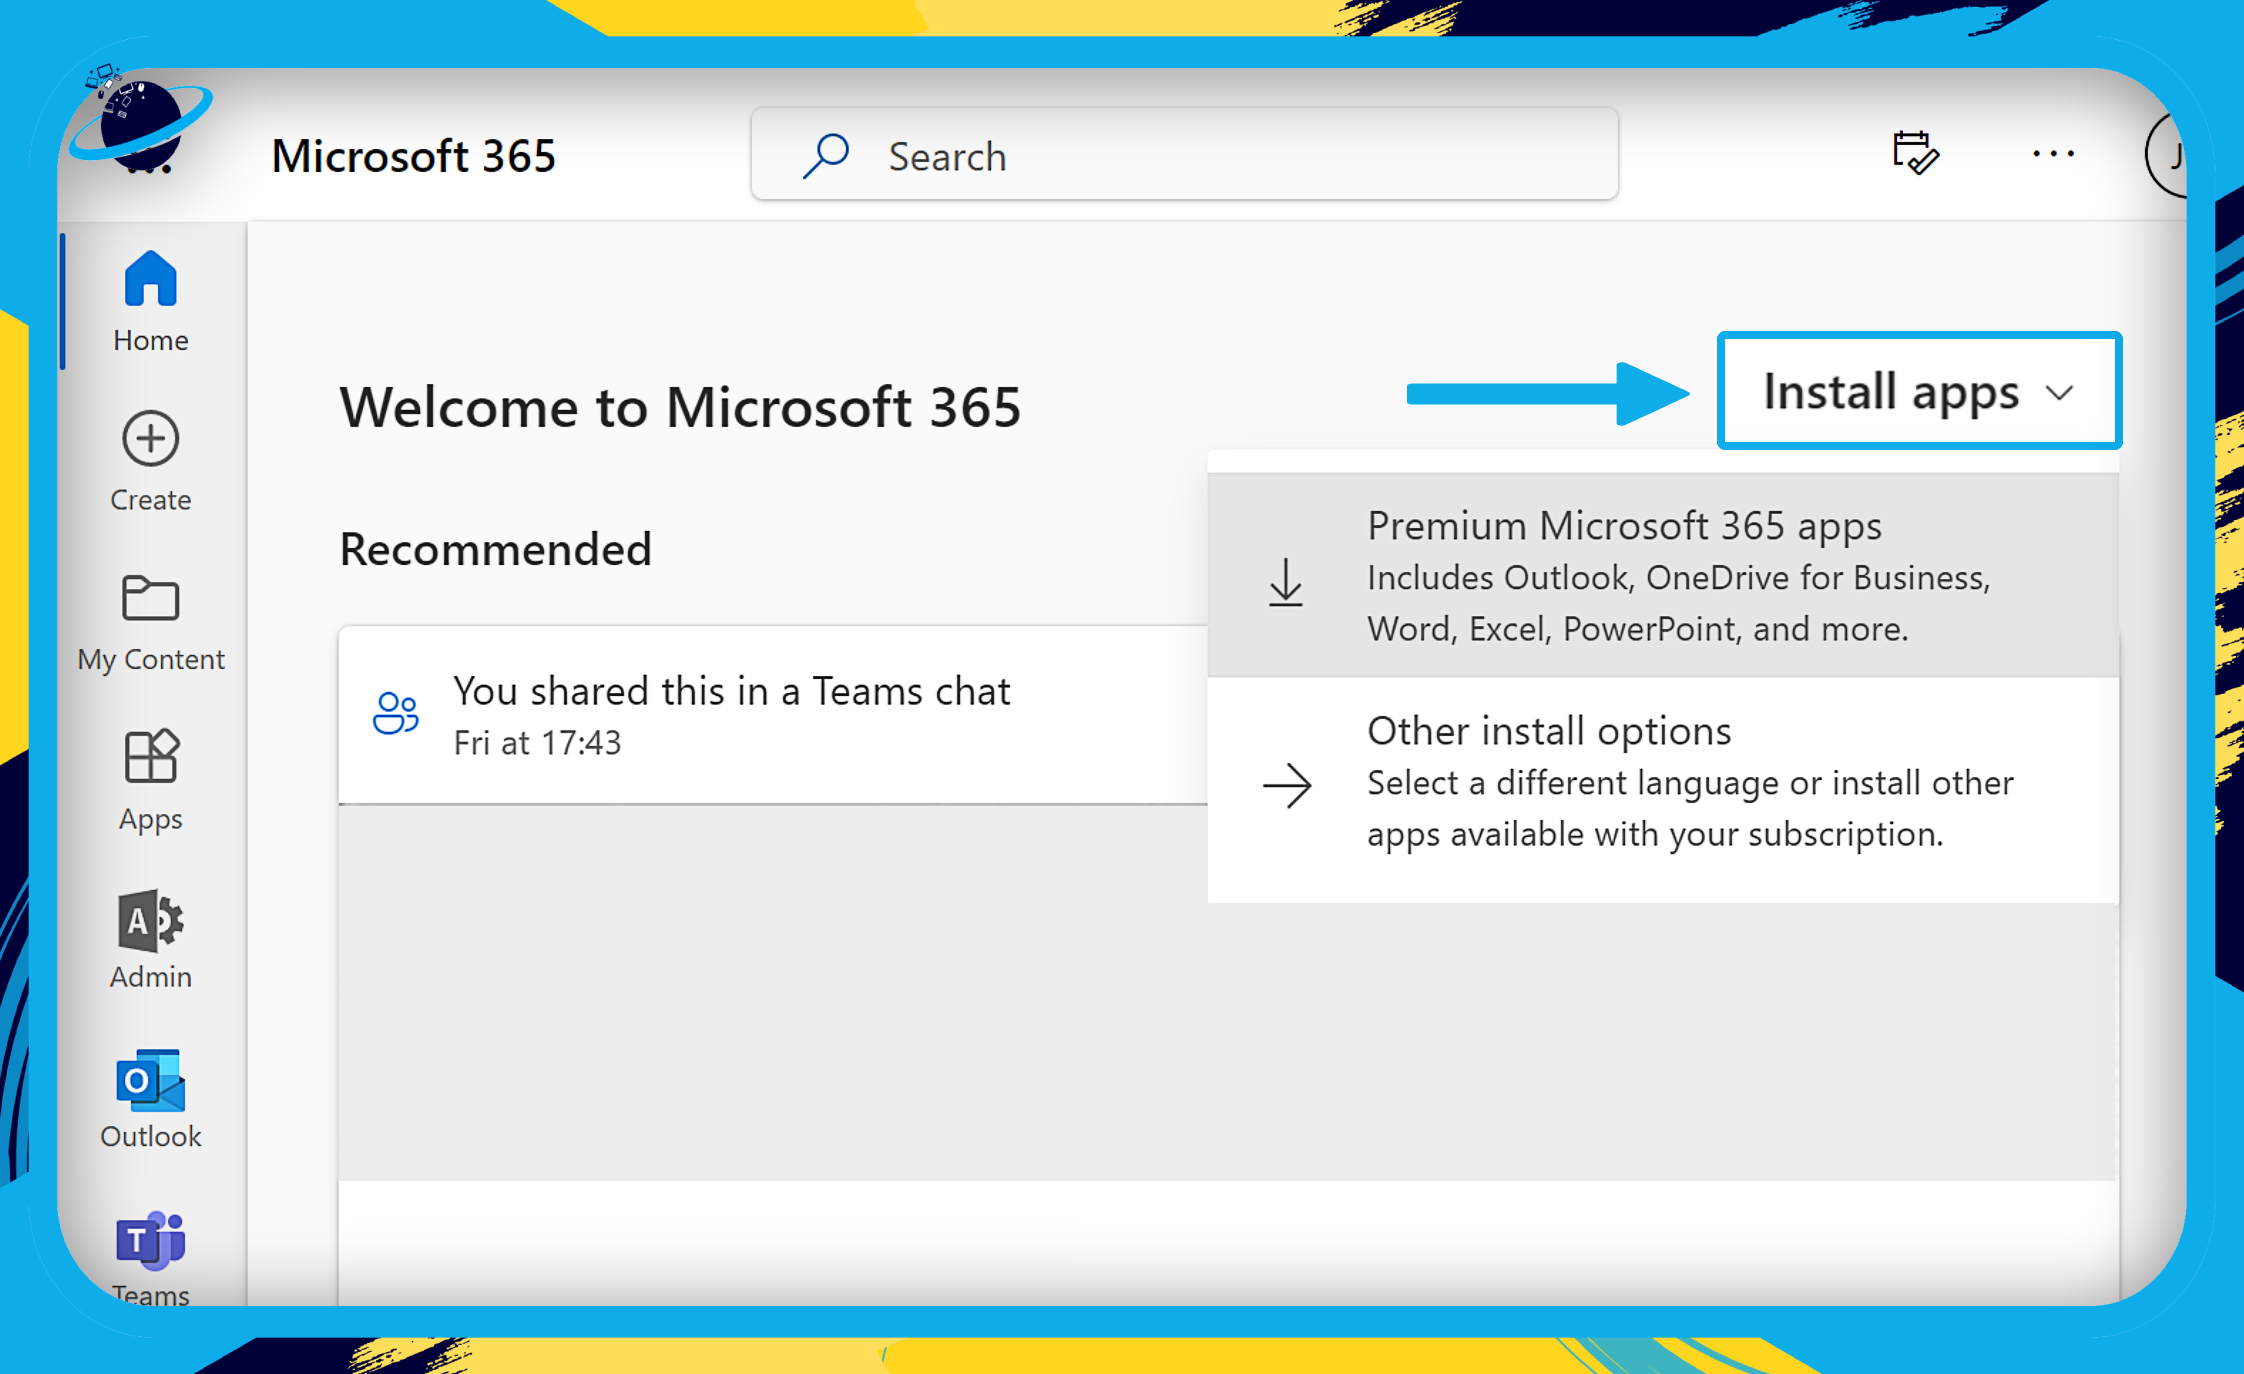
 sign into your Microsoft 365 account.
 - Then click on “Install apps,” located in the top-right of the window.
- You will see two options in the dropdown menu:
- Premium Microsoft 365 apps.
- Other install options.
If you want to download the installer without changing the language or bit-version, select “Premium Microsoft 365 apps.” Otherwise, if you want to set a specific language, or if you want to find out which products and licenses you have, click on “Other install options.”
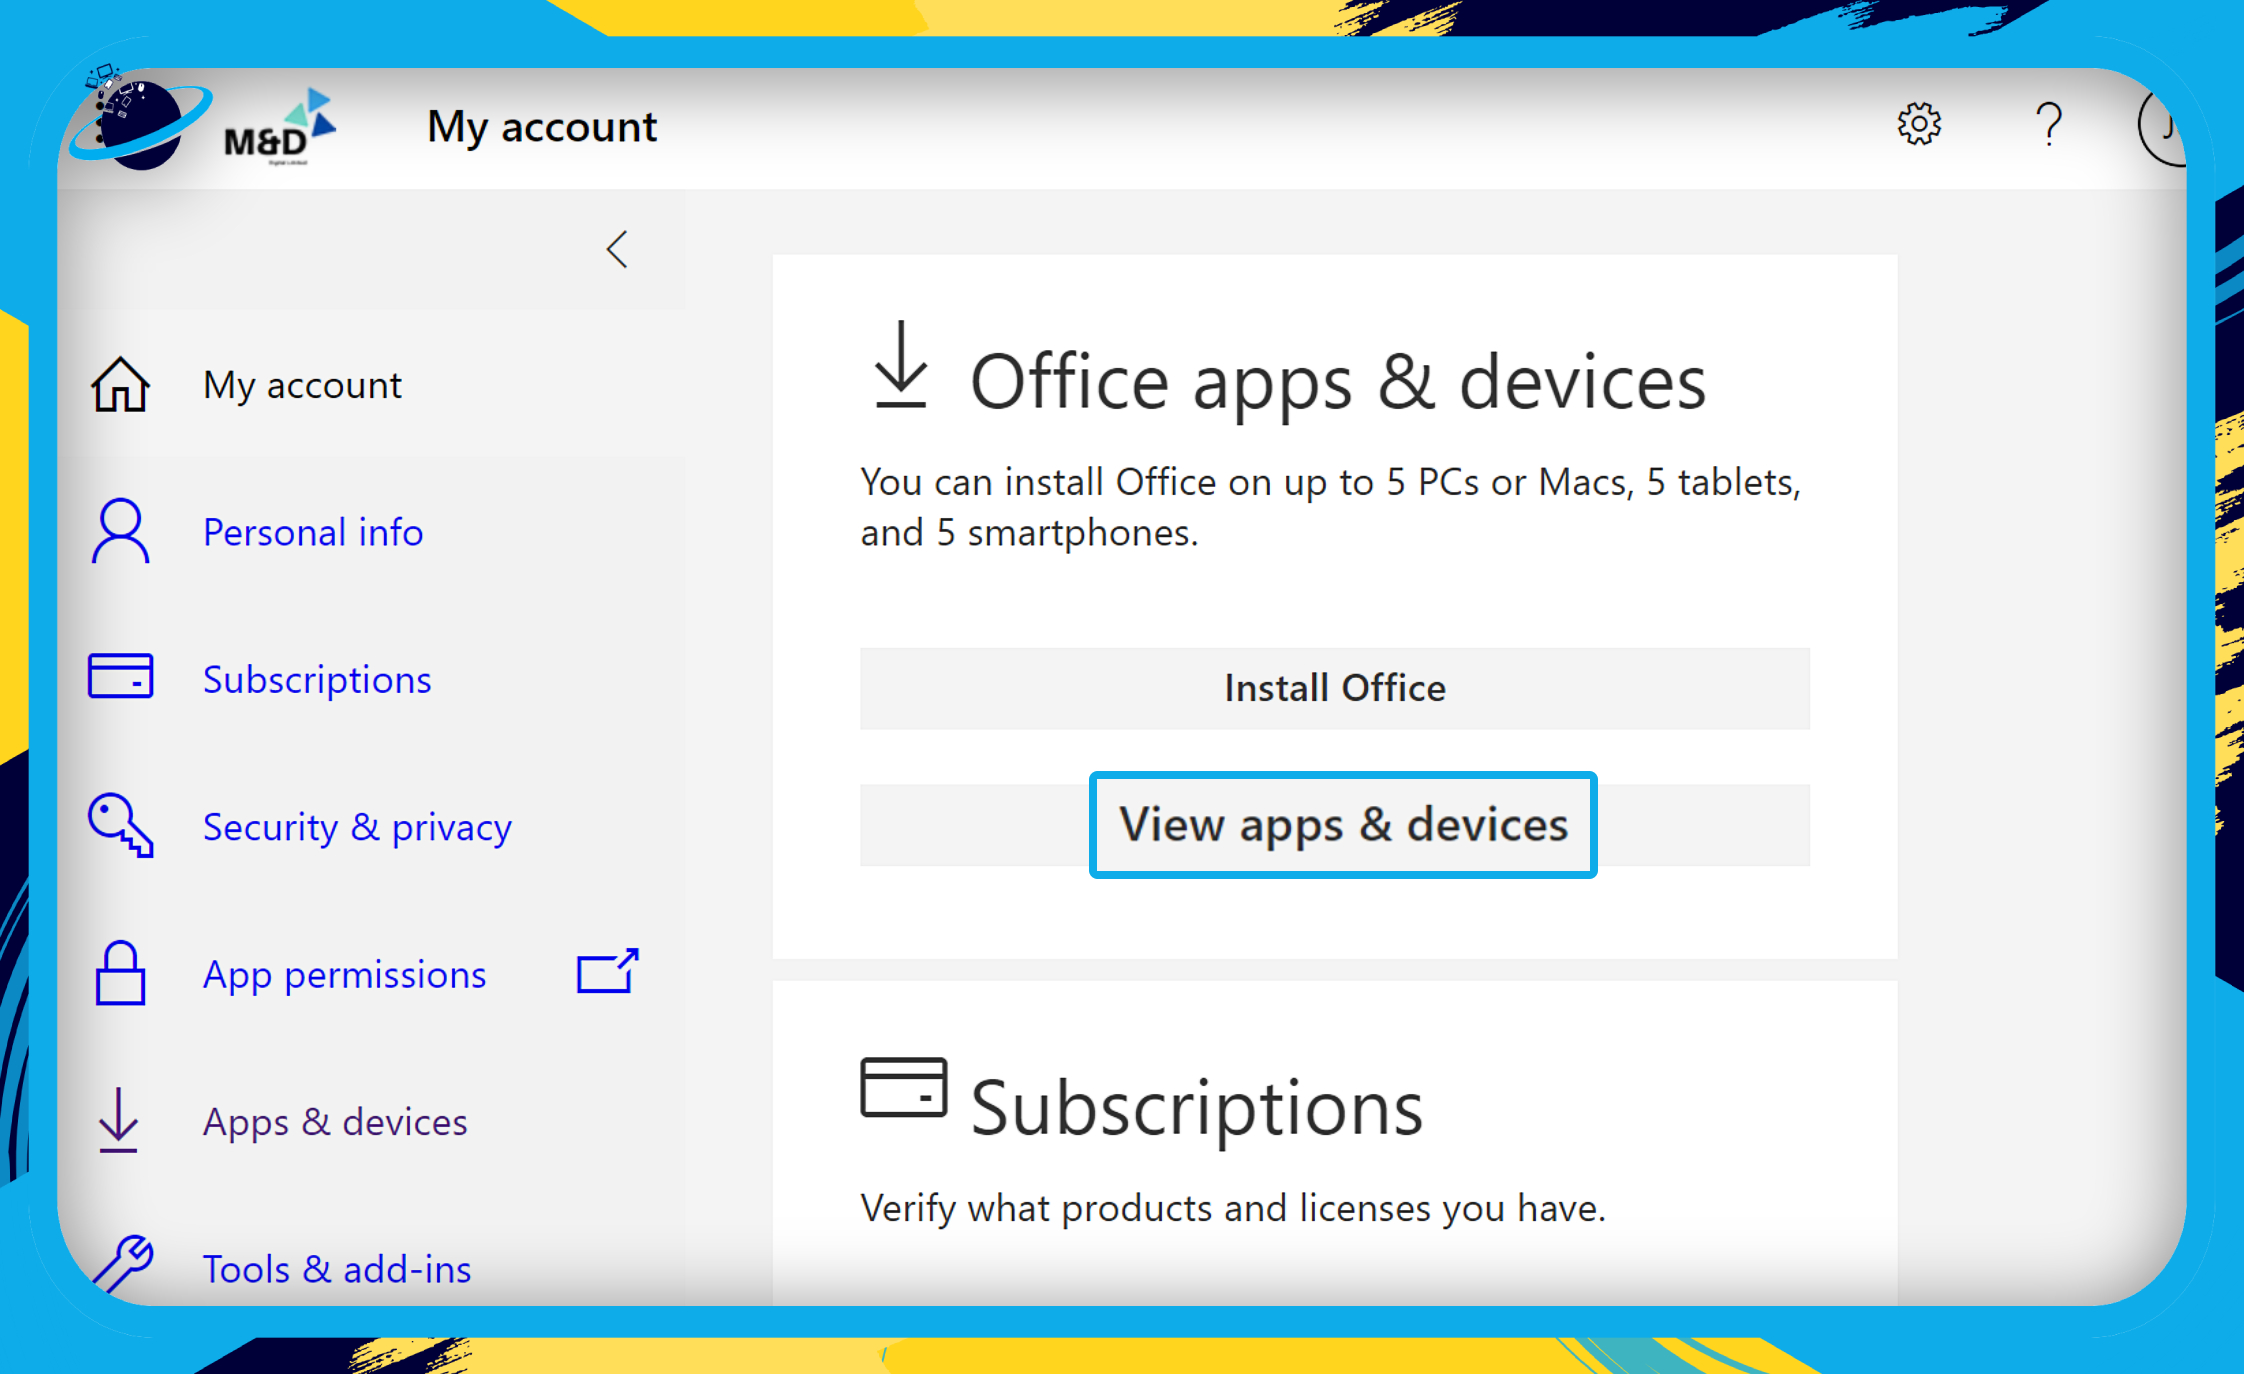
- Click “View apps & devices” after selecting “Other install options.”
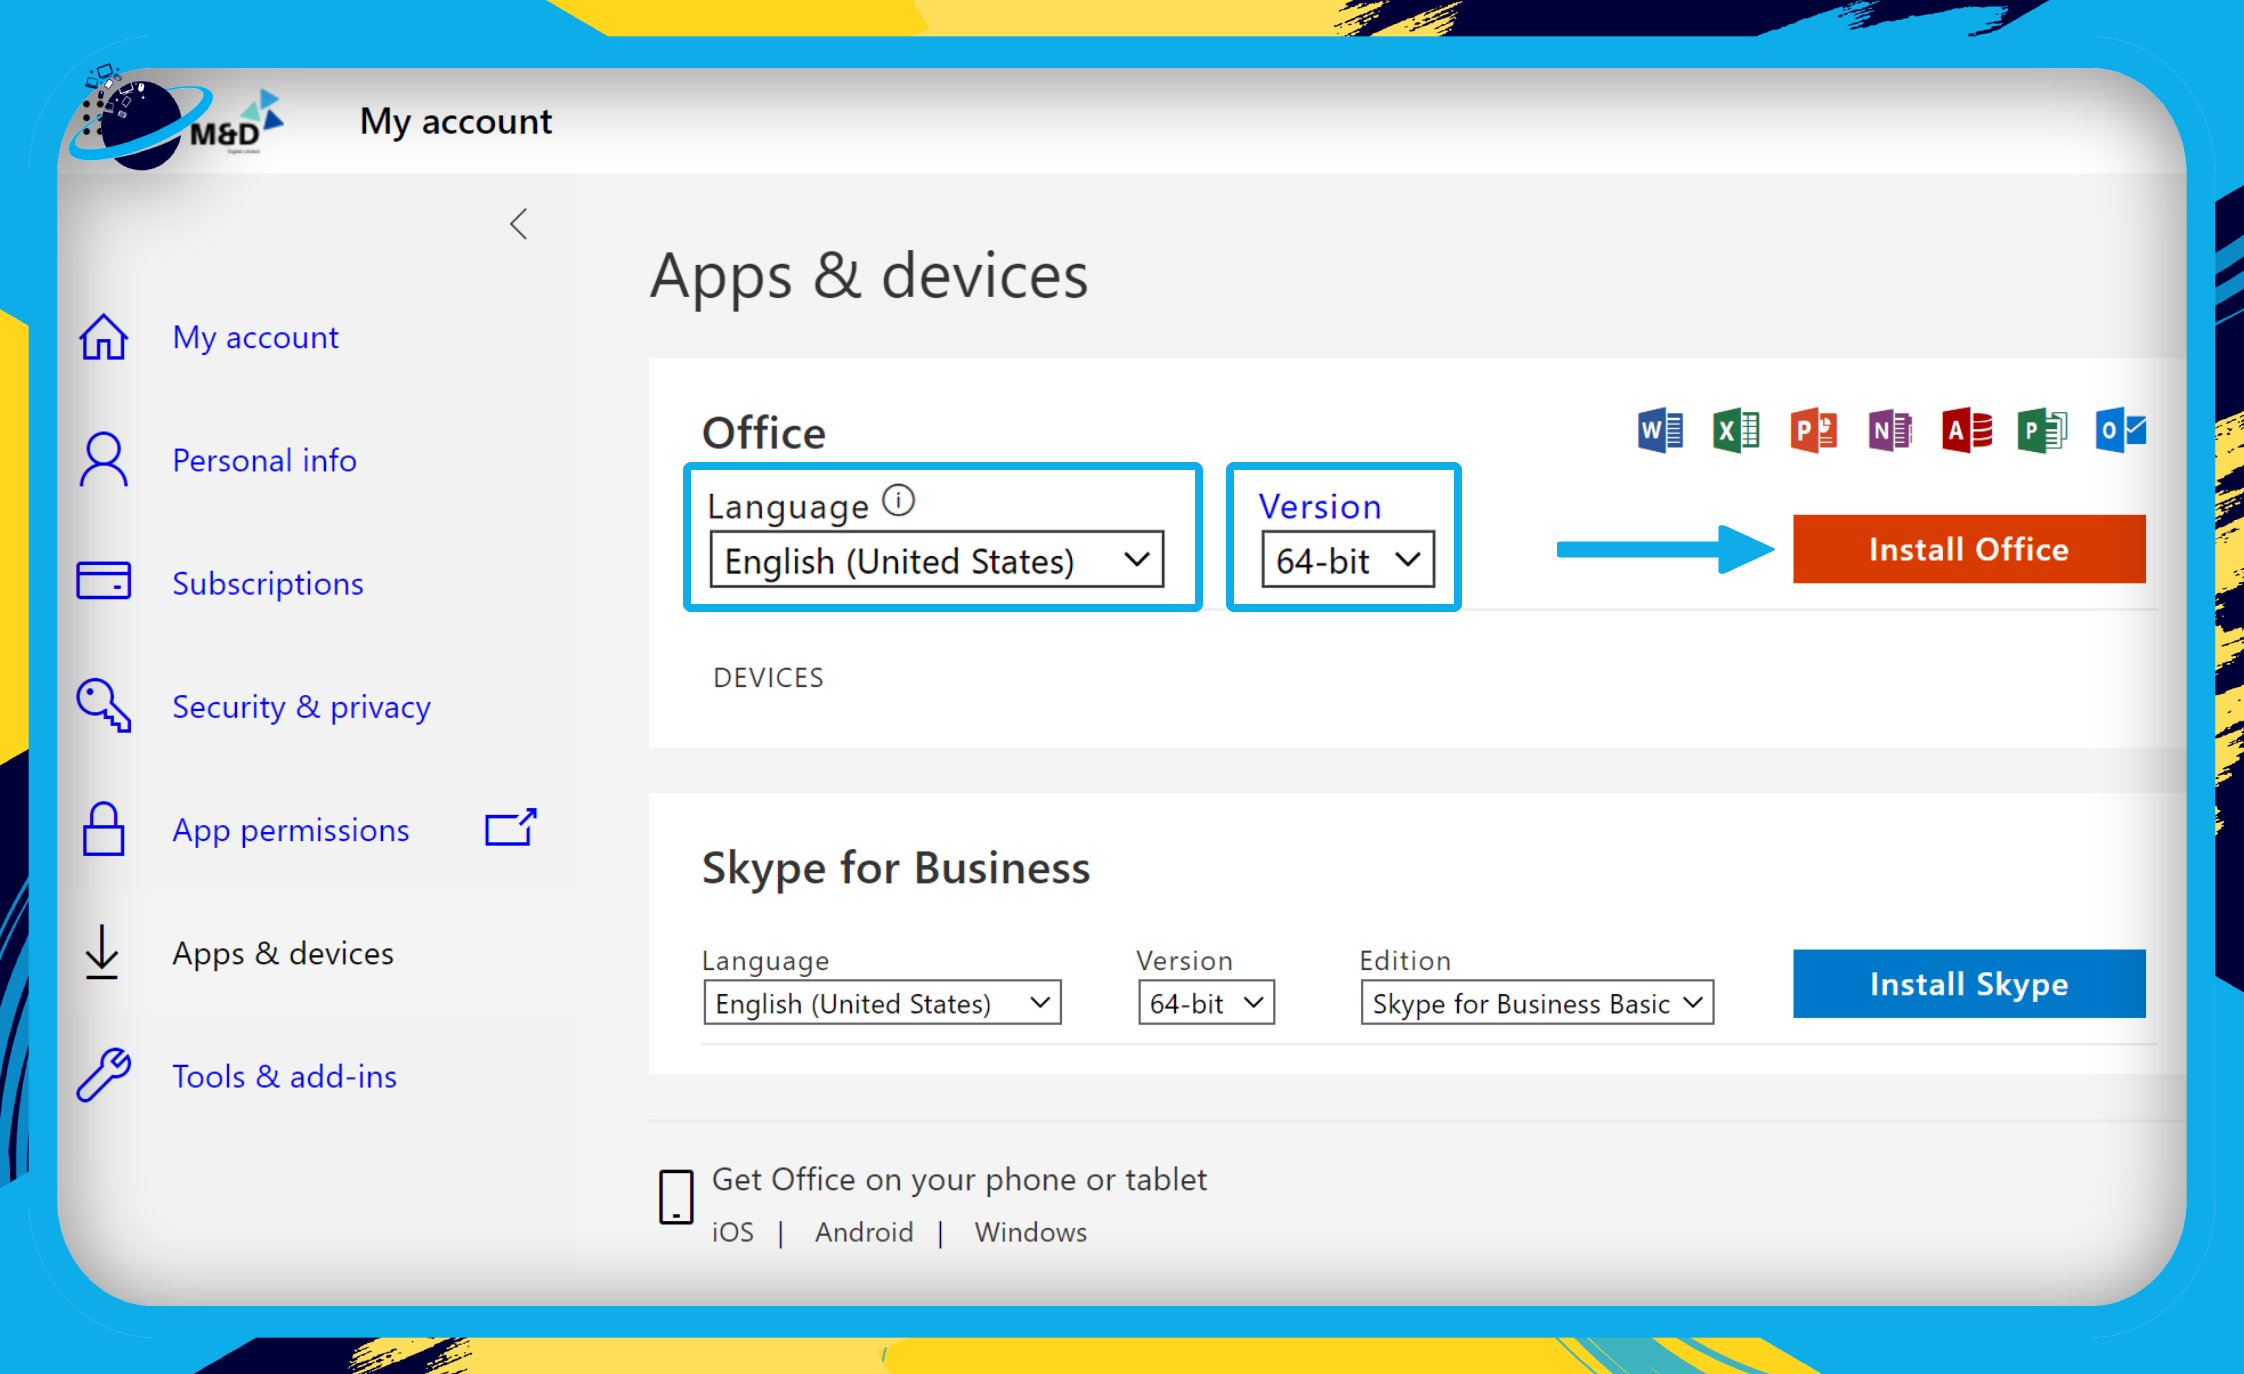
- Select your preferred language under “Office” at the top.
- Select your version — 32-bit or 64-bit.
- Then click the “Install Office” button.
How do I know if I need the 32-bit or 64-bit version of Office?
To check which Office version you need, type “System” into your Windows search bar. If you can’t find the Windows search bar, press the ![]() Windows + S keys on your keyboard at the same time.
Windows + S keys on your keyboard at the same time.
- Click “Open” after typing “System” into your Windows search bar.
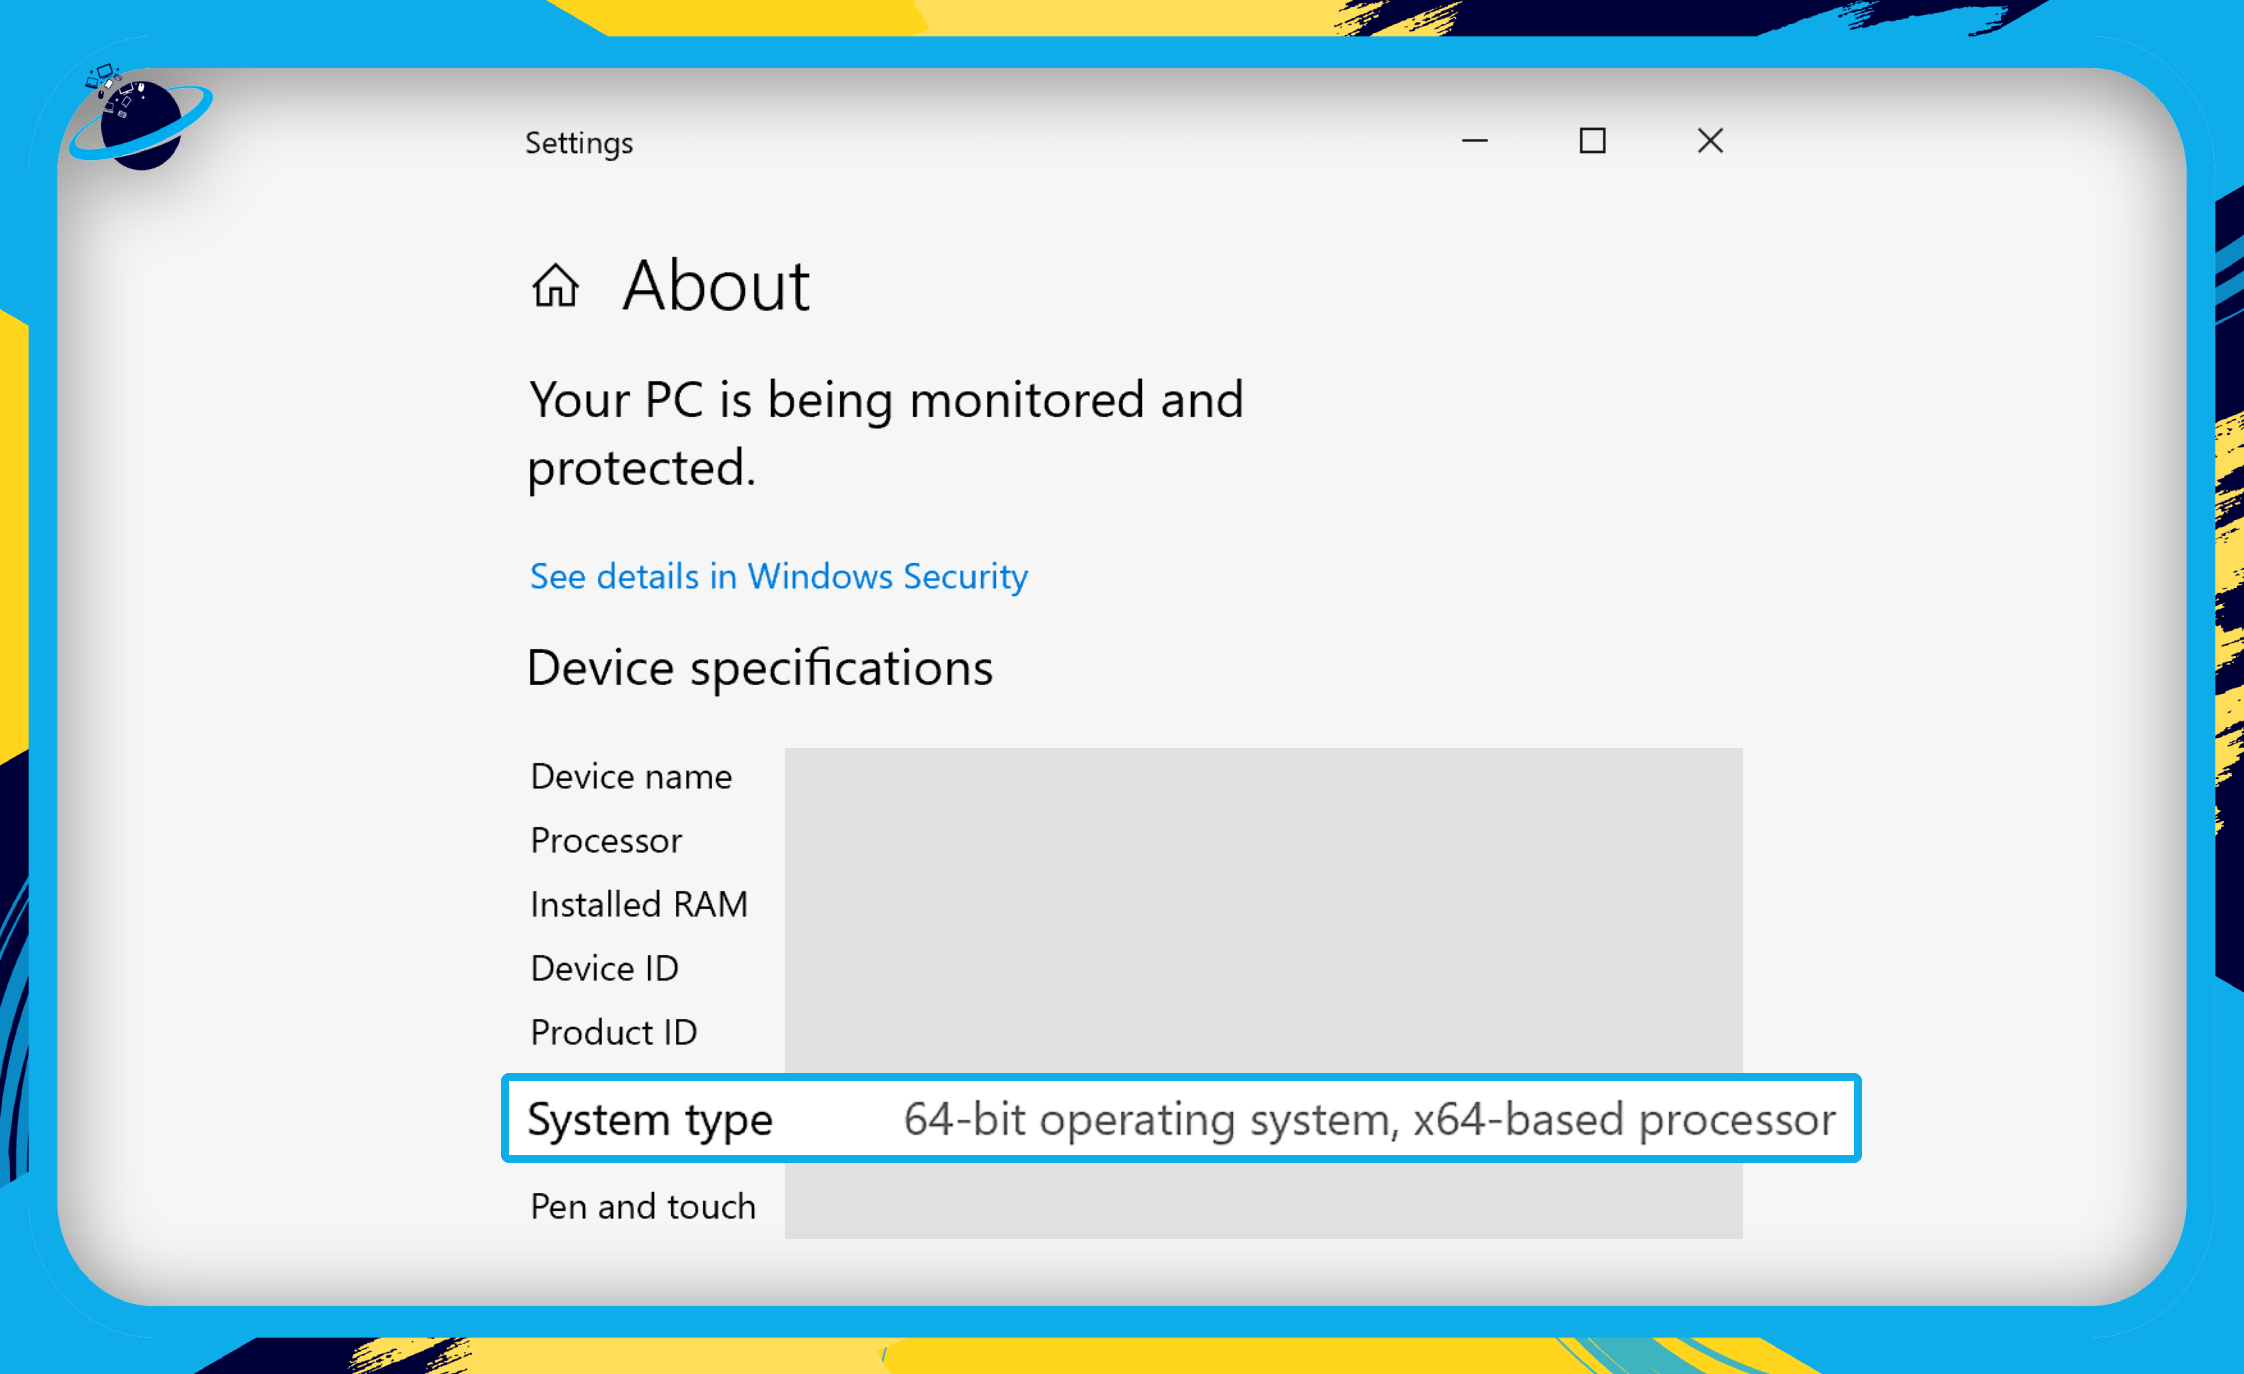
![]() Note: the information you need can be found in “System” or “System Information” by looking for “System Type.”
Note: the information you need can be found in “System” or “System Information” by looking for “System Type.”

- The information you need is “System type.”
- In our example, we have a “64-bit” operating system.
Solution 2: Add the Office installer to your antivirus exclusions
The method for adding the Office installer to your antivirus exclusions will depend on which antivirus software is running on your device. Please follow the steps below if you are using Windows Defender.
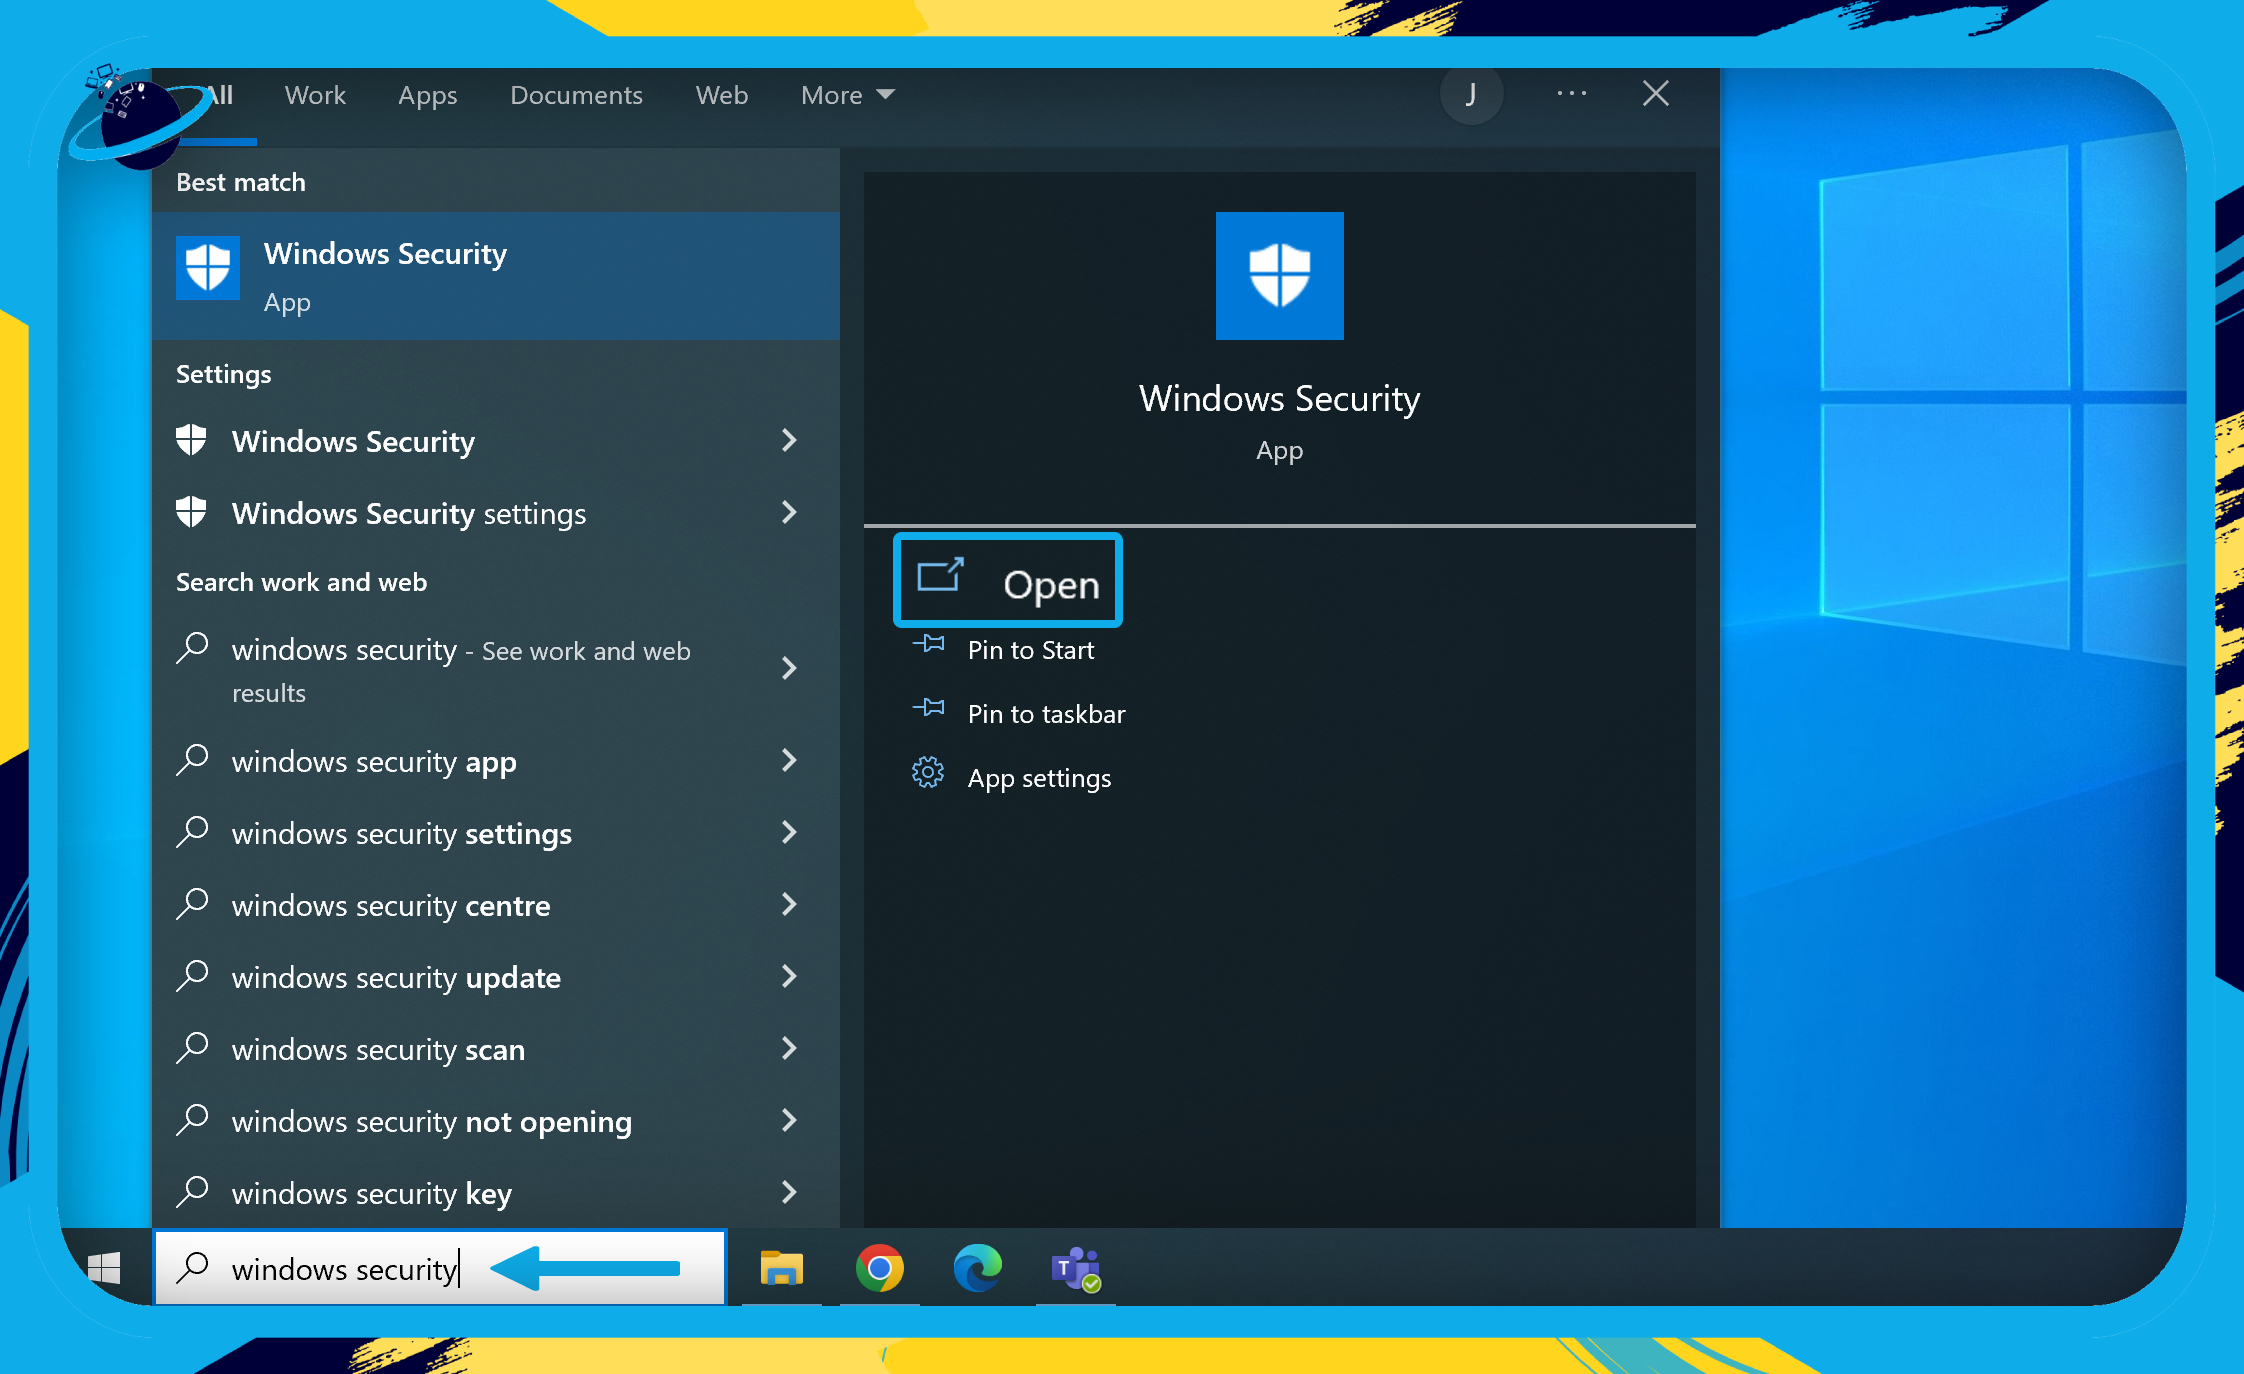
- First, type “Windows Security” into your Windows search bar.
If you can’t find the Windows search bar, press the ![]() Windows + S keys on your keyboard at the same time.
Windows + S keys on your keyboard at the same time.
- Then click “Open.”
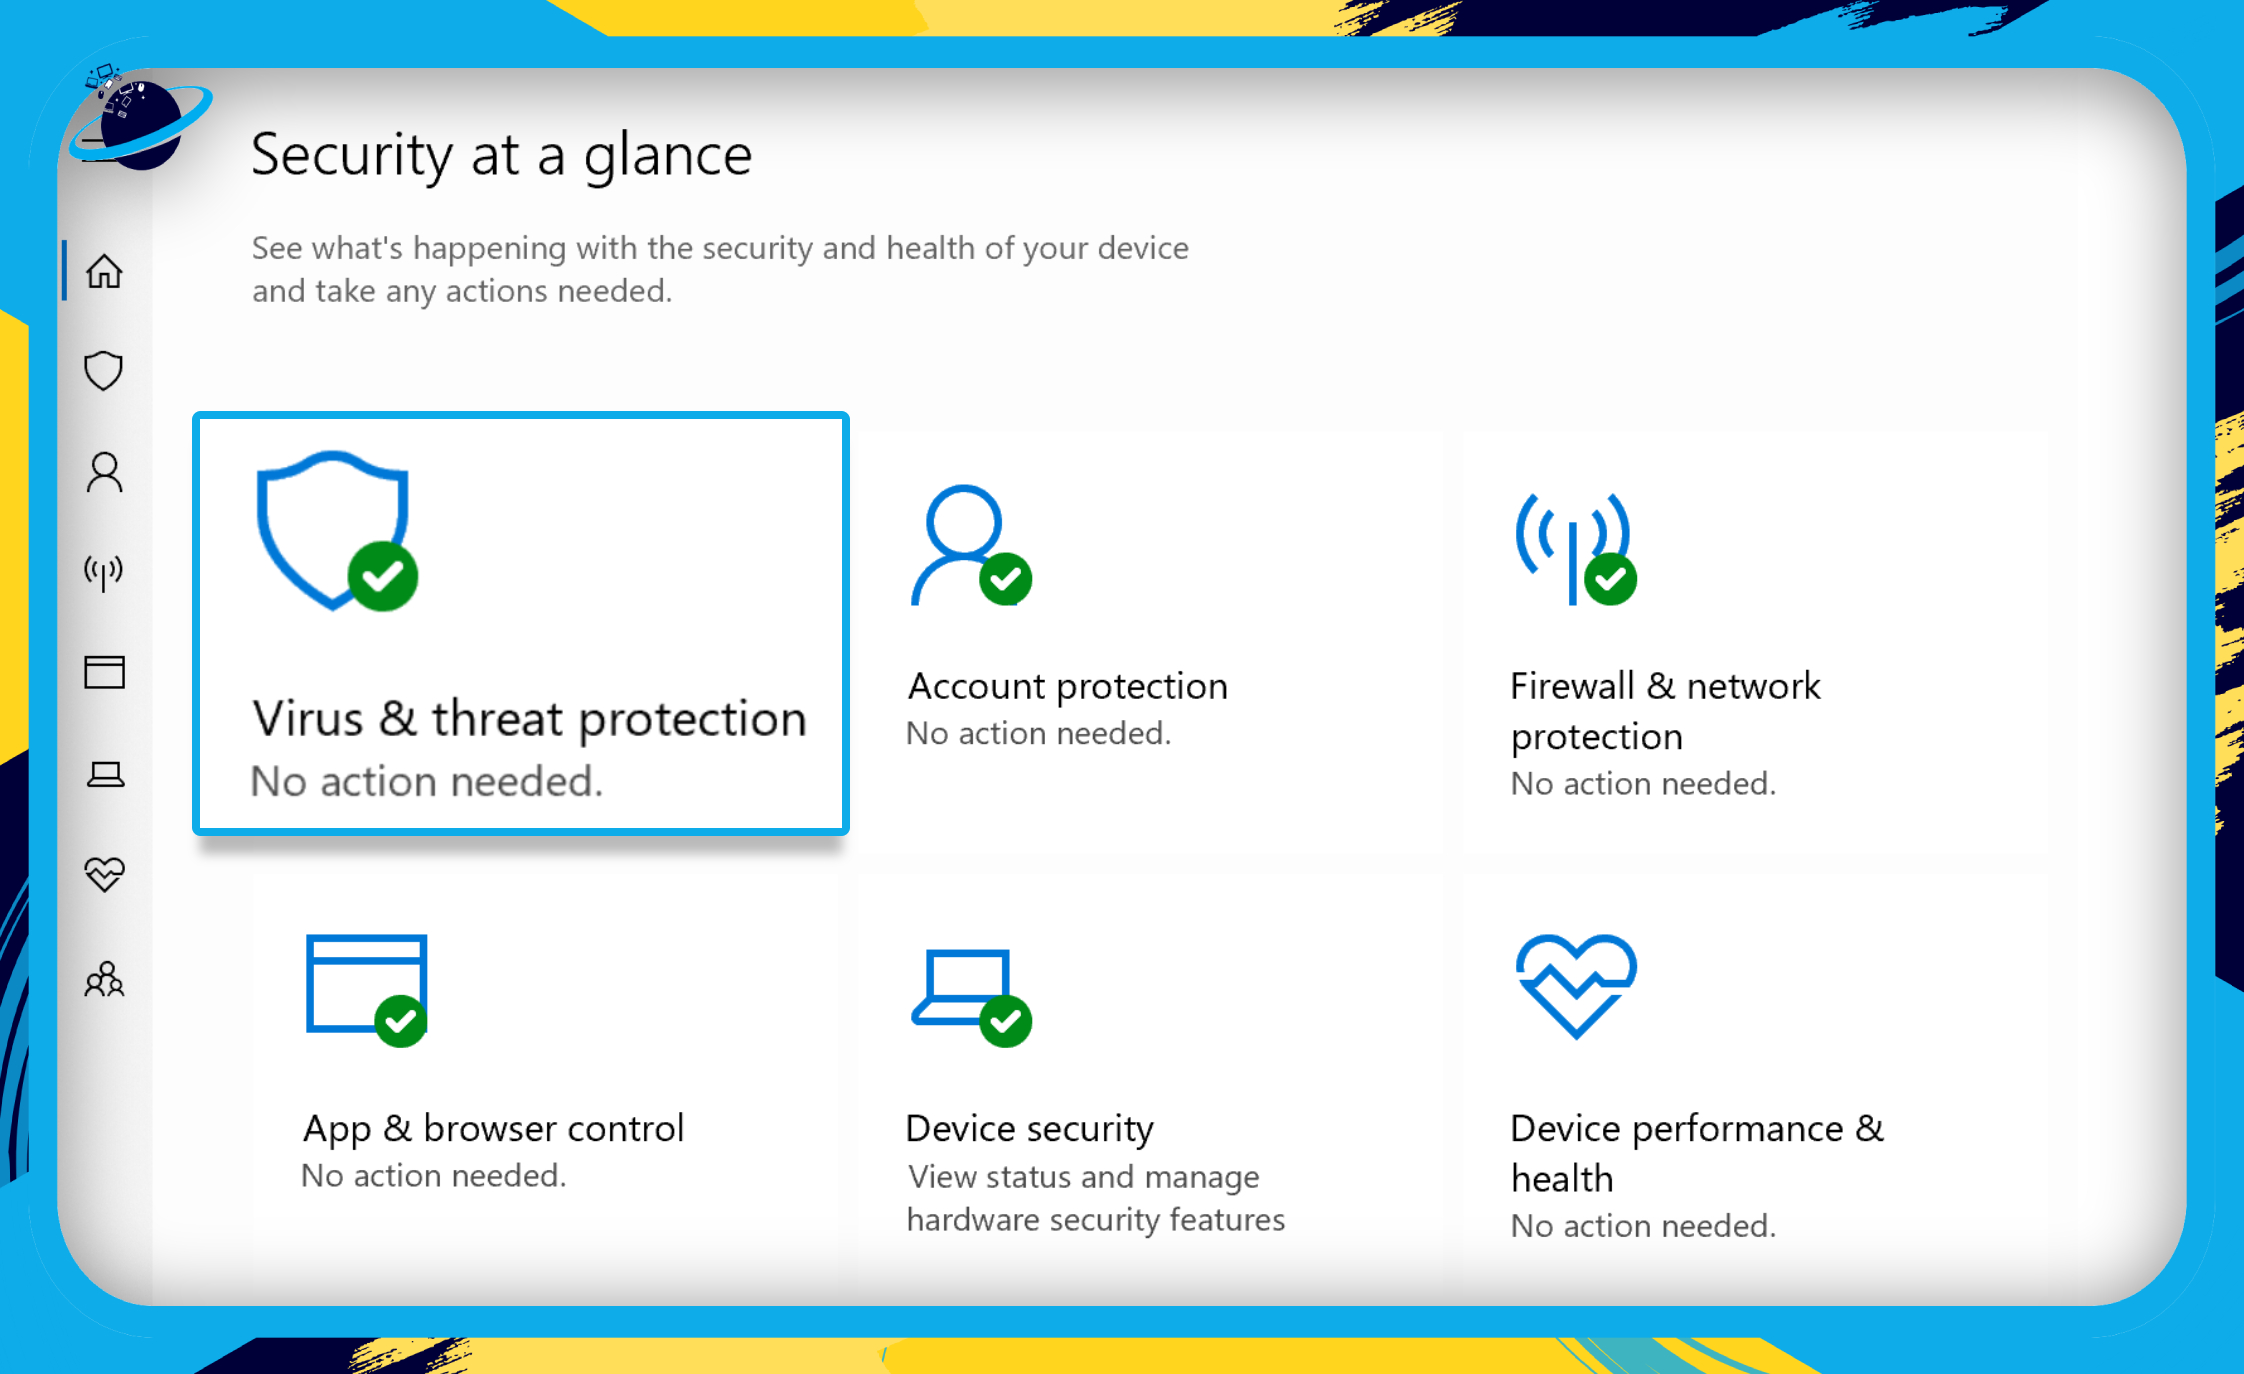
- Go to “Virus & threat protection.”
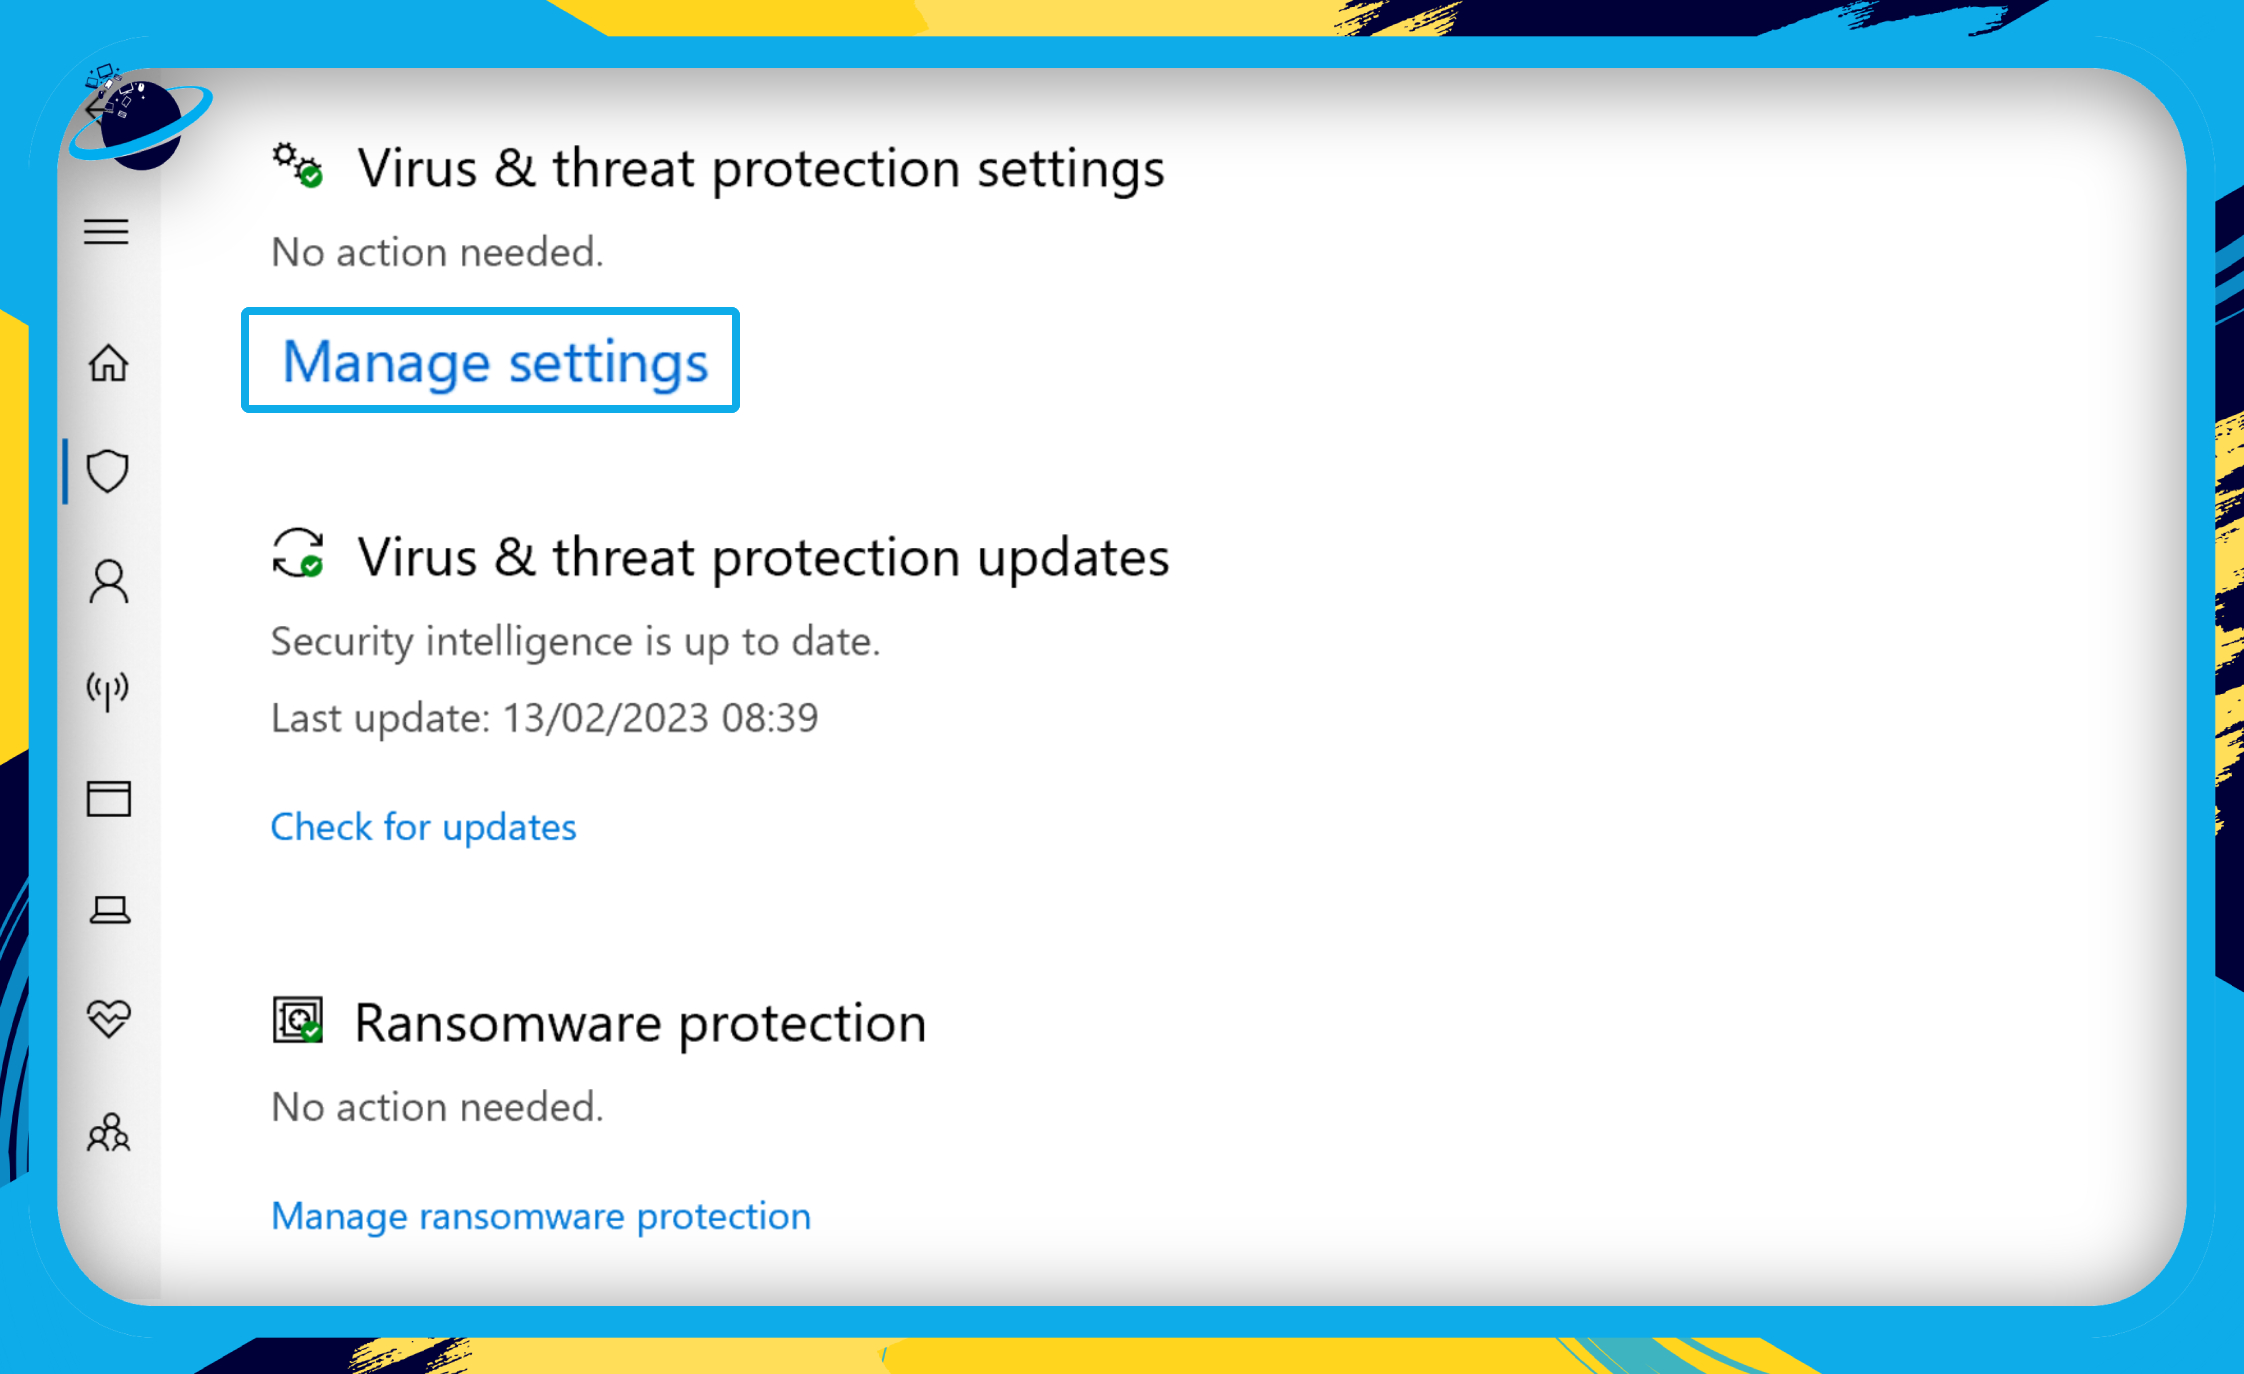
- Scroll down to “Virus & threat protection settings” and click “Manage settings.”
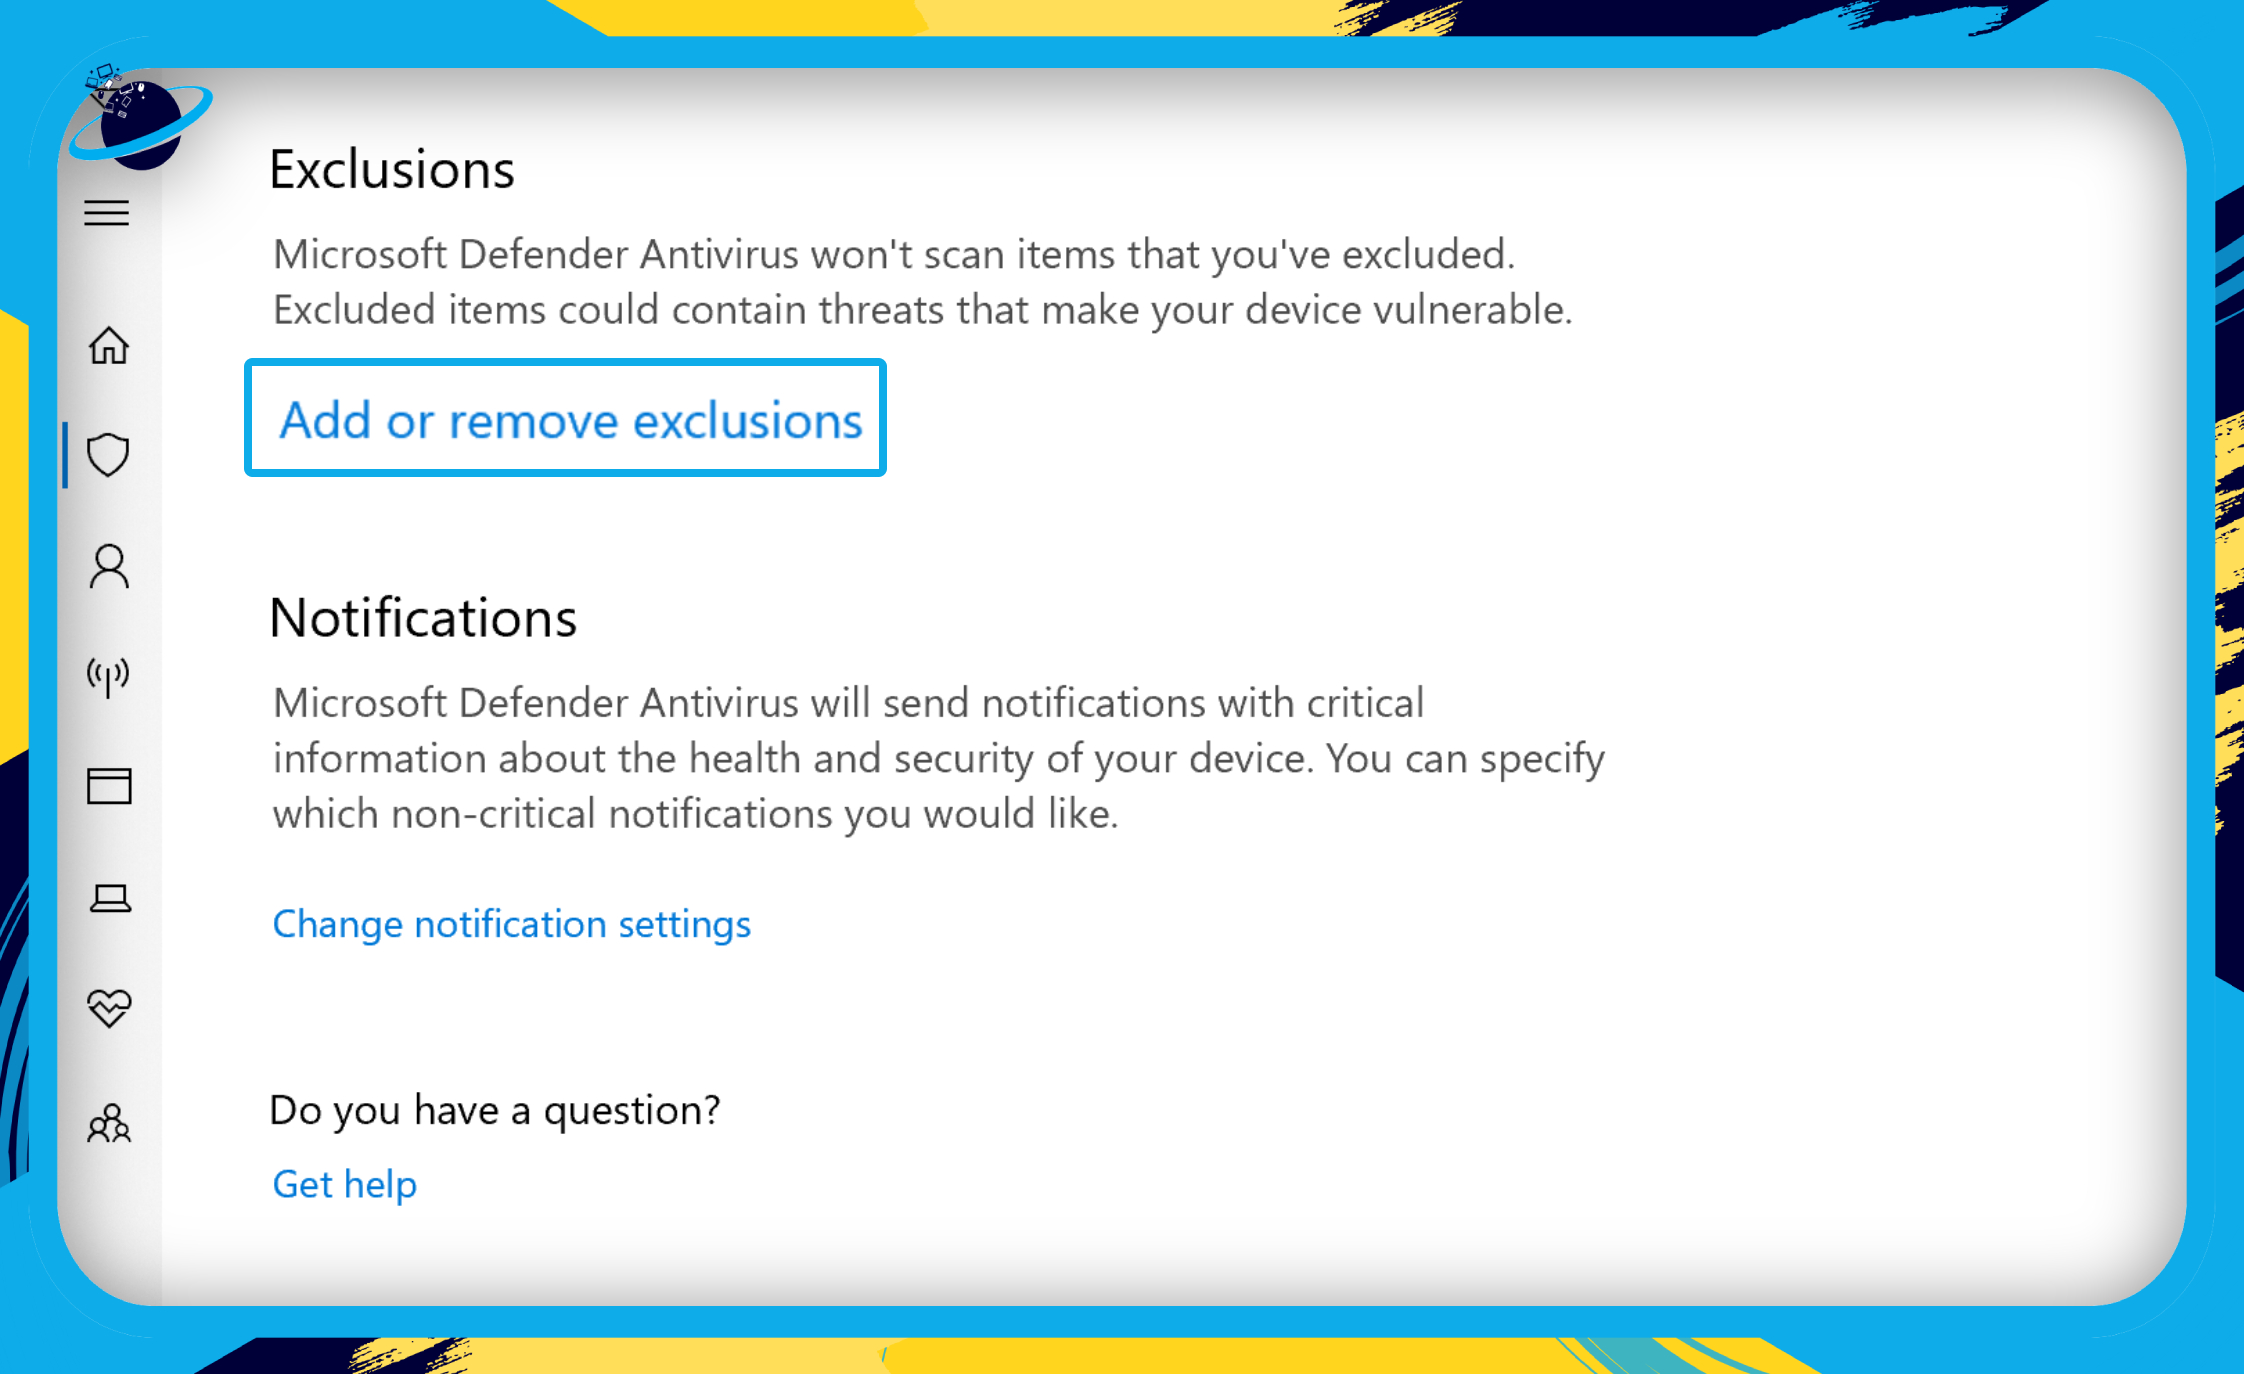
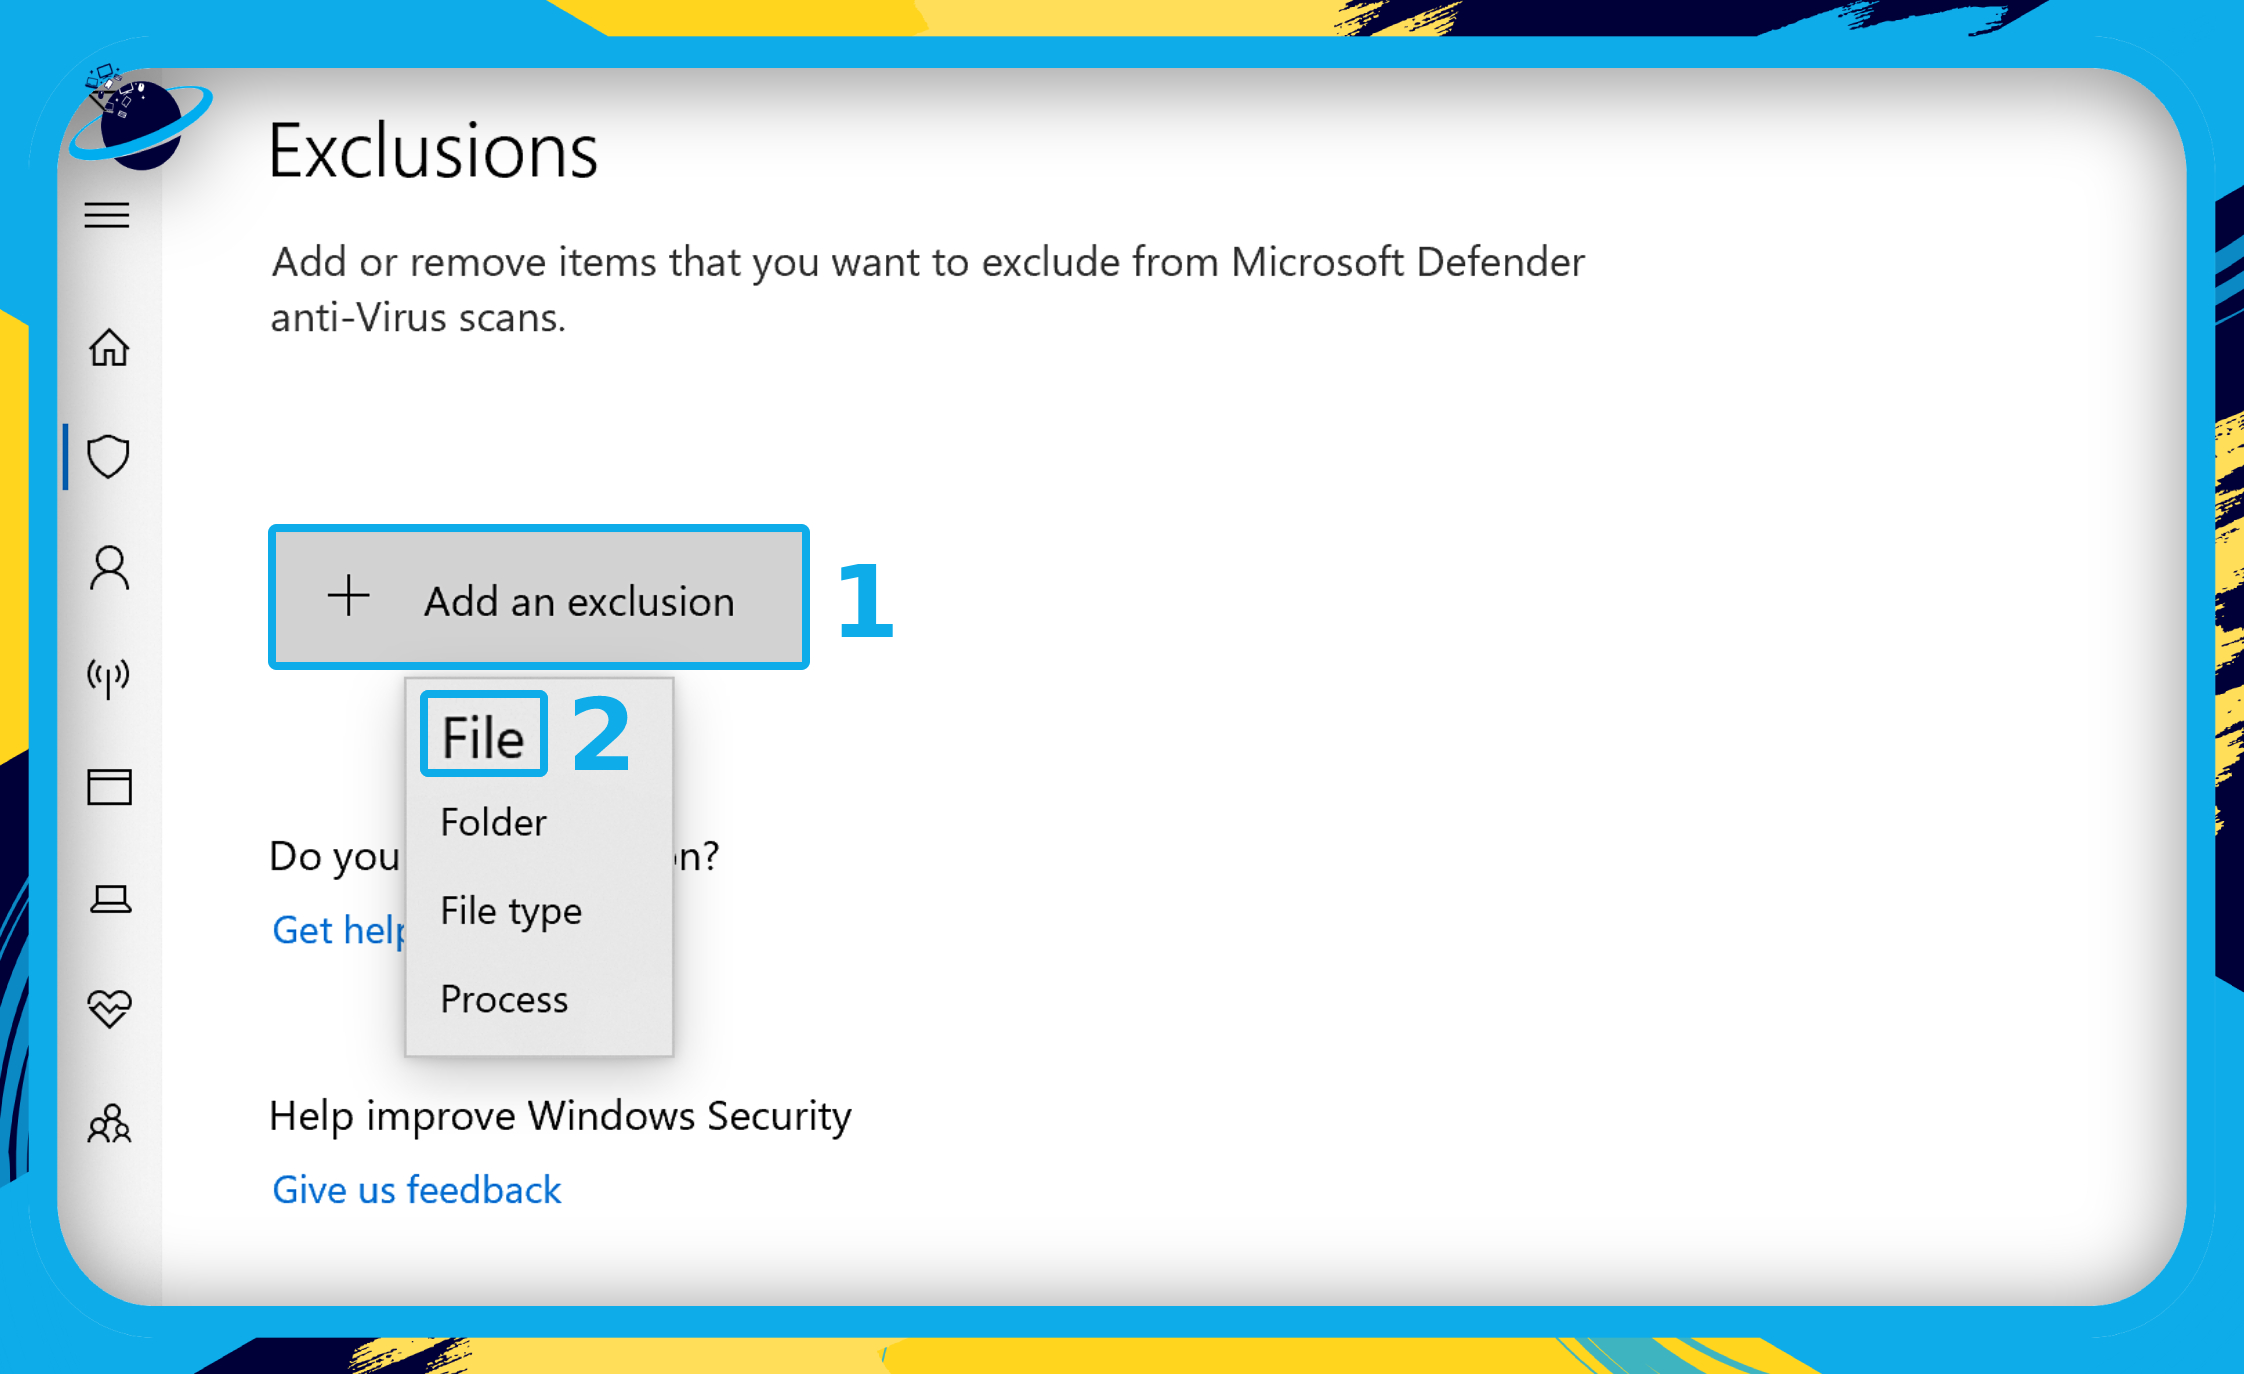
- Scroll down to “Exclusions” and click “Add or remove exclusions.”
- Click the “+ Add an exclusion” button. (1)
- Then select “File” from the dropdown list. (2)
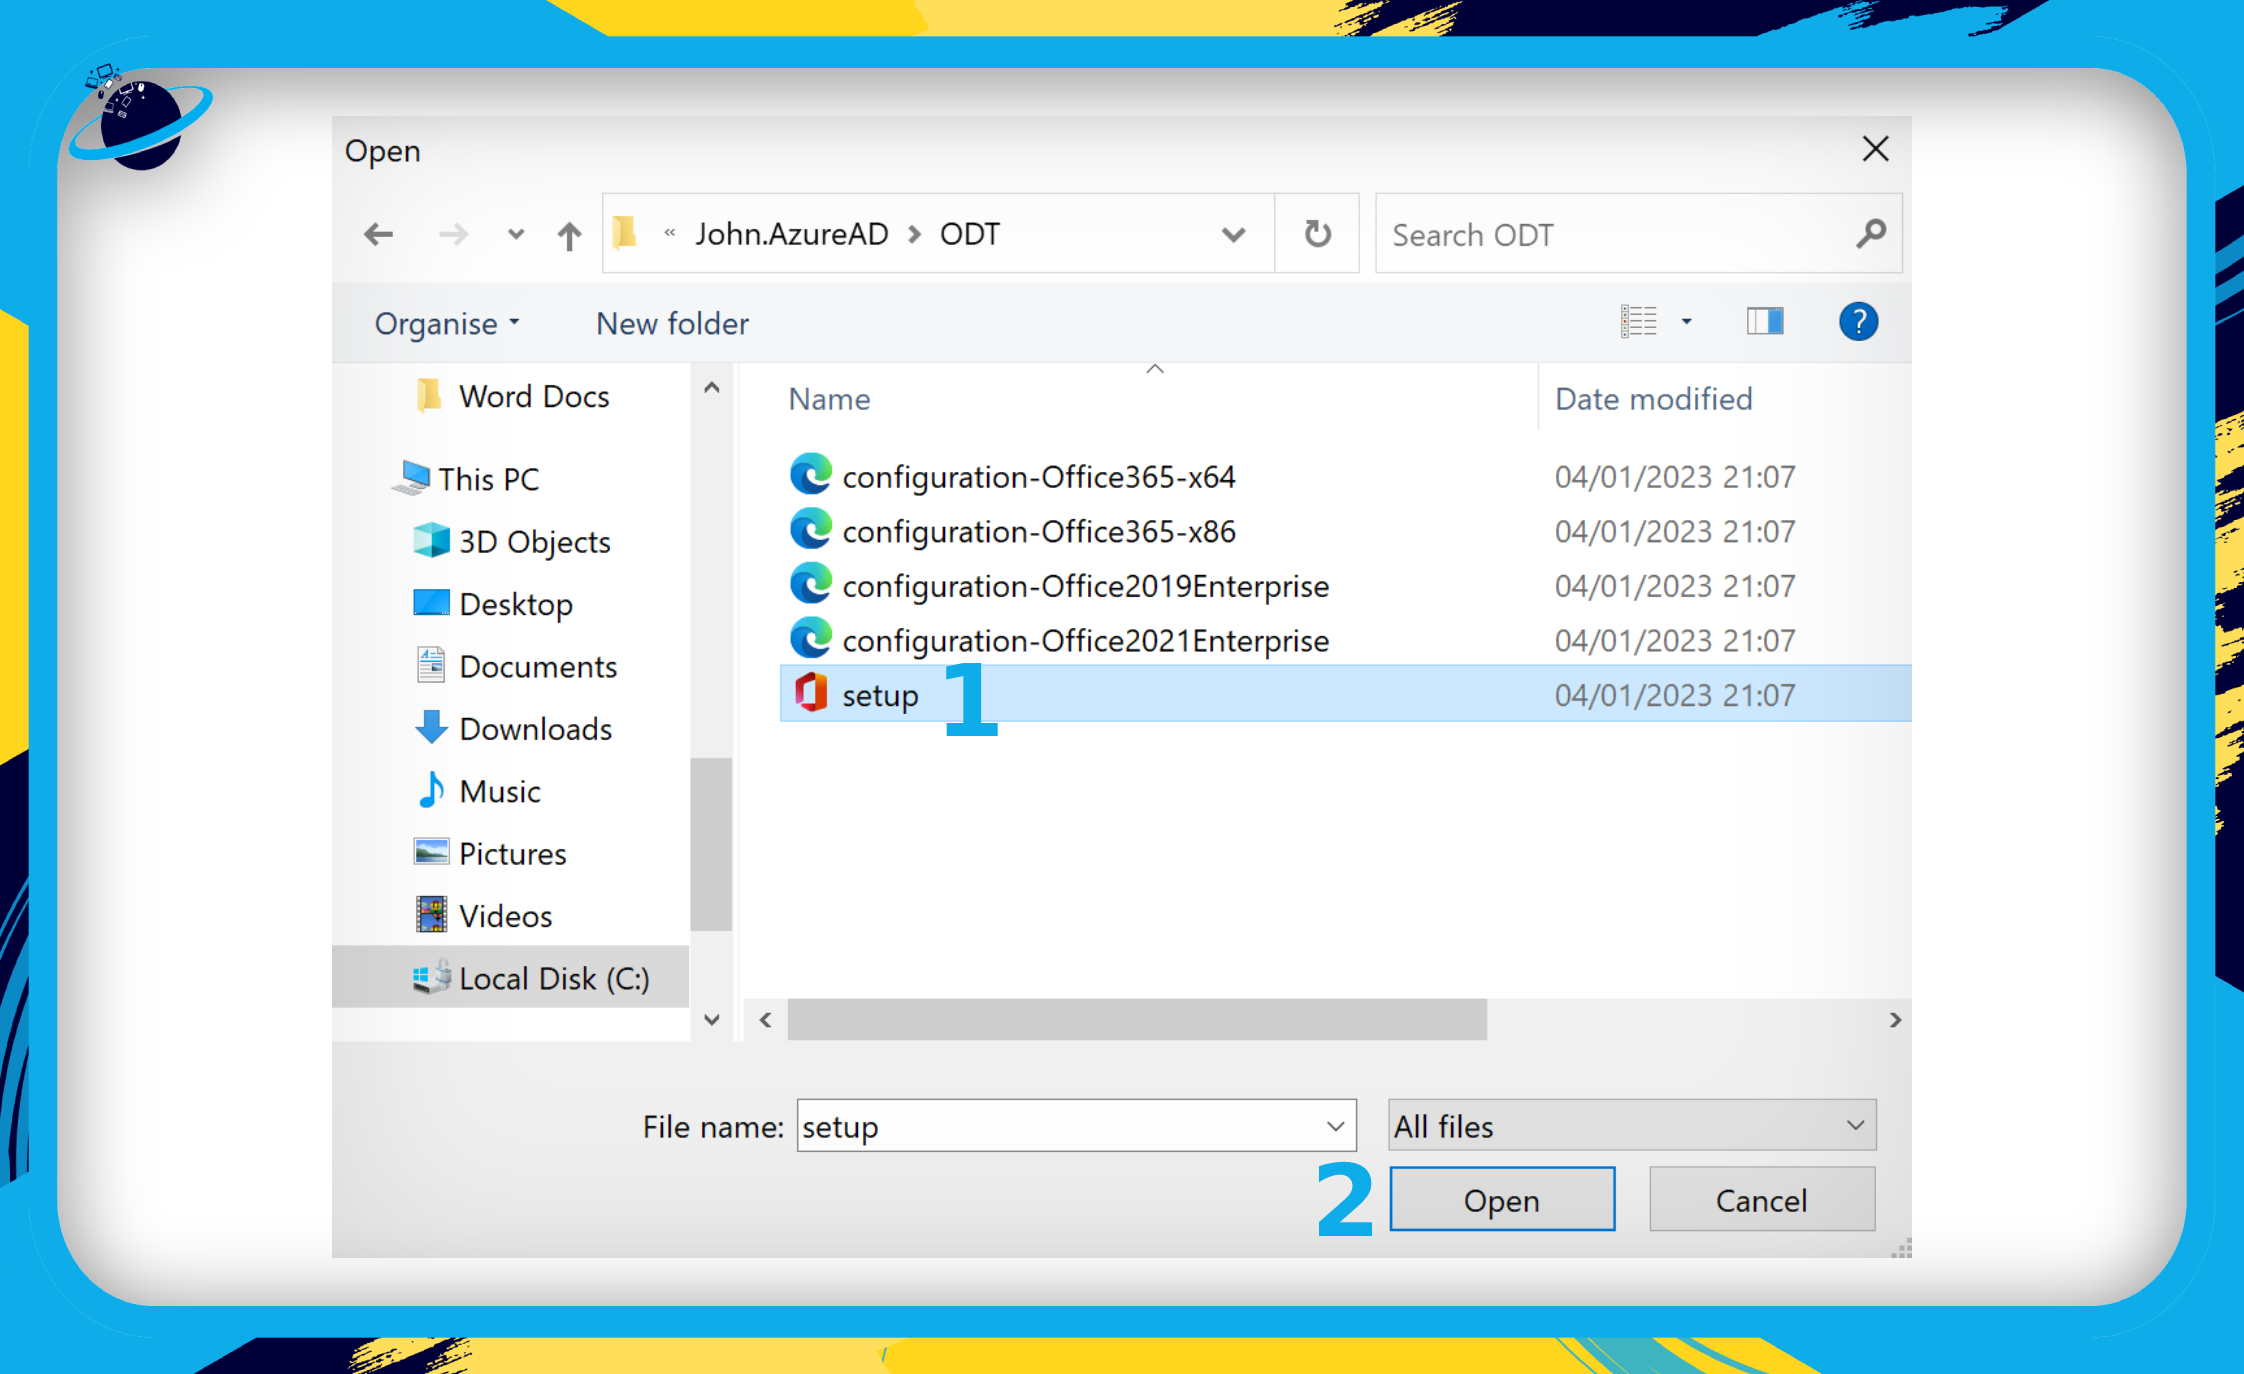
- Search for your Office installer or download the installer here.
- Right-click the installer. (1)
- Then click the “Open” button.
Now attempt to install your Microsoft 365 software again. If you still receive the 0-2054 error, please continue to the next solution.
Solution 3: Temporarily disable your firewall to fix error 0-2054
If you decide to temporarily disable your firewall, it’s important to do so only during the process of instaling your Microsoft 365 applications. Leaving your device without firewall or antivirus protection can put your documents and security at risk.
The method for disabling your firewall will depend on the software you are using. Below is the step-by-step process for Windows defender.
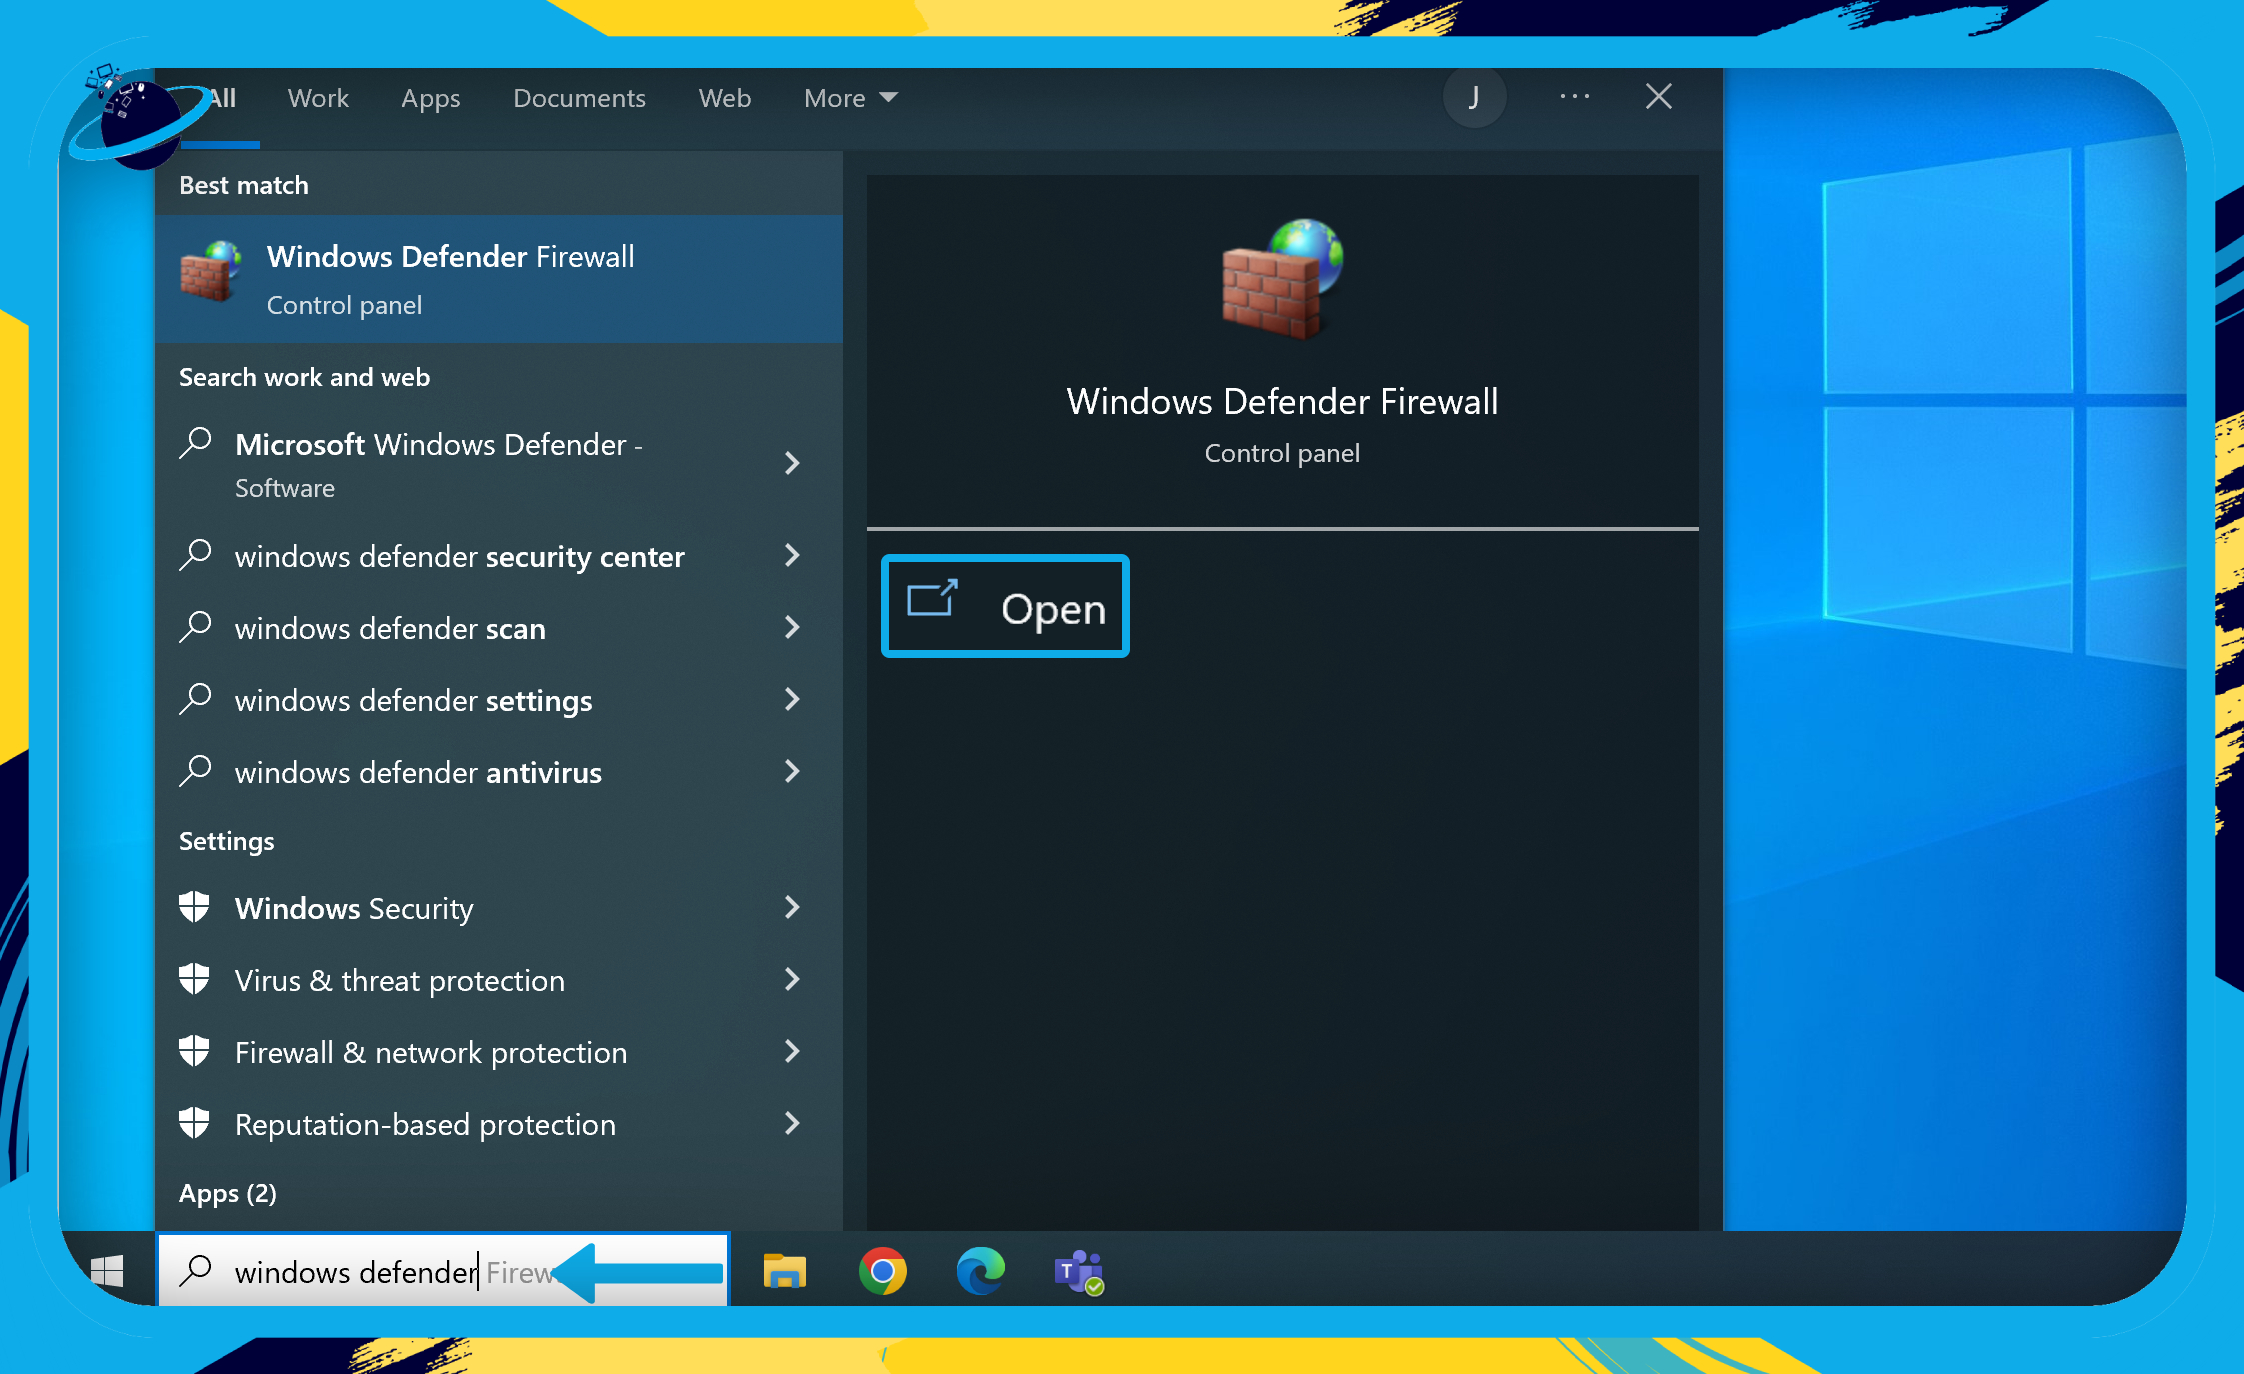
- First, type “Windows Defender” into your Windows search bar.
If you can’t find the Windows search bar, press the ![]() Windows + S keys on your keyboard at the same time.
Windows + S keys on your keyboard at the same time.
- Then click “Open.”
- Click “Turn Windows Defender Firewall on or off” in the left menu.
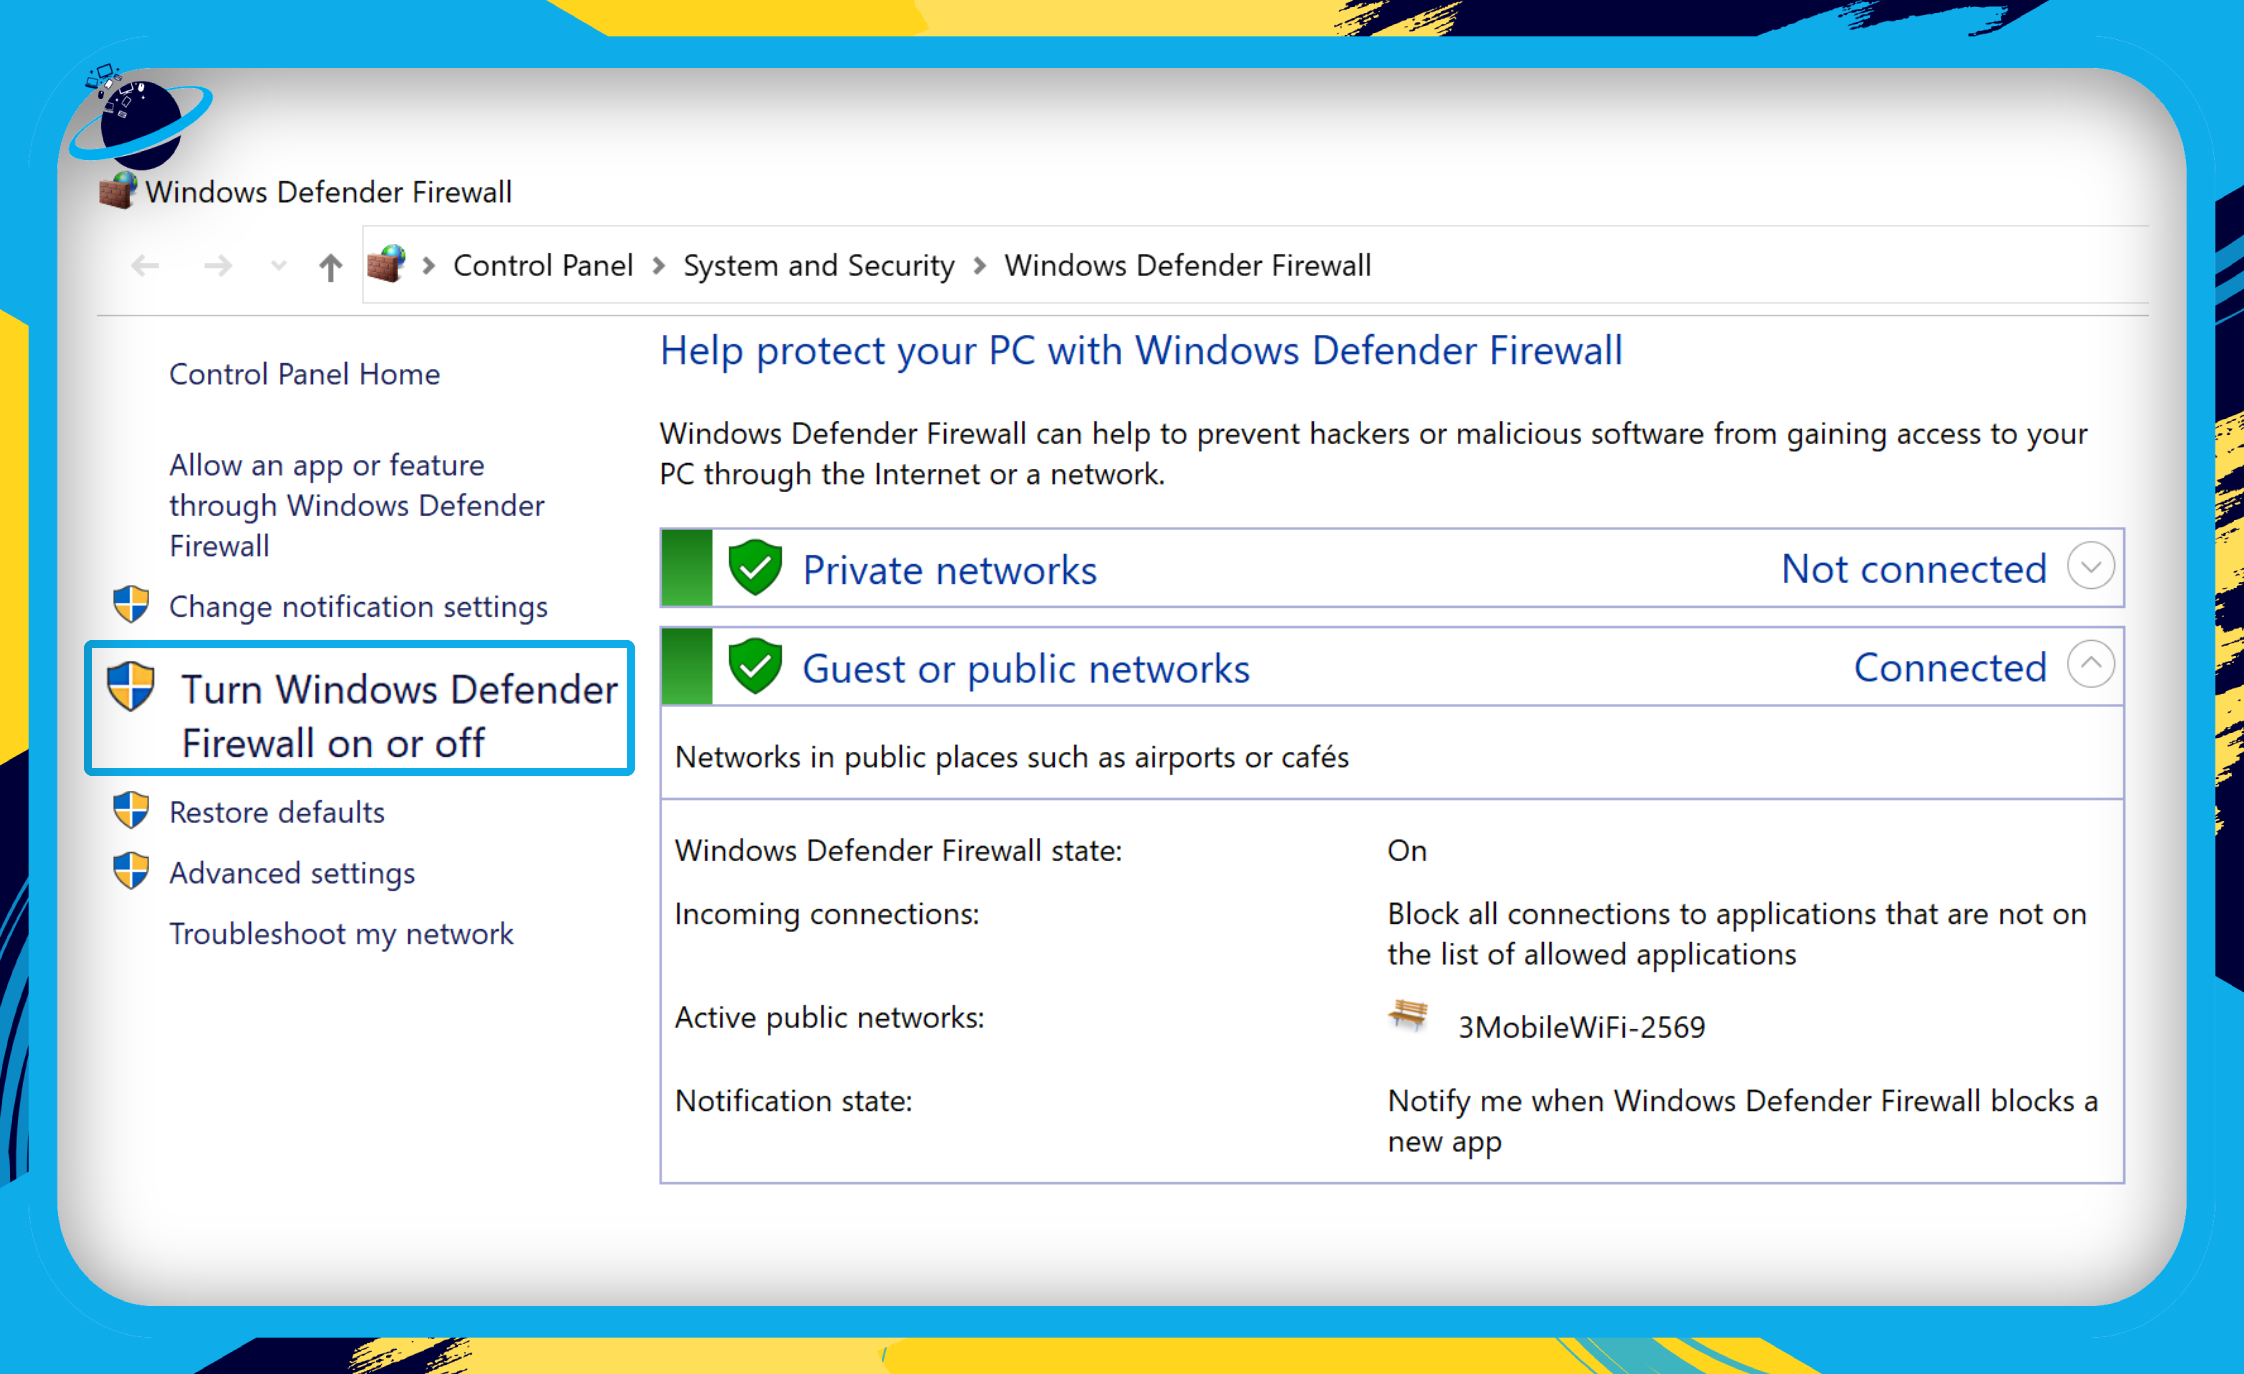
- Click the circular buttons next to “Turn off Windows Defender Firewall.”
- Then click the “OK” button.
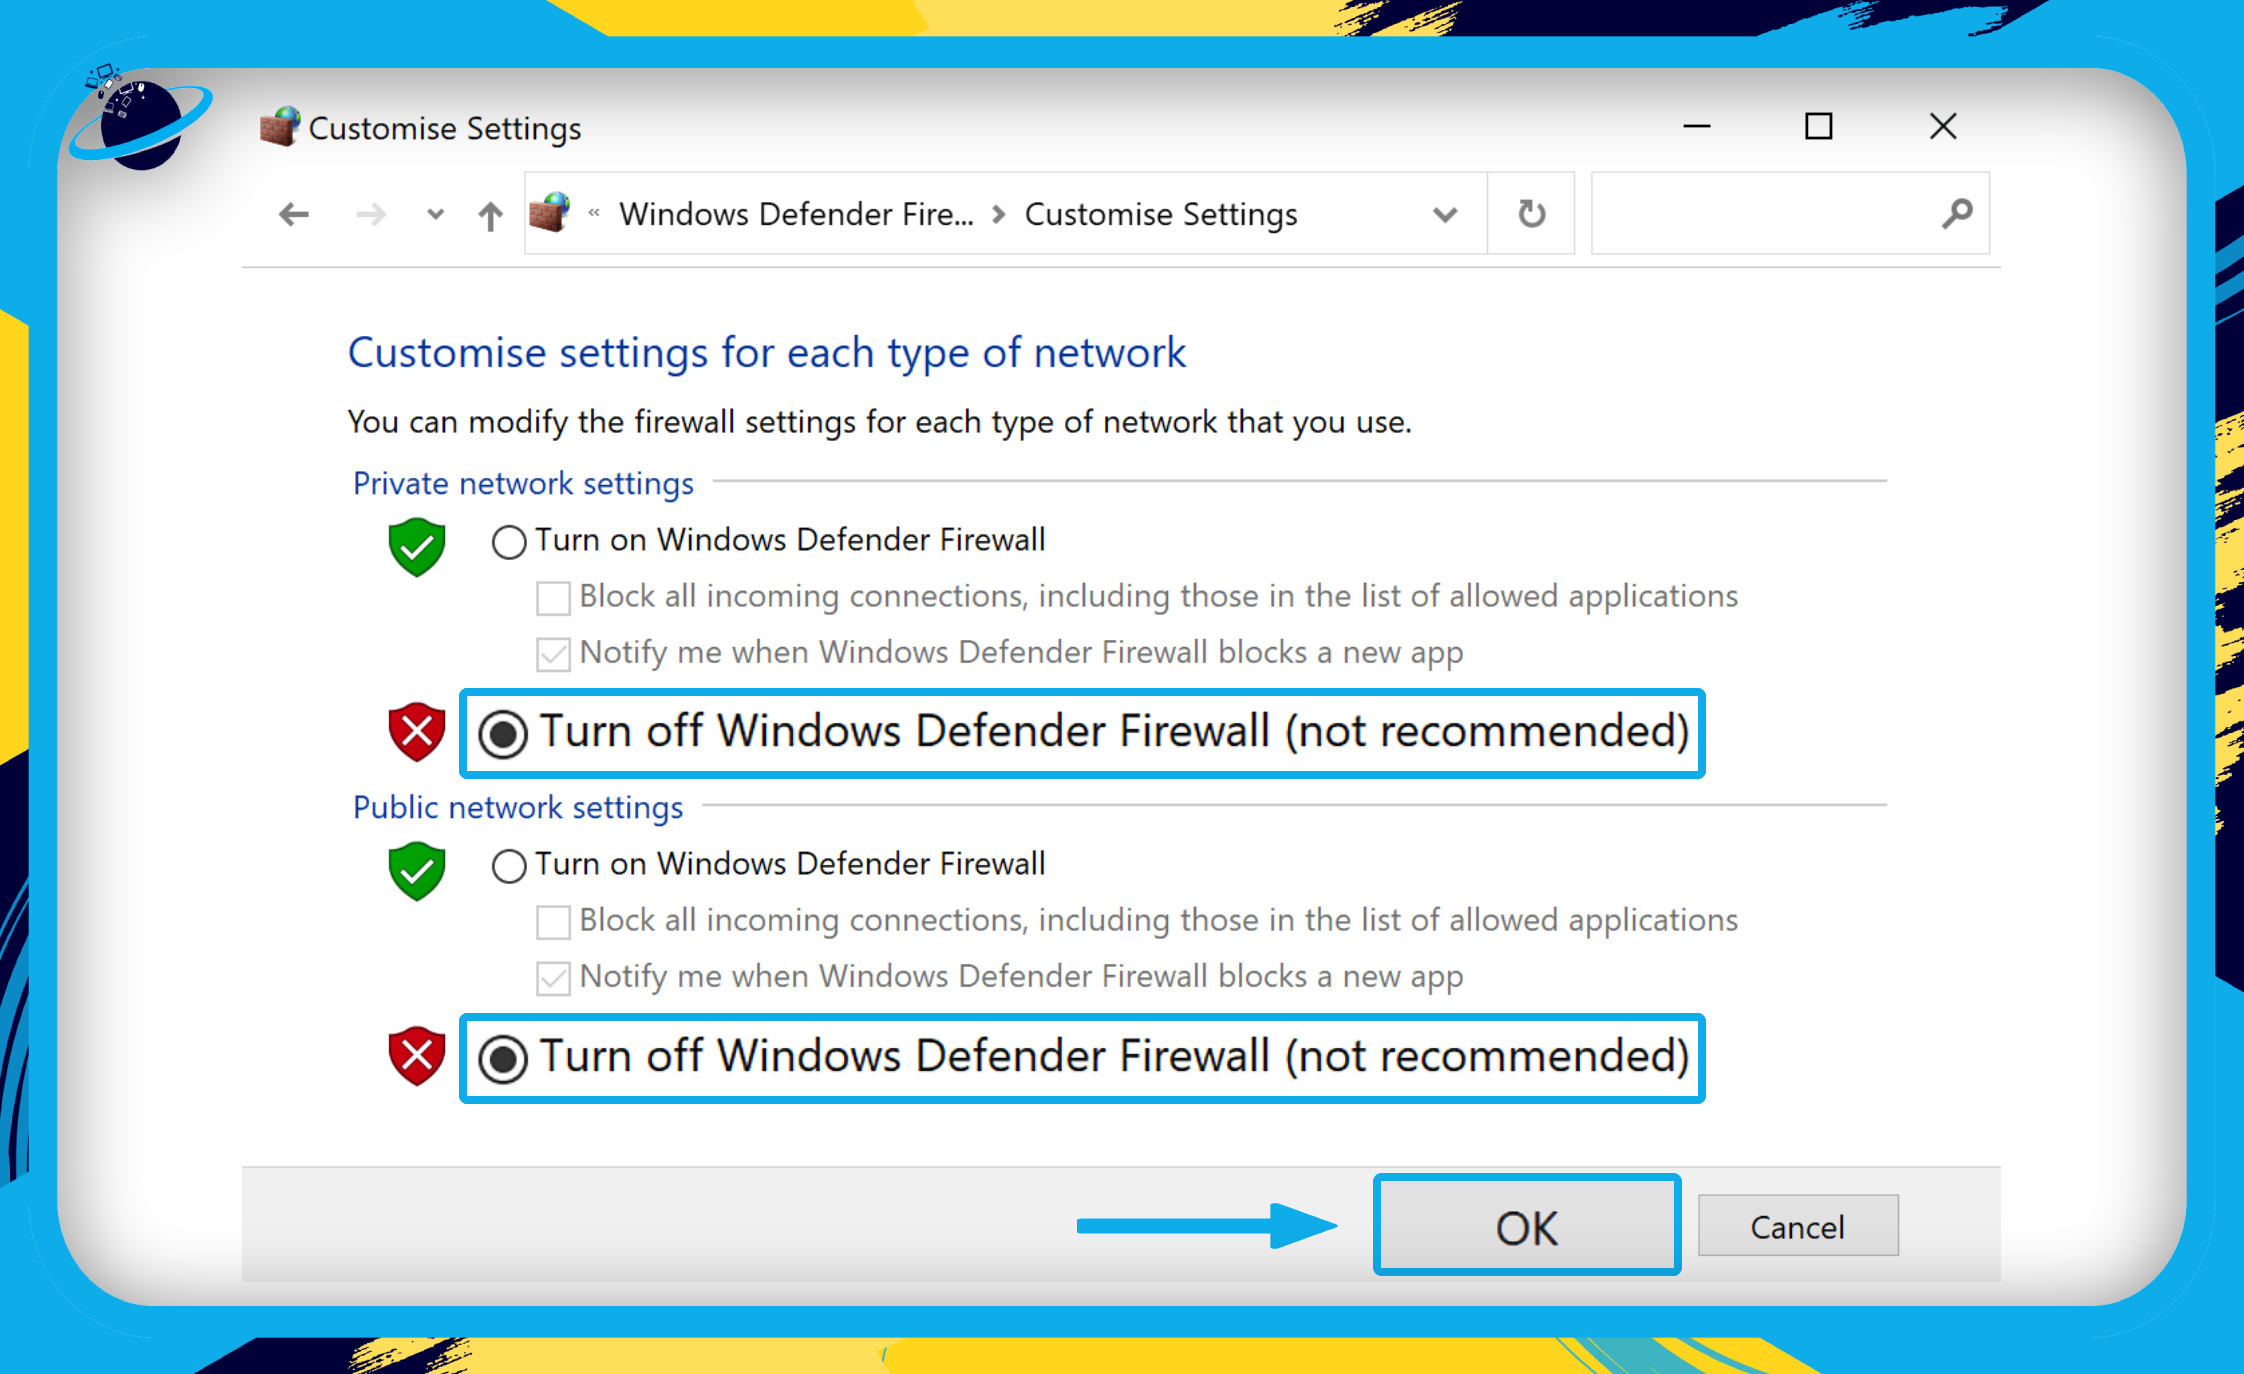
Now install your Microsoft 365 software and turn on the Windows Defender Firewall after the installation is complete. If you still receive the 0-2054 error, please continue to the next solution.
Solution 4: Delete the Office folder in AppData\Roaming\Microsoft
- First, open your
 File Explorer.
 - Copy and paste the following path into the File Explorer’s address bar:
C:\Users\[username]\AppData\Roaming\MicrosoftReplace “[username]” with your own username on your device. Your username is the name of the folder in C:\Users\ in which “AppData” is located.
- Now located the “Office” folder, right-click it, and select “Delete” from the popup menu.
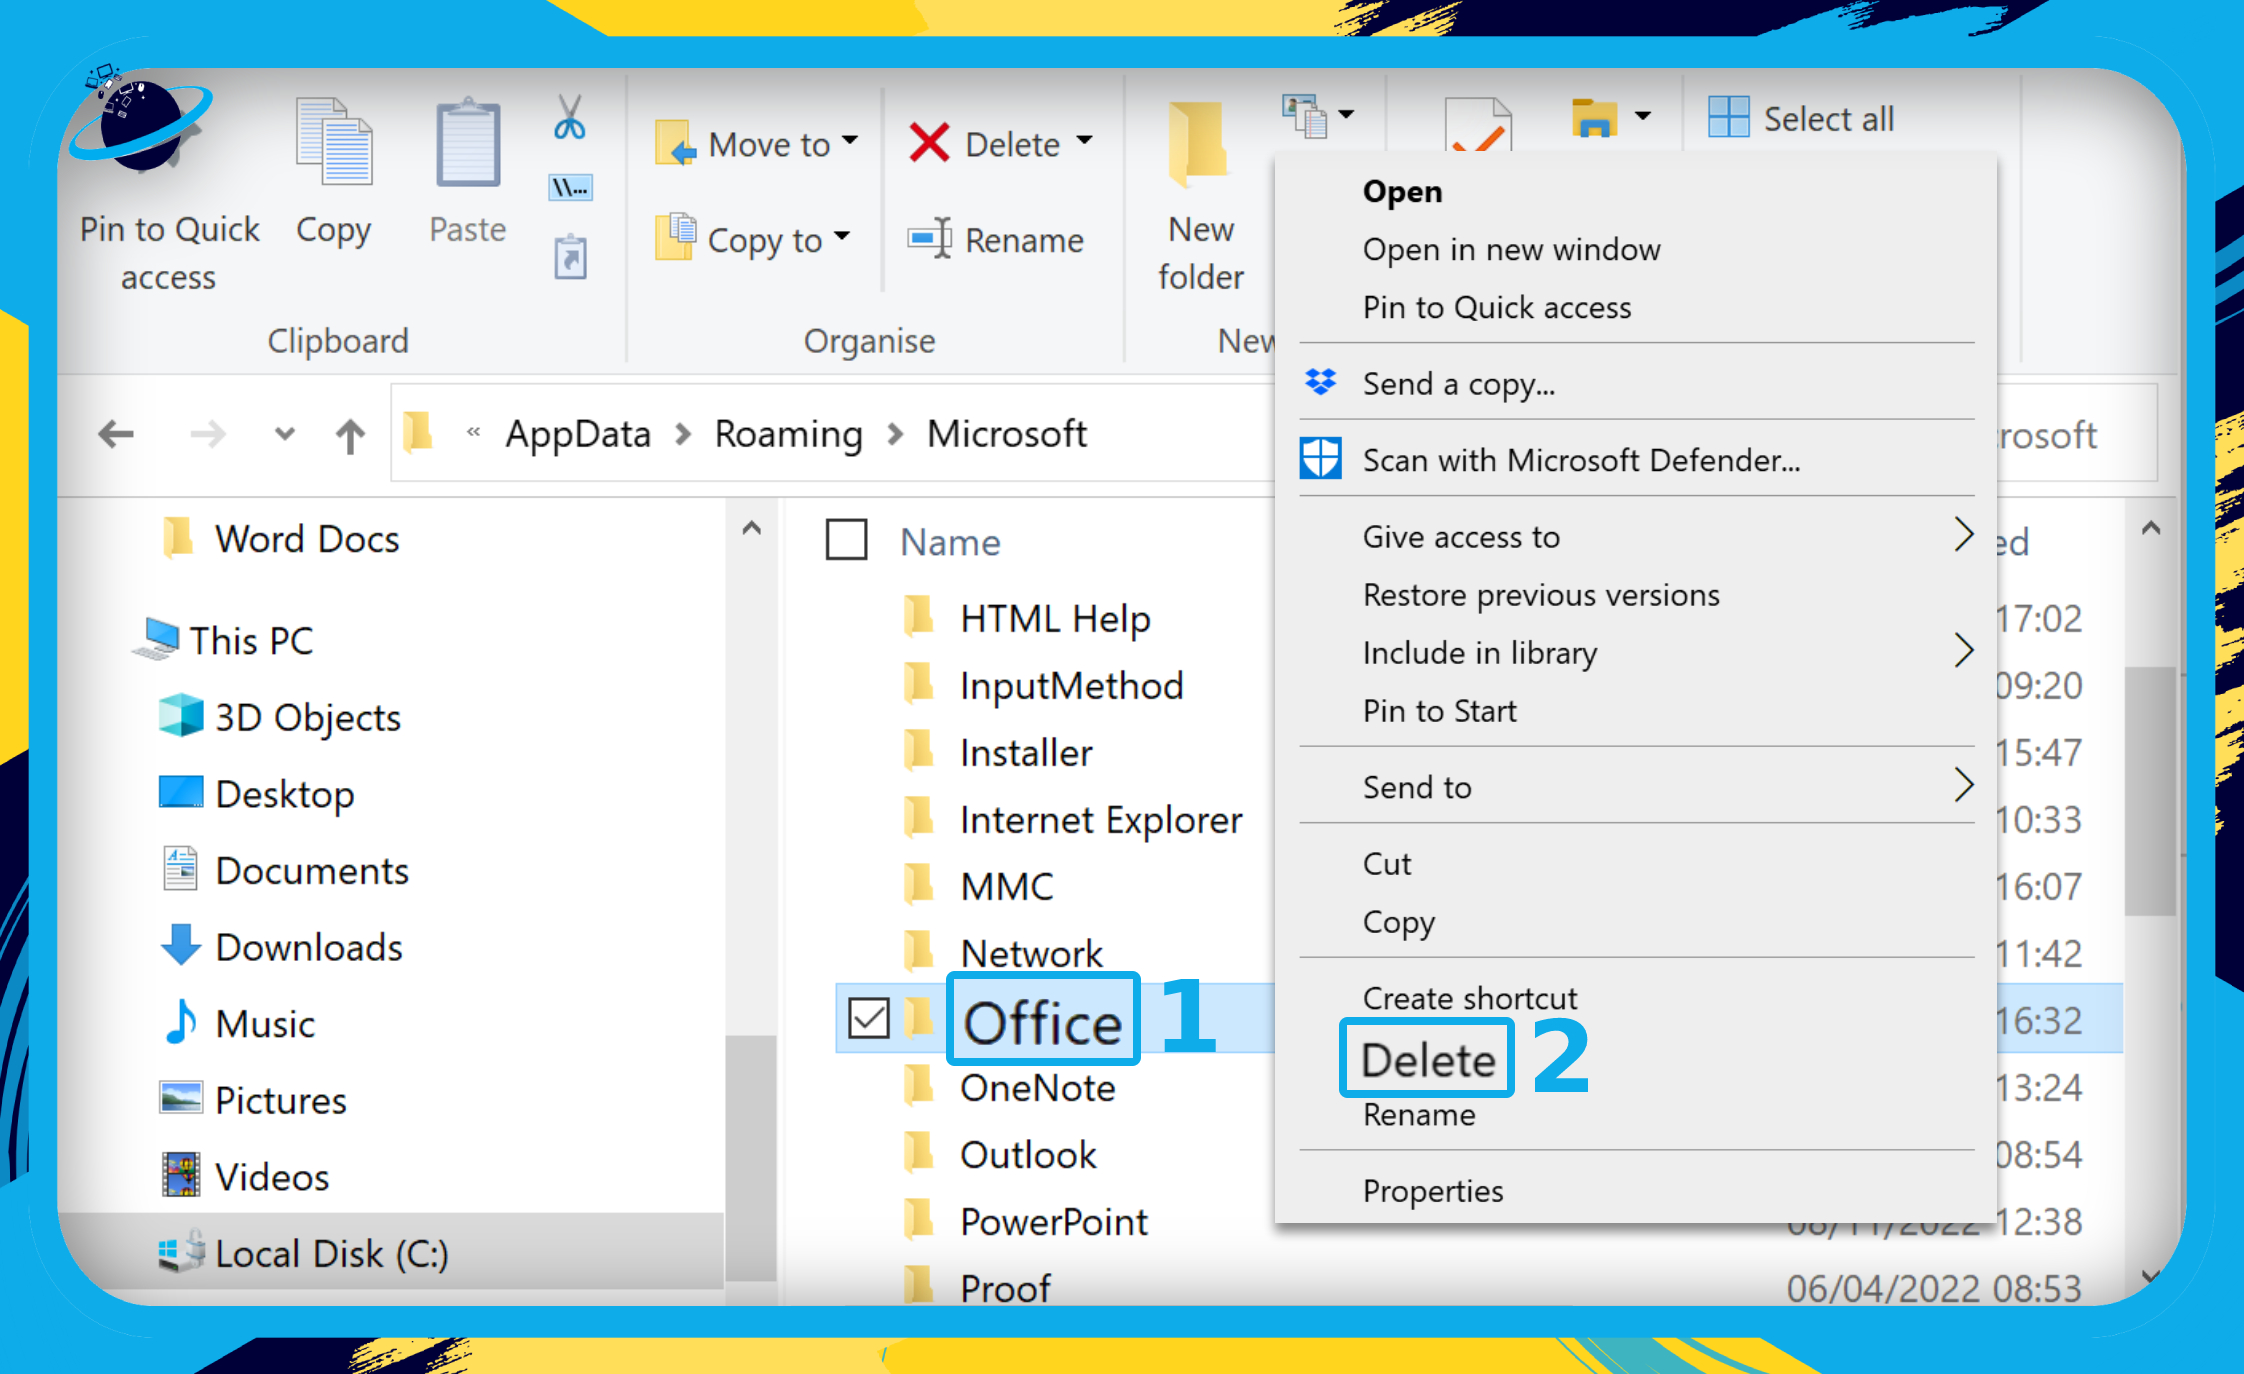
Now attempt to install your Microsoft 365 software. If you still encounter the 0-2054 error, please continue to the next solution.
Solution 5: Use Registry Editor to fix error 0-2054
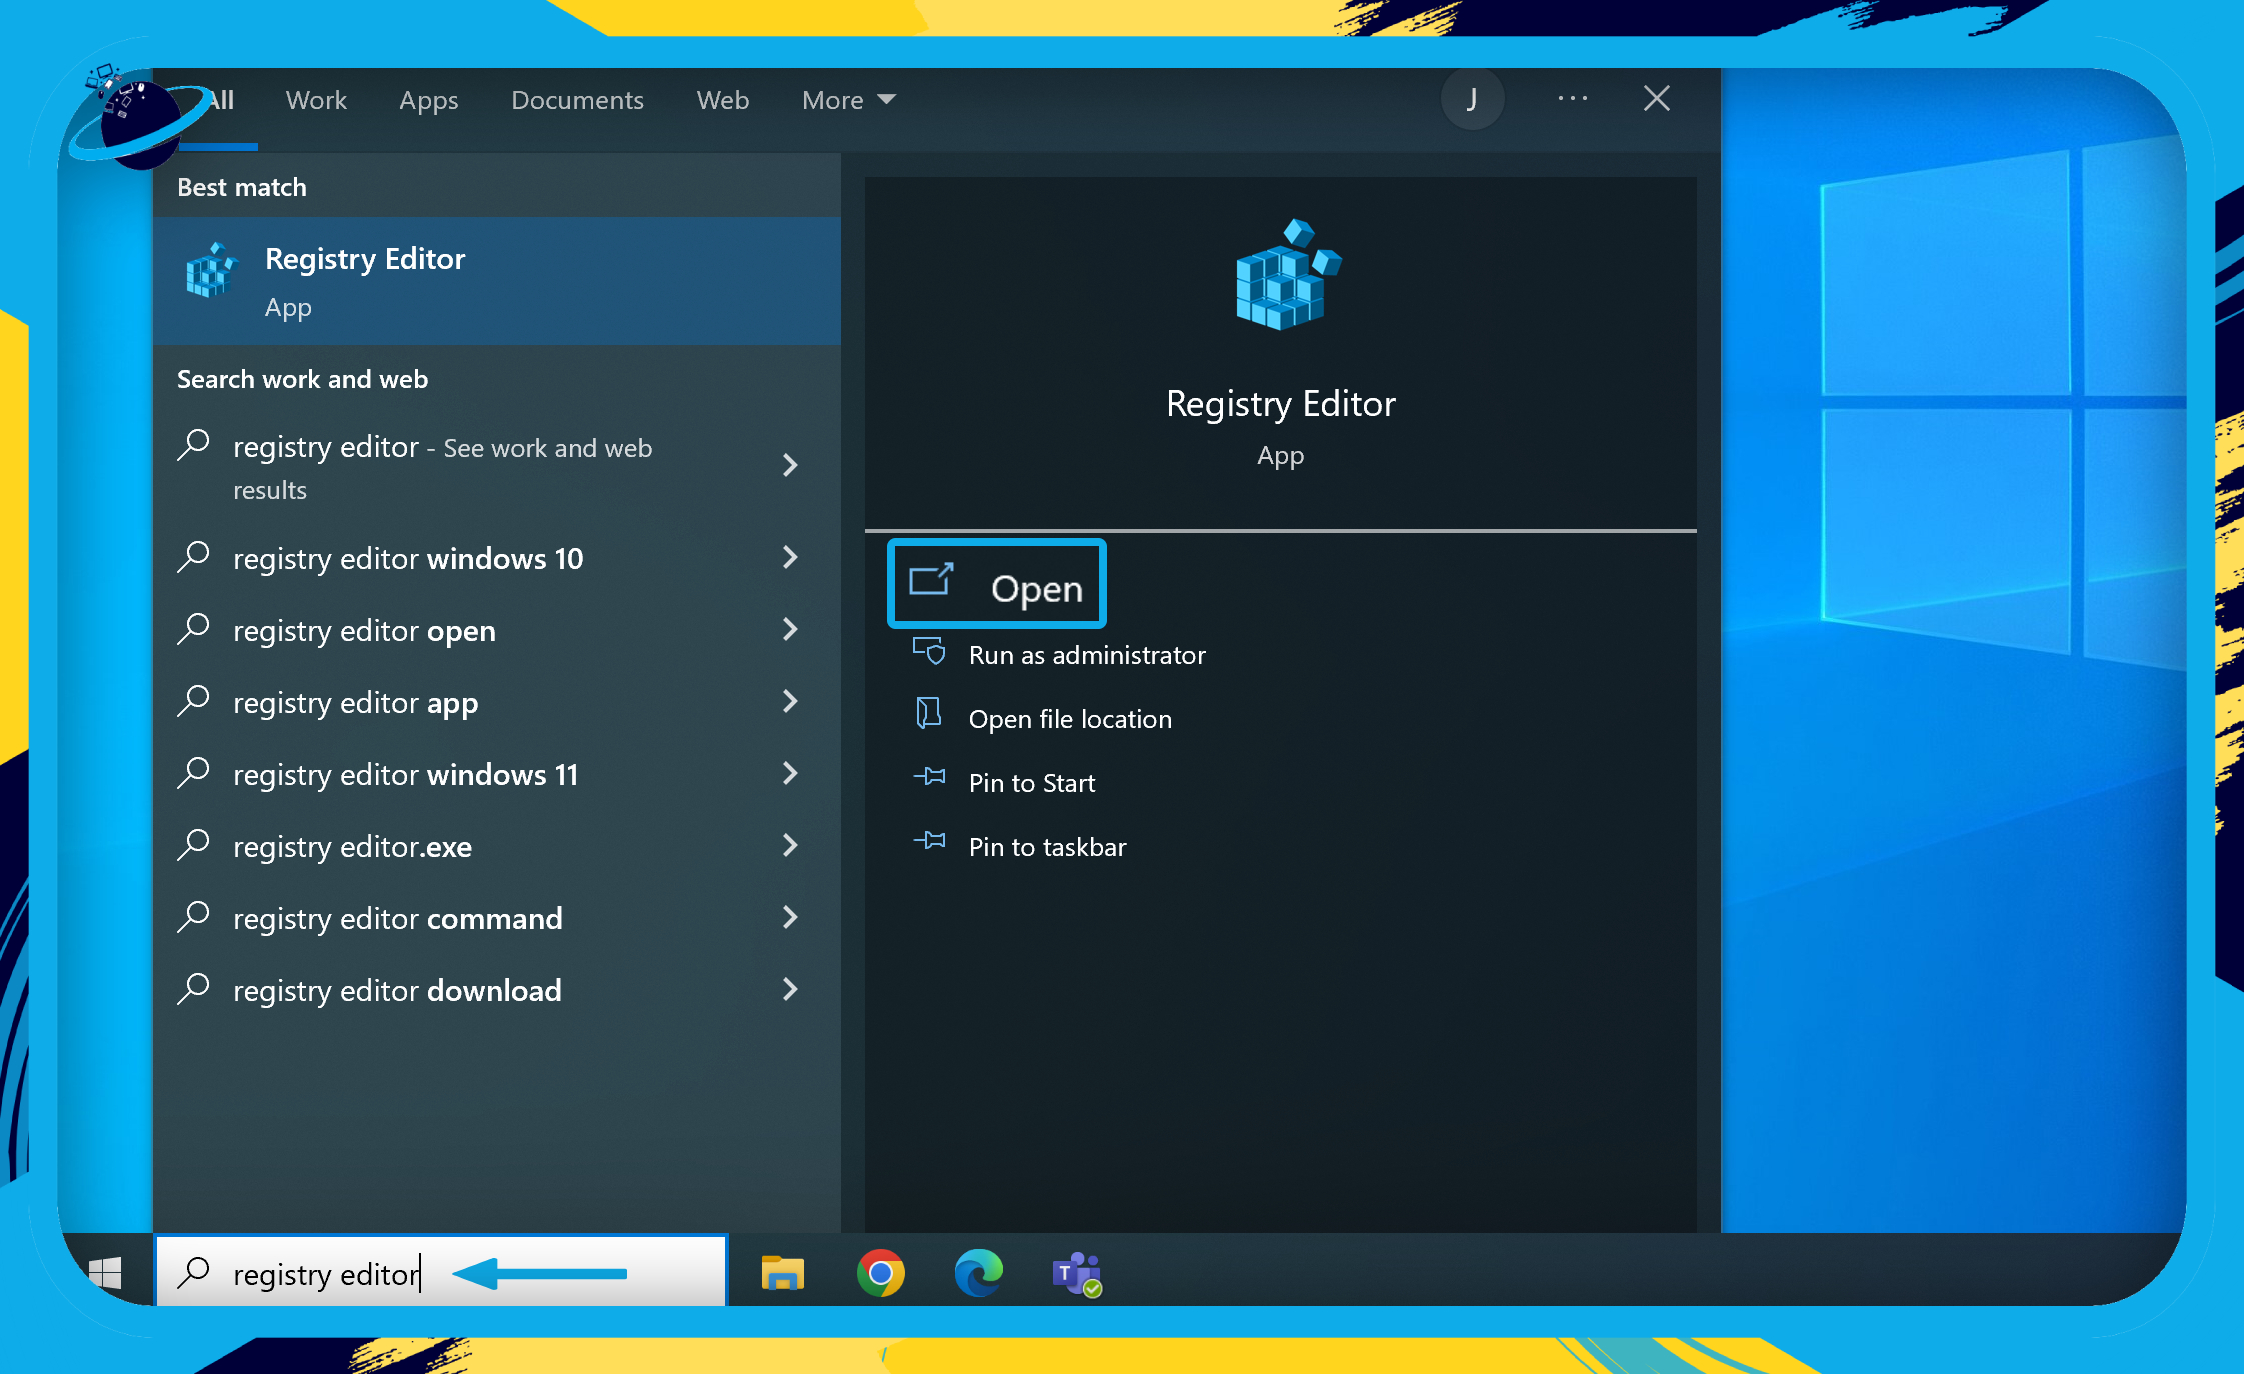
- First, type “Registry Editor” into your Windows search bar.
If you can’t find the Windows search bar, press the ![]() Windows + S keys on your keyboard at the same time.
Windows + S keys on your keyboard at the same time.
- Then click “Open.”
- Copy & paste each path, one at a time, into your Registry Editor’s address bar:
HKEY_CURRENT_USER\Software\Microsoft\Office\16.0
HKEY_CURRENT_USER\Software\Microsoft\Office\15.0
HKEY_CURRENT_USER\Software\Microsoft\Office\14.0
HKEY_CURRENT_USER\Software\Microsoft\Office\12.0
HKEY_CURRENT_USER\Software\Microsoft\Office\11.0- Press the ⏎ Return key on your keyboard to search for the folder.
- If the folder exists, right-click it in the left menu and select “Delete.”
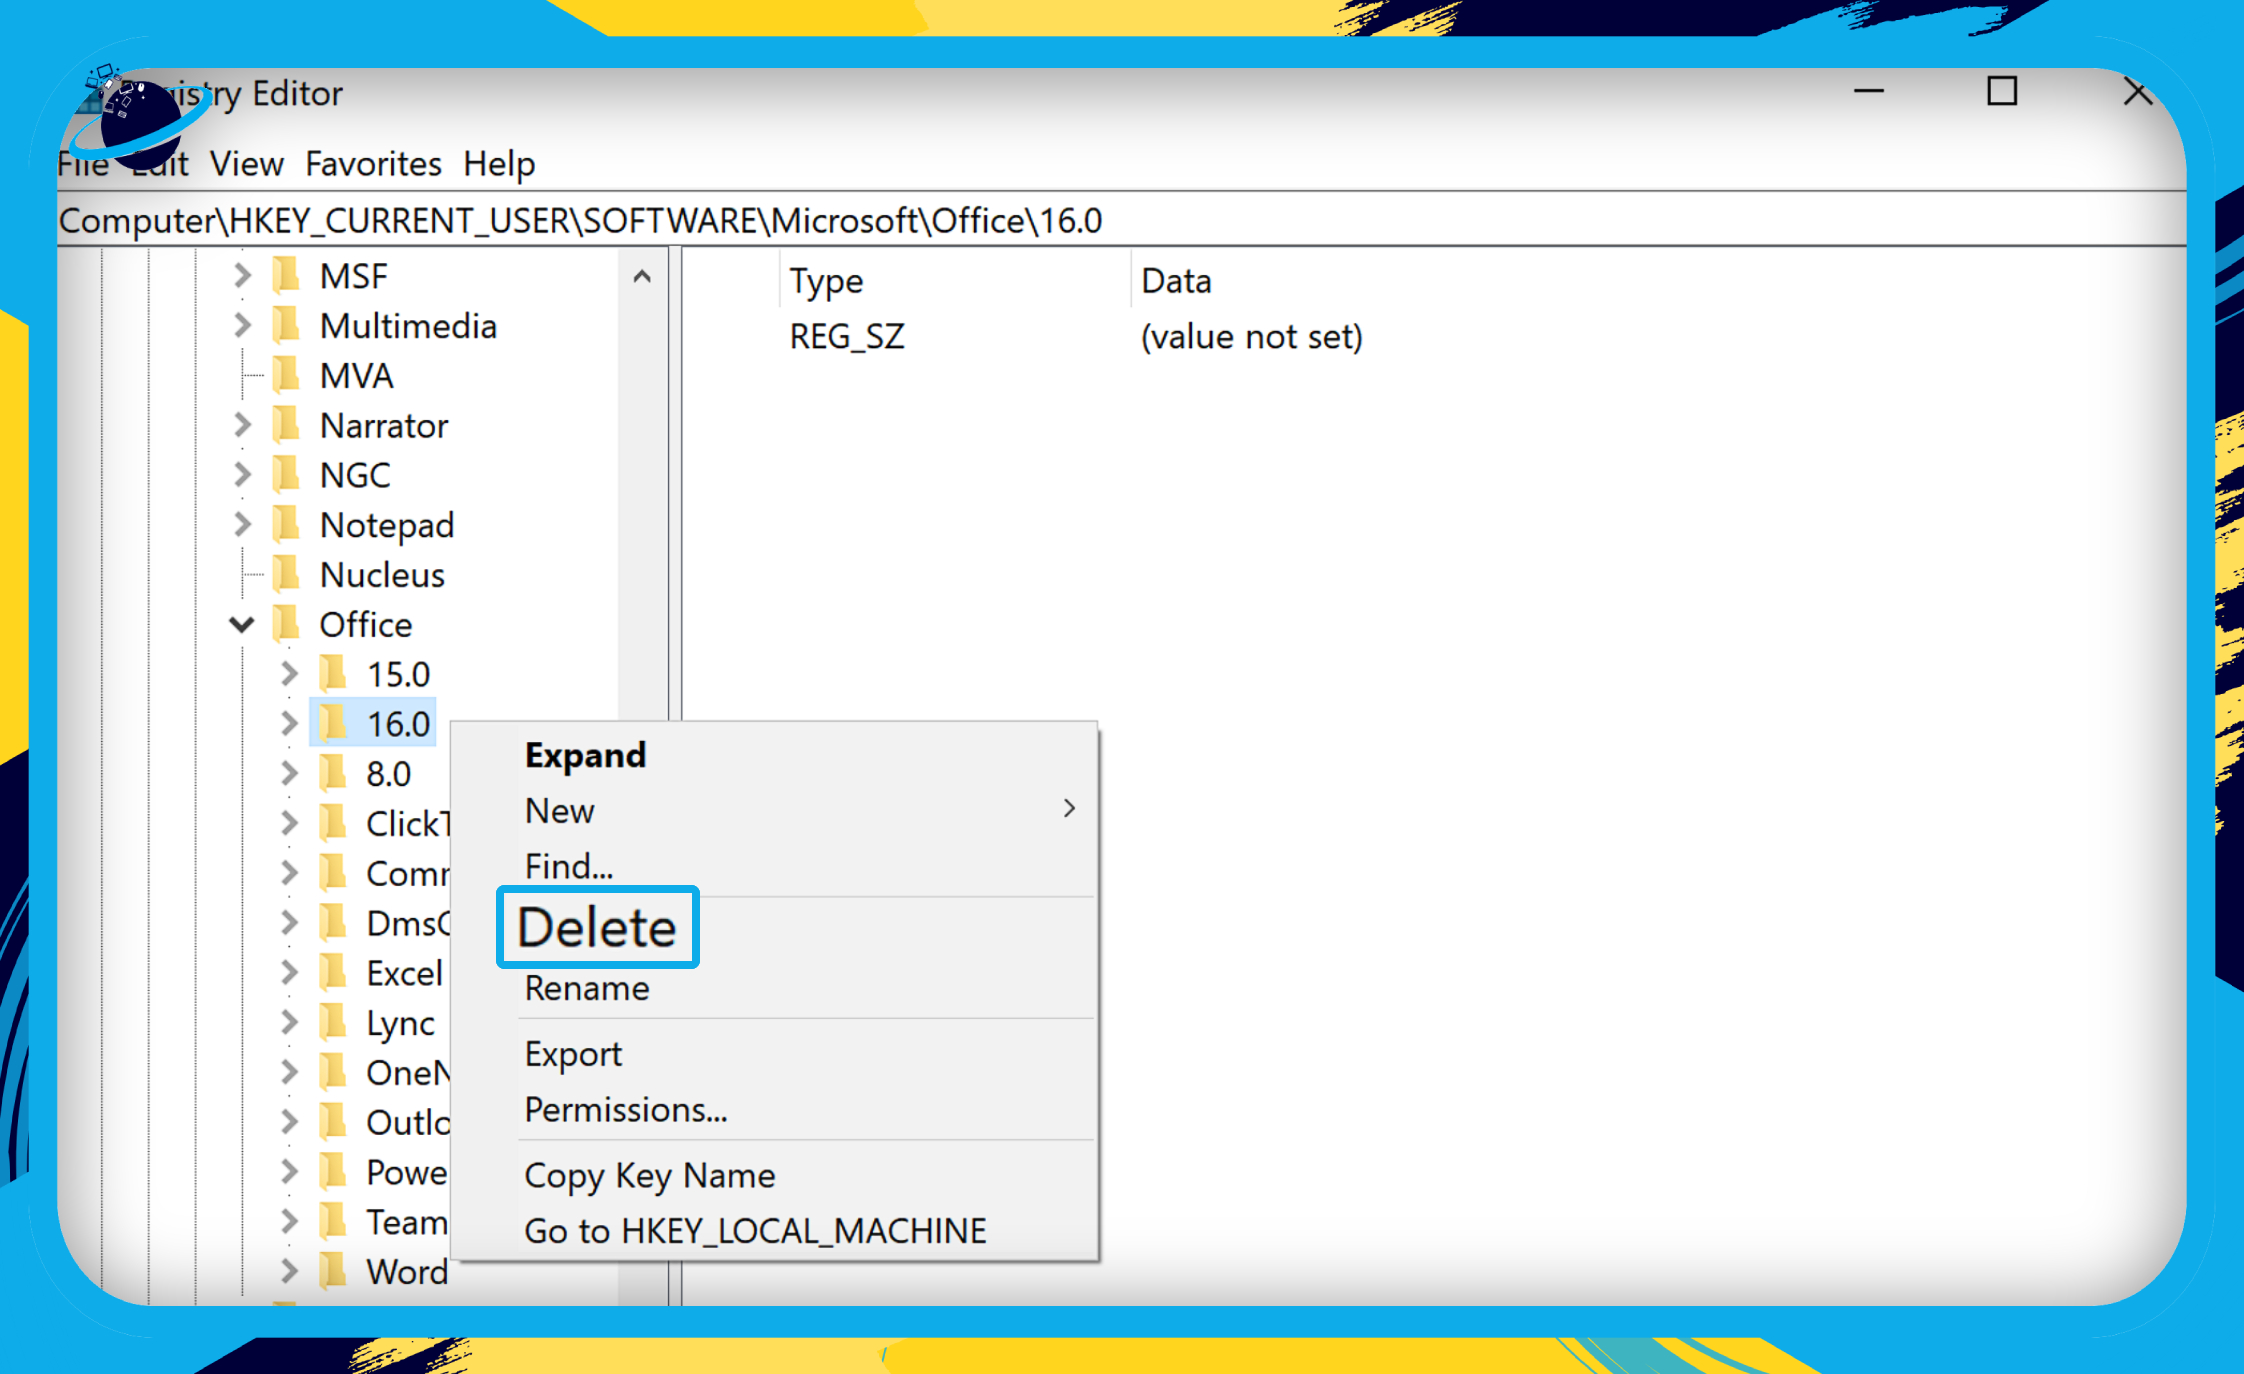
Once the folders have been deleted in Registry Editor, try to install your Office apps again. If you still see the 0-2054 error, you can try some of the additional solutions in the next section.
Alternative methods to fix the Office 365 error code 0-2054
Connect your device directly to the router
Plug your device into your router using an ethernet cable. Doing so may avoid any errors caused by a poor WiFi connection.
Install Office from a different location
If you’re attempting to install Office at work or school, network restrictions may prevent you from doing so. If that is the case, try installing Office at home, or in a WiFi hotspot.
Turn off your VPN for the time being
Before installing Office, consider turning off your VPN by going to Start > Settings > Network & internet > VPN.
Run an SFC scan to fix the issue
The System File Checker (SFC) can quickly resolve the error code 0-2054 if it is caused by system file corruption. The SFC scan is a procedure for replacing or repairing damaged system files using a cached copy from the directory.
To start the SFC scan, follow these steps:
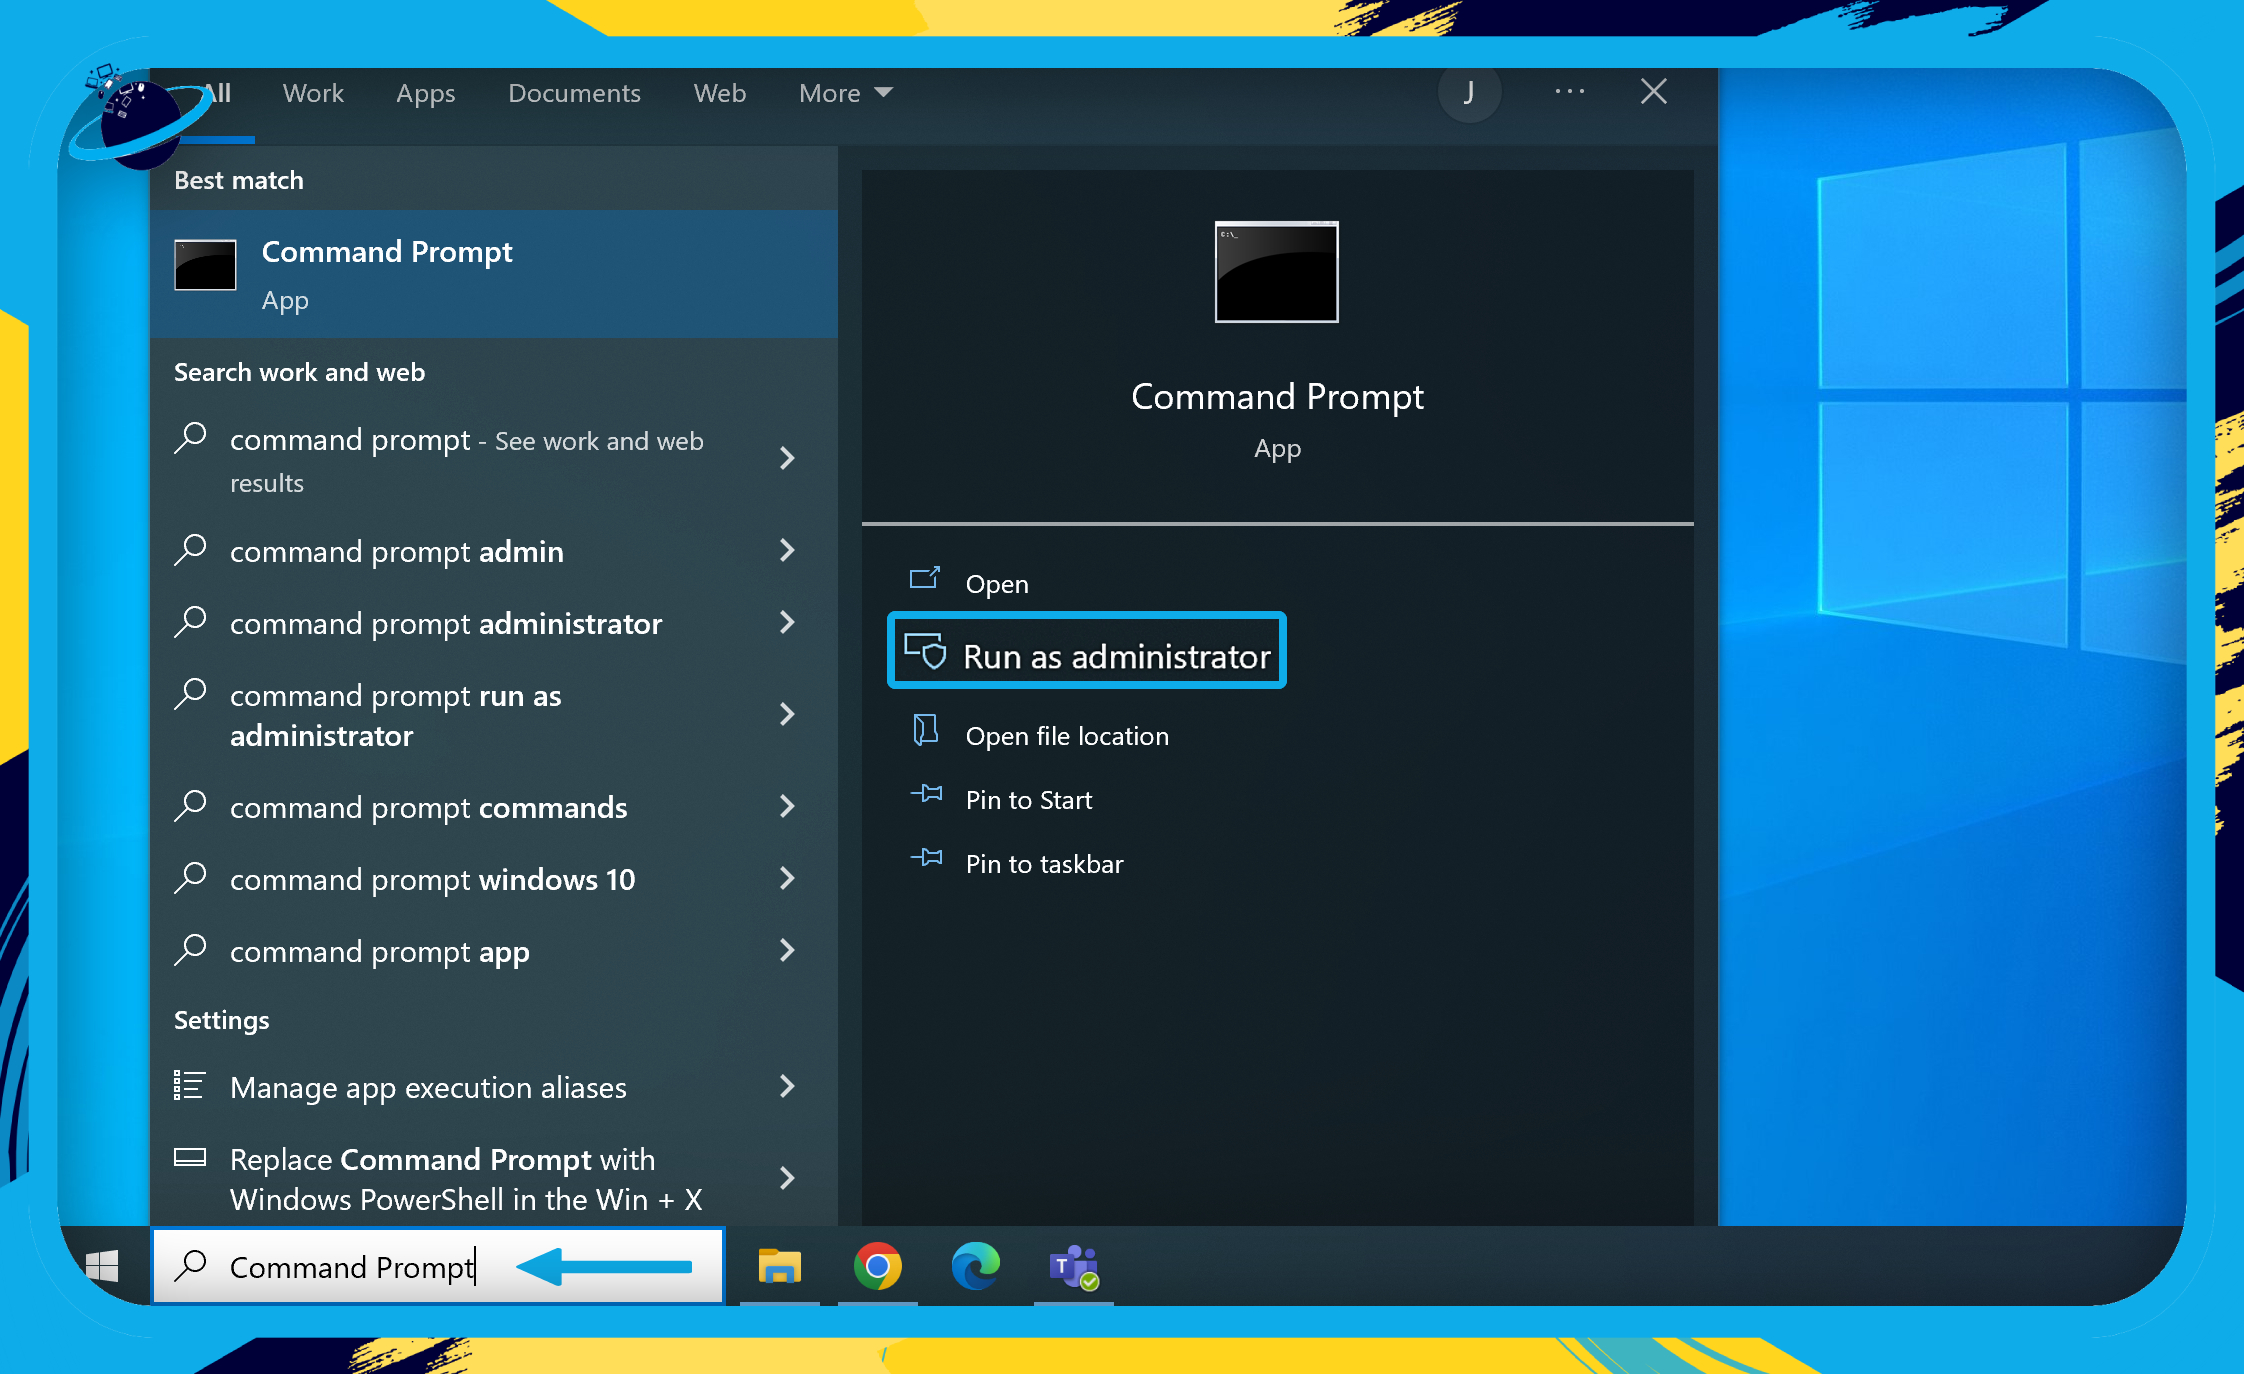
- First, type “Command Prompt” into your Windows search bar.
If you can’t find the Windows search bar, press the ![]() Windows + S keys on your keyboard at the same time.
Windows + S keys on your keyboard at the same time.
- Then click “Run as administrator.”
- Type “sfc /scannow” into the Command Prompt window.
- Then press the ⏎ Return key on your keyboard.
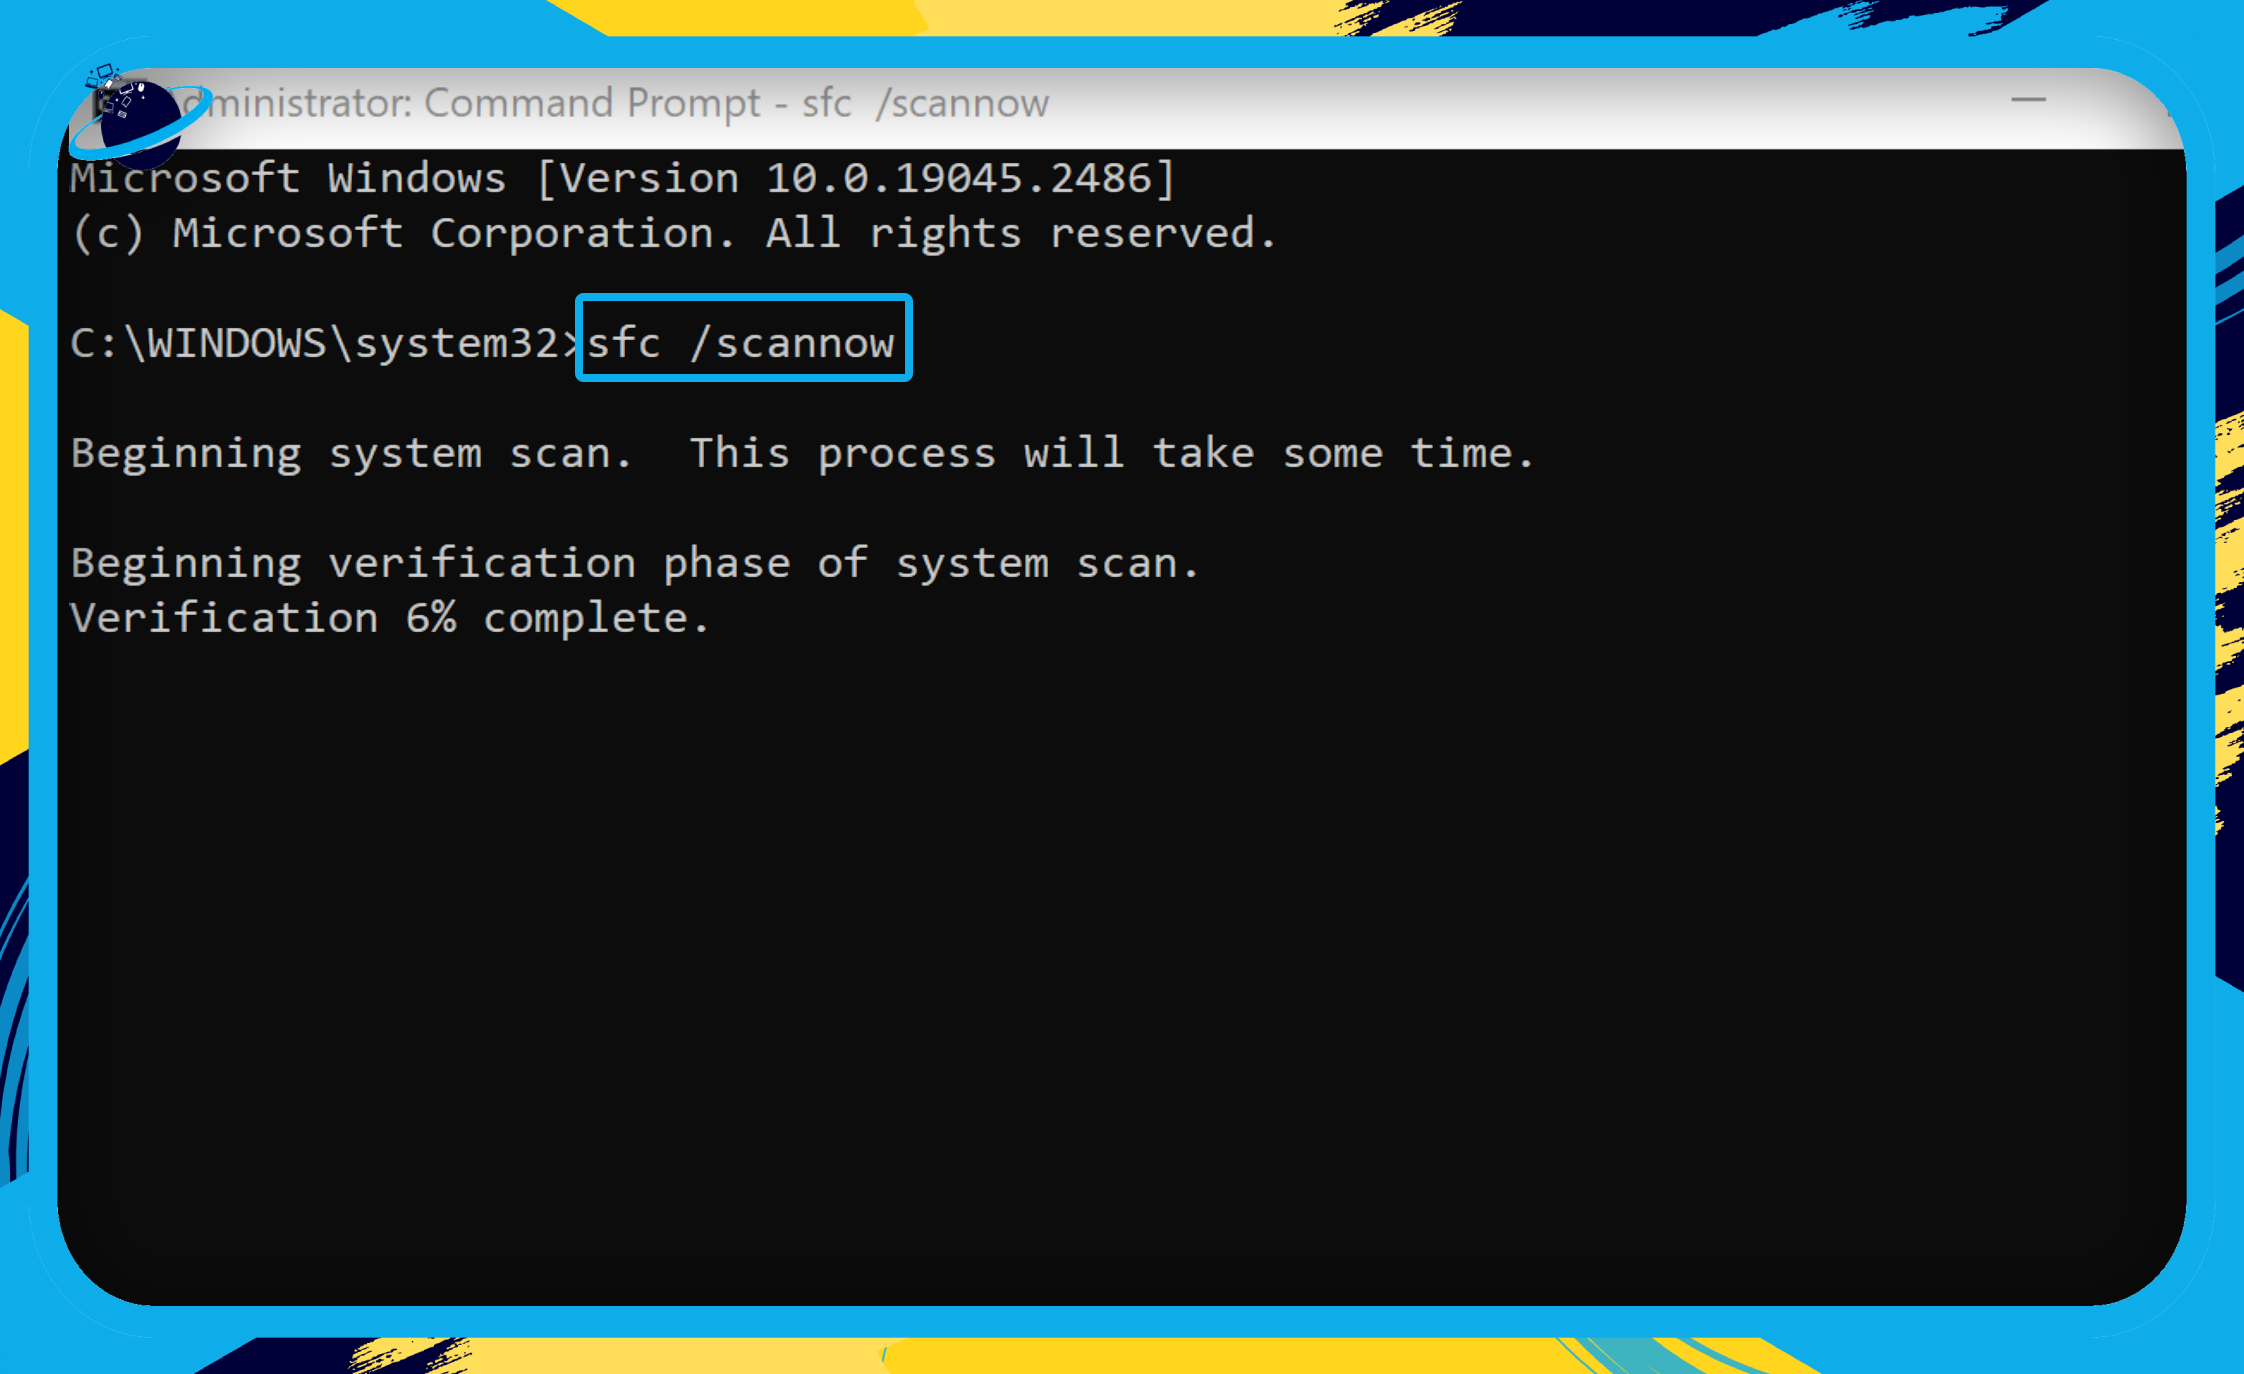
Try to install Office again when the scan is complete to see if the 0-2054 error has been resolved.
Frequently Asked Questions (FAQ)
 How do I repair Office 365 on Windows 10?
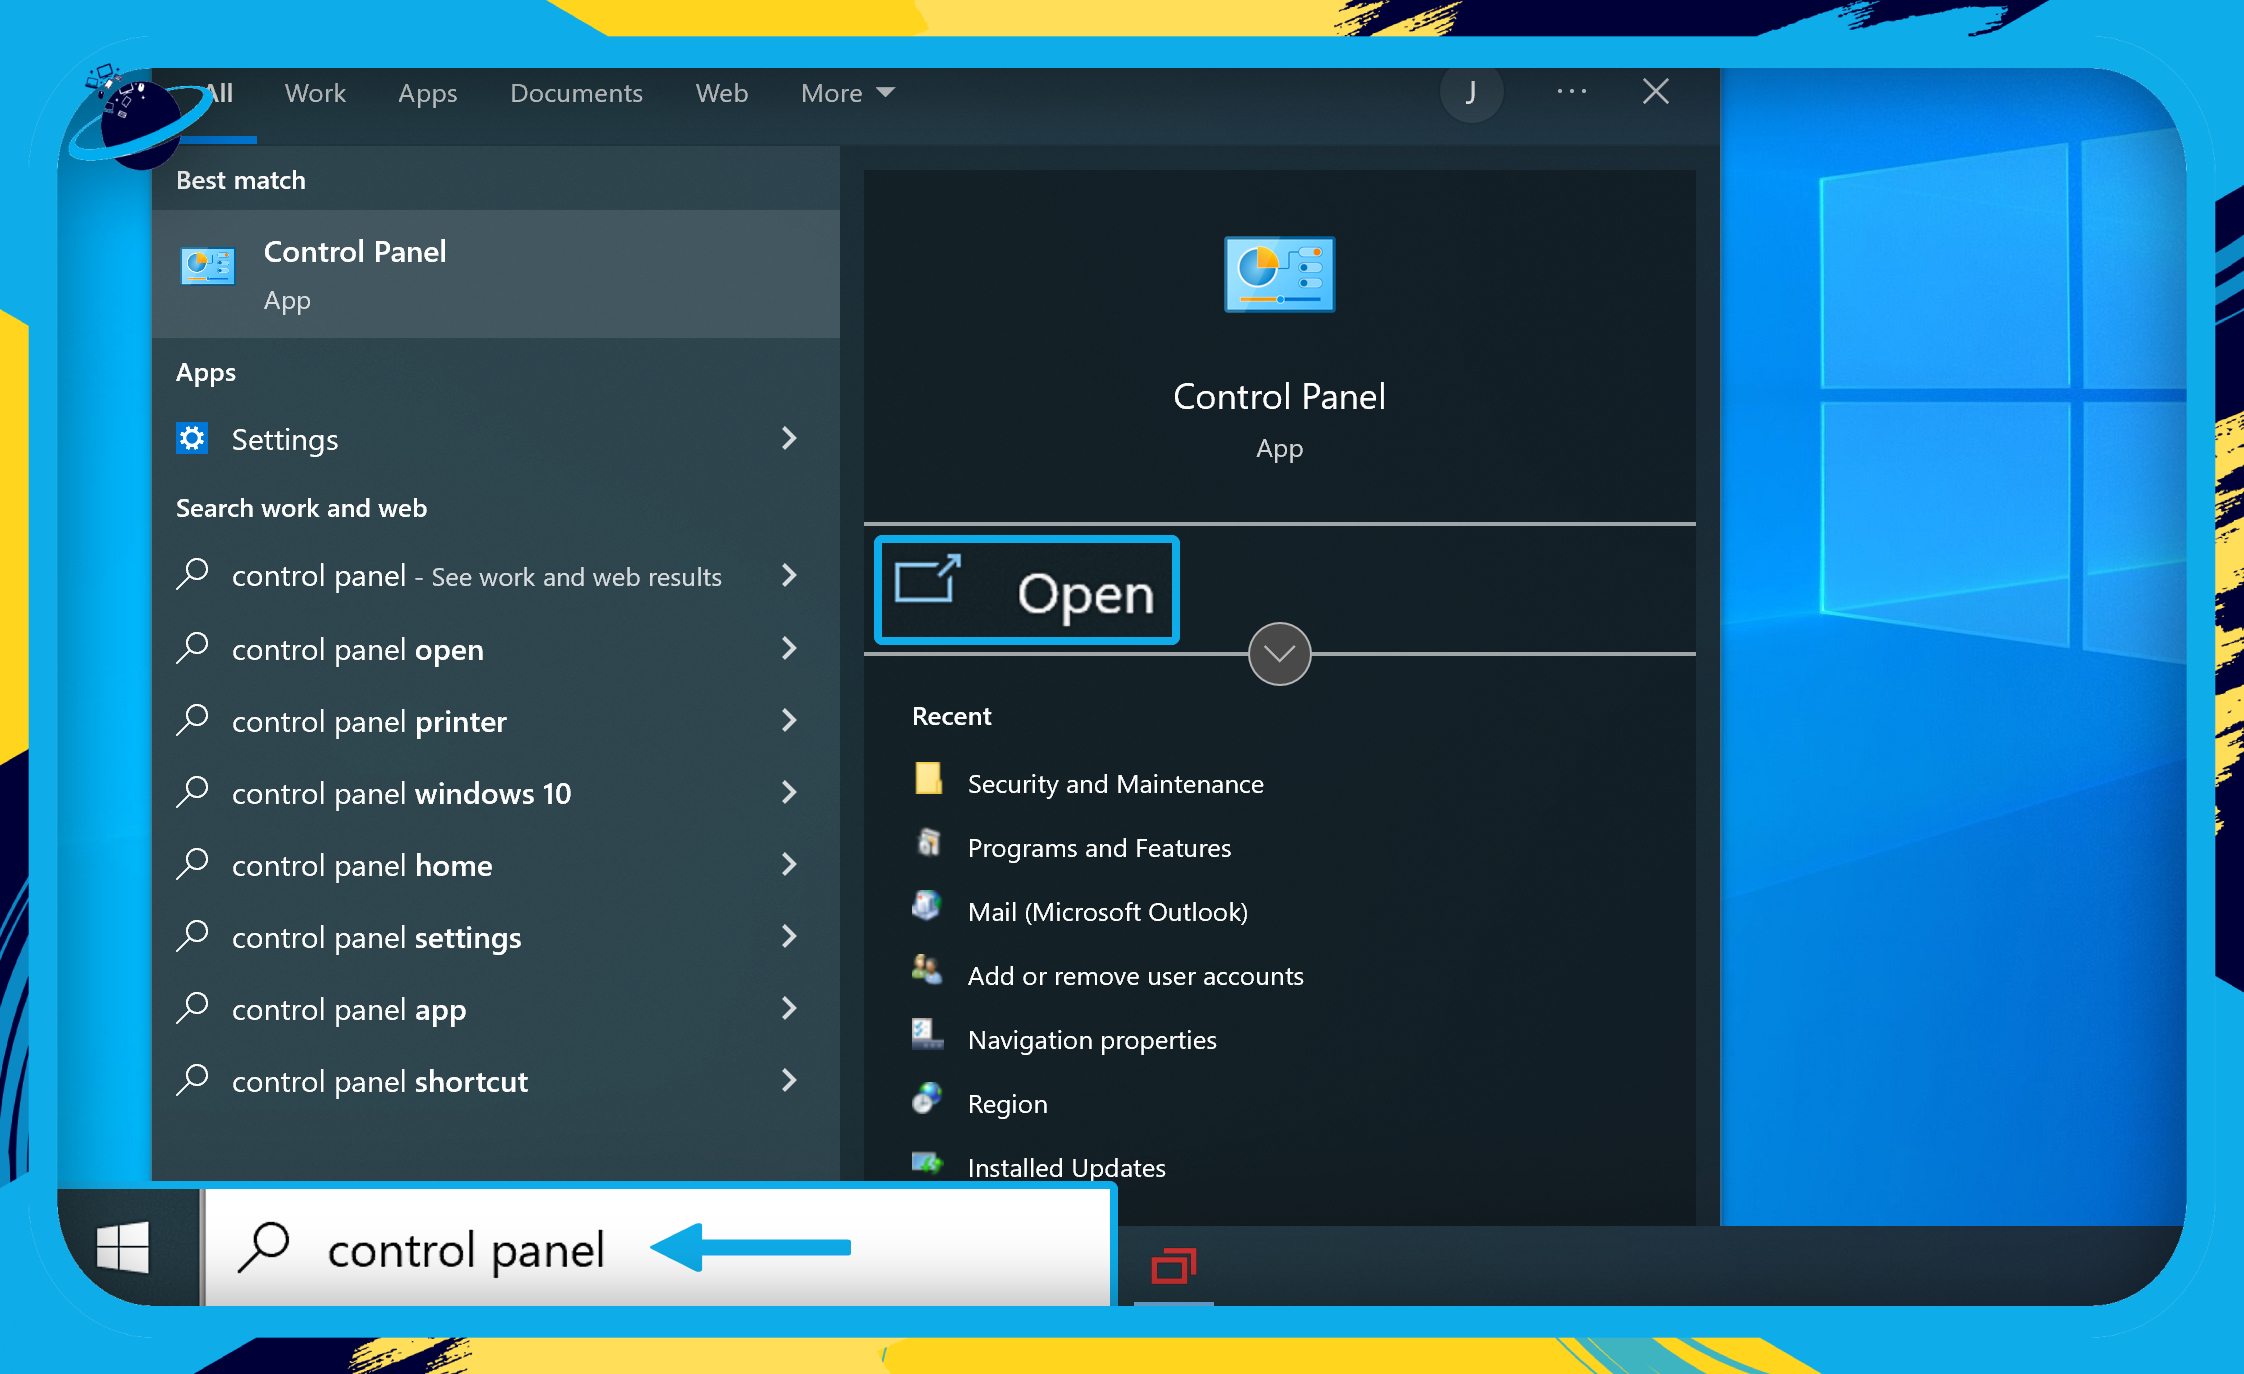
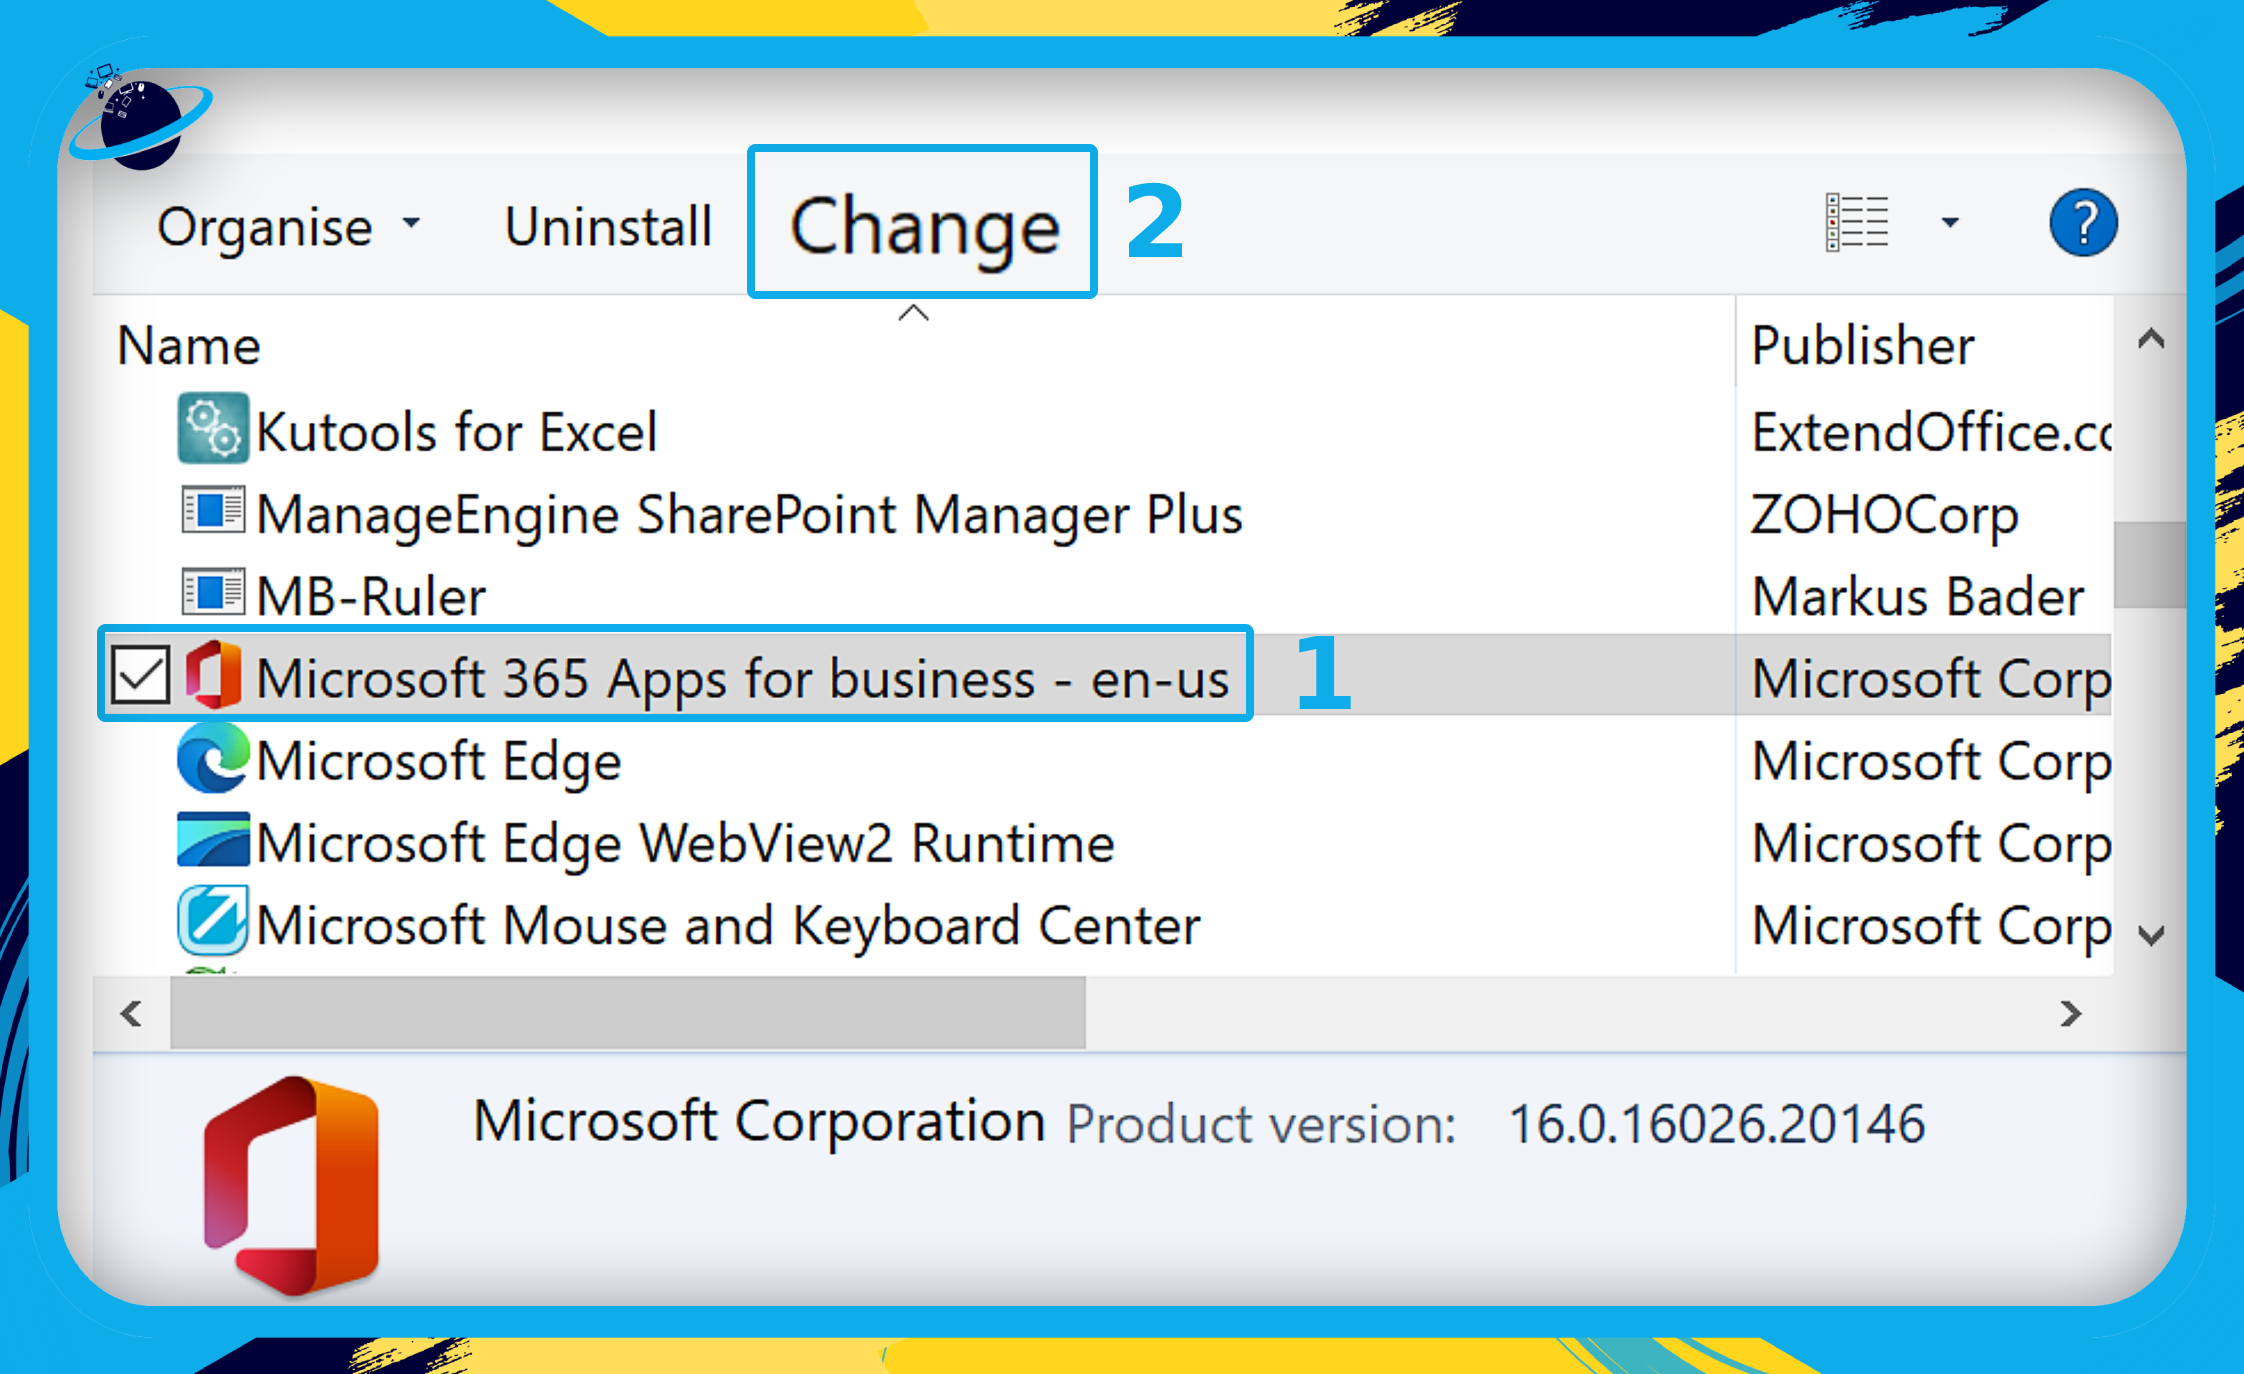
- Type “Control Panel” into your Windows search bar.
- Then click “Open.”
- Click on “Uninstall a program” under “Programs.”
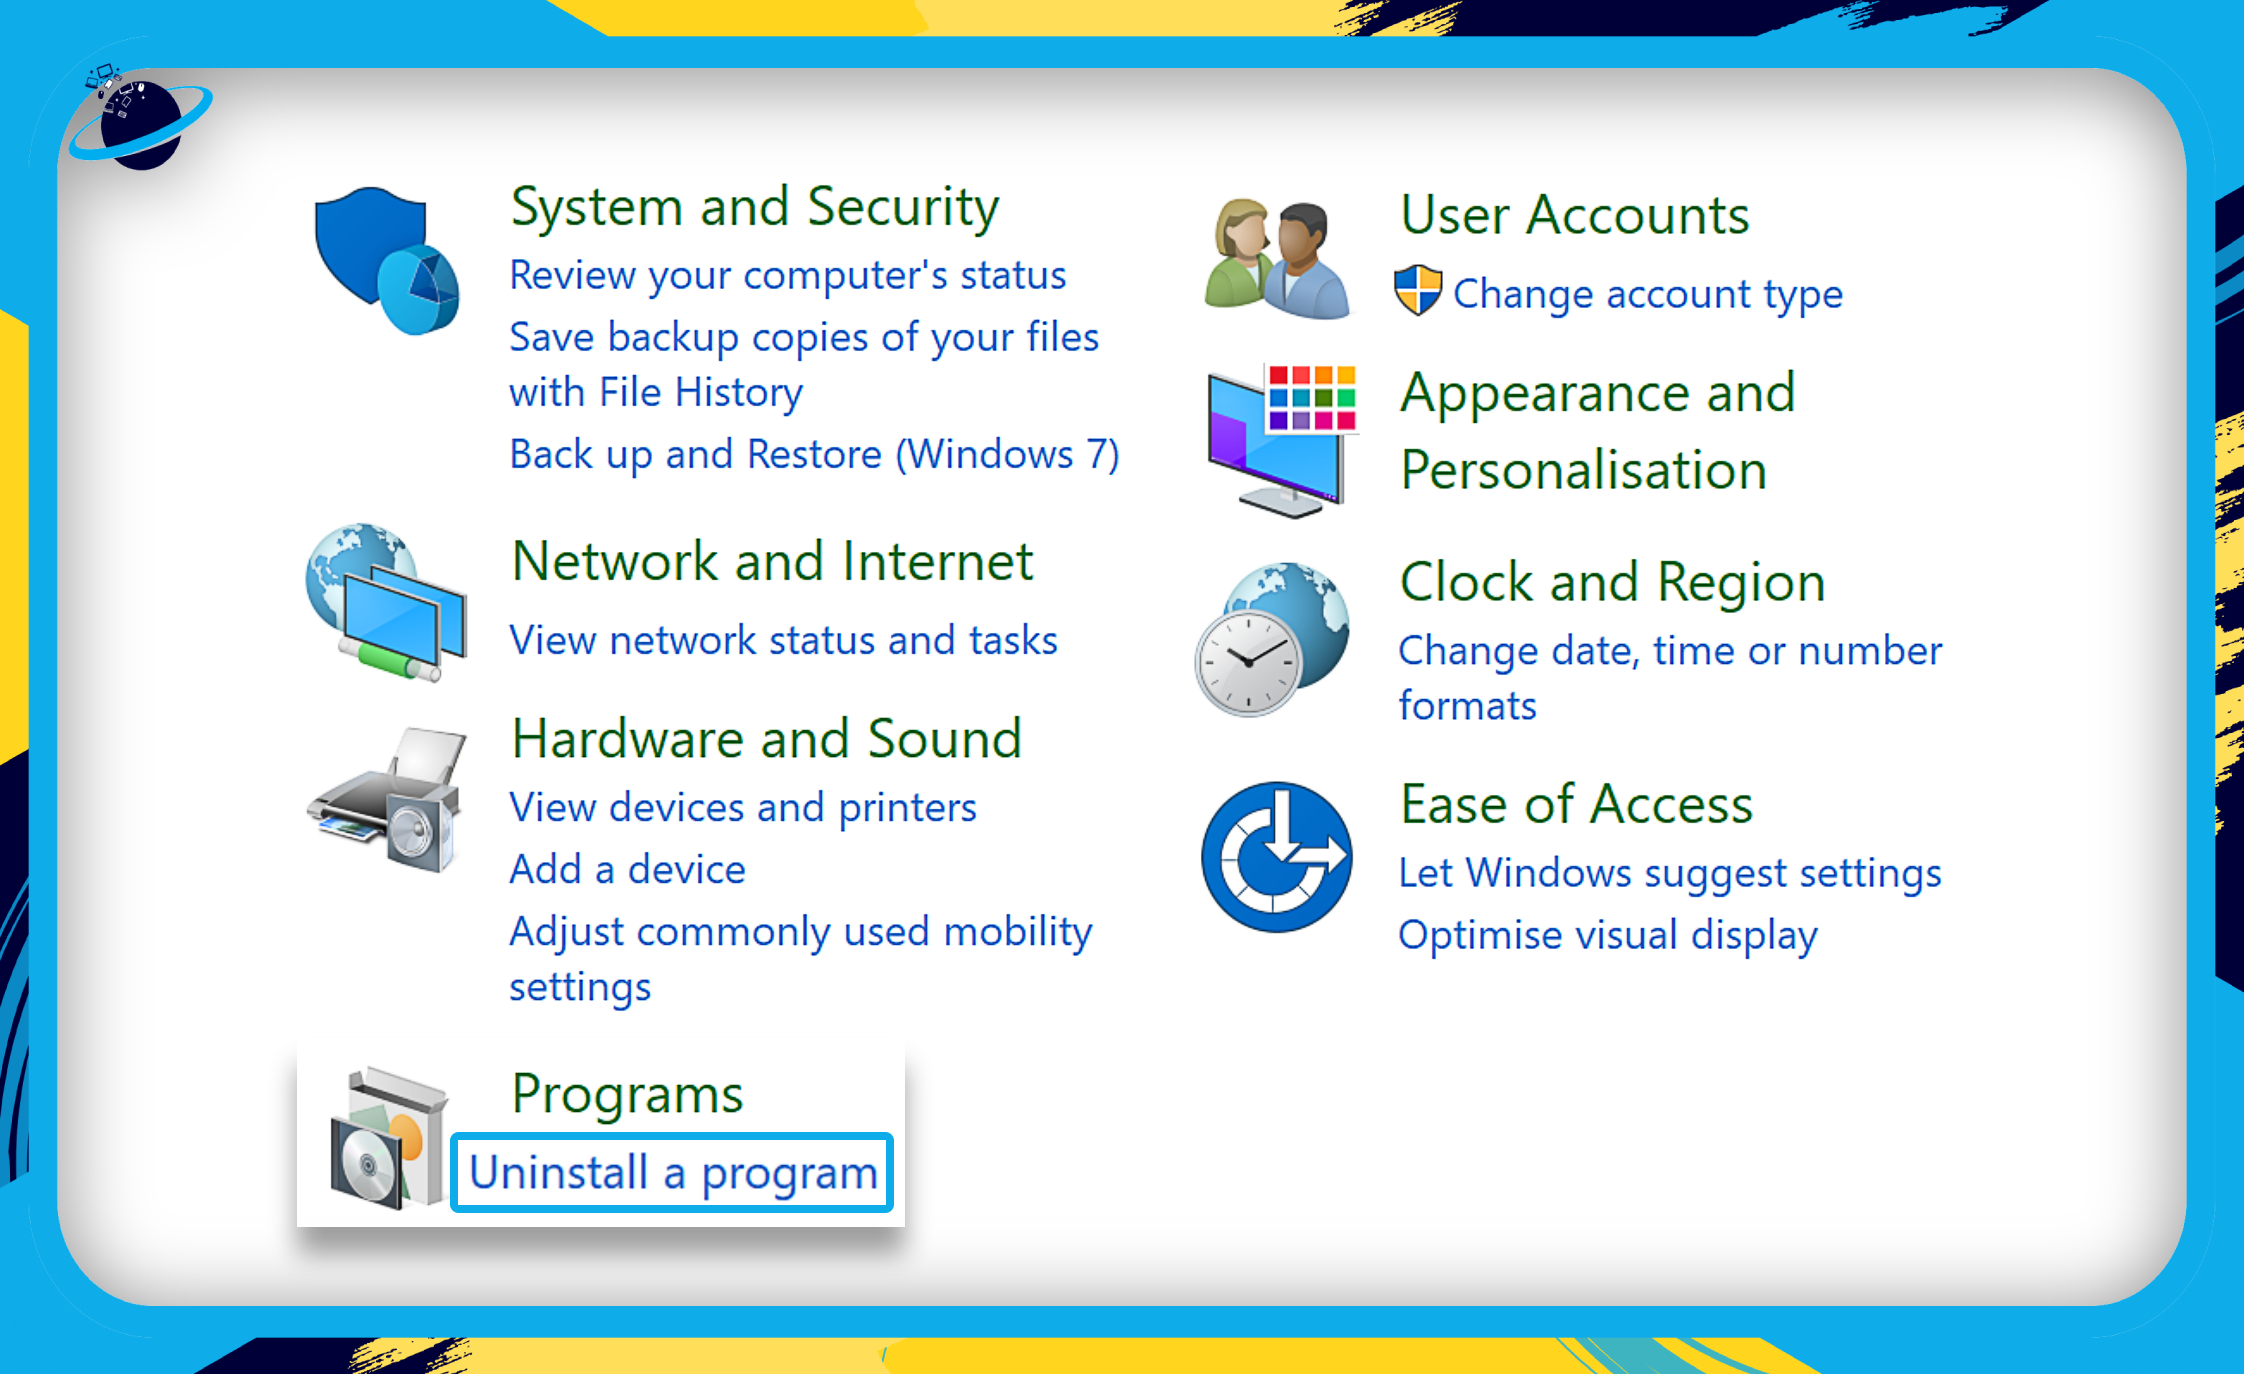
- Select “Microsoft 365…” (1)
- Then click “Change.” (2)
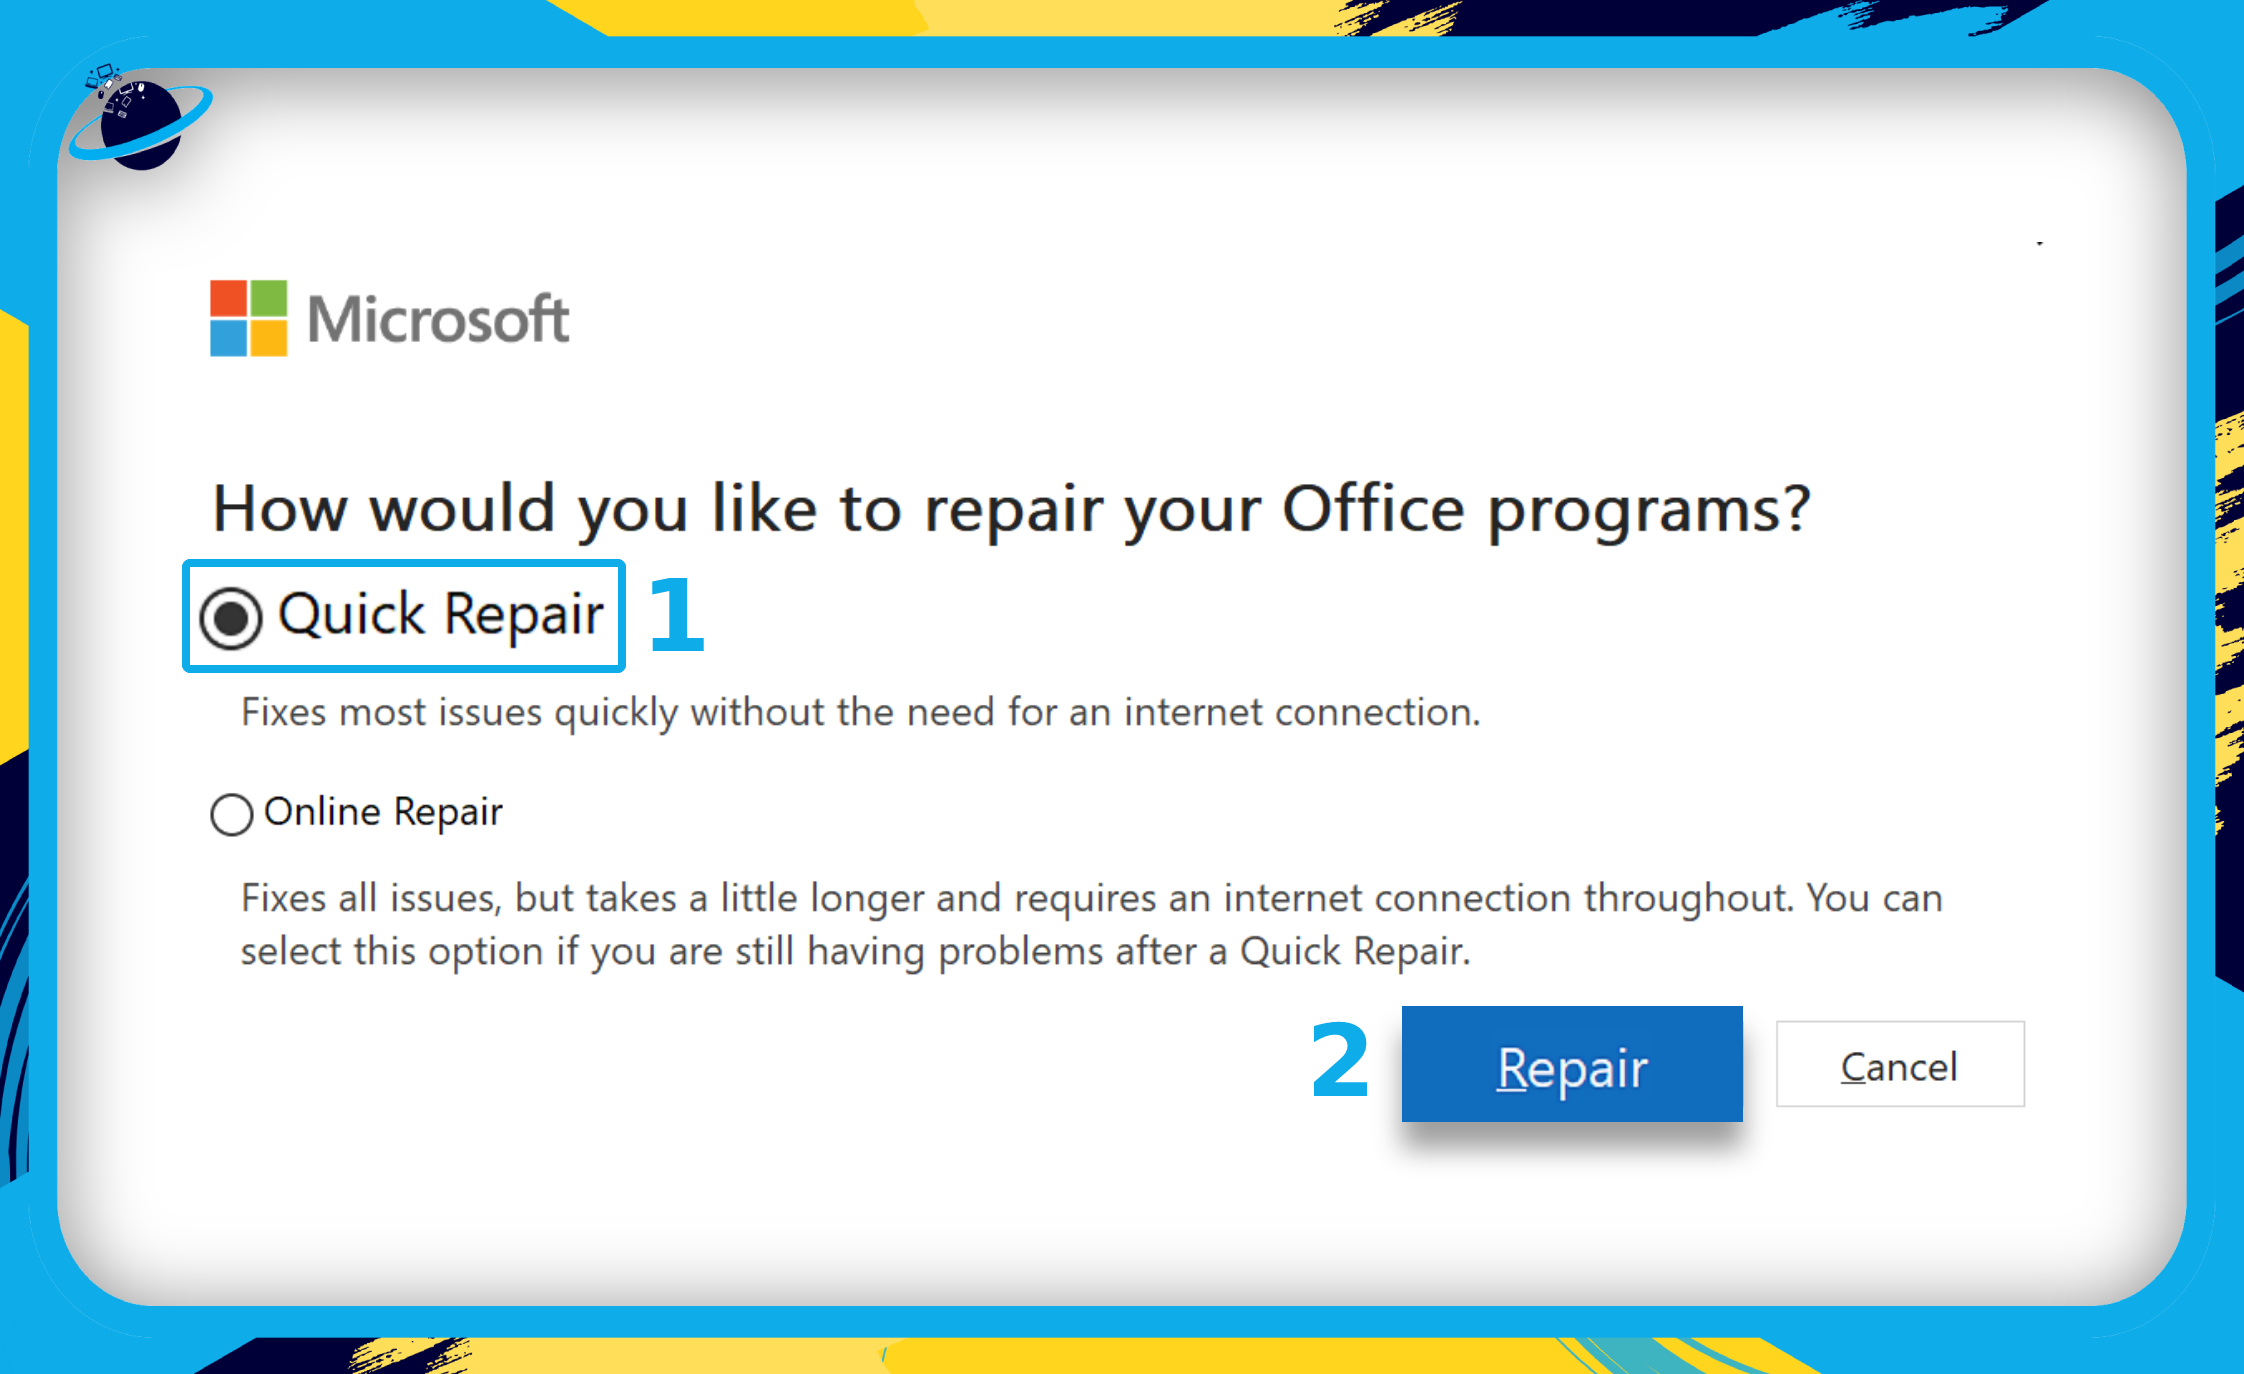
- Select “Quick Repair.” (1)
- Finally, click the “Repair” button. (2)
Why is Office 365 not working?
There are several common problems that may cause your Office / Microsoft 365 to stop working:
- Your Firewall software is preventing Office from working correctly.
- Add-ins are causing performance issues.
- Internet/Network connection issues.
- You have made a recent change to your device.
- Your subscription has ended.
- Corrupted or expired cache — fix your cache.
Run a “Quick Repair” to help resolve your issue (see section above).

Conclusion
The 0-2054 error in Microsoft 365 is associated with problems during installation of your Office software. The error is commonly seen when using Office Deployment Tool (ODT) to install Office. Unless you need to use ODT, we suggest ![]() downloading the installer from your Microsoft account.
downloading the installer from your Microsoft account.
If you need to use ODT, we suggest ensuring that all old installations of Office have been removed. Then, add the installer to your antivirus or firewall exceptions and try to install your software again.
Be sure to try all the solutions offered in this guide. But if you still can’t install Office, we suggest contacting ![]() Microsoft support for more assistance.
Microsoft support for more assistance.
Thanks for reading!