If you have employees that will never need to send emails to users outside of your organization, it can make sense to restrict their ability to do so. This inevitably keeps your data safer. So in this blog post, I’m going to demonstrate how you can restrict users from sending emails to users outside of your organization.
Follow the steps below to restrict users from sending emails to users outside of your organization:
- Navigate to Office.com > Sign in using your Microsoft 365 credentials > Open the Admin app using the app launcher
- Click Show all > Open the Exchange admin center
- Click mail flow
- On the rules page, click + (New) > Click Create a new rule
- Name rule
- Under ‘Apply this rule if…’, click the recipient is located… then Outside the organization > Click OK
- Under ‘Do the following…’, click Reject the message with the explanation… and include an explanation for the email getting blocked — alternatively, select Delete the message without telling anyone if you don’t want users to know
- Click Save
Please note: you must be an Exchange admin to follow the steps given above. Otherwise, you’ll be unable to create new mail flow rules. Also, please note that following the steps above will apply this new rule to all users — I’ll explain as part of step 6 how you can restrict certain users rather than all.
Following the steps above, you’ll successfully set up a new mail flow rule that will prevent the users within your organization sending emails to external users. As I said, as part of step 6 I’ll explain how you can set this rule up for certain groups rather than all of your users. For example, you might want directors to retain the ability to email external users, rather than preventing everyone from sending emails externally.
Keep reading as I demonstrate the entire process while also including screenshots.
   |
Step-by-step: How to restrict users from sending emails to users outside of your organization
For some businesses, it makes sense to prevent users from sending emails to people outside of your organization. For example, you might not want your finance team sending emails to users outside of your business. Or you might have users that don’t communicate with external individuals and businesses, therefore making the ability to email external users redundant. If you need to restrict users from sending emails to users outside of your organization, you can follow the steps below.
- Navigate to Office.com > Sign in using your Microsoft 365 credentials > Open the Admin app using the app launcher
- Click Show all > Open the Exchange admin center
- Click mail flow
- On the rules page, click + (New) > Click Create a new rule
- Name rule
- Under ‘Apply this rule if…’, click the recipient is located… then Outside the organization > Click OK
- Under ‘Do the following…’, click Reject the message with the explanation… and include an explanation for the email getting blocked — alternatively, select Delete the message without telling anyone if you don’t want users to know
- Click Save
As I said before, please bear in mind that you must be either Microsoft 365 Exchange or global admin to follow the steps given above. Without the suitable privileges, you won’t be able to follow the steps given.
Now I’m going to demonstrate creating the mail flow rule, including screenshots so you can easily follow along.
   |
1. Navigate to Office.com > Sign in using your Microsoft 365 credentials > Open the Admin app using the app launcher
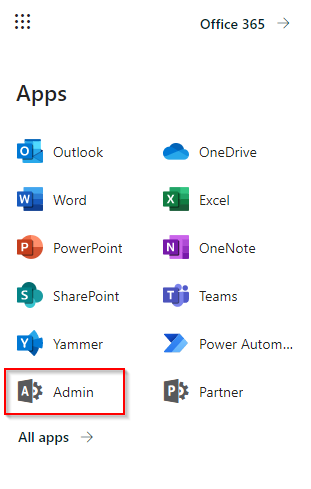
After logging in to Office.com using your Microsoft 365 credentials, open up the Admin application using the app launcher. If you cannot see the admin application, this means that you don’t have the right privileges.
If this is the case, ask your M365 global admin to add the privileges you need to your account.
2. Click Show all > Open the Exchange admin center
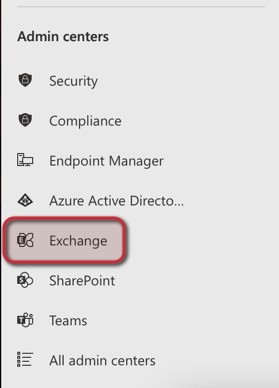
After opening up the Admin application, open the Exchange admin center. If the Exchange admin center is unavailable, this is likely because you don’t have the appropriate privileges assigned to your user.
3. Click mail flow
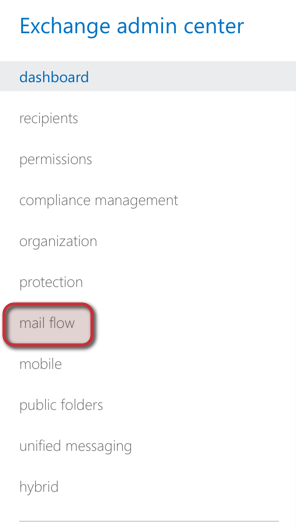
Once the Exchange admin center loads, click mail flow on the side bar menu to open up your organization’s mail flow settings. Within the mail flow section of the Exchange admin center, you’ll find the ‘rules’ page where you can create new mail flow rules — which is what we’re going to do to prevent your organization’s users from being able to send emails to external users.
4. On the rules page, click + (New) > Click Create a new rule
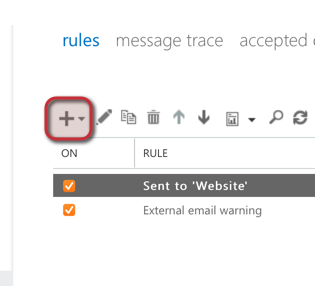
After clicking +, a dropdown menu will appear. Click Create a new rule on the menu to open up a child window where you can create and configure your rule.
5. Name rule
A nice and easy step — start by naming the rule once the child window opens up.
For the purposes of this blog post, we’ve named our demonstration rule Blocking emails being sent externally.
6. Under ‘Apply this rule if…’, click the recipient is located… then Outside the organization > Click OK

After naming the rule, move down to ‘Apply this rule if…’ and select The recipient is located…
The recipient location should be set as Outside the organization. Then move onto the next step where we choose what happens when an email causes the rule to be triggered.
The only problem here is that this rule will activate when anyone within your organization tries to send an email to an external user. This could end up being problematic and it might make sense to simply block certain users and groups from sending emails to external users (i.e., preventing the finance team from sending emails to external users instead of the entire organization).
If you want to restrict certain users or groups, simply scroll down and click the text link More options…
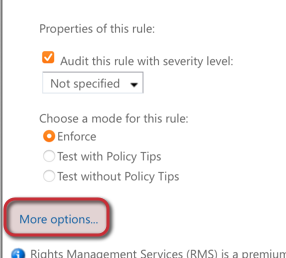
This will open up the ability to add more conditions. So scroll back up and click add condition.

There are tons of options to choose from here as additional conditions. I will usually choose is this person or is a member of this group to restrict specific members of staff or certain groups within the organization.
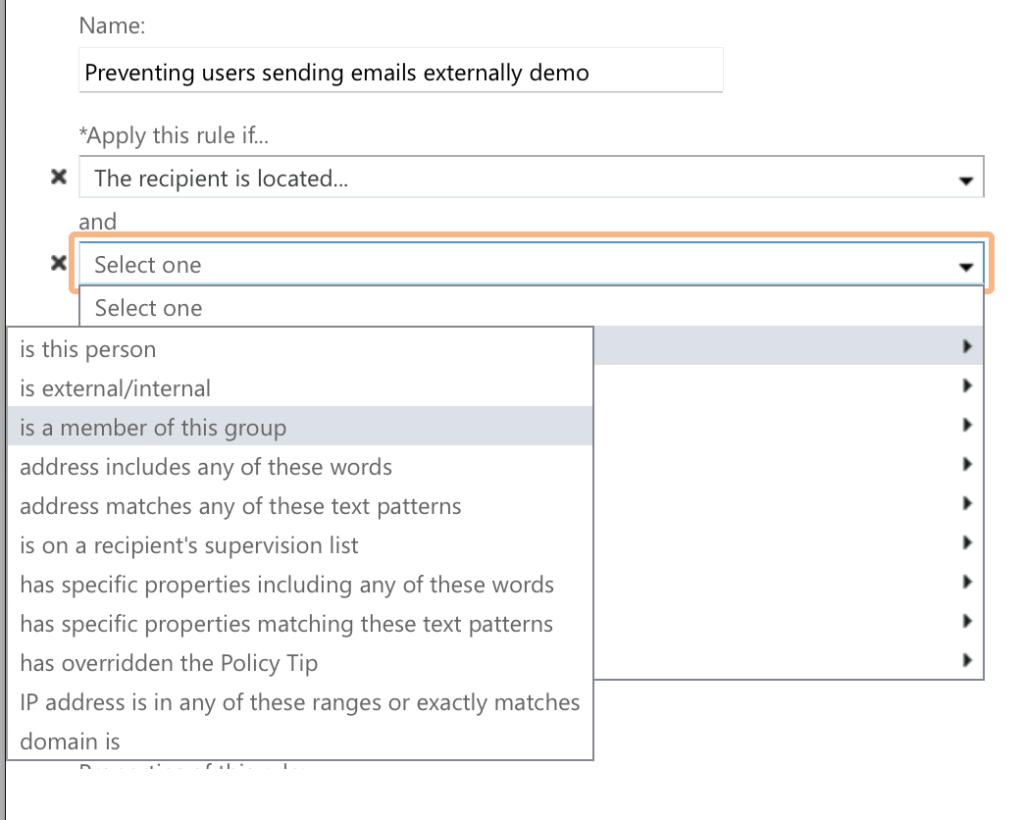
The screenshot below shows what appears after clicking is a member of this group. At this point, you can click Select people to decide which users you want the rule you’re creating to apply to.

7. Under ‘Do the following…’, click Reject the message with the explanation… and include an explanation for the email getting blocked — alternatively, select Delete the message without telling anyone if you don’t want users to know

Under ‘Do the following…’, click Reject the message with the explanation…
The explanation message can be whatever you want it to be. I usually explain why the user’s email is being blocked, as they’ll keep trying time and time again to send the email if they have no reason for the email getting blocked.
That being said, if you want to prevent the email sending without letting the user know why, simply select the option Delete the message without telling anyone. This option does what it says on the tin — prevents the email from sending without informing the user of why.
8. Click Save
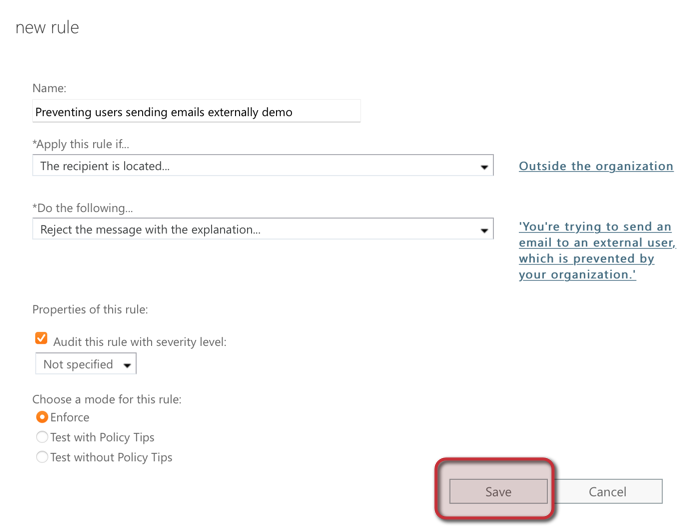
By this point, you should have created a rule that looks a little something like the screenshot above. As you can see, we’ve chosen when the rule will apply — under ‘Apply this rule if…’ — as well as the action that will take place when the rule is triggered. I’ve also specified a message that the user will receive via email when they trigger the new rule.
Once you’ve finished configuring the rule to your satisfaction, simply click Save and the rule will be activated. This rule should be fully active within roughly 10 – 15 minutes.
Thanks for reading this blog post and I hope that you’ve found it useful! If you have any questions, please feel free to leave a comment below and I’ll answer as soon as possible.