Syncing files and folders from Microsoft Teams to your PC is a very practical feature to consider. In order to sync your Teams folders, you usually have to sync your Teams channel folders from OneDrive to your local PC. One common problem that users have been facing is after they decide to unsync a folder, the folder still shows up in their file explorer and they can’t seem to delete it. A frequent issue with this is that the folder seems to be empty after it has been unsycned, however the empty folder itself cannot be deleted. In this blog post I will outline a couple of ways that these folders can be deleted from your file explorer after they have been unsynced.
Deselecting your folders to stop folders still showing in file explorer after unsyncing:
- Right click on the small OneDrive icon at the bottom of your screen
- Click ‘Settings’
- Make sure that you’re on the ‘Account’ tab
- Click on ‘Choose folders’
- Untick the folders you want to stop showing in the file explorer
- Click ‘OK’

Unlinking your PC to stop folders still showing in file explorer after unsyncing:
- Right click on the small OneDrive icon at the bottom of your screen
- Click ‘Settings’
- Make sure that you’re on the ‘Account’ tab
- Click on ‘Unlink this PC’
- Select ‘Unlink account’
Please be aware that all of your important files that you do not want to delete should be synced to the cloud before you unlink your PC. If important files are not synced to the cloud, they will be deleted from your PC as soon as you unlink your account.
   |
Step by step process to deselecting your folders on Windows 10
 |
- Right click on the small OneDrive icon at the bottom of your screen

When you have OneDrive open in your file explorer, a small OneDrive icon should appear at the bottom of your screen in the lower panel. Right click on this icon.
- Click ‘Settings’

Then, a pop up window will appear with a drop down list as demonstrated in the screenshot above. From the list, select ‘Settings’.
- Make sure that you’re on the ‘Account’ tab

Another window will appear with multiple tabs at the top. Ensure that you are on the ‘Account’ tab.
- Click on ‘Choose folders’
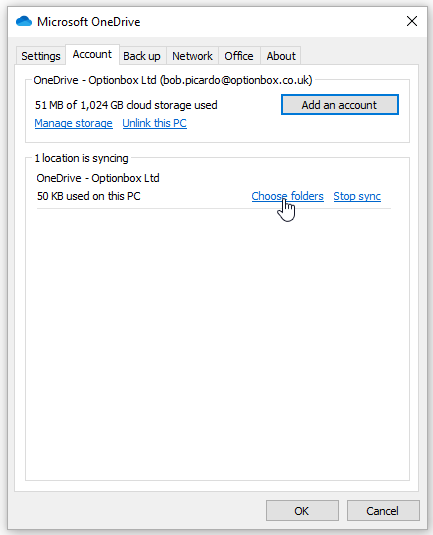
Click on the option for ‘Choose folders’. This will allow you to select and deselect the folder you would like to see in your file explorer.
- Untick the folders you want to stop showing in the file explorer

In the new window, there will be a list of all the folders that have been synced. You can then deselect the folder that you no longer want to be visible in your file explorer. Click on the box in front of the folder name to deselect it.
- Click ‘OK’

Once the folders have been deselected, click on ‘OK’ at the bottom of the window. This will save the changes you’ve made and when you go to your file explorer, the files you wanted to delete should no longer be there.
Why do I need to unlink my PC?
The method for deselecting your folders seems to work in most cases, however if the issue still persists and the folders you unsynced are still visible in your file explorer, it may be that you need to unlink your PC from OneDrive and then delete the unnecessary folder from your PC. Although this seems like a long process to delete the folder, it is relatively simple and once the folder has been deleted, you may sign back into your OneDrive app to link it to your PC again. To try this method, follow the screenshots set out below for the step by step process to unlink your PC. It is important to note that all of your important files that you do not want to delete should be synced to the cloud before you unlink your PC, as once your PC has been unlinked, any unsynced folders will be deleted.
Step by step process to unlink your PC from OneDrive to stop folders still showing in file explorer
- Right click on the small OneDrive icon at the bottom of your screen
When you have OneDrive open in your file explorer, a small OneDrive icon should appear at the bottom of your screen in the lower panel. Right click on this icon.
- Click ‘Settings’
Then, a pop up window will appear with a drop down list as demonstrated in the screenshot above. From the list, select ‘Settings’.
- Make sure that you’re on the ‘Account’ tab
Another window will appear with multiple tabs at the top. Ensure that you are on the ‘Account’ tab.
- Click on ‘Unlink this PC’

Instead of selecting ‘Choose folders’ like you did for the previous method, click ‘Unlink this PC’ from the first section of the window.
- Select ‘Unlink account’

When the small window appears, confirm that you want to unlink your PC by selecting ‘Unlink account’. As mentioned previously please ensure that all important folders have been synced to the cloud before you unlink your PC to ensure no important files are lost or deleted.
Thank you for reading! If you have any further questions about this blog post, or have any other general question, feel free to leave a comment below and we’ll be happy to help.