Teams use your mic and speakers to help process calls within the program. One unique feature of Microsoft Teams is answering calls on your desktop; if you don’t have your mobile device available to answer Teams related calls, you can use your desktop to answer calls. If you find that in Microsoft Teams, you cannot answer external calls, you can use the guide below to see why. Read through for more information on how you can troubleshoot external calls not being answerable on the desktop.
Below is a guide on how you can troubleshoot external calls not being answerable on the desktop; we have composed the guide of a few solutions to allow you to address external calls not being answerable on the desktop for Microsoft Teams.
- Check your WiFi connection/network.
- Clear Teams cached data.
- Check if notification prompts are still active.
Here are some of the points you can use to help address the situation of not being able to answer external calls on the desktop. Ensuring you have the correct WiFi network and a proper connection can help for calls to feed through to your desktop. If you had recent setting changes that affect Teams notifications and calls, you might find it worthwhile to clear Teams cached data. Finally, call inputs to your device arrive on the same network as notification inputs, so making sure that it’s turned on internally is essential.
Check your WiFi connection/network to answer Teams calls
The first solution is quite simple, make sure you are connected to the correct WiFi network; if there are any issues with network connectivity, the solution below will allow you to progress and check to make sure your network connection is fully intact.
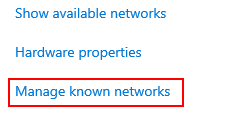
- Firstly, open “Settings.”
- Click on “Network & Internet.”
- Click on “WiFi.”
- Now click on “Manage known connections.”
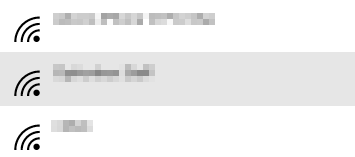
- Select your preferred network.
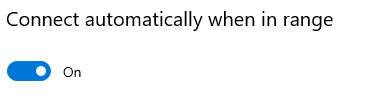
- Now click on “Properties.”
- Finally, ensure that the “Connect automatically when in range” toggle is set to on.
Once the steps above have been completed, you will have successfully managed to set a preferred network setting based on what you require and what you use for your Teams related calls. If you find that Teams isn’t connecting well to your network, there may be an issue with your network connection; check to make sure that it’s connected to the correct network and is live on your desktop.
In-depth step by step guide [with screenshots] – How to check your WiFi connection/network
This is a more in-depth guide on the process shown above; if you find that the steps above are somewhat challenging to understand, you can use the guide here to help with advancing through the process. The guide includes screenshots to help you visually understand the steps shown above.
- Firstly, open “Settings.”
- Click on “Network & Internet.”

- Click on “WiFi.”

- Now click on “Manage known connections.”
- Select your preferred network.
- Now click on “Properties.”

- Finally, ensure that the “Connect automatically when in range” toggle is set to on.
If Teams isn’t connecting to your network correctly, your network connection may be a problem— ensure it’s connected to the correct network and active on your desktop. Once you’ve completed the steps above, you’ll have successfully set a preferred network setting based on what you need and use for your Teams calls.

Clear Teams cached data to answer Teams calls
You can attempt the following solution clear your Teams cached data; if you find that there have been recent setting changes, for example, restricted external members have now been given access as members that can contact you, those changes may not have been reflected clearly due to cached data impeding the process of delivering that information. Calls may not be answerable if the changes are not updated clearly, read through for more information on how you can clear cached data in Teams.
- Microsoft Teams must be completely closed and not running on the toolbar in the bottom right corner of Windows.
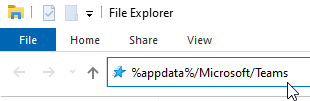
- In a File Window, navigate to “%appdata%/Microsoft/Teams.”
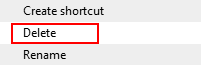
- Select everything in the Cache folder at this point.
- Then right-click and press “Delete.”
- Before starting Teams, wait for the essential files to download.
You will successfully clear the Team cached data once the steps above have been completed; clearing the cached data is a great way to resolve issues that impede the process of script transfers. Programs such as Teams use cached data to make repetitive processes such as opening and loading content much more manageable and smoother. Sometimes this folder can be overwhelmed by content that is no longer necessary or if changes have been made to specific scripts due to changes within the program. These aren’t reflected because you cannot delete downloaded cached data.
In-depth step by step guide [with screenshots] – Clear Teams cached data
Here is a much more in-depth process of the guide illustrated above; the steps here include screenshots which allow for better representation in a visual context. You can use the screenshots to help find the specific functions on the UI, which will help you understand what needs to be done to complete the process illustrated above.
- Microsoft Teams must be completely closed and not running on the toolbar in the bottom right corner of Windows.
- In a File Window, navigate to “%appdata%/Microsoft/Teams.”
- Select everything in the Cache folder at this point.

- Then right-click and press “Delete.”
- Before starting Teams, wait for the essential files to download.
Once the procedures above have been performed, the Team’s cached data will be successfully cleaned. Clearing the cached data is a wonderful technique to tackle issues that slow down the script transfer process. Caching data is used by programs like Teams to make repetitive tasks like opening and loading material considerably easier and smoother. This folder can become overburdened with content that is no longer required or if changes to specific scripts have been made due to program changes. As you cannot remove downloaded cached data, these aren’t reflected.
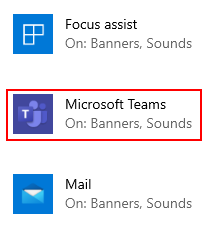
Check if notification prompts are still active to answer Teams calls
The last process you can try is checking your notification prompts are still active on your desktop settings section. Most of the time, the setting is on by default; however, sometimes, the settings can be switched off for security reasons— this may cause calls to be impeded if the prompts are turned off. This issue is primarily due to the same gateway being used for notification and calls based in Teams. Follow for an in-depth guide on checking if notification prompts are still active.
- Firstly, open “Settings” from the start menu.
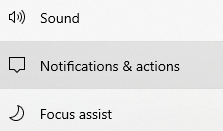
- Now click on “System.”

- From there, click on “Notification & actions.”
- Scroll down to the option for Teams.
- Finally, make sure the toggle is switched on.

With the prompts running for Microsoft Teams, you can now successfully use the gateway to answer external calls. This problem often occurs when the connection has been impeded primarily due to your network not receiving the prompt. If you turn the notifications on, you will be able to answer calls successfully.
Conclusion
That’s it for the blog; we hope the series of solutions provided here will help you address the situation of not being able to answer external calls in Microsoft Teams. If you find that you cannot complete the steps above, you can drop a comment below, and we will address any issues you may have.