 Key Takeaways
 To add Microsoft Lists to Teams, open the team to which you want to add Lists and hit the plus icon at the top. Then, search for “Lists” and select the app. [More…]
 Changes you make to the lists in Teams or the Lists app will reflect in both applications when you refresh the page.

Microsoft Lists is perfect for planning and task management, but you can also bring Lists into Microsoft Teams, centralizing your planning and collaboration! So, in this guide, we’ll show you how to add and use Microsoft Lists in Teams.
How to use Microsoft Lists in Teams:
- First, open
 Microsoft Teams.
 - Go to
 “Teams” in the left menu.
 - There, open the team that you want to add Lists to.
- Next, click the
 plus icon at the top.
 - Search for
 “Lists.”
 - Select the Lists app from the results.
- Finally, hit “Save.”
This guide will also show you how to:
We’ve also created a video to help guide you through the process:
 Overview:
Microsoft Lists is a versatile tool that allows you to create, share, and manage information in an organized and customizable manner. It’s a modern list-making application integrated with the Microsoft 365 suite of productivity tools. You can use Lists to track various types of data, tasks, projects, and more, providing a centralized location for collaboration and data management.
Here’s how Microsoft Lists can improve work efficiency:
- Data Organization:
Lists helps you structure and organize data in a visually appealing and user-friendly format. Whether it’s tracking tasks, issues, inventory, or any other type of information, Lists allows you to categorize, sort, and filter data to find what you need quickly. - Collaboration:
You can allow your whole team to collaborate on a list, making it easy to keep everyone on the same page. You can share Lists and set permissions to control who can view, edit, or manage the data. - Customizable Templates:
Microsoft Lists provides various customizable templates catering to different business needs. Whether you’re managing projects, tracking assets, or even planning events, there’s likely a template that suits your requirements. - Automation:
Lists can be enhanced with Power Automate, allowing you to build automated workflows based on triggers and conditions. This helps streamline processes and reduces manual intervention. - Integration with Microsoft 365:
Since Lists is part of the Microsoft 365 ecosystem, it seamlessly integrates with other apps like Microsoft Teams, SharePoint, and Outlook. This integration ensures a consistent user experience across various tools. - Mobile Accessibility:
The Lists app is available on mobile devices, allowing you to access and update your lists on the go. This is particularly useful for remote work and field operations. - Conditional Formatting:
You can apply conditional formatting to your lists, making it easier to identify important items, trends, or specific conditions within the data. - Notifications and Reminders:
Lists can send notifications and reminders to team members about upcoming deadlines, tasks, or changes, ensuring that everything runs smoothly. - Version History:
Lists maintains a version history of changes so you can track modifications and revert to previous versions if needed. - Data Insights:
Lists can be integrated with Power BI, Microsoft’s business intelligence tool, to visualize and analyze data trends, helping you make informed decisions.
In short, Microsoft Lists is a versatile tool that empowers teams to work more efficiently by providing a structured way to manage data, collaborate, and automate processes. It’s excellent for organizations that need to track and manage various information across different projects and departments.

 How to add Microsoft Lists in Teams
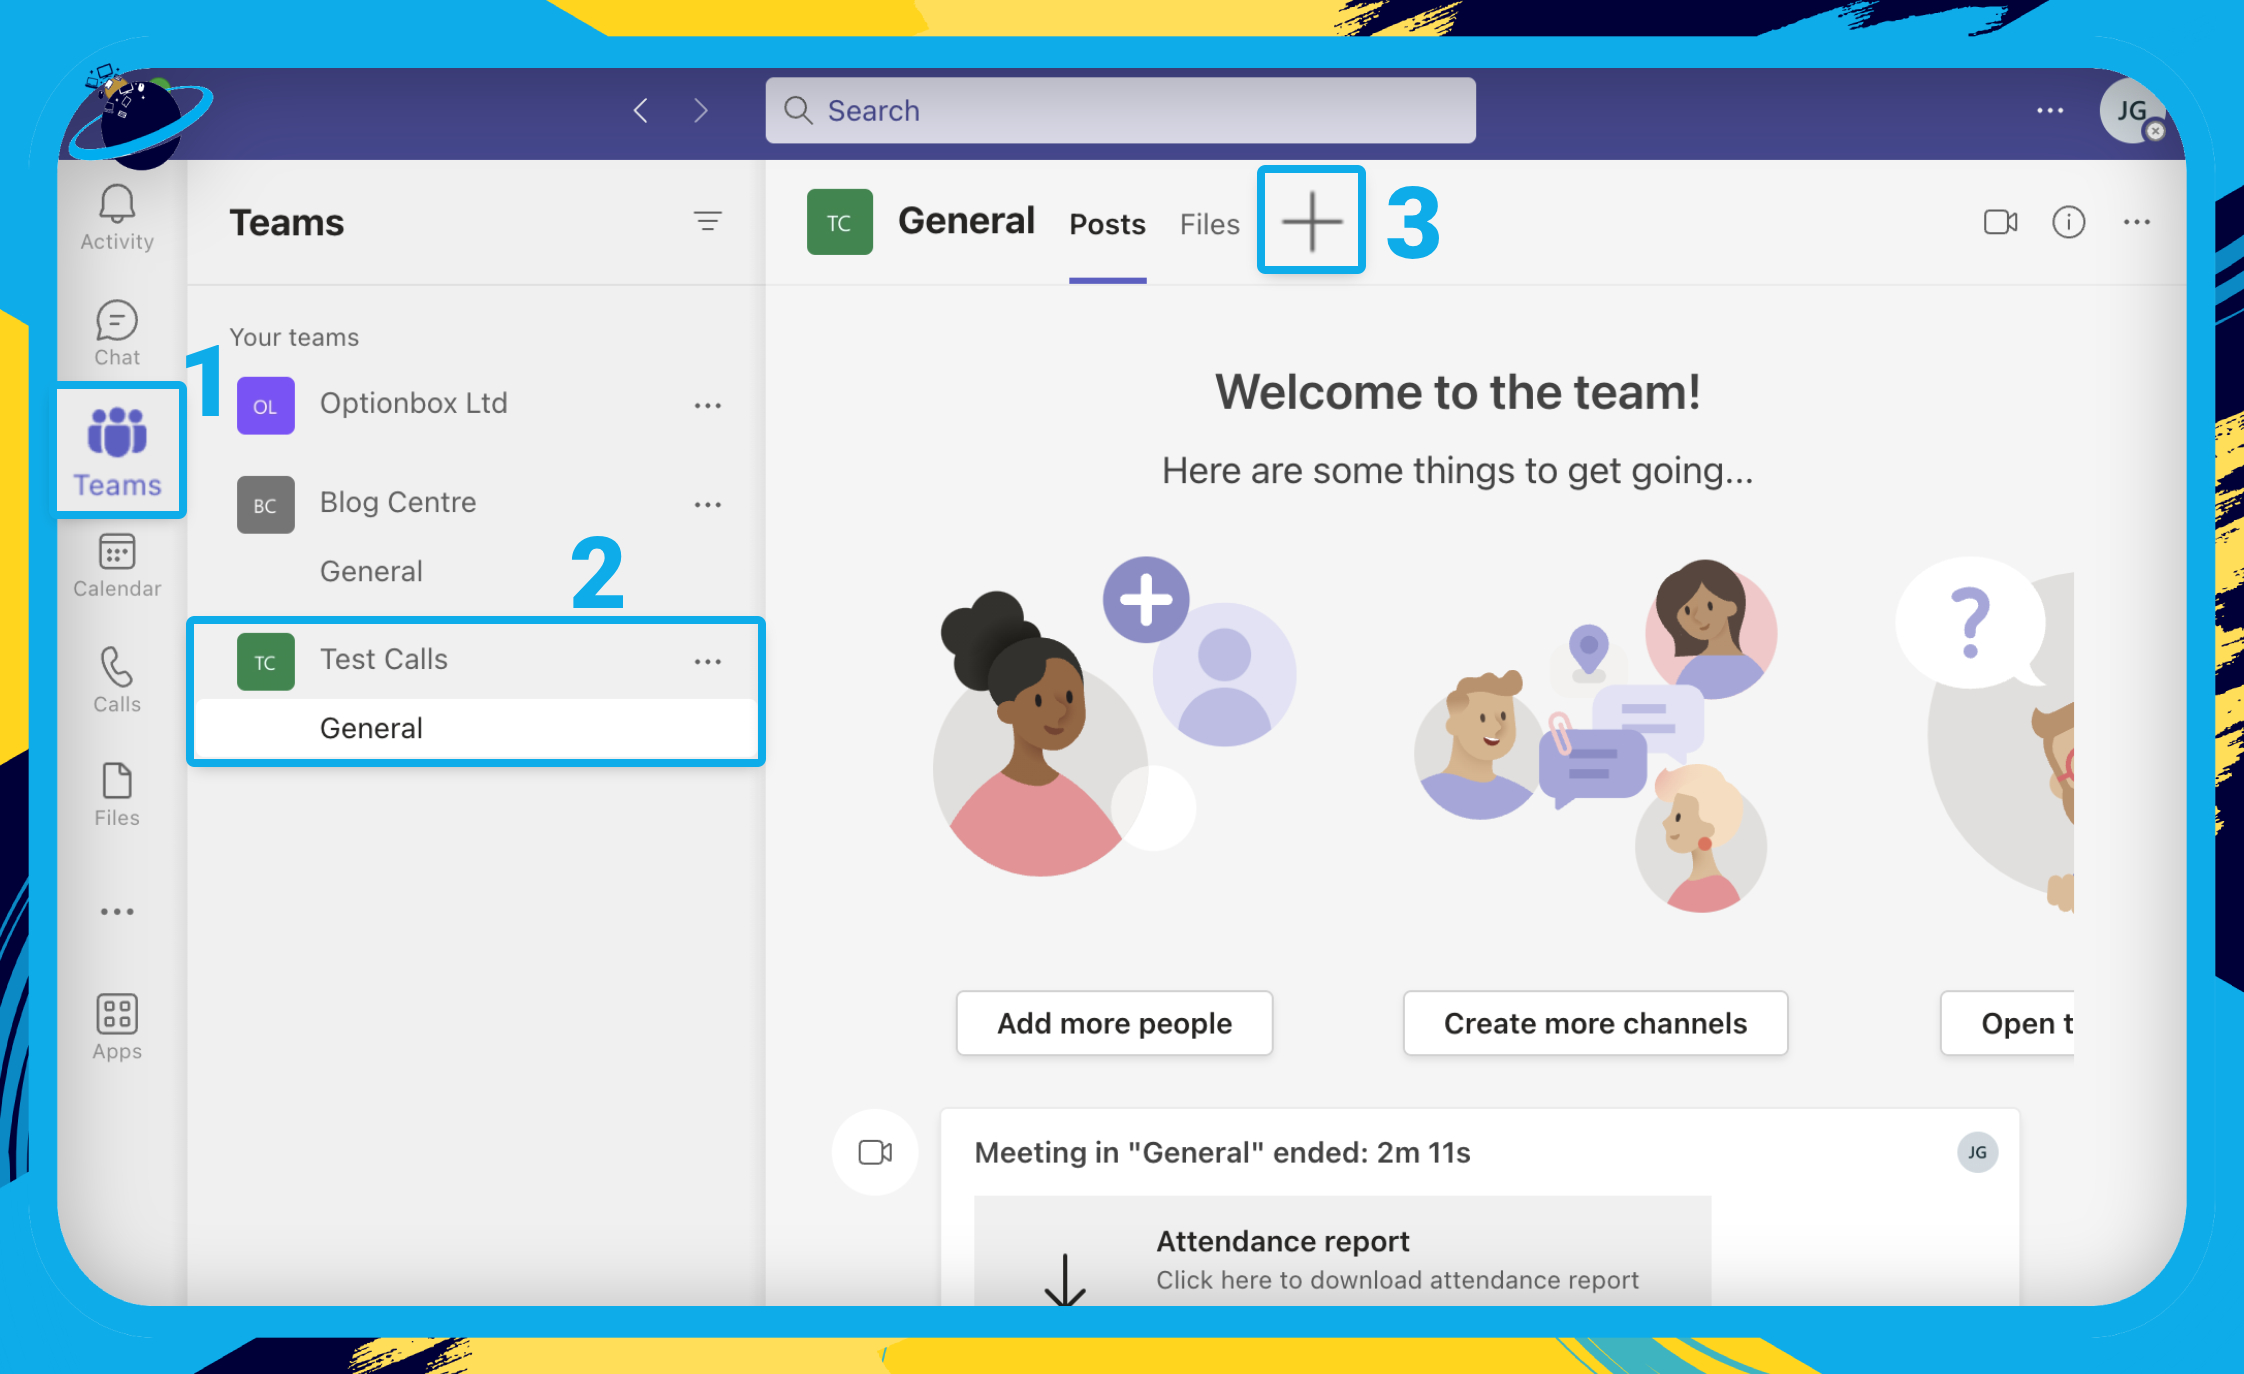
- First, open Microsoft Teams.
- Go to “Teams” in the left menu. [1]
- There, open the team that you want to add Lists to. [2]
- Next, click the plus icon at the top. [3]
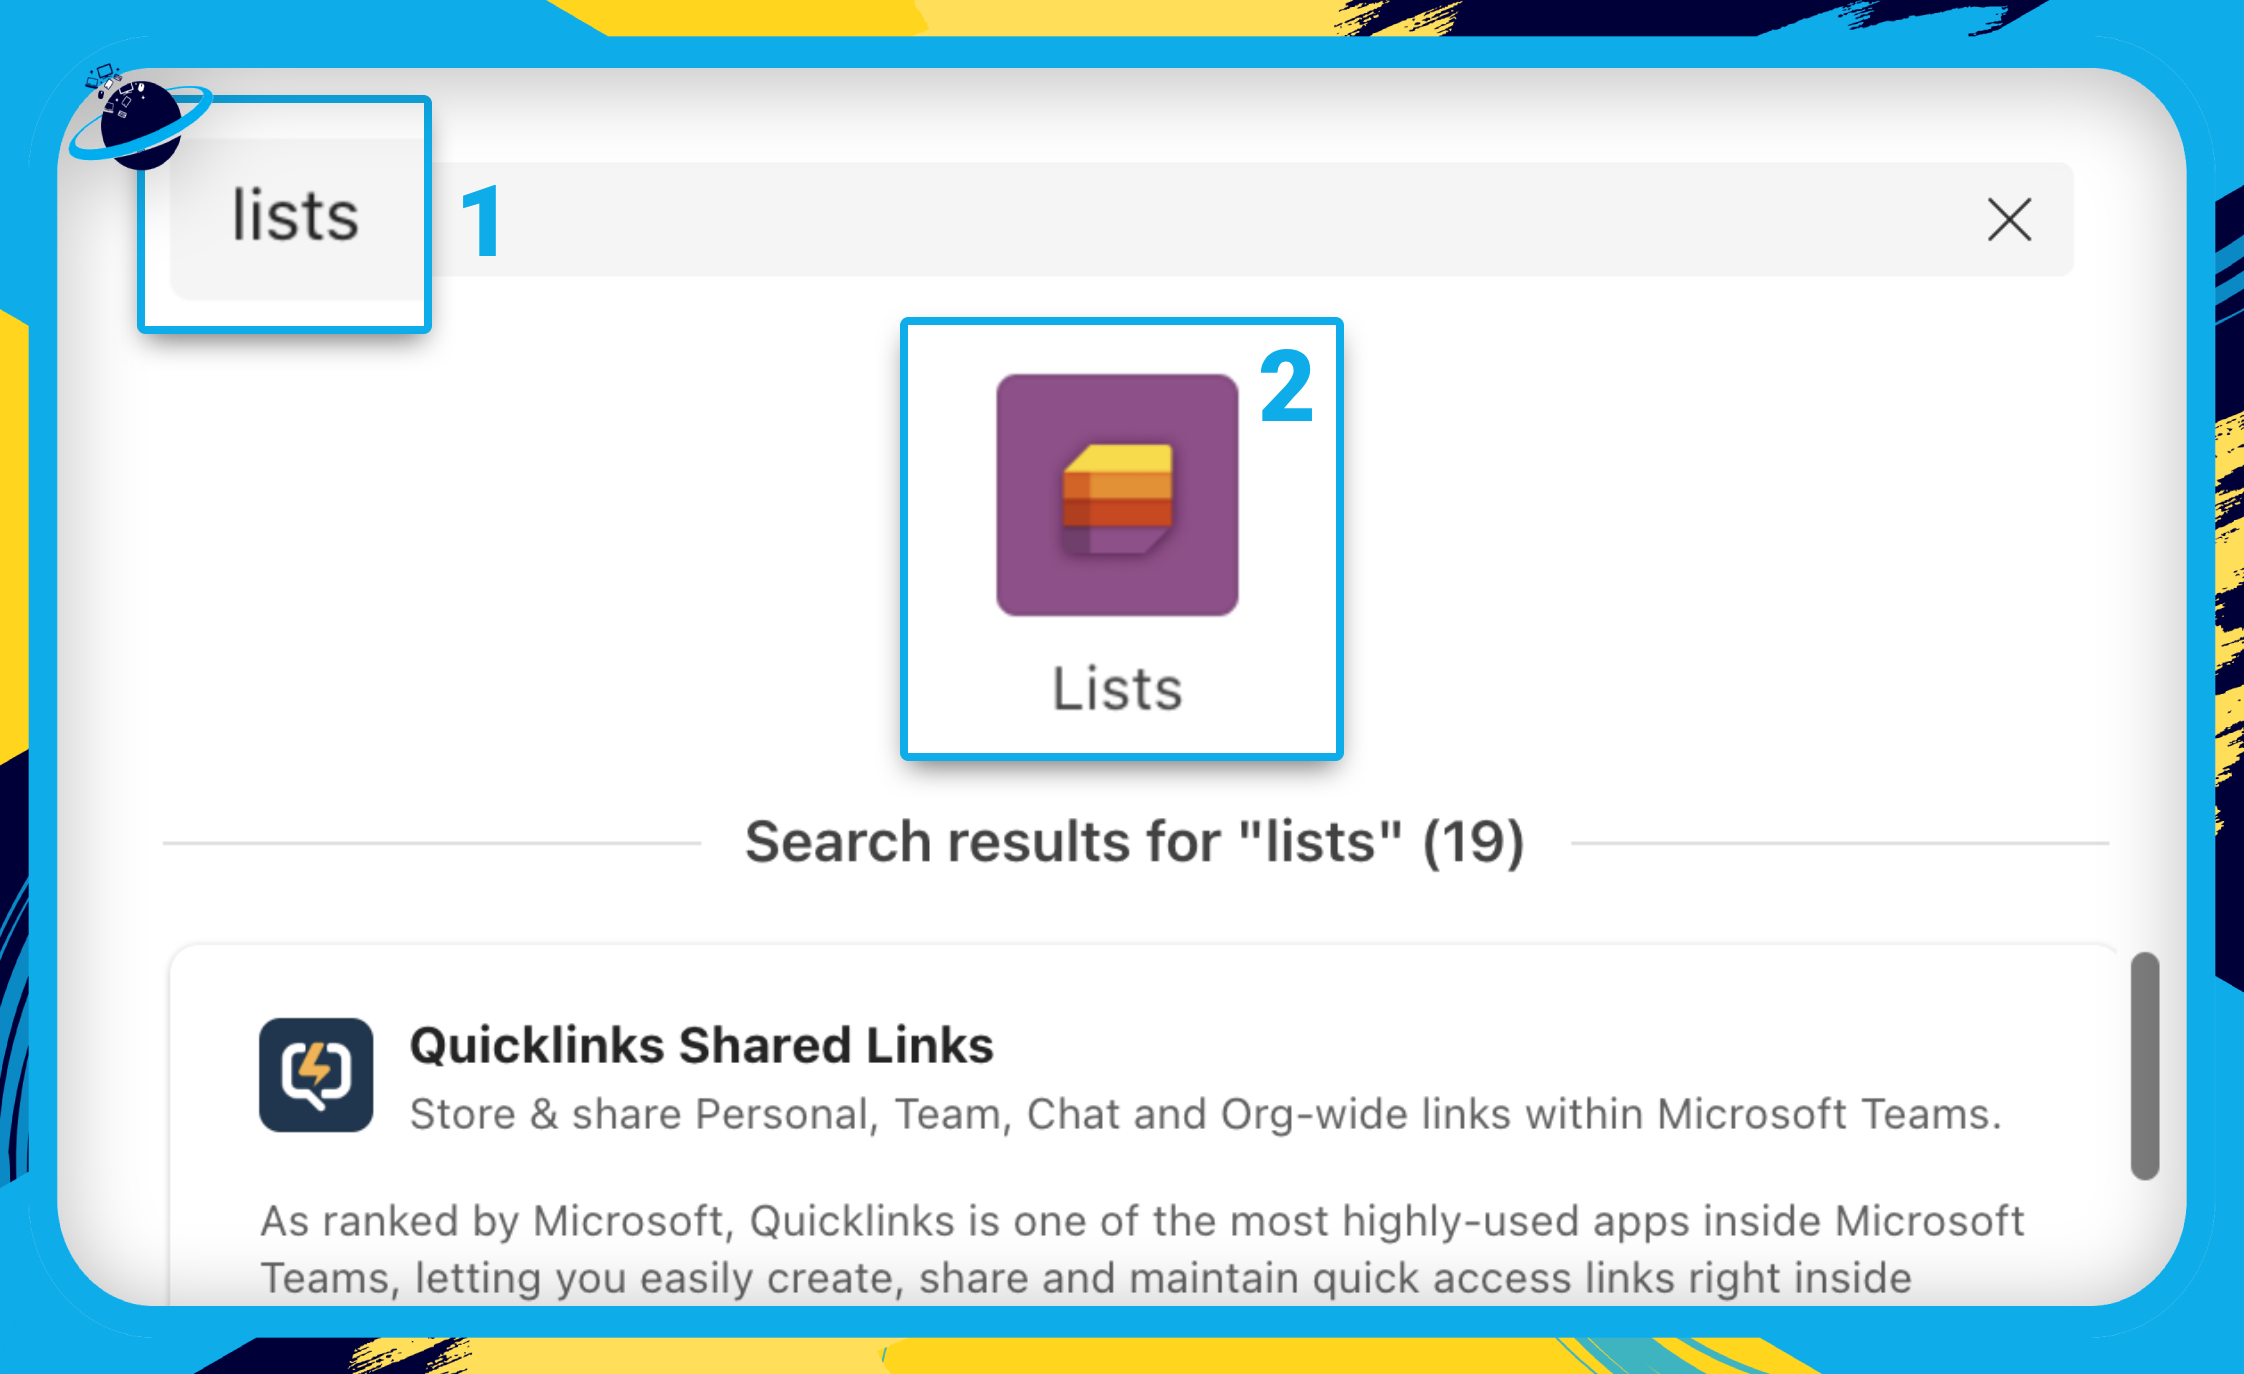
- Search for “Lists.”
- Select the Lists app from the results.
- Finally, hit “Save.”

How to use Microsoft Lists in Teams
In this part of the guide, we’ll show you how to use Microsoft Lists. This includes creating a new list, adding an existing list, importing a list from Excel, and using a template.

How to create a new list
In this section, we’ll show you how to create a new list with a “Choice” column that lets you select whether the item is “Complete” or “Incomplete.”
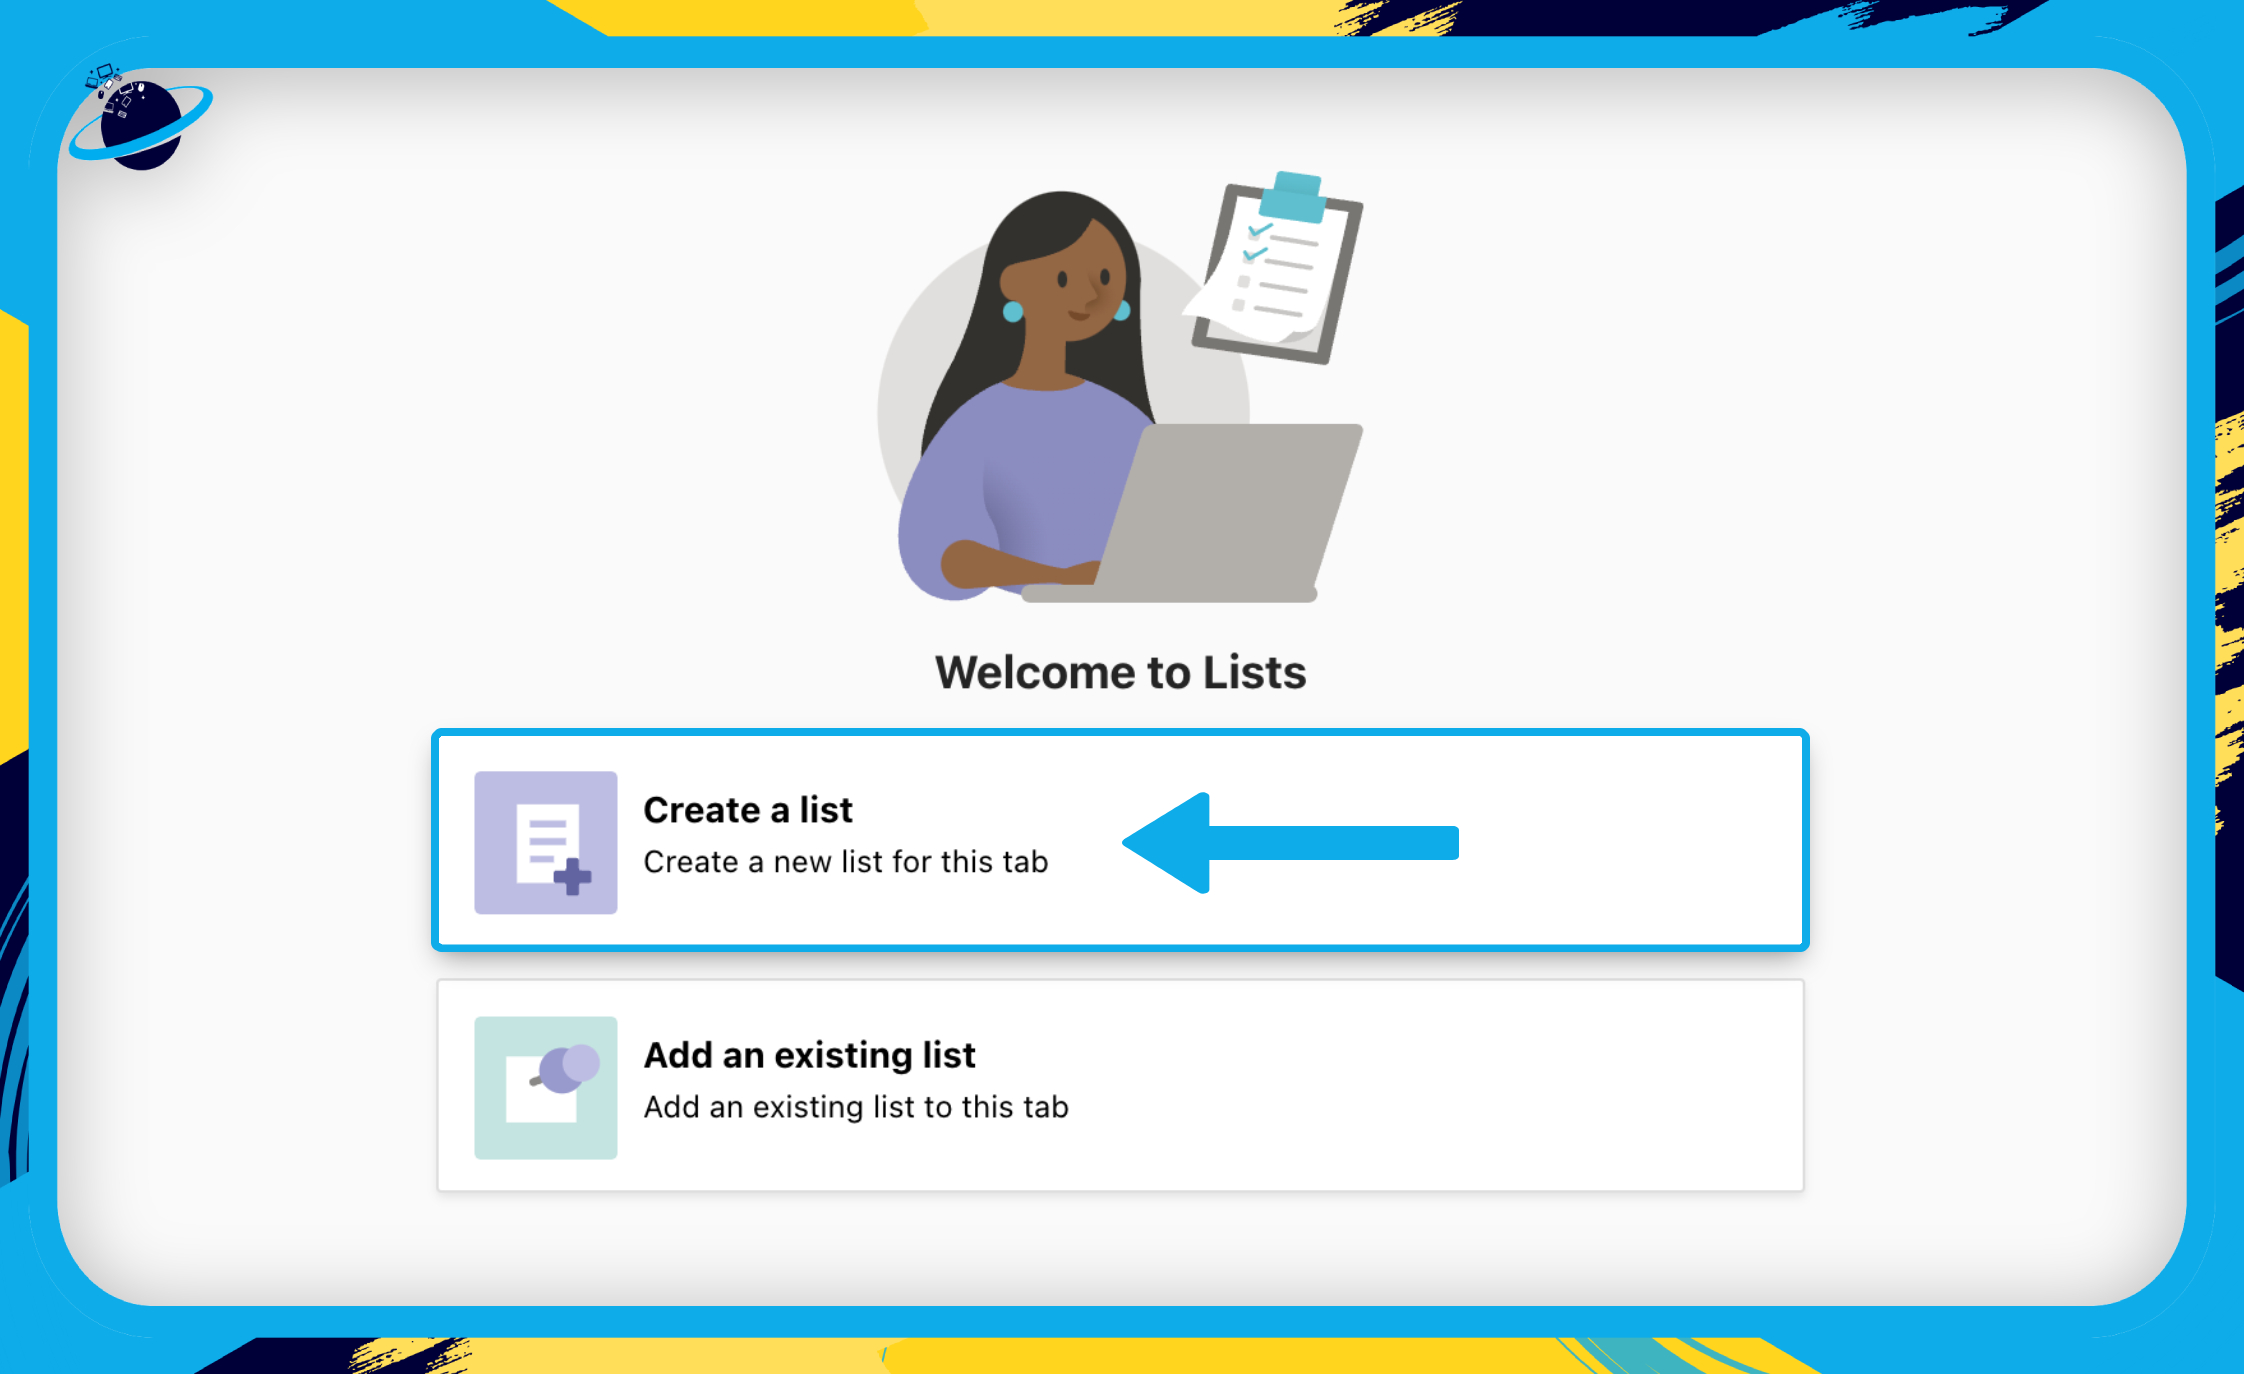
- Once you’ve added Lists to Teams, click “Create a list.“
- Next, click “Blank list” at the top.
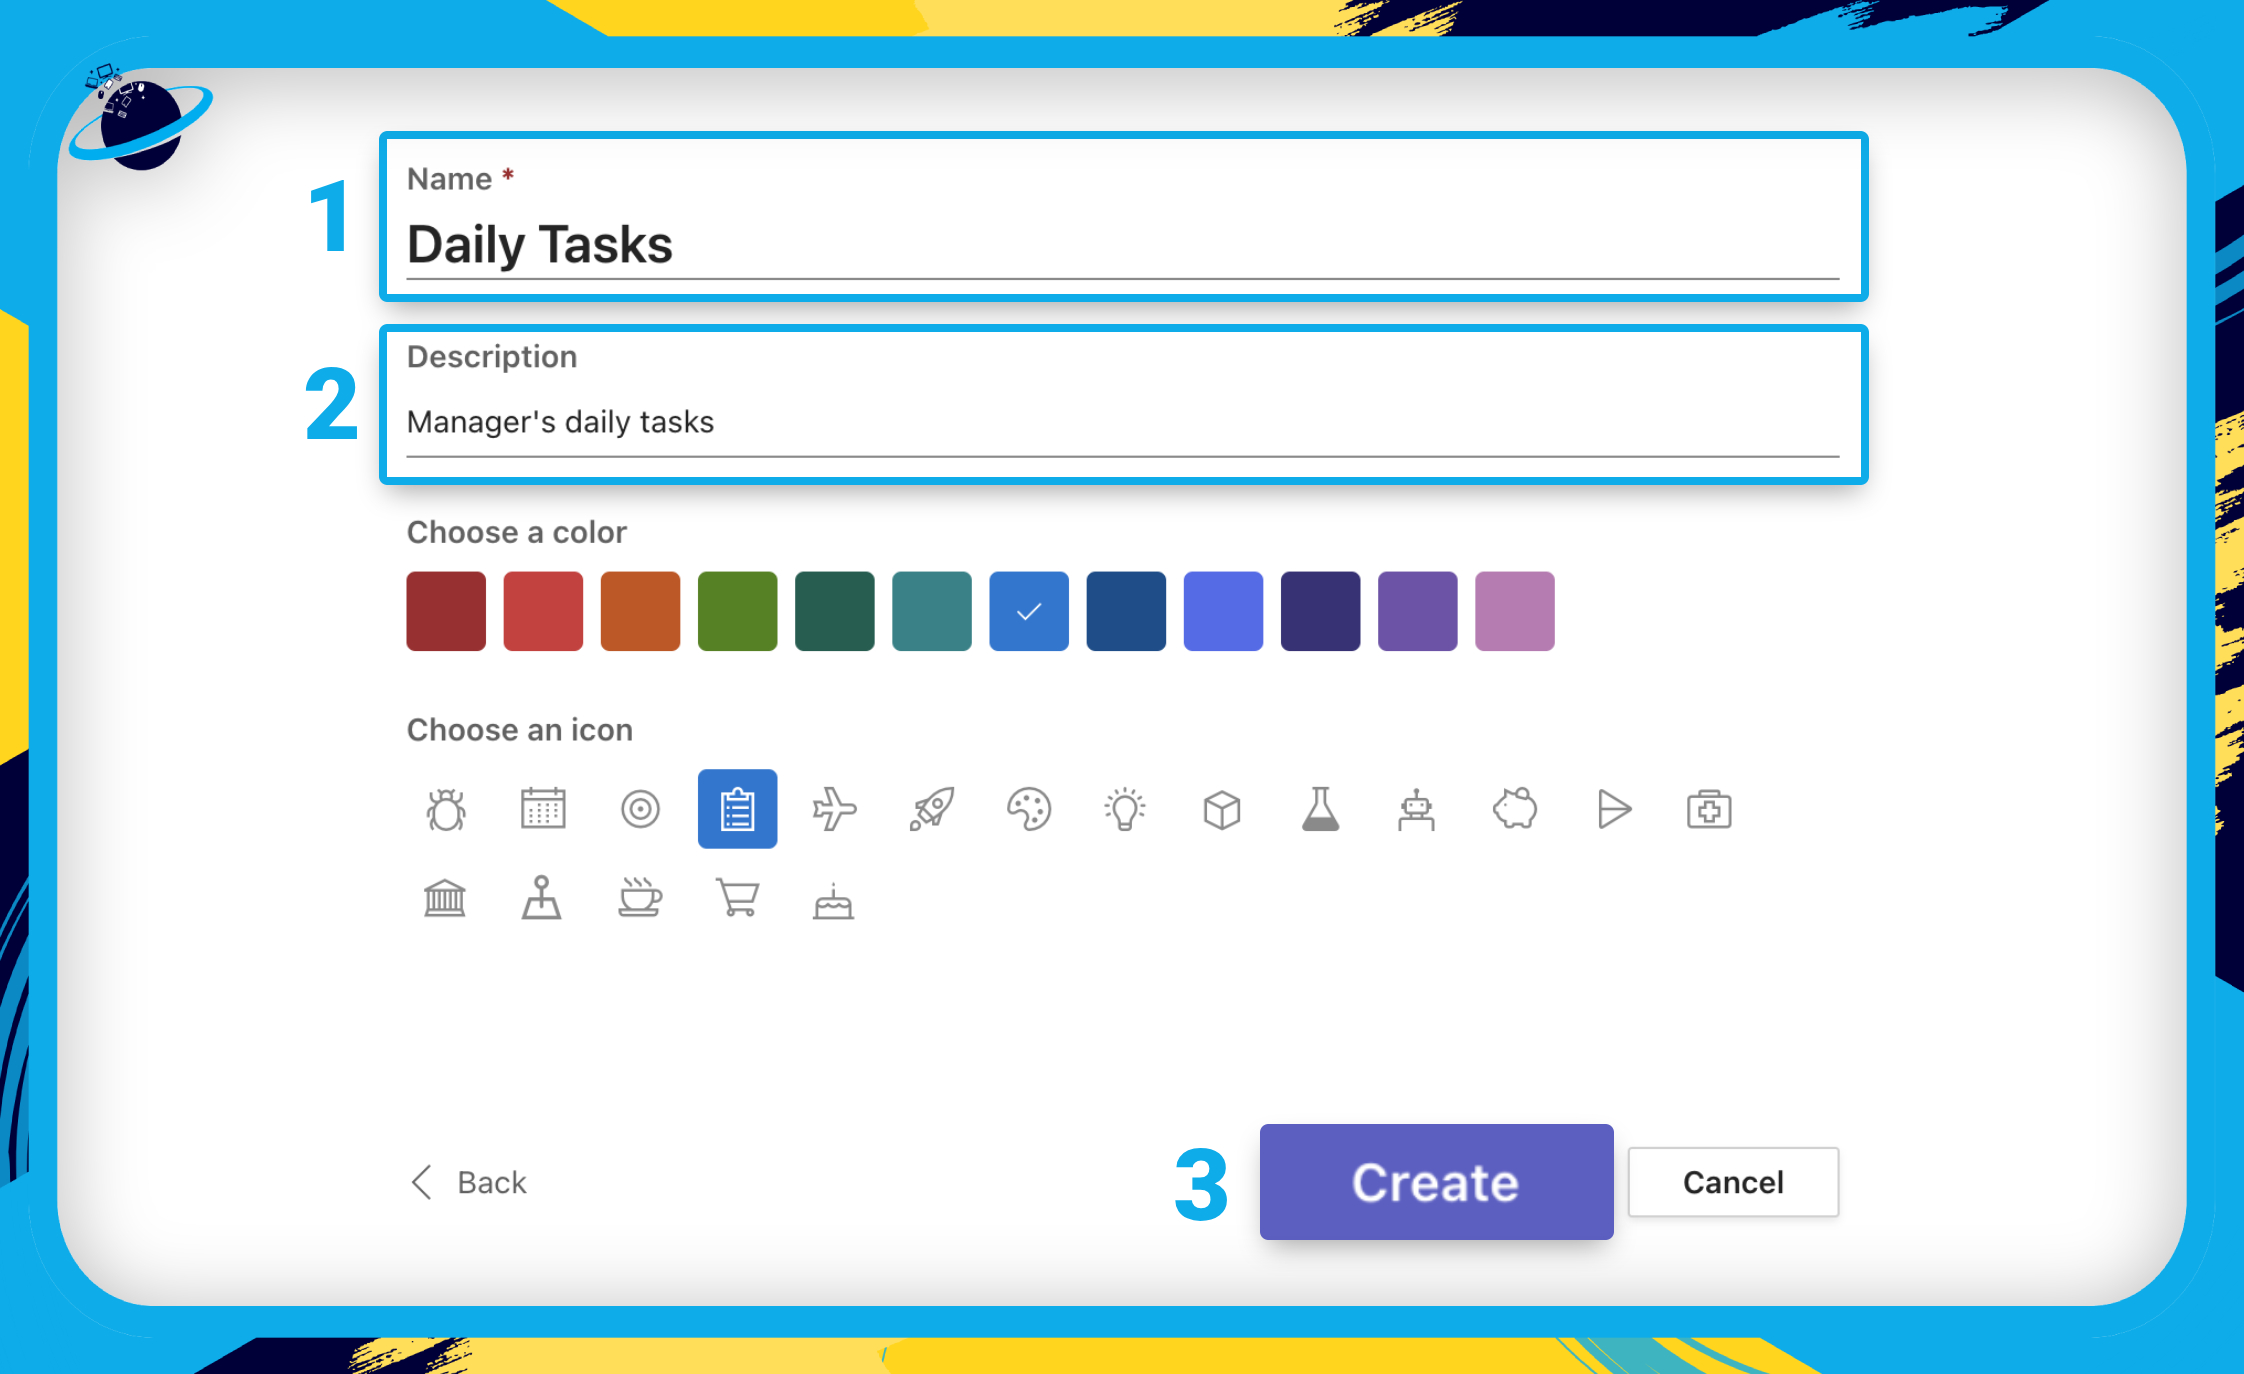
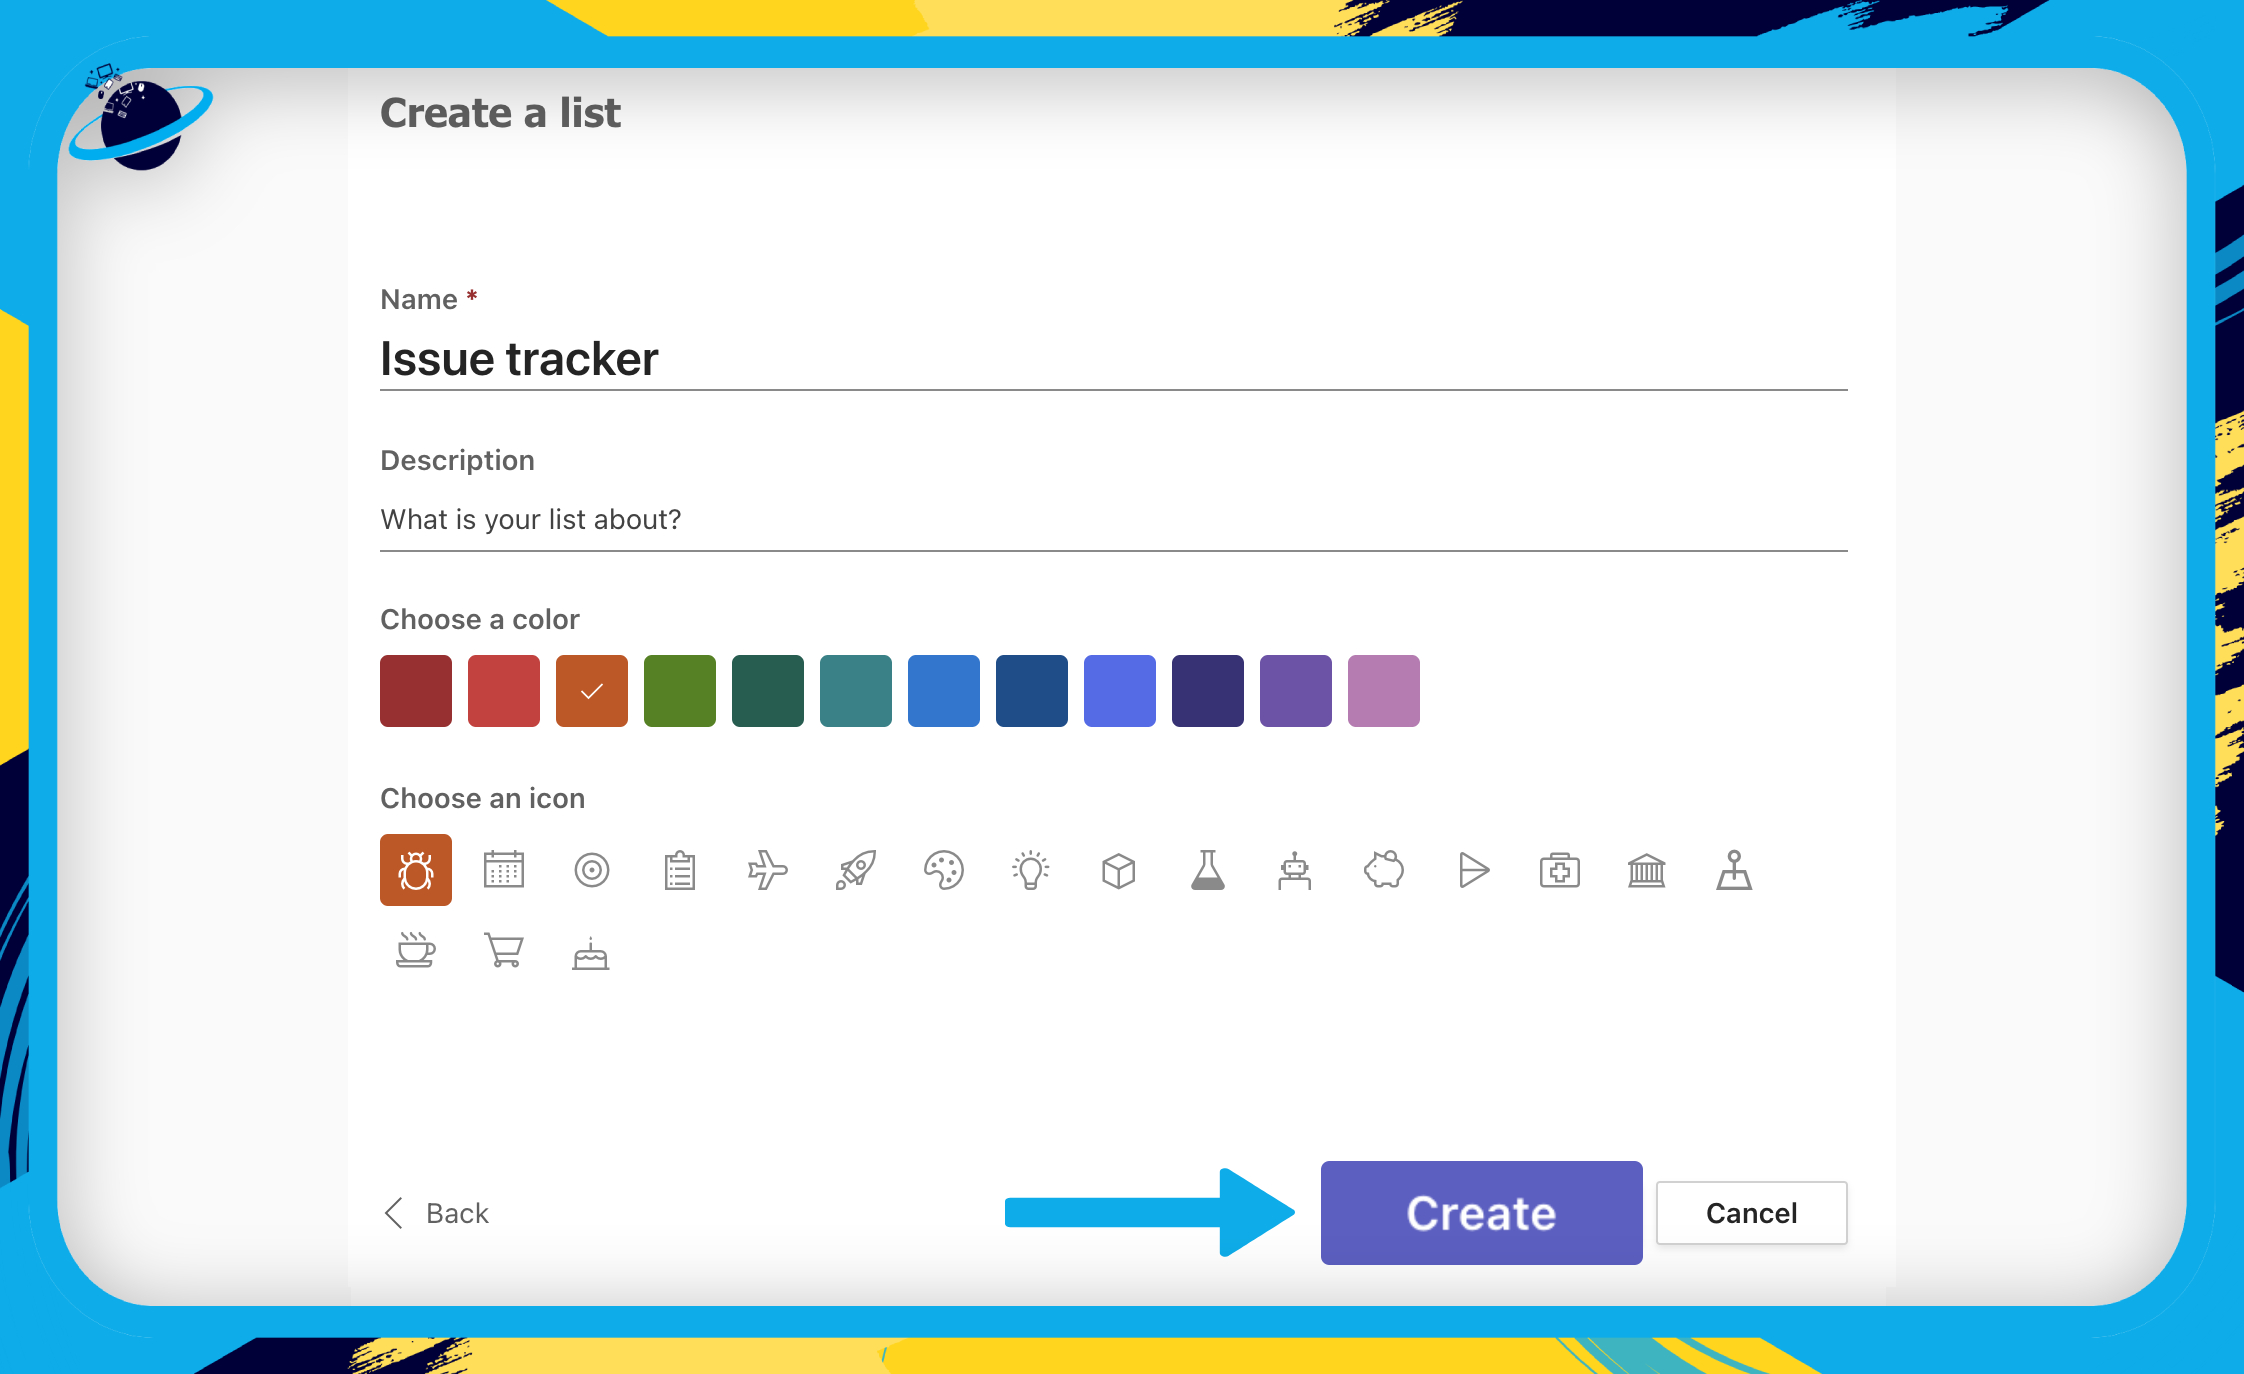
- Give the list item a name. [1]
- Add an optional description. [2]
- Choose a new color and icon (these will be selected for you automatically).
- Then, hit the “Create” button. [3]
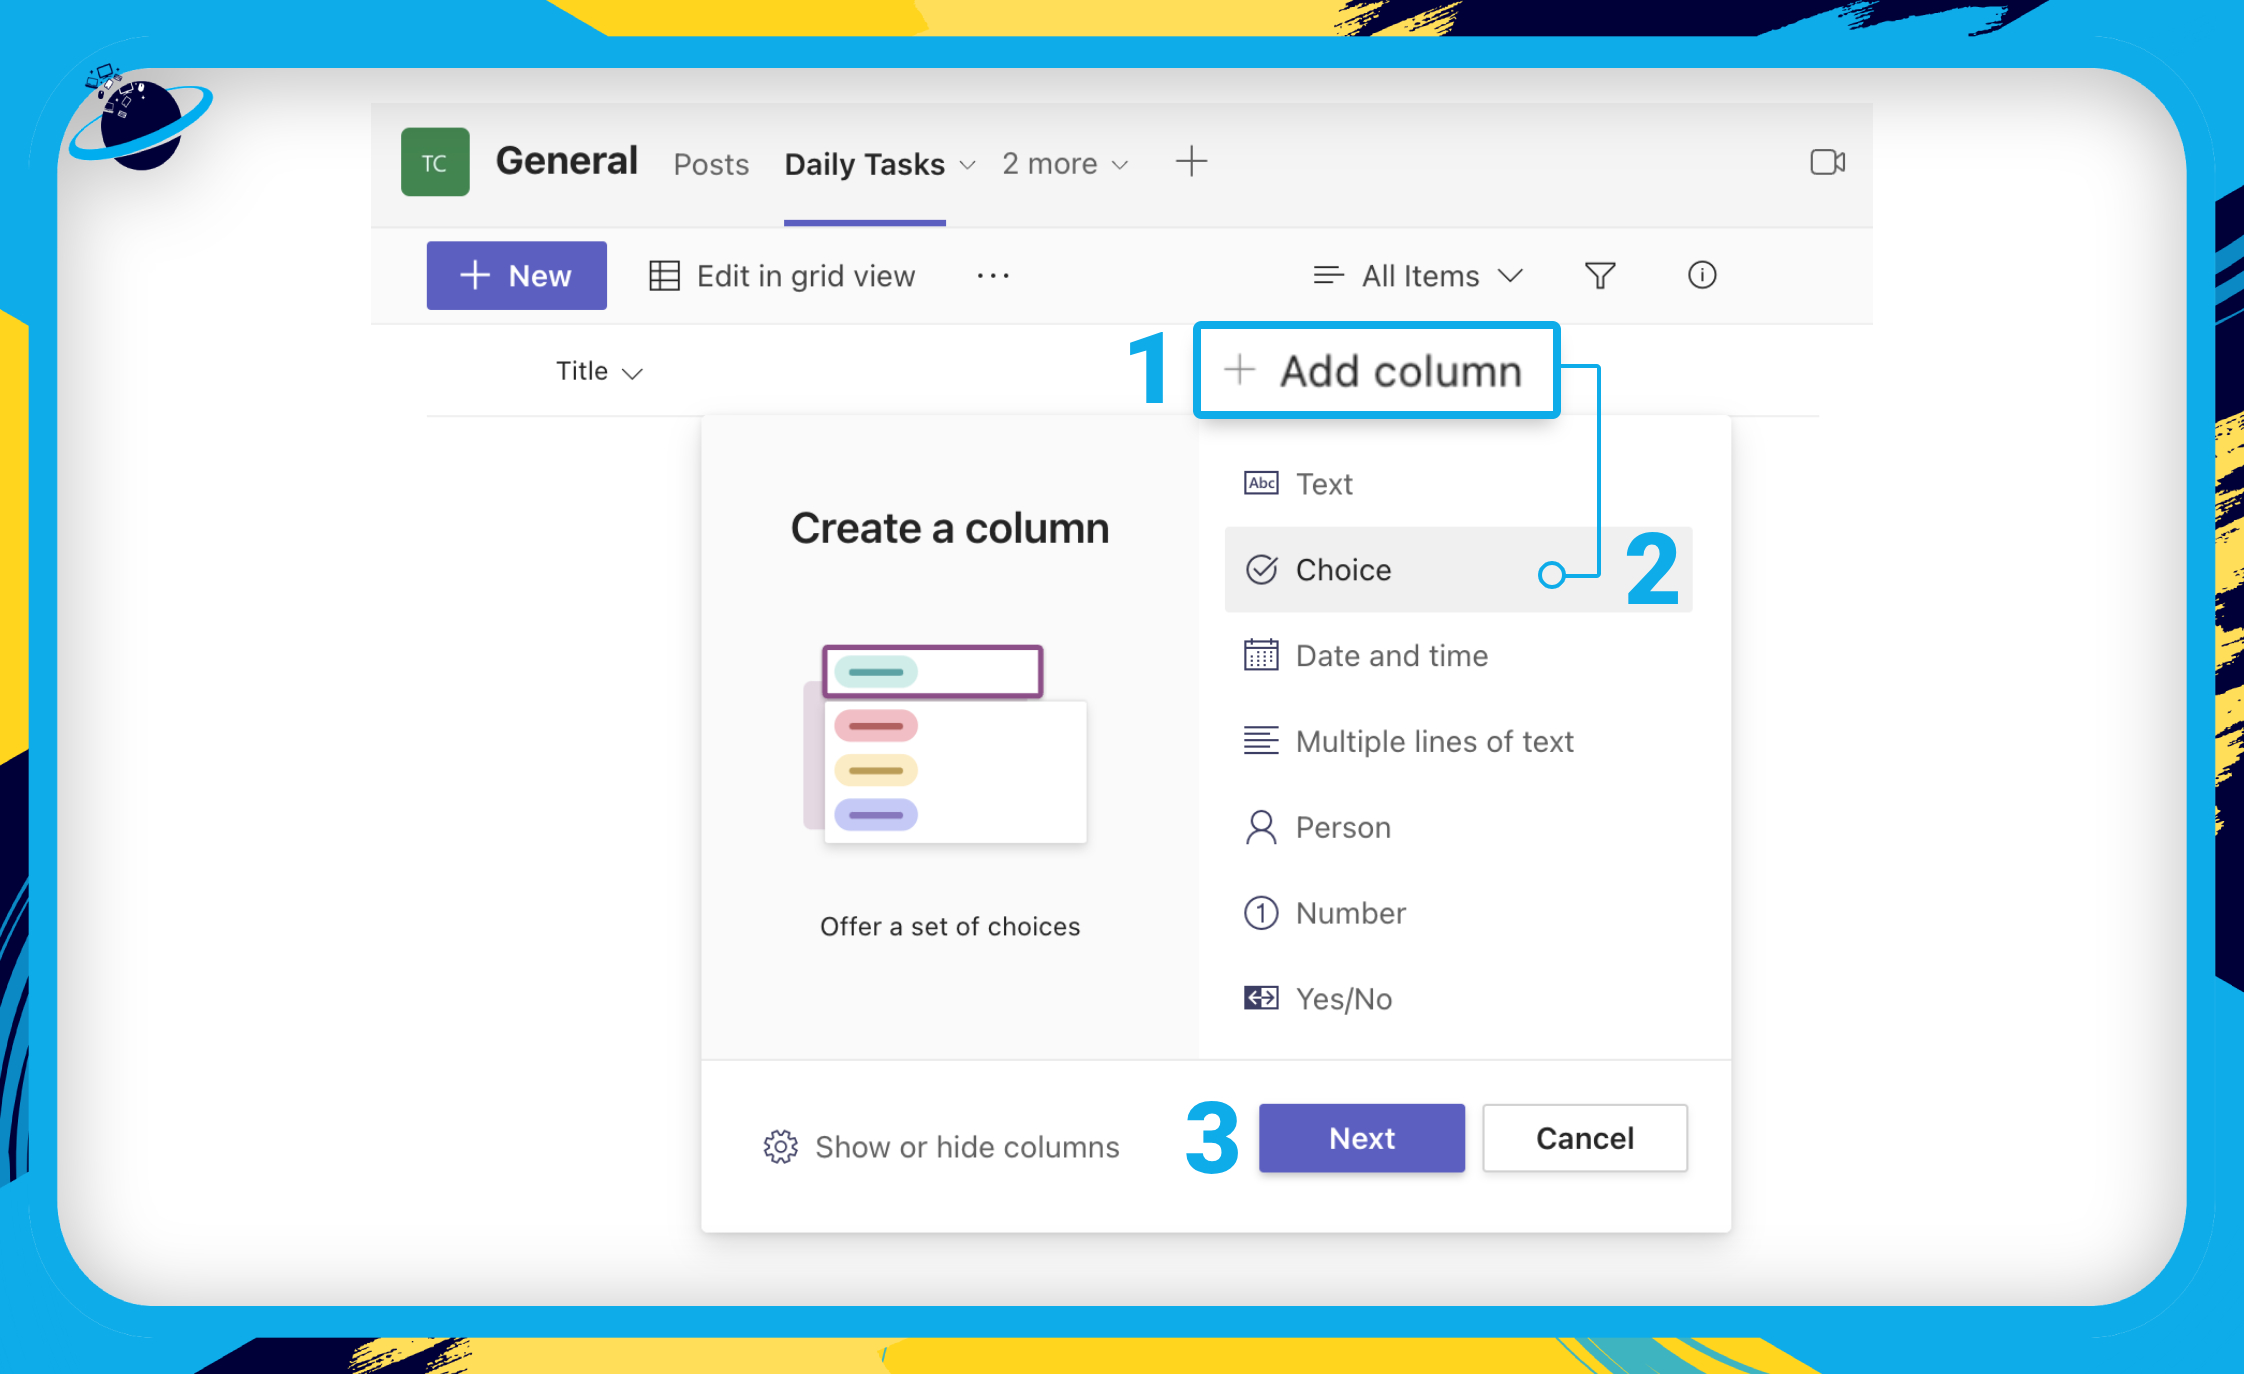
We want to create a task list, so we’ll need a way of checking the items off our list as we complete them. We can do that using a “Yes/No” column. However, we can also do that using a “Choice” column.
- Click “Add column” at the top. [1]
- Select
 “Choice” from the list of column types. [2]
 - Click “Next.” [3]
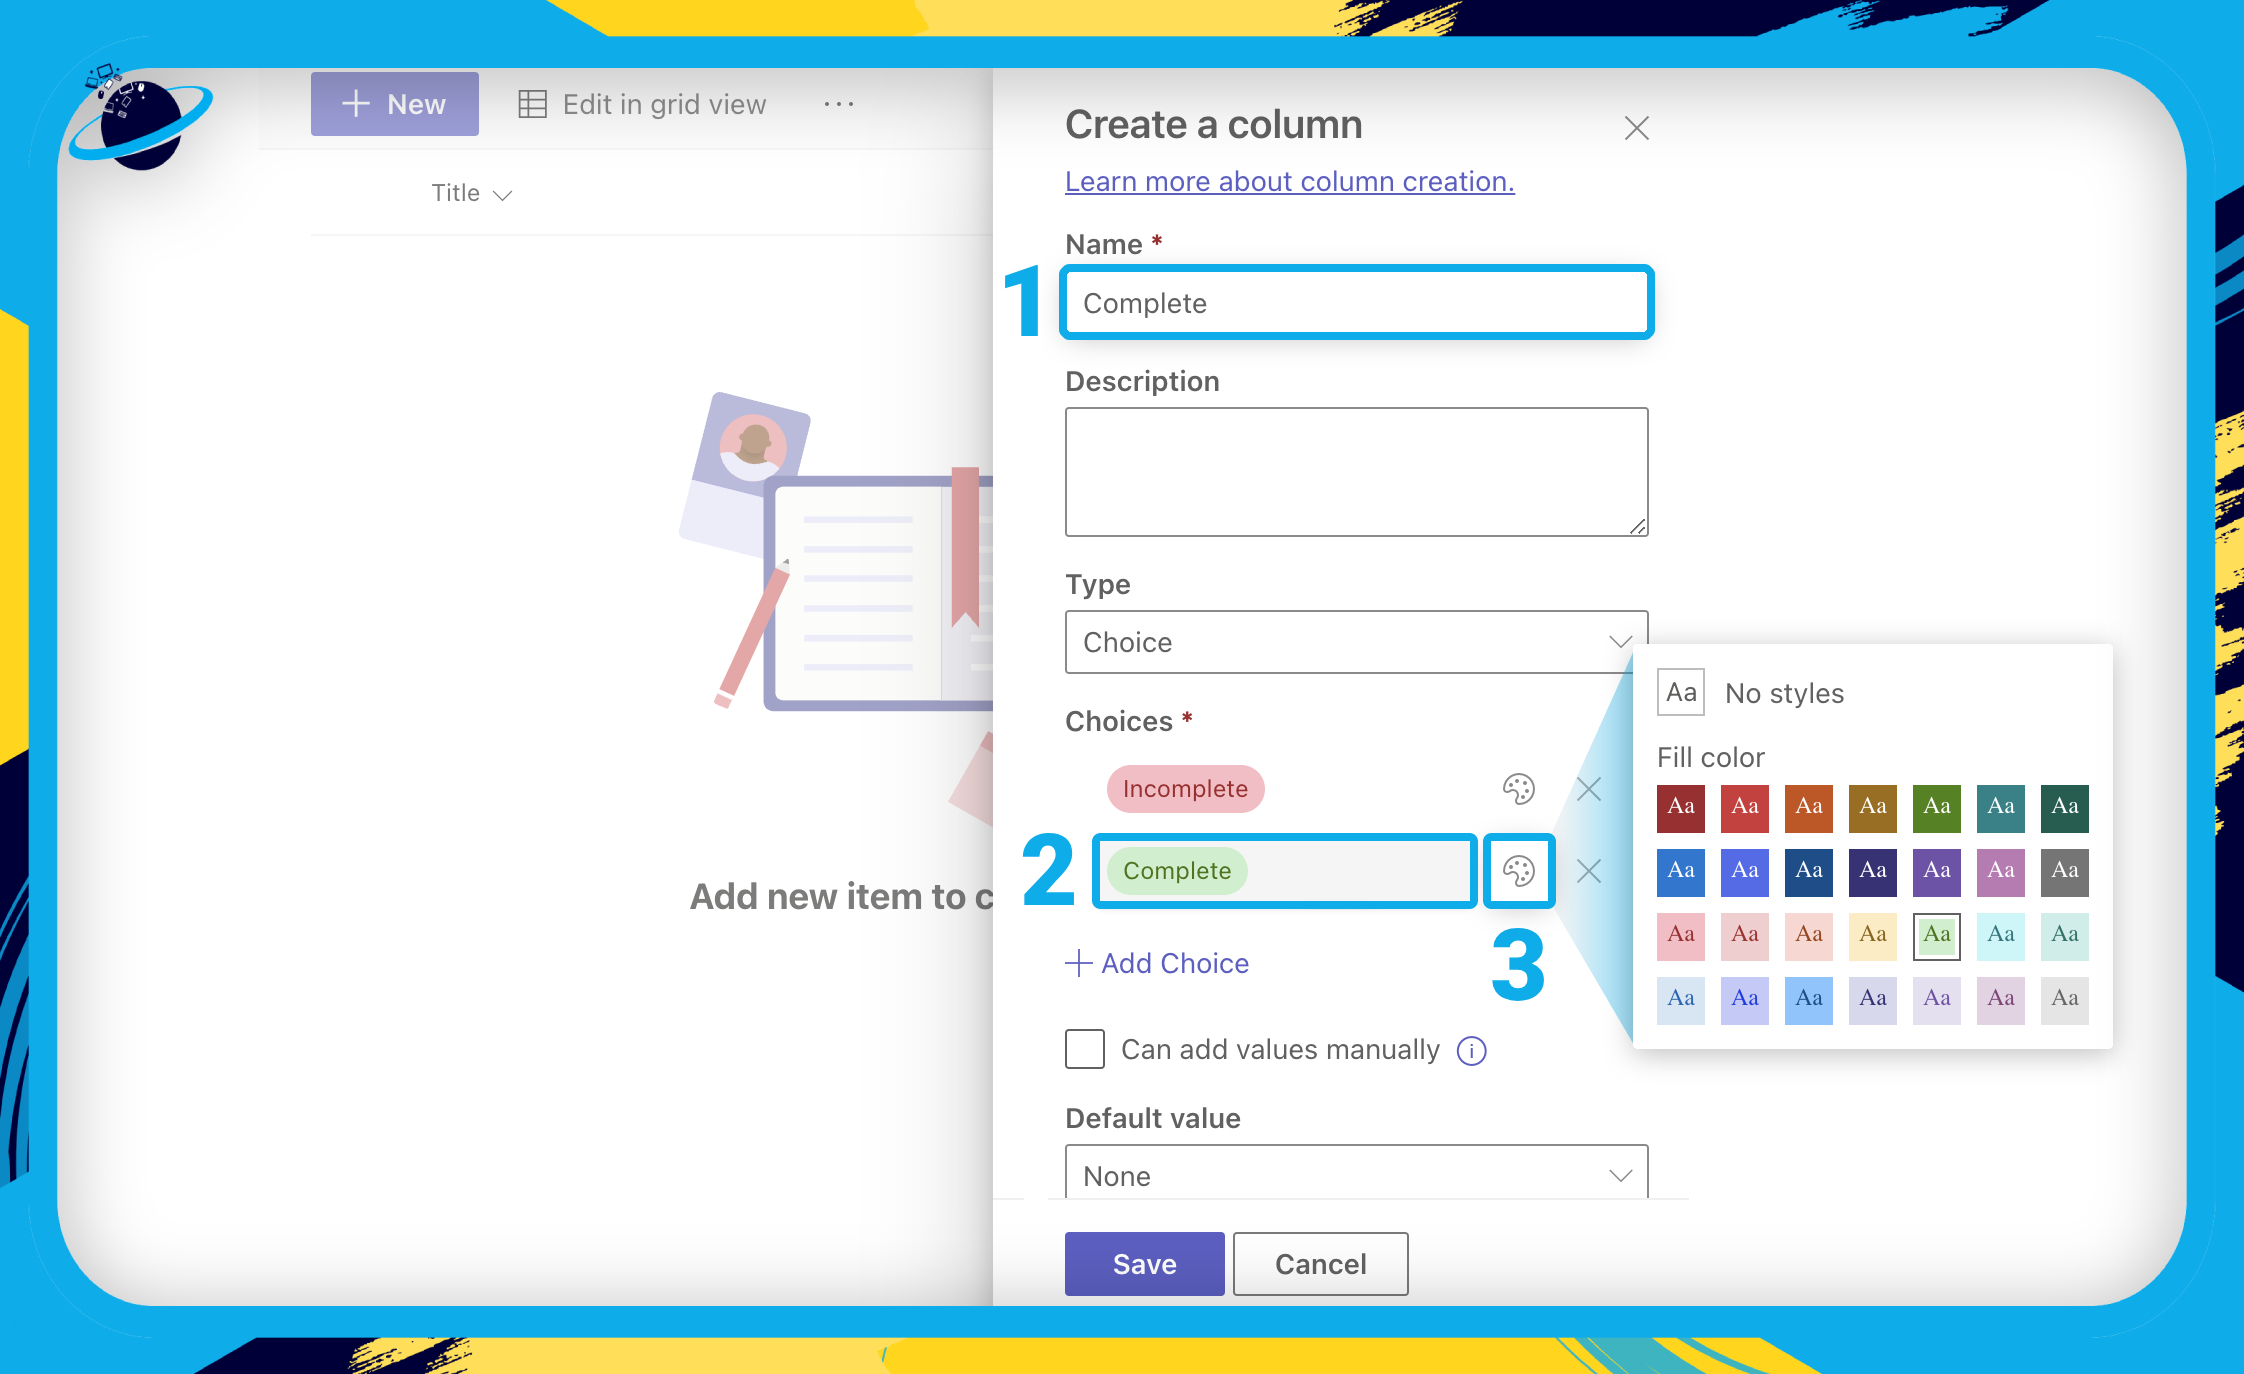
- Name the column. [1]
- Click the choices and edit the text to create “Complete” and “Incomplete.” [2]
- You may also want to create a third choice named “In Progress.”
- Click the
 color pallete to select a style. [3]
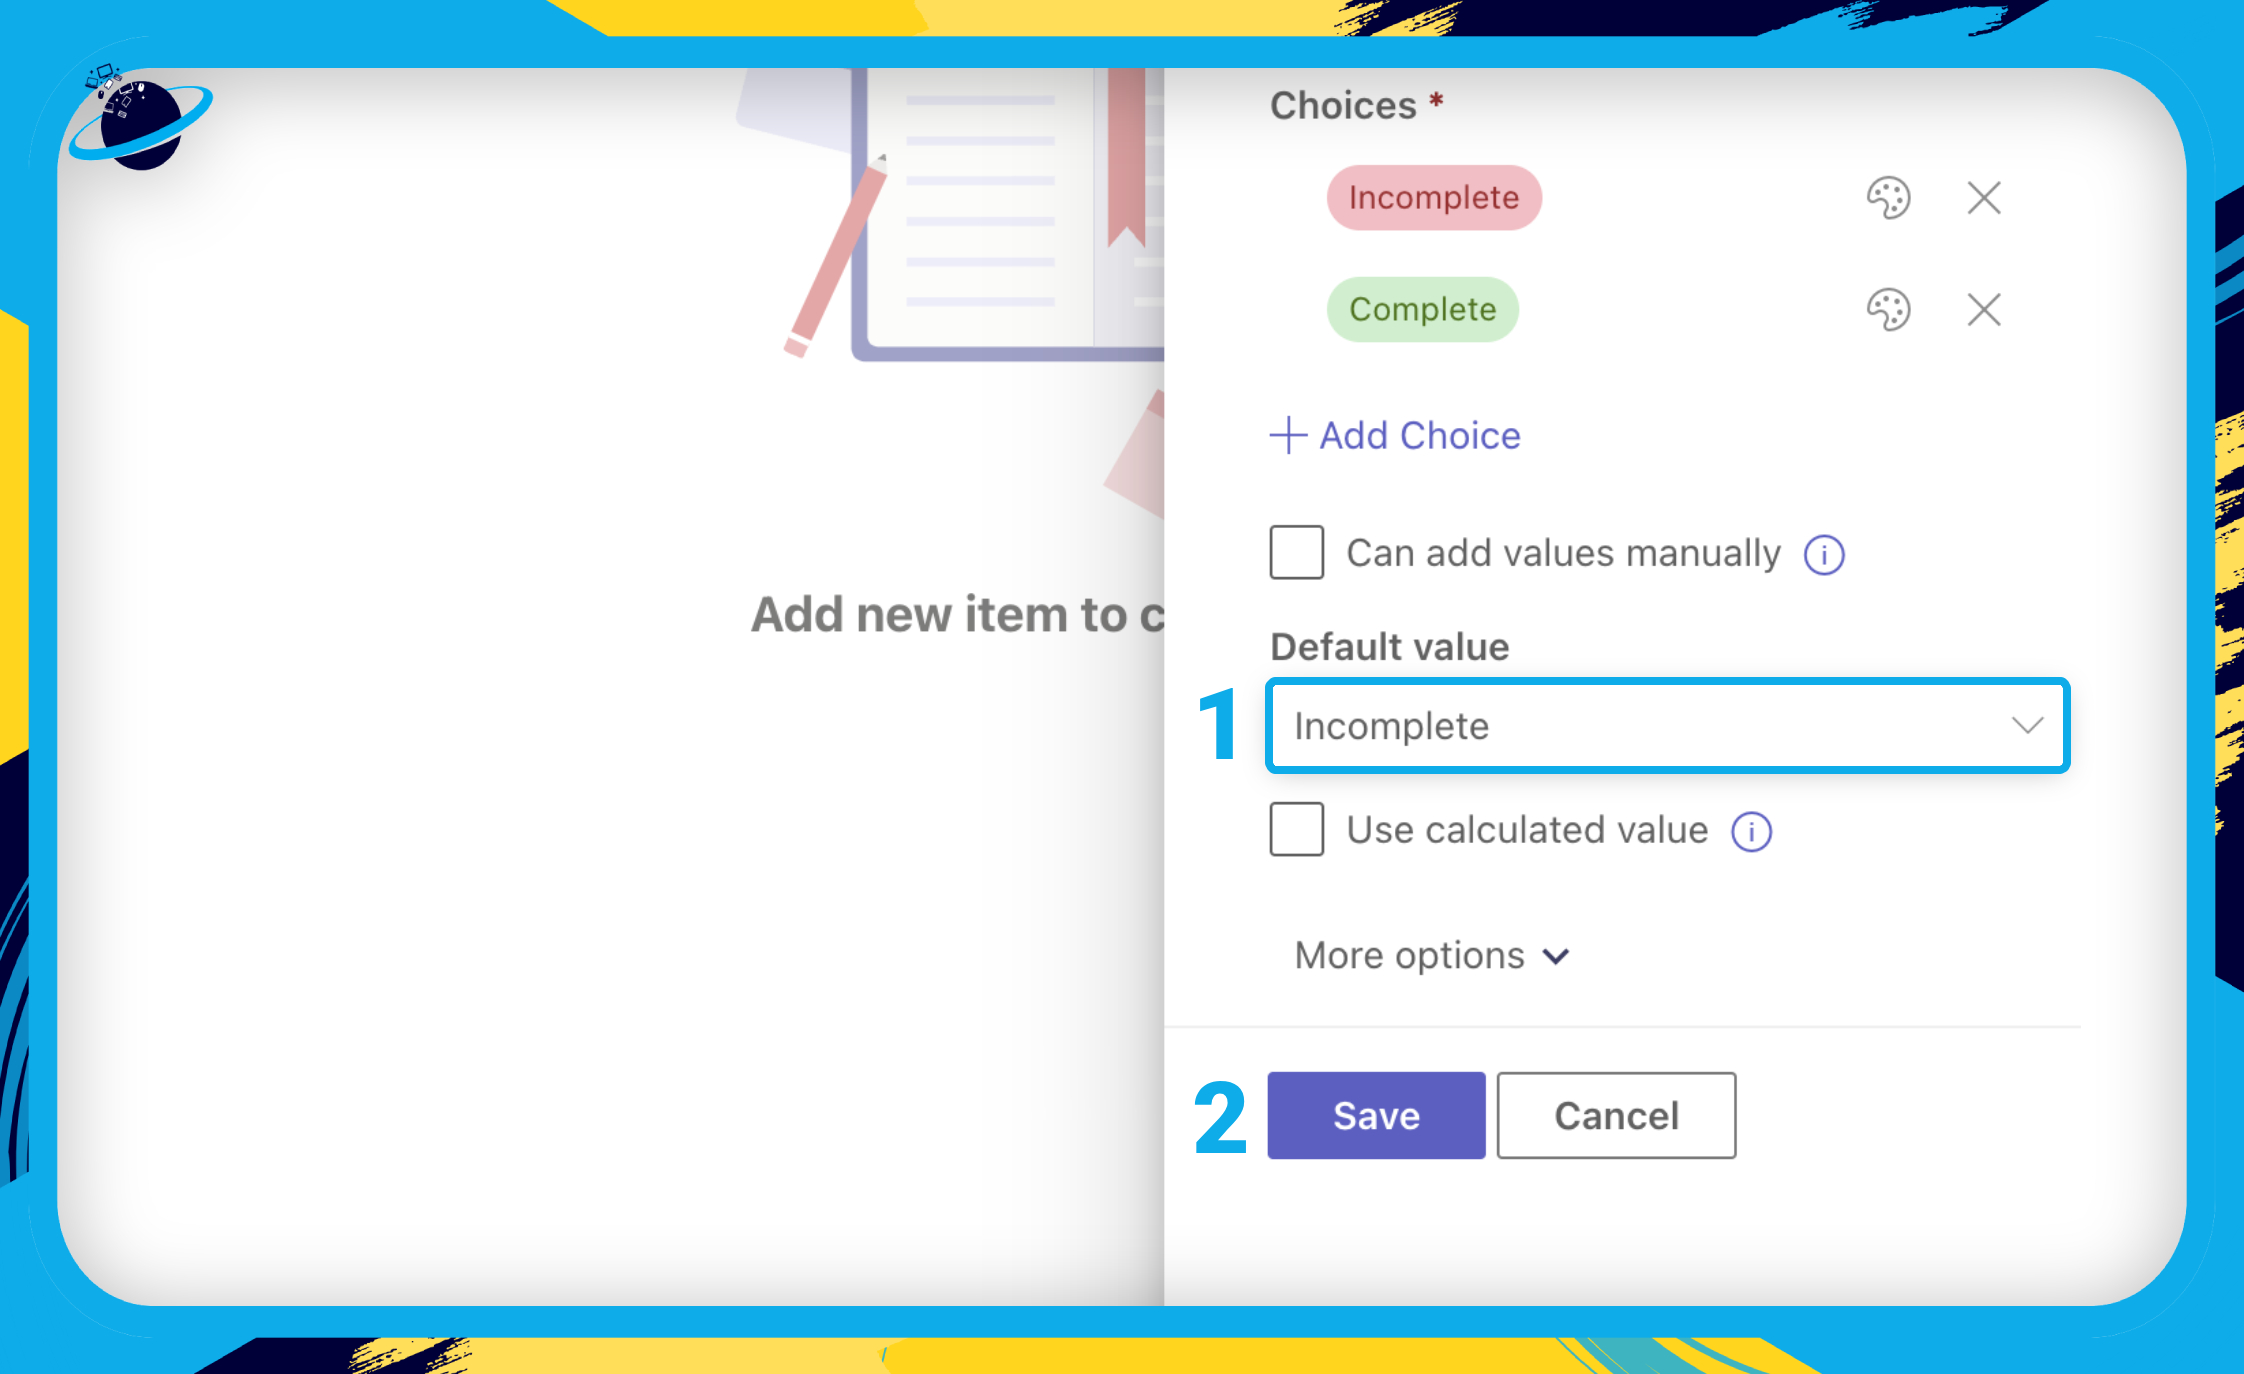
- Scroll down, click the select box under “Default value” and select “Incomplete.” [1]
- Finally, hit “Save.” [2]
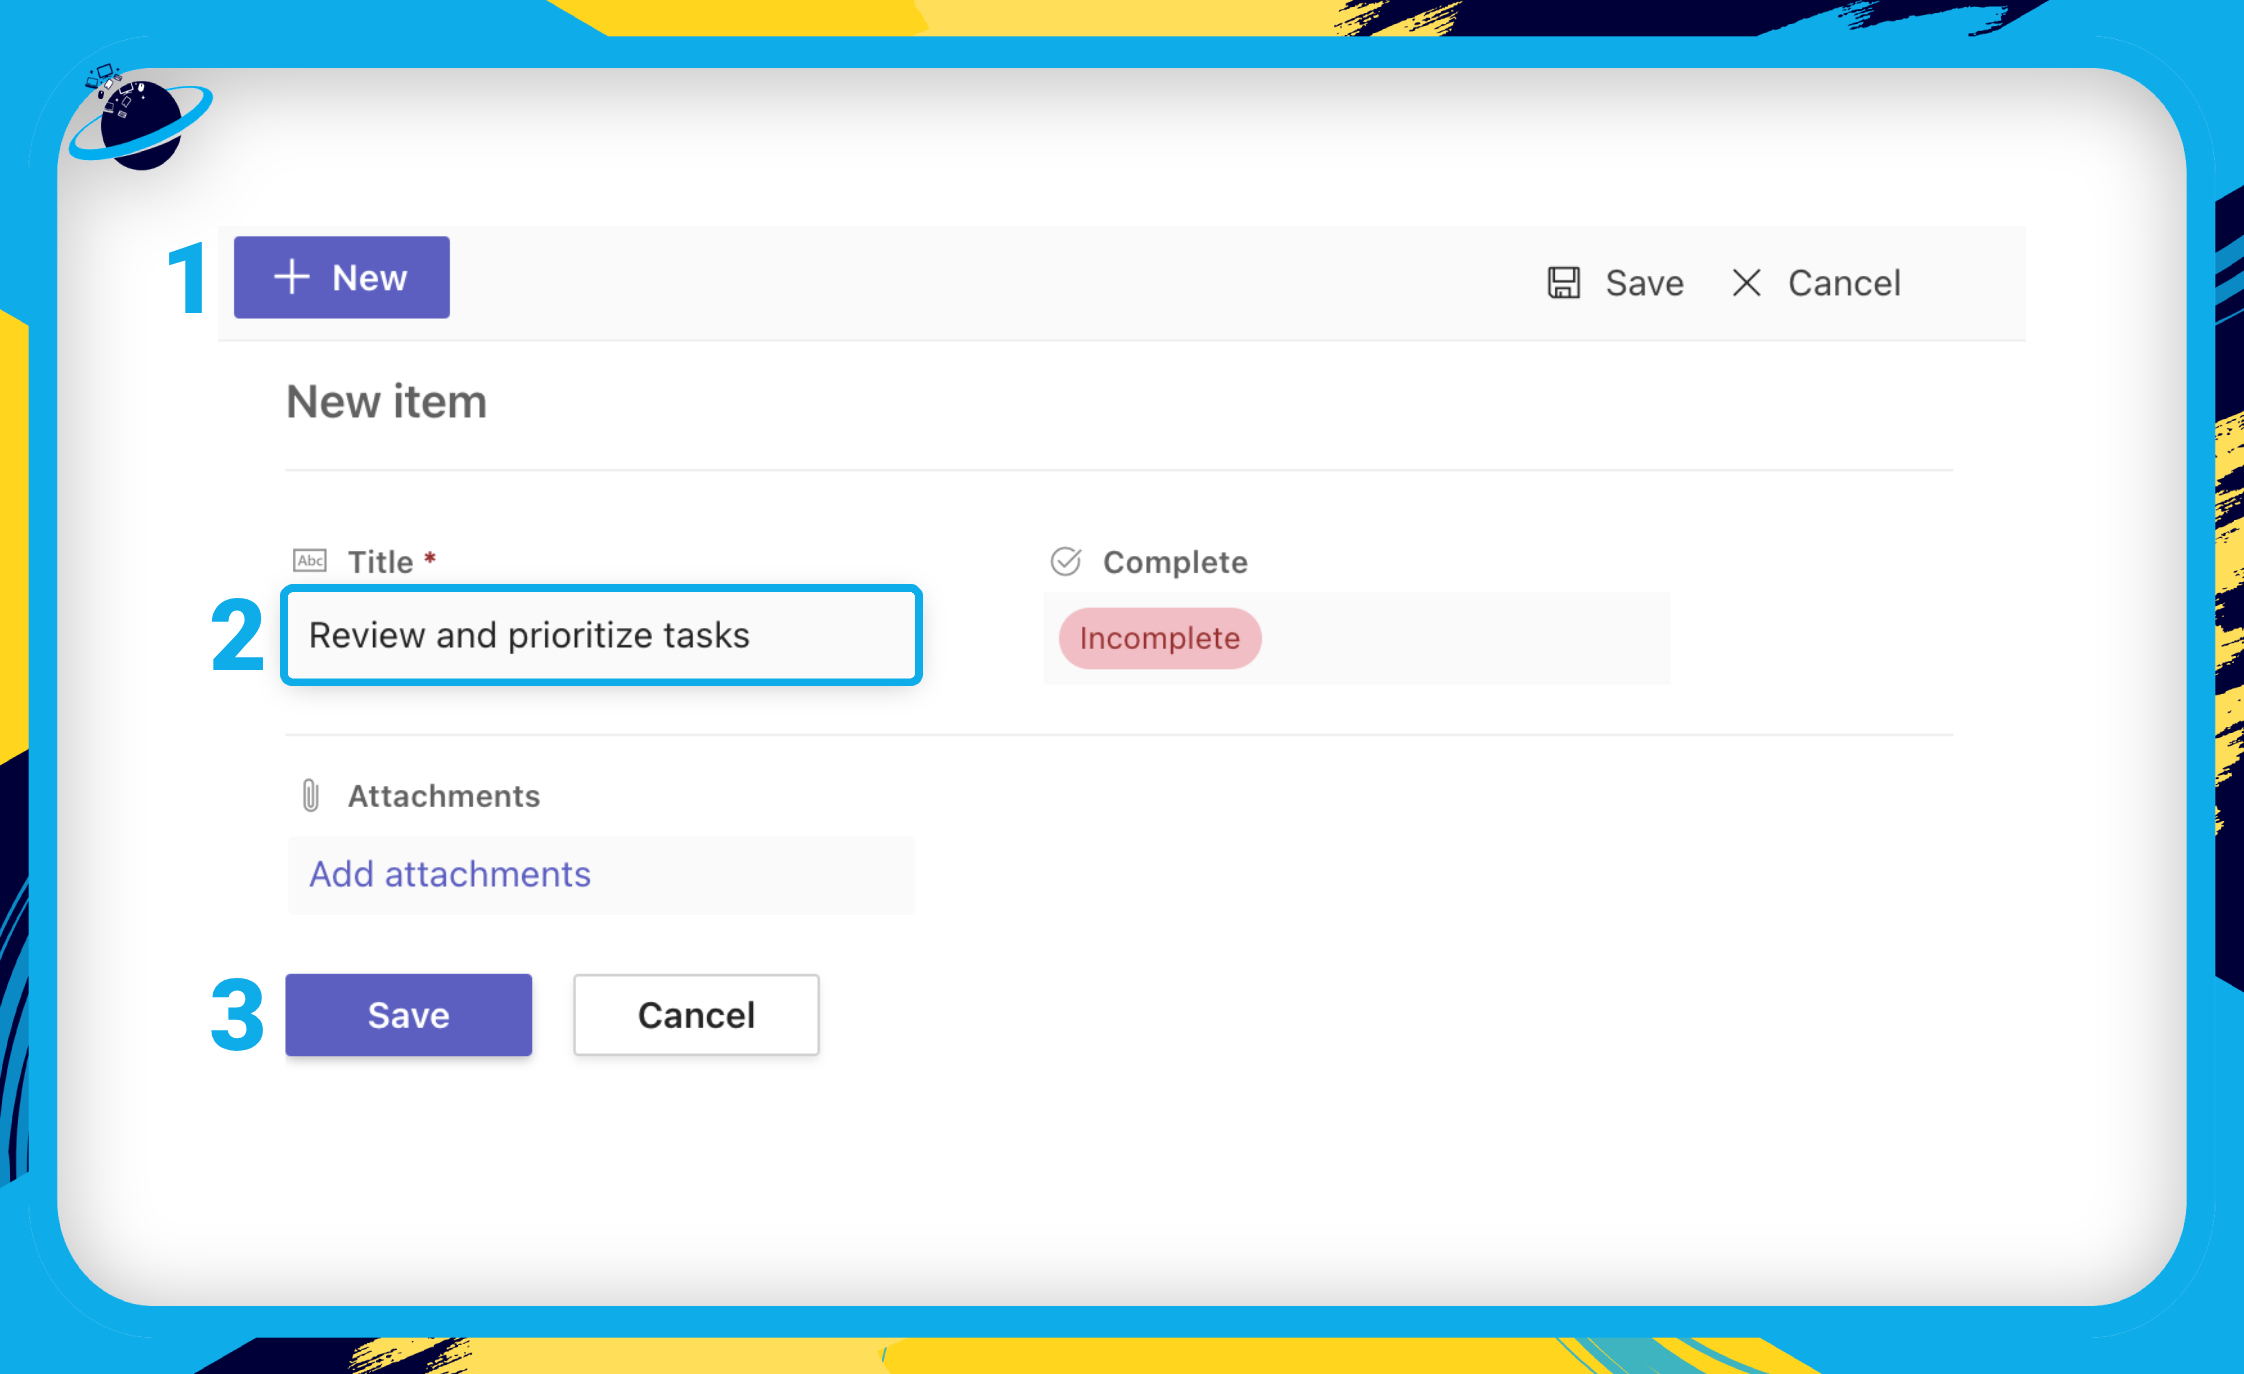
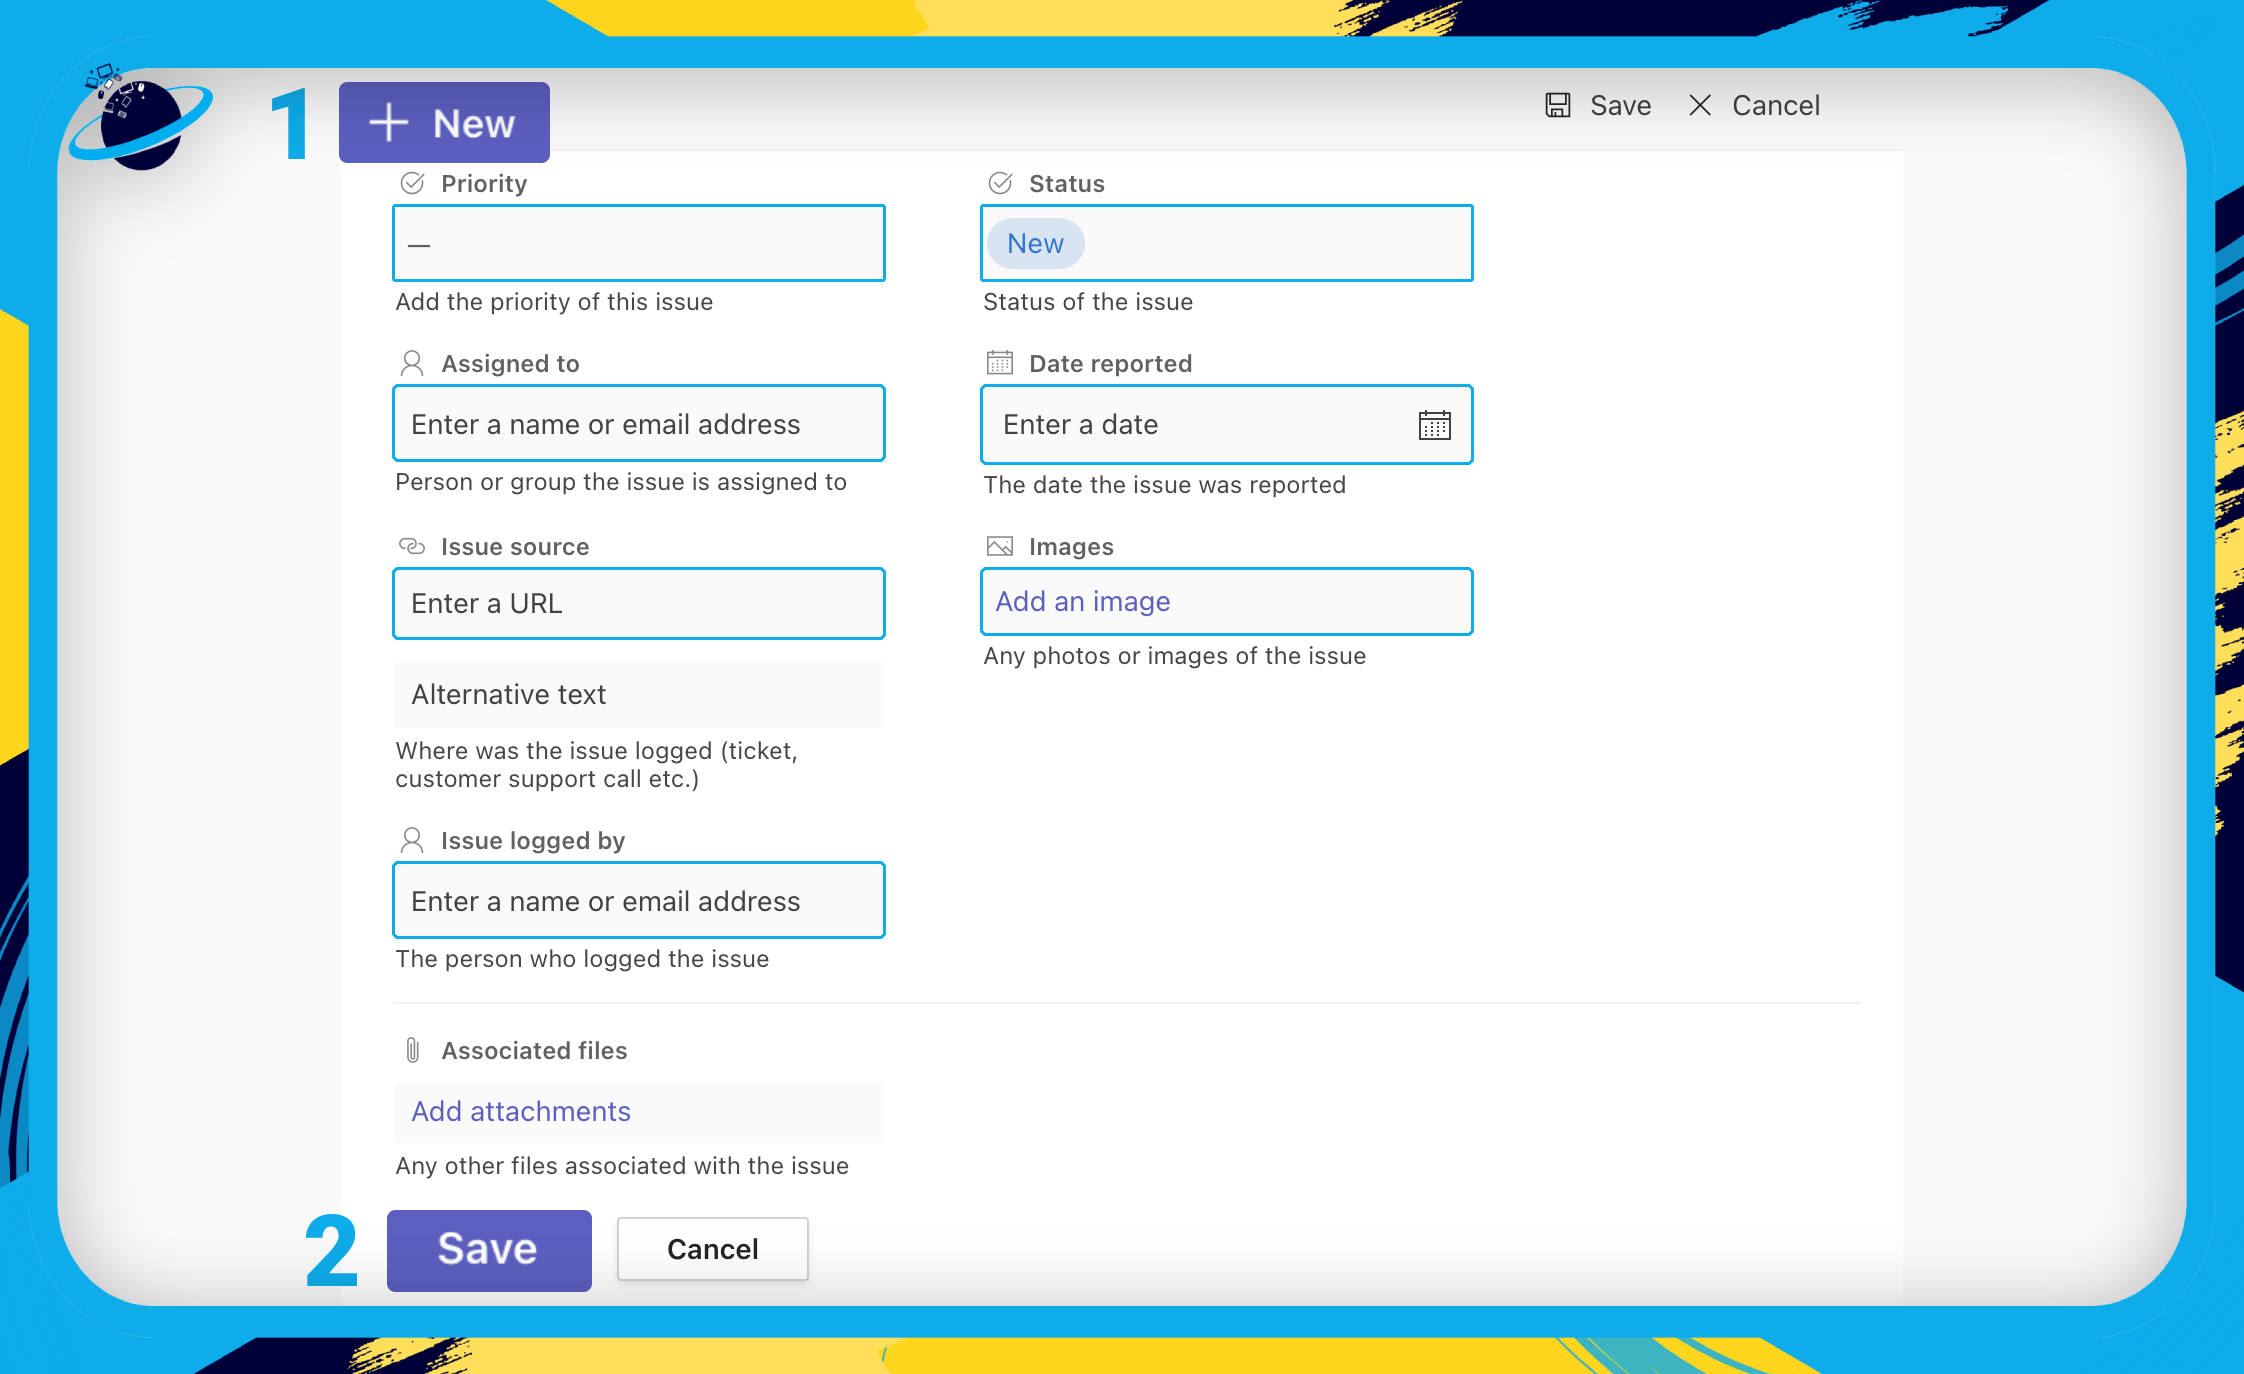
- We can add tasks to our list by hitting “New” at the top. [1]
- Enter a title for the task. [2]
- Then hit “Save.” [3]
Once you’ve added all your tasks, you will want to set them to complete as you progress. To do that, please follow these steps:
- First, click the task that you’ve completed. [1]
- Then head down to where it says “Incomplete” and click it to reveal the other option(s). [2]
- Now select “Complete.” [3]
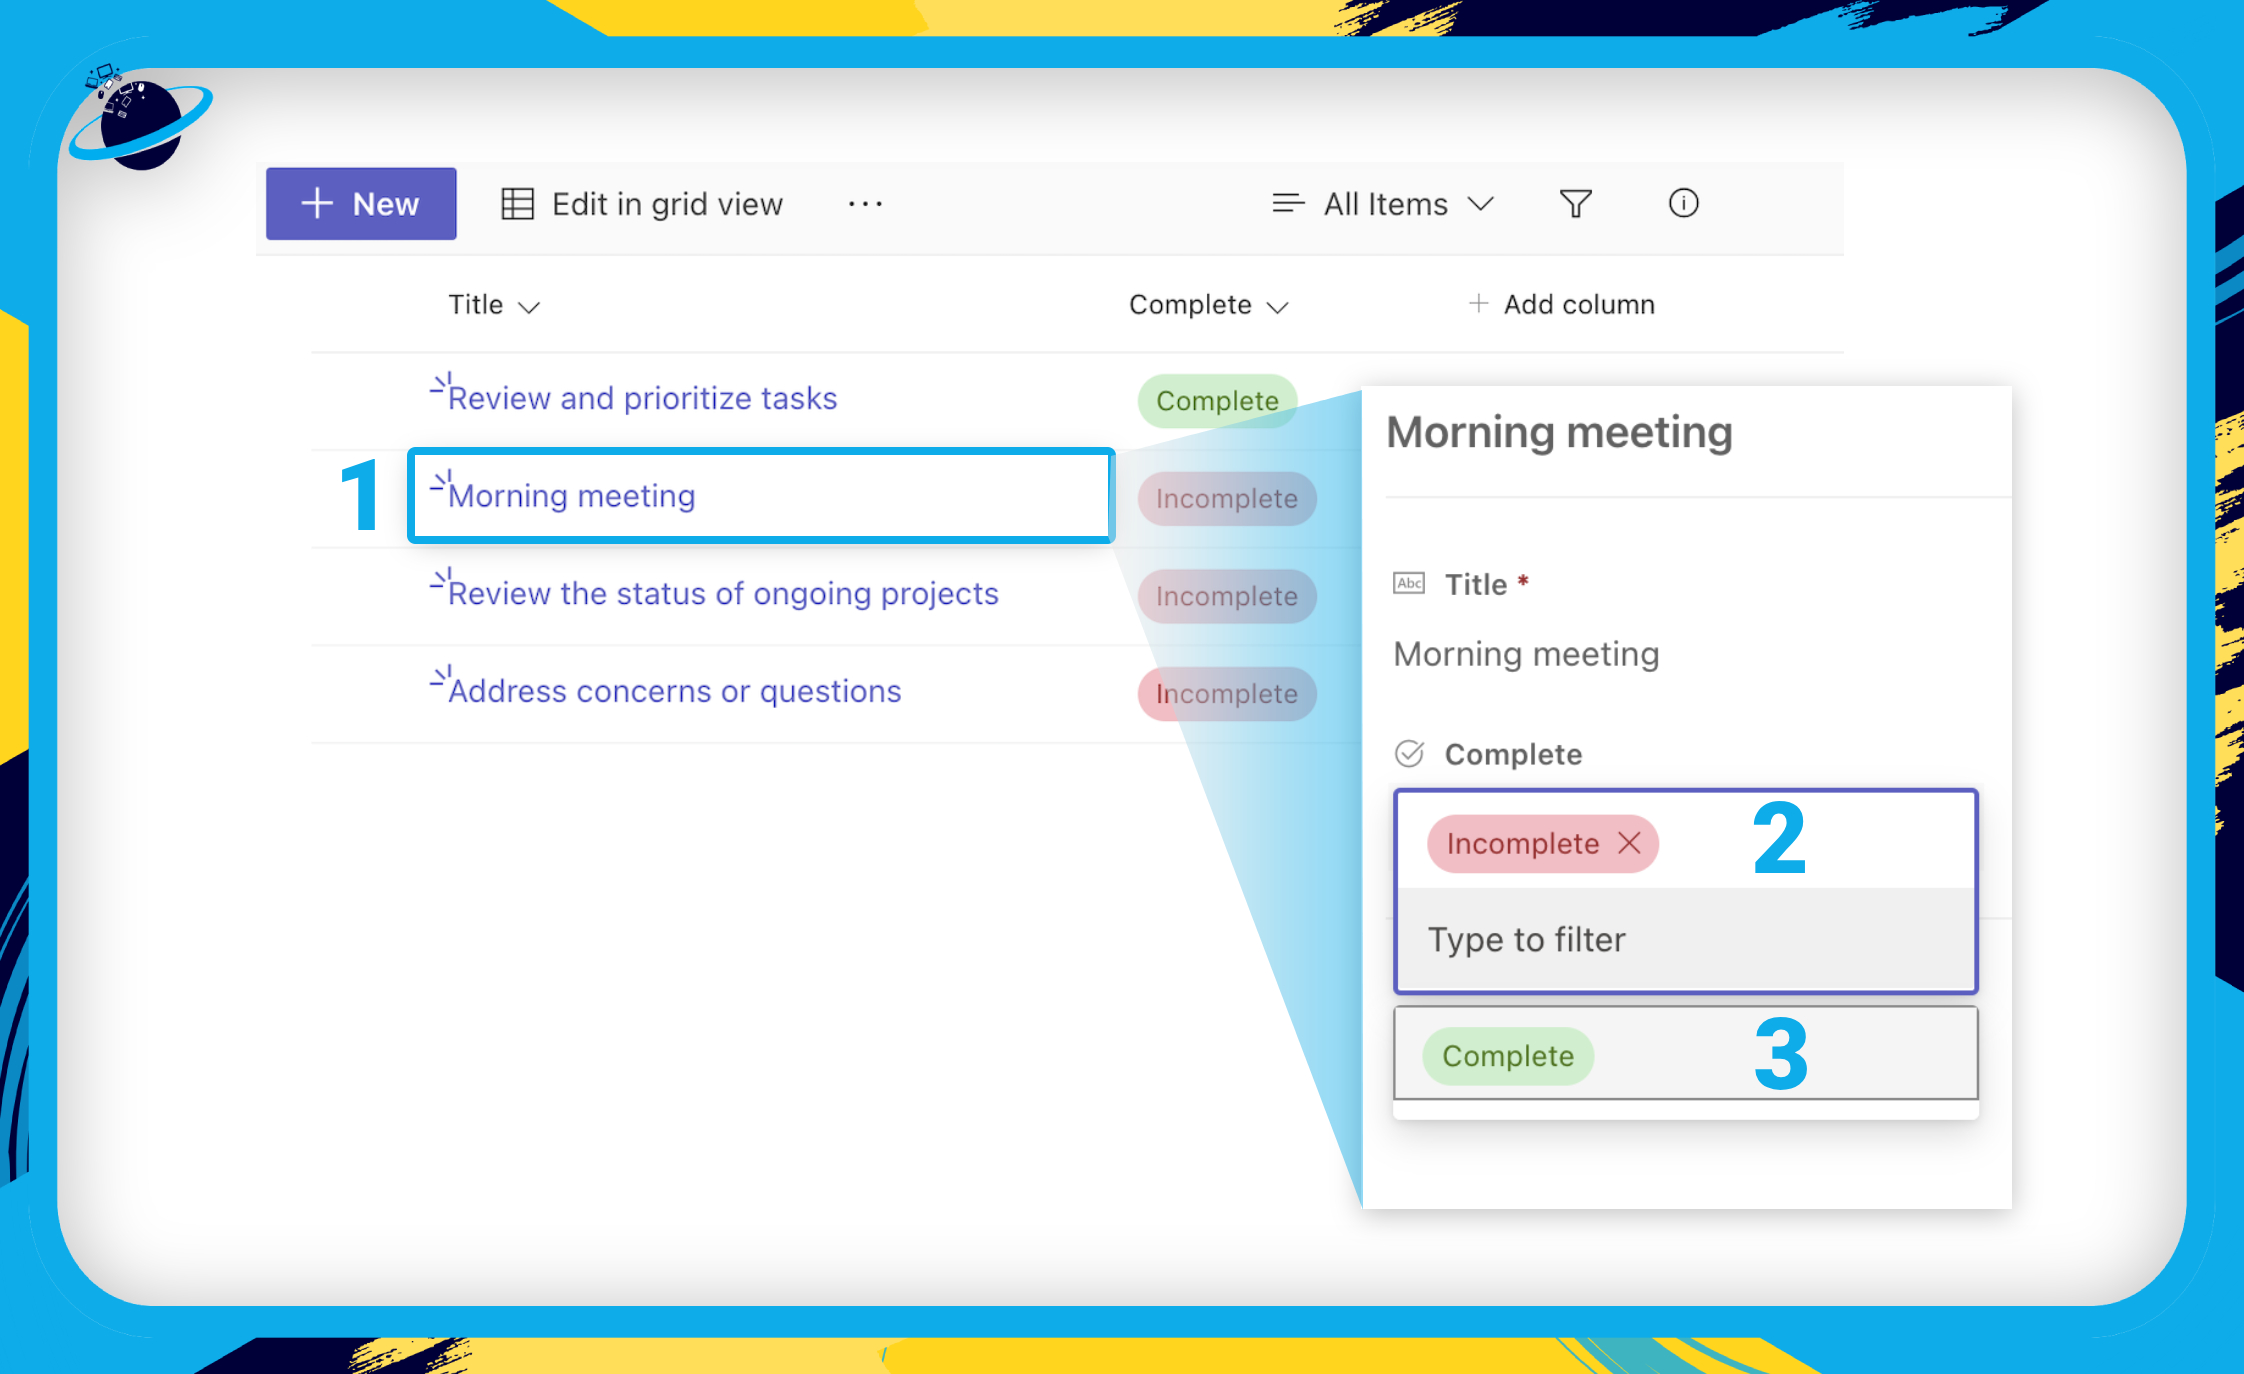
The list item will update automatically once you’ve selected “Complete.”

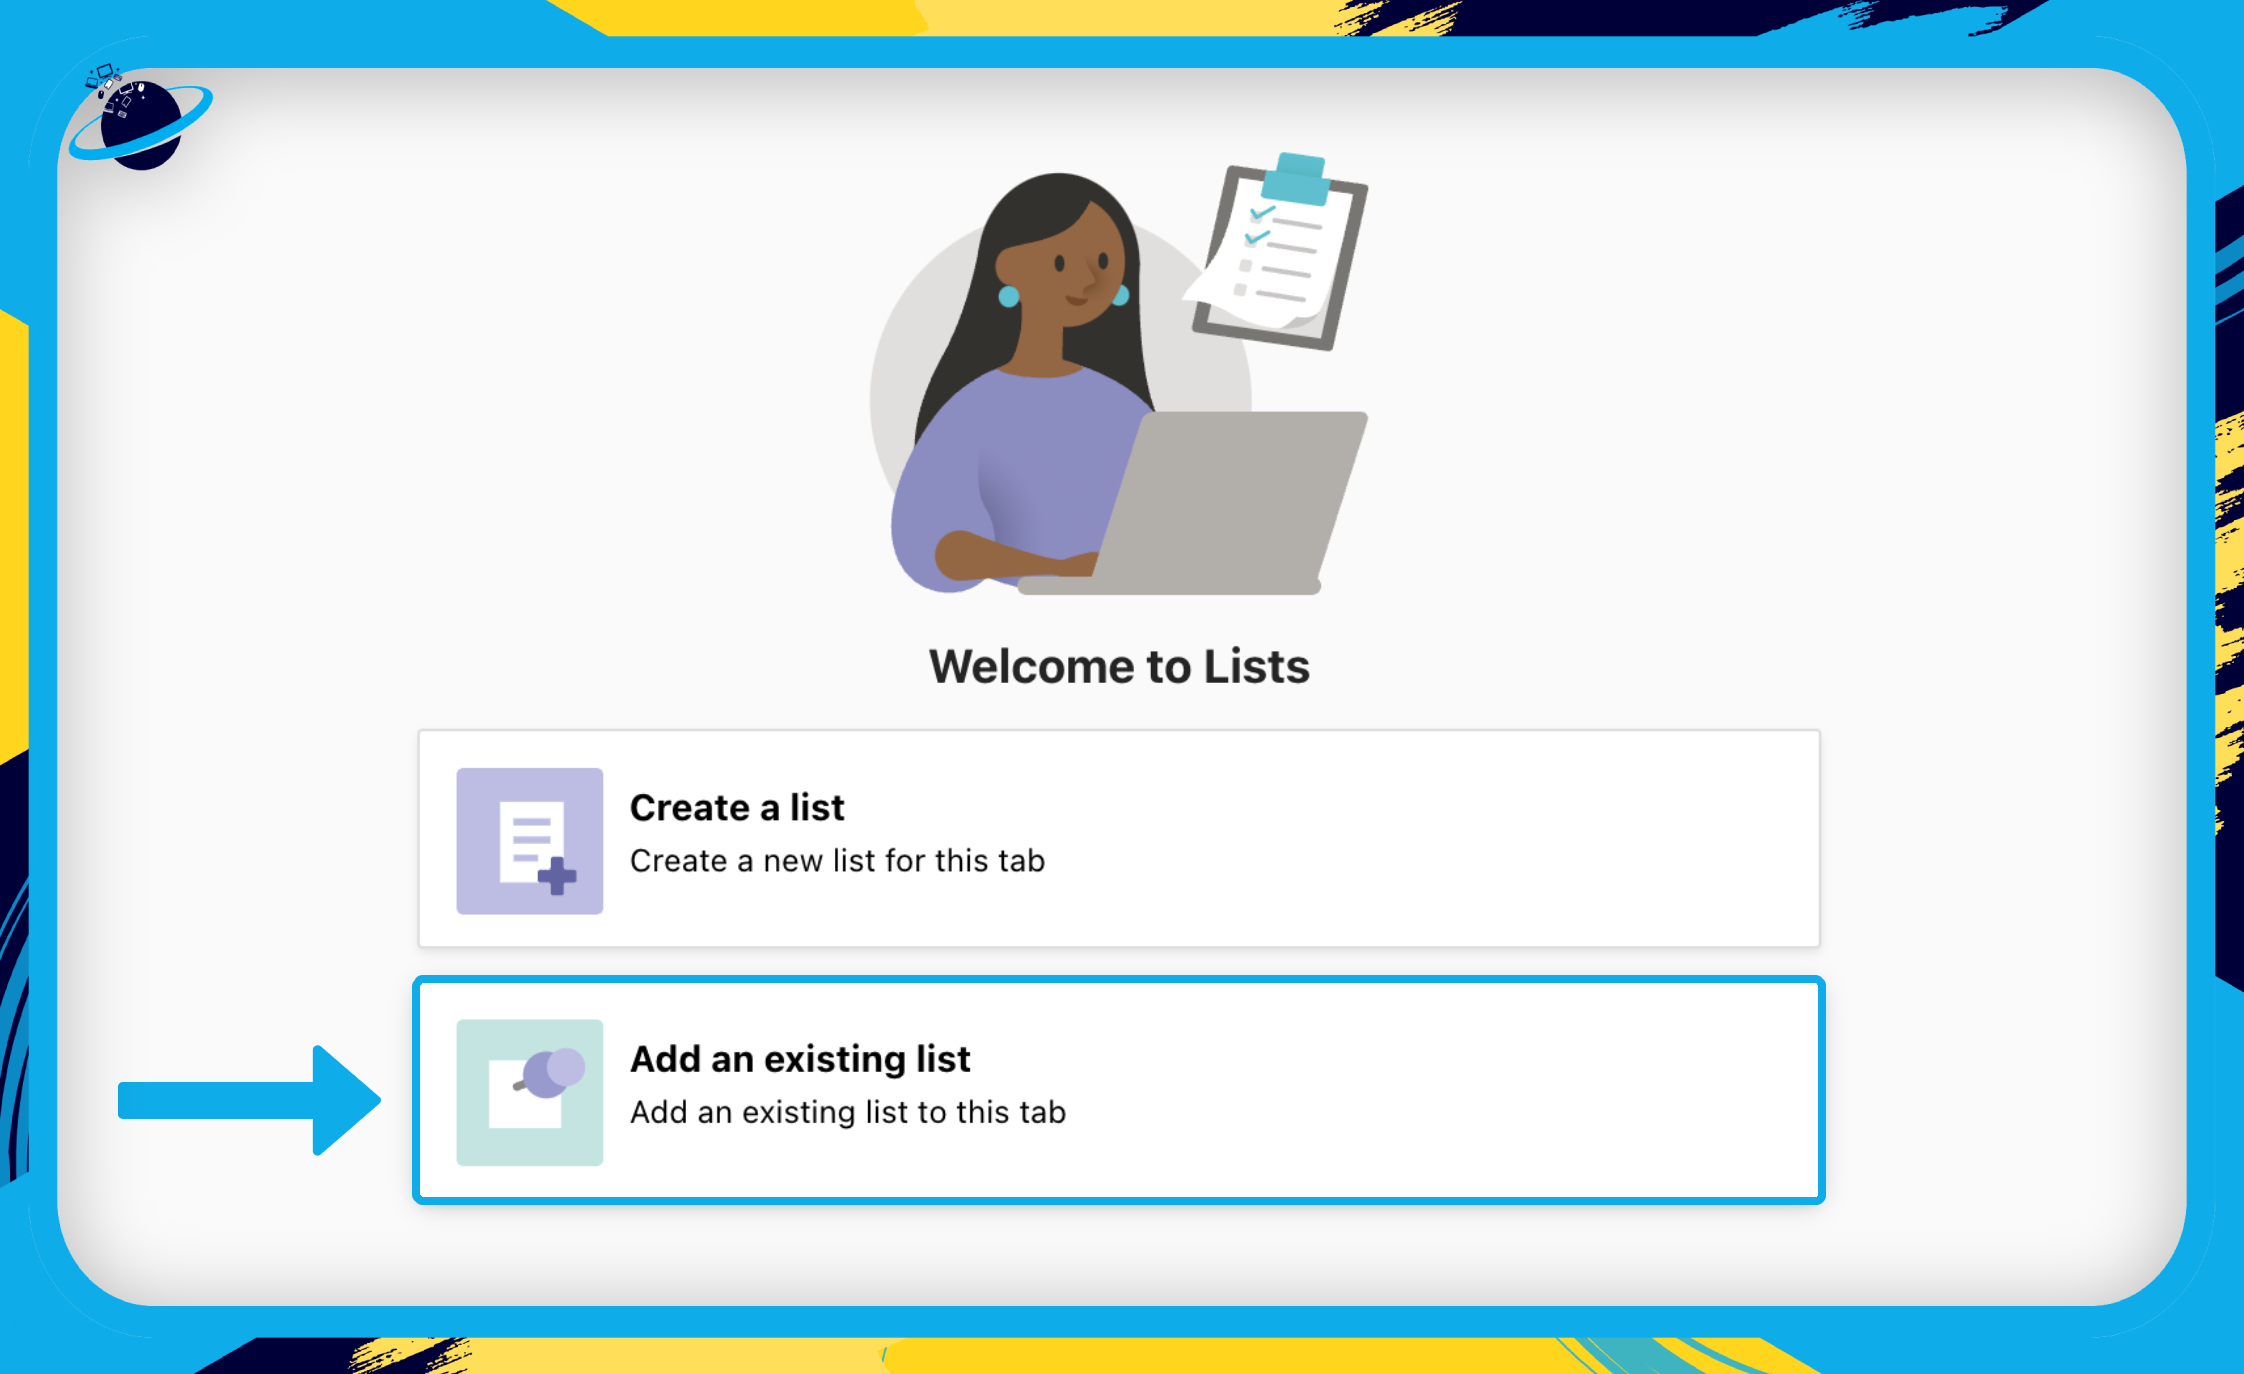
How to add an existing list
In this section, we’ll show you how to add an existing list from your Microsoft Lists app.
- Once you’ve added Microsoft Lists to Teams, select “Add an existing list.”
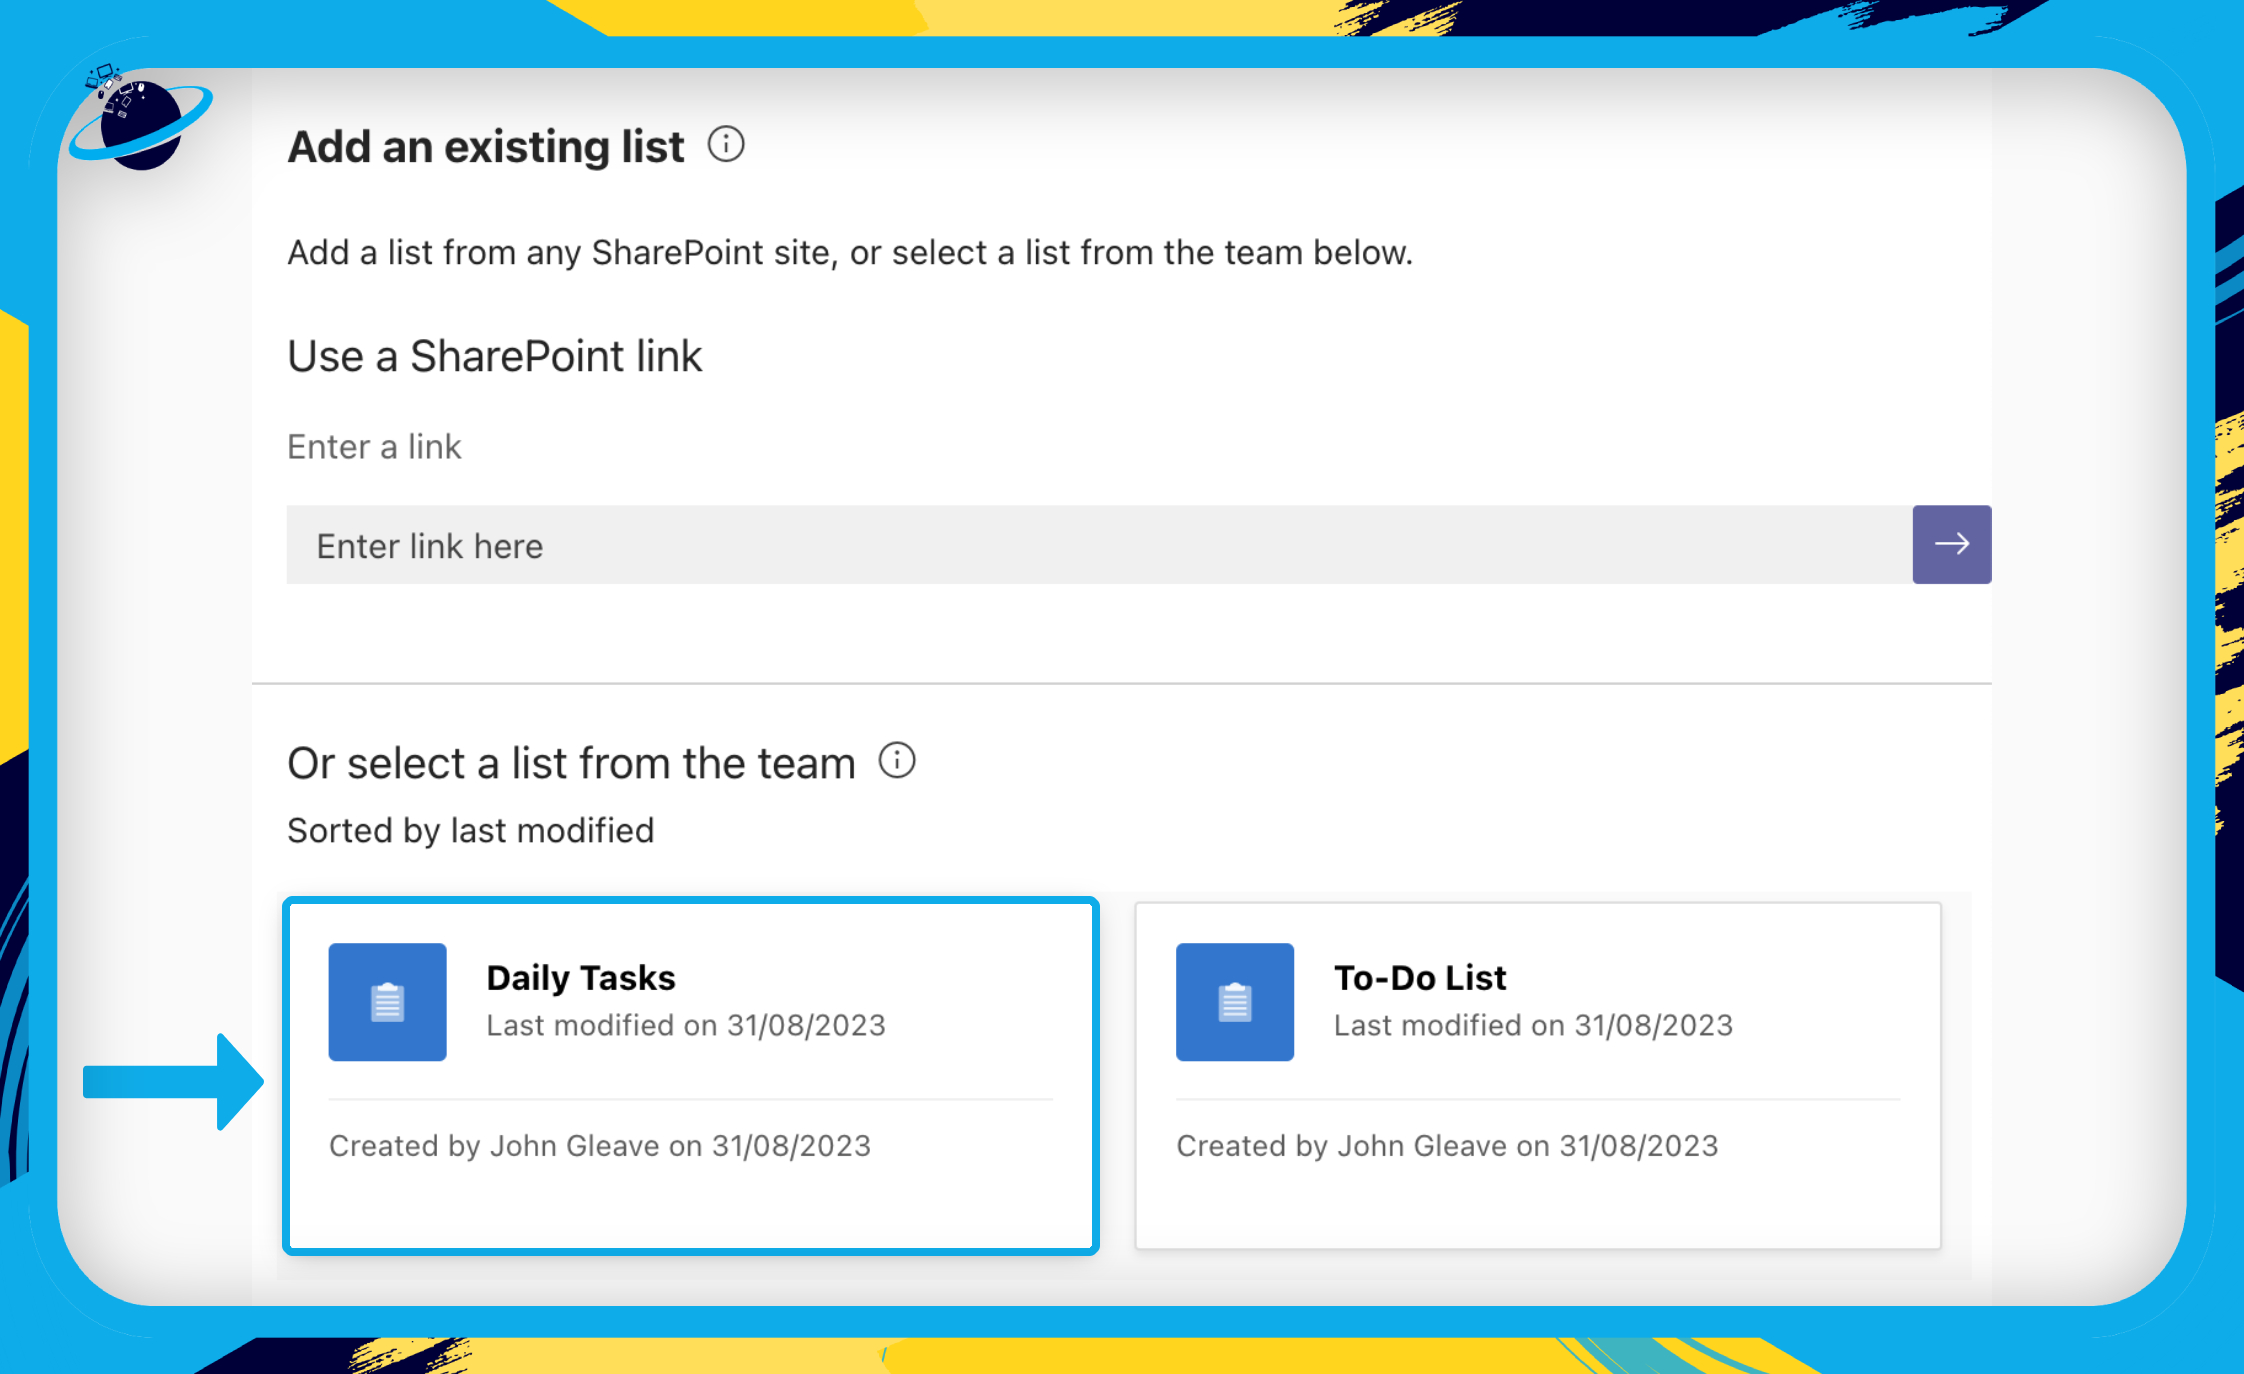
On the next page, you’ll have the option to add a link to a SharePoint list or select from your existing lists in the Lists app. Once selected, the list will open in your Teams channel, allowing you to modify the list. All updates you make in Teams will be reflected in the Lists app and vice versa.
![]() Note: Although changes will reflect across both applications, whether you make changes in Teams or Lists, the changes won’t appear in real-time. That means you’ll need to refresh the page to see those changes.
Note: Although changes will reflect across both applications, whether you make changes in Teams or Lists, the changes won’t appear in real-time. That means you’ll need to refresh the page to see those changes.
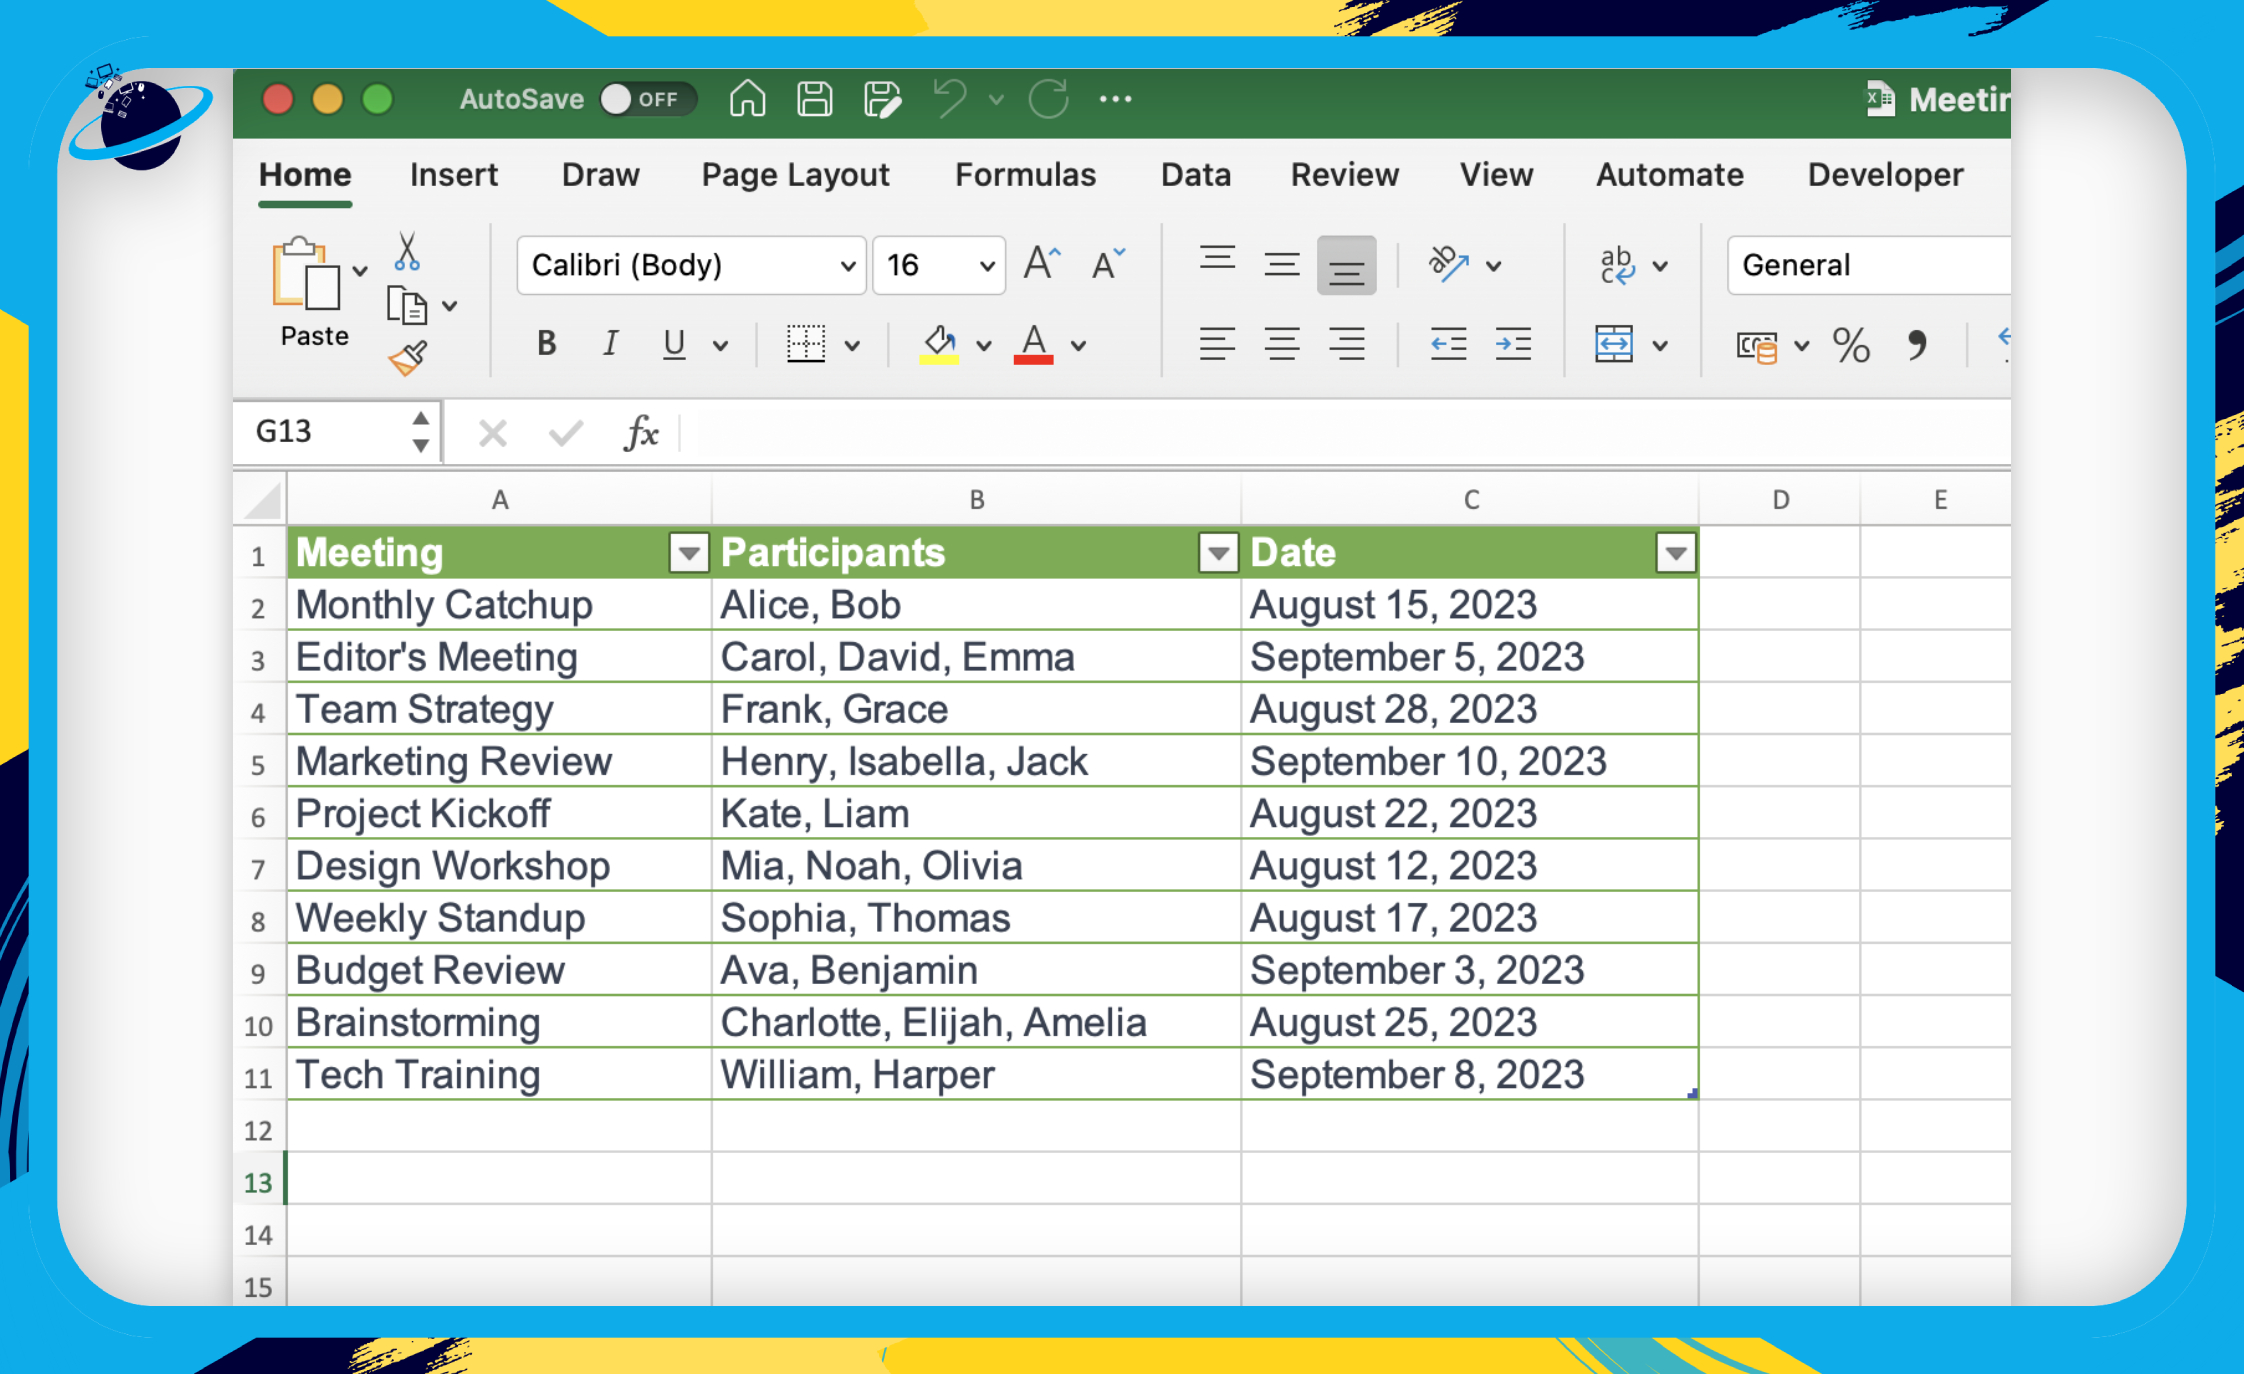
How to import a list from Excel
In this section, we’ll show you how to import a list or table into Microsoft Lists from an Excel worksheet.
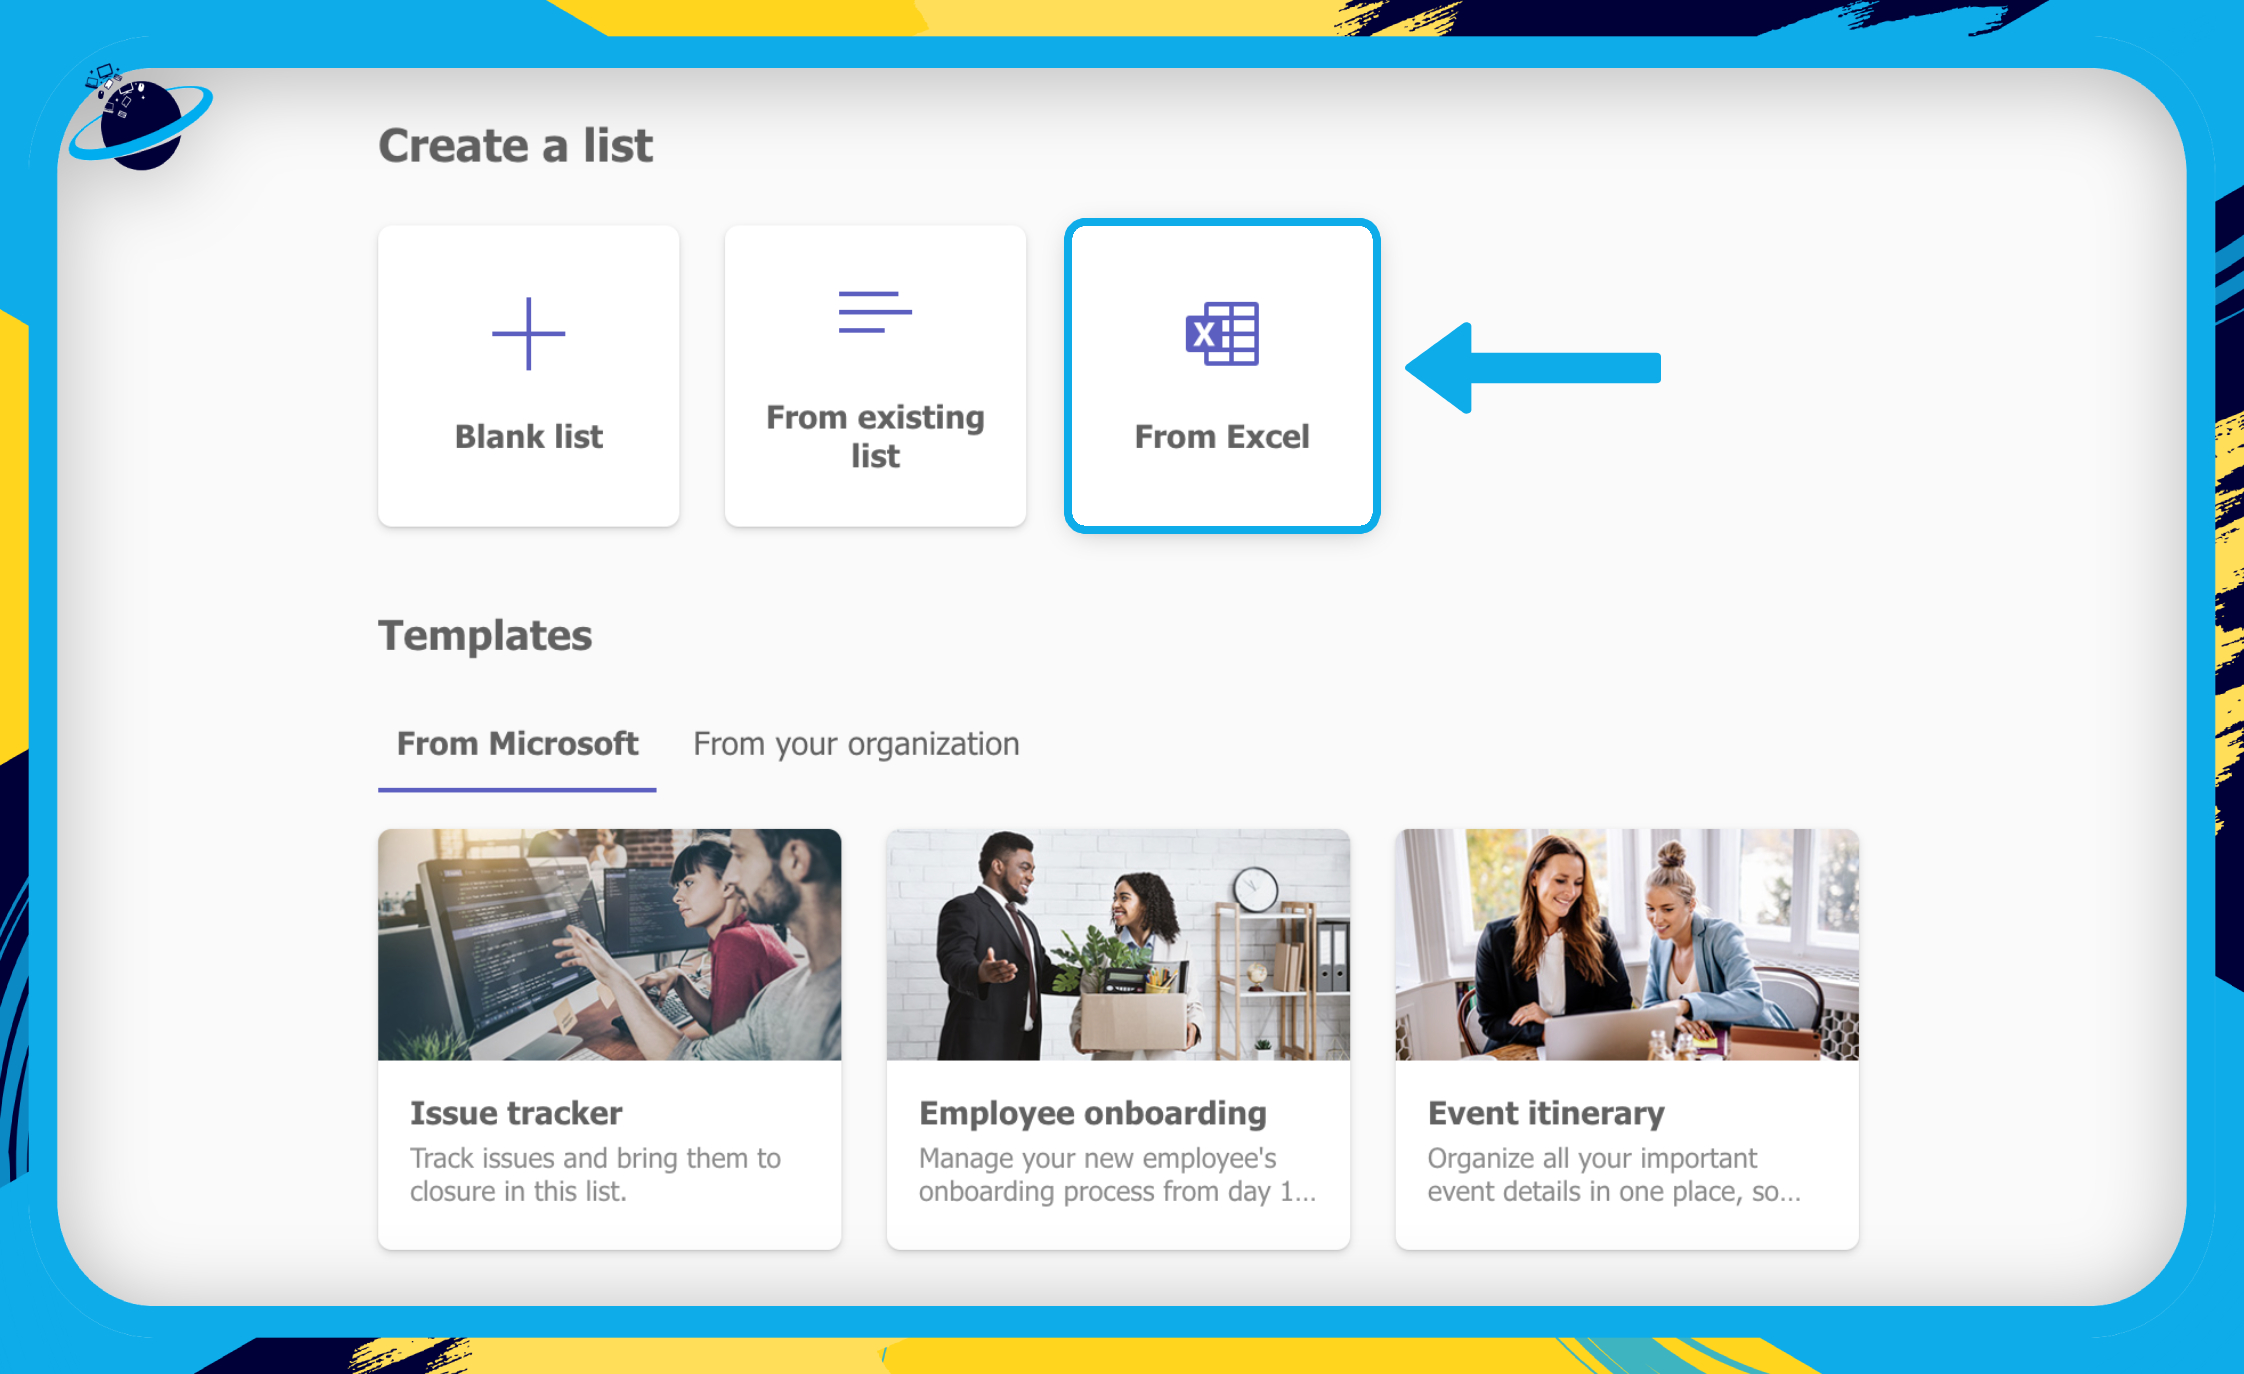
- Once you’ve added Microsoft Lists to Teams, select “Create a list.”
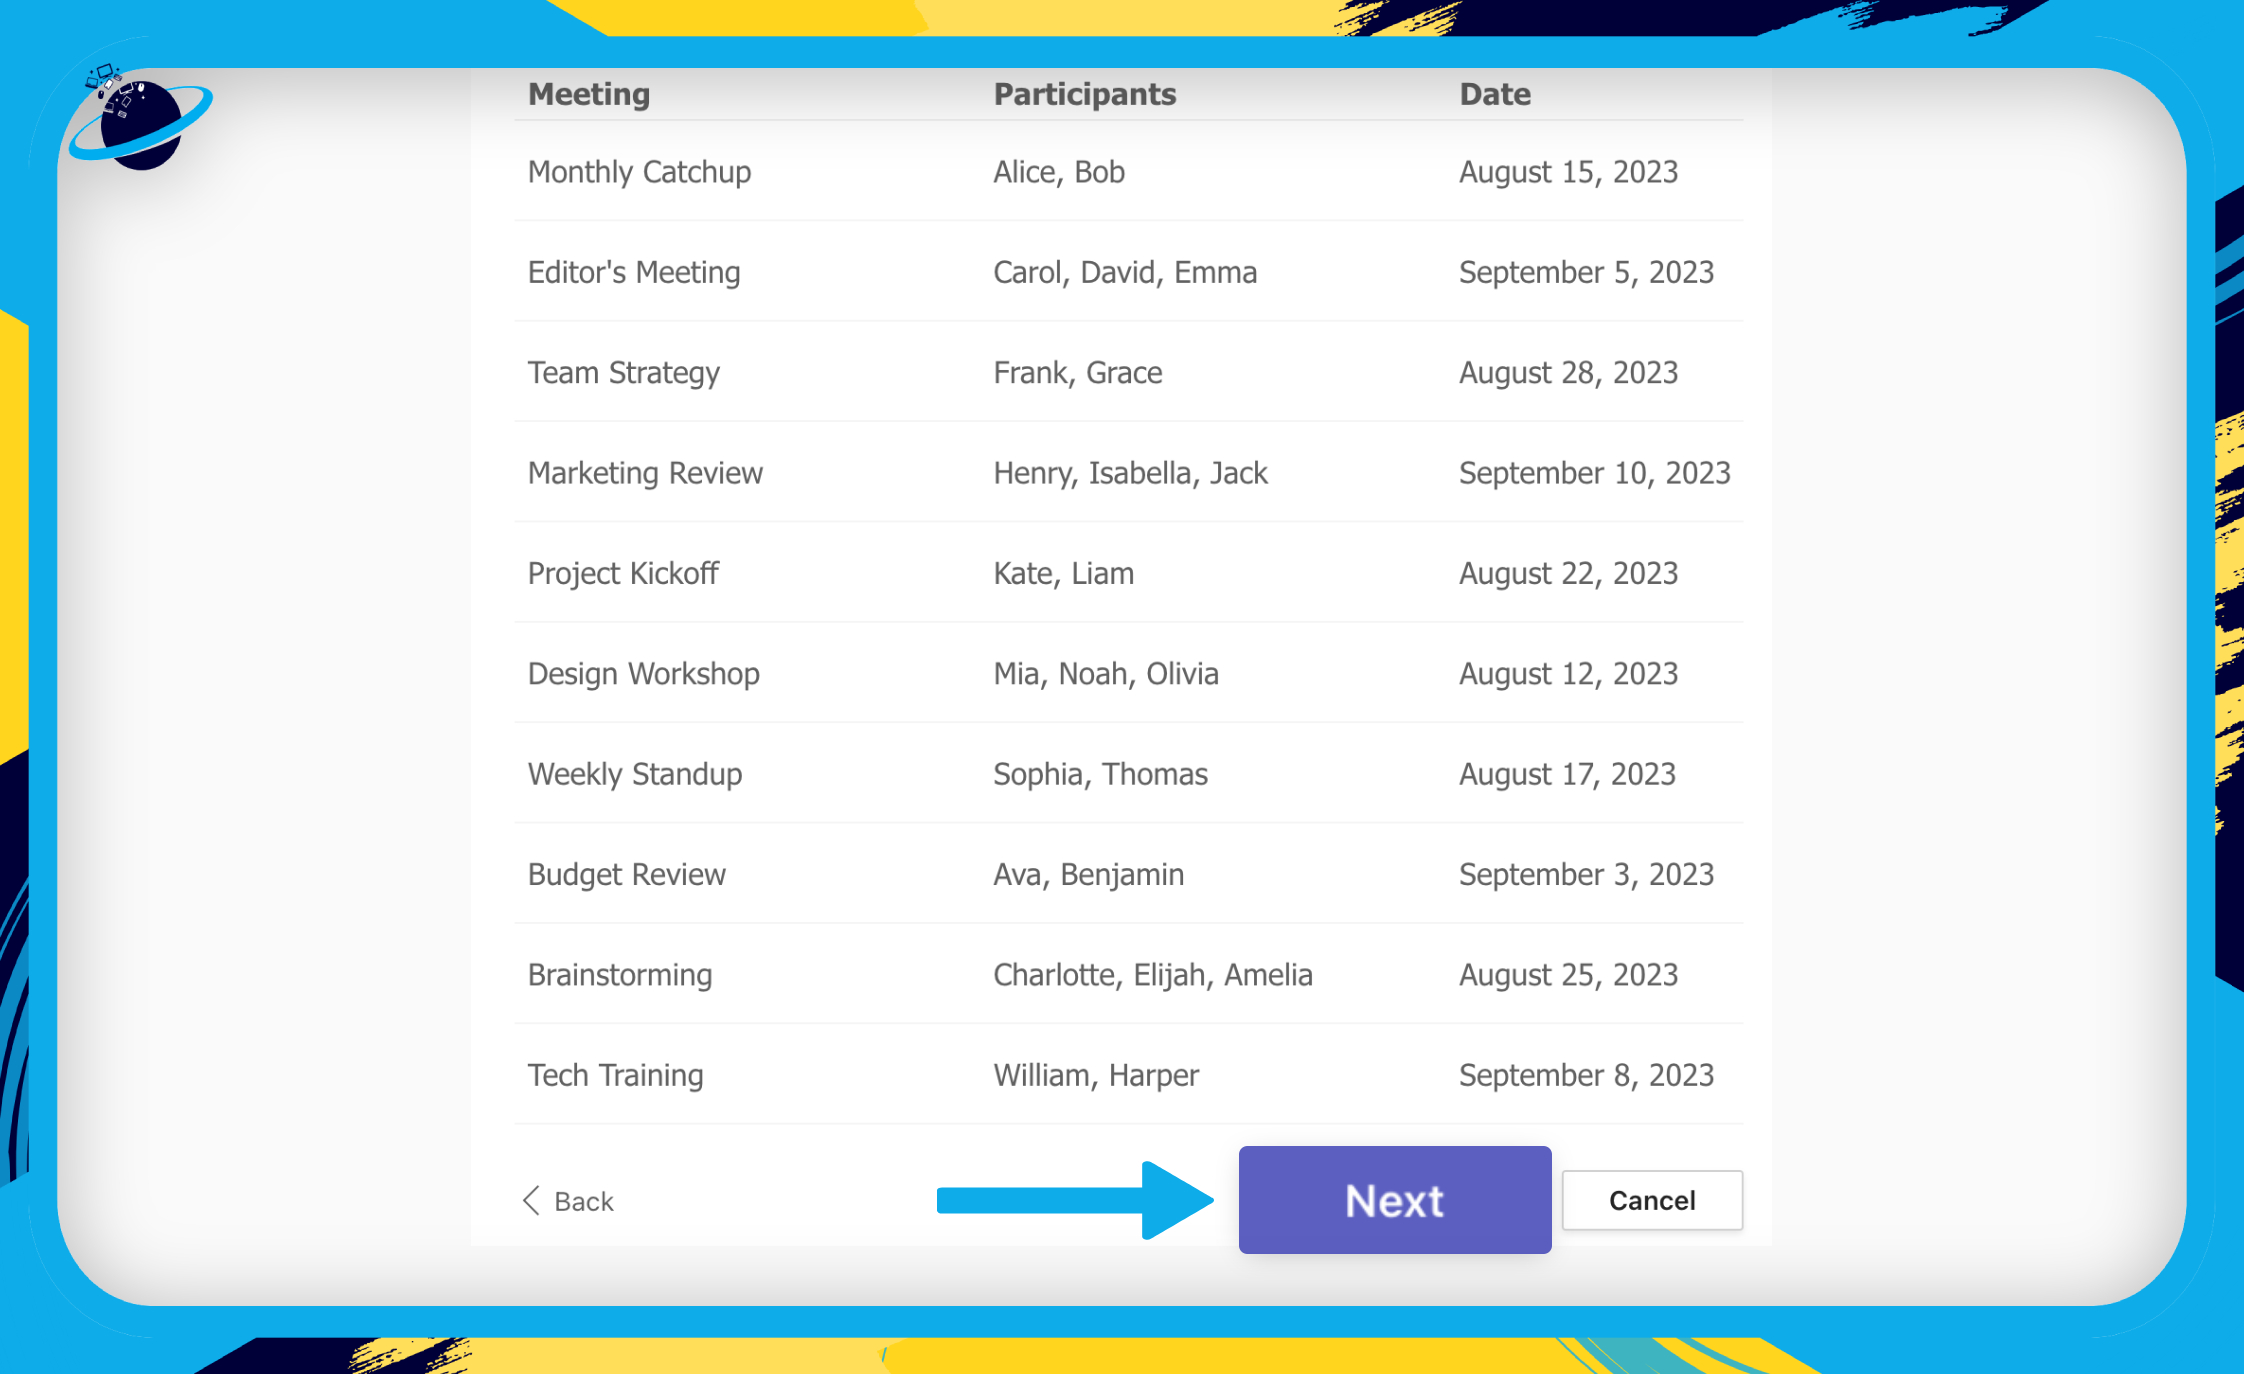
Here’s a table of meetings in Excel, including columns for the dates and participants. It’s a good idea to ensure that your tables contain headers so the information will carry over to Lists when you import the file.
- Next, select “From Excel.”
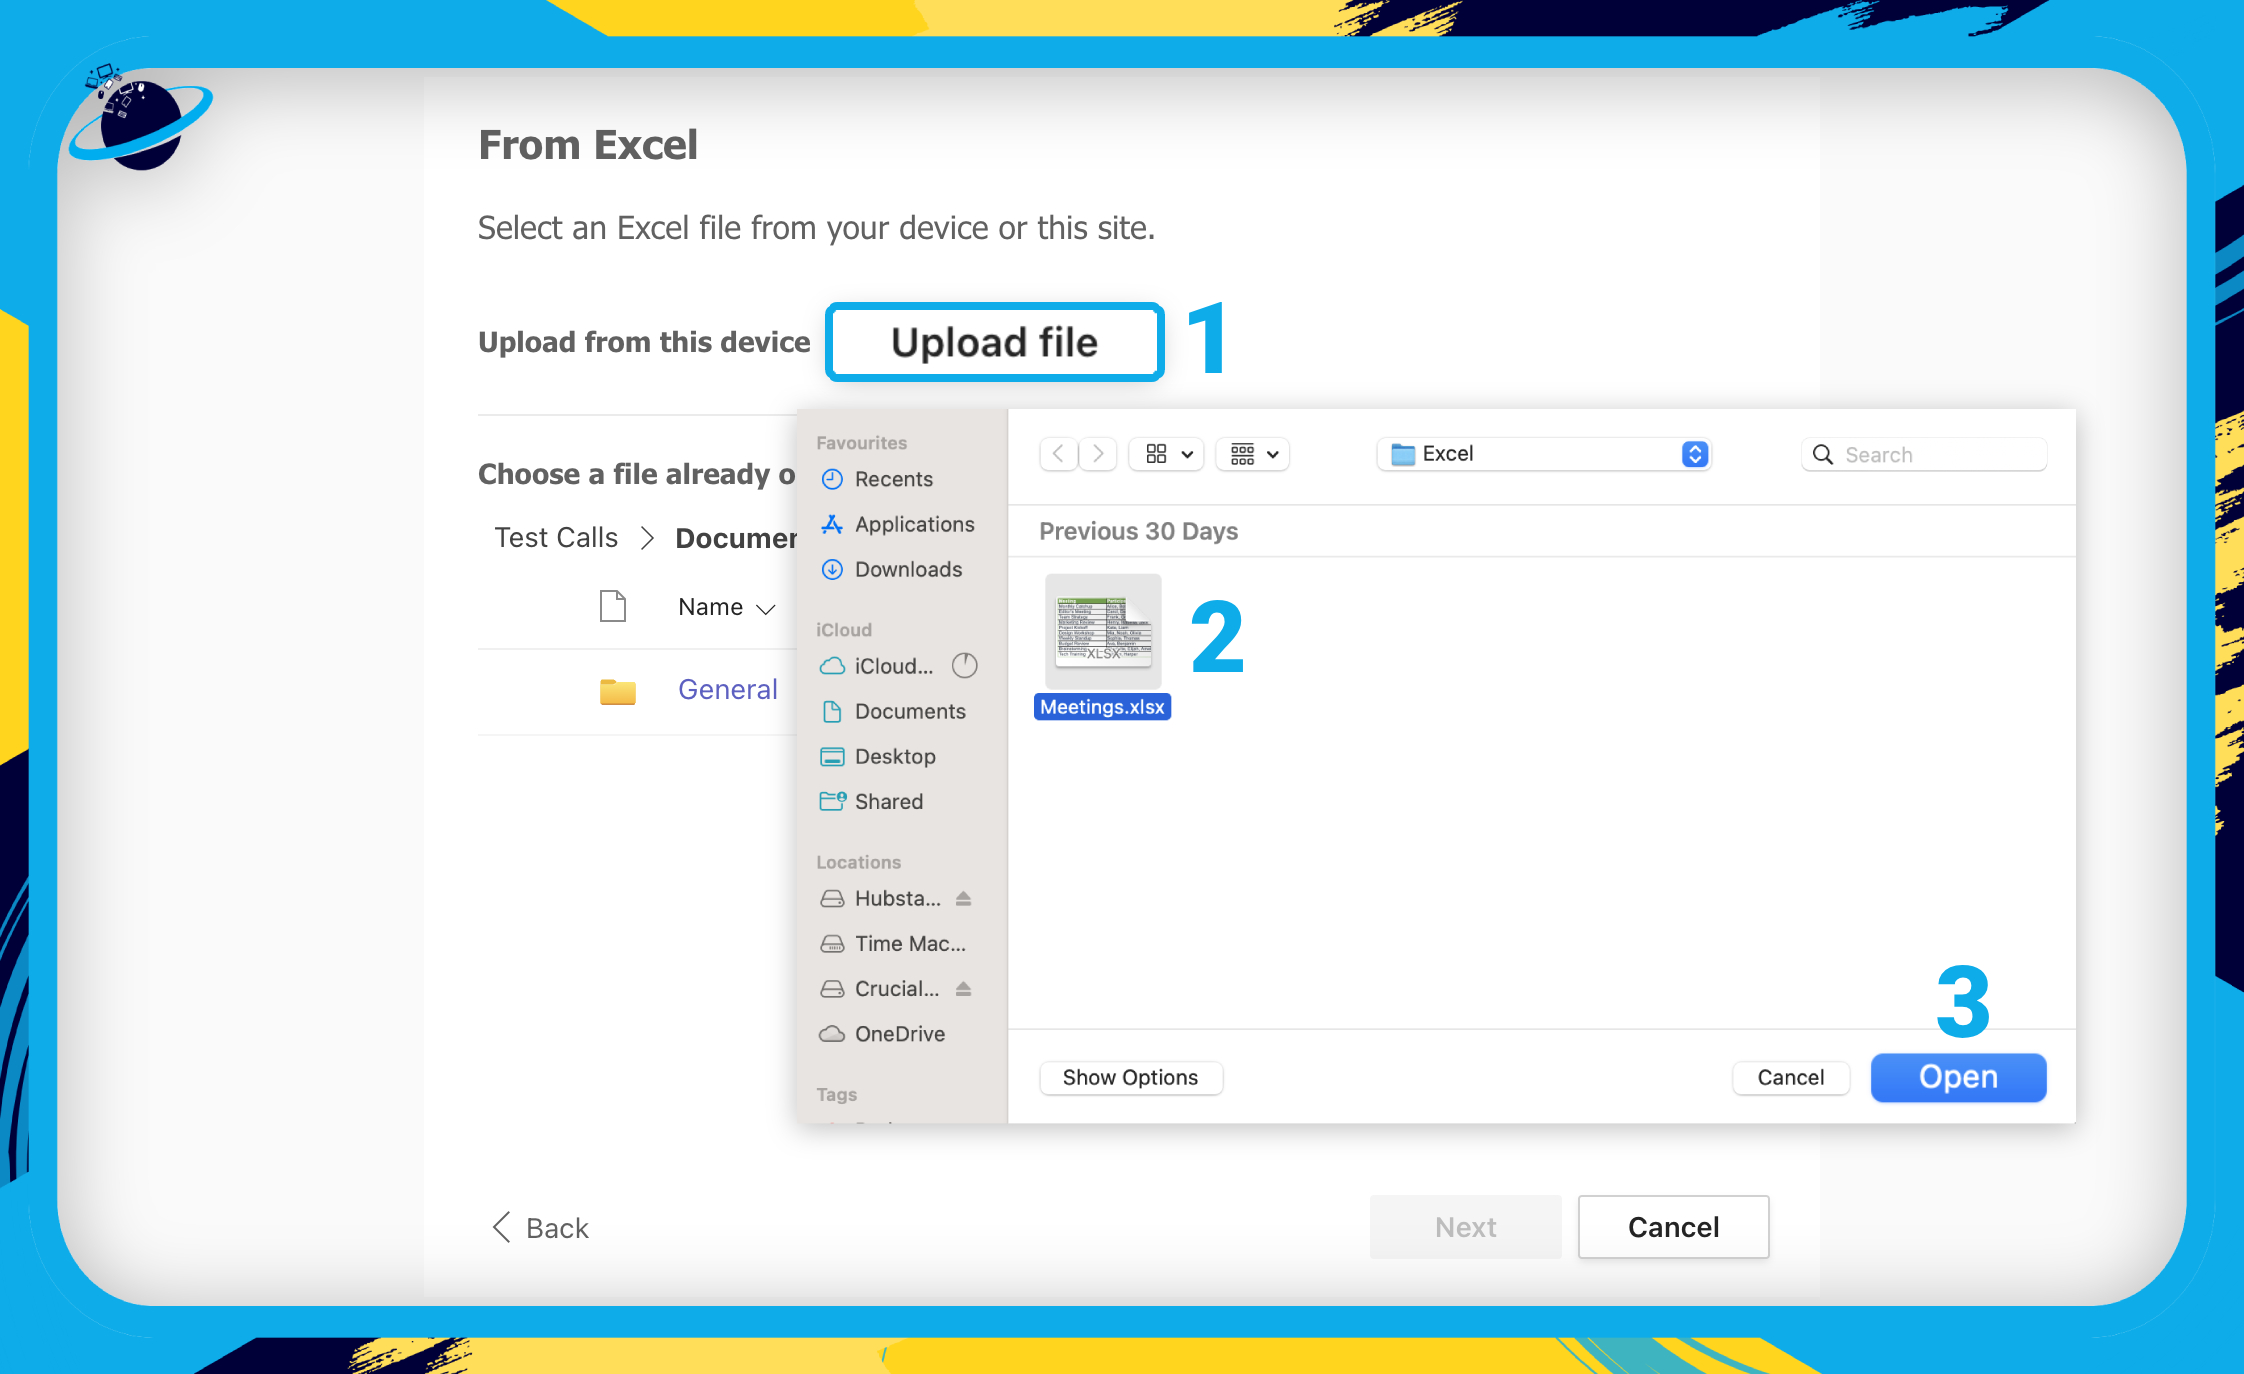
- If your worksheet is already uploaded to your teams’ files, select it.
- Otherwise, click “Upload file.” [1]
- Find and select your Excel workbook. [2]
- Then hit “Open.” [3]
- When the list has loaded, head down and click “Next.”
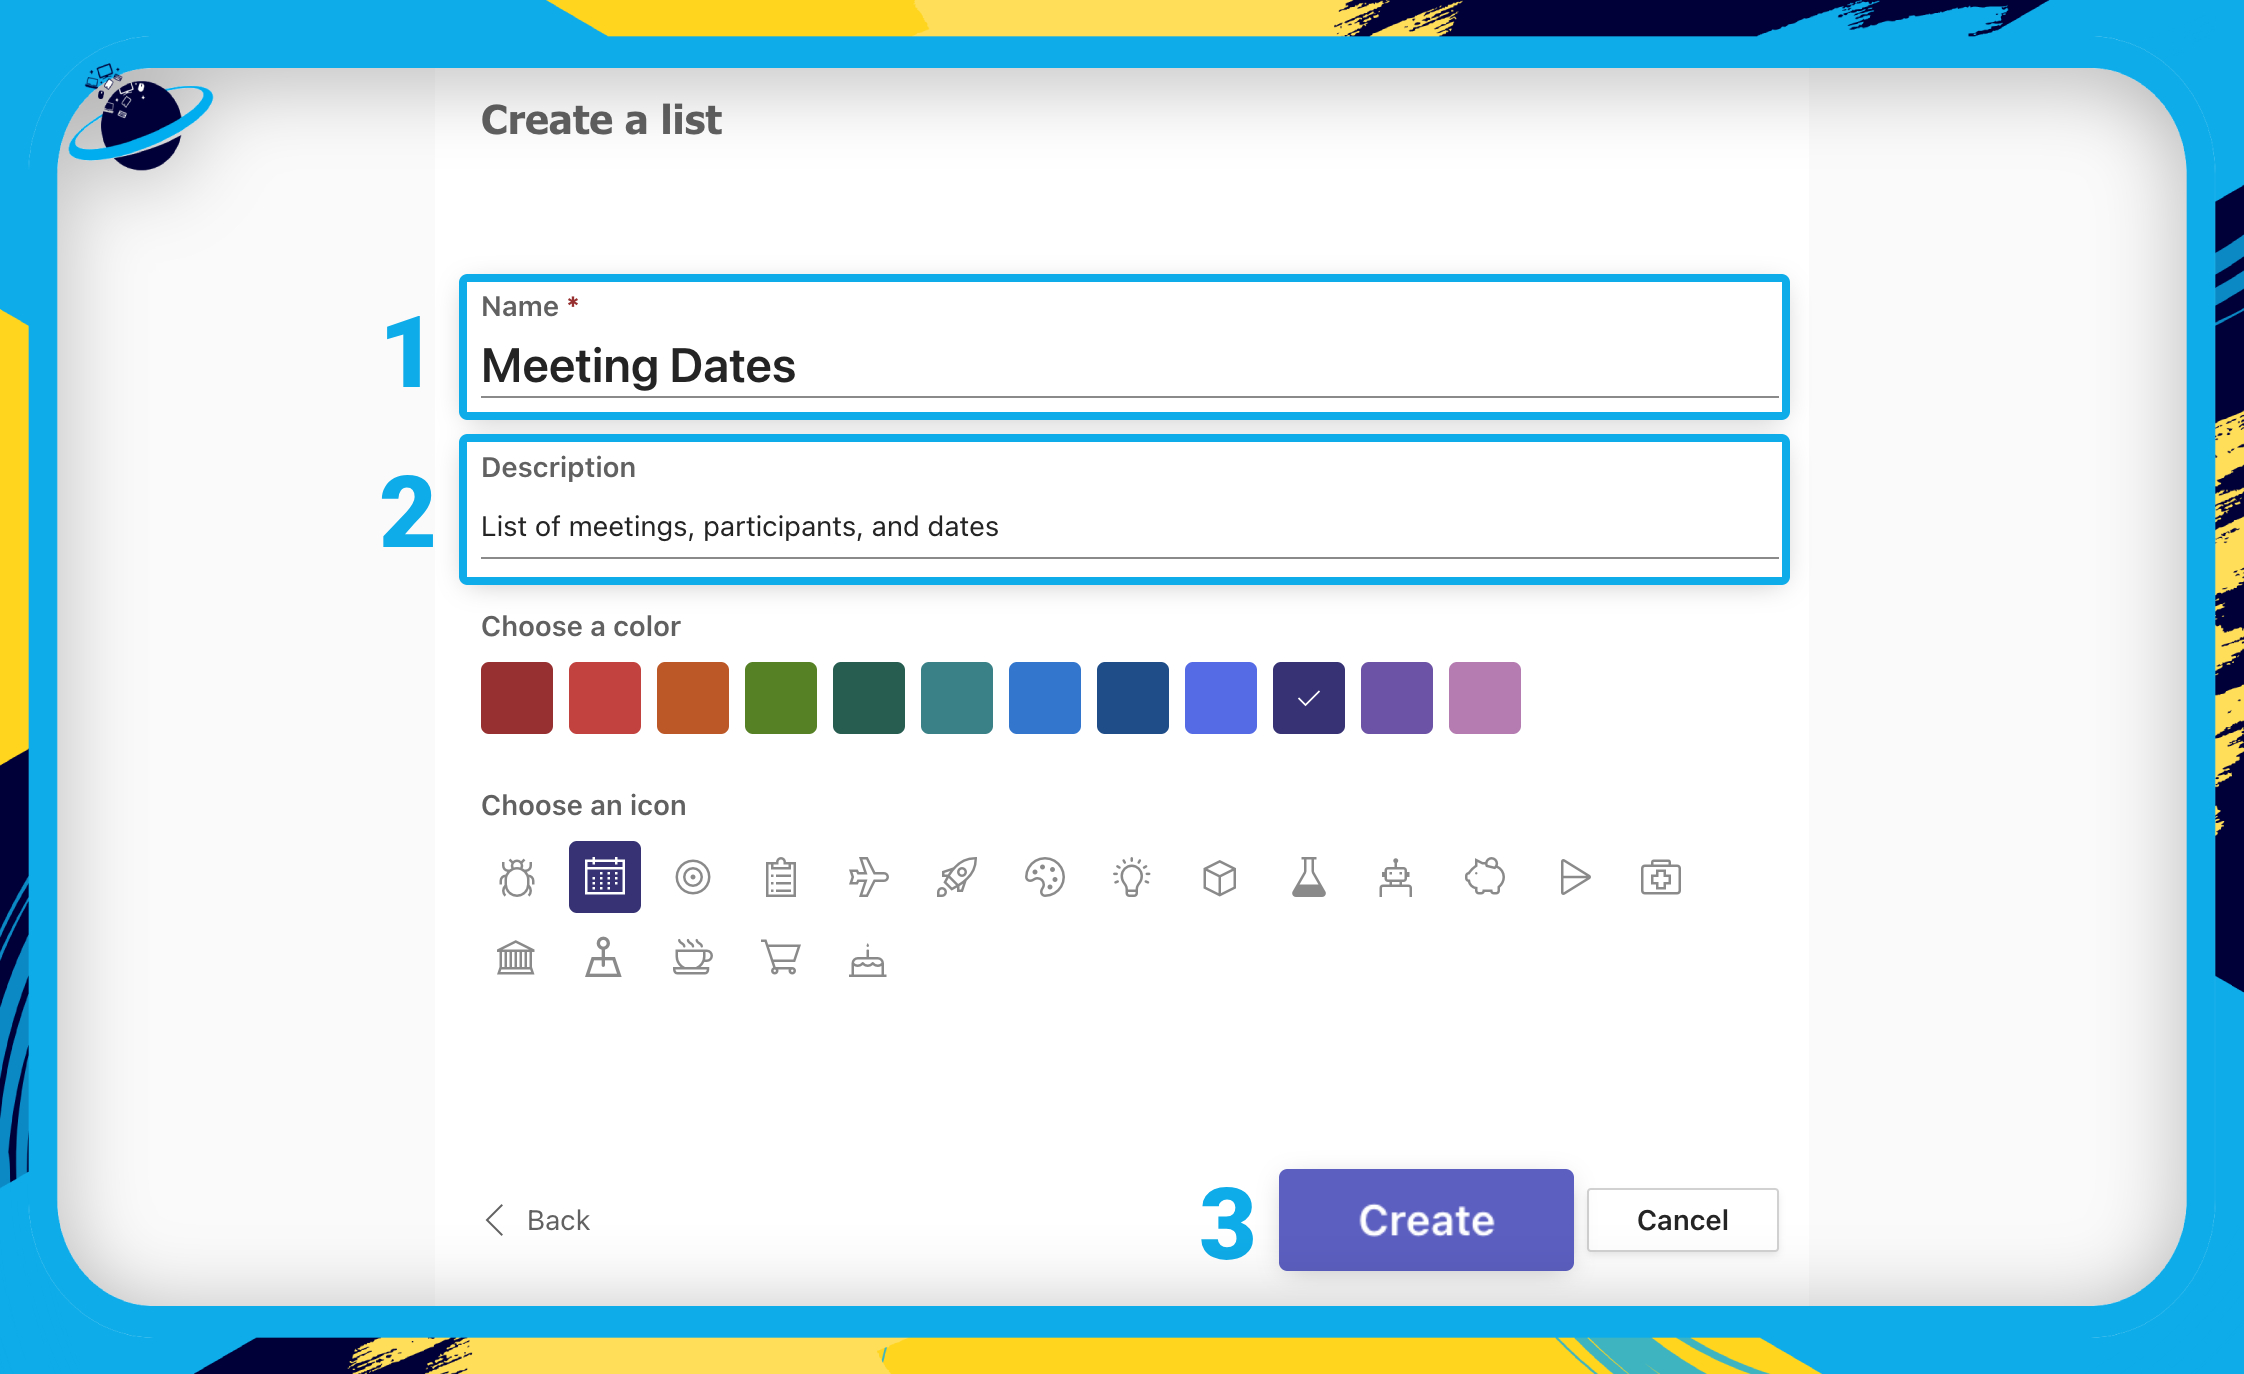
- Add a name for the list. [1]
- Add an optional description. [2]
- And finally, hit “Create.” [3]
We have a “Date” column in our list. If you want to convert the column to a functioning date and time, please follow these steps:
- First, click the column header. [1]
- Go to “Column settings” in the dropdown. [2]
- Then select “Edit.” [3]

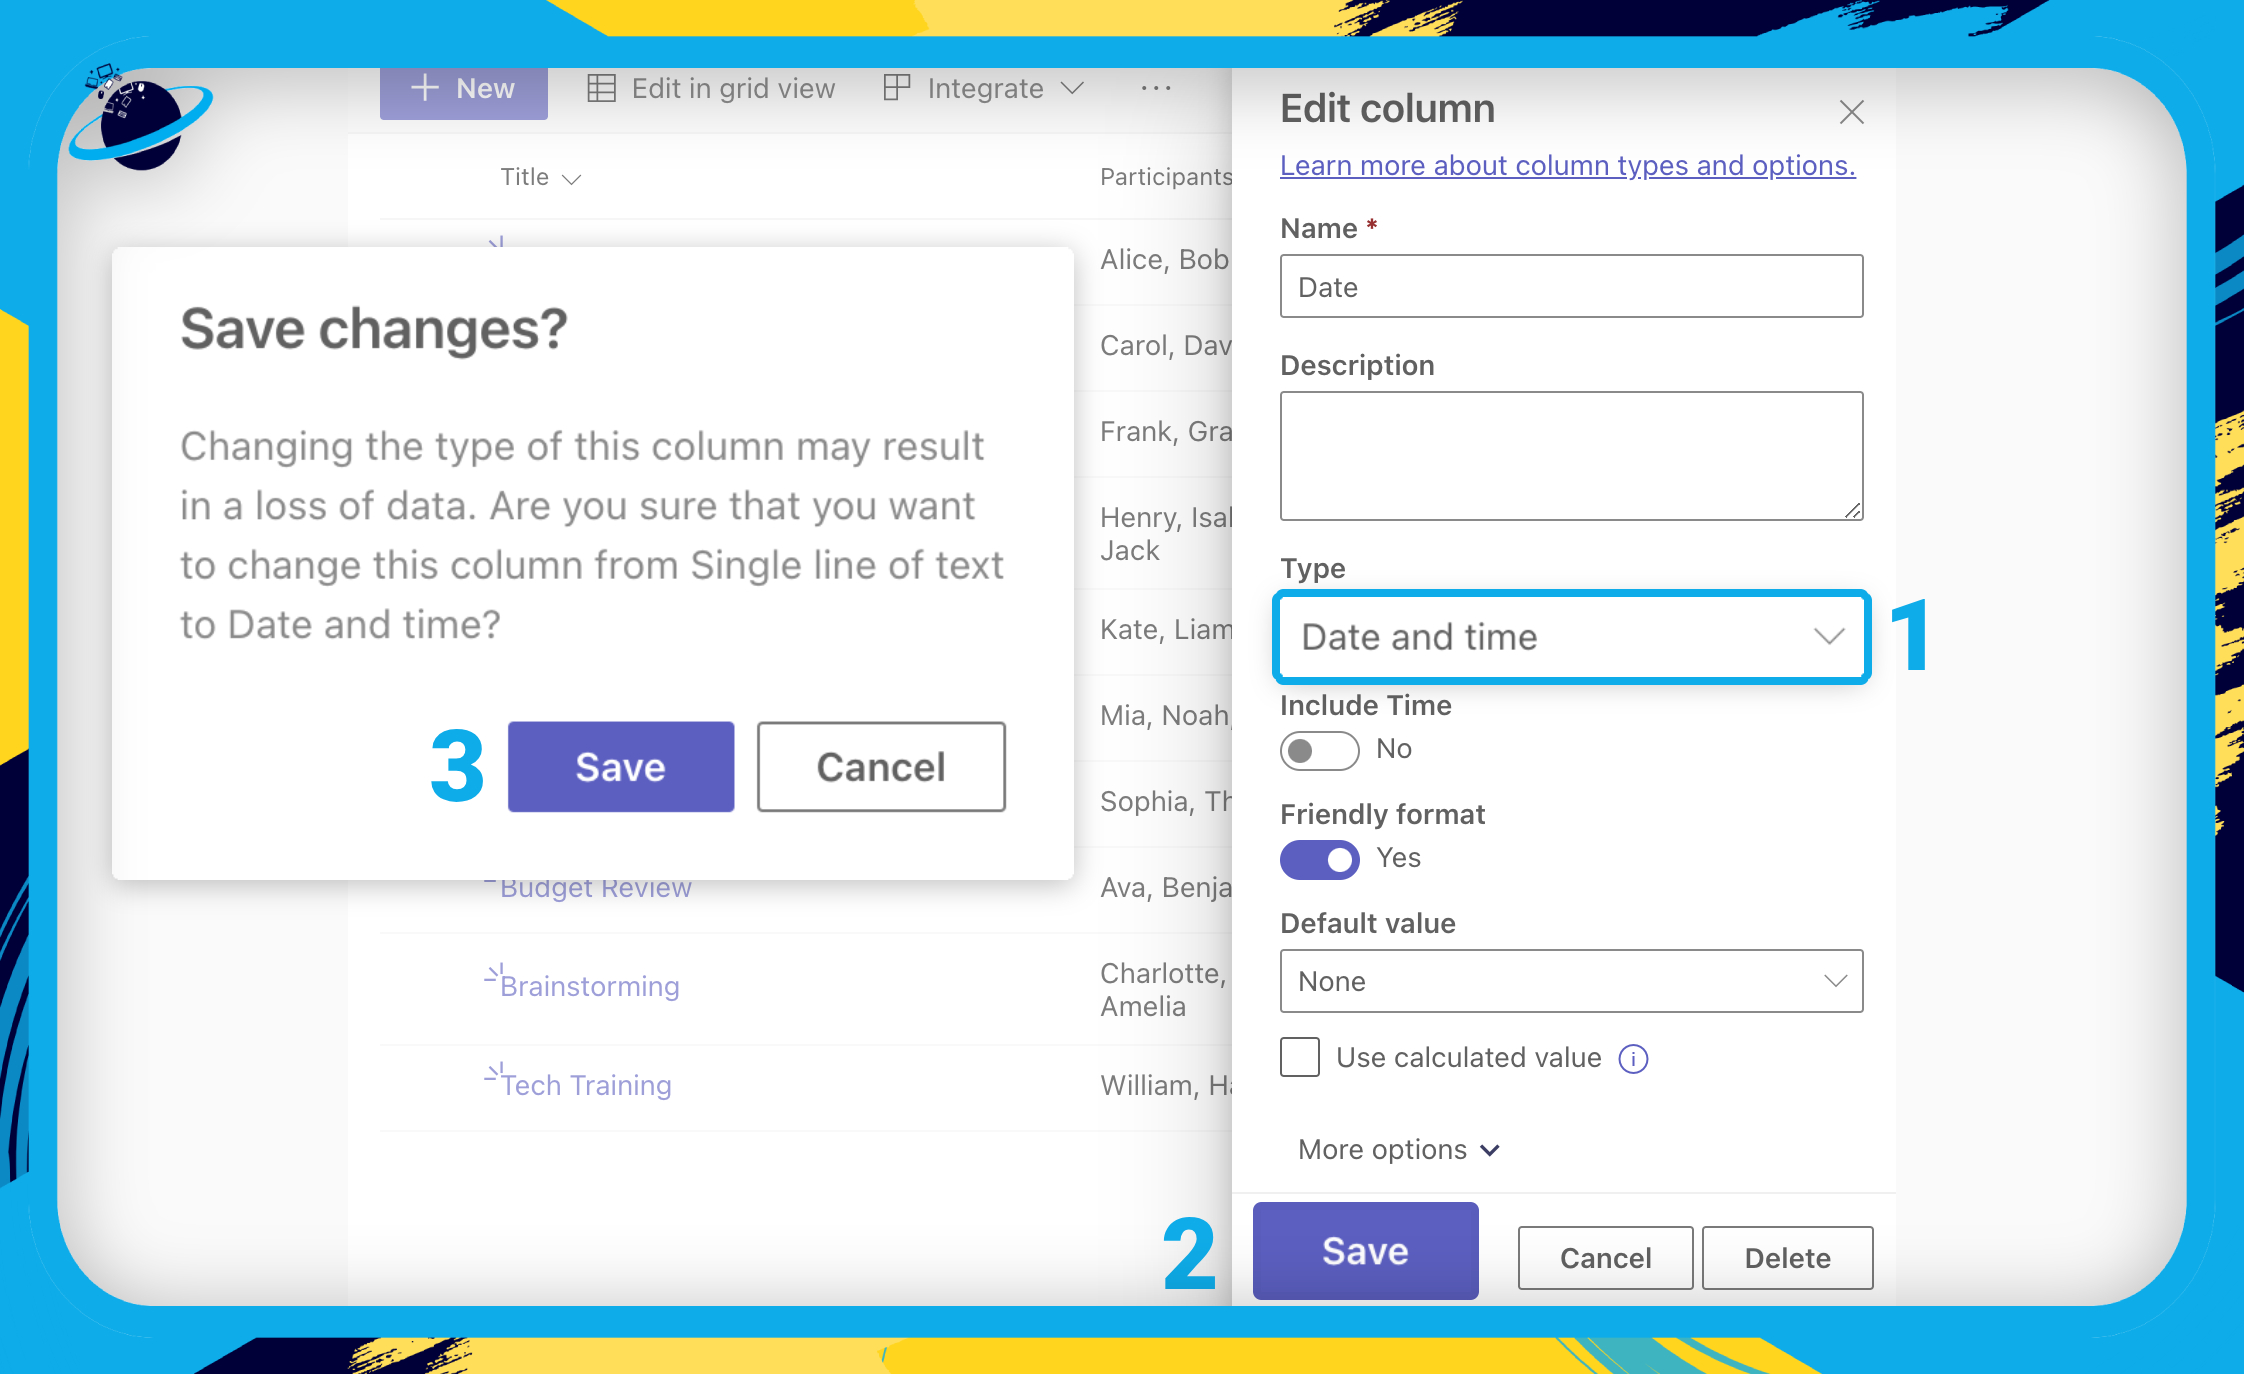
- In the “Edit column” pane, click the select box under “Type” and choose “Date and time.” [1]
- Toggle on “Friendly format” to see how much time remains or has elapsed.
- When you’re done, hit “Save” at the bottom. [2]
- Then click “Save” again in the dialog box to confirm. [3]
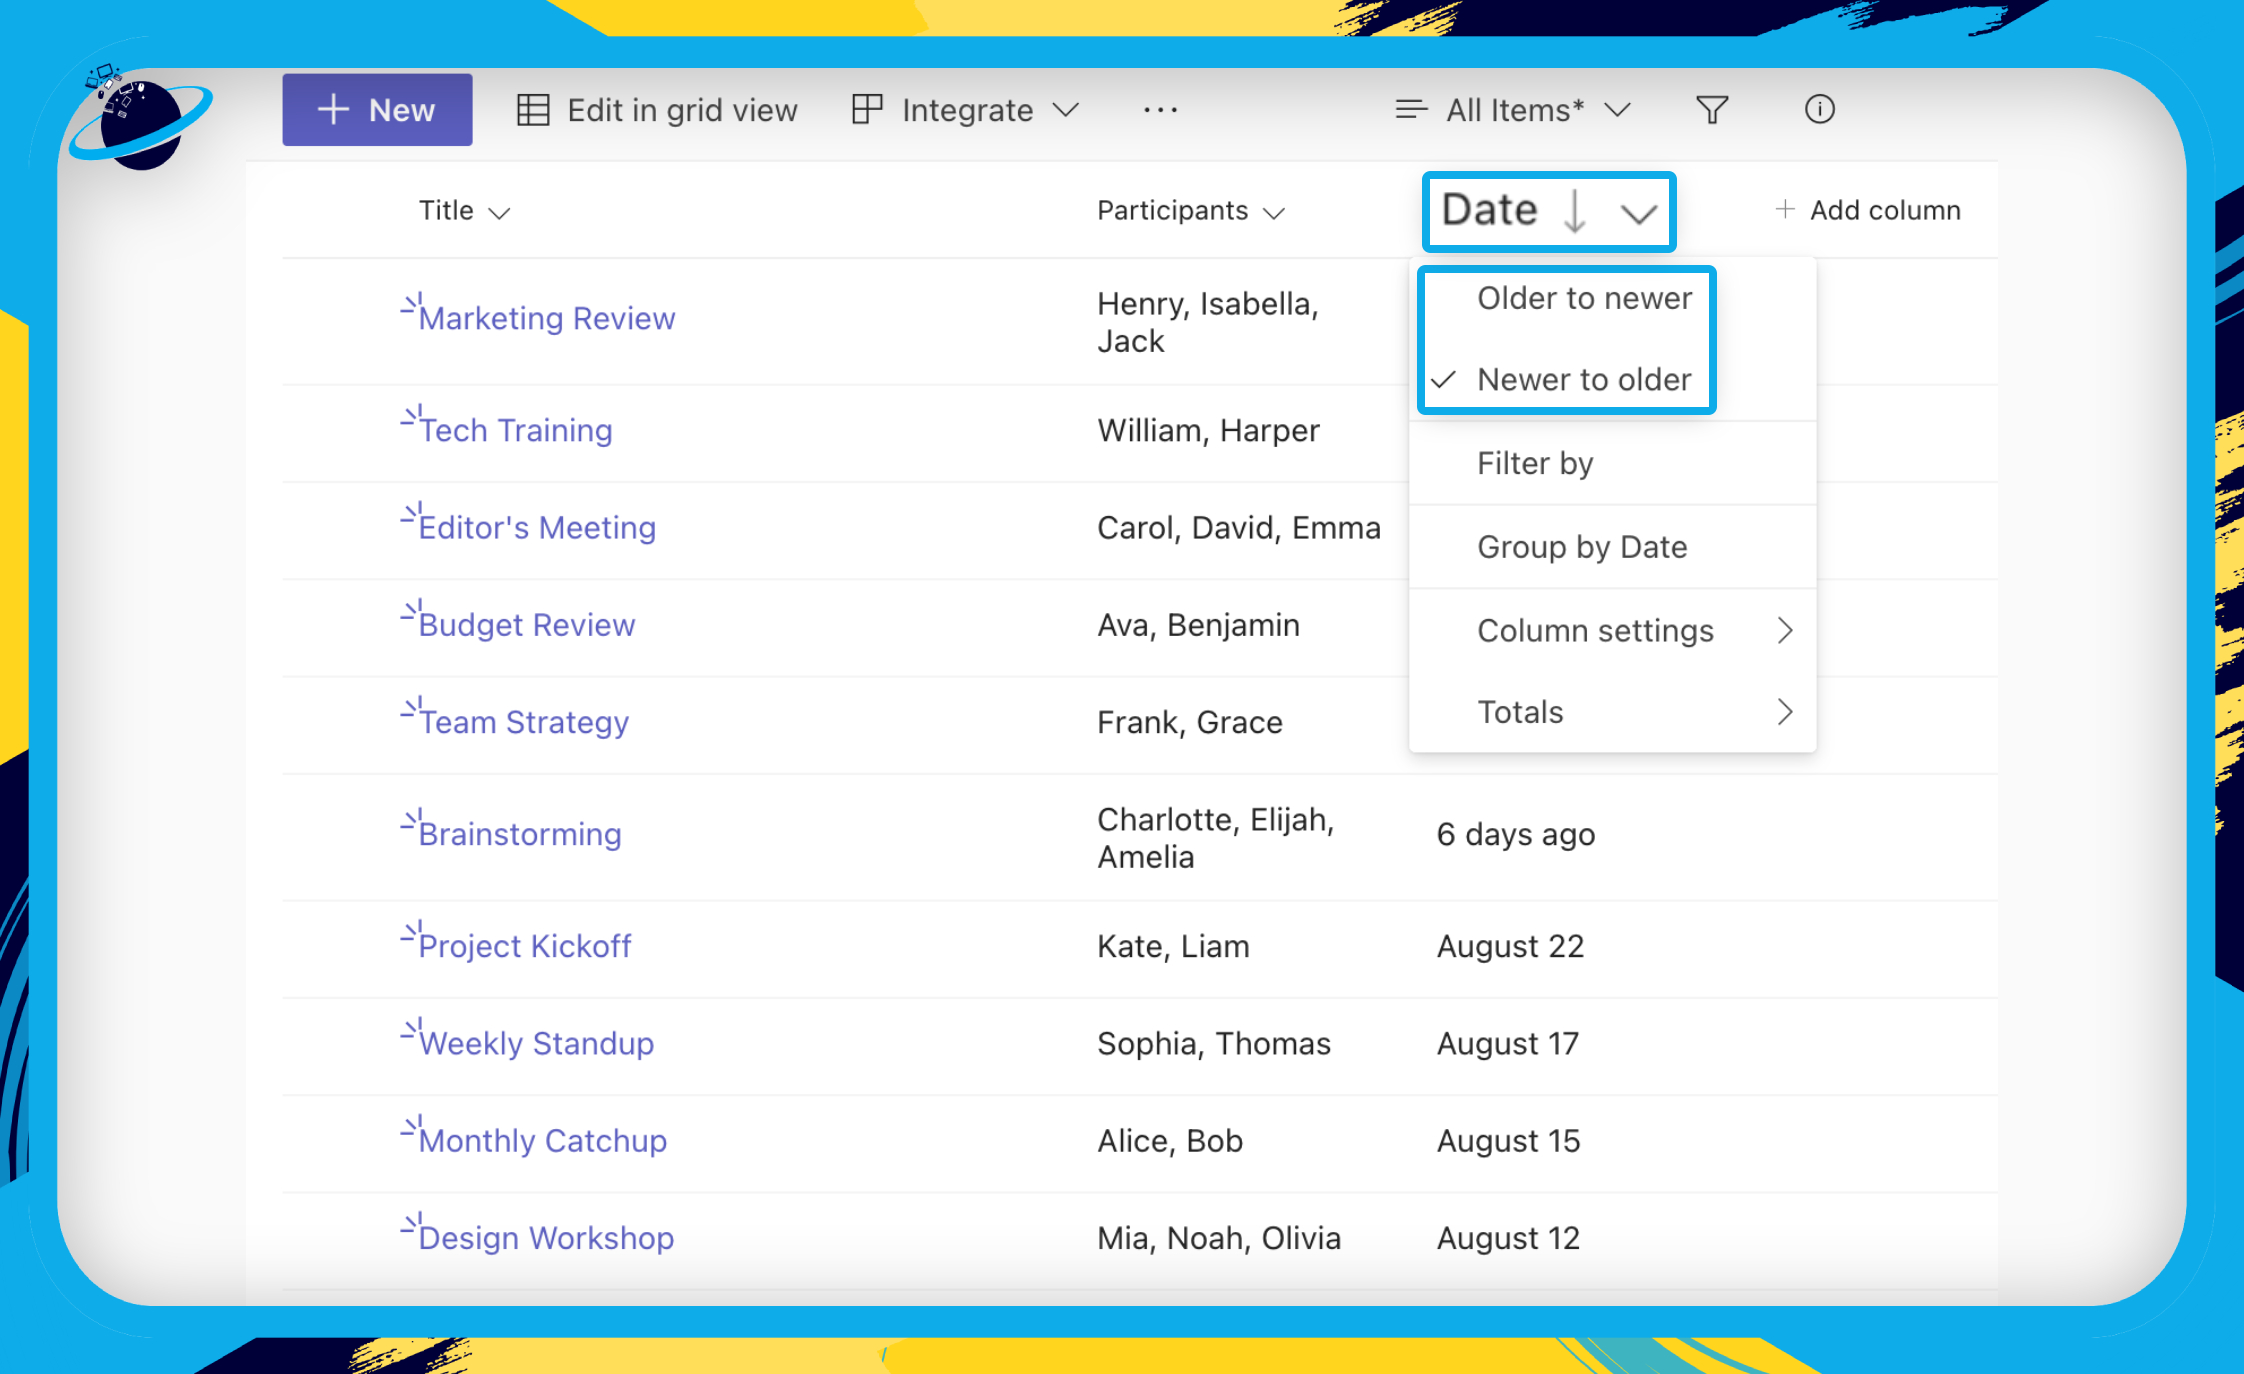
- To order the dates, click the column header. [1]
- Then select “Older to newer” or “Newer to older.” [2]
How to use a Lists template
In this section, we’ll show you how to add a template.
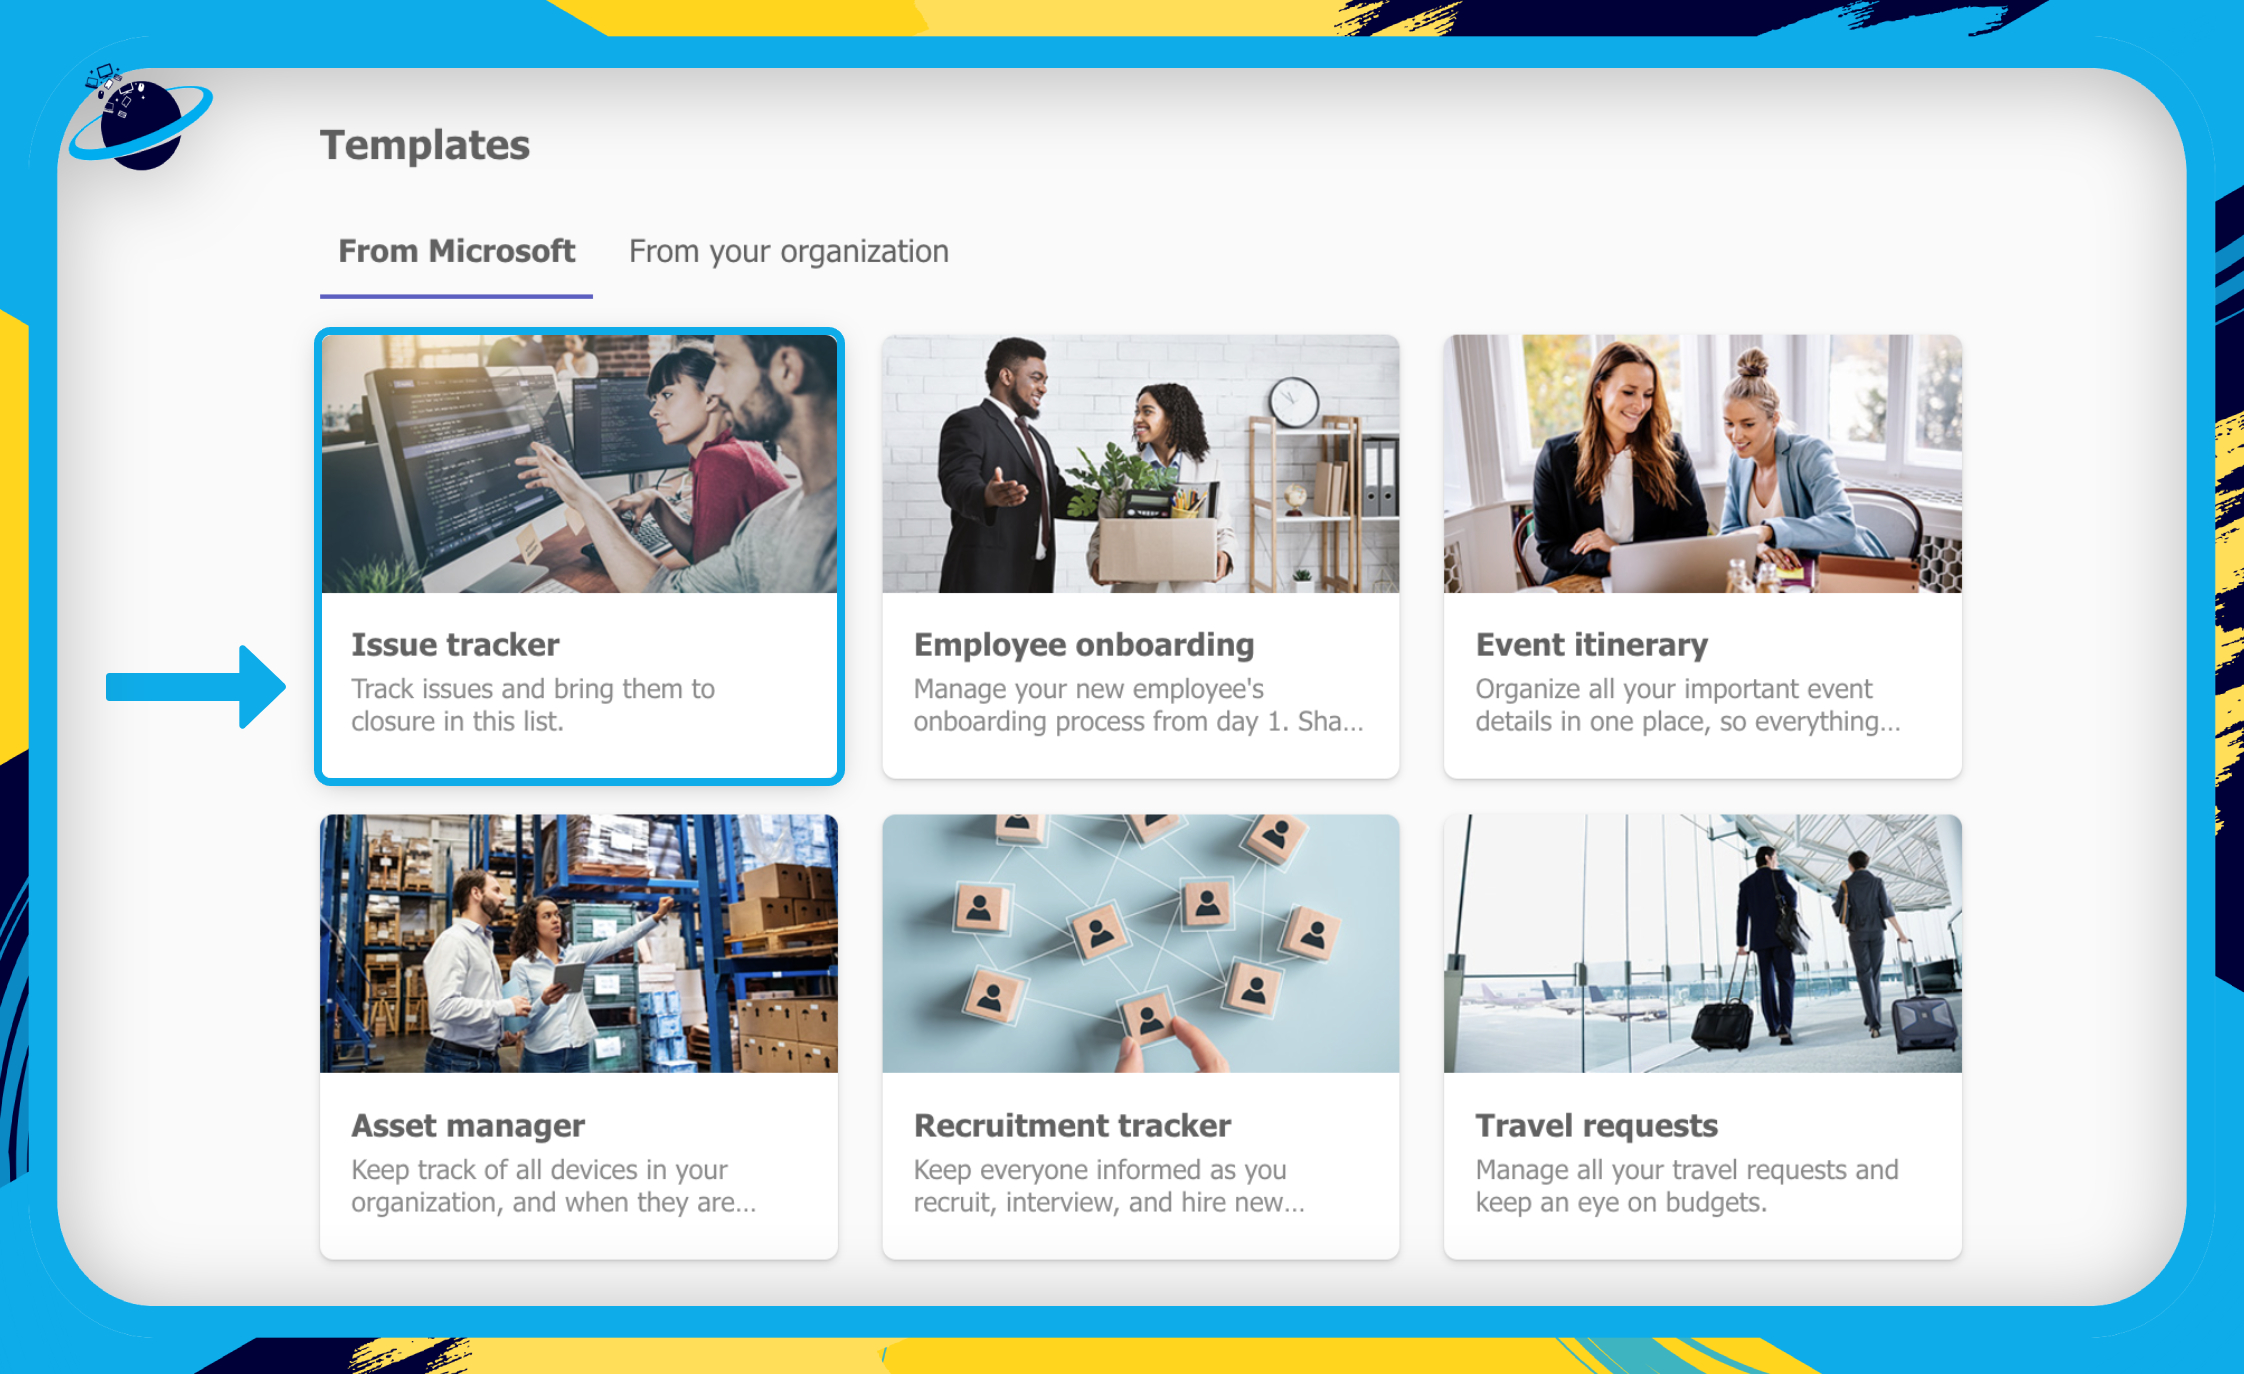
- Once you’ve added Microsoft Lists to Teams, select “Create a list.”
- Scroll down and select a template from the list.
- Scroll down and hit “Use template” at the bottom.
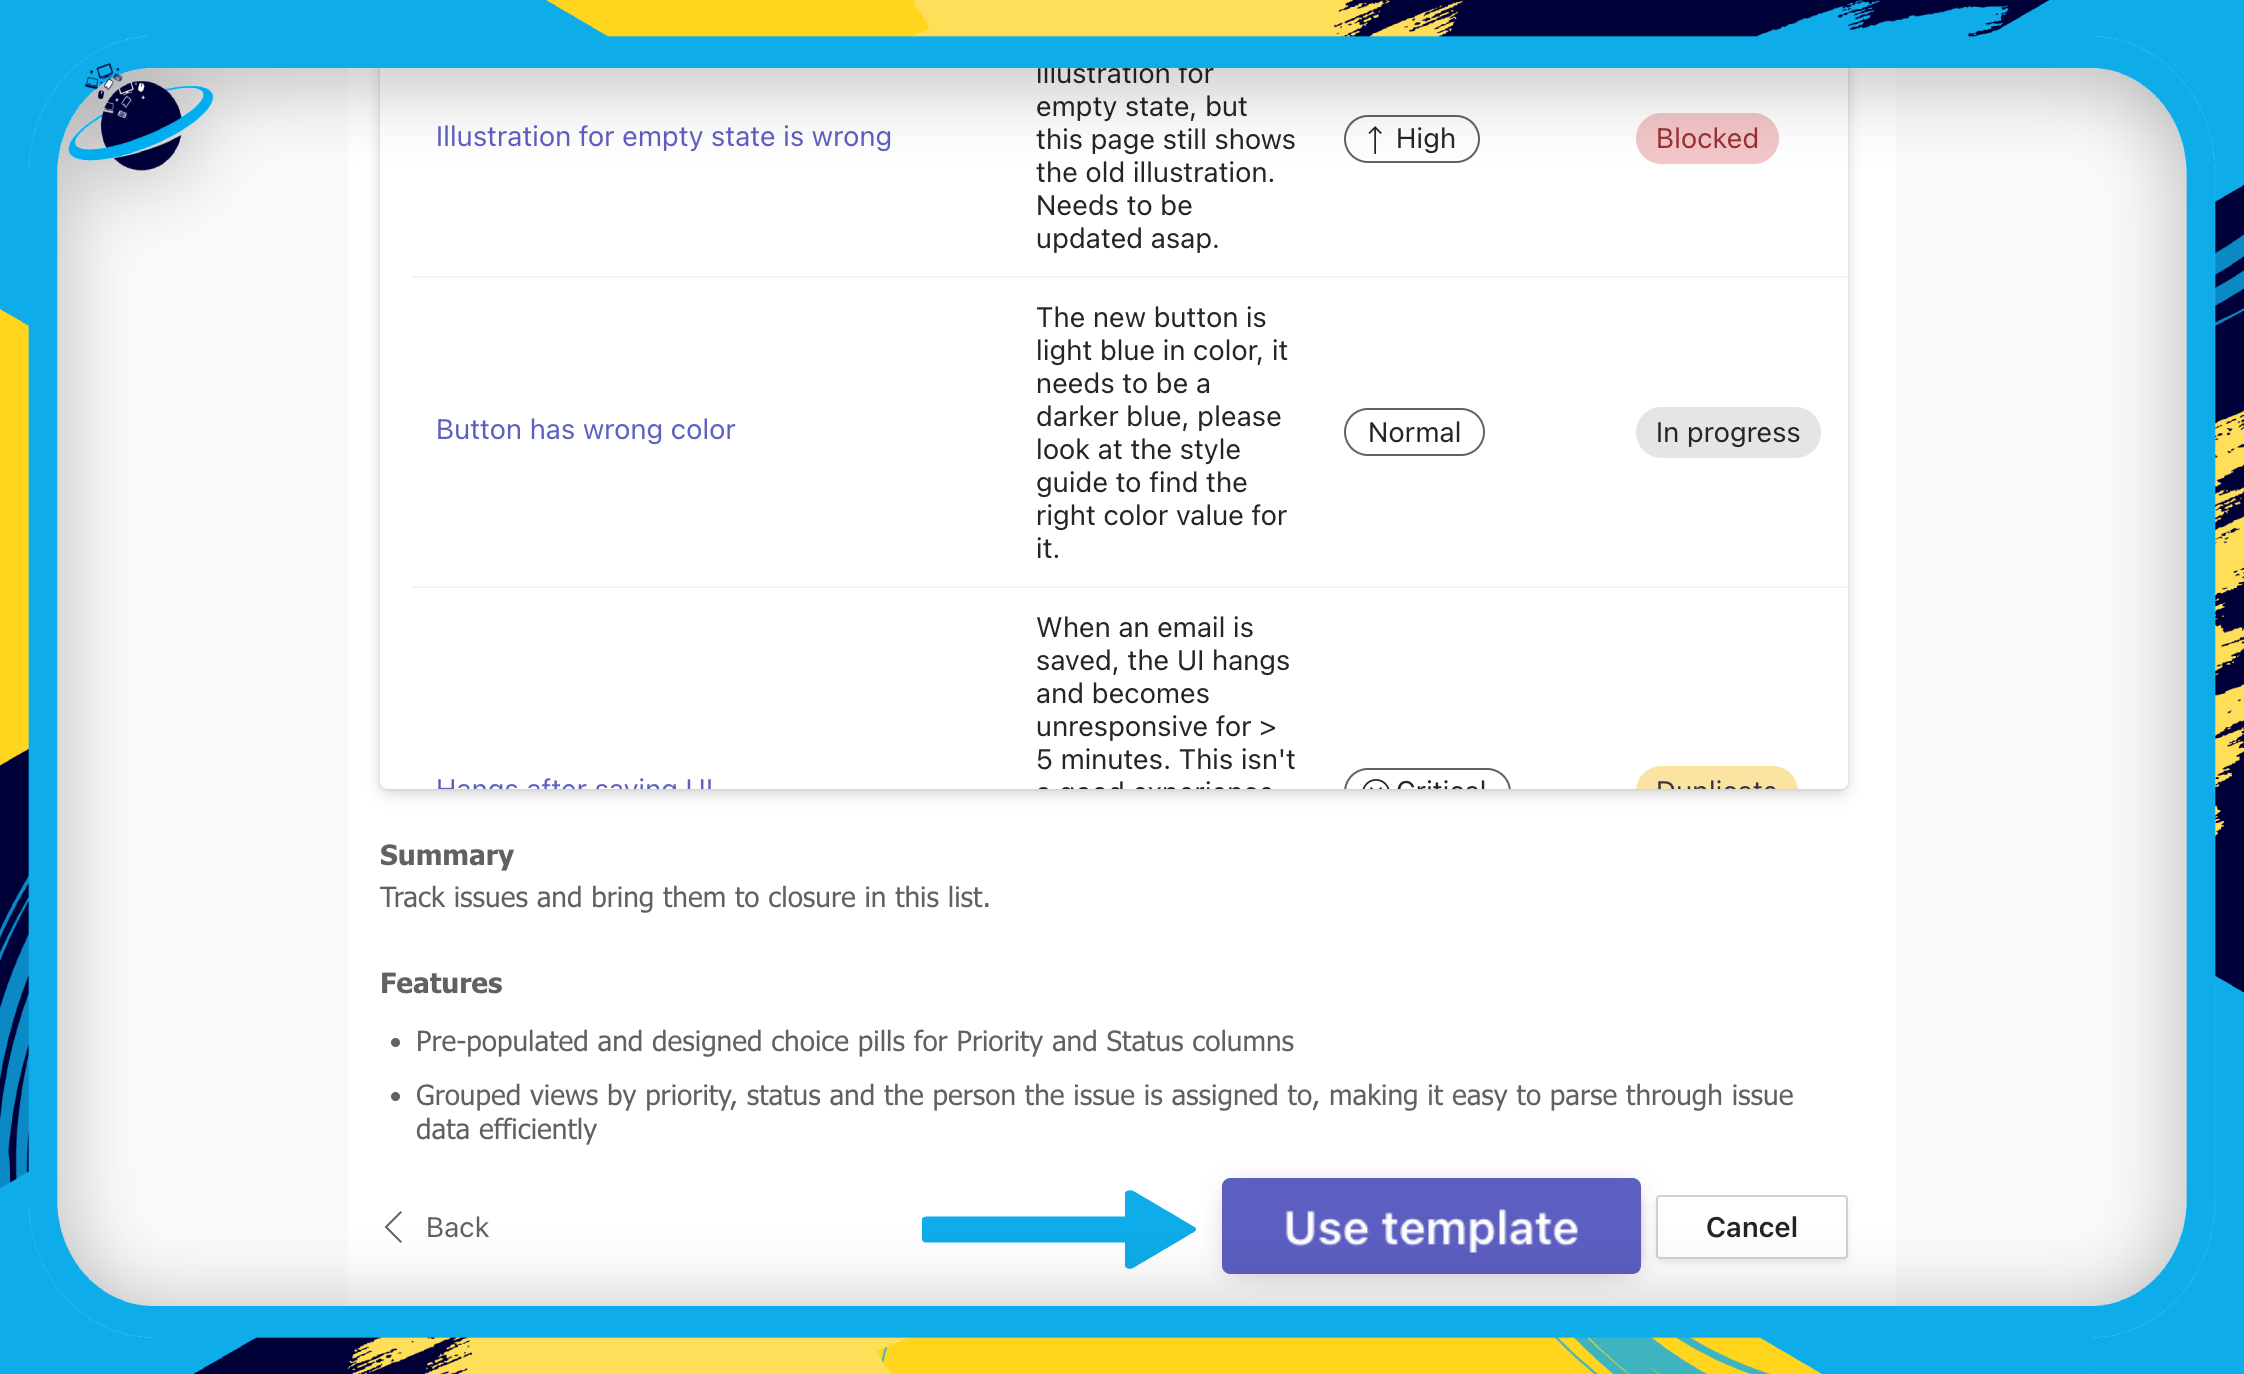
- Change the name, description, color, and icon if you wish.
- And finally, hit “Create.”
- Once you’ve selected the template, you can begin adding items to it.
- To do that, click “New” at the top. [1]
- You can now enter the information for each column.
- When you’re done, hit “Save.” [2]
Frequently Asked Questions (FAQ)
 What is the difference between Microsoft Planner and Lists?
Microsoft Planner and Microsoft Lists are two separate tools within the Microsoft 365 suite, designed to help teams and individuals organize tasks and information. Here’s a brief overview of the differences between the two:
Microsoft Planner is a task management tool that creates and manages tasks within a team or project. The application allows teams to organize their work, assign tasks to members, set due dates, and track progress. Some key features of Microsoft Planner include:
- Boards: You can create boards for different projects or teams and organize tasks within these boards.
- Tasks: You can create individual tasks, assign them to team members, set due dates, and add descriptions and attachments.
- Checklists: Tasks can have checklists associated with them, helping you break down tasks into smaller steps.
- Progress Tracking: You can visualize the progress of tasks on a visual board, allowing team members to see what’s being worked on and what’s completed.
- Integration: It integrates with other Microsoft 365 apps like Teams and Outlook, making it easy to collaborate and stay updated on tasks.
Microsoft Lists is a more versatile tool that allows you to create, customize, and manage lists of information. While it can certainly be used for task tracking, it goes beyond just tasks and can be used to track any information. Some key features of Microsoft Lists include:
- Customizable Lists: You can create lists from scratch or use pre-built templates for issues tracking, inventory management, etc.
- Columns and Views: Microsoft Lists allows you to define columns to capture specific data types. You can also create different views of the same list to display data in various ways.
- Data Entry and Editing: Lists are designed for structured data entry and editing. You can add attachments, use rich text formatting, and more.
- Automation: You can set up rules and automations within lists to trigger actions based on certain conditions.
- Integration: Like Planner, Lists integrates with other Microsoft 365 apps for seamless collaboration.
Is a Microsoft list the same as a SharePoint list?
A list in Microsoft Lists is closely related to a SharePoint list, and you can import lists from SharePoint into Microsoft Lists. However, there are some distinctions between the two.
A SharePoint list is a fundamental component of Microsoft SharePoint. SharePoint lists are used to store and manage structured data and can be highly customized to fit various business needs. These lists can include columns, different views, custom forms, workflows, and more. SharePoint lists provide a structured way to store information and can be used for tasks such as tracking inventory, managing projects, collecting feedback, and more. They are an integral part of SharePoint’s data management and collaboration capabilities.
On the other hand, a Microsoft List is a more recent iteration of this concept that provides a simplified way to create and manage lists of information. Microsoft Lists is available within SharePoint and as a standalone app within Microsoft 365. Microsoft Lists aims to make it easier for users to create and manage lists without needing advanced SharePoint configuration. It inherits many of the capabilities of SharePoint lists. Still, it provides a more user-friendly interface for creating and managing lists, making it accessible to a broader range of users, even those who might not be familiar with SharePoint’s more complex features.
In short, a Microsoft List is a more user-friendly and simplified version of a SharePoint list, designed to provide a straightforward way to create and manage lists of information. SharePoint lists offer more advanced customization and integration options, making them suitable for complex scenarios within the broader SharePoint platform.

Conclusion
In conclusion, Microsoft Lists offers a robust, efficient planning and task management solution that integrates seamlessly with Microsoft Teams. This guide has outlined the integration process and highlighted the transformative potential of Microsoft Lists in your work processes.
Microsoft Lists, a versatile tool within Microsoft 365, empowers users to create, share, and manage information effectively. Whether you’re tracking tasks, projects, or inventory, Lists provides an organized and visually appealing approach to data. Integrating with Microsoft Teams centralizes data, enabling real-time collaboration and alignment among team members.
The benefits of Microsoft Lists extend beyond data organization and collaboration. Lists enhances work efficiency with customizable templates, automation through Power Automate, and integration with Microsoft tools. Features like mobile access, conditional formatting, notifications, and data insights contribute to its value. By adopting Microsoft Lists, you’re optimizing data management and creating a productive hub for collaboration.