Welcome to our guide on Microsoft Teams video conferencing. In today’s business world, communication and collaboration are essential for success. With remote work becoming more prevalent, Teams is a popular choice for virtual meetings. This article explores Teams’ features and aims to help you make the most out of your video conferencing experience. Let’s get started!
 Table of content


High-Quality Video and Audio
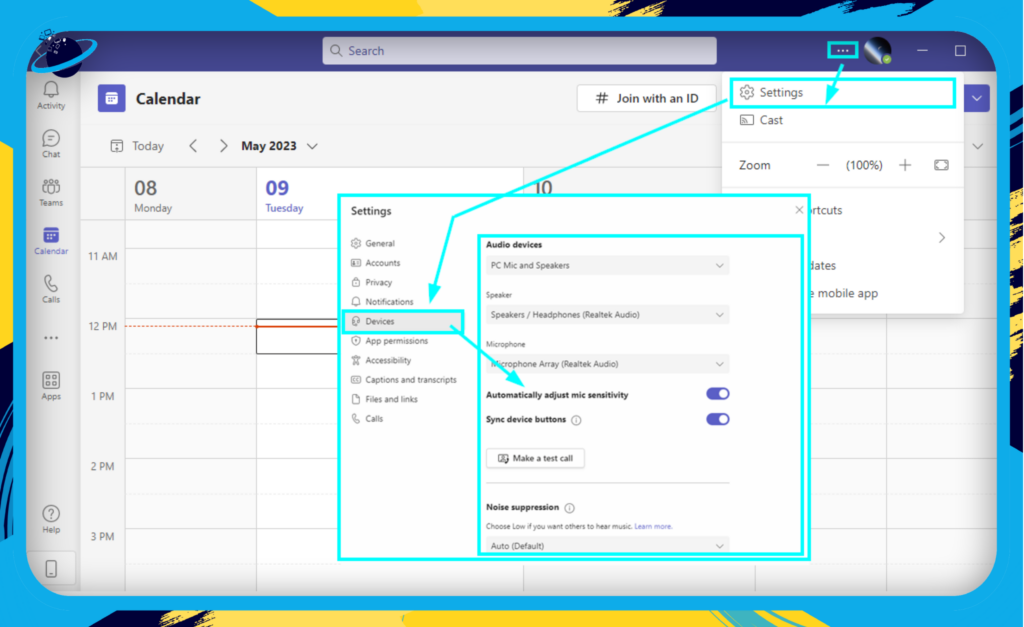
Microsoft Teams offers top-notch video and audio quality for clear virtual meetings. Follow these steps to adjust video and audio settings in Teams:
- Open the Teams desktop app.
- Now click on “Settings and more.”
- Click on “Settings.”
- Select “Devices.”
- Adjust the audio and video settings based on what you require. Audio devices.
- Speakers.
- Microphone.
- Noise suppression.
- Camera.
- Green Screen
- Adjust brightness
- Soft focus
- Speakers.
HD Video
Microsoft Teams offers high-definition (HD) video that supports resolutions up to 1080p, ensuring that your video conferences are sharp and clear. Some benefits of HD video include:
- Enhanced visual clarity for presentations and screen sharing
- Improved facial recognition, making it easier to identify participants
- A more immersive experience, fostering better engagement
Note: The video resolution during a conference may vary depending on the participants’ internet connection, device capabilities, and Teams settings.
Crystal-Clear Audio
In addition to HD video, Microsoft Teams delivers high-quality audio that minimizes background noise and echo. This superior audio experience is achieved through features like:

Noise suppression:
Microsoft Teams uses advanced noise suppression algorithms to filter out background noises, allowing participants to focus on the speaker without distractions.

Echo cancellation:
Teams employ echo cancellation technology to minimize audio feedback, ensuring clear conversations without disruptive echoes.
Bandwidth Management
Microsoft Teams intelligently manages bandwidth usage during video conferences to optimize video and audio quality, even in low-bandwidth situations. Key bandwidth management features include:
- Adaptive bitrate streaming: Teams adjust the video and audio bitrate in real time based on network conditions, ensuring a smooth experience without buffering.
- Quality of Service (QoS) support: Microsoft Teams supports QoS, enabling organizations to prioritize video conferencing traffic on their network, ensuring optimal performance.
By offering high-quality video and audio, Microsoft Teams makes it easier for businesses to collaborate effectively and maintain the personal touch essential for successful communication.
Personalizing Your Video Conference with Background Effects and Filters
Microsoft Teams offers a variety of background effects and filters to help you create a more professional and visually engaging video conferencing experience. These features add a touch of personalization and help maintain privacy by concealing your surroundings. Let’s explore these options and learn how to make the most of them.
Virtual Backgrounds
With Microsoft Teams, you can replace your real background with a virtual one, making it easier to maintain a professional appearance during video calls. Here’s how:
- Blur: This feature automatically blurs your background, keeping you in focus while hiding any distractions or clutter behind you.
- Pre-set images: Microsoft Teams offers a collection of pre-set images you can use as your background, including professional office settings and abstract designs.
- Custom images: Upload your image or choose from various third-party options to create a unique, personalized background.
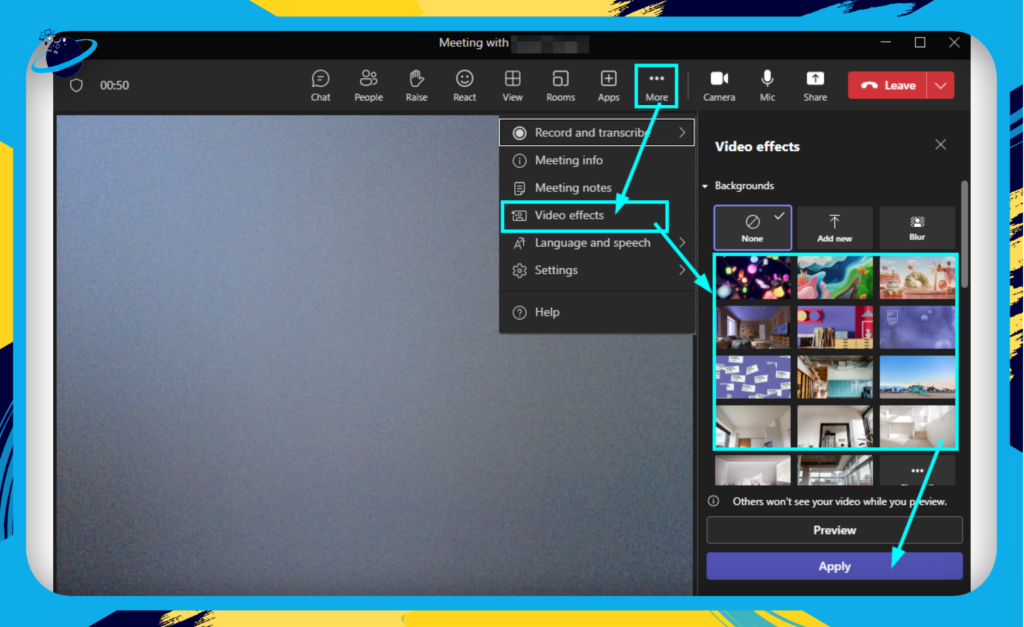
To access and apply these virtual backgrounds, follow these simple steps:
- During a video call, click on the “More actions” button (three dots) at the top-right corner of your screen.
- Select “Video effect.”
- Browse the available options, upload your image, and click “Apply.”
Video Filters
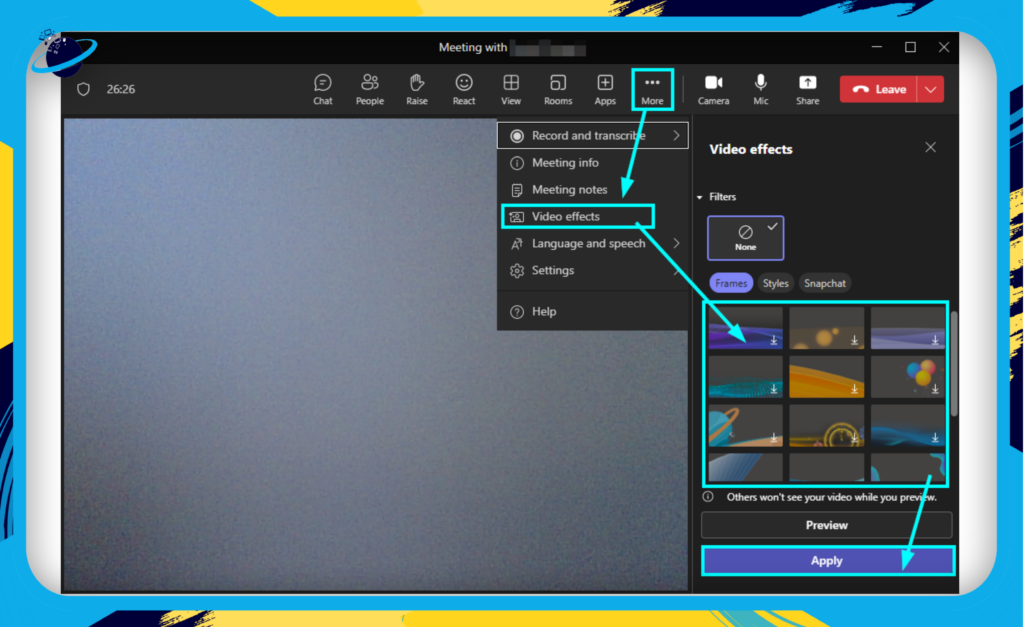
Microsoft Teams also offers a selection of video filters that help enhance your appearance during video calls. These filters can adjust lighting, saturation, and other visual elements to make you look more polished and professional. To access and apply video filters, follow these steps:
- During a video call, click on the “More actions” button (three dots) at the top-right corner of your screen.
- Select “Video effect.”
- Browse the available filter options, and click “Apply.”
Remember: While using background effects and filters can be fun and engaging, it’s essential to maintain a professional and appropriate appearance during business calls. Choose backgrounds and filters that align with your company’s culture and values, and avoid anything distracting or offensive to your colleagues or clients.
With these handy features, you can create a more visually appealing and personalized video conferencing experience that leaves a lasting impression on your meeting participants. Try them and see how they can elevate your Microsoft Teams video calls!
Screen Sharing and Collaboration
Microsoft Teams excels at fostering collaboration during video conferences thanks to its robust screen sharing and real-time collaboration features. This section will delve into the various aspects of these capabilities that make teamwork a breeze, even when your team members are miles apart.
Screen Sharing
Follow these steps to share a screen in a Teams meeting:
- In a meeting, click on “Share.”
- Select “Screen.”
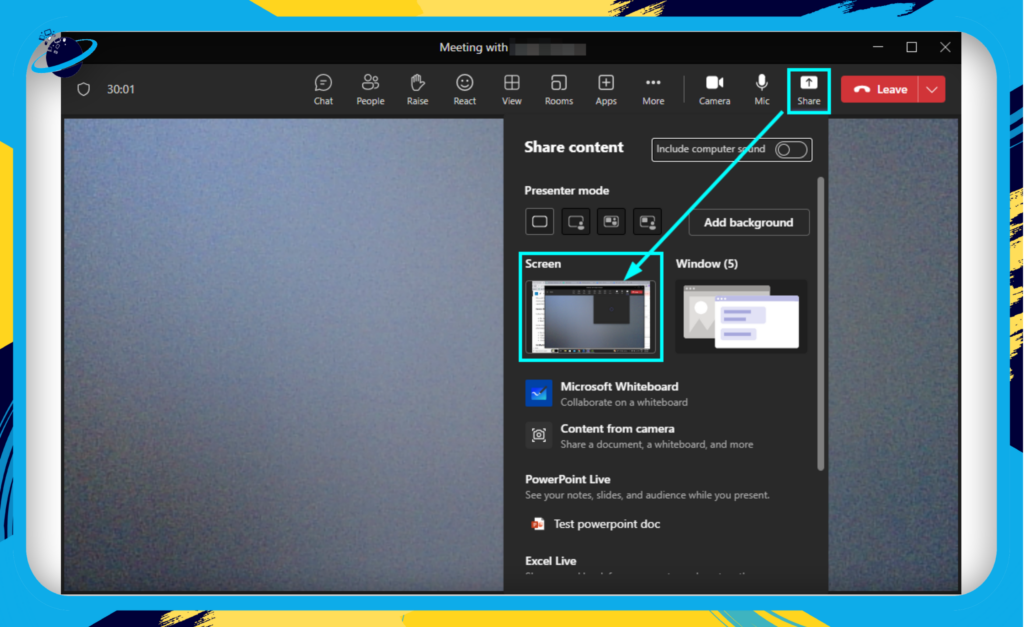
Screen sharing is vital to effective virtual meetings, allowing participants to present and discuss important information. Microsoft Teams offers a versatile screen-sharing experience that includes the following:
- Sharing your entire screen, specific windows, or applications
- High-quality resolution and frame rates, ensuring smooth presentations
- Presenter controls, such as pausing and resuming screen sharing
- Annotation tools to draw or highlight content during a presentation
In-Meeting Collaboration Tools
Microsoft Teams integrates several tools to help teams collaborate in real time during video conferences:
- Whiteboard: A digital canvas that allows participants to sketch, brainstorm, and annotate ideas. Multiple users can contribute simultaneously, making it perfect for group collaboration.
- Co-authoring documents: Seamlessly open and edit Word, Excel, or PowerPoint files with your team members during a meeting without leaving the Teams environment.
- Meeting Notes: Take collaborative notes during meetings that all participants can easily access and edit.
Engaging Interaction Features
Keep your video conferences engaging and interactive with these built-in features:
- Raise Hand: Allows participants to signal without interrupting the speaker when they have a question or comment.
- Reactions: Use emojis to express your thoughts or feelings during the meeting, adding a fun and engaging element to your conversations.
- Polls: Gather quick feedback from attendees on specific topics with live polls.
In summary, Microsoft Teams provides a range of screen-sharing and collaboration features that make remote teamwork seamless and efficient. From sharing presentations to real-time editing of documents and brainstorming on a virtual whiteboard, Teams enables your team to stay connected and productive during video conferences.
Breakout Rooms: Enhance Collaboration in Smaller Groups
One of the standout features of Microsoft Teams is the Breakout Rooms functionality, which can be a game-changer for large meetings and webinars. Breakout rooms enable you to split your main meeting into smaller, focused discussion groups, allowing participants to engage in more productive conversations and collaborations.
Setting Up Breakout Rooms
Setting up breakout rooms in a Microsoft Teams meeting is simple and efficient. Here are the steps to create and manage breakout rooms:
- Start or join a meeting: You must be the meeting organizer to create and manage breakout rooms. If you are, open the meeting in Microsoft Teams.
- Locate the breakout rooms icon: In the meeting control bar, find the breakout rooms icon, which looks like a square with four smaller squares inside.
- Create breakout rooms: Click on the breakout rooms icon. A panel will appear, allowing you to select the rooms you want to create (up to 50). Choose between automatically assigning participants to rooms or doing it manually. Click “Create rooms” to proceed.
- Assign participants manually (if needed): If you’ve chosen to assign participants manually, click on the “Assign participants” button next to each breakout room. A list of attendees will appear. Select the ones you want to assign to that specific room. Repeat this step for each breakout room.
- Rename breakout rooms: To customize the names of the breakout rooms, click on the ellipsis (three dots) next to the room’s name and select “Rename room.” Enter the desired name and click “Save.”
- Open the breakout rooms: Once you’ve set up the rooms and assigned participants, click “Start rooms” to open all the breakout rooms simultaneously. Attendees will receive a notification and be automatically moved to their assigned rooms.

Creating and managing breakout rooms in Microsoft Teams is a breeze. As the meeting organizer, you have the flexibility to:

Create multiple breakout rooms:
Depending on the size of your meeting, you can create a specific number of rooms to accommodate all participants.

Assign participants:
You can manually assign participants to specific rooms or let the system distribute them automatically.

Rename and reassign:
Customize the names of the breakout rooms and easily reassign participants as needed.
Maximizing Breakout Room Usage
To make the most of breakout rooms, consider the following tips:
- Clearly define objectives: Before participants enter breakout rooms, ensure they understand the purpose, discussion topics, or tasks to be completed during the session.
- Assign a facilitator: Appoint a facilitator for each breakout room to guide the discussion, answer questions, and ensure participants stay on track.
- Set a time limit: Establish a specific timeframe for the breakout session to keep discussions focused and maintain the overall meeting schedule.
- Utilize collaboration tools: Encourage participants to use Microsoft Teams features such as screen sharing and the Whiteboard for a more interactive experience.
- Monitor progress: As the meeting organizer, you can join any breakout room to check progress and provide necessary assistance.
Reconvening and Sharing Insights
After the breakout sessions, it’s essential to reconvene the main meeting and allow each group to share their findings, insights, or completed tasks. This allows for valuable knowledge transfer and ensures all participants benefit from the smaller group discussions.
With the power of breakout rooms, Microsoft Teams provides an efficient way to enhance collaboration, foster creativity, and make large meetings more engaging and productive.
Meeting Controls and Moderation
As a business user, it’s essential to maintain order and professionalism during your video conferences. Microsoft Teams offers a variety of meeting controls and moderation features that make it easy for hosts to manage their meetings efficiently. This section will explore these tools and how they can help you create a seamless video conferencing experience for all participants.
Host Controls

Muting and Unmuting Participants:
Meeting hosts can mute or unmute individual attendees or all participants simultaneously. This is handy to eliminate background noise, control interruptions, or facilitate a Q&A session.

Camera Access Control:
Hosts can also manage participants’ camera access, ensuring that only relevant attendees are visible during the meeting. This is especially useful during presentations or when focusing on specific individuals.

Managing Attendee Permissions:
As the host, you can assign specific roles and permissions to participants, such as presenter or attendee. This helps you control who can share their screen, present content, or mute others during the meeting.
Meeting Options and Settings
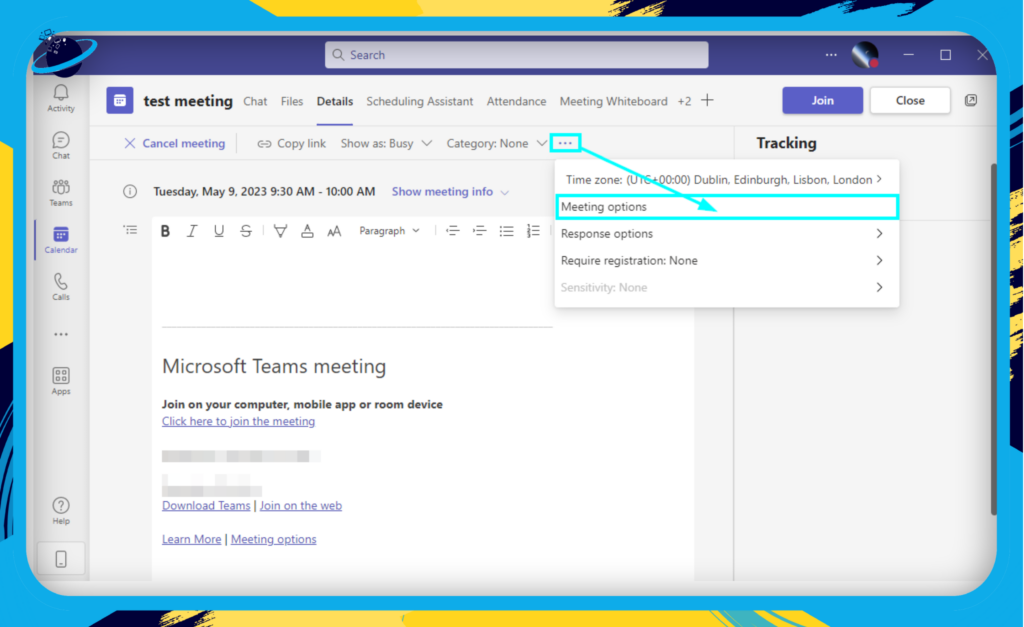
Use these steps to edit meeting options in Teams:
- Click on “Calendar.”
- Click on a meeting, then choose “Edit.”
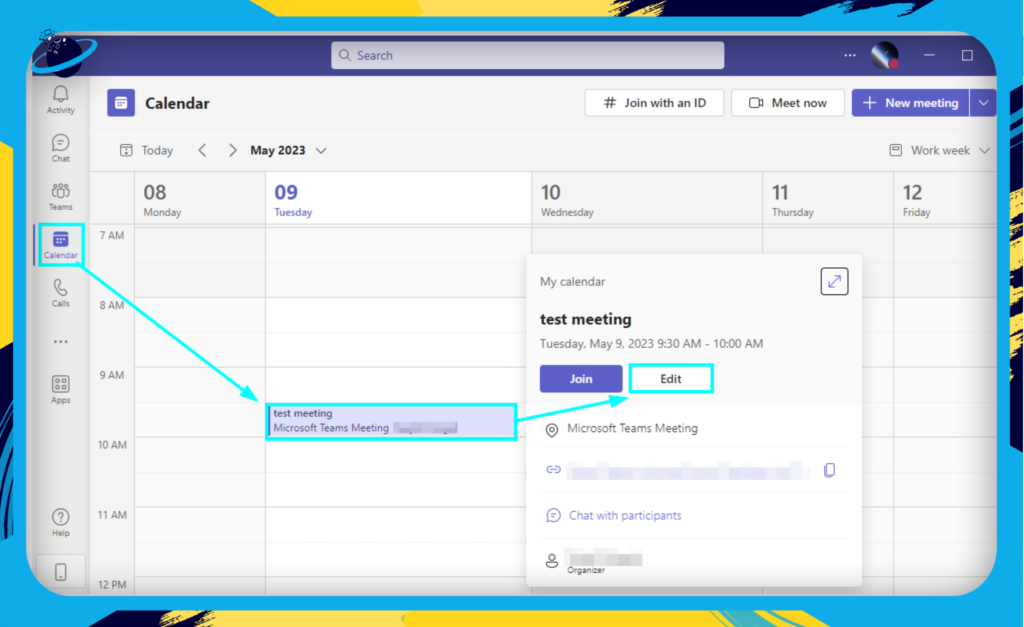
- Click on the three dots and choose “Meeting options.”
- Adjust the settings and click on “Save.”
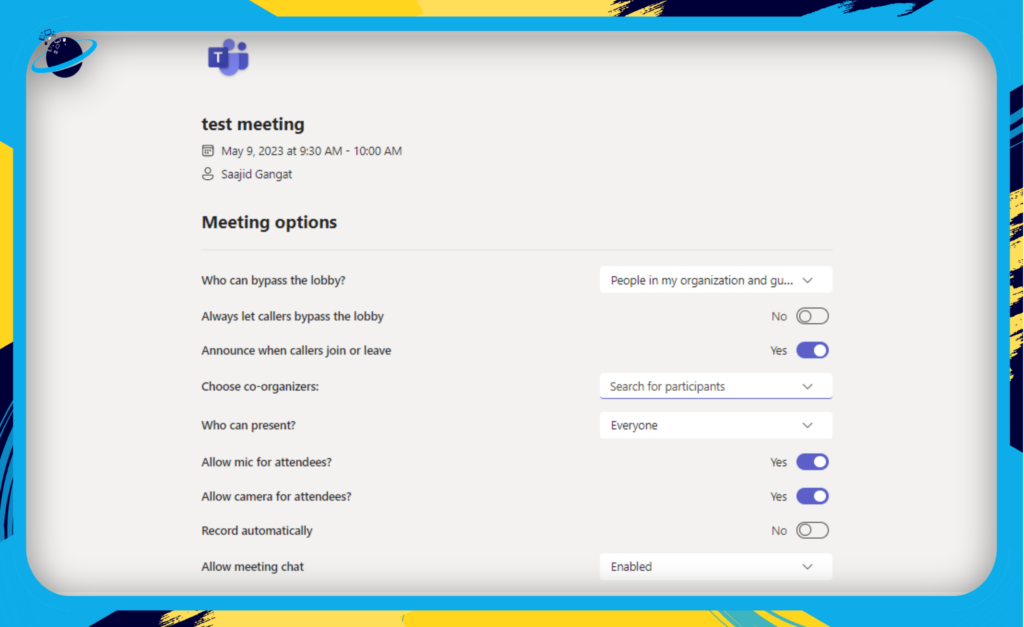
Waiting Room: Enable the waiting room feature to better control who joins your meeting. This allows you to admit participants individually or in groups, ensuring that only authorized attendees gain access.
Lobby Bypass: Choose whether participants can bypass the lobby and join the meeting directly or if they need to wait for the host to admit them. This helps maintain the security and privacy of your video conferences.
Announce Joining and Leaving: You can enable or disable the announcement of participants joining or leaving the meeting, which can help minimize disruptions during the conference.
Advanced Moderation Tools
Spotlight: Choose a participant’s video feed to focus attention during a meeting.
Raise Hand: Use the ‘raise hand’ feature during discussions to maintain order and address questions or input systematically as the host.
Hard Mute: Use ‘hard mute’ in larger meetings to keep control and prevent attendees from unmuting themselves without permission.
Utilizing these meeting controls and moderation features allows you to create a more organized and efficient video conferencing experience in Microsoft Teams, ensuring that your meetings run smoothly and productively.
Live Captions and Transcripts
In an increasingly global and diverse business environment, accessibility and inclusivity should be top priorities. Microsoft Teams is designed with these values, offering live captions and transcripts for video meetings. These features benefit participants with hearing impairments or language barriers and improve overall communication and comprehension for all attendees.
Setting up live captions in a Microsoft Teams meeting is a simple process. Follow these steps to enable live captions during a video conference:
- Join a meeting: Start or join a Microsoft Teams meeting as you normally would.
- Open meeting controls: Once in the meeting, locate the meeting controls bar, typically at the top or bottom of the screen.
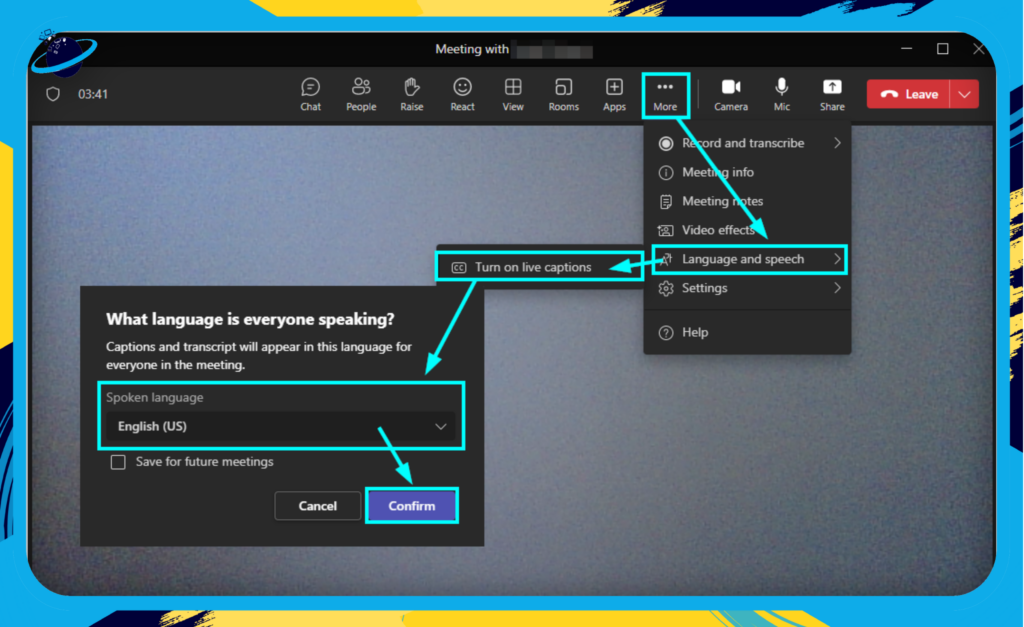
- Enable live captions: Click on the ellipsis (three dots) in the meeting controls bar to access more options. From the dropdown menu, select “Turn on live captions.” This will enable real-time captions at the bottom of the screen for all meeting participants.
- Adjust caption settings: If you want to customize the appearance of the captions, go to your Microsoft Teams settings. Click on your profile picture in the top right corner, then choose “Settings.” In the settings menu, select “Accessibility.” Here, you can adjust the caption font size, background color, and other visual aspects to suit your preferences.
- Turn off live captions: To disable live captions during the meeting, click on the ellipsis (three dots) in the meeting controls bar again and select “Turn off live captions.”
Real-time Captions
- Microsoft Teams provides real-time captions during video conferences, displaying the spoken content as on-screen text.
- This feature makes it easier for participants with difficulty hearing or understanding the speaker’s accent or language.
- To enable live captions, click the ellipsis (three-dot) menu during a meeting and select Turn on live captions.
Meeting Transcripts
- Meeting transcripts are a valuable resource that captures the entire conversation in text format.
- Microsoft Teams automatically generates a transcript after the meeting, which can be accessed and shared with attendees for future reference.
- Transcripts are especially helpful for individuals who couldn’t attend the meeting, providing them with a detailed record of the discussion.
Language Support and Translation
- Microsoft Teams supports live captions in multiple languages, making it easier for non-native speakers to follow along.
- The platform continually expands its language support to cater to diverse user needs.
- Additionally, Teams is working on real-time translation features to further enhance the inclusivity and accessibility of video conferences.
By incorporating live captions and transcripts in your Microsoft Teams video conferences, you create a more inclusive environment and ensure that vital information is effectively communicated and retained.
Meeting Recording and Storage
Microsoft Teams lets you record and save meetings for later reference. This is helpful if you miss a meeting or need a recap. Learn how to record, save, and share your video conferences here.
Recording a Meeting
To record a meeting in Microsoft Teams, follow these simple steps:
- Start or join a meeting.
- Click on the “ellipsis” (three dots) in the meeting control bar.
- Select “Start Recording” from the dropdown menu.
- A notification will appear, informing all participants that the meeting is being recorded.
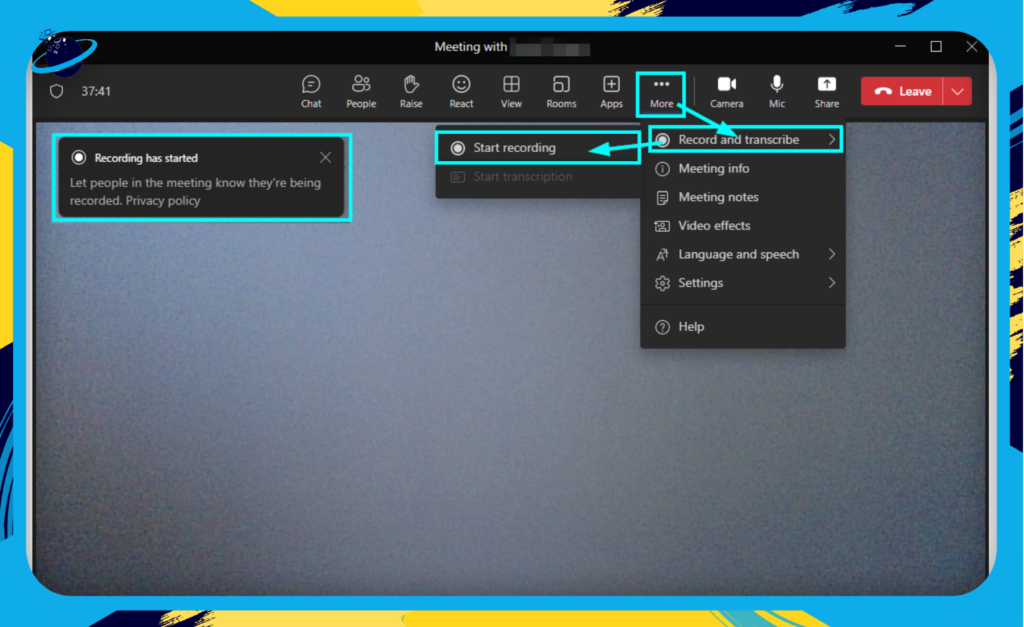
Note: Only the meeting organizer or a presenter can start a recording.
Accessing and Sharing Meeting Recordings
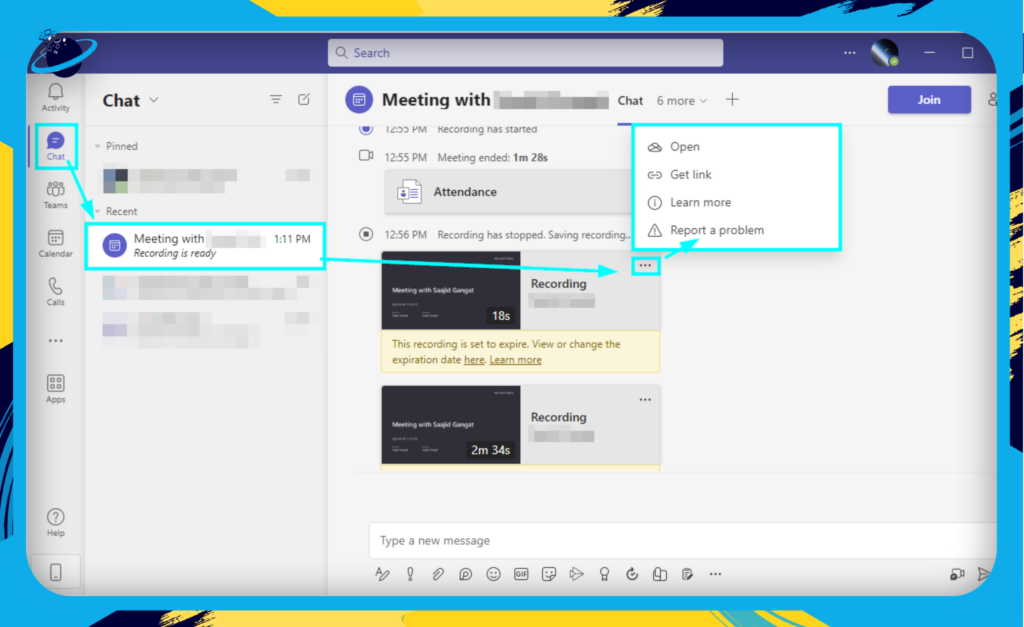
Once a meeting has been recorded, it is automatically saved to the cloud, making it accessible for all participants. To access and share your recorded meetings, follow these steps:
- Go to the “Chat” tab in Microsoft Teams.
- Locate the chat thread for the specific meeting.
- The recording will appear as a card in the chat thread with a thumbnail, date, and time.
- Click on the “ellipsis” (three dots) on the recording card for more options, such as:
- Play: Watch the recording directly in Teams.
- Open in Microsoft Stream: View the recording in Microsoft Stream, where you can access additional features like captions and transcripts.
- Get a link: Generate a shareable link for the recording.
- Download: Download the video file to your local device.
Storage and Retention
Microsoft Teams now saves meeting recordings in OneDrive for Business or SharePoint for better integration and storage management.
Admins can set retention policies for recorded meetings in Teams, automatically deleting them after a specified time. This ensures important discussions are preserved without cluttering storage.
Conclusion
Microsoft Teams is an excellent choice for corporate video conferencing. It integrates well with other Microsoft tools and third-party apps for a seamless experience. Features like high-quality audio and video, background effects, screen sharing, breakout rooms, and meeting recordings can improve communication and collaboration. Follow our tips to get the most out of Teams and elevate your business collaboration.