Microsoft Teams is a versatile platform for remote customer service. Mastering it can make all the difference in providing outstanding service from anywhere in the world. Join us for an informative journey filled with valuable insights, practical tips, and real-world examples. Let’s ensure our customers remain happy and satisfied even from a distance.
 Table of content


Introduction to Microsoft Teams
As the digital landscape evolves and diversifies, the tools we use to navigate it must also evolve and diversify. Enter Microsoft Teams: an all-in-one platform that fosters collaboration, communication, and productivity. But did you know it’s also a powerhouse for remote customer service? Let’s set the stage.

A Brief History
- 2017: Microsoft Teams made its debut, pitching its tent as a direct competitor to platforms like Slack. Little did we know how central it would become to our working lives!
- Rapid Evolution: With Microsoft’s might behind it, Teams quickly integrated with other Office 365 products, making it a staple for businesses everywhere.
The Rise of Remote Work
- Shift in Dynamics: The past few years have witnessed a seismic shift in how we work. The cubicles and conference rooms have increasingly given way to home offices and virtual meet-ups.
- Teams to the Rescue: As remote work soared, so did the need for tools to support it. Microsoft Teams stepped up, evolving beyond internal team chats to become a hub for external communications, including customer service.
How Teams Fits into Remote Customer Service
- Unified Communication: Imagine a world where video calls, instant messaging, file sharing, and collaborative editing live under one roof. That’s Teams for you.
- Integration Power: From CRM systems to task management tools, Teams plays well with others, ensuring you have all you need at your fingertips to serve customers efficiently.
Takeaway: Microsoft Teams isn’t just another tool in your arsenal—it’s a dynamic platform ready to revolutionize your approach to customer service. Whether you’re navigating the waters of remote work for the first time or looking to optimize your current setup, Teams has something in store for you.
Core Features of Microsoft Teams for Customer Service
In the bustling hub of Microsoft Teams, there are a handful of features that stand out, especially when the spotlight is on customer service. Let’s explore these gems, shall we?
Chat: The Instant Messenger
- Instant Responses: In an age where every second counts, chat enables you to respond to customer queries in real-time.
- Group Discussions: Need a team’s input? Create group chats and brainstorm solutions on the go.
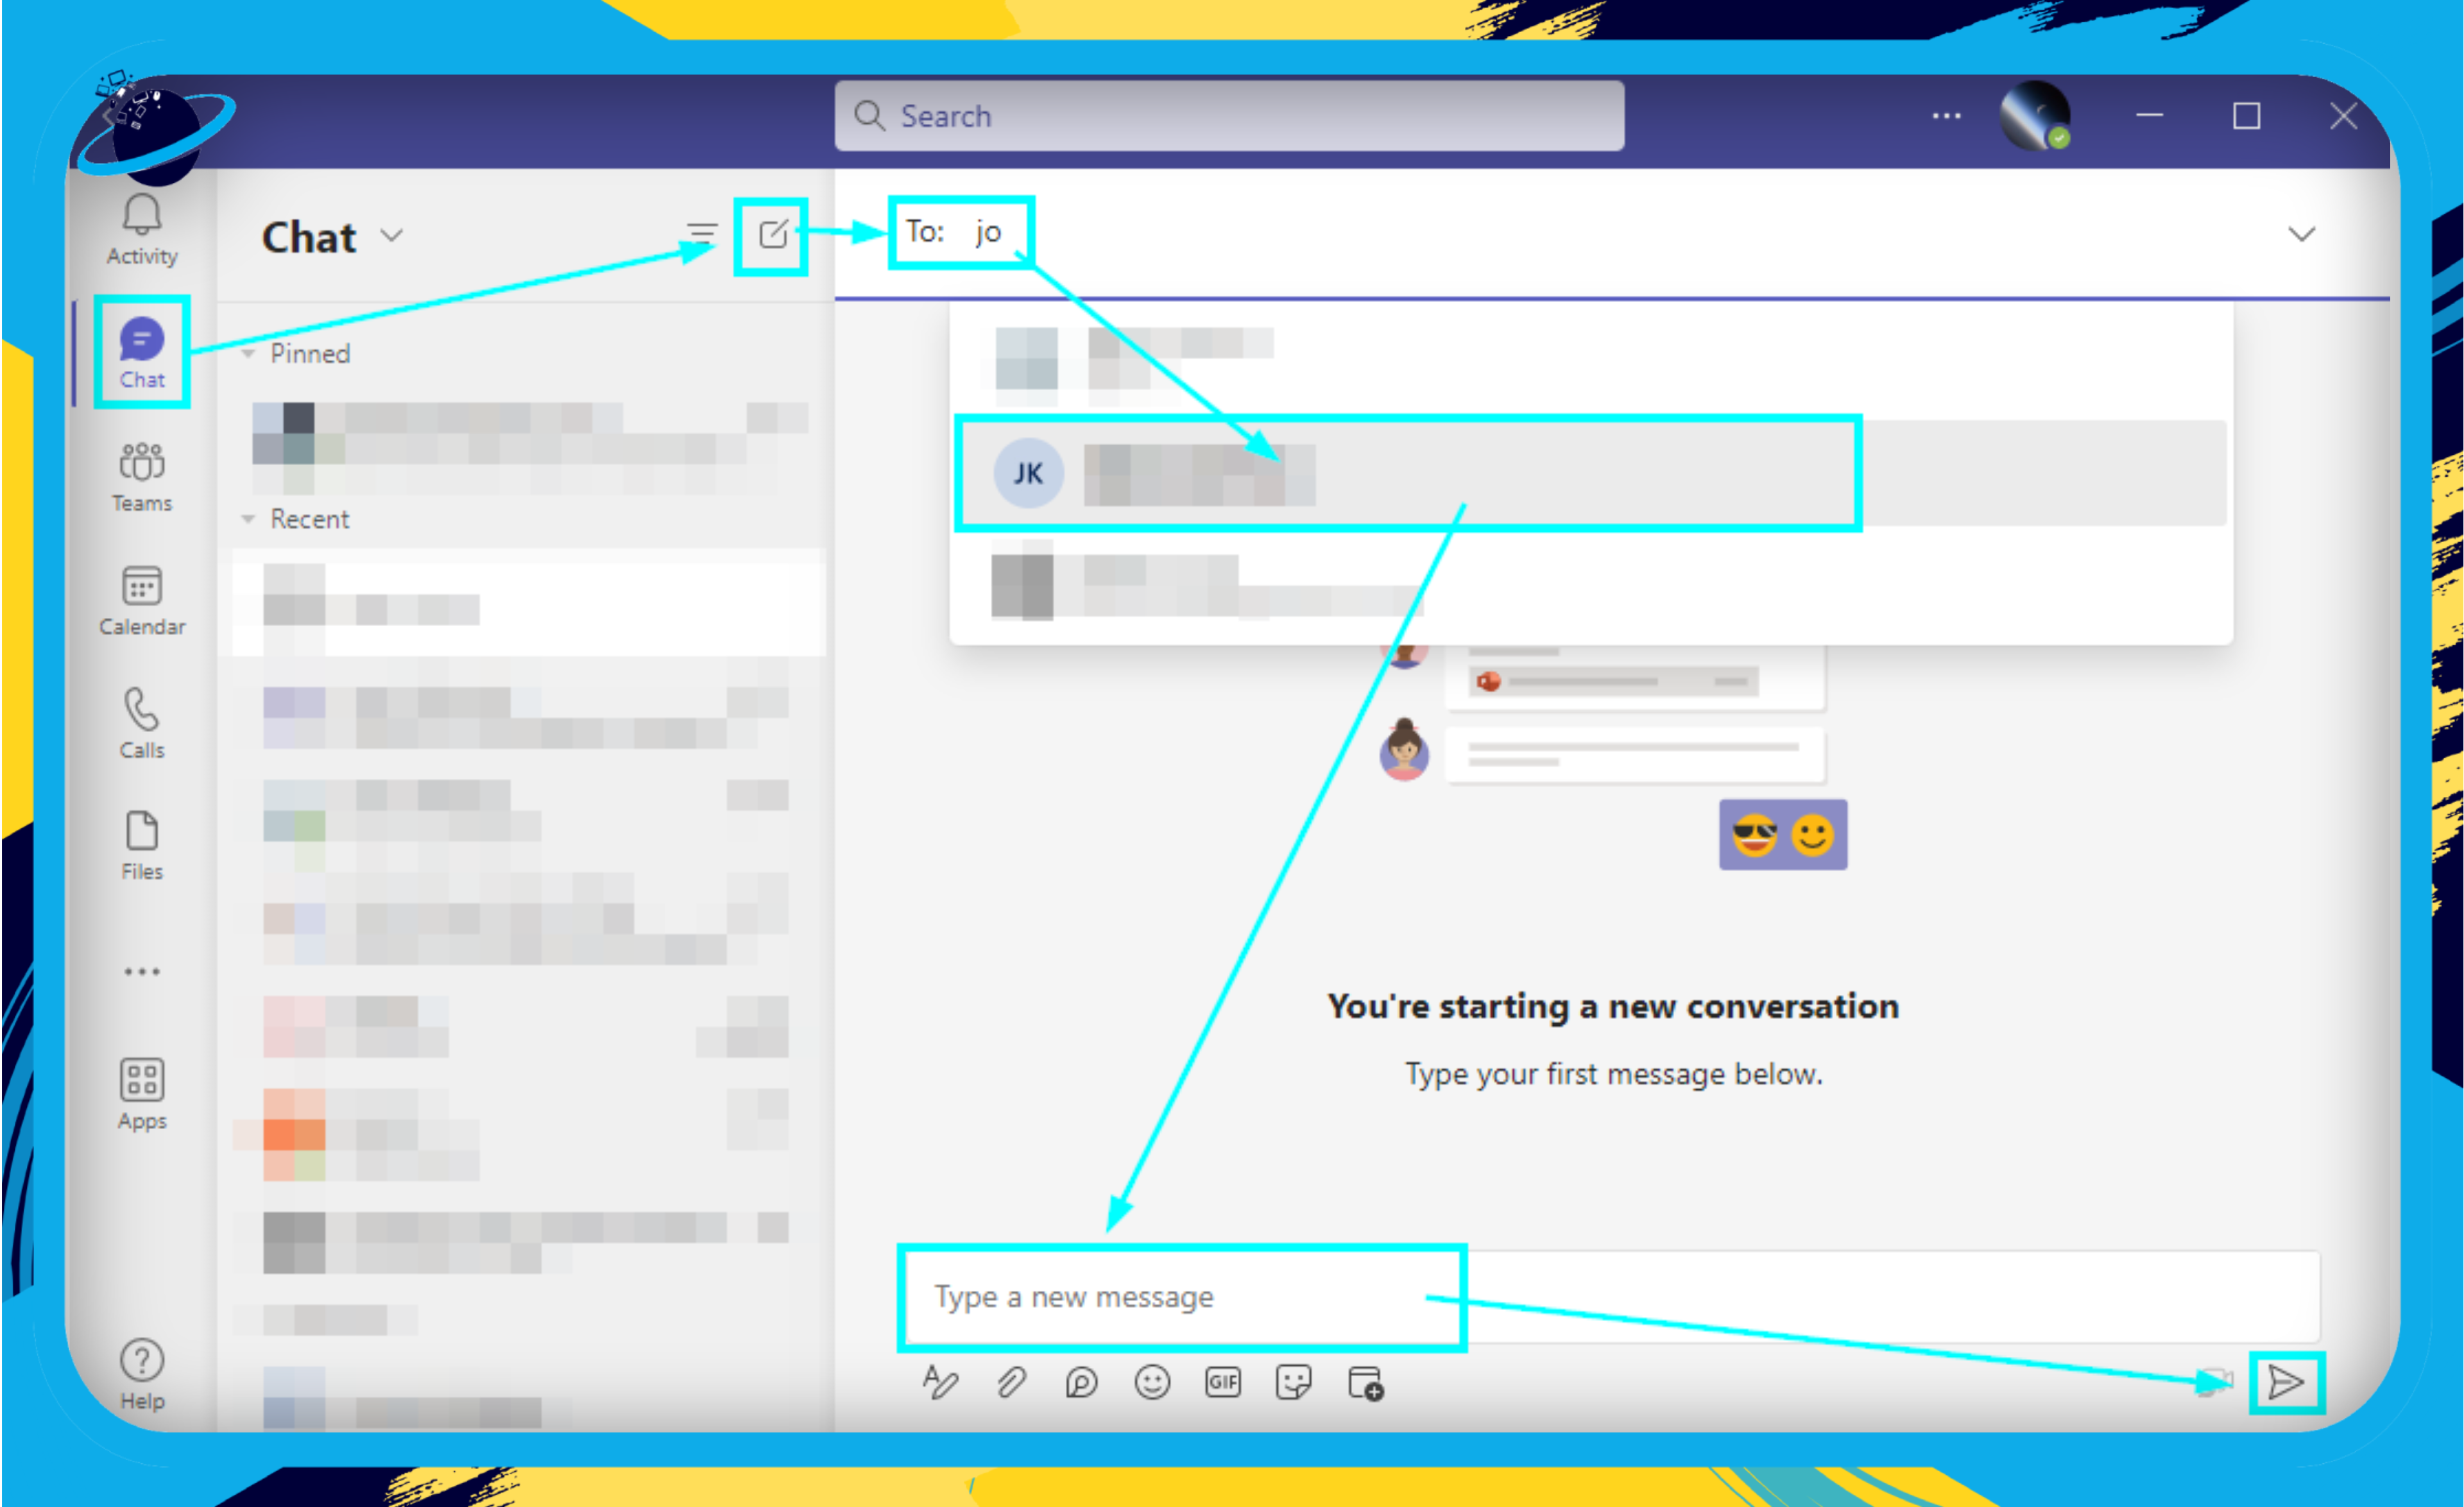
Follow these steps to send a chat in Teams:
- Launch Microsoft Teams
- Open the Microsoft Teams application on your computer or browser.
- Locate the Chat Tab
- On the left-hand side, you’ll find a vertical bar with various icons. Click on the “Chat” icon, which resembles a speech bubble.
- Starting a New Chat
- Once you’re in the Chat tab, click on the “New Chat” icon located at the top. It looks like a small pencil or quill.
- In the “To” field, start typing the name of the person you want to chat with. Microsoft Teams will suggest names from your organization as you type.
- Select the desired recipient from the dropdown list.
- Type Your Message
- Below the “To” field, you’ll see a space where you can type your message.
- You can also use the formatting options located below the text box to enhance your message (bold, italic, bullet points, and so on).
- Add Attachments (Optional)
- If you need to send a file, click on the paperclip icon 📎 below the text box to attach files from your computer, Teams, or other integrated services.
- Sending the Chat
- Once you’ve composed your message and added any necessary attachments, press the Enter key on your keyboard or click the Send icon (resembling a paper airplane) to send the chat.
- Managing the Chat
- After initiating a chat, it will appear in your recent chat list. You can return to it anytime, continue the conversation, or even add more participants if you wish to make it a group chat.
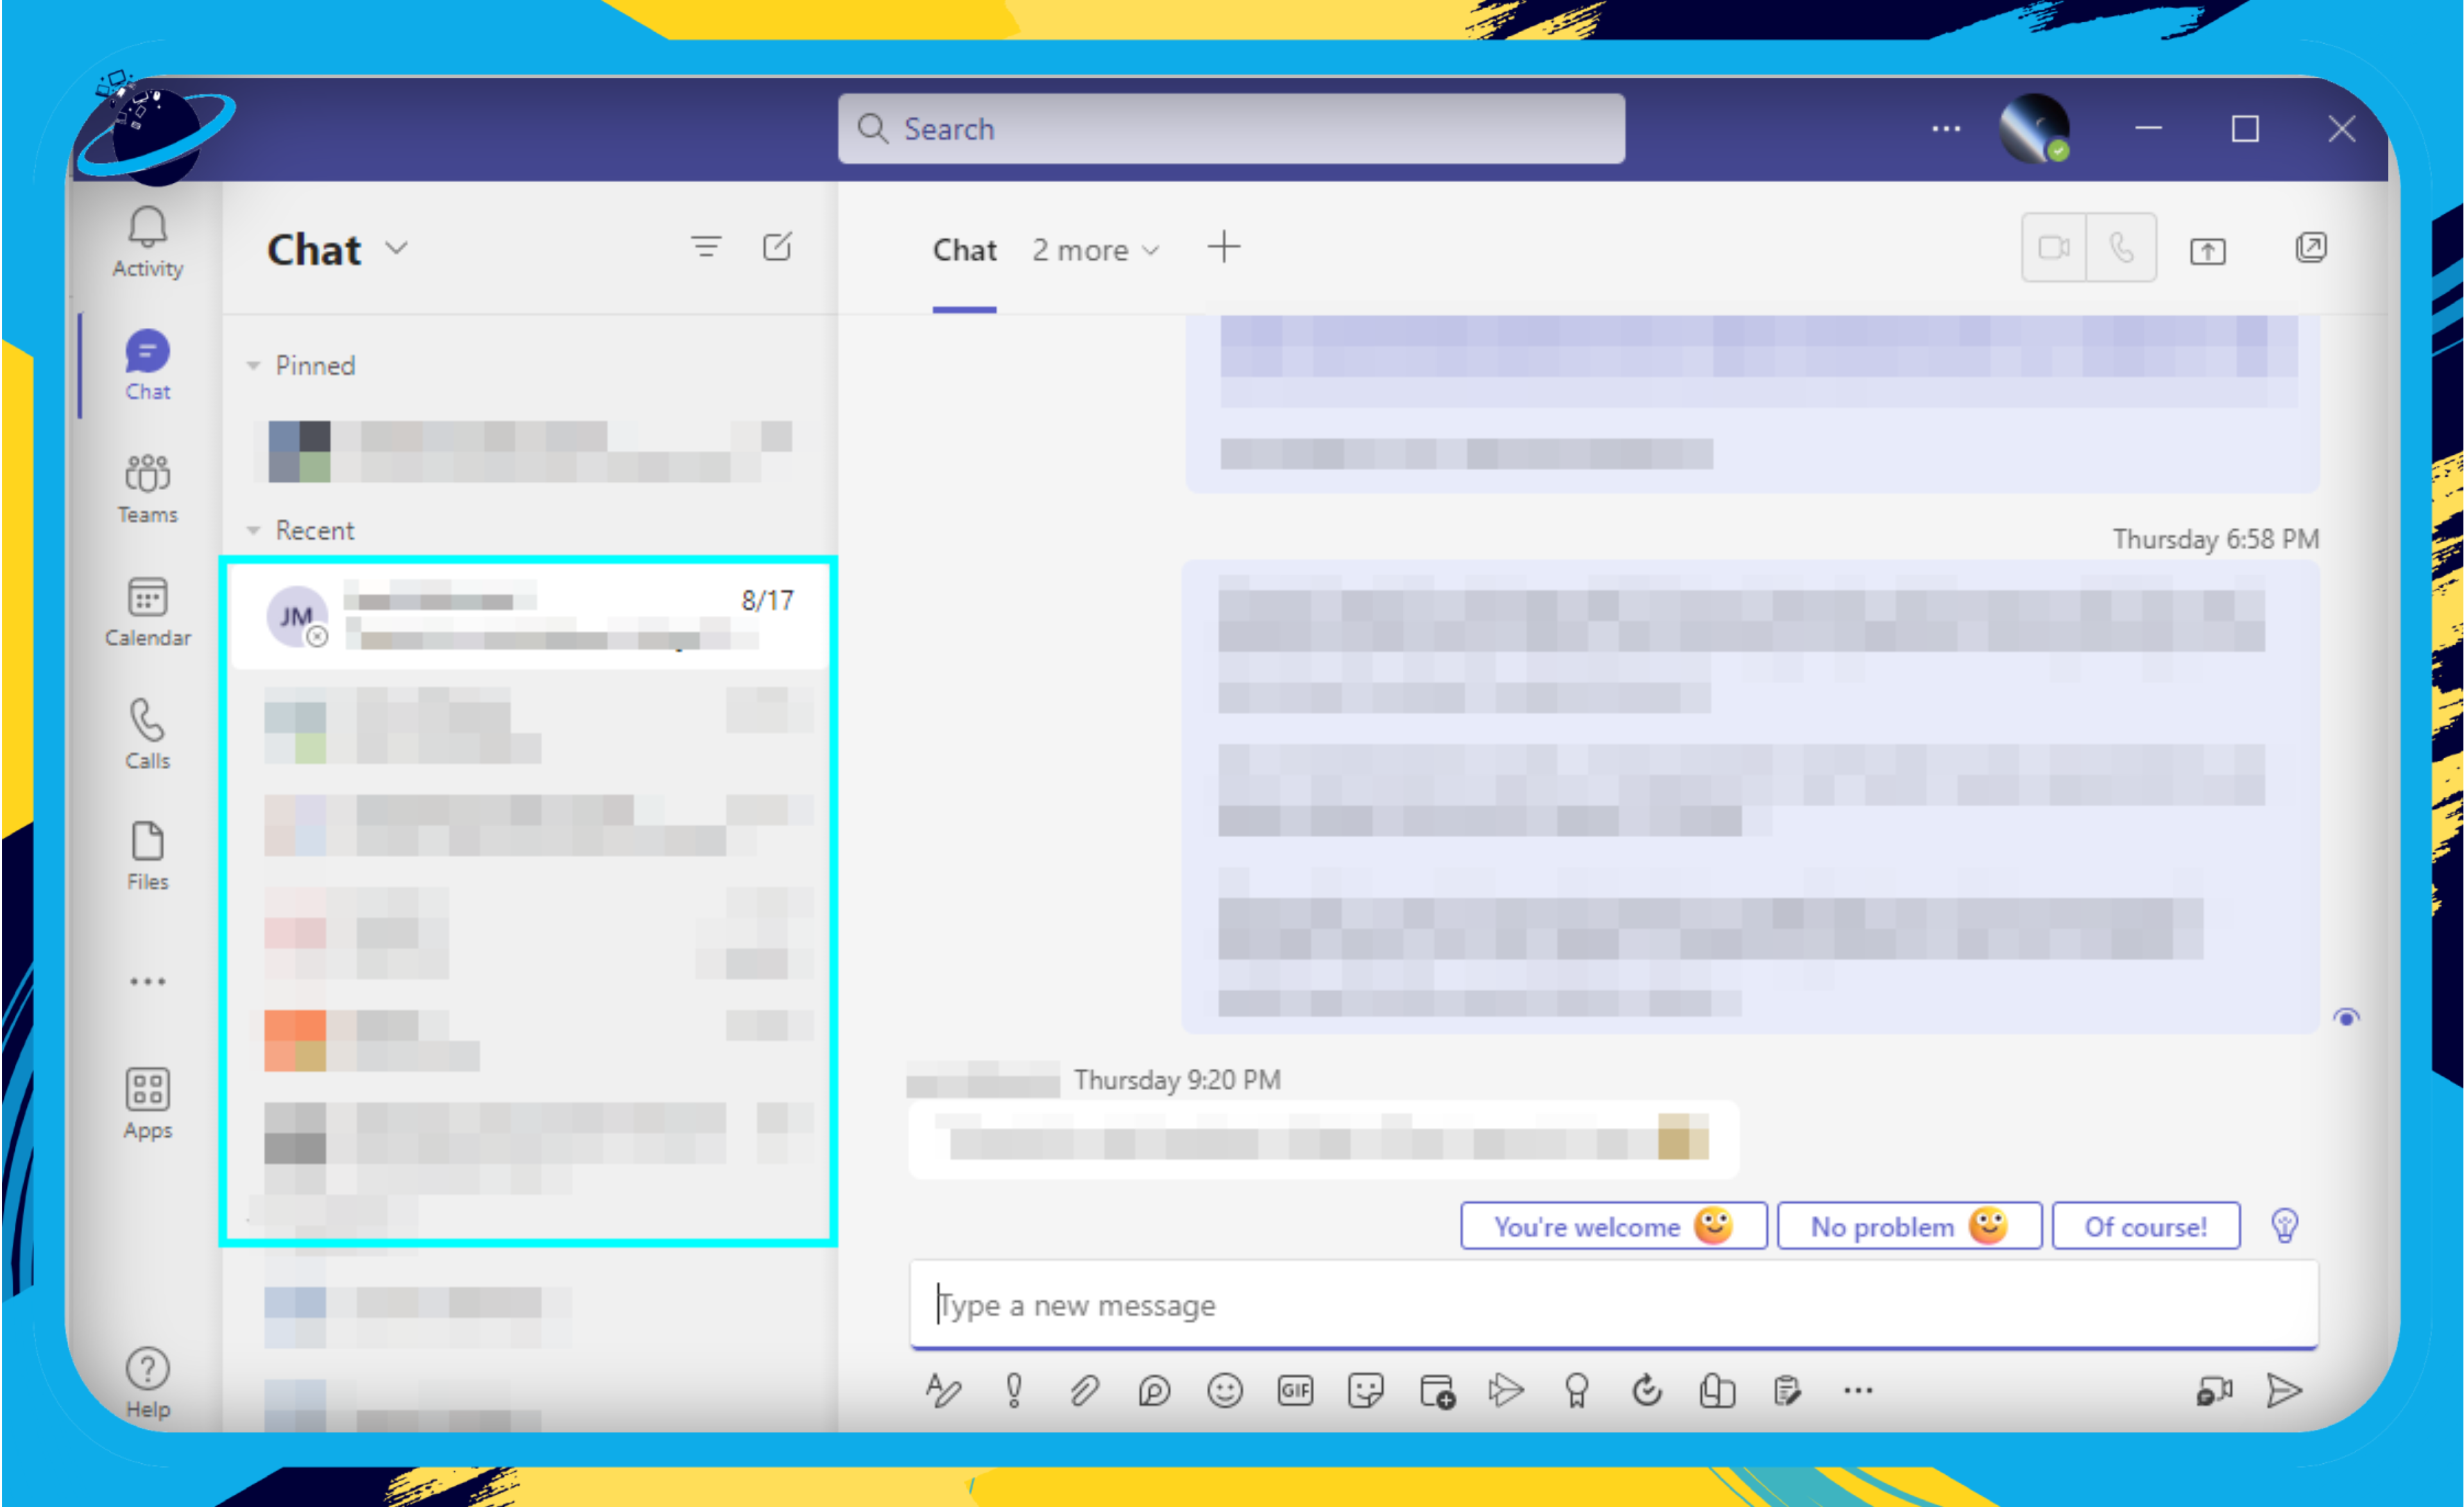
Remember, Microsoft Teams offers many features to enhance your chat experience, such as emojis, gifs, stickers, and the ability to create and join meetings directly from the chat. Familiarizing yourself with these features can help make your communication more efficient and engaging.
Meetings & Video Calls: The Digital Face-to-Face
- Direct Interaction: Foster a personal connection with customers, transcending the barriers of remote communication.
- Screen Sharing: Sometimes, showing is better than telling. Effortlessly share your screen to provide visual aid.
- Recording: Missed a detail? No worries! Record meetings for future reference.
Follow these steps to schedule a meeting in Teams:
- Open Microsoft Teams: Launch the Microsoft Teams application on your desktop, or access it via a web browser.
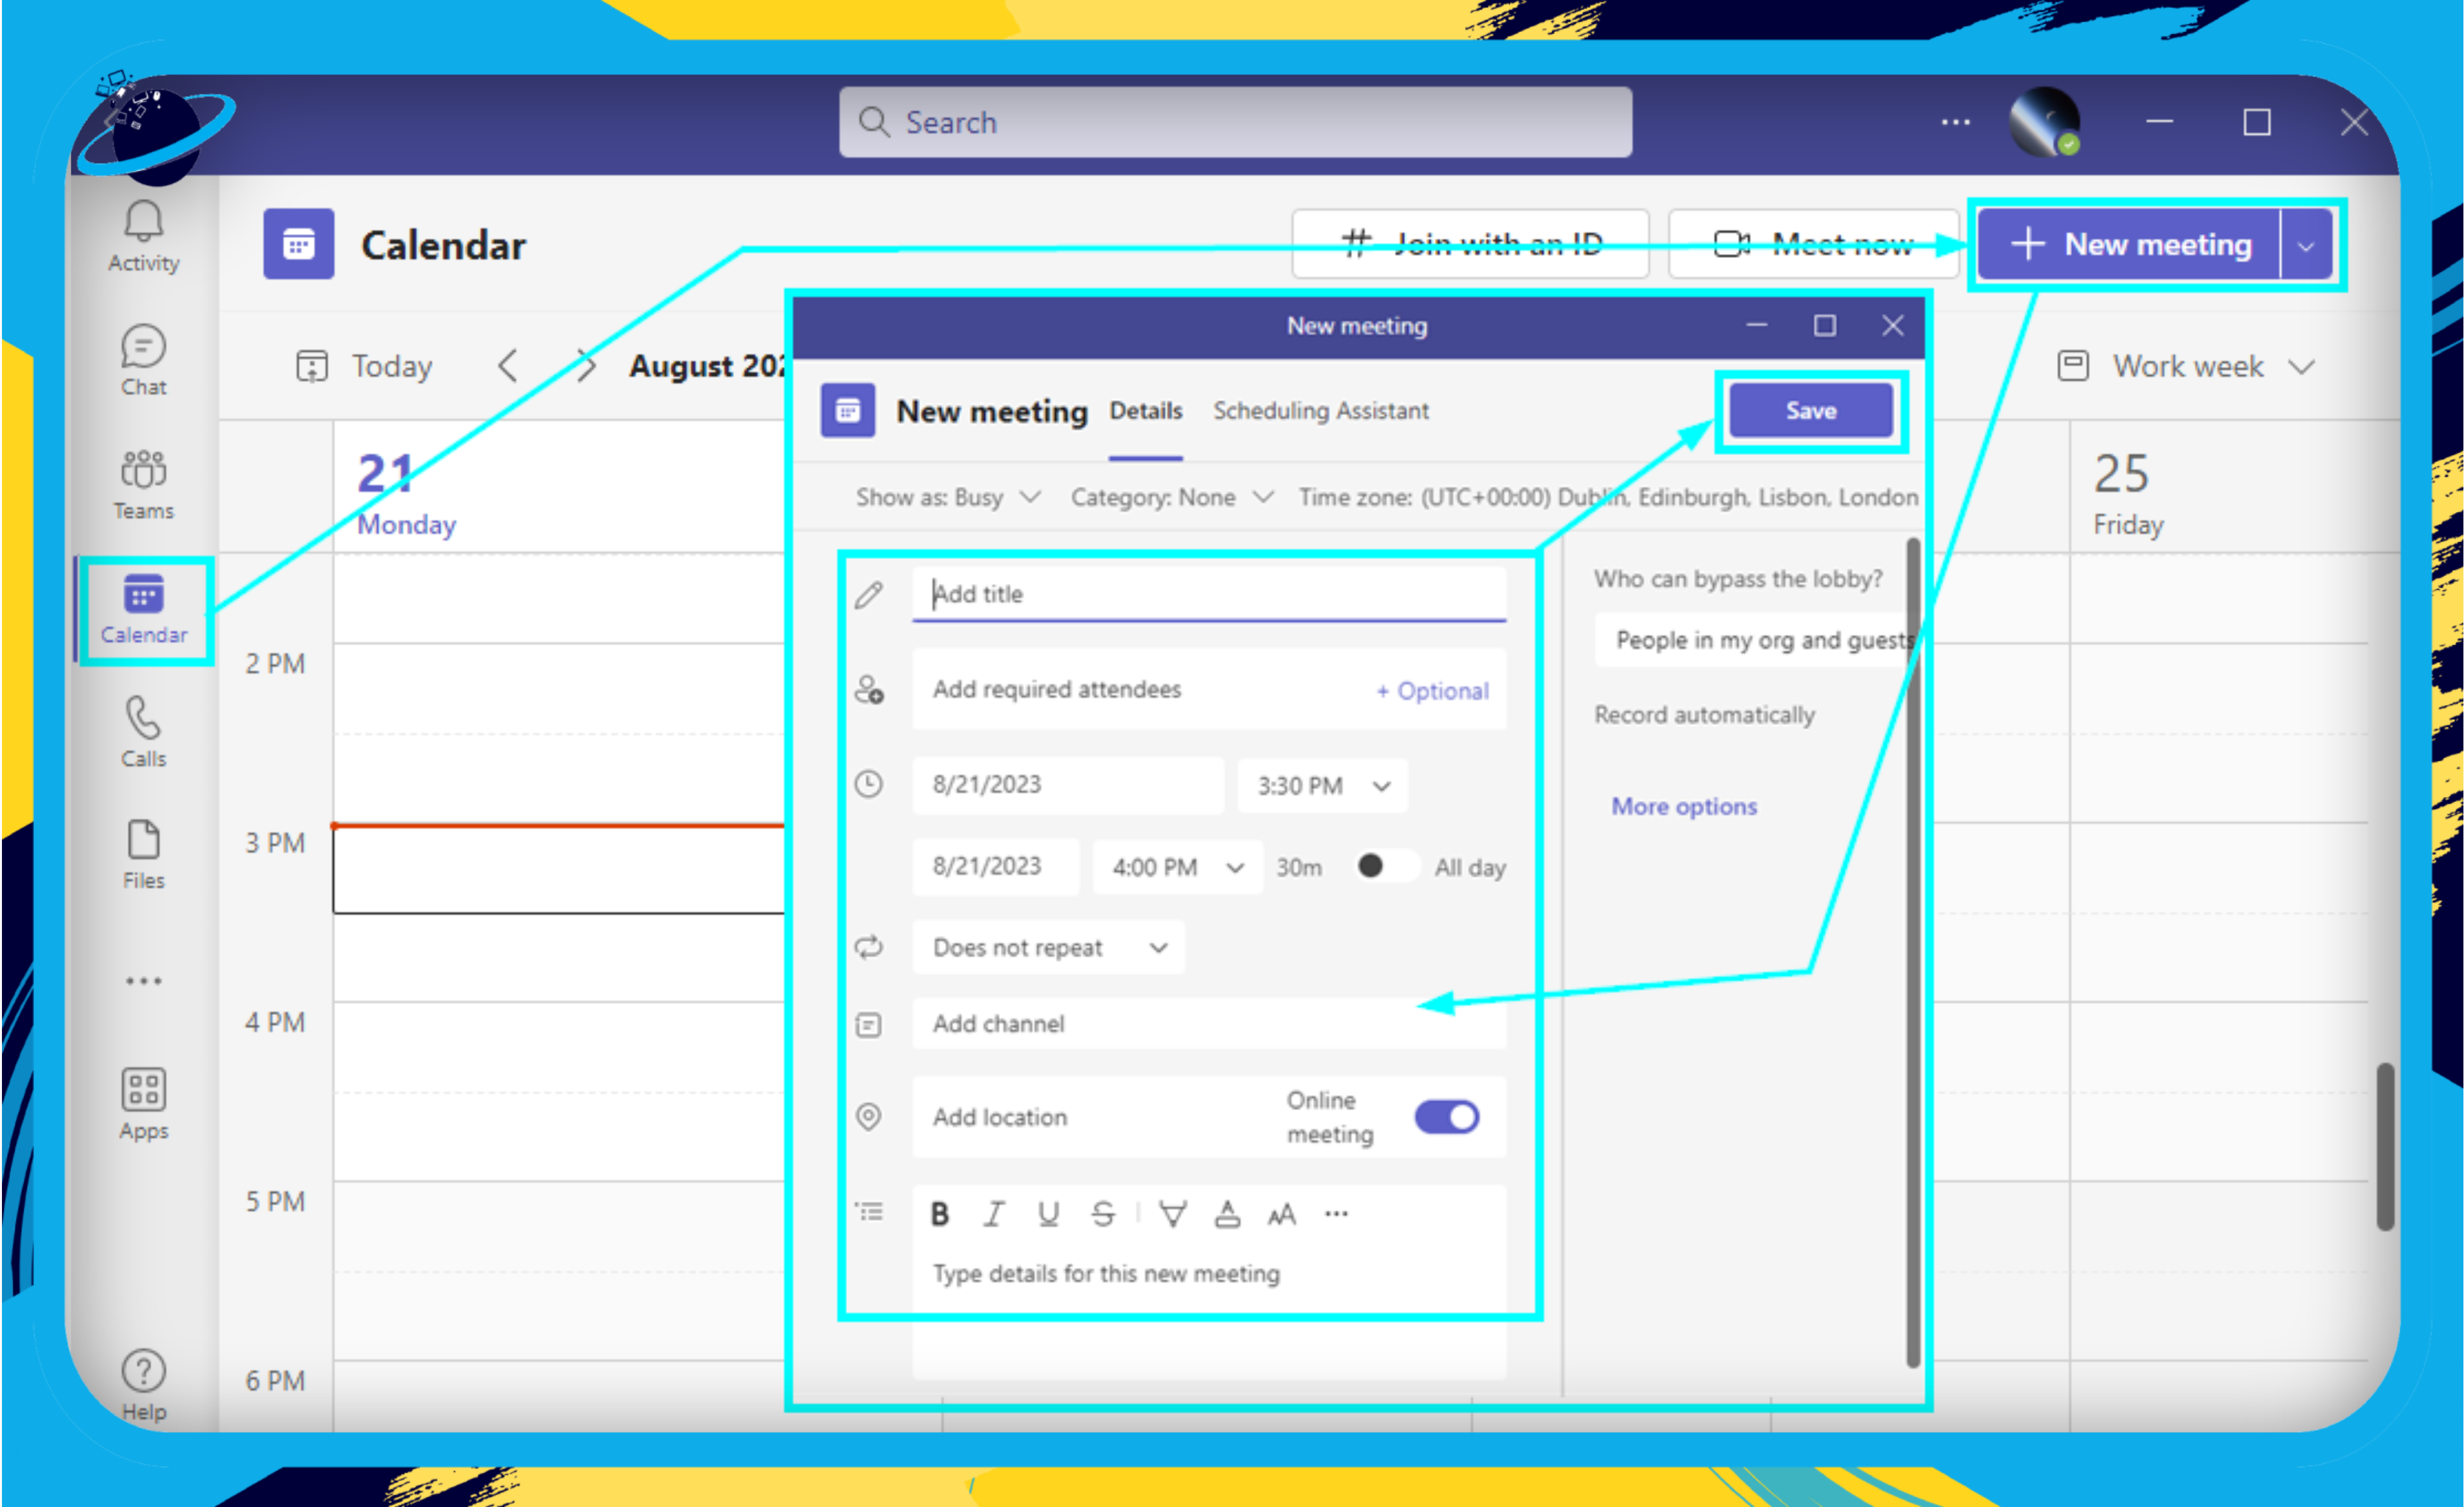
- Navigate to the Calendar:
- On the left-hand side of the Teams interface, you’ll see a series of icons.
- Click on the Calendar icon (it looks like a small calendar).
- Schedule a New Meeting:
- In the top-right corner of the Calendar tab, click on the “New Meeting” or “Schedule Meeting” button.
- Fill in the Meeting Details:
- Title: Enter a title or subject for your meeting.
- Attendees: Type the names or email addresses of the people you want to invite. As you type, Teams will suggest matches from your contact list. Click on a name to add them.
- Date and Time: Choose the start date and time and the end date and time for your meeting. You can also set it as an all-day event if necessary.
- Details: Add any relevant details or an agenda for the meeting.
- Location: By default, this will be set to Microsoft Teams, meaning it’s a virtual meeting. However, if you’re using Teams for in-person events, you can specify a physical location here.
- Channels: If you want the meeting to be associated with a specific Teams channel, you can select it. This way, all members of the channel will see the meeting.
- Additional Settings:
- Click on “Scheduling Assistant” if you want to see the availability of your attendees, making it easier to find a suitable time.
- If you want to make it a recurring meeting (e.g., daily or weekly), click on the “Does not repeat” dropdown and select your preferred frequency.
- Save & Send Invitations:
- Once you’ve filled in all the details, click on the “Send” button. This will save the meeting to your calendar and send an invitation to all the attendees.
- View or Edit Meeting:
- After scheduling, the meeting will appear on your Teams calendar.
- To view or edit the meeting details, simply click on the meeting entry in the calendar.
That’s it! You’ve successfully scheduled a meeting in Microsoft Teams. Attendees will receive a notification about the meeting, and they can accept or decline the invitation. When it’s time for the meeting, everyone can join with just a click from the Teams calendar or the link in the invitation.
Channels: Your Organized Helpers
- Dedicated Spaces: Set up channels for specific issues, teams, or even VIP clients. Keep discussions focused and streamlined.
- Custom Notifications: Prioritize which updates you receive, ensuring you never miss an important conversation.
Follow these steps to set up a channel in Teams:
- Open Microsoft Teams
- Launch the Microsoft Teams application on your computer or access it via a web browser.
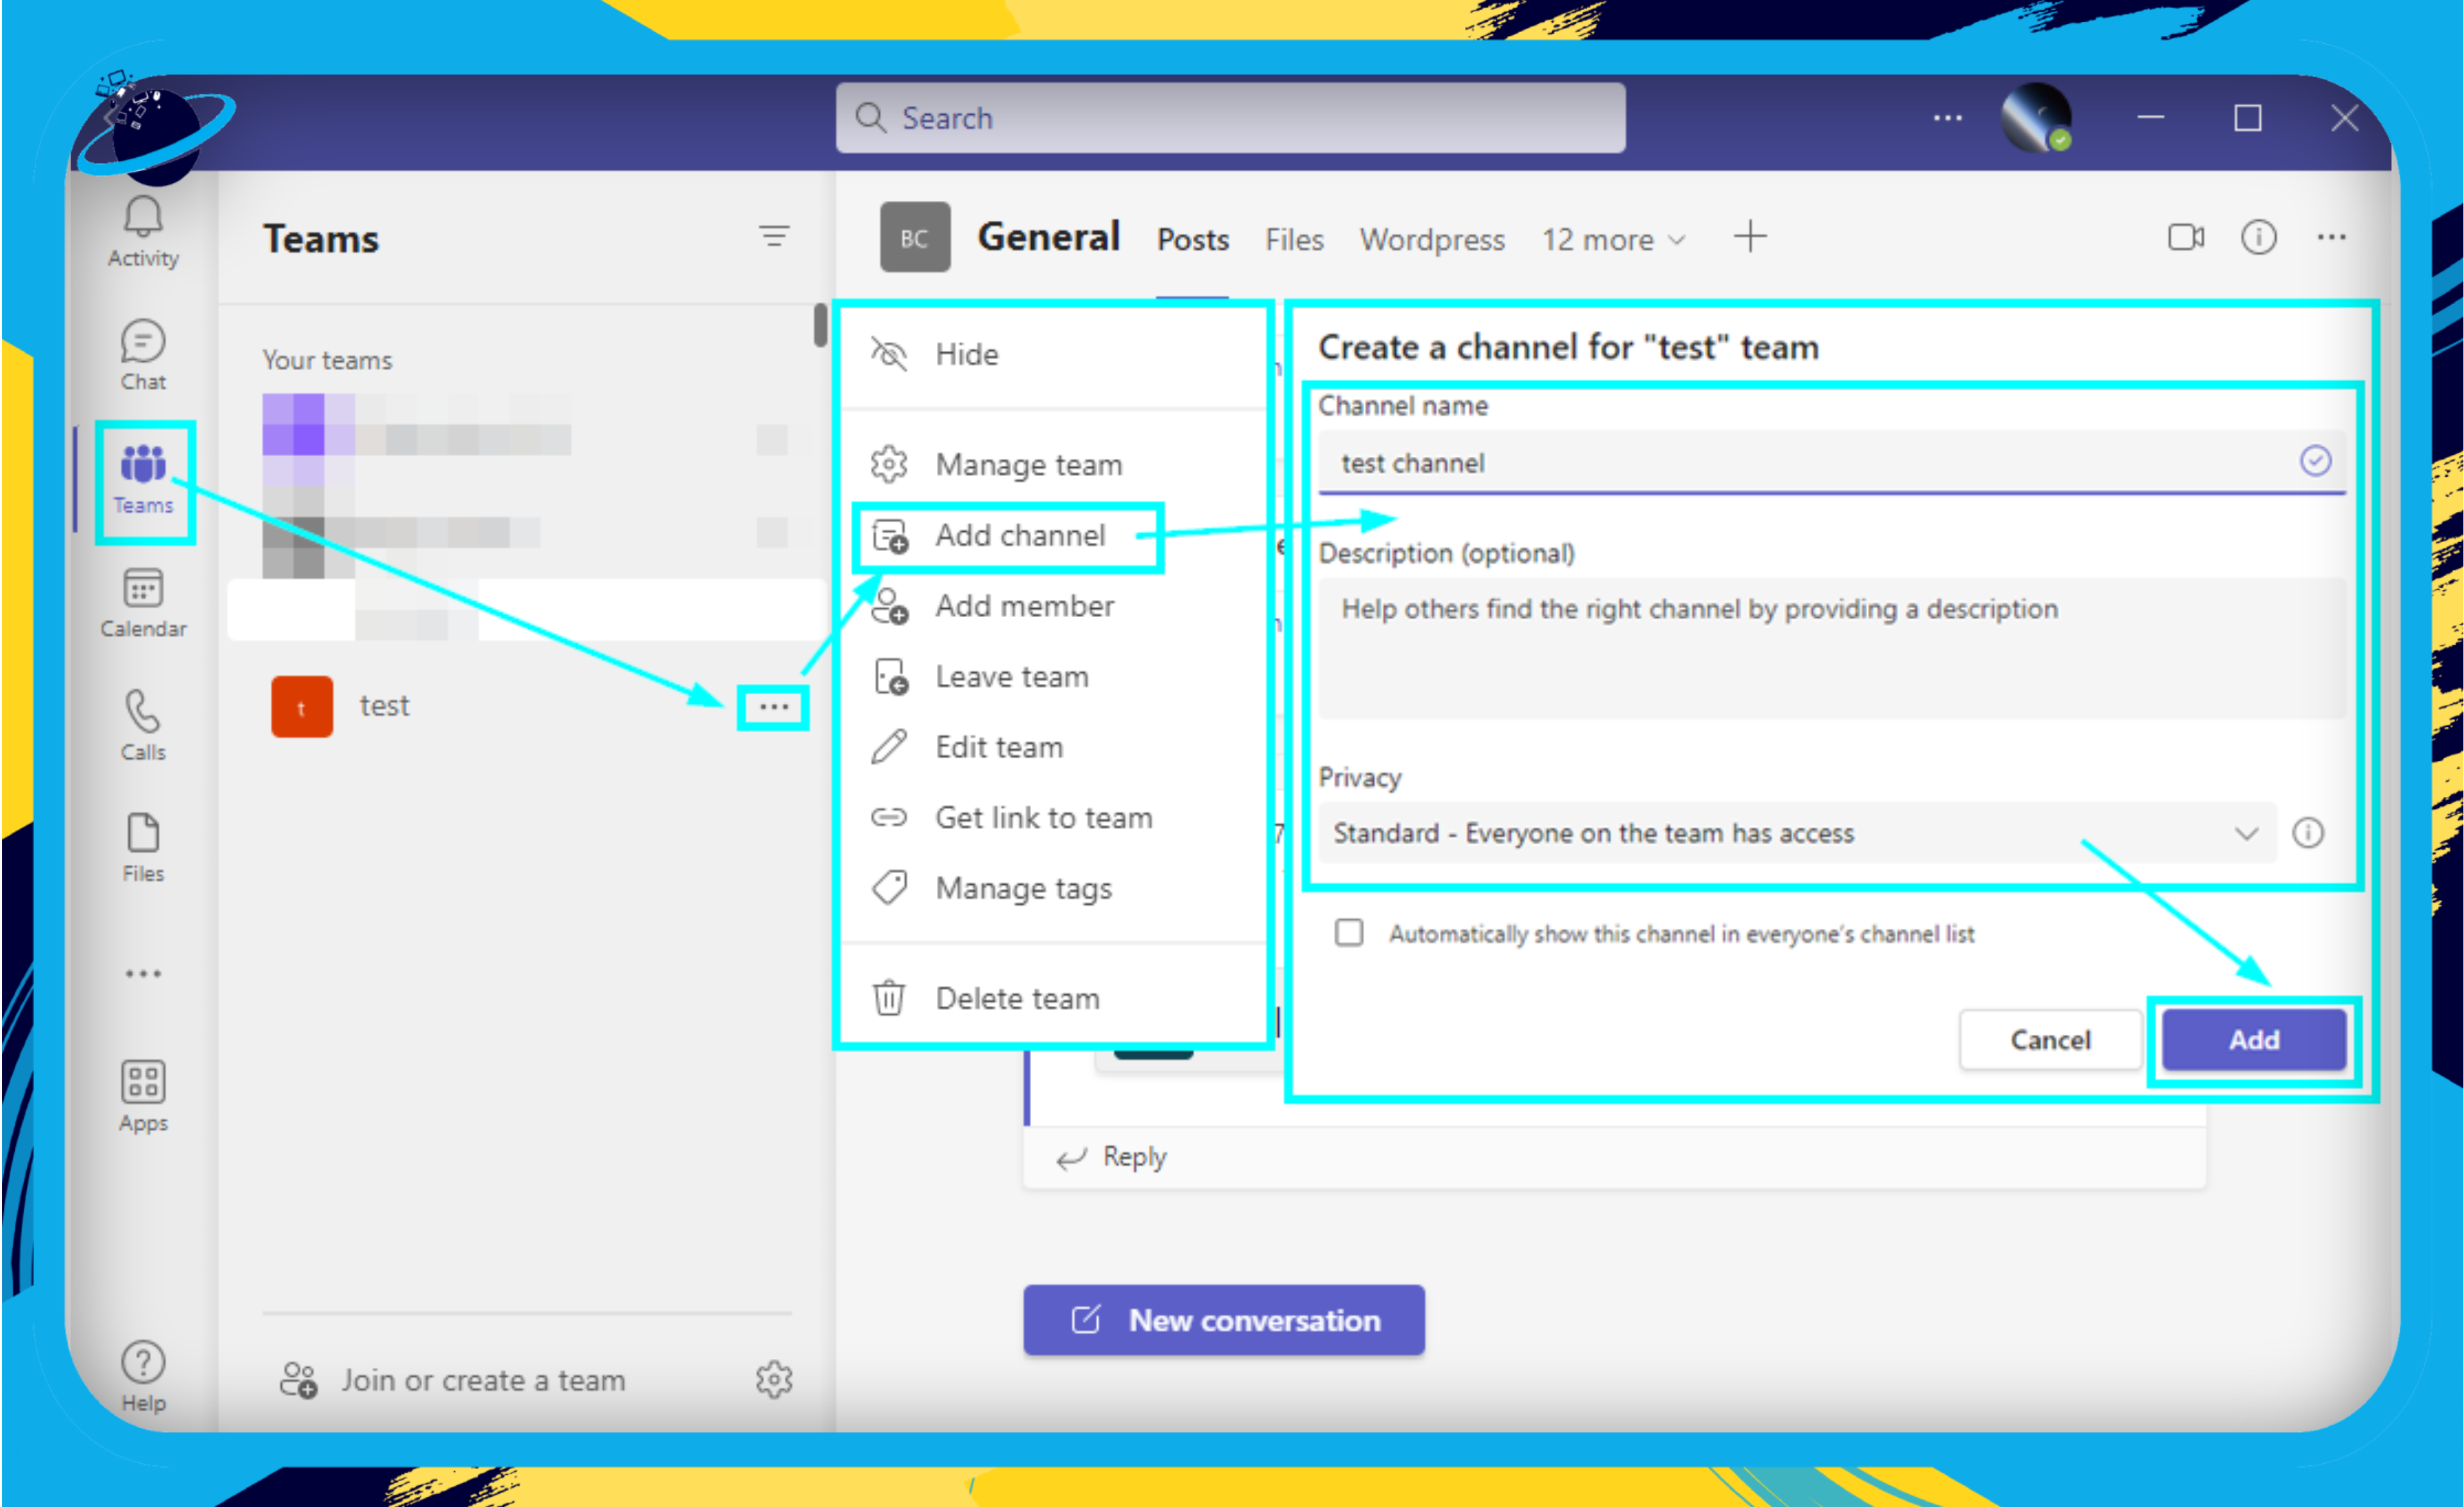
- Go to the Team
- In the left sidebar, you’ll see a list of your Teams.
- Click on the team where you want to add the new channel. If you haven’t created a team yet, you’ll need to do that first.
- Add a Channel
- Click on the three dots (ellipsis) next to the team’s name, often referred to as the “More options” button.
- From the drop-down menu, select Add channel.
- Configure Channel Details
- Name: Give your channel a descriptive name.
- Description: (Optional) Add a brief description to let members know the purpose of the channel.
- Privacy: Decide between:
- Standard – Accessible to everyone in the team.
- Private – Accessible only to a specific group of people within the team.
- Advanced Settings (optional)
- Automatically show this channel in everyone’s channel list: If checked, the channel will be visible to all team members by default. If unchecked, team members will need to manually pin the channel to their list.
- Create
- Click the Add button to finalize the creation of your new channel.
- Access the New Channel
- After creation, you’ll see the new channel listed under the team’s name in the left sidebar.
- Click on it to start a conversation or share files specific to that channel.
Remember, Microsoft Teams is updated frequently, so while these steps should remain generally accurate, it’s always a good idea to check Microsoft’s official documentation or help center if there are discrepancies or if you encounter any issues.
Files & Tabs: The Digital Briefcase
- Central Repository: Store, share, and collaborate on customer-related documents. Everything you need in one place.
- Simultaneous Editing: Collaborate in real-time, making document edits a team effort.
Follow these steps to set a tab in Teams:
- Open Microsoft Teams: Launch the Microsoft Teams application on your desktop or access it via the web.
- Choose a Team and Channel:
- On the left-hand sidebar, click on “Teams.”
- Navigate to and select the specific team and channel where you’d like to add the tab.
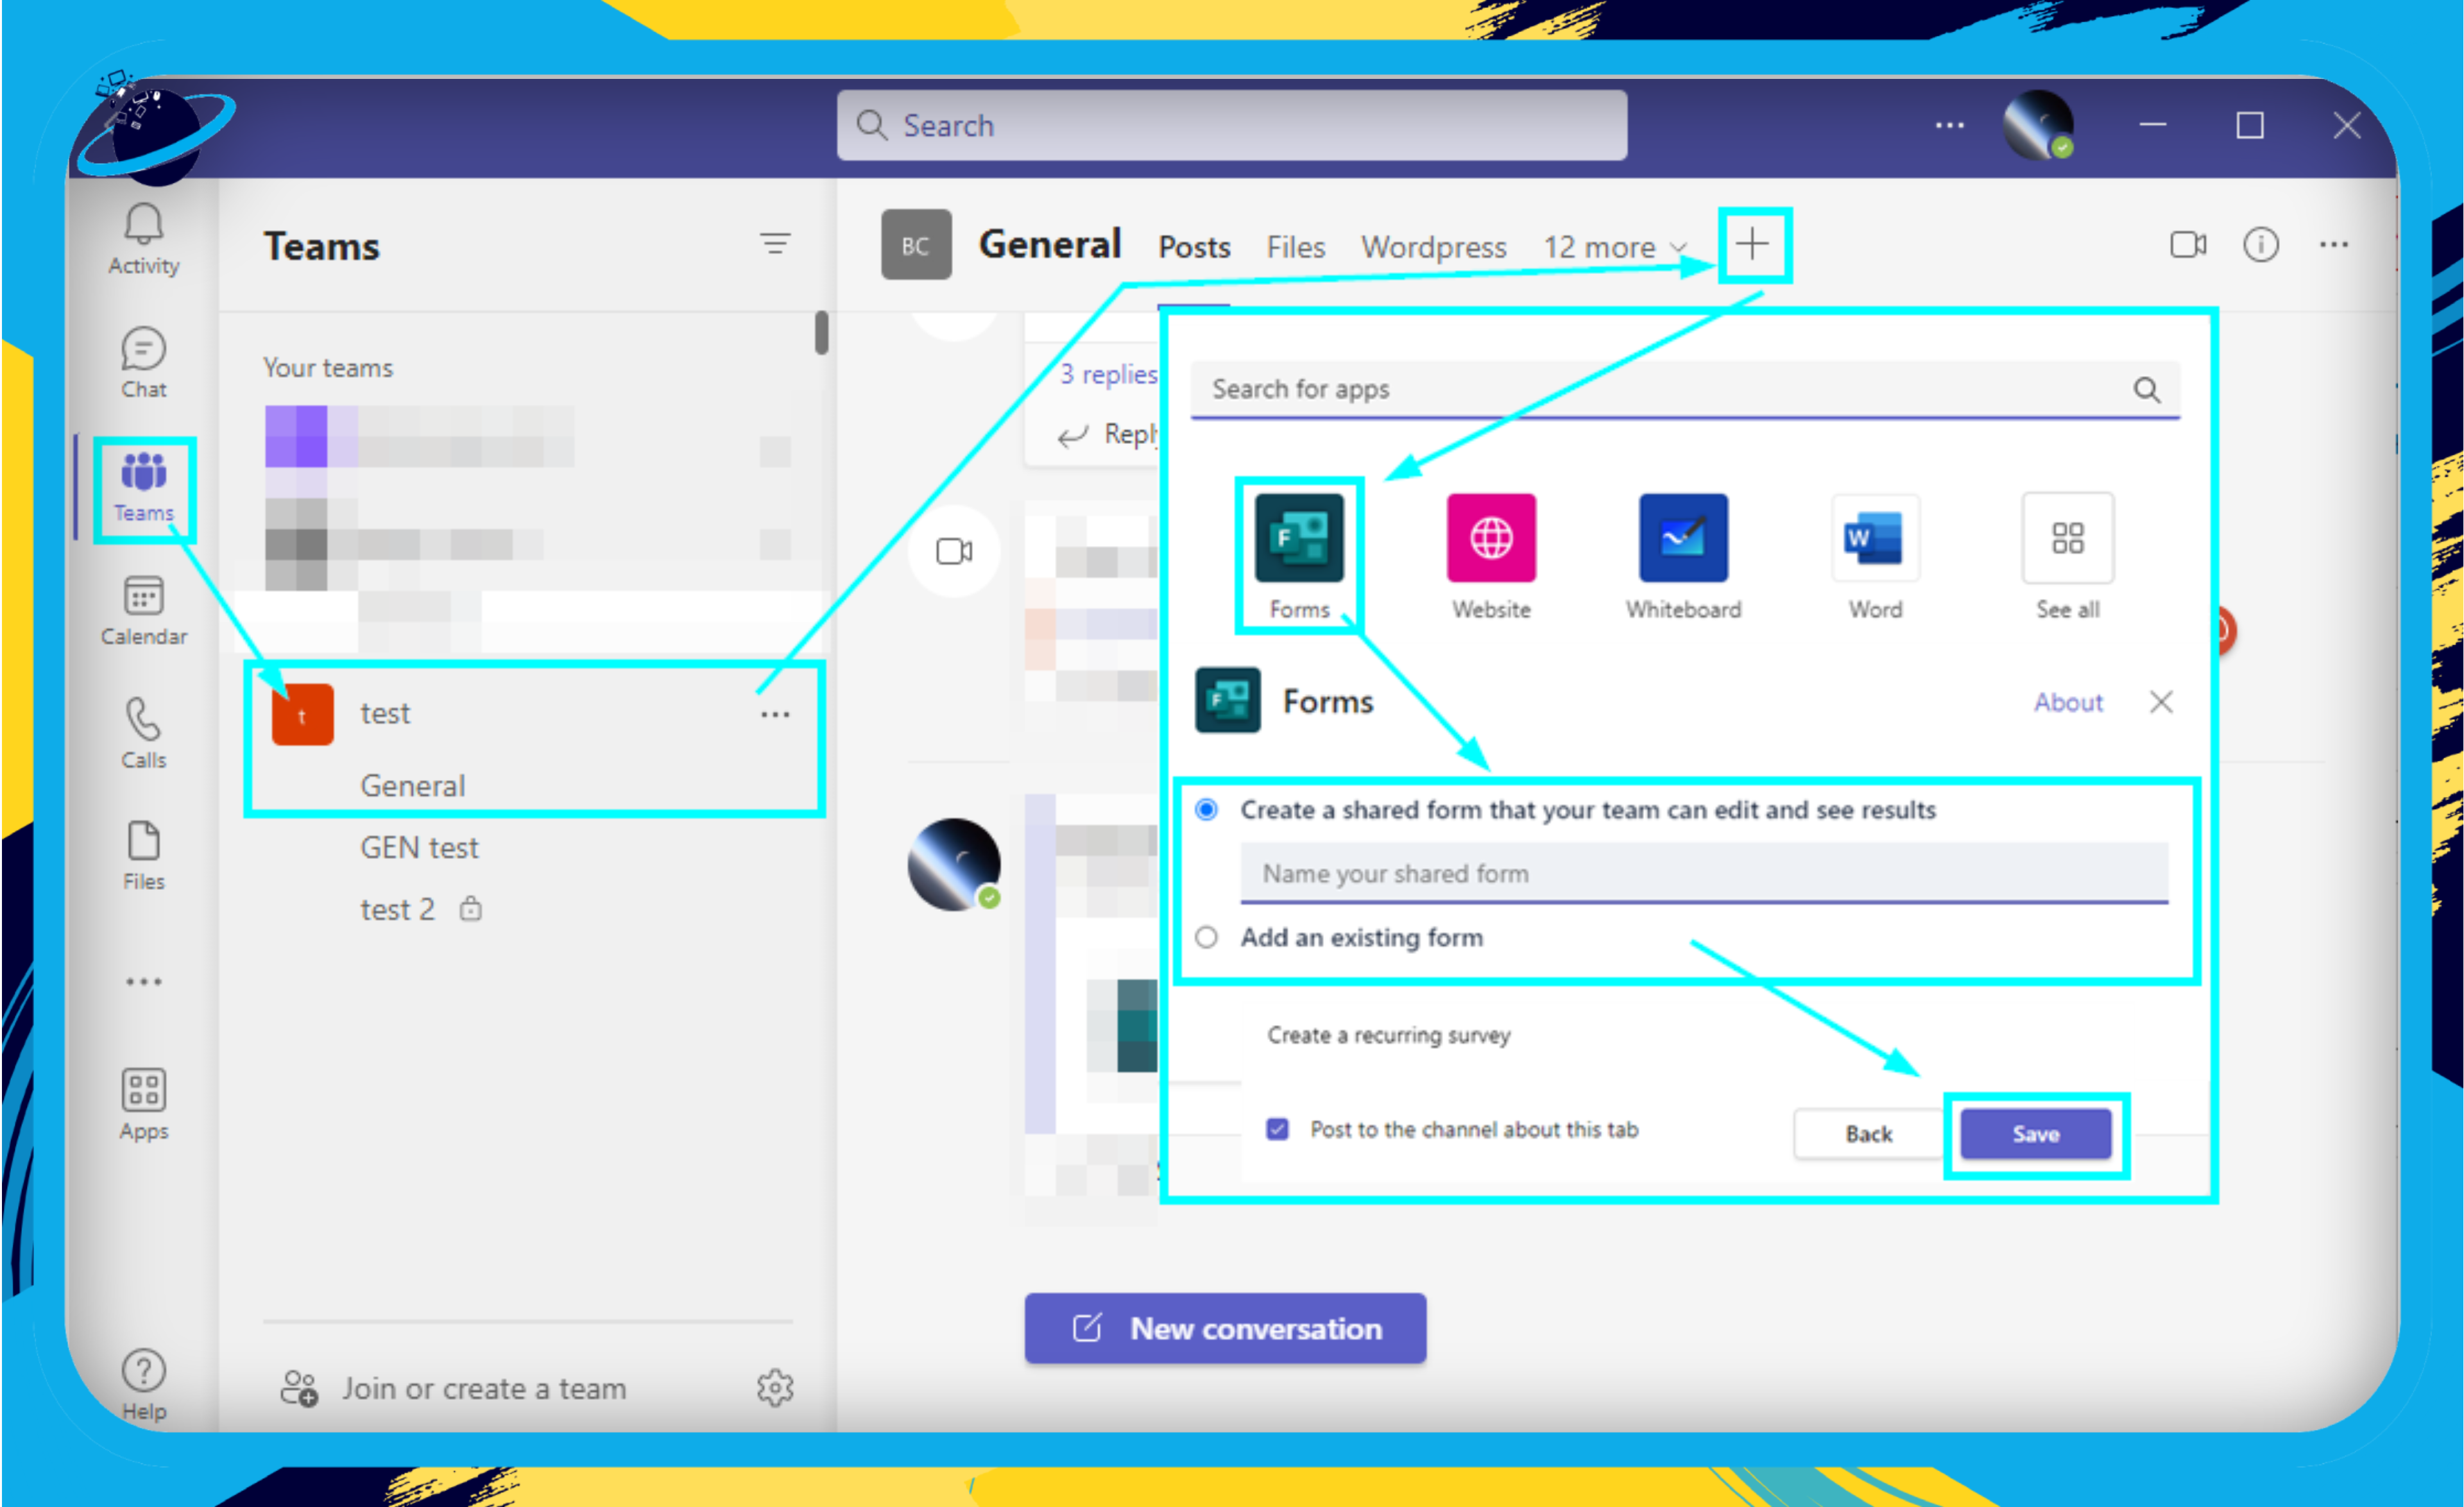
- Add a Tab:
- At the top of the channel, you’ll notice a set of tabs like “Posts”, “Files”, etc.
- Click on the “+” icon located to the right of the existing tabs. This will open the “Add a tab” page.
- Select a Service or Tool:
- You’ll be presented with a variety of apps, tools, or services that you can add as a tab. This might include options like Microsoft Planner, Excel, PowerPoint, or third-party apps and services.
- Click on the tool or service you’d like to add.
- Configure Your Tab:
- Depending on the tool or service selected, you might have to configure certain settings, provide permissions, or point to a specific document or URL.
- Follow the prompts and fill in the required information.
- Name Your Tab:
- Before adding the tab, you’ll have an option to name or rename it. This can be helpful if you wish to customize it for the specific context of your channel or chat.
- Save and Pin (Optional):
- Once you’ve configured the tab to your liking, click the “Save” or “Add” button. Your tab will now appear at the top of your channel.
- Optionally, if you wish to pin the tab for easy access, right-click on the tab and select “Pin.”
And there you have it! By following these steps, you can effectively set up tabs in Microsoft Teams to streamline your workflow and ensure that essential tools and services are always within reach.
Task Management: Keeping You on Track
- Integrated Planner: Set tasks, deadlines, and reminders to ensure timely resolution of customer issues.
- Status Updates: Monitor the progress of tasks, ensuring accountability and efficiency.
Follow these steps to set up planner in Teams:
- Access Microsoft Teams: Start by opening the Microsoft Teams application on your computer or via a web browser.
- Choose a Team and Channel:
- Navigate to the left sidebar and select the team where you want to add Planner.
- Choose the specific channel where you’d like the Planner tab to appear.
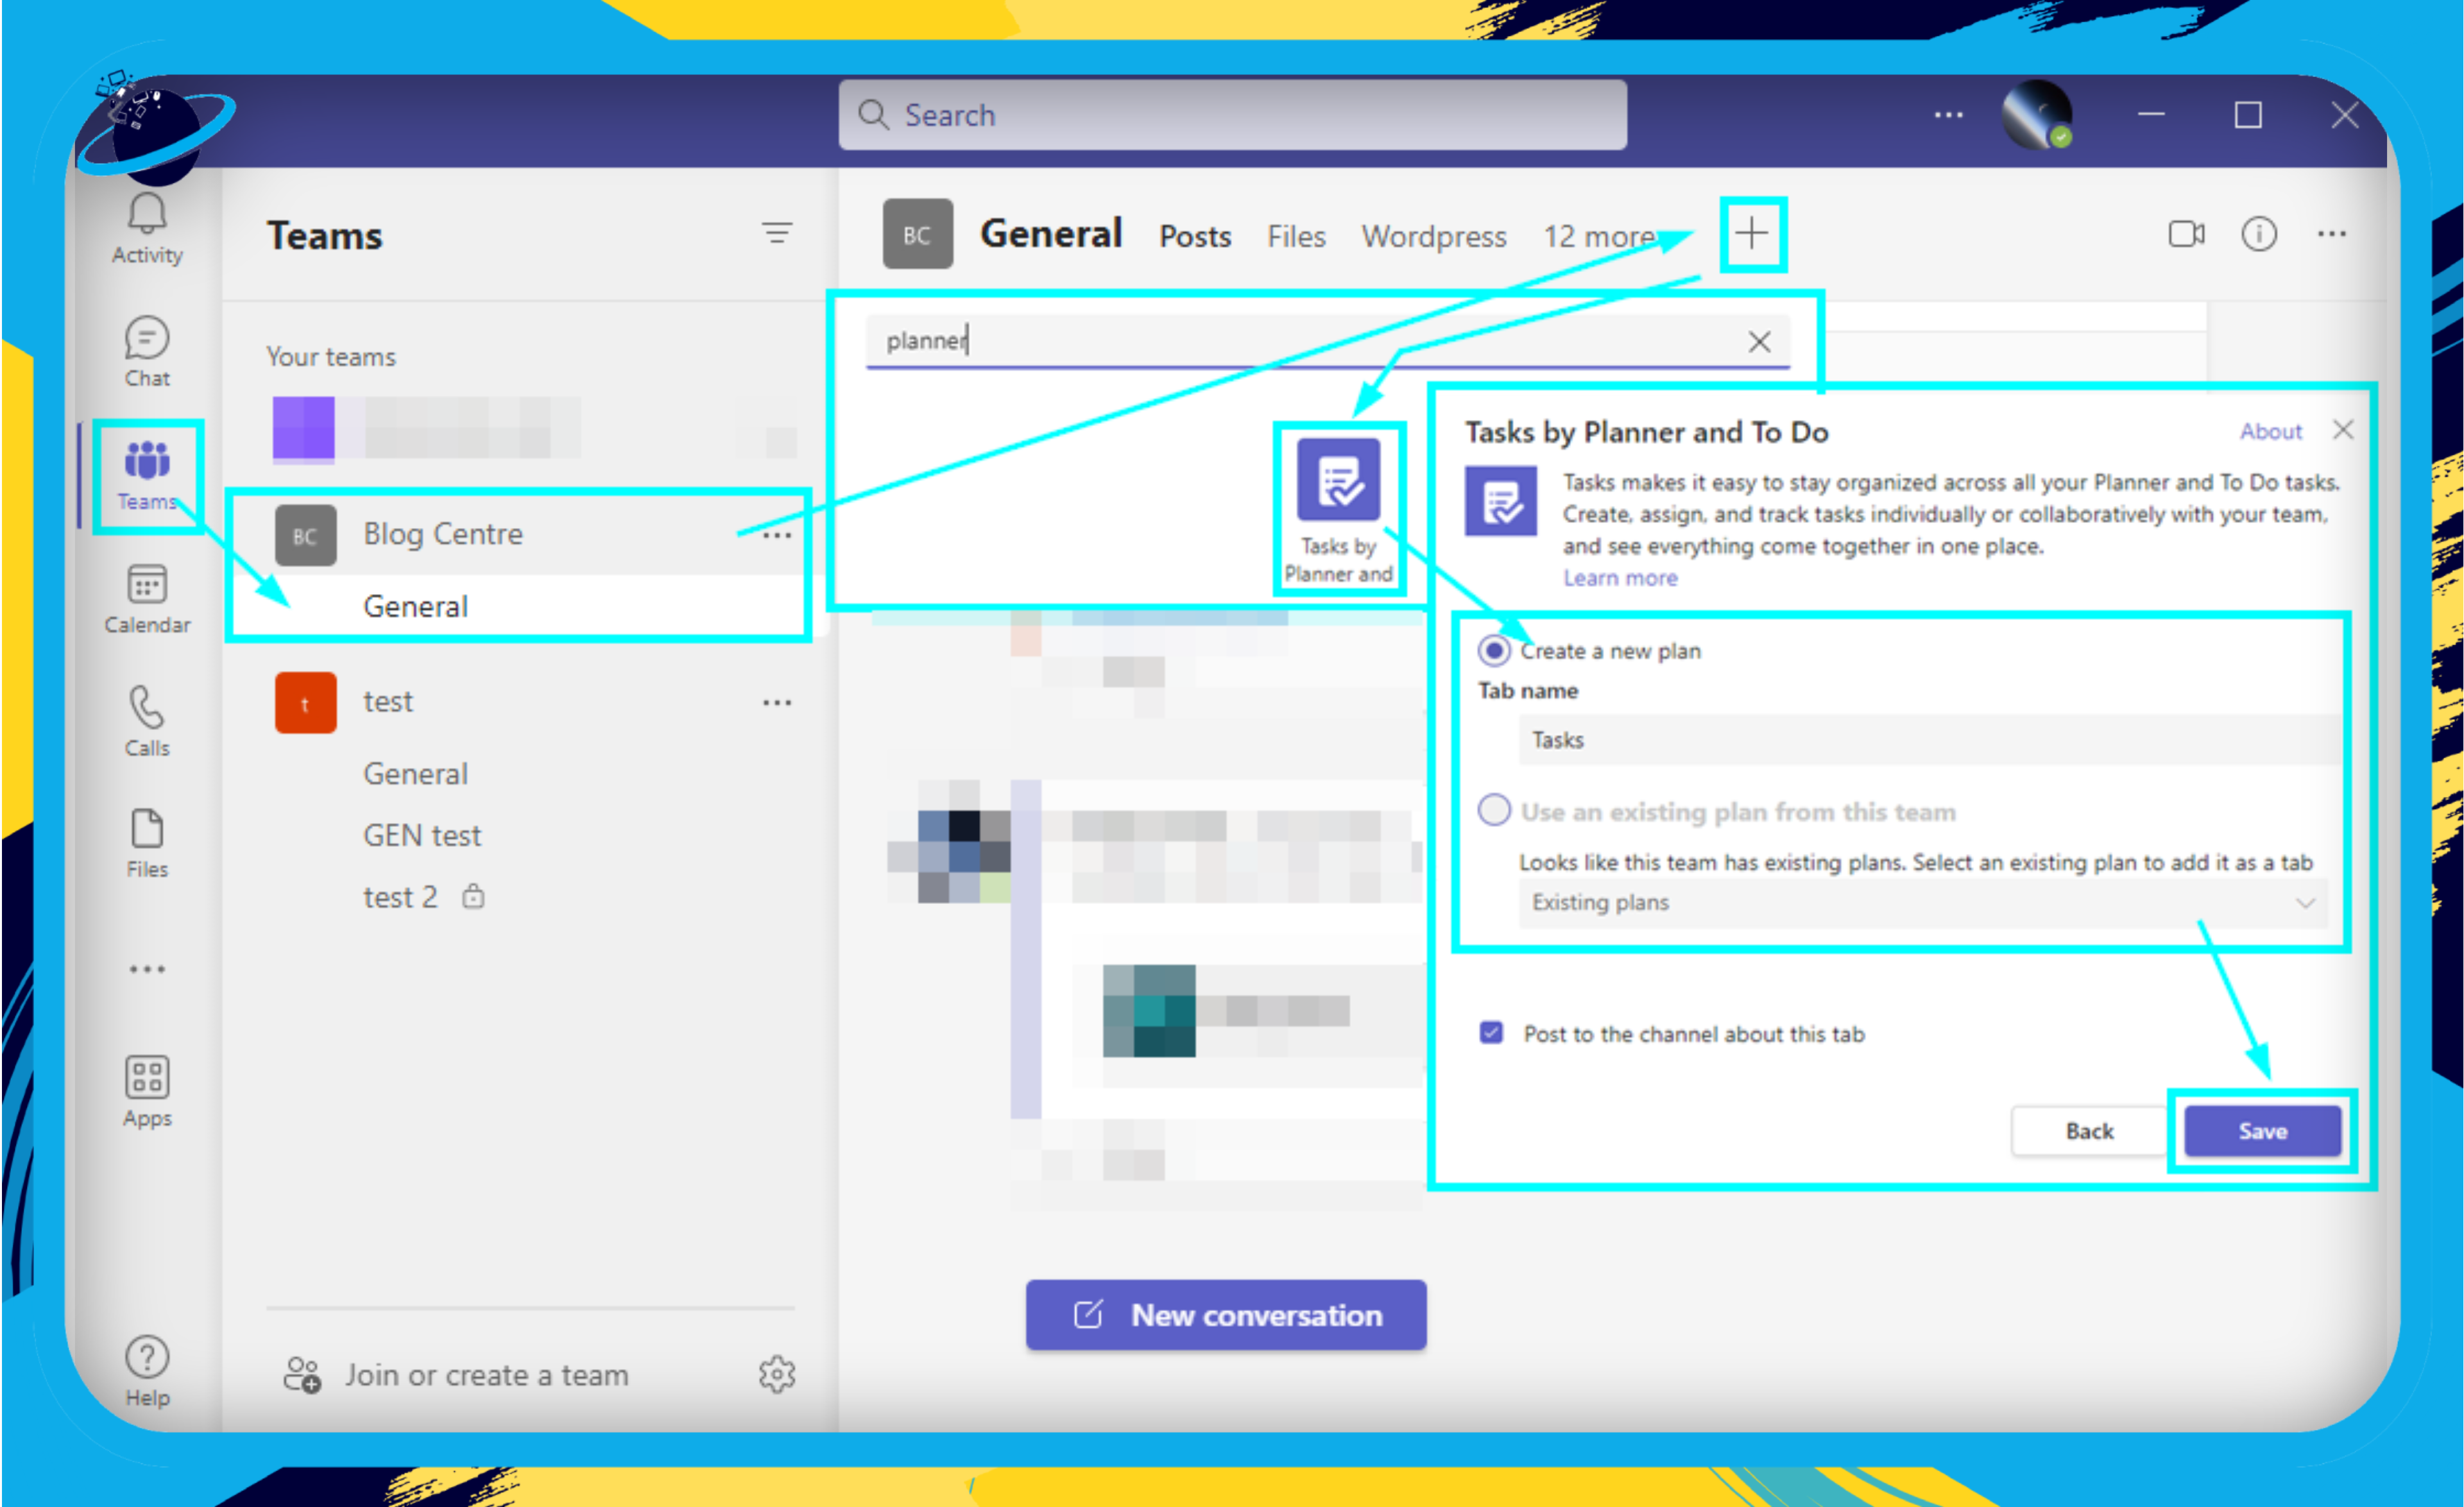
- Add a New Tab:
- At the top of the channel conversation, you’ll notice a set of tabs (like Posts, Files, etc.).
- Click on the “+” icon to add a new tab.
- Select “Planner“:
- From the list of available apps, find and select “Planner.”
- If it’s not visible right away, you can use the search bar to find it.
- Configuration:
- You will be given an option to either create a new plan or select an existing one.
- Provide a name for your plan if creating a new one. This name will be visible as the tab’s title.
- If you choose an existing plan, simply select it from the drop-down list.
- Review Settings and Permissions:
- Decide if you’d like to post to the channel about this tab. Posting can notify team members about the new Planner tab.
- Ensure you understand the permissions. By default, all members of the team will have access to the Planner tab.
- Click “Save“: Once you’ve made your selections, click the “Save” button.
Remember, while the Planner app in Teams offers convenience, you might occasionally want to access the full Planner app for more extensive features and functionalities.
As we journey deeper into the digital era, tools like Microsoft Teams evolve to serve our growing needs. Harnessing these features not only elevates customer service but also fosters a culture of innovation and efficiency. So, are you ready to let Teams transform your customer service game? Onward we go!
Benefits of Using Teams for Customer Service
In a world where remote work and virtual interactions are quickly becoming the norm, harnessing the right tools can spell the difference between average and outstanding customer service. Microsoft Teams, known to many as a hub for team collaboration, is emerging as a superhero in the realm of customer care. Here’s why:
Unified Platform
- One-stop-shop for all communication needs: Gone are the days of juggling between multiple tools. With Teams, you can chat, video call, share files, and even conduct webinars, all from one place.
- Consistency: With everything under one roof, your team can offer a seamless service experience to customers, ensuring they know exactly what to expect every time.
Integration Capabilities
- Sync with Office Suite: The seamless blending of Teams with tools like Word, Excel, and PowerPoint means your reports, presentations, and documents are always at your fingertips.
- Third-party integrations: Connect your CRM, ticketing software, and other essential tools directly with Teams, making data retrieval and sharing a breeze.
Security
- Top-tier Protection: Microsoft Teams boasts some of the industry’s best security features, ensuring your customer data remains confidential and protected.
- Custom Permissions: Tailor who sees what, ensuring sensitive customer information is only accessible to those who truly need it.
Flexibility & Scalability
- Grow at Your Own Pace: Whether you’re a bustling enterprise or a boutique business, Teams molds itself to fit your needs.
- Platform Versatility: Access Teams via desktop, mobile, or web, ensuring you can connect with your customers no matter where you are.
In Conclusion: Microsoft Teams isn’t just another tool in your digital arsenal—it’s a powerful ally in revolutionizing how you interact with and serve your customers. From small businesses to corporate giants, embracing Teams can elevate the remote customer service game for everyone.
Best Practices for Utilizing Microsoft Teams in Customer Service
Navigating the multifaceted landscape of Microsoft Teams for customer service can seem a bit daunting. But fear not! By following a handful of best practices, you can ensure your team maximizes the benefits of this platform while fostering meaningful connections with your customers. Let’s dive right in!
Training is Key
- Onboarding Sessions: Before setting sail, make sure every team member is equipped with the basic knowledge of Teams. Host a series of onboarding sessions to familiarize them with the platform’s functionalities.
- Continuous Learning: Microsoft Teams is ever-evolving. Regular training sessions will help your team stay updated with the latest features and best ways to leverage them.
Managing Notifications Like a Pro
- Set Clear Guidelines: Establish and communicate guidelines on notification settings. This ensures that important customer communications don’t get lost in the noise.
- Do Not Disturb: Teach your team to use the “Do Not Disturb” mode during critical customer interactions, ensuring that they remain focused and present.
The Art of Digital Etiquette
- Professional Appearance: In video calls, a neat and clutter-free background can leave a lasting impression. Encourage team members to either use professional backgrounds or blur their surroundings.
- Mute Etiquette: Ensure your team knows the importance of muting when not speaking, especially in larger meetings. This prevents unwanted background noise and distractions.
Establishing a Feedback Loop
- Collect Feedback: Regularly gather feedback from both your team and your customers. This offers invaluable insights into potential areas of improvement.
- Iterate & Improve: Use this feedback as a roadmap. Implement changes, test their effectiveness, and always strive for excellence.
Embrace the Power of Integration
- CRM & More: Integrate Microsoft Teams with your CRM system, ticketing tools, and other essential platforms. This seamless integration ensures that every bit of customer information is at your fingertips.
In conclusion, mastering Microsoft Teams for customer service is a blend of training, effective communication, and continuously adapting to feedback. With these best practices under your belt, you’re well on your way to delivering top-tier remote customer service experiences. Happy collaborating!

Integrating Teams with Other Tools
In the vibrant world of digital business, one tool rarely stands alone. The true strength of any application often lies in how seamlessly it can weave into the broader fabric of an organization’s tech ecosystem. Microsoft Teams, with its robust integration capabilities, is no exception. Let’s explore how you can amplify your customer service by linking Teams with other tools.
CRM Systems
Customer Relationship Management (CRM) tools are the backbone of many businesses, providing a comprehensive view of customer interactions.
- Dynamics 365: As a Microsoft product, it’s no surprise that Dynamics 365 integrates effortlessly with Teams. By linking these two, you can:
- View customer records directly within a Teams chat.
- Update CRM entries in real-time during meetings.
- BoldDesk: Share CRM insights with team members with just a few clicks.
- Salesforce: With the Salesforce-Teams integration, keep your sales and customer service team in sync. You can:
- Get instant notifications in Teams for CRM updates.
- Collaborate on Salesforce records within Teams.
Ticketing Systems
A streamlined ticketing system can greatly enhance response times and customer satisfaction.
- Zendesk: When you connect Zendesk with Teams, your customer service reps can receive real-time ticket notifications.
- BoldDesk: Collaborate on ticket resolution without leaving the Teams environment.
- Provide quick feedback on ticket status.
- ServiceNow: Bridge the gap between IT support and customer service with this integration. It enables automated ticket creation from Teams conversations.
- Real-time status updates in both Teams and ServiceNow.
Knowledge Bases
A well-maintained knowledge base can empower customer service reps to provide consistent and accurate information.
- SharePoint: Given that SharePoint and Teams are both Microsoft products, their synergy is remarkable. Use this combo to:Access knowledge base articles directly in Teams.
- BoldDesk: Collaborate and edit documents in real-time.
- Ensure that your team always has the most up-to-date information.
Quick Tips for Successful Integration
- Plan Ahead: Identify which tools are vital for your customer service workflow before diving into integrations.
- Training: Make sure your team knows not just how to use Teams, but also how to make the most of integrated tools.
- Stay Updated: The digital world evolves rapidly. Keep an eye on new integration features or changes to maximize benefits.
The beauty of Microsoft Teams is not just in its standalone features, but in its ability to become a hub for all your customer service tools. By crafting a seamless environment, you not only boost efficiency but also enhance the overall customer experience.
Wrapping Up Our Journey with Microsoft Teams
Navigating the intricate pathways of remote customer service can indeed be a challenge. But as we’ve discovered, Microsoft Teams can be that trusty compass guiding businesses through uncharted territories.
Key Takeaways
- Microsoft Teams is not just a tool; it’s a solution. Adapt it to fit the unique customer service needs of your business, regardless of its size.
- Integrations matter. Seamless collaborations with CRM tools, ticketing systems, and knowledge bases can drastically enhance your customer service experience.
- Security is paramount. In an age where data breaches are all too common, Teams ensures customer information remains protected.
Moving Forward
As we propel into a future increasingly reliant on digital platforms, it’s comforting to know tools like Microsoft Teams are there to bridge the gaps. Consider this:
- Continuous Learning: As with all tech tools, Teams will evolve. Stay updated with its new features and updates to ensure you’re always offering the best to your customers.
- Feedback is Gold: Always keep an ear to the ground. Regular feedback from customers and staff can reveal hidden opportunities and areas for improvement.
Last Words
In the grand tapestry of business tools and solutions, Microsoft Teams shines brightly for those aiming to master the art of remote customer service. So, whether you’re just starting or looking to optimize your current setup, remember: success in customer service is just a ‘Team’ away!