Get ready to enhance your collaboration experience with Microsoft Teams virtual breakout rooms, a feature that allows you to split large meetings into smaller groups. This user-friendly guide will show you how to use breakout rooms and troubleshoot the common issues. Let’s get started!
 Table of content


Understanding Virtual Breakout Rooms
In the digital toolkit of a modern business, Microsoft Teams stands as a powerhouse, a hub of communication and collaboration. One of its features that has been making waves lately is the Virtual Breakout Rooms. But what are they exactly, and why should they matter to you and your business?
The Magic of Virtual Breakout Rooms
The Virtual Breakout Rooms in Microsoft Teams act like miniature meeting spaces within a larger meeting. They allow meeting hosts to split participants into smaller groups for more intimate, focused discussions or brainstorming sessions.
Here’s why they’ve become a game-changer in virtual collaboration:
- Enhanced Collaboration: It’s an ideal setting for brainstorming, where smaller groups can foster a more engaging and creative environment.
- Better Learning and Mentoring: In educational or training contexts, they facilitate group work, discussions, and presentations.
- Effective Meeting Management: They make it easier to manage large meetings by allowing simultaneous smaller sessions.
In the following sections, we’ll delve into the details of setting up and effectively utilizing these breakout rooms. We’ll also share some expert tips to help you maximize their potential, improving both the efficiency and the outcomes of your meetings.
Setting Up Breakout Rooms in Microsoft Teams
With a sprinkle of patience and a dash of curiosity, you can master the art of creating and managing breakout rooms in Microsoft Teams. We’ve laid out a simple step-by-step guide to get you started:
Starting a Breakout Room
- Open your Microsoft Teams meeting: Join your scheduled Teams meeting as you usually would.
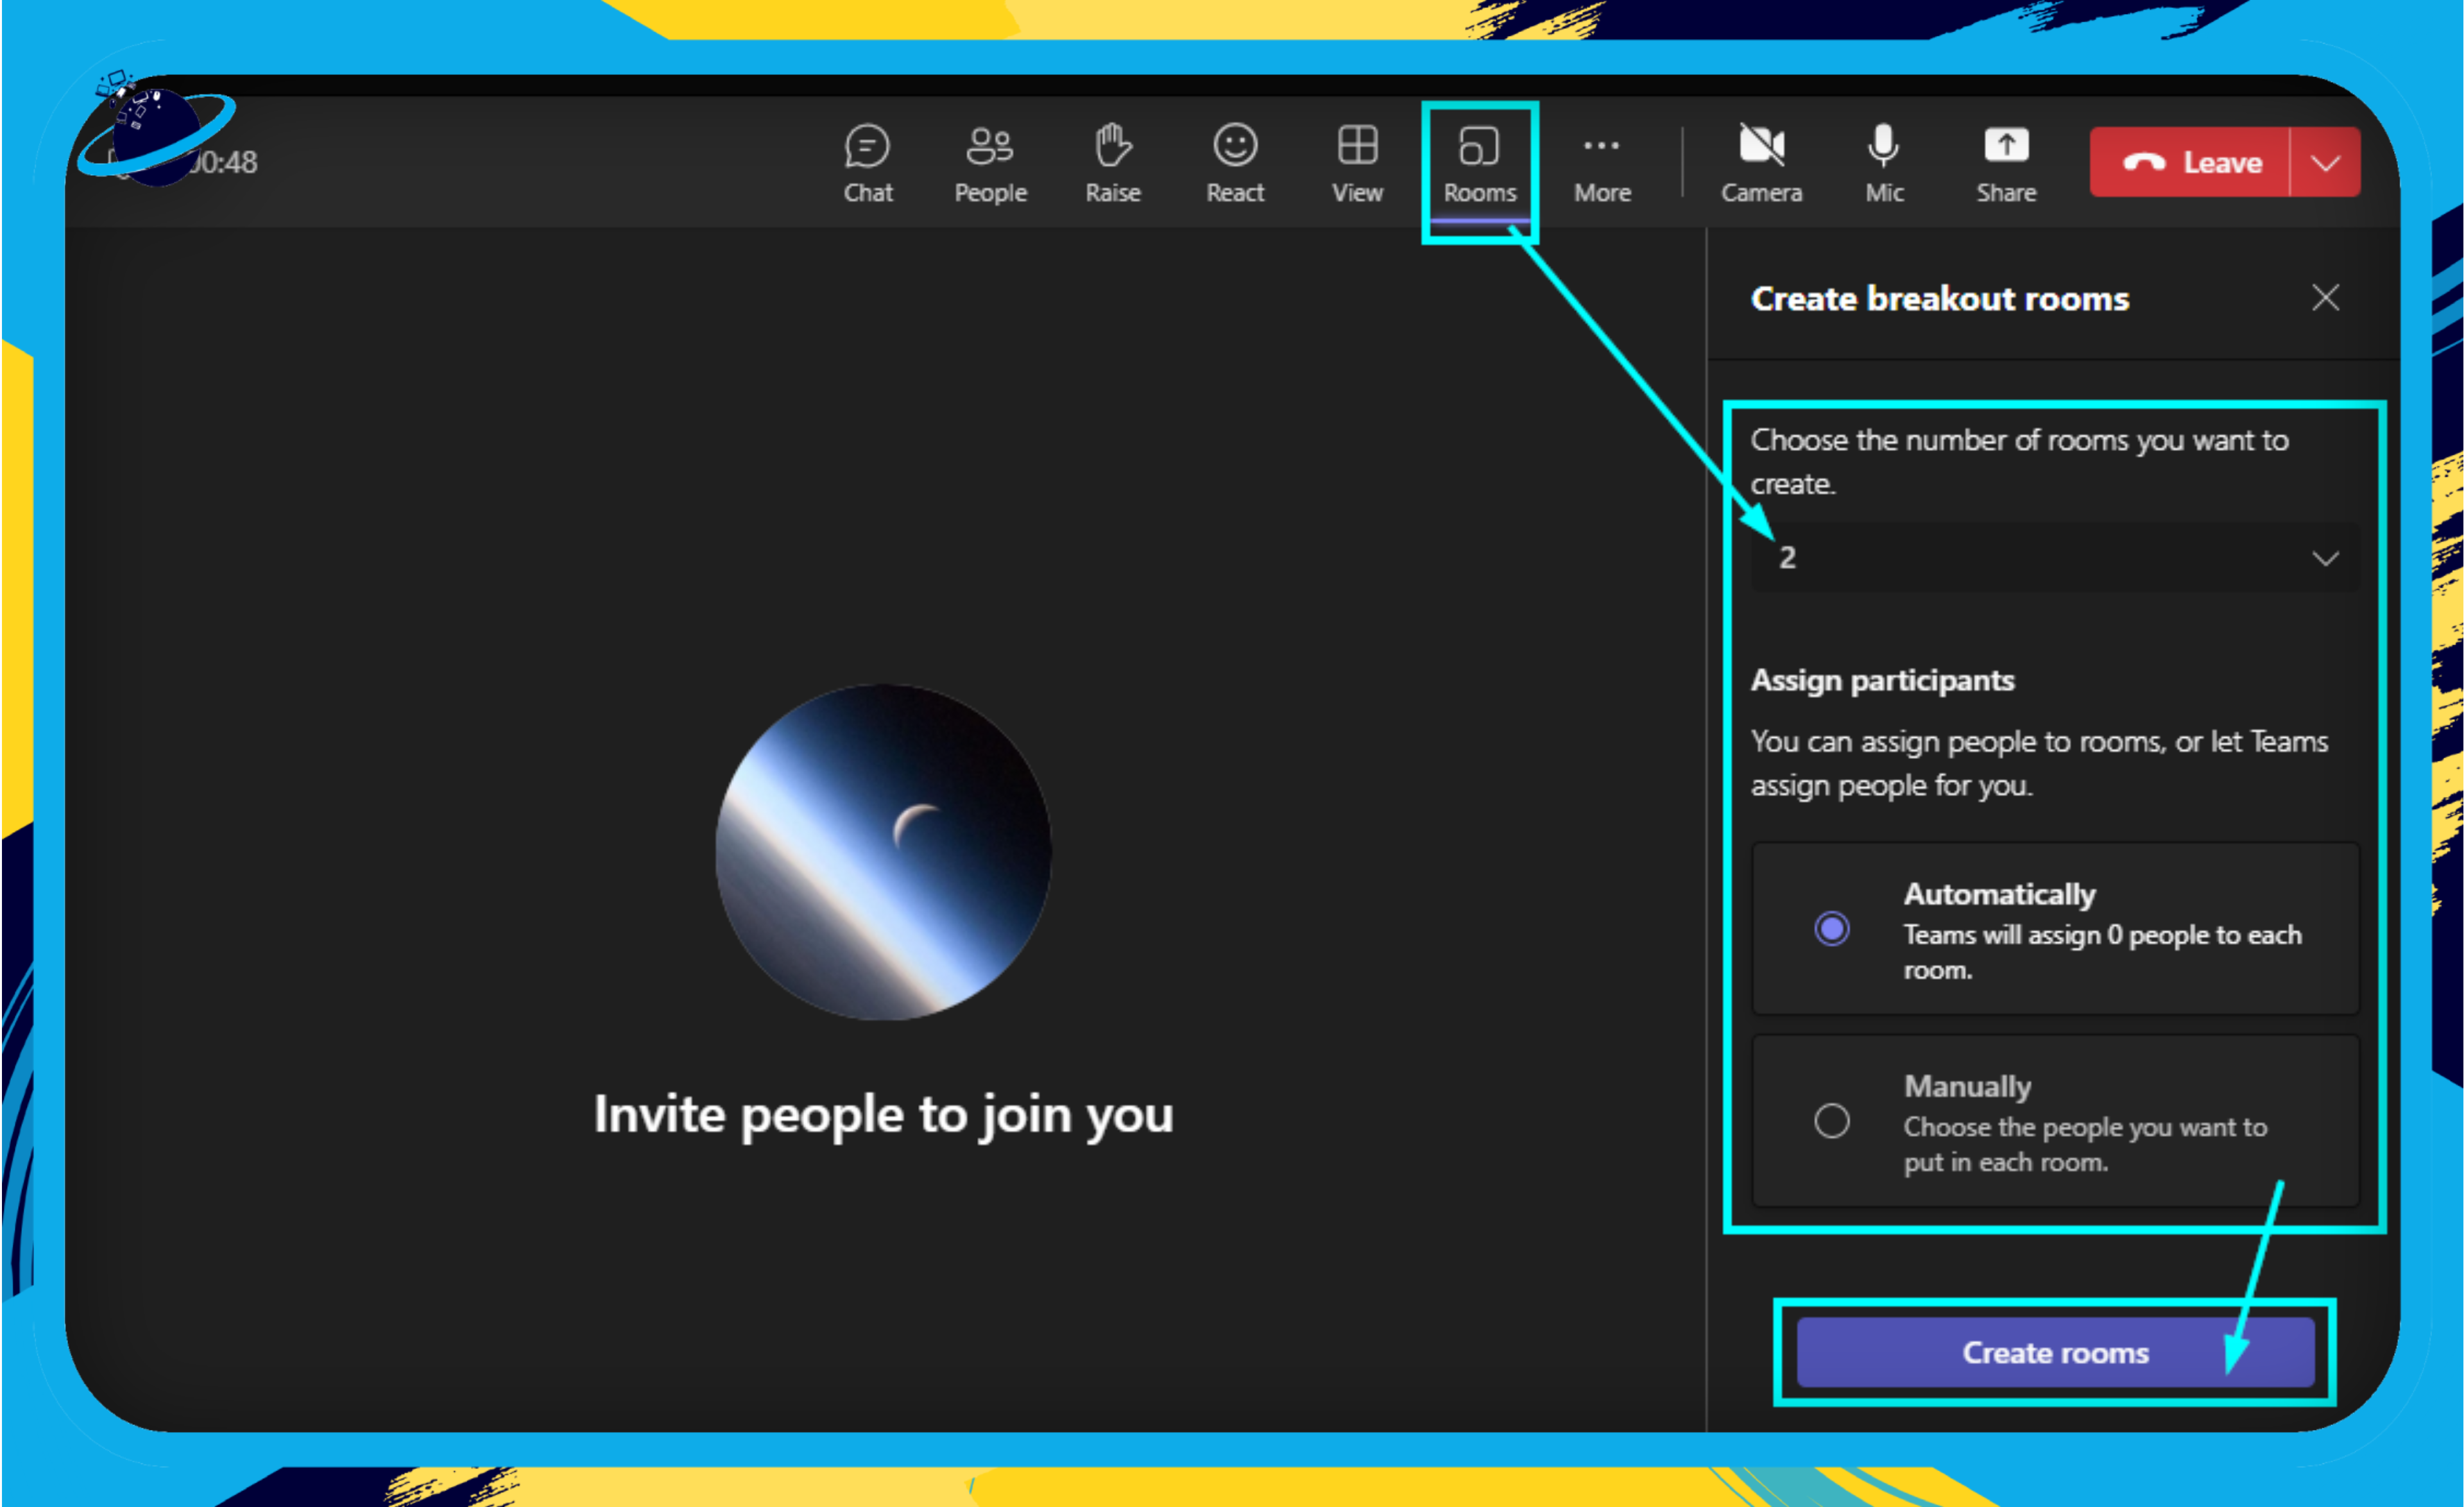
- Locate the breakout room panel: Once inside the meeting, you should see an icon for breakout rooms in your control panel. It looks like two small squares.
- Create the breakout rooms: Click the icon, and a sidebar will open. Here, you can specify the number of rooms you want to create. You can choose to let Teams automatically assign participants to rooms or manually assign them yourself.
![]() Read more: How to set up breakout rooms in advance in Teams
Read more: How to set up breakout rooms in advance in Teams
Assigning Participants to Rooms
- Automatic assignment: If you choose an automatic assignment, Teams will evenly distribute participants across the breakout rooms. The work is done for you!
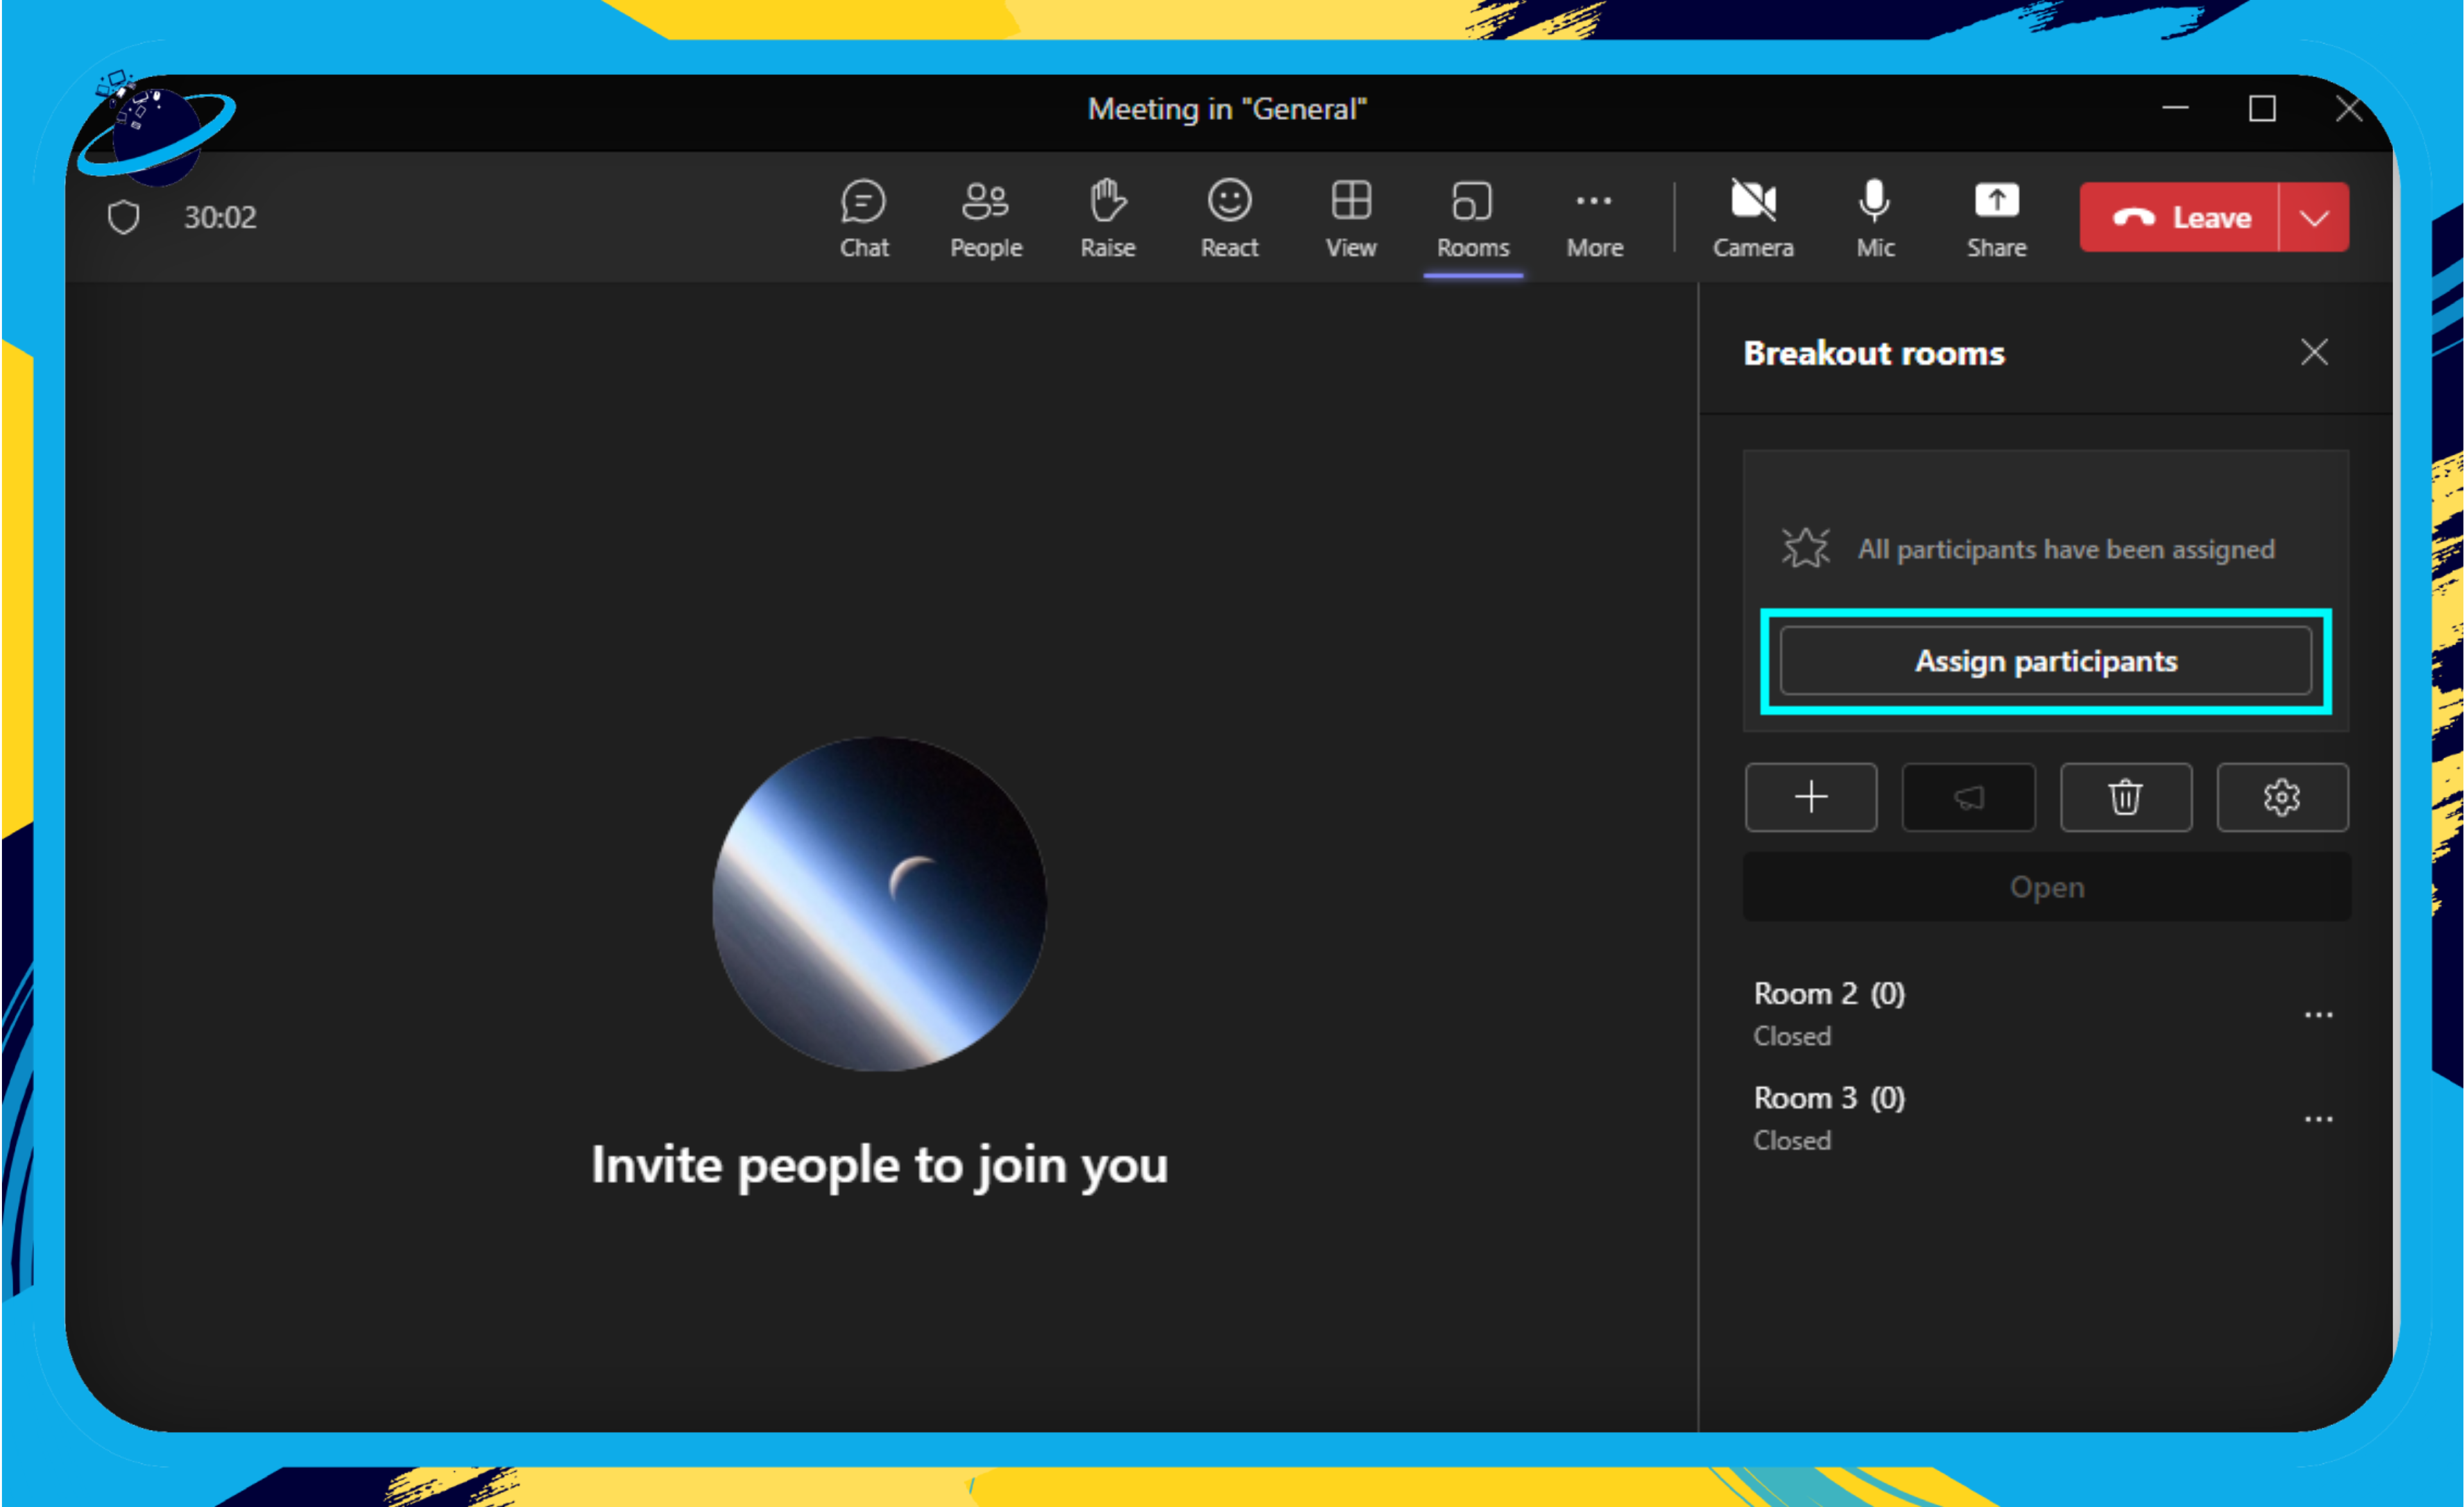
- Manual assignment: If you chose manual assignment, click on ‘Assign Participants.’ You will see a list of everyone in the meeting. Simply select the participants and assign them to your created rooms.
Starting the Breakout Sessions
Now that your rooms are all set up, and your participants are assigned, you’re ready to ‘Start Rooms.’ This will open all the breakout rooms simultaneously, and assigned participants will be moved into their respective rooms.
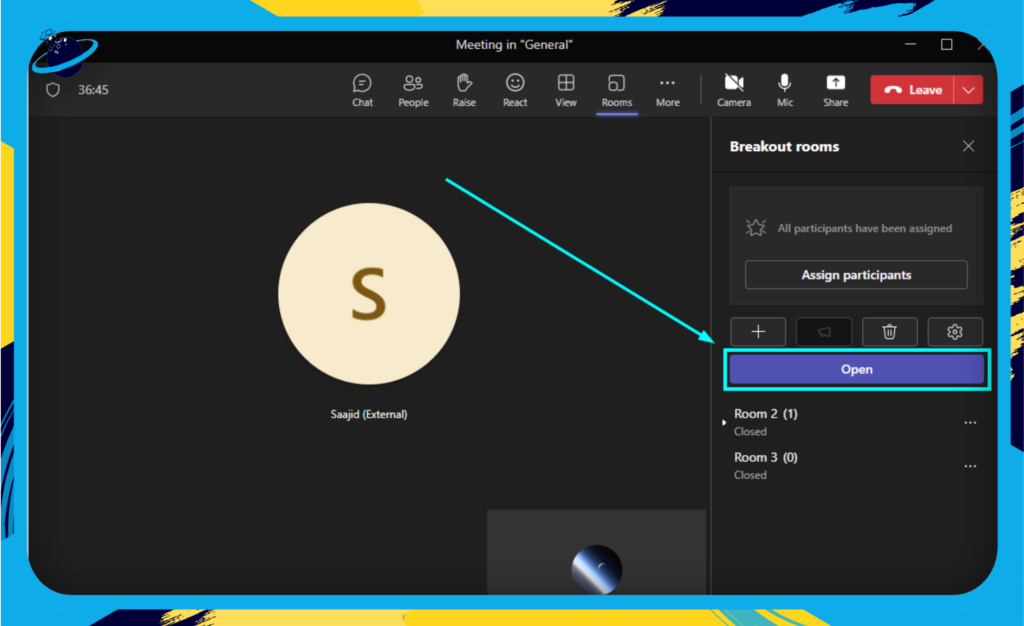
It’s important to note that as the meeting organizer, you have the freedom to hop between rooms, ensuring discussions are on track or assisting as needed.
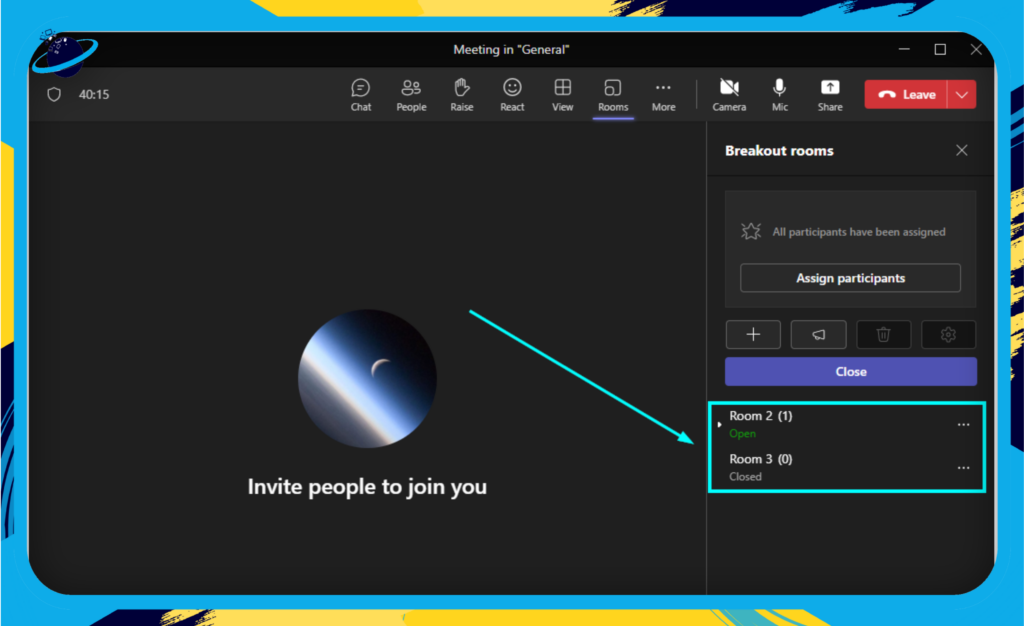
Closing the Breakout Rooms
When your breakout sessions have served their purpose, it’s time to wrap up. Simply go back to the breakout room panel and select ‘Close Rooms.’ This will bring everyone back to the main meeting.

There you have it! With this knowledge, you’re well-equipped to facilitate engaging and productive breakout sessions. Keep in mind that, like anything new, mastering this feature may take a little practice. But don’t worry, the more you use it, the more confident you’ll become. Happy teaming!
Use Cases for Breakout Rooms
In the bustling hive of business activities, virtual breakout rooms serve as the perfect smaller huddle zones, enabling you to carry out a variety of tasks more efficiently. Let’s take a look at a few scenarios where they prove particularly useful:
Brainstorming Sessions
When you need to drum up creative ideas, smaller groups often yield the best results. Instead of having everyone shout out ideas in a large meeting, breakout rooms allow participants to brainstorm in smaller groups, encouraging everyone to contribute. The facilitator can then visit each room, ensuring the discussion stays on track and recording the ideas.
Project Team Meetings
Have a large project with multiple sub-teams working on different aspects? With breakout rooms, each sub-team can have its own private discussion. You can also switch members between rooms to facilitate cross-pollination of ideas.
Training Sessions
In a training session with a mix of beginners and advanced participants? Breakout rooms let you group participants based on their skill level. This way, everyone gets the level of instruction they need without holding back or overwhelming others.
Team Building Exercises
Virtual team building can be a challenge, but breakout rooms make it easier. You can use the rooms for various team-building activities, such as problem-solving tasks, role-playing exercises, or simply casual breakout sessions for teammates to connect on a personal level.
Customer Focus Groups
Holding a virtual product demo or a customer feedback session? Breakout rooms are perfect for conducting parallel focus group discussions, giving every customer a chance to voice their opinions.
Multi-Departmental Meetings
In meetings that involve multiple departments, breakout rooms can be used to discuss department-specific strategies or issues and then reconvene to share with the larger group.
Microsoft Teams’ Virtual Breakout Rooms provide you the ability to tailor your virtual interactions to meet specific business needs, boosting productivity and fostering deeper connections. Remember, the key to success lies in planning the breakout session well and setting clear expectations for all participants.
Best Practices for Using Microsoft Teams’ Virtual Breakout Rooms
Microsoft Teams’ breakout rooms offer a fantastic way to foster dynamic and collaborative exchanges in smaller groups. But like any tool, they’re most effective when used thoughtfully. Here are some best practices to help ensure your breakout room sessions are fruitful and engaging.
Clear Instructions
Before diving into a breakout session, make sure all participants understand the purpose and desired outcome. This could involve:
- Defining the topic or task for each group.
- Establishing a time limit for discussions.
- Deciding on how the groups will share their findings or conclusions once back in the main meeting.
Assigning a Group Leader
Appointing a group leader or facilitator for each breakout room can be helpful. This person can keep the conversation on track, ensure everyone has a chance to speak, and manage time effectively. This role can rotate if you’re conducting multiple sessions.
Use of Collaboration Tools
Leverage the array of collaboration tools available within each breakout room:
- Use the chat function to share links or important points.
- The whiteboard feature is excellent for brainstorming sessions.
- The share screen option allows users to present information visually.
- Use the record feature (with participants’ consent) to revisit discussions later.
Regular Check-Ins
As the meeting organizer, you can jump into different breakout rooms to see how things are progressing. Regular check-ins can help solve any issues in real time and ensure the session is on track. You can also use the “Make an announcement” feature to broadcast messages to all breakout rooms simultaneously.
Follow-Up
Once the breakout room sessions end, it’s a good idea to have a debriefing session in the main meeting. This allows each group to share their discussions and conclusions. This can be done verbally or by sharing any documents or whiteboards created during the session.
These practices are just a starting point. Remember, the beauty of Microsoft Teams’ breakout rooms lies in their flexibility. Don’t hesitate to adapt and experiment to find what works best for your team. After all, each team is unique, and so is the way it collaborates!
Moderation and Control
Navigating a multitude of virtual spaces may seem daunting but with Microsoft Teams’ Virtual Breakout Rooms, maintaining control and ensuring smooth communication is a breeze.
Steering the Ship
As a meeting organizer, you have the power to guide the conversation, drop into breakout rooms, and bring everyone back to the main meeting as needed.
Room Hopping
Feel free to pop into different rooms just as you would in a physical setting. This ability to join and leave different breakout rooms allows you to participate in ongoing discussions, provide inputs, or help solve issues. You can:
- Join any breakout room from the breakout room panel.
- Leave the room without ending the breakout session.
Making Announcements
Do we need to share an update or direction with all rooms? No problem! The ‘Make an announcement’ feature enables you to send a message to all breakout rooms simultaneously. Here’s how:
- Open the breakout room panel.
- Select ‘Make an announcement.’
- Enter your message and hit ‘Send.’
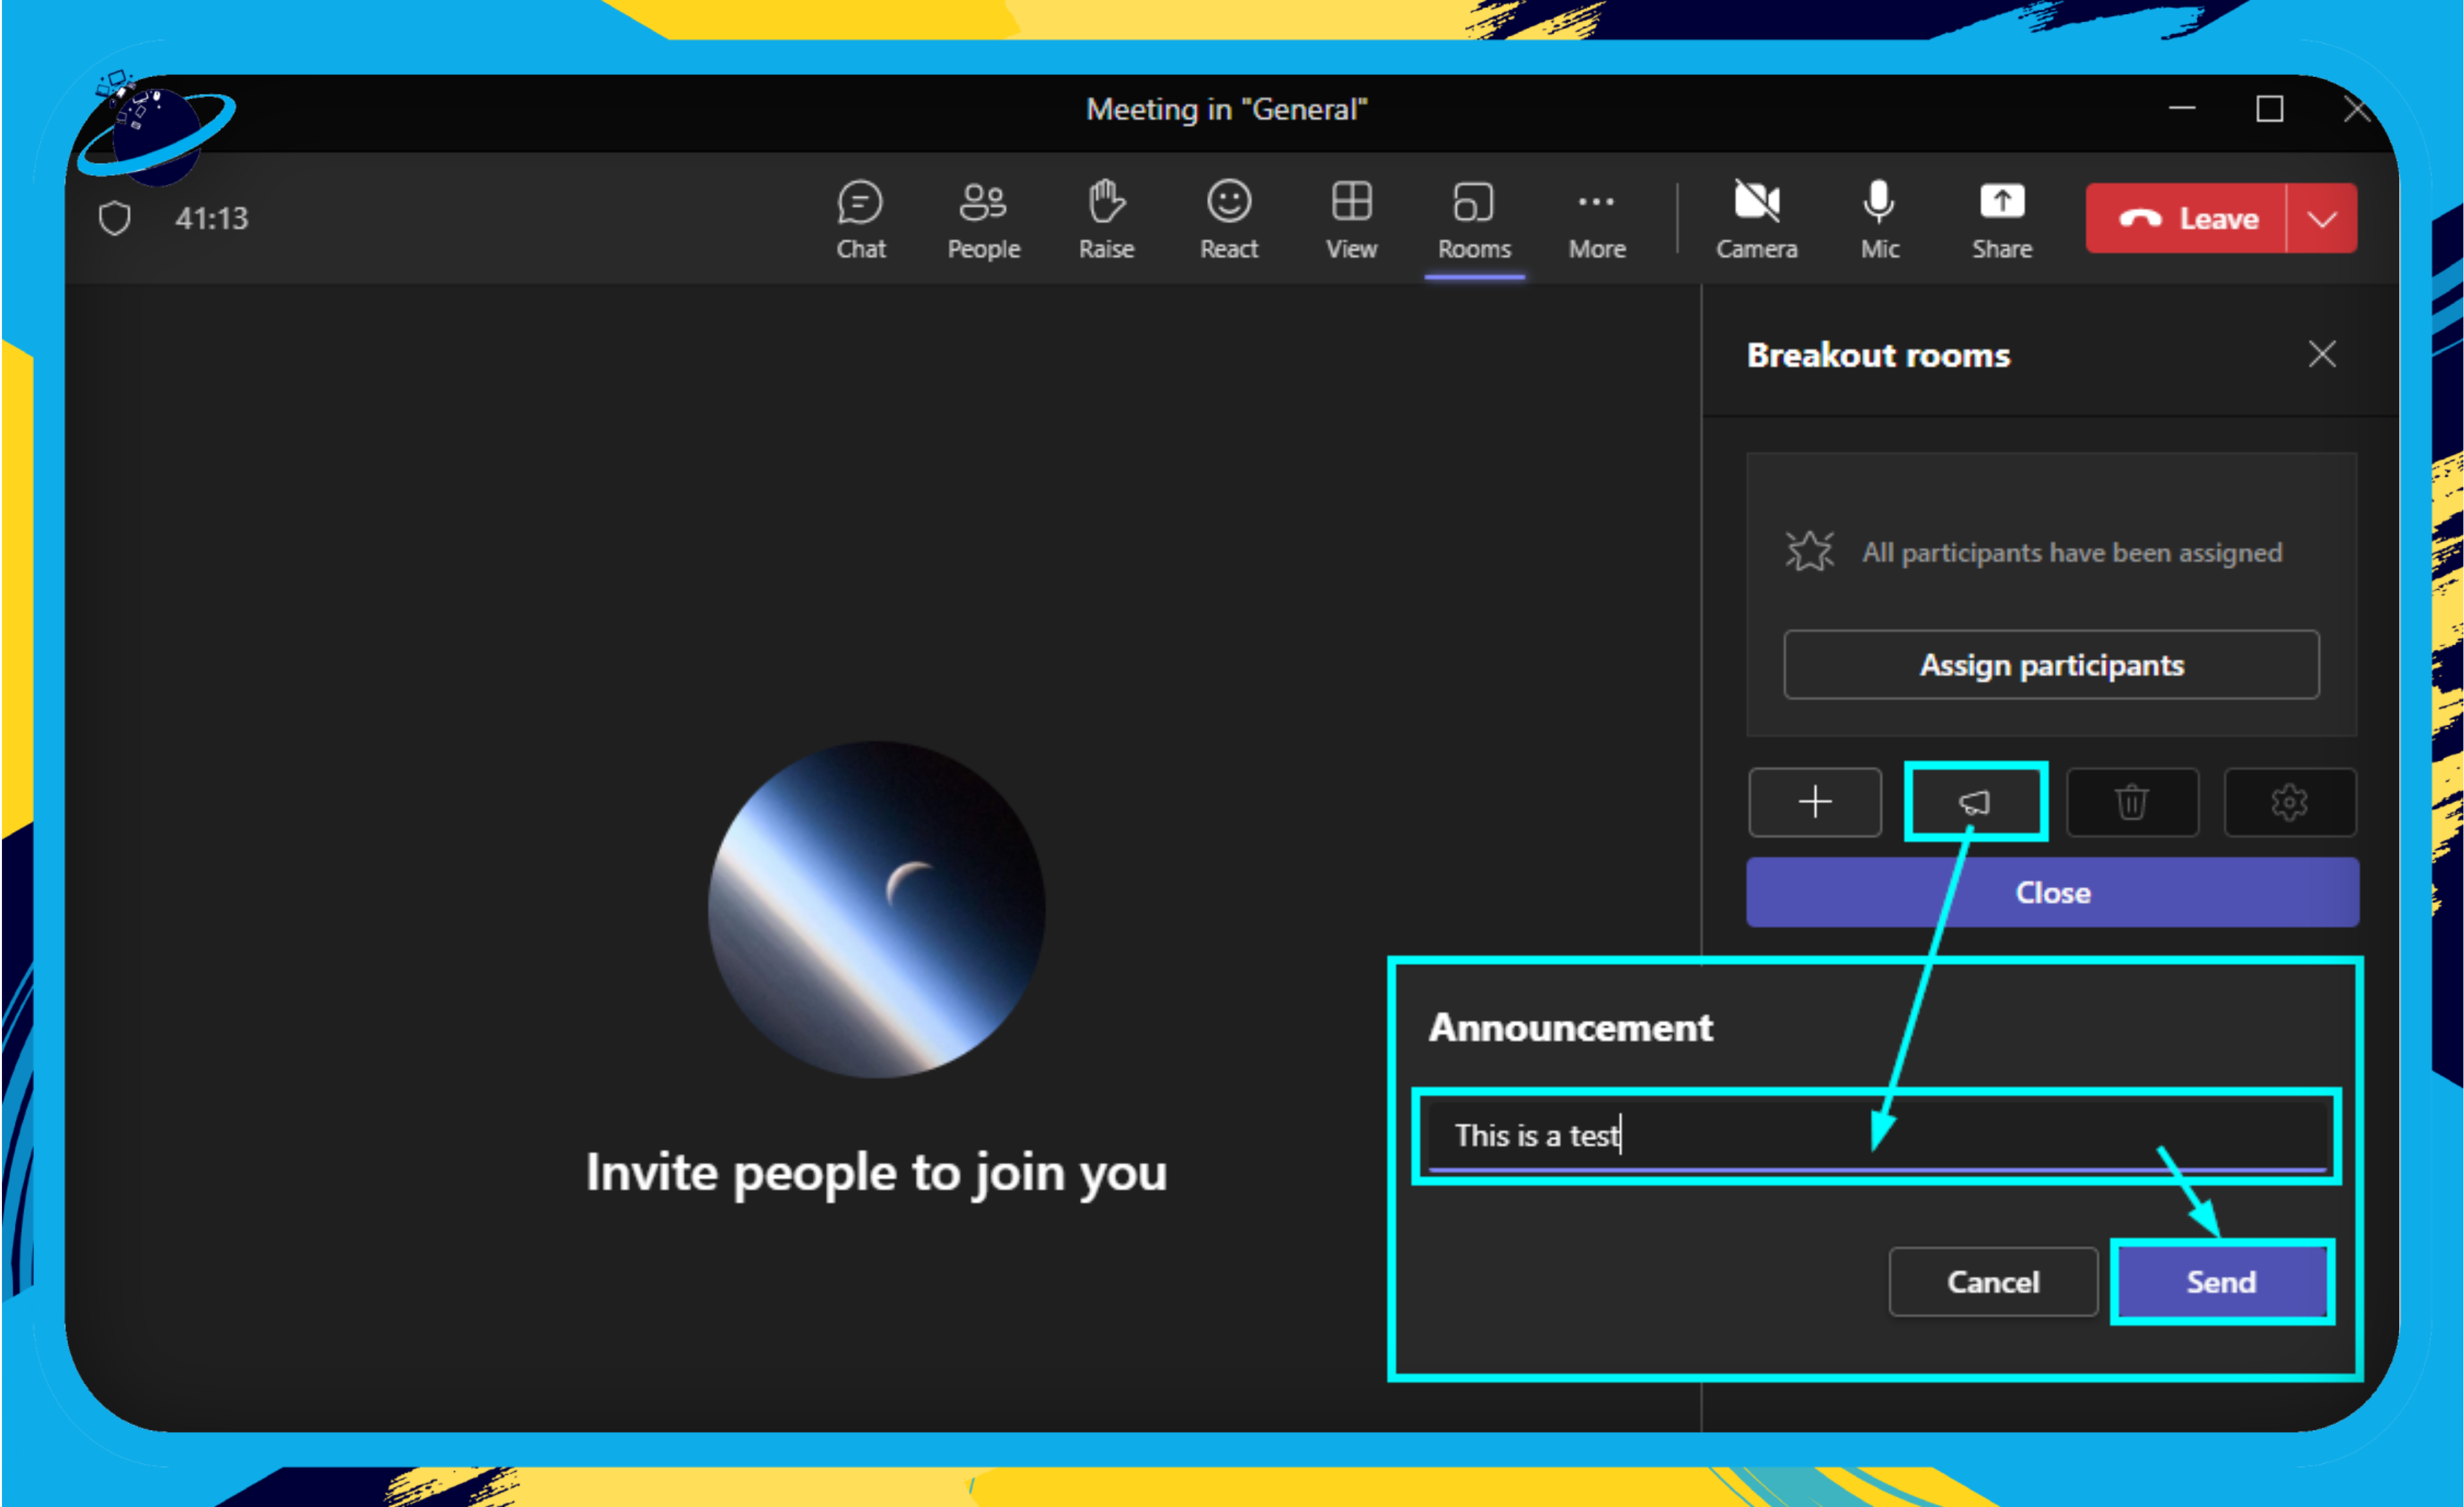
These messages appear as an announcement in each room, keeping everyone on the same page.
Wrapping Up
At the end of the breakout sessions, you can effortlessly pull everyone back to the main meeting.
Closing Breakout Rooms
When it’s time to regroup, simply:
- Open the breakout room panel.
- Click on ‘Close rooms.’
This ends all breakout sessions and moves participants back to the main meeting.
Automatic Room Closure
To keep things running on schedule, consider using the ‘Set a time limit’ feature when creating breakout rooms. This automatically closes the rooms after the set time, ensuring no group runs over time.
With Microsoft Teams’ Virtual Breakout Rooms, you have the steering wheel to direct your team’s discussions and collaborations. Up next, we will explore the host of collaboration tools available within breakout rooms, enabling you to enhance your team’s collaborative experience further. Stay tuned!
Collaboration Tools in Breakout Rooms
Microsoft Teams Virtual Breakout Rooms are more than just separate meeting spaces. They come equipped with a suite of collaboration tools that enhance the interactive experience, making your group discussions more engaging and productive. Here, we explore these key features:
Chat Function
One of the core features of breakout rooms is the Chat Function. This allows members within the same breakout room to communicate through text messages. It’s particularly useful for:
- Sharing quick thoughts or ideas
- Posting relevant links or resources
- Asking questions or clarifying points without interrupting the speaker
Keep in mind that the chat history in each breakout room is accessible only to the participants of that specific room and not to the meeting organizer unless they join the room.
Whiteboard
The Whiteboard feature in Microsoft Teams allows participants to collaborate visually, fostering creativity and brainstorming. Here’s how you can leverage it:
- Draw diagrams or charts to explain complex concepts
- Use sticky notes for brainstorming ideas
- Annotate over a shared screen for more clarity
The whiteboard is saved at the end of each session, allowing participants to refer back to it later.
File Sharing
File Sharing is another handy tool in Microsoft Teams breakout rooms. It lets participants share relevant documents, images, or other resources within their group. Keep in mind:
- Files shared in the chat are accessible to all members of the breakout room
- Files are stored in the meeting’s chat and can be accessed even after the session ends
Conclusion
The digital landscape of business communication is constantly shifting, presenting both new challenges and opportunities. Amidst this, Microsoft Teams’ Virtual Breakout Rooms have proven to be a boon, transforming the way we connect, collaborate, and create in the virtual world.
Unlocking the Full Potential
From setting up your breakout rooms to effectively managing them, we’ve explored the breadth of this feature together. Remember the following key points:
- Plan ahead: Knowing the number and purpose of your breakout rooms before the meeting can streamline the process.
- Utilize tools: Make full use of the collaborative tools in each room, like chat, whiteboard, and file sharing.
- Be flexible: Don’t shy away from shuffling participants between rooms or extending the time if required.
Embrace the Future of Collaboration
As we’ve learned, Microsoft Teams’ breakout rooms offer a range of possibilities for businesses:
- Engage in focused group discussions during larger meetings
- Foster deeper connections among employees through virtual team building
- Enhance knowledge-sharing and problem-solving within the team
Stepping Forward
Virtual meetings can be productive if you experiment with different approaches. Microsoft Teams offers Virtual Breakout Rooms to recreate in-person collaborations and promote a productive environment. Keep an eye out for new updates and features to enhance virtual meetings. Here’s to more engaging discussions in your future breakout sessions!