Microsoft Teams is a valuable tool for virtual collaboration. Whether you’re a new or seasoned user, our guide will help you unlock its full potential. From scheduling meetings to mastering screen-sharing and virtual meeting etiquette, we’ll be your guide. Our goal is to make your Teams experience smooth and effective so that every meeting is a triumph. Welcome aboard!
 Table of content


Creating and Scheduling Meetings
As any seasoned professional knows, getting everyone together at the same time can be quite a challenge. That’s where Microsoft Teams shines! With Teams, you can create a meeting on the fly or schedule one for later. This section will guide you through this process with ease.
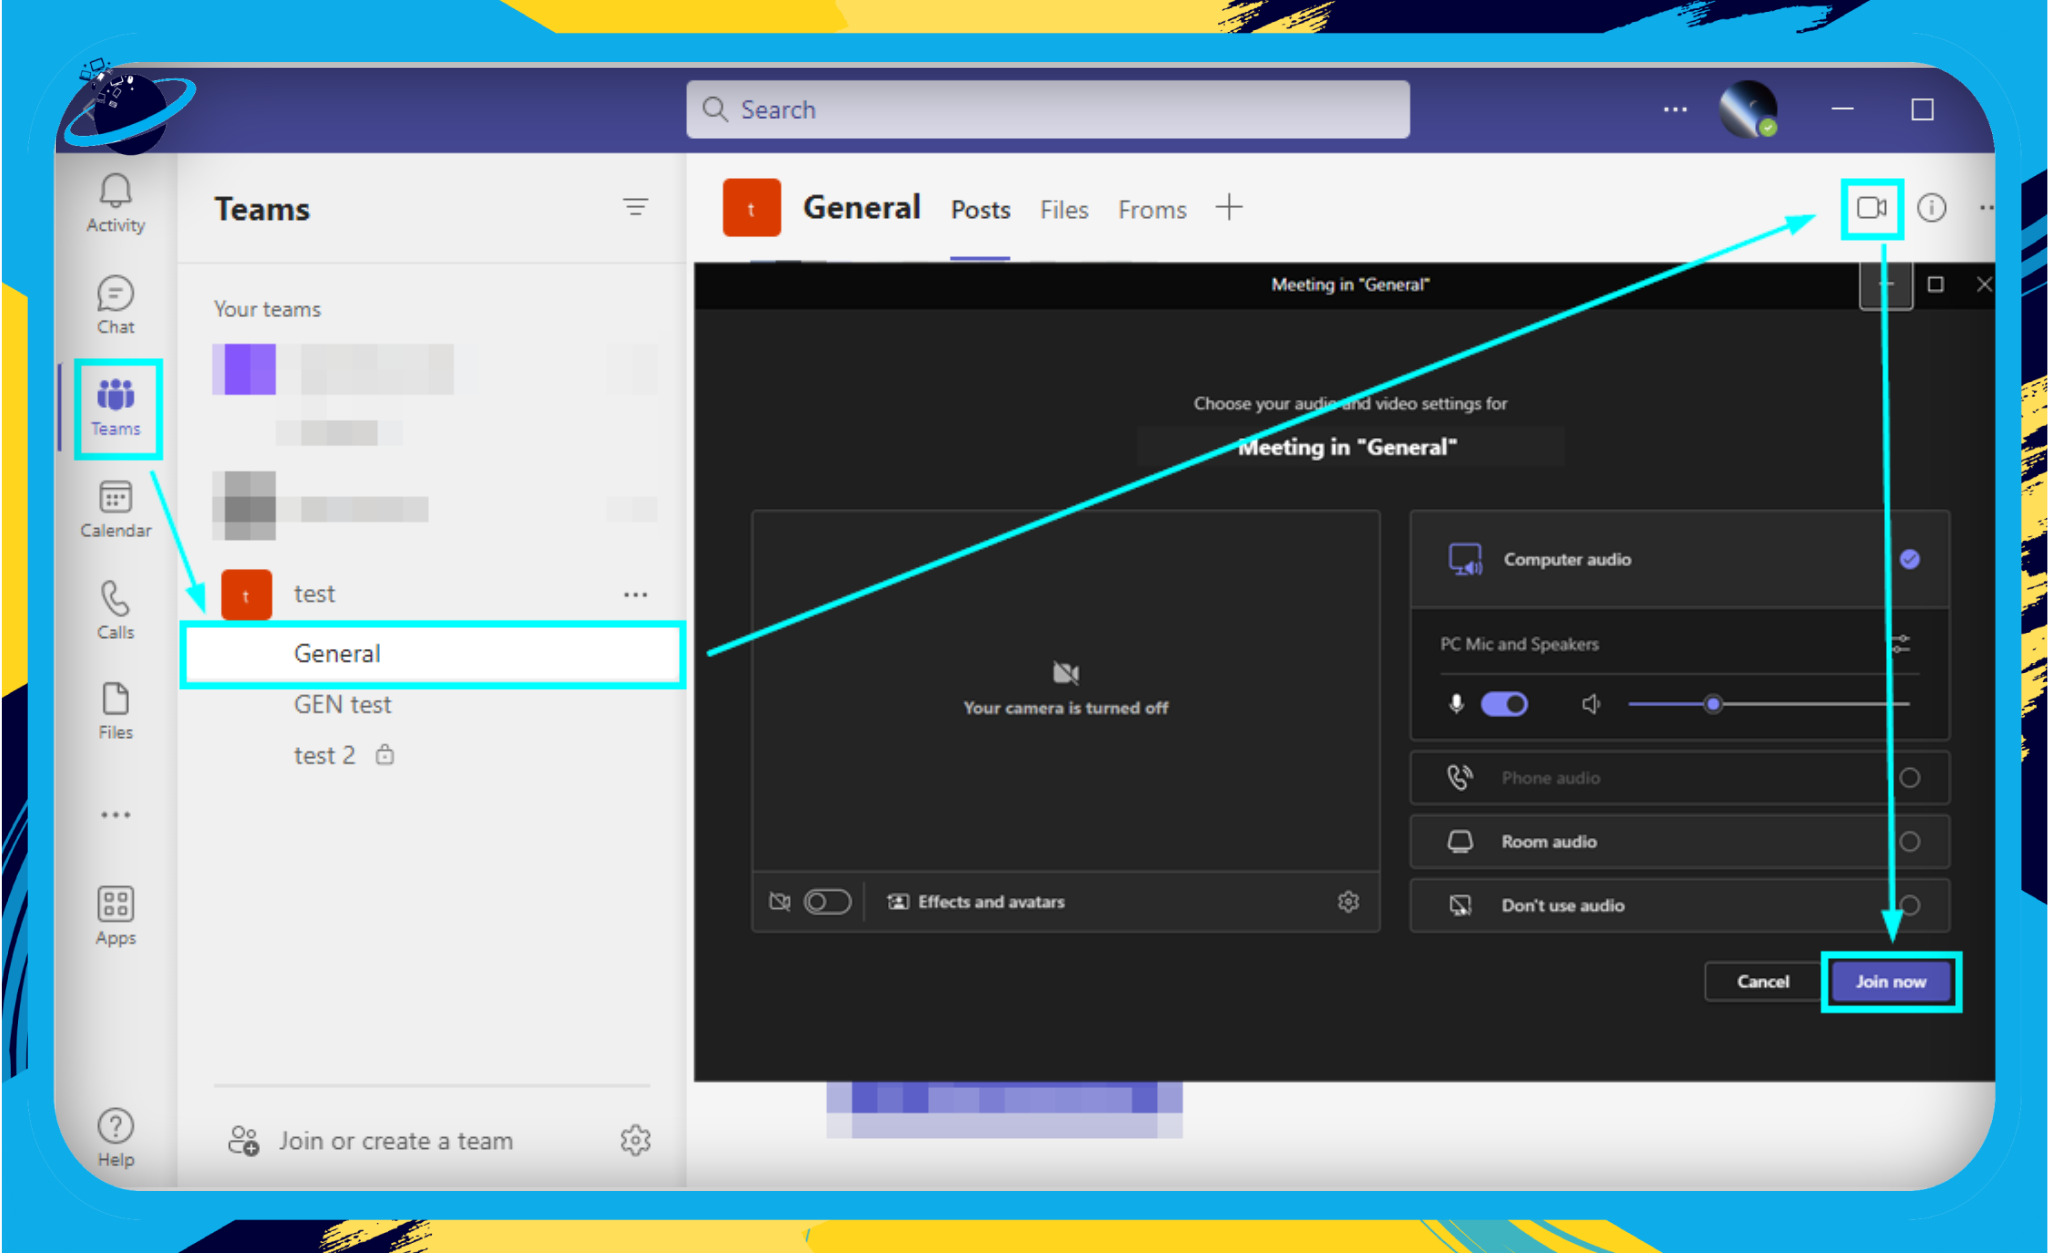
Creating an Instant Meeting
Let’s say you’re in the middle of a lively discussion in your team chat, and you realize a quick face-to-face conversation could speed things up. Here’s how to make that happen:
- Choose a team or chat.
- Click on the ‘Meet now’ button in the top right corner of the Teams interface.
- Select ‘Meet now’.
- Hit ‘Join now’ to start the meeting.
Scheduling a Meeting for Later
In the world of business, scheduling is key. Whether it’s a weekly check-in or a monthly review, Microsoft Teams ensures that you’ll never miss a beat. Here are the steps to schedule a meeting:
- Navigate to the Calendar tab on the left side of Teams.
- Click on ‘New Meeting’ at the top right.
- Fill in the details: meeting title, date, time, duration, and participants.
- Add a detailed agenda in the ‘Details’ section. This helps attendees prepare for the meeting.
- Hit ‘Save.’ An invitation will be sent to all participants.
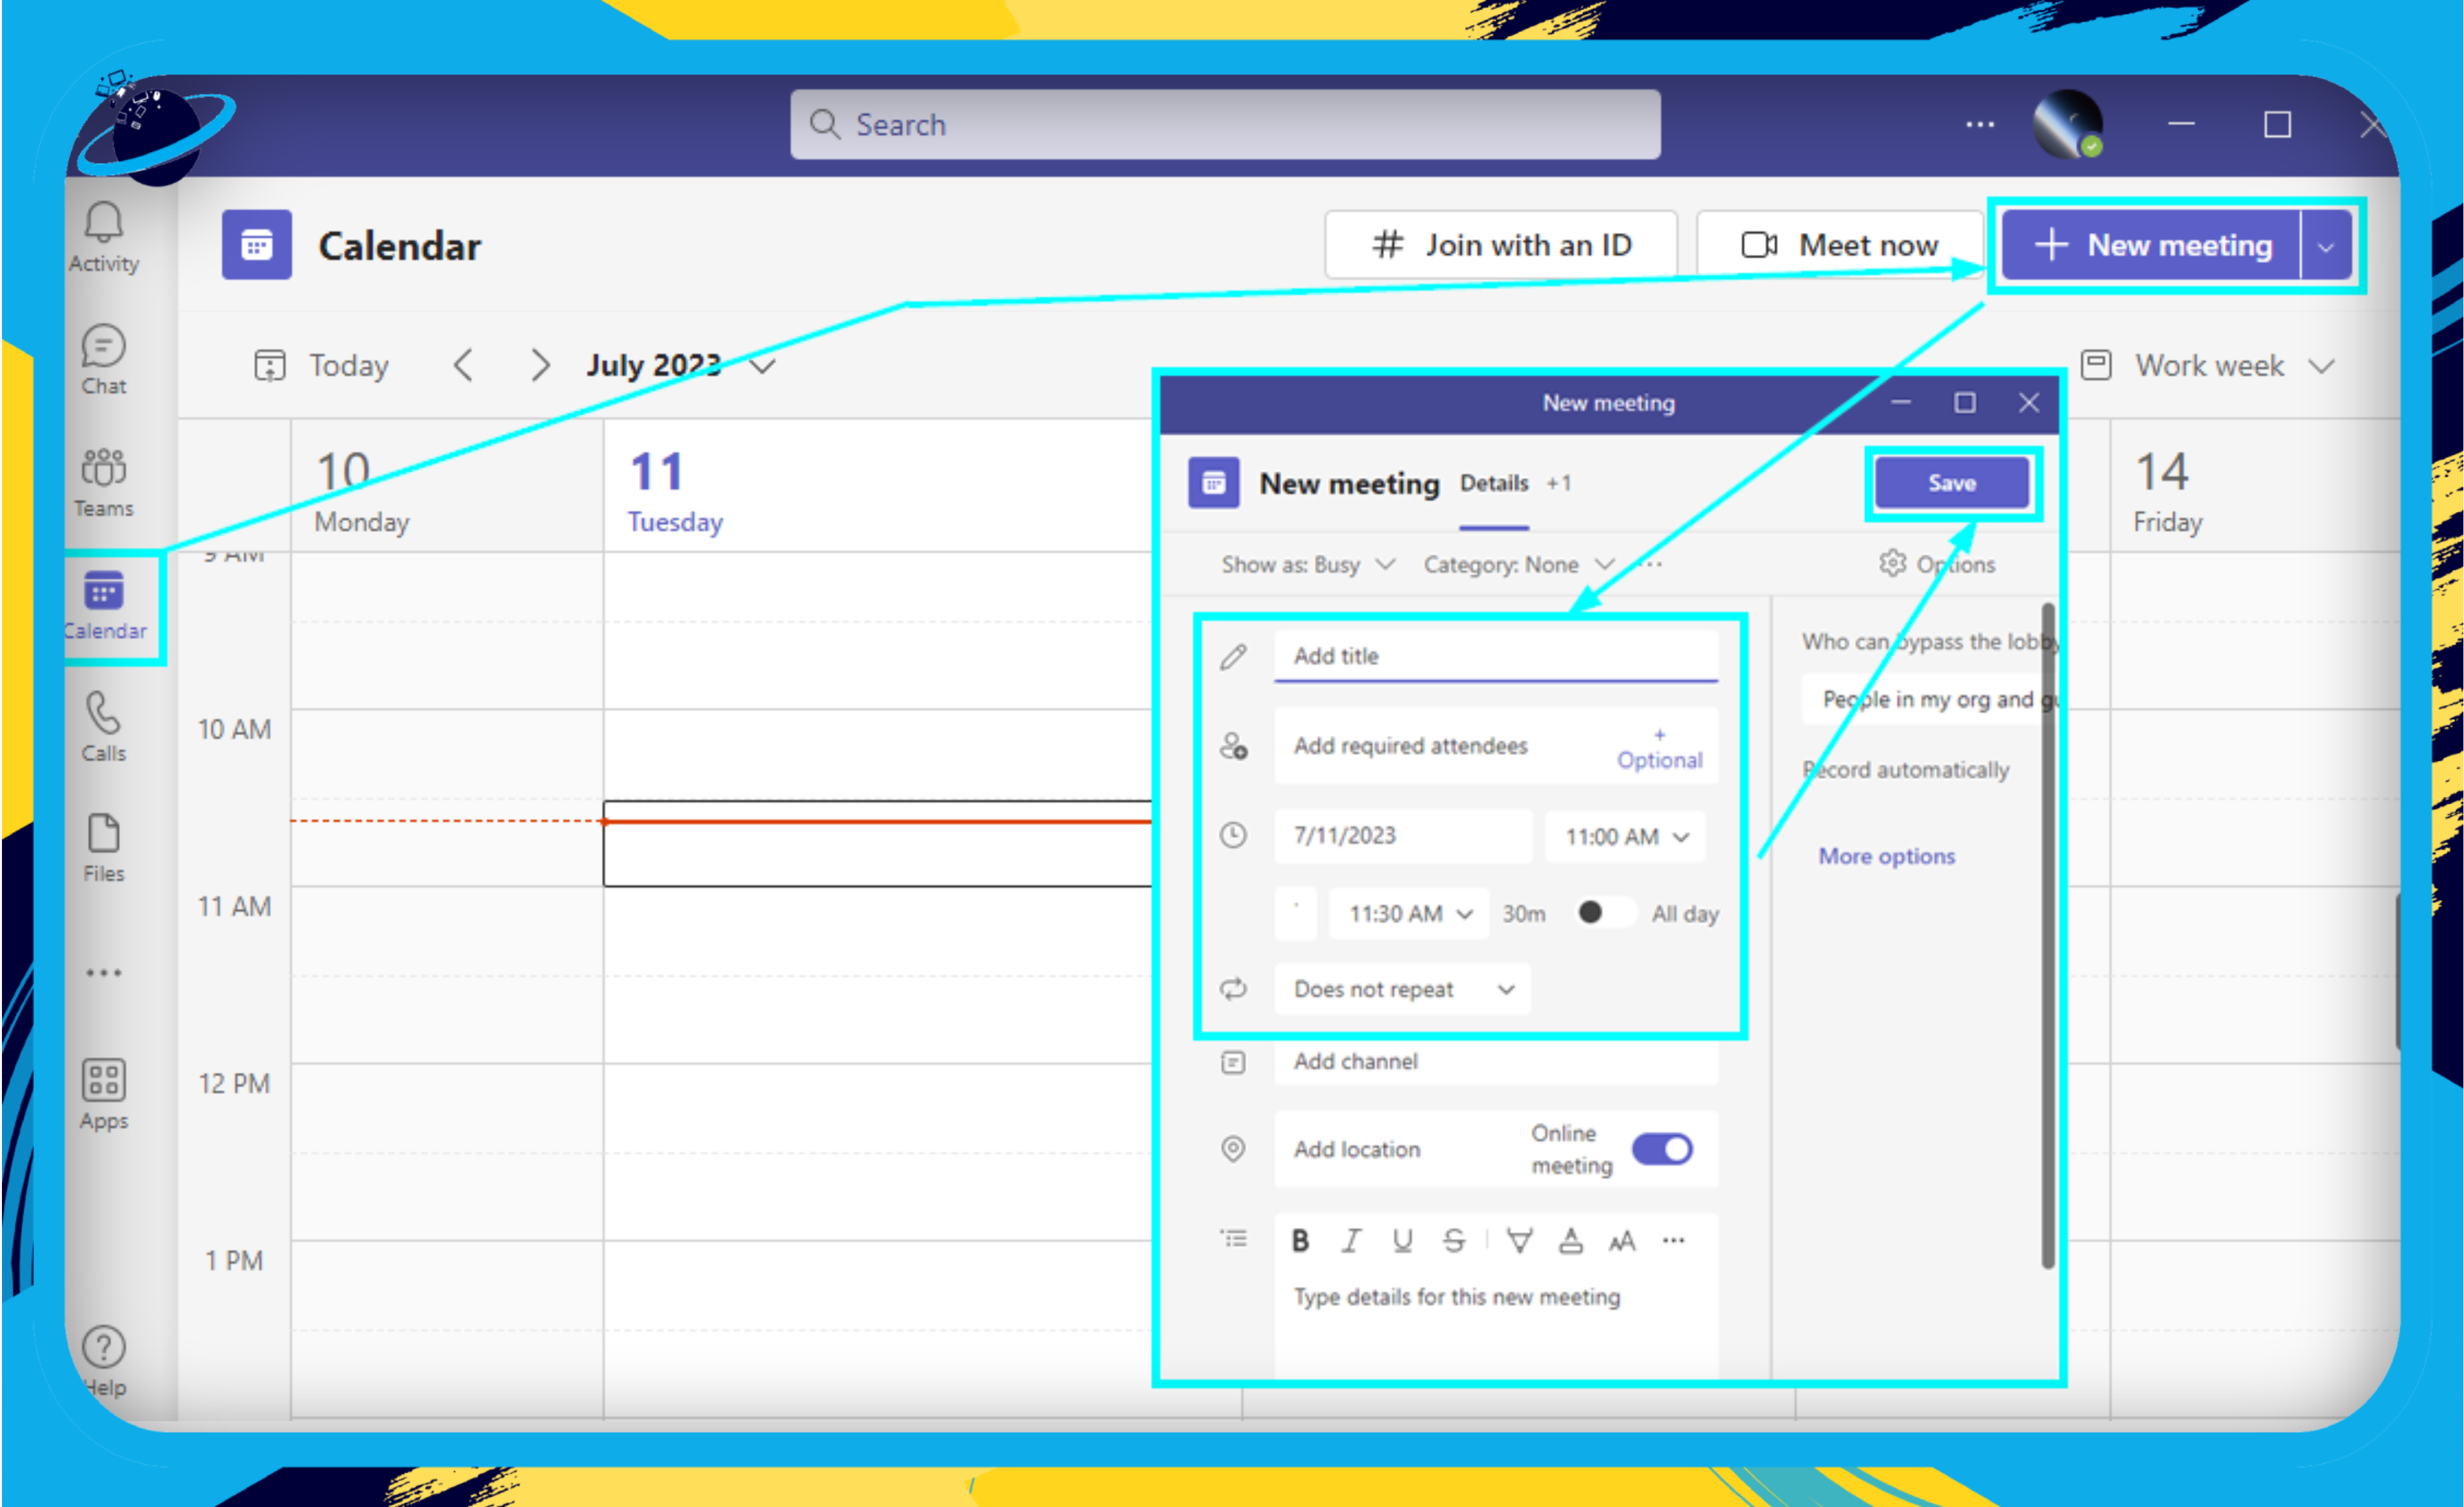
Scheduling a meeting has never been so simple!
Setting Up Recurring Meetings
When you have those regular meetings on your calendar, setting them up as recurring meetings can save you a lot of time and avoid the potential mishaps of forgotten scheduling. Here’s how you can set up a recurring meeting in Teams:
- Follow the steps for scheduling a meeting, as mentioned above.
- In the ‘Repeats’ section, select the frequency of the meeting – daily, weekly, monthly, or custom.
- Specify the number of occurrences or the end date.
- Confirm by clicking ‘Done’ and then ‘Save.’
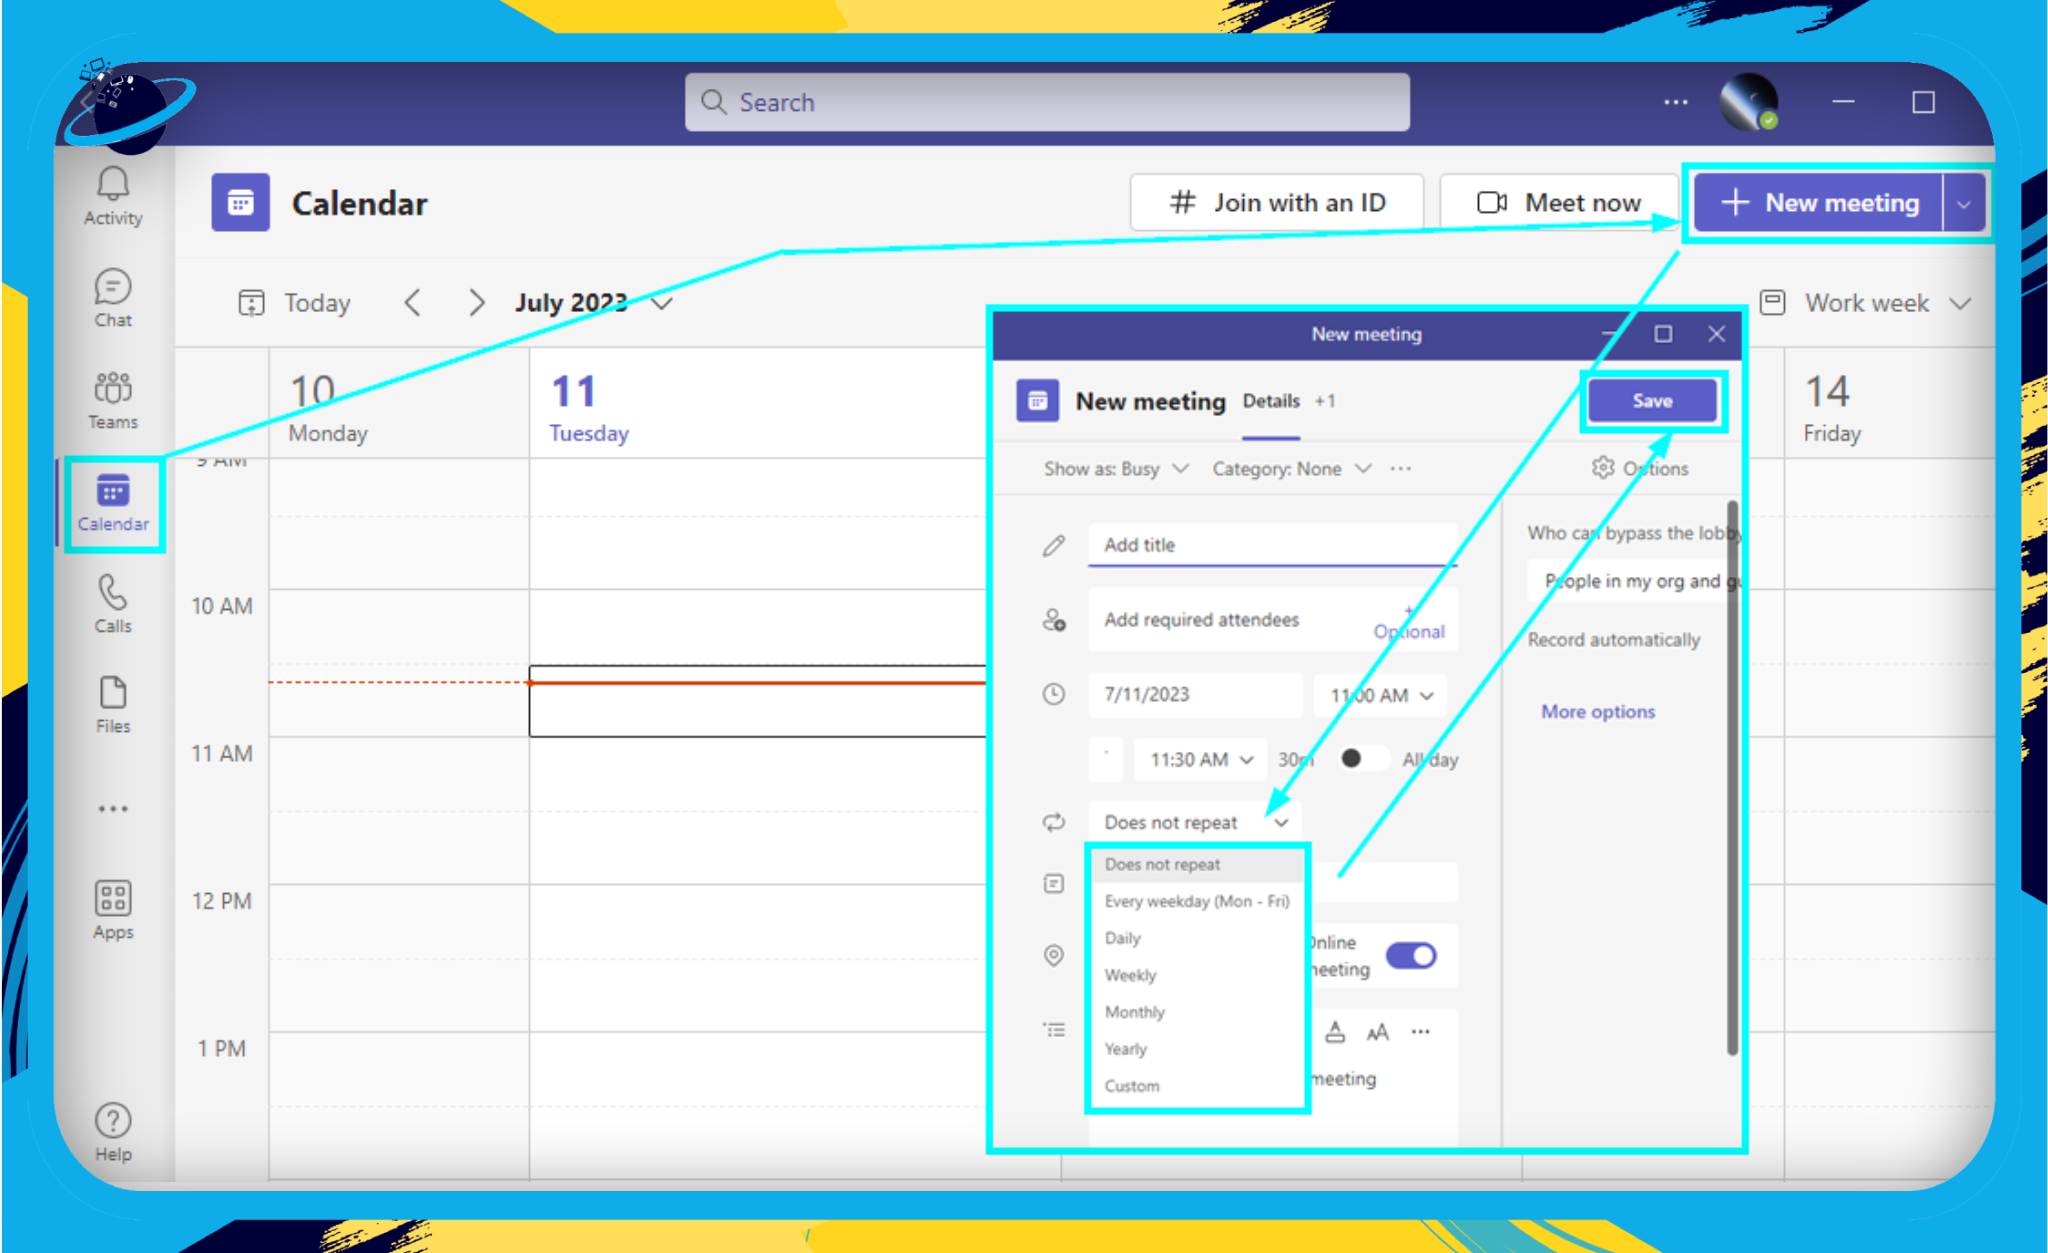
And there you have it! Now, your recurring meeting is all set, and Teams will remind you and your participants at the right time.
Take full advantage of these features to organize your meetings like a pro. Remember, a well-planned meeting is the first step to a successful discussion. Happy scheduling!
Pre-meeting Preparations: Ensuring a Smooth Ride
In this fast-paced, digital work environment, being prepared for your virtual meeting is just as important as attending it. When it comes to Microsoft Teams, preparation isn’t simply about having your presentation ready; it’s about ensuring that your technology is all set up to facilitate a smooth and effective meeting. Here are some of the key areas you should consider:
Test Your Equipment: Make sure your microphone, speakers, and camera are working correctly. Microsoft Teams allows you to check your settings before the meeting starts. To do this:
- Go to your Teams settings.
- Click on ‘Devices,’ and you will see options to test and adjust your camera, speaker, and microphone settings.
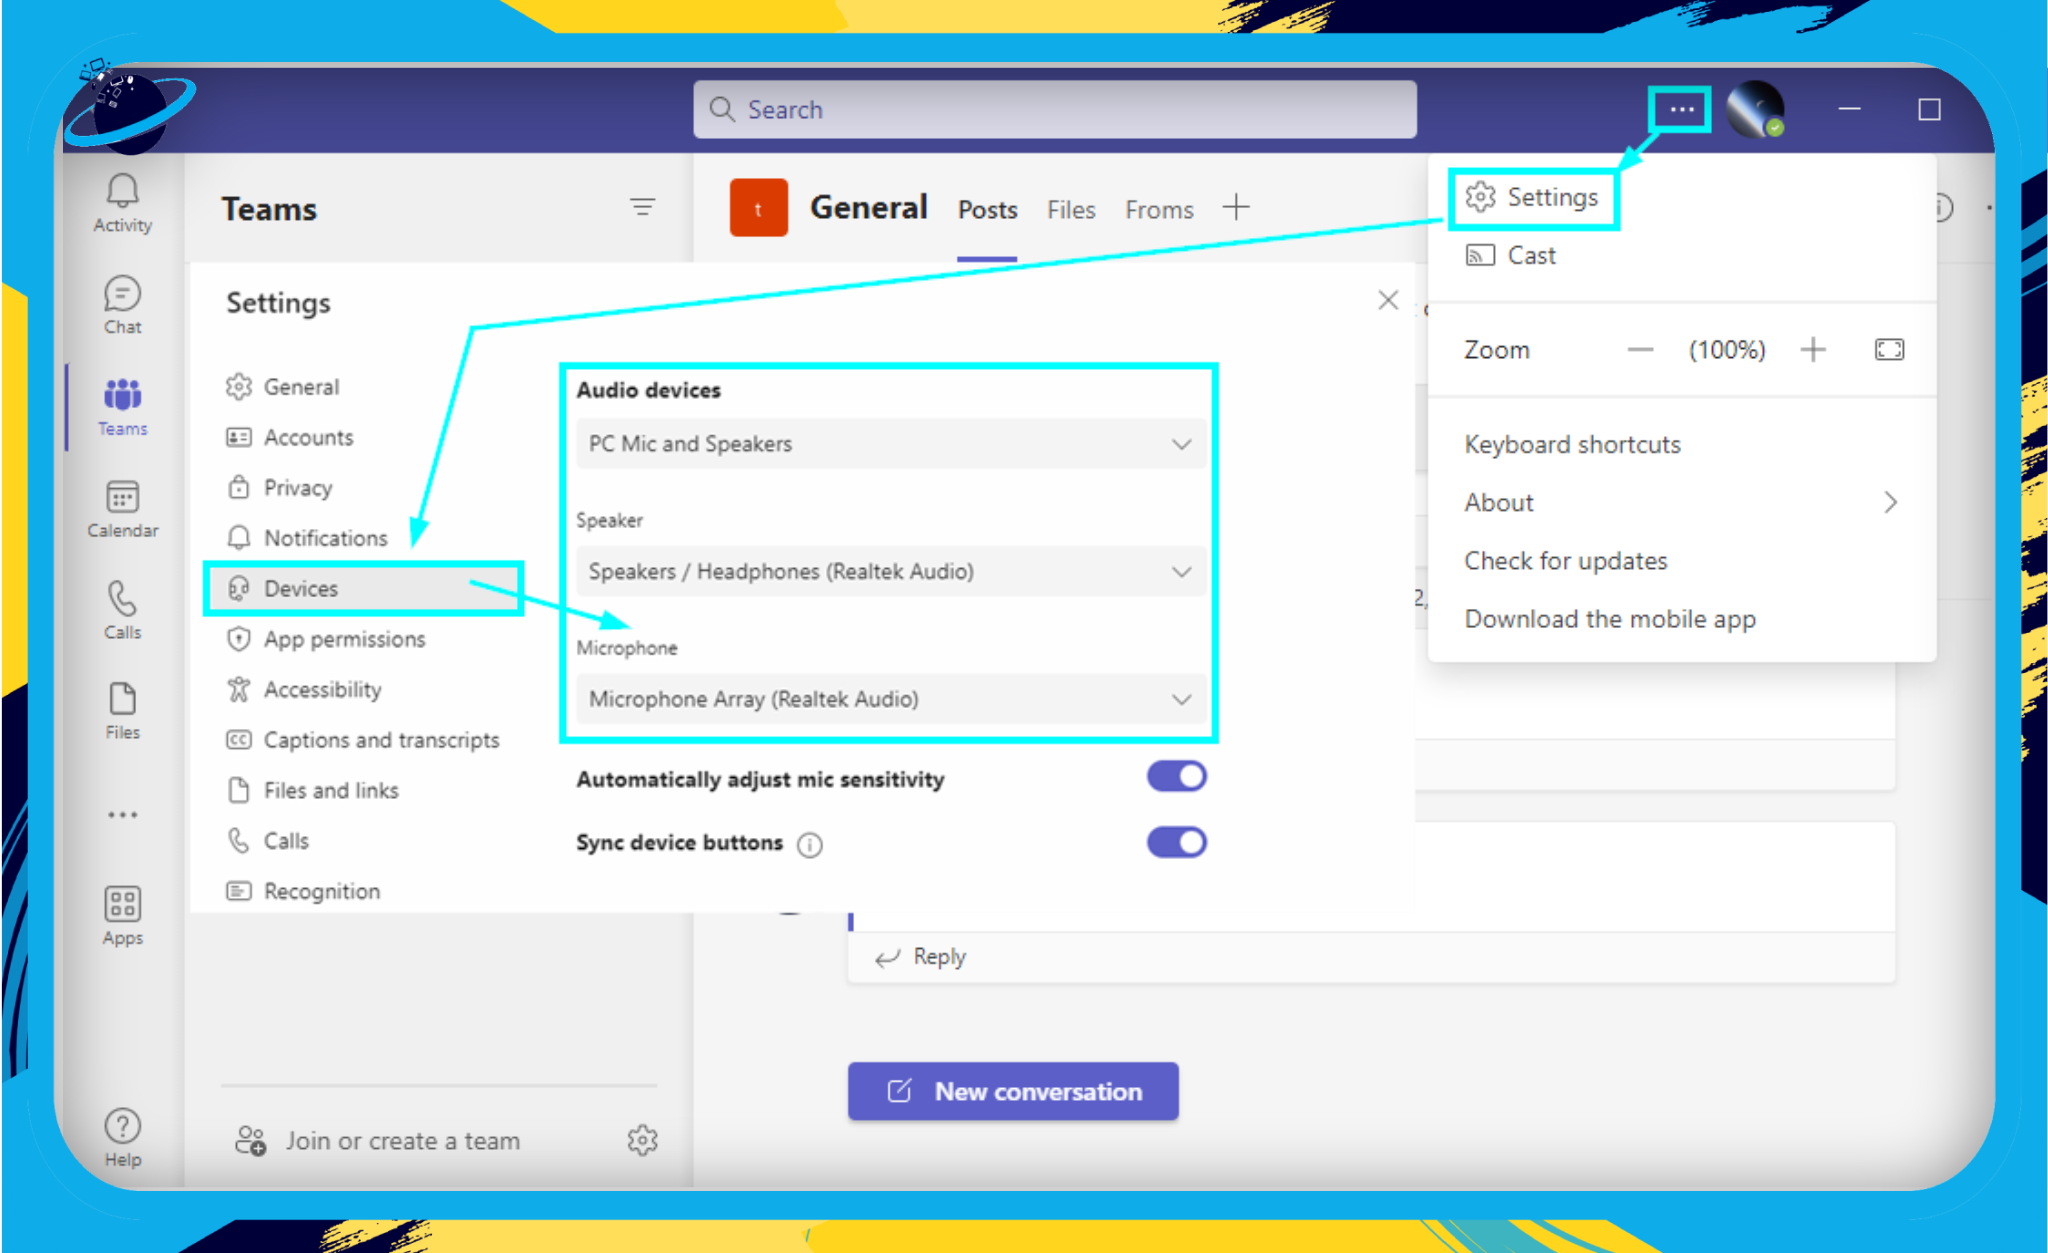
Remember: Regularly testing your equipment can help prevent last-minute technical glitches and ensure you can communicate effectively during your meeting.
- Check Your Internet Connection
An unstable internet connection can disrupt your meeting, causing dropped calls, poor video quality, or connection loss. To avoid this:
- Use a wired connection if possible, as it is typically more stable than a wireless connection.
- Close any unnecessary applications or tabs that might be using your bandwidth.
Note: If you’re still experiencing issues, turning off your video can help improve the connection.
- Minimize Background Noise
To ensure everyone in the meeting can hear clearly, try to minimize background noise. This can be achieved by:
- Using headphones with a built-in microphone to limit external noise.
- Muting your microphone when you’re not speaking.
Pro Tip: Microsoft Teams has a noise suppression feature that can help reduce distracting background noise.
- Set up Your Workspace
Prepare your workspace to ensure you’re comfortable and free from distractions. This could involve:
- Choosing a spot with good lighting, so other participants can see you clearly if you’re using video.
- Making sure your background is professional and not distracting. You can use the ‘Background effects’ feature in Teams to blur or change your background.
With these pre-meeting preparation steps, you’re well on your way to having an effective, productive, and stress-free Microsoft Teams meeting. Remember, preparation is key. As Benjamin Franklin wisely said, “By failing to prepare, you are preparing to fail.”
Mastering Audio and Video Settings
A smooth virtual meeting experience heavily relies on optimal audio and video settings. Let’s dive into how you can adjust these settings to ensure crystal-clear communication.
Adjusting Audio Settings
Testing your audio before a meeting is a fundamental step to avoid the all too common “Can you hear me now?” scenario.
- Select Settings.
- Click on Devices in the left pane, where you’ll see the audio devices linked to your Teams app.
- To test your speaker, click the Make a test call option.
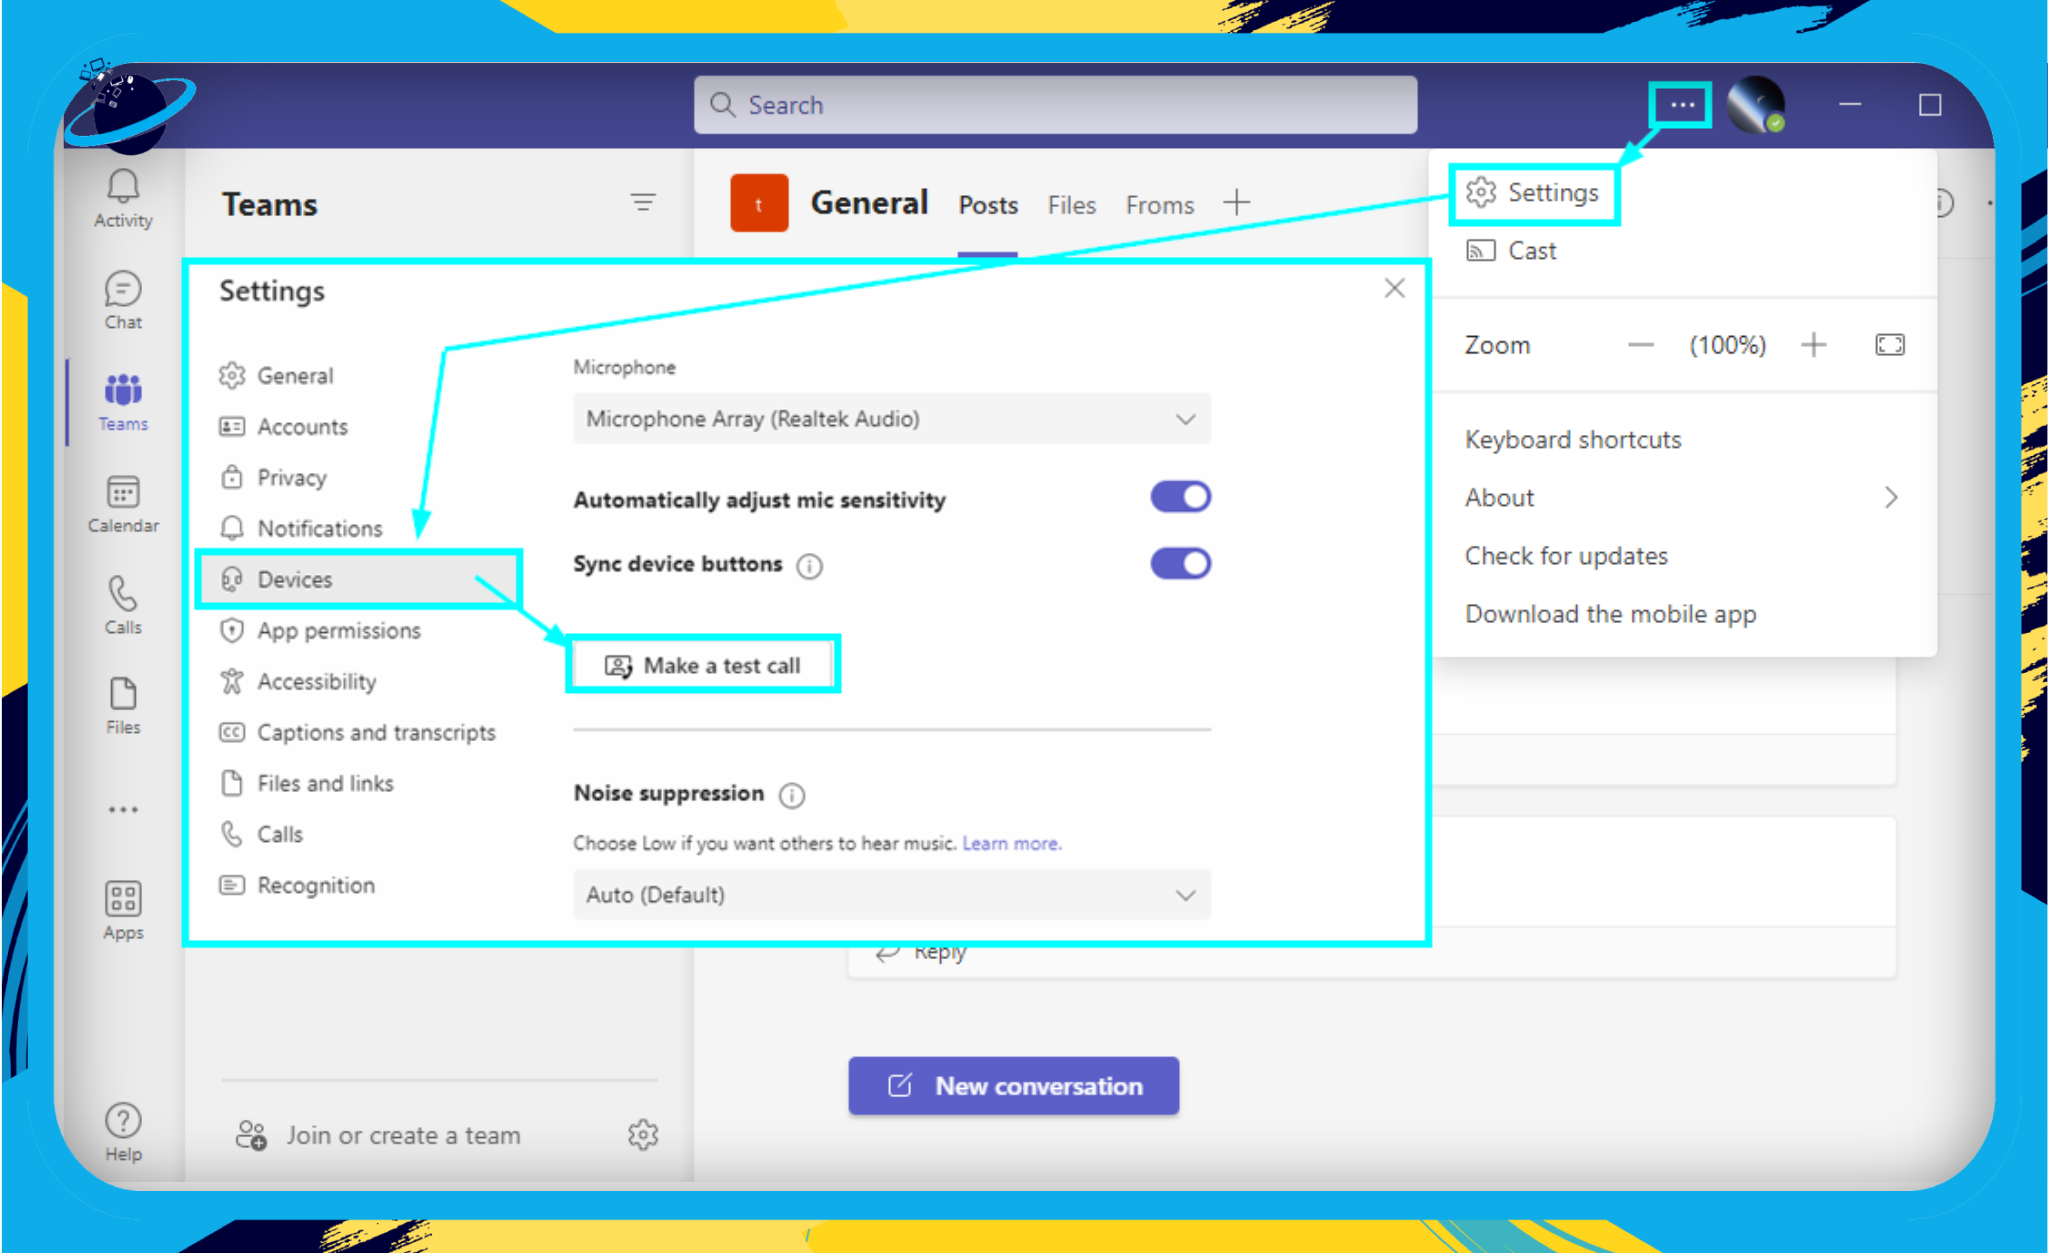
Don’t forget the value of using headphones to improve sound quality and reduce echo. It’s an easy yet often overlooked way to drastically improve your audio experience.
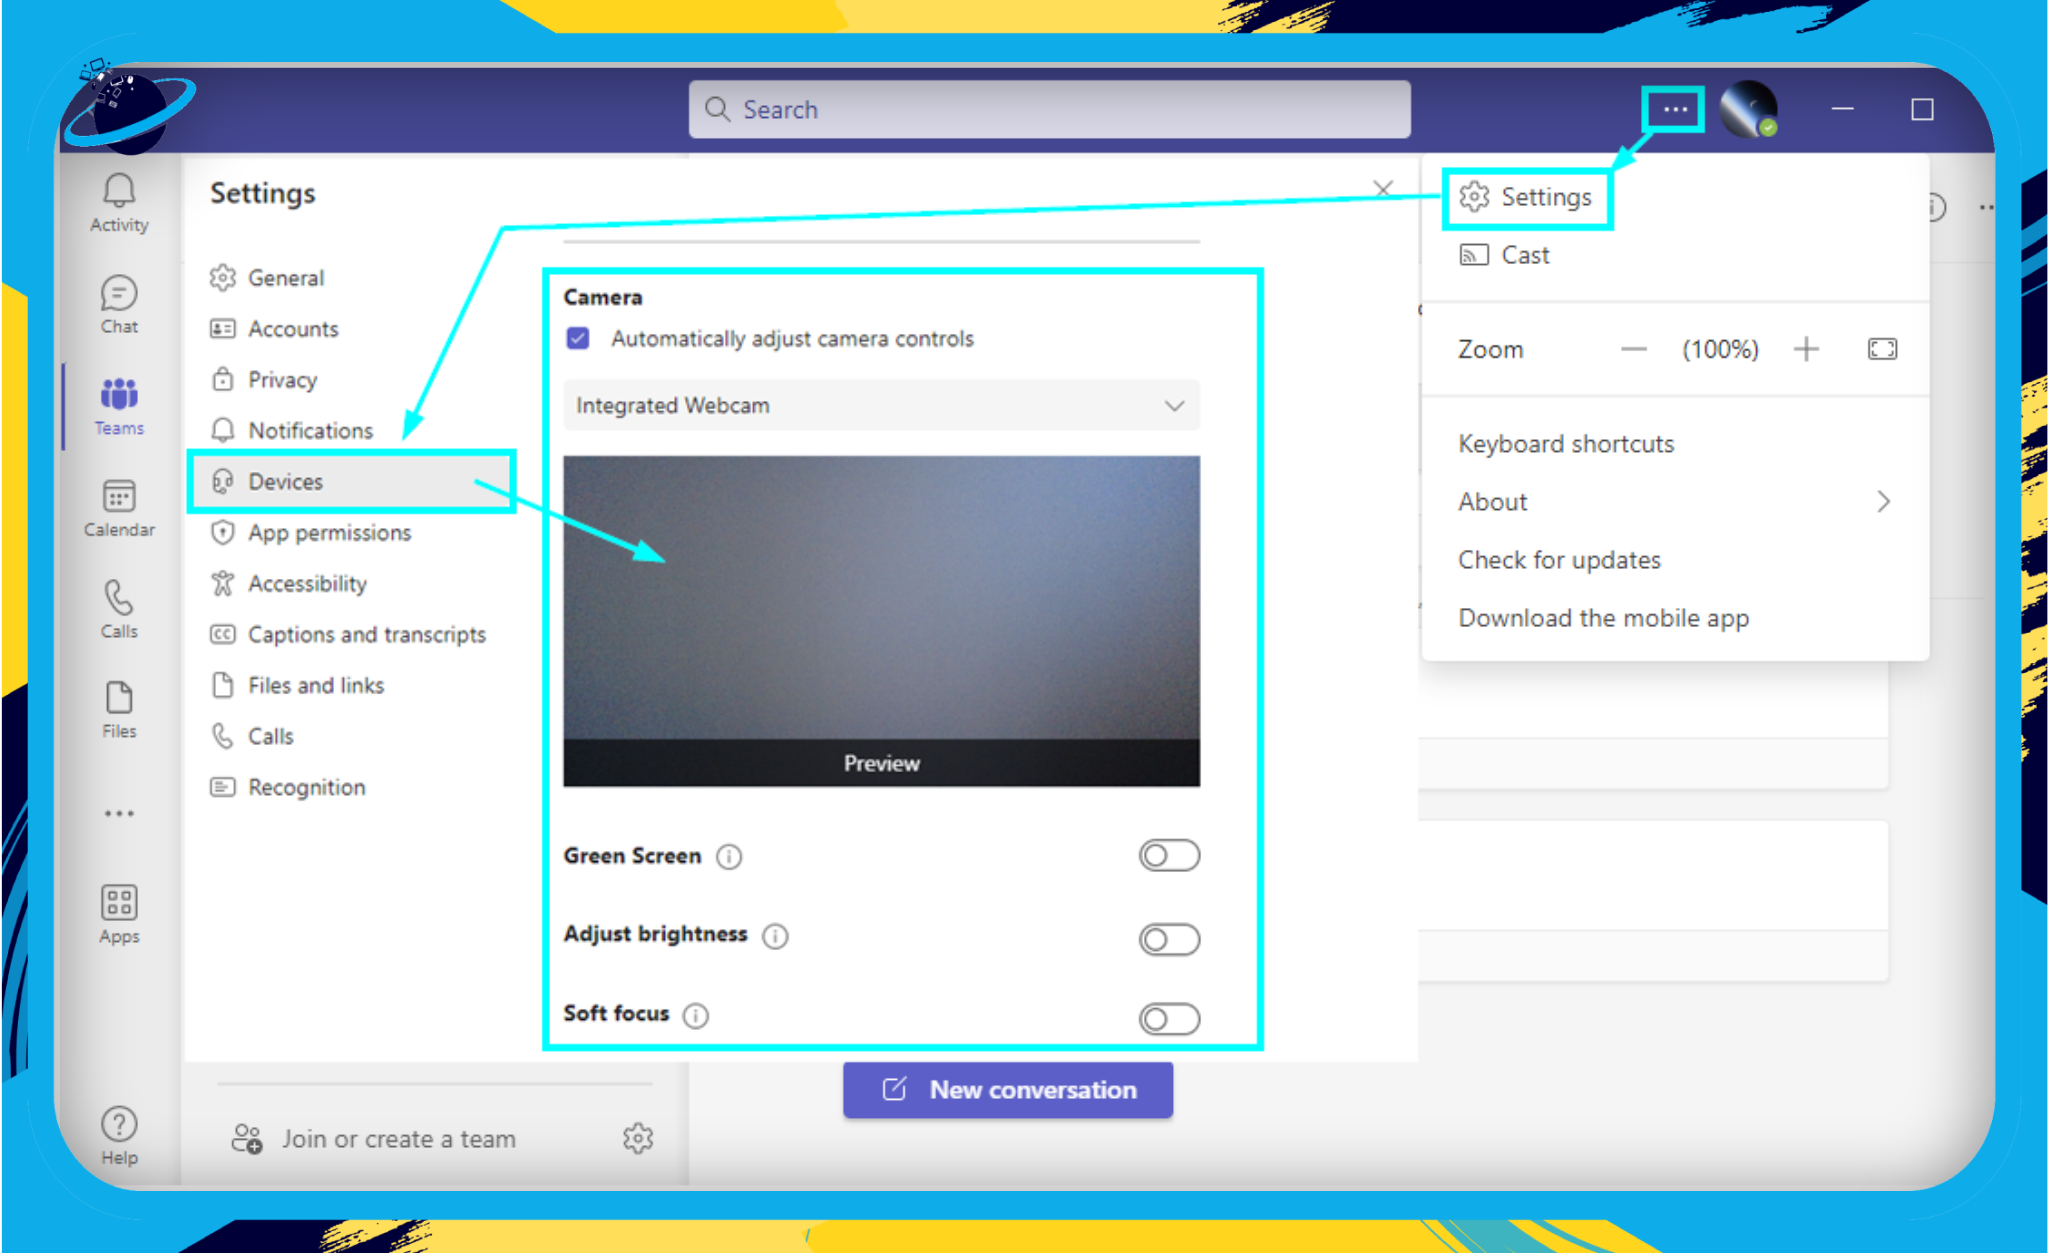
Controlling Video Settings
The key to a good video call? Great lighting and a clear camera. Here’s how to ensure your video settings are up to par:
- Go to Settings > Devices, and, under Camera, see if your video is working fine. Adjust the camera until you’re in the frame.
- You can also choose a camera if you have multiple options.
- Remember, natural light is your friend! Position yourself to face a window or light source to avoid appearing in shadows.
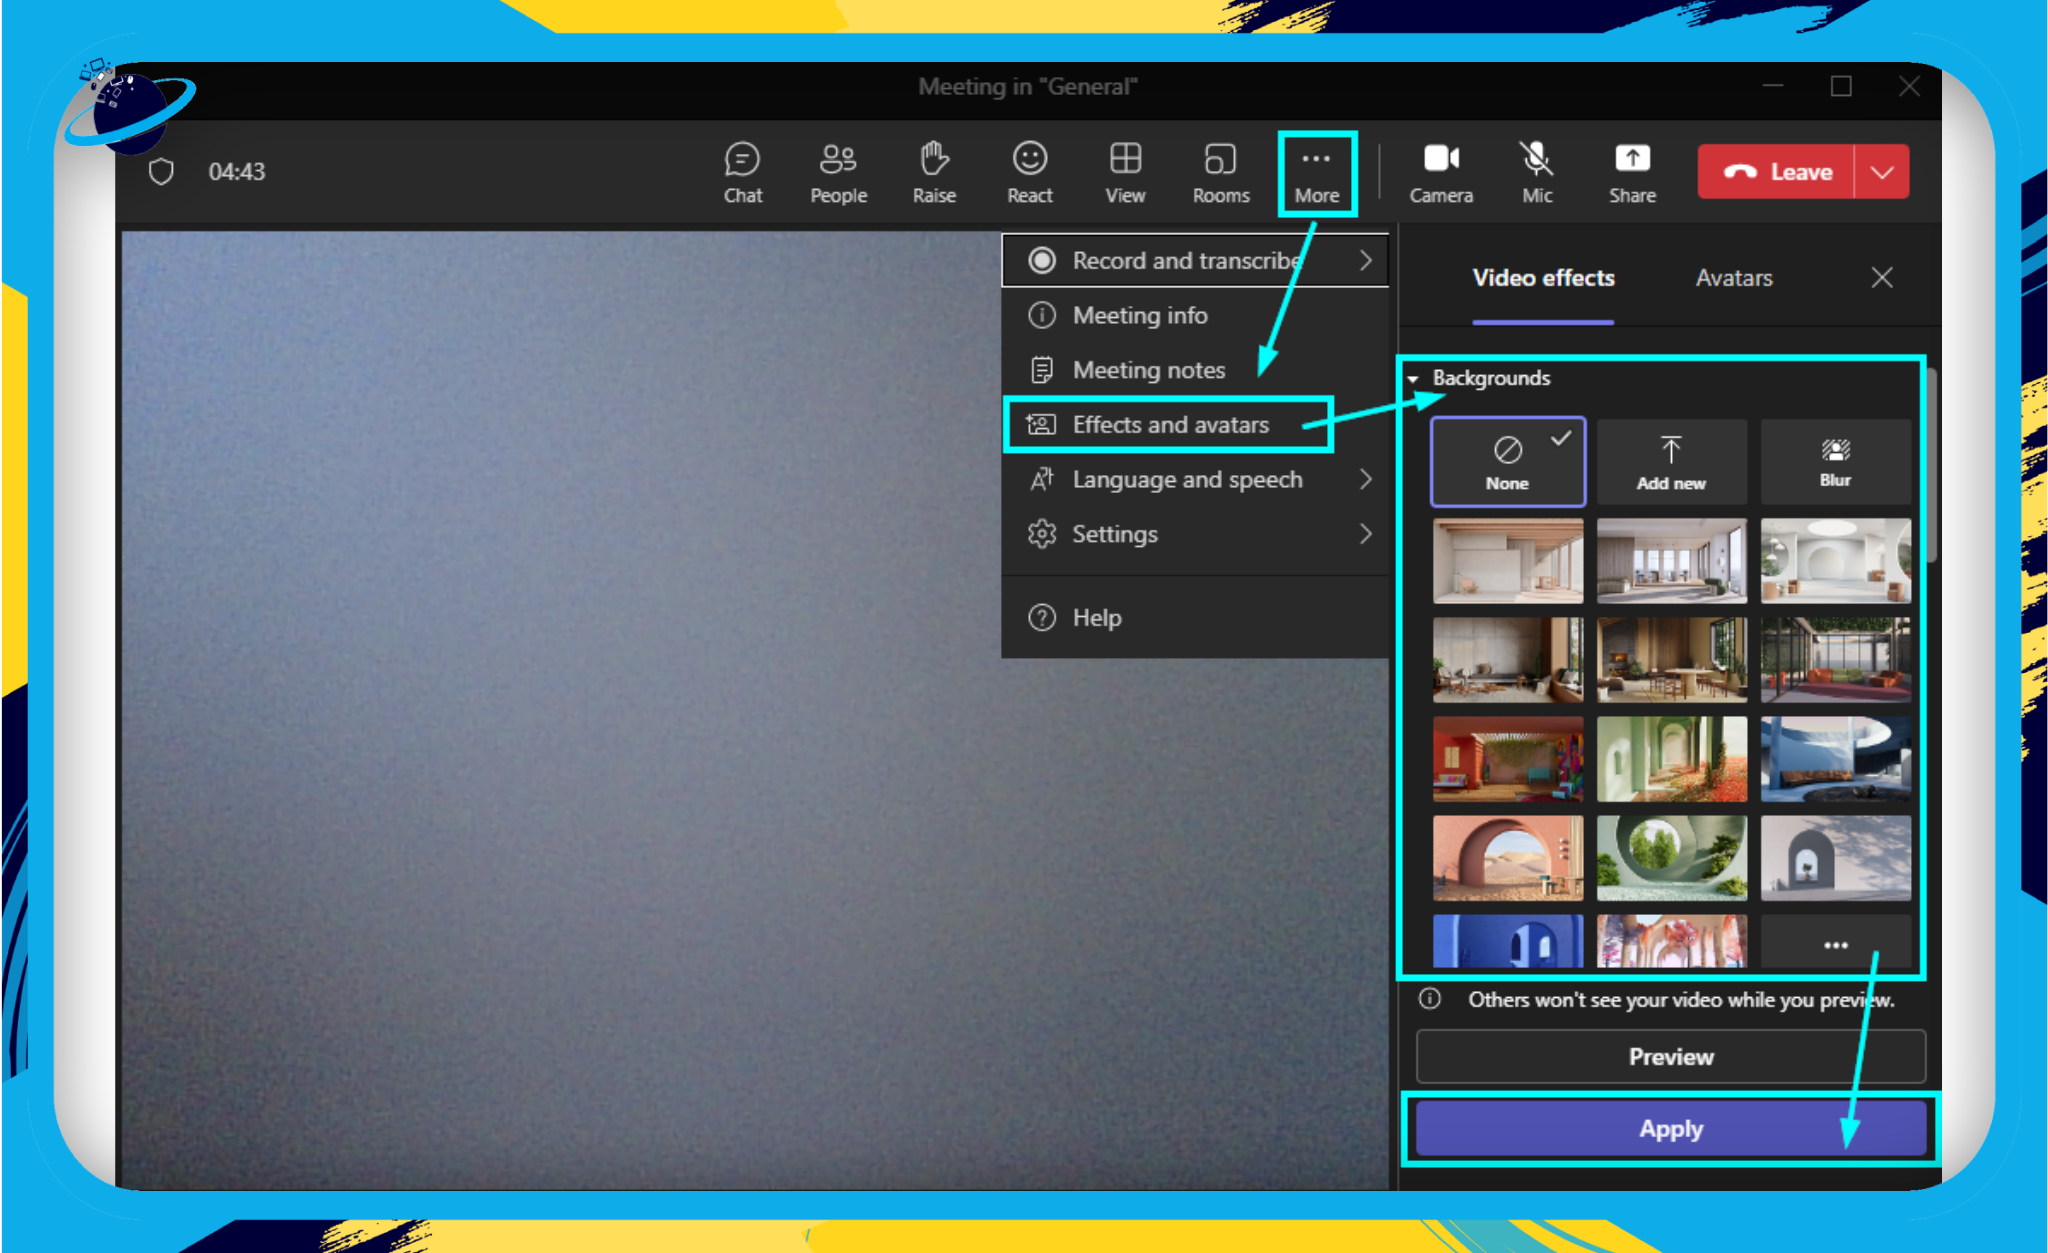
Using Background Effects
To avoid unexpected cameos from your beloved pets or family members or to simply hide a messy room, Teams allows you to blur your background or even use custom images.
- During a meeting, click the … (more actions) button.
- Select Effects and avatars.
- Here you can blur your background, choose one of the preset images, or upload your own custom background.
- Hit Apply to save those changes.
By paying attention to these audio and video settings, you’ll not only ensure a more seamless meeting experience for yourself but also show respect for your colleagues’ time and attention. Happy meeting!
Using Background Effects to Enhance Your Presentation
In a world where our home spaces have become our workspaces, it can be challenging to ensure that our surroundings always look professional. This is where Microsoft Teams swoops in like a superhero with its Background Effects feature, allowing you to create a virtual background or blur your real one. Here’s how you can use this feature to your advantage:
Blur Your Background
Sometimes, you might find yourself in a chaotic environment when you need to join a meeting. No worries! Microsoft Teams lets you blur your background, keeping the focus solely on you. Here’s how to do it:
- Once you’re in a meeting, click on the ‘More actions’ icon (three dots).
- Select ‘Effects and avatars.’
- From the list, choose ‘Blur’ and click on ‘Apply.’
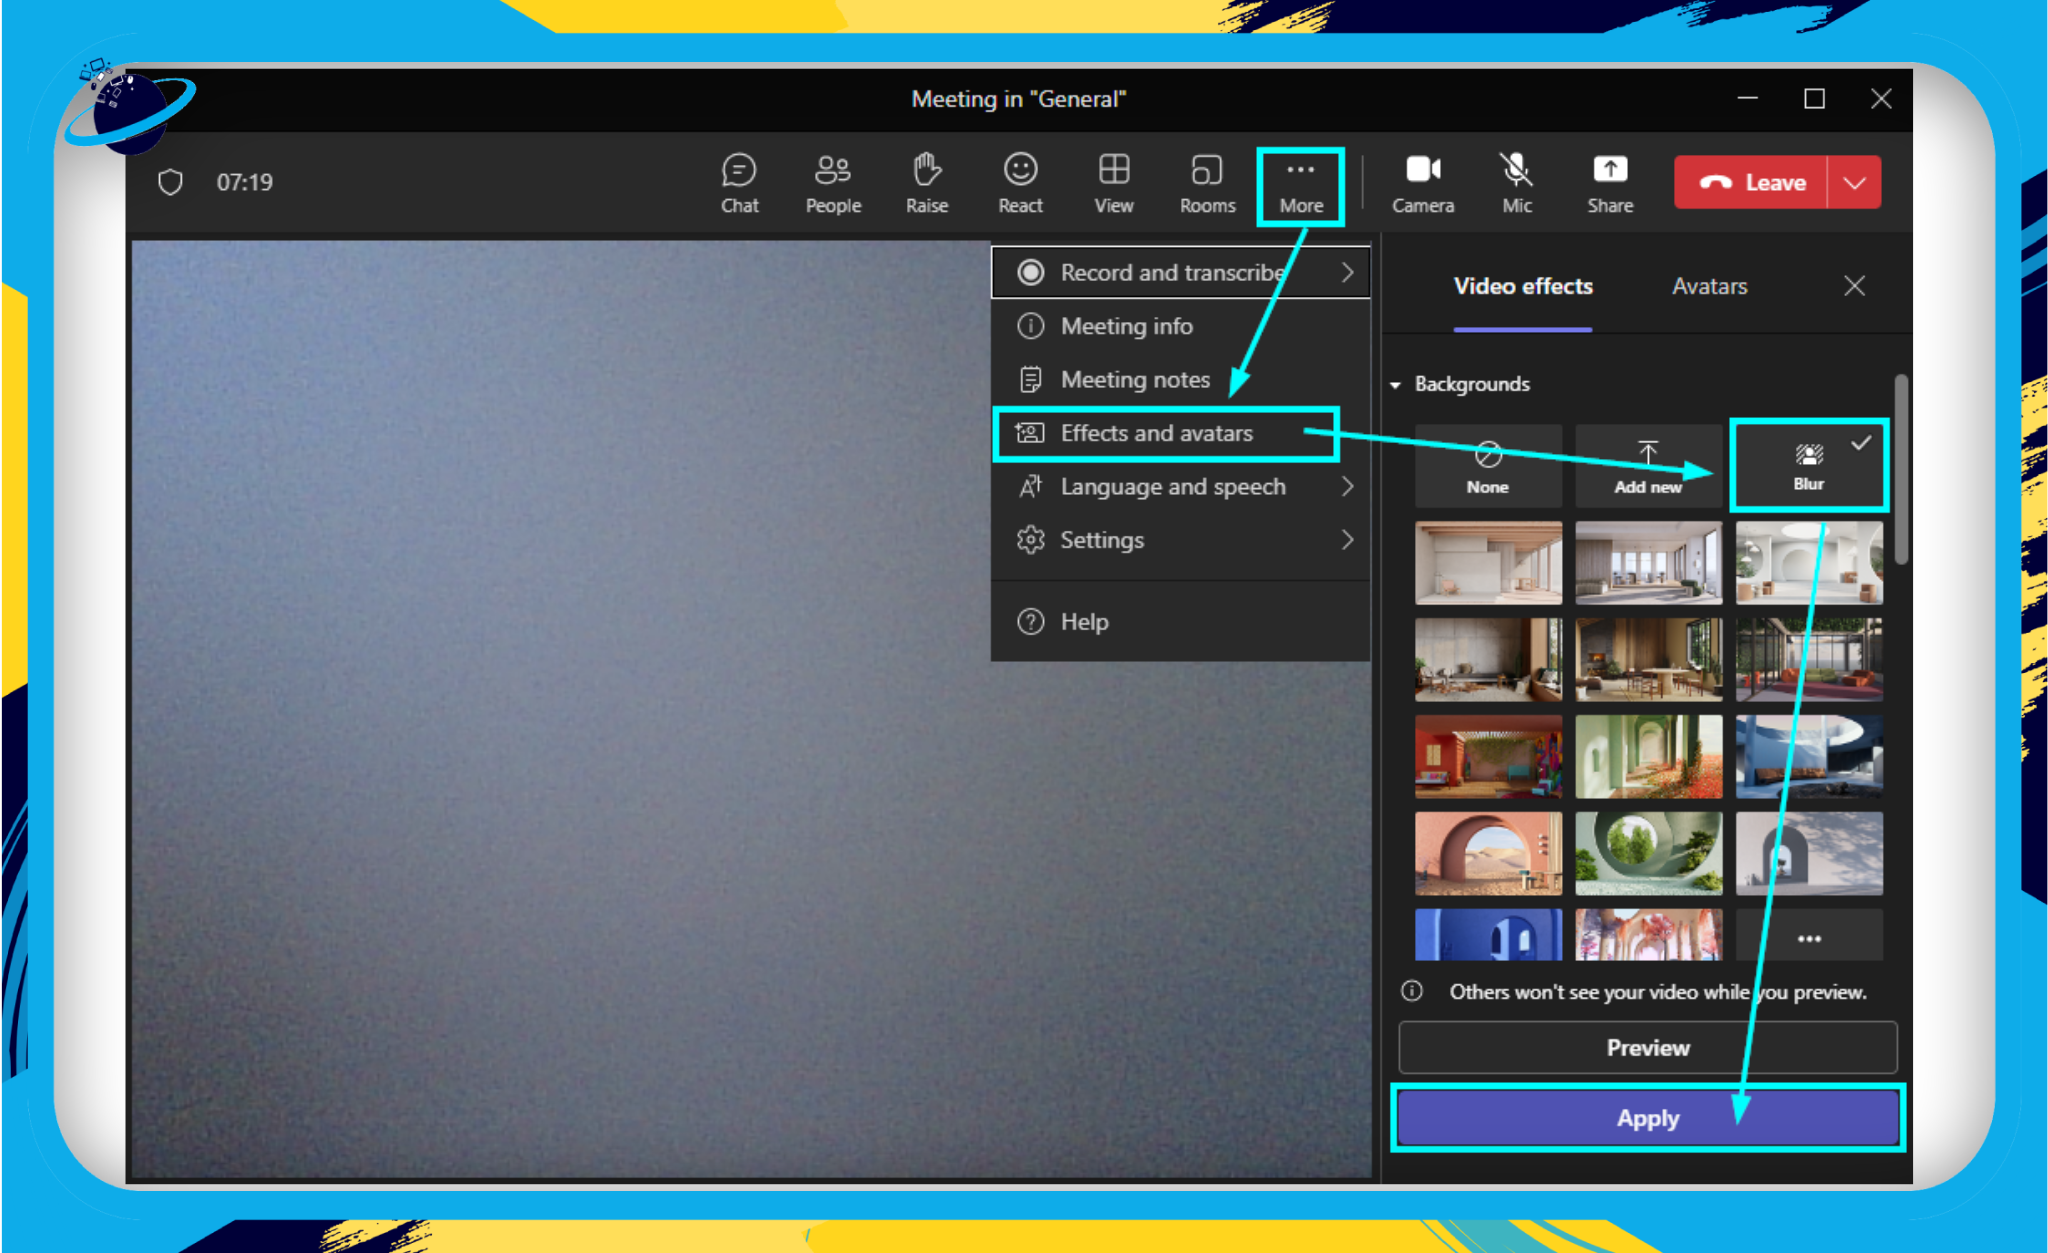
This will blur everything in your background, creating a neutral and distraction-free setting.
Choose a Virtual Background
If you want to go a step further and change your background entirely, Microsoft Teams has got you covered. The platform offers a selection of default images, but you can also upload your own for a more personal touch. Here’s how:
- Click on the ‘More actions’ icon during a meeting.
- Now select ‘Effects and avatars.’
- Choose an option from the background section and click ‘Apply.’

And voila! You’ve successfully changed your background.
Note: Remember to check your image before applying it. It should be a professional, non-distracting image that enhances rather than detracts from your meeting.
By mastering these background effects, you’re not just ensuring that you present yourself in the best light; you’re also maintaining the professionalism and effectiveness of your meetings. So go ahead, blur that busy background, or transport yourself to a peaceful office setting. Your Microsoft Teams meetings are about to get an upgrade!
Screen Sharing and Presentation
One of Microsoft Teams’ most powerful features is the ability to share your screen or present documents directly in the meeting. This helps keep everyone on the same page (quite literally!) and makes discussions more focused and productive.
Let’s explore this feature and uncover its true potential.
Sharing Your Screen
You’ll find the screen-sharing feature in the meeting toolbar, which usually appears at the top of your screen during a meeting.
- Start or join a Teams meeting.
- Navigate to the meeting toolbar and click on the ‘Share’ icon.
- A tray will pop up at the bottom showing all the windows you can share.
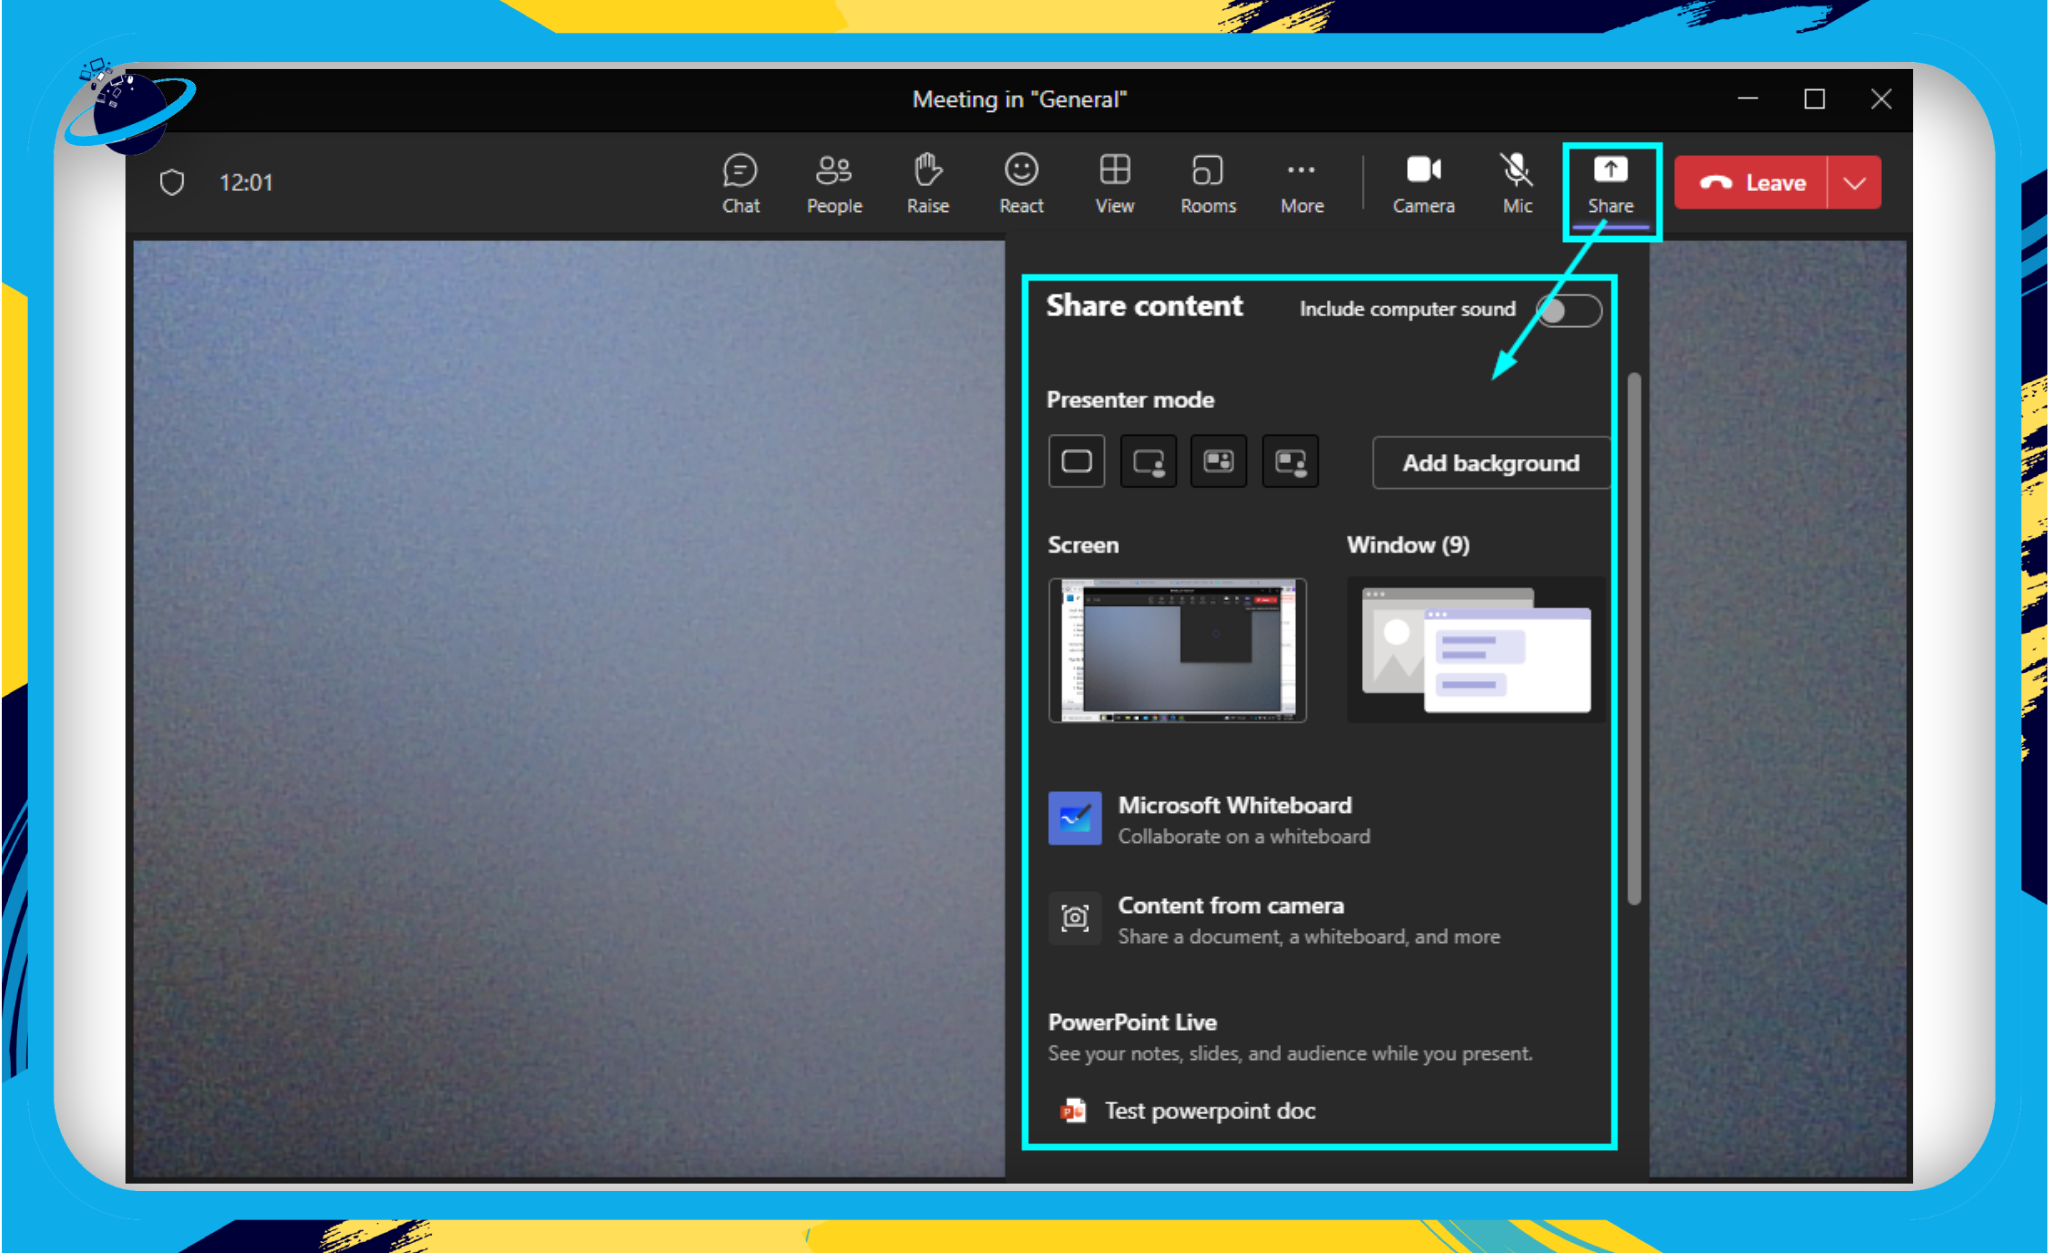
Remember, you can choose to share your entire desktop, which will show everything on your screen, or select individual windows or Microsoft Edge tabs.
Tips for Successful Screen Sharing:
- Close unnecessary tabs and applications: This will not only make it easier to find the window you want to share, but it also avoids accidentally sharing sensitive information.
- Check your screen before sharing: To ensure that nothing confidential is displayed, do a quick check before sharing your screen.
- Pause notifications: You might not want to share your incoming email notifications or chat alerts with everyone. Consider pausing these before you start your presentation.
Presenting Documents
If you’re presenting a document, like a PowerPoint presentation, there’s an even better way to share.
- Start or join a Teams meeting.
- Navigate to the meeting toolbar and click on the ‘Share’ icon.
- In the tray that appears, you’ll see an option for PowerPoint. Click on this to show a list of your recent PowerPoint files.
- Select the PowerPoint file you want to present. If it’s not on the list, you can select ‘Browse’ to find it.
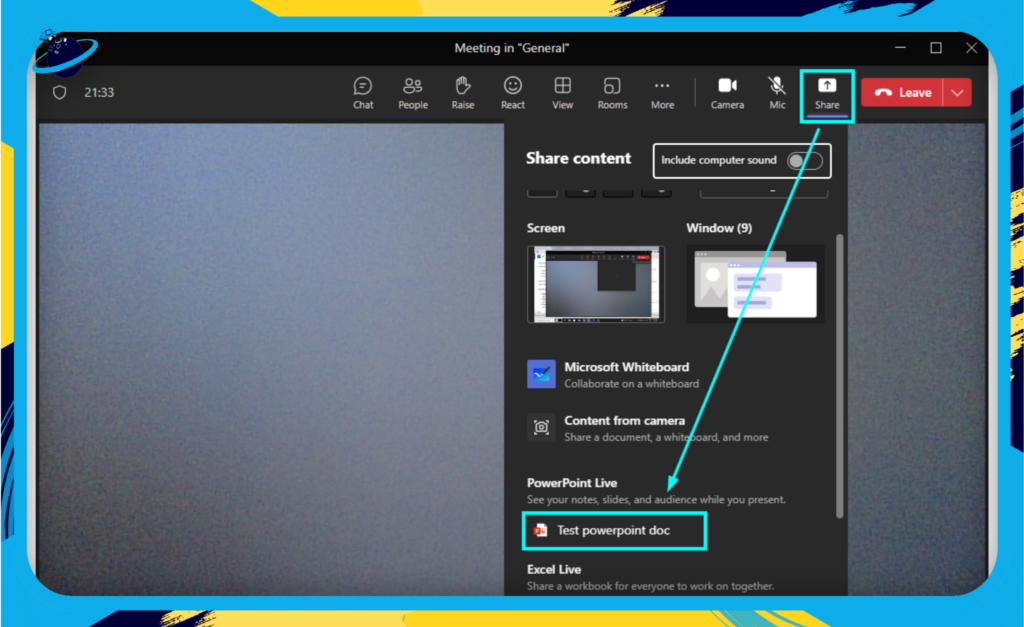
The beauty of presenting a PowerPoint in this way is that it allows your audience to move through the presentation at their own pace. But if you’d prefer to keep everyone on the same slide, you can select ‘Take control’ to lock the presentation.
Remember, screen sharing and presenting are about facilitating communication, not just broadcasting information. Encourage questions and interaction to keep your audience engaged.
Stay tuned for our next section, where we dive into the power of recording meetings and the protocols around it. Remember, it’s all about making Teams work for you!
Recording Meetings
In the business world, the phrase ‘if it isn’t documented, it didn’t happen’ often rings true. The good news is Microsoft Teams has your back! It offers a seamless way to record meetings so you can always refer back to discussions, share the meeting with absentees, or use it for training purposes. Let’s dive in and understand how you can use this feature effectively.
How to Record a Meeting
Before you start recording, it’s essential to inform all participants and get their consent. Once that’s out of the way, the process is pretty straightforward:
- Start or join the meeting as you usually would.
- On the meeting controls panel, find and click on the ‘More actions’ ellipsis (…).
- Select ‘Start recording’ from the dropdown menu.
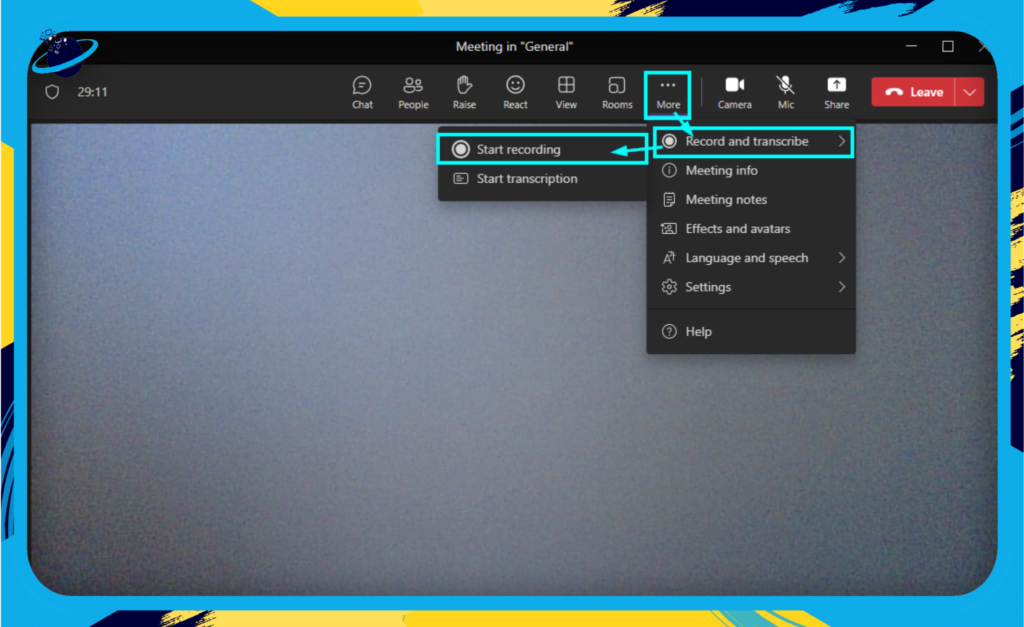
Voila! Your meeting is now being recorded and will continue until you choose to stop it.
Stopping and Saving Recordings
To end the recording, you can follow a similar process:
- Click on the ‘More actions’ ellipsis (…) in the meeting controls.
- From the dropdown menu, select ‘Stop recording’.
- A notification pops up, confirming the recording has ended.
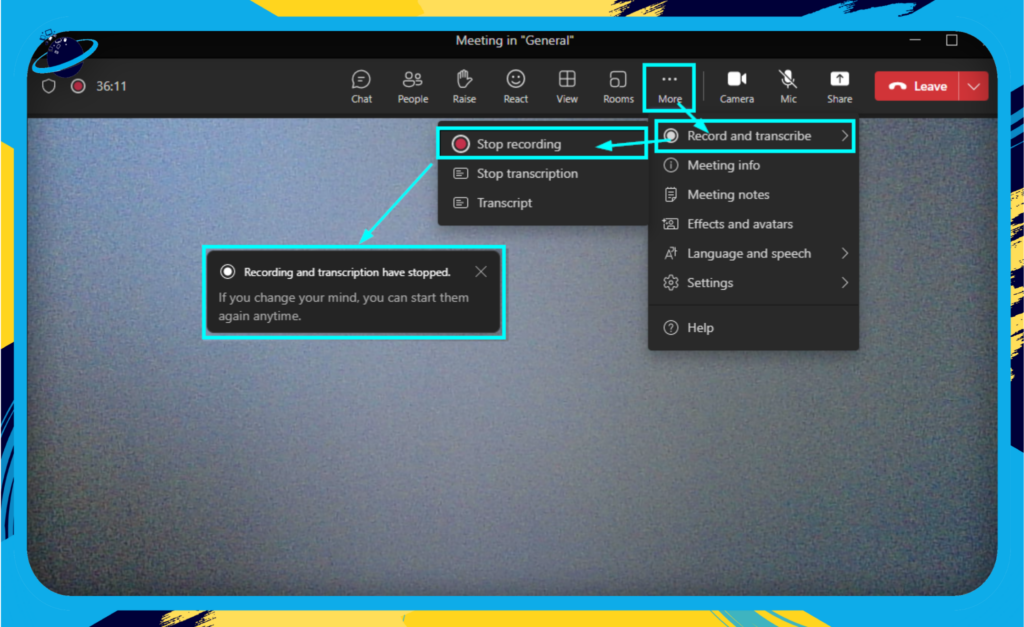
After stopping the recording, Teams automatically saves the file. It could take a little time to process, but don’t worry; Teams will send you an email once your recording is ready for viewing.
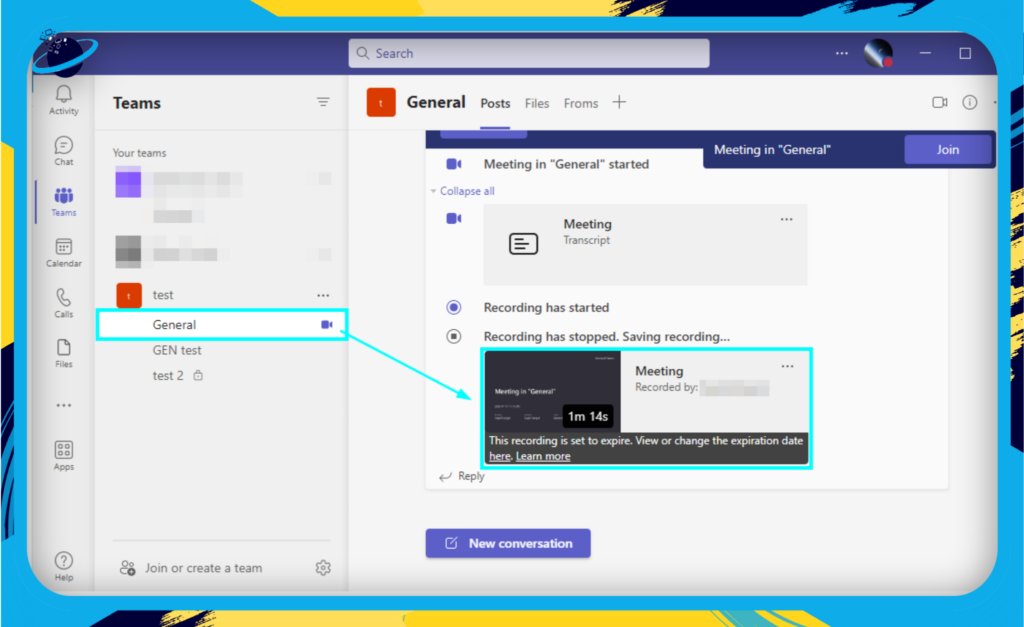
Accessing and Sharing Recorded Meetings
Accessing your recorded meetings is as easy as pie:
- Go to the ‘Chat’ panel of the meeting where the recording happened.
- The recording will appear as a Microsoft Stream link.
- Click on the link to play the video.
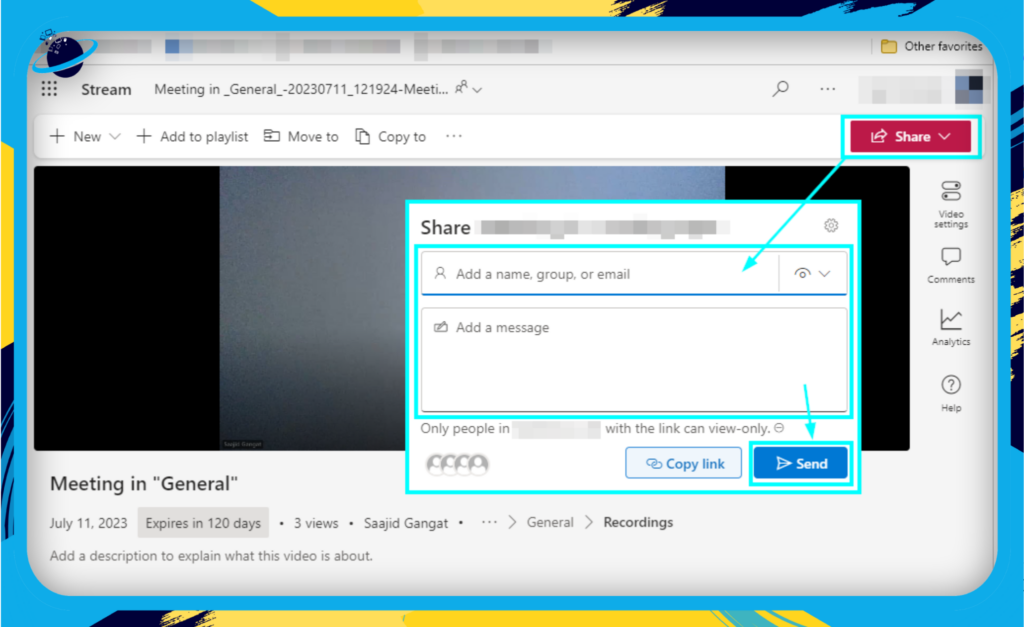
Sharing is caring! If you want to share the recorded meeting with someone:
- Simply click on the ‘Share’ button.
- Input the recipient’s details and click on ‘send.’
In summary, Microsoft Teams’ recording feature is a powerful tool that can transform the way you do meetings. So, hit that record button and never miss a beat (or a word)!
Harnessing the Power of the Chat Function
When it comes to virtual meetings, seamless communication is key. The chat function in Microsoft Teams is a powerful tool that allows you to converse with your team members during a meeting without interrupting the main discussion. Let’s break down how you can utilize the chat function effectively:
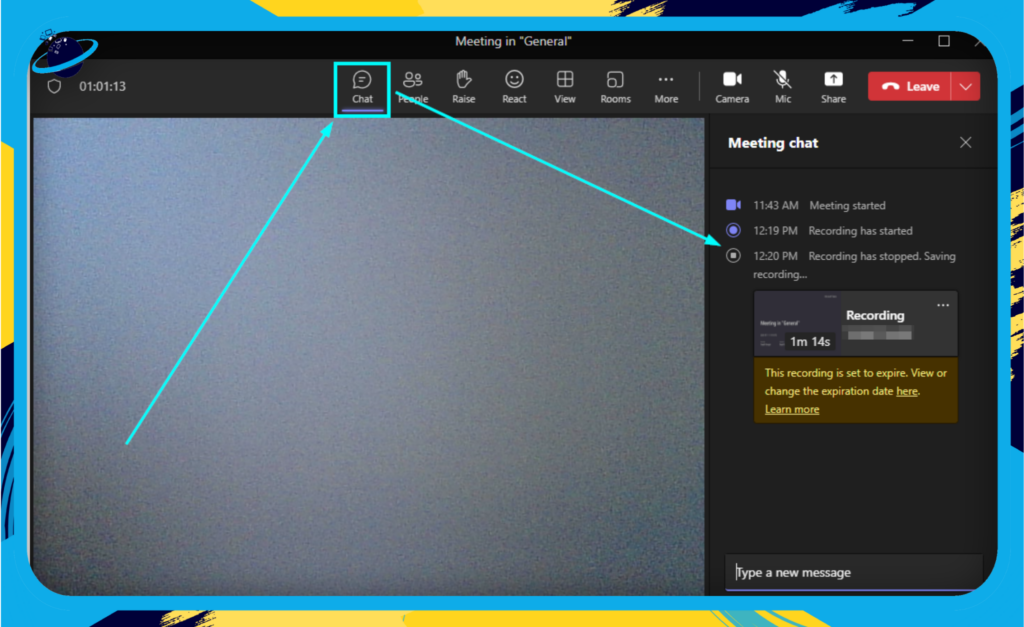
Sending Messages
While in a meeting, simply click on the ‘Show conversation’ icon on the meeting controls panel. This will open the chat window on the right side of your screen. Here, you can type and send messages to all participants in real time.
- Tip: If you want to draw someone’s attention to a message, use the ‘@’ function to mention them specifically.
Sharing Files
Microsoft Teams makes it easy for you to share files with your colleagues. In the chat window, click on the ‘Attach’ (paperclip) icon located at the bottom of the chat window. You can then choose a file from your computer, Teams, or even from cloud storage like OneDrive.

- Tip: You can view all files shared within a meeting by clicking on the ‘Files’ tab at the top of the Teams window.
Asking Questions
Sometimes, you might have a question during a presentation, but you don’t want to interrupt the speaker. The chat function can come to your rescue. You can post your question in the chat, and the speaker or another participant can answer when it’s convenient. This helps maintain the flow of the meeting while ensuring your question gets answered.
- Tip: To make sure your question doesn’t get lost in the chat, consider using the ‘Reply’ function to respond directly to a specific message.
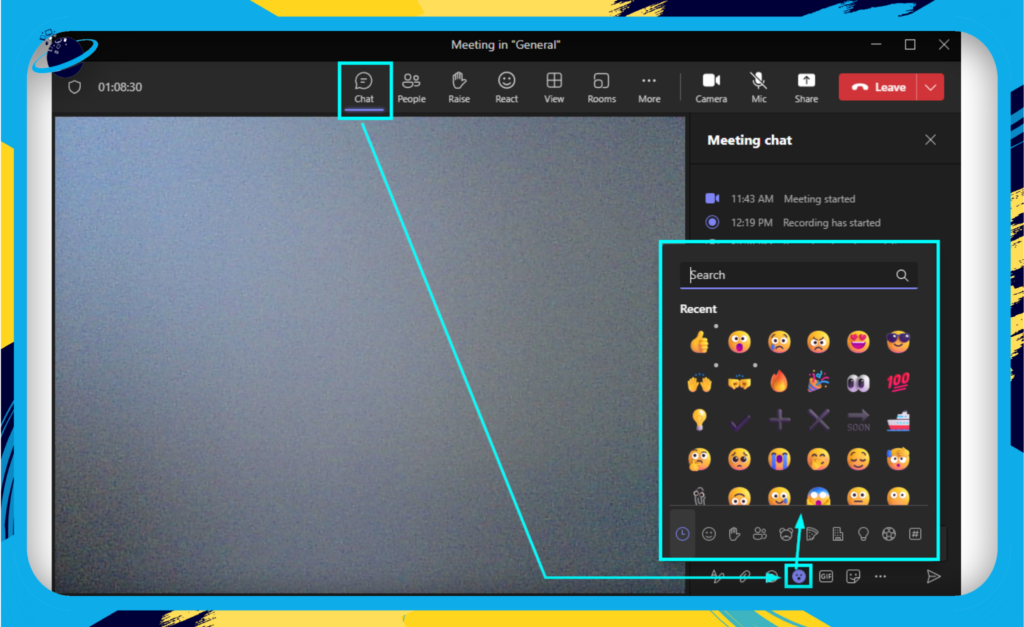
Using Emojis, GIFs, and Stickers
A little bit of fun never hurt anyone, right? Microsoft Teams offers a range of emojis, GIFs, and stickers that you can use to add a bit of flavor to your conversations. Simply click on the relevant icons at the bottom of your chat window to access these options.
Remember, effective communication is the backbone of productive virtual meetings. Harness the power of the chat function in Microsoft Teams to make your conversations clearer, more interactive, and even a bit more fun. After all, who said work couldn’t be enjoyable?
Harnessing the Power of Collaboration Tools
Microsoft Teams is not just about virtual meetings. It’s also a powerful collaboration hub. We’ll delve into these collaborative features, like the Whiteboard and integrated Microsoft Office tools, to truly enhance your virtual team experience.
Brainstorming with Whiteboard
Feeling nostalgic for the good old days of brainstorming on a physical whiteboard? Teams have you covered. The Whiteboard feature in Teams provides a freeform digital canvas where you and your team can ideate, collaborate, and visually bring your ideas to life, even if you’re miles apart.
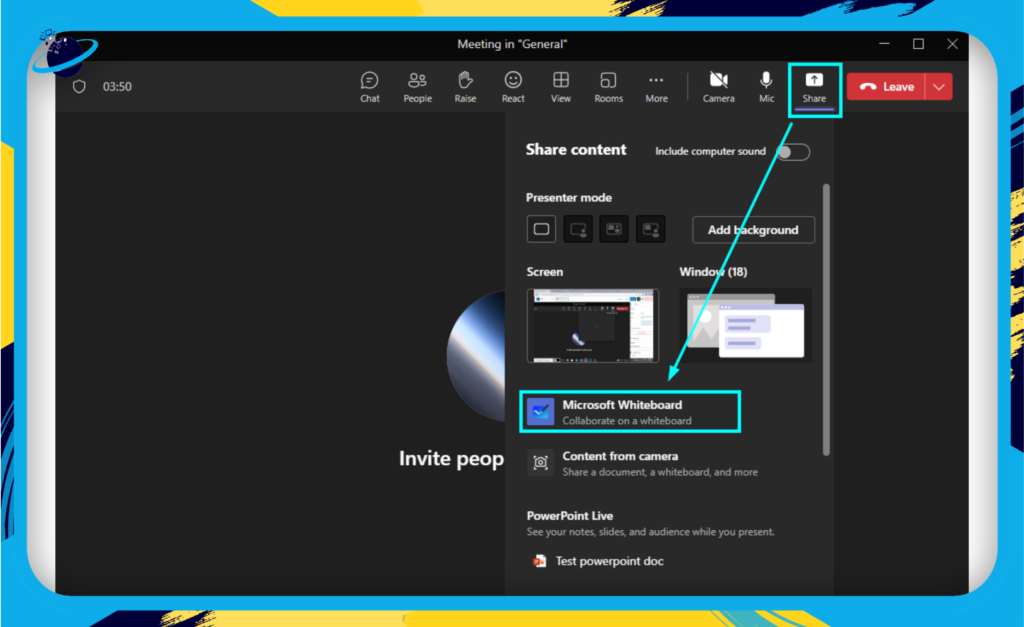
- How to Access Whiteboard: During a Teams meeting, select Share content on your meeting controls, then Whiteboard.
- Using the Tools: Whiteboard has a selection of tools like pens, text, and sticky notes that you can use. Choose what works best for your session.
- Saving your Whiteboard: Worried about losing your brilliant ideas after the meeting? Don’t be. Whiteboards are automatically saved and can be reopened later for further brainstorming or review.
Remember, just like a real-life brainstorming session, encourage every participant to contribute, and ensure all ideas are considered.
Real-Time Collaboration with Microsoft Office
Microsoft Teams seamlessly integrates with other Microsoft Office tools, making it a one-stop solution for all your collaboration needs. You can work on Word documents, Excel spreadsheets, or PowerPoint presentations together in real-time, making the review and editing process a breeze.
- Sharing a Document: Start by uploading the document to Teams. Then, during a meeting, use the Share Content button and select the document.
- Collaborating in Real Time: Once shared, any changes made by participants are updated in real-time, making a collaboration truly live and interactive.
- Using the Chat Function: Use the chat function to discuss changes, clarify doubts, or share insights while working on the document.
Note: Confidential documents should be shared wisely. Make sure you’re aware of your company’s policy on data privacy and protection.
Microsoft Teams’ collaboration tools can be game-changers for your team’s productivity. Don’t just meet – collaborate! Your next big idea could be just a virtual brainstorming session away.
Managing Participants: Master the Art of Meeting Control
In the grand theater of virtual meetings, being the host doesn’t merely mean being the lead actor; you’re also the director. As such, Microsoft Teams provides several features that allow you to effectively manage participants. This section will guide you through these features, allowing you to conduct meetings like an accomplished maestro, ensuring everyone gets their time to shine, and reducing the chances of cacophonous interruptions.
Mute/Unmute Participants
At times, a meeting can become a symphony of background noises – the rustling of papers, the clickety-clack of keyboards, and the occasional dog bark. Luckily, Microsoft Teams offers an easy solution.
- To mute a participant, simply navigate to the list of participants, locate the person you’d like to mute, and click on the microphone icon next to their name. Remember, it’s good practice to inform the participant before muting them to avoid any misunderstanding.
- Unmuting a participant follows a similar process. However, bear in mind that you can’t unmute someone. They will need to do this themselves when they’re ready to speak. You can send a prompt to the participant to unmute themselves when their turn to speak arrives.
Removing Participants
Sometimes, you may need to remove a participant from the meeting – perhaps they’ve joined by mistake or are causing disruptions.
- To remove a participant, find their name in the participant list, click on the ‘More options’ button (denoted by three dots), and select ‘Remove participant.’
Giving Presentation Control to Others
Teamwork makes the dream work, and sometimes you’ll want to pass the baton to another team member to share their insights or lead a part of the discussion.
- To give control, start sharing your screen, then select ‘Give Control’ on the sharing toolbar, and pick the person you want to give control to.
- To take back control, simply select ‘Take Back Control’ on the sharing toolbar.
Remember, no one can take control of your screen without your permission, ensuring that your privacy is always safeguarded.
By understanding and utilizing these participant management features in Microsoft Teams, you can ensure your meetings run smoothly, efficiently, and professionally. In the next section, we’ll explore the exciting world of Breakout Rooms – stay tuned!
Utilizing Breakout Rooms for Efficient Teamwork
In today’s bustling digital meeting rooms, Microsoft Teams offers a fantastic feature to maintain the intimacy of smaller groups and facilitate efficient teamwork. Enter Breakout Rooms—the perfect solution for dividing your large group meetings into smaller, more manageable discussion units. In this section, we’ll explore how to create and manage these rooms for a streamlined and effective meeting experience.
Setting Up Breakout Rooms
Creating Breakout Rooms is a breeze. Follow these steps:
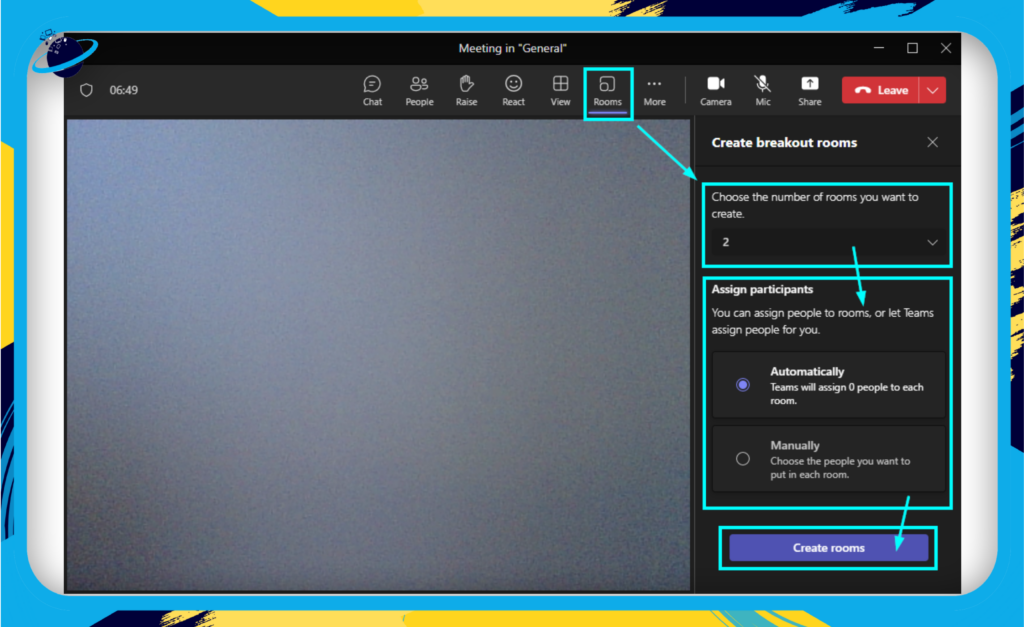
- Begin a Teams meeting as a meeting organizer.
- In the meeting controls, select Rooms.
- Choose the number of rooms you want to create (Teams allows up to 50 breakout rooms in a single meeting).
- Select ‘Automatically’ if you want Teams to assign participants to rooms or ‘Manually’ if you prefer to assign participants yourself.
- Finally, hit ‘Create Rooms’ to complete the process.
Remember, only the meeting organizer can create and manage Breakout Rooms.
Breakout Rooms Best Practices
To ensure a smooth Breakout Room experience, consider these tips:
- Plan ahead: Think about the number of rooms and groupings ahead of the meeting. This will save valuable time during the meeting.
- Assign roles: Assigning a group leader or note-taker for each room can help keep discussions focused and productive.
- Time management: Keep track of time and give participants a heads-up before closing rooms. This allows for a smoother transition back to the main meeting.
- Record or take notes: Important discussions and ideas can emerge in Breakout Rooms. Make sure to record or take notes to share with the larger group or reference later.
By effectively leveraging Breakout Rooms, you can transform your large, potentially unwieldy meetings into more personal, focused, and efficient discussion spaces. With this feature, every participant has a voice, and every voice is heard. Embrace the power of small-group collaboration with Microsoft Teams Breakout Rooms!
Mastering the Art of Virtual Meeting Etiquette
Navigating the digital workspace is not solely about understanding technical aspects; it’s also about establishing and adhering to an etiquette that promotes productivity and respect among participants. In this section, we’ll delve into the ‘dos’ and ‘don’ts’ of Microsoft Teams meeting etiquette.
Be Punctual
Being on time is the first rule of any meeting, virtual or otherwise. In fact, aim to join the meeting a few minutes early to check your audio and video settings. This shows respect for others’ time and allows the meeting to start promptly.
- Action Tip: Use Teams’ reminder notifications to ensure you never miss a meeting.
Mute When Not Speaking
One of the most common etiquette mistakes in virtual meetings is leaving the microphone on when not speaking. This can lead to background noise which can be distracting for other participants.
- Action Tip: Make it a habit to mute your microphone when you’re not speaking. Remember to unmute when it’s your turn to talk.
Avoid Interruptions
Interrupting someone while they are speaking can derail the conversation and cause misunderstandings. Use the “Raise Hand” feature in Teams to indicate that you have something to say. This feature allows the meeting organizer to manage the discussion effectively.
- Action Tip: Encourage the use of the “Raise Hand” feature during your meetings.
Stay Engaged
Virtual meetings can be tricky, especially when cameras are off. It’s easy to lose focus or get distracted. However, it’s important to stay engaged in the discussion. Your input is valuable!
- Action Tip: Consider keeping your camera on to create a more engaging atmosphere.
Maintain Professionalism
Just because you’re not in a physical office doesn’t mean professionalism should be tossed aside. Dress appropriately, choose a clean and distraction-free background, and address others politely.
- Action Tip: Use the blur or custom background features in Teams to keep the focus on you, not your surroundings.
Remember, successful virtual meetings are a balance between mastering the tool and maintaining effective communication and respect among participants. A great meeting is just a click away!
Wrapping It Up
Congratulations! You’ve just navigated the comprehensive landscape of Microsoft Teams for virtual meetings. By now, you should feel confident in harnessing the power of this dynamic tool. Let’s take a moment to revisit some key takeaways.
Key Takeaways
- Getting Started and Meeting Set-Up: From downloading Microsoft Teams and creating your account to scheduling and managing your meetings, you’ve covered the basics and the intricate. Remember, preparation is the key.
- Audio, Video, and Presentation: Mastering these settings can greatly improve the effectiveness of your communication and presentations. A smooth-running meeting is a successful one.
- Features and Tools: Understanding and utilizing the variety of features available, like chat, screen sharing, and breakout rooms, is crucial for an engaging and productive meeting.
- Etiquette and Accessibility: Observing the right etiquette and leveraging accessibility features ensures a respectful and inclusive meeting environment.
This guide has given you a toolkit for success, whether you’re hosting a brainstorming session, a presentation, or simply catching up with your team. Remember, practice makes perfect – don’t be afraid to experiment with features until you’re comfortable.
Looking Forward
Invest in your skillset with Microsoft Teams to lead productive meetings from anywhere. Use it to build relationships, drive innovation, and enhance productivity within your team. Embrace adapting to new ways of working and seize the day with today’s leading digital tools.