The main capacity of Microsoft Teams, as I’m sure you are aware, is that it has the ability to allow the user to host and join video meetings. It is hardly surprising that the application boomed in popularity over the last year or so given the circumstances of the wider world, as people have been forced to find solutions to previously unprecedented questions.
Course, as is the case with any program or application, you are bound to encounter some errors in Microsoft Teams throughout the time in which you use it. One such error is when the application will not let you record a meeting that you are in, which given the nature of Teams, is something of a major issue.
Thankfully though, there is a solution to this. In order to enable recording within Teams meetings, you have to ensure that your application is allowing cloud recording. To do this, you need to access the settings in your Microsoft Teams admin center, more specifically, the Meetings policies of your Microsoft Teams admin options.
Now, if the above sentence alone is not enough detail for you to work with, then do not worry. As is the case with every article we publish, we will first look at the process in slightly more detail via a step by step, which will offer you a deeper insight and may well serve to be enough for some people.
If not though, again, do not worry. After that, we will break down the process in complete detail for those who need it. With this explanation will be accompanying screenshots with annotations to best bolster your aid.
DISCLAIMER: This process can only be completed if you have access to the Microsoft Admin center, which you will only have if you are a global admin. If you do not have access to this, then this can be resolved by discussing your permissions with your local provider.
- Get Microsoft Teams from just $4.00 per month with Microsoft Teams Essentials.
Step by step: Microsoft Teams won’t let me record meetings – How to solve
- Access Microsoft Admin via the application launcher in the top left corner of your screen.
- From here, look to the left sided listing menu. At the bottom will be an option named ‘Show All’. Click this.
- Now, of the new options, click the one titled ‘Teams’.
- This will bring you to the main menu of the Teams admin center.
- From here, click the subheading titled ‘Meetings’.
- Now, click ‘Meeting Policies’, which will be a drop down from the overarching ‘Meetings’ heading.
- Here, you should see a list of different features of your Teams application.
- There should be one called ‘Global (Org-wide default)’. Click that.
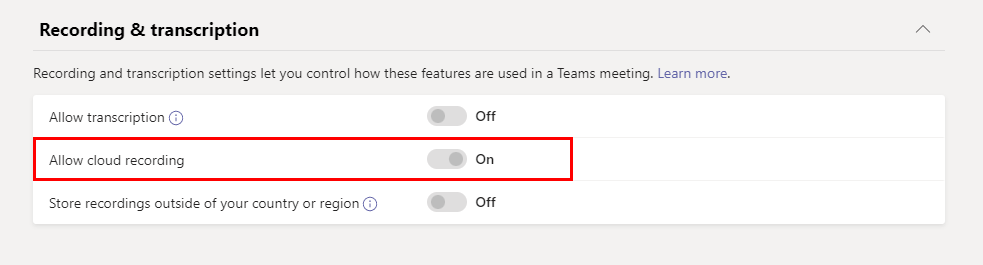
- From this, scroll until you see the heading that reads ‘Recording and Transcriptions’.
- Under this will be a toggle for whether or not Teams will allow cloud recording.
- Make sure this is set to ‘On’.
- Scroll to the bottom of the screen and click ‘Save’ to save your changes.

We will now delve into the process deeper in a completely thorough walkthrough.
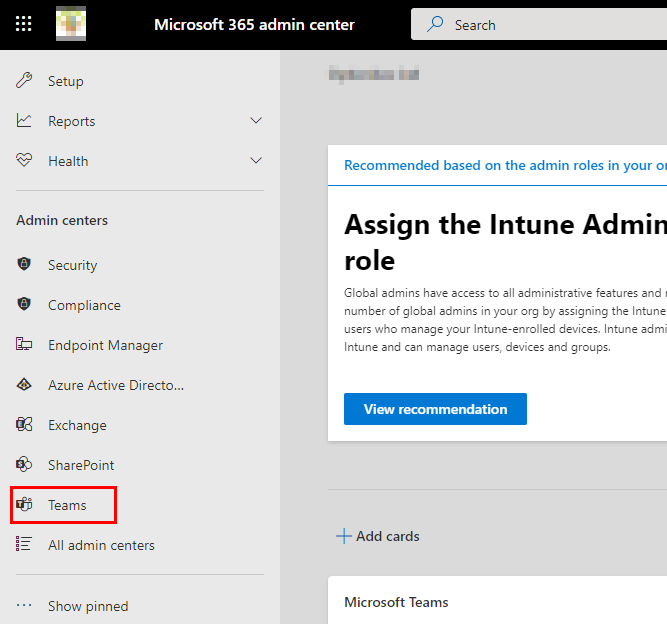
Your first step will be to access Microsoft Admin. To do this, whilst you can definitely do it another way, your best bet would be to access another Microsoft application first, such as Outlook. From here, if you click on the app launcher in the top left corner, you will be able to access the Admin center with ease.

Clicking this will, very unsurprisingly, bring you to the Admin dashboard, from which you can browse and edit numerous arms of settings. There will be a menu to your left, listing down numerous subsections of options. At the very bottom will be an option that reads ‘Show All’, and it is this you will want to click.

Clicking this will, as you should expect, show you every option of Microsoft Admin, revealing those previously hidden. The ‘Admin Centers’ bracket of options will noticeably expand, going from just Exchange to several choices. Of these choices, one will be to go to the Teams admin center, and it is this that you will want to click.
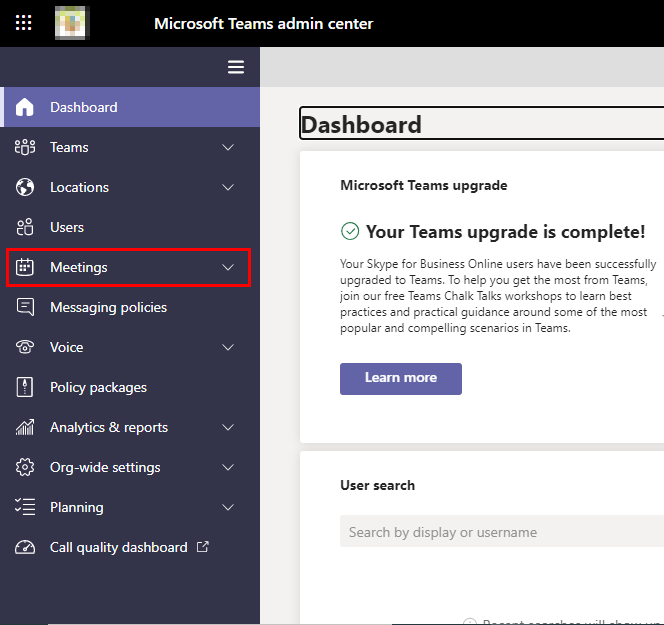
This will bring you to the main hub of the Microsoft Teams Admin Center, from which you will be able to delve further into editing your recording preferences within the application. Again, there will be a menu on the left side of your screen, and there should be a heading that reads ‘Meetings’, which is what you will want to click.
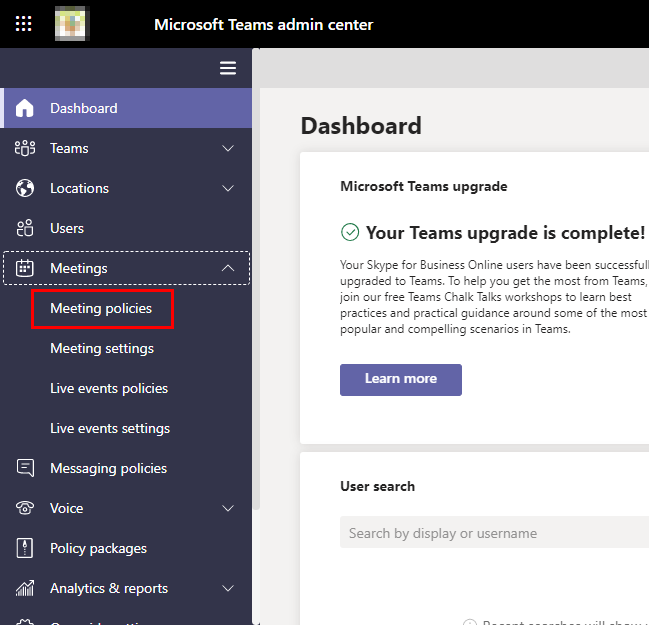
Clicking ‘Meetings’ will, as you will probably expect now, present you with another list of options. One of these options will be titled ‘Meetings Policies’, and it is this that you will want to click to progress through the walkthrough.
Clicking this will bring you to a menu on which you can manage a selection of policies that will present themselves to you on a new dashboard. Scrolling down slightly will show you the policies within your organisation that you can edit. Whilst these, of course, will be specific to your individual organisation, there will be an option at the foot of this list titled Global (Org-wide default). It is this that you will want to click.

After clicking this, you will be offered a variety of options to edit. Scroll down the page slightly, stopping only when you find the heading that is titled ‘Recording and Transcription’. Under this will be a toggle option for the setting, ‘Allow cloud recording’. Make sure this option is set to ‘On’, as it is below.
Following this, scroll to the bottom of the screen and click ‘Save’ to save the changes you have made, and then the process is complete!
Thank you for taking the time to read this blog, I hope you found it as helpful as you wanted it to be! As is the case with every article we publish on the site, if you run into any issues whatsoever when following the tutorial, or simply wish to share some thoughts you may have on any aspect of it, then please do not hesitate to get into contact with a member of our team.