Within Microsoft PowerPoint, there is a feature known as ‘Presentation Notes’. That being said, they are also frequently known as ‘Speaker Notes’. The notes are used by the presenter of the slideshow as something of a prompt, quick reminders to spur them on in their speeches. You can probably imagine that such a feature is incredibly useful.
Sometimes though, PowerPoint can prevent the user gaining complete access to their speaker notes by not allowing the user to print them. Thankfully, there is a solution to this issue which we will delve into shortly. First though, what causes such an issue with the speaker notes of Microsoft PowerPoint?
If your speaker notes are not printing, then chances are it is because your device, be that a phone or computer, is not linked to any nearby printer.
So, in this article, we will first show you how to link your device to a printer, and then we will look at the settings you should choose when printing Presentation Notes.
As is the case with every article we write, do not worry if this alone is not enough detail for you to work with. We will first show you a step by step of each process, before breaking each of them down into further detail, with a more thorough walkthrough complete with accompanying screenshots to best suit your aide.
Step by step: PowerPoint won’t print Presentation Notes: How to fix
- First, you will want to open your Control Panel.
- After doing this, click the subheading titled ‘Hardware and Sound’.
- From here, look for the heading that reads as ‘Devices and Printers’.
- Under this will be an option that is titled as ‘Add a device’. Click this.
- On the menu that arises, select a printer to sync your device with.
So, in order to complete the first of these steps, you will need to open the ‘Control Panel’ of your computer. This is a section of your device, from which you can analyse and edit multiple different facets of the computer on which you work.
Whilst you can attempt to find the control panel manually, you would be better off using the search bar that comes pre-equipped with the navigation bar at the bottom of your screen. Enter ‘Control Panel’ into the search bar, and click the first option that presents itself to you. Both the search bar and the option you should see and click have been highlighted, should you need the assistance.

Opening the control panel will, fairly unsurprisingly, bring you to its main menu. Here, you can see the overarching subtopics of options that you are free to browse and edit. From this screen, you will want to look towards the subsection titled ‘Hardware and Sound’, which again, has been highlighted in the screenshot below.

Clicking ‘Hardware and Sound’ will understandably bring you to the menu of hardware settings, such as printers. From here, the top title should read as ‘Devices and Printers’. Under here will be a sub option that reads ‘Add a device’. This has been emboldened below via the red rectangle.

Clicking this will cause a submenu to arise, on which you can select the printer you wish to link to your computer.
Now that we have that out of the way, it is time to look at the settings you should look to edit within PowerPoint itself to alter the issue you are having with your presentation notes. Again, as was aforementioned, we will first offer you a step by step before delving deeper into the process.
This process looks at editing the sizing of the notes, as sometimes issues within this can corrupt them.
STEP BY STEP: HOW TO FIX POWERPOINT PRESENTATION NOTES
- Open your Microsoft PowerPoint application.
- From the main menu, click the ‘File’ tab.
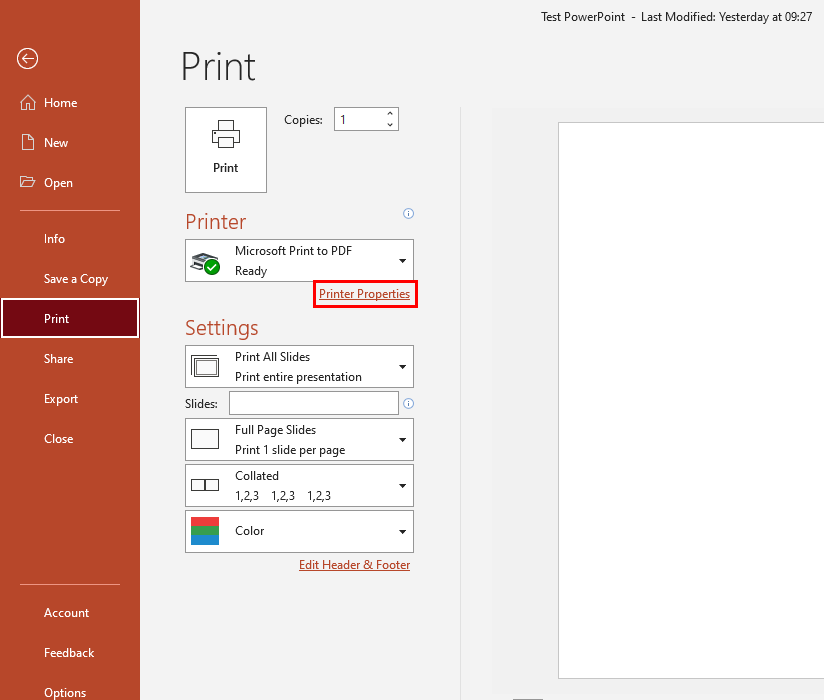
- Here, look to click the subsection titled ‘Print’.
- Now, under the subheading ‘Print’ (which is an option under the section titled ‘Print’, I’m aware it’s confusing), click ‘Printer Properties’.
- Clicking ‘Printer Properties’ will open a new, small menu for you to browse.
- Here, click the option ‘Advanced’.
- Next to where it says ‘Paper Size’, it will be defaulted to ‘Letter’.
- Click this, and select any other option. Then, select ‘OK’.
- Now, go back through these steps to reach ‘Paper Size’, and revert it back to ‘Letter’. Click ‘OK’ to save your changes again.
- Now, on the PowerPoint main screen, go to ‘View’ and select ‘Notes Master’.
- From this, right click on an empty grey spot of your screen and select ‘Notes Master Layout’.
- On this small menu, untick everything and select ‘OK’.
- Now, repeat the right clicking of the grey, and selecting ‘Notes Master Layout’, and re-tick everything. Then, click ‘OK’.
So, you will first want to open Microsoft PowerPoint. After doing this, look towards the top of the application and find the subheading ‘File’.

After clicking ‘File’, look to click ‘Print’, which again has been highlighted below.

After clicking ‘Print’, there will be a small option you can click titled ‘Printer Properties’, it is this you will want to click.
Clicking this will open a very small tab with a menu contained in it. On this menu, you should look to click the ‘Advanced’ option presented to you.

Here, you will see that by default, the paper size is set to ‘Letter’. Clicking this will prompt a drop down menu to appear, from which you can select a different paper size from numerous options. Click any that isn’t ‘Letter’, and then click ‘OK’ to save your changes.
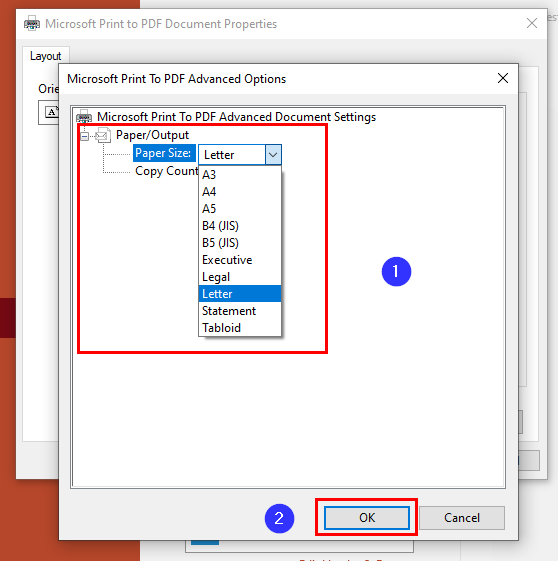
Now, follow those steps again, reaching this very advanced menu once more. Here, revert the paper type back to ‘Letter’ and click ‘OK’ to save this change. This is something of a hard reset, and may be enough alone to fix the printing issues you are having with your presentation notes.
If not though, there is some more you can do, as you will have gathered in the steps above. From the main PowerPoint screen, navigate to ‘View’.

On the ‘View’ tab, click ‘Notes Master’ to progress.

Now, on the grey area that surrounds the space on which you can type on PowerPoint, right click somewhere in that space. Then, opt to click ‘Notes Master Layout’.

This will open up a small tick box littered menu, on which you can edit certain permissions of the Notes Master layout. Here, you should first untick everything.

After this, your Notes Master should be empty. Similar to the above step, you will want to relive the process you have just done up to reaching this menu. Here, retick everything again, select ‘OK’ to save your options, and yet again, you will have done something of a hard reset in order to get the speaker notes working once more.
Thank you for taking the time to read this blog, I hope you found it as helpful as you wanted it to be! As is the case with every post we write, if you encounter any issues or simply wish to share your thoughts, then please don’t hesitate to get in touch with a member of our team.