When a “Microsoft Teams” team is established, it generates a few object instances, one of which is a SharePoint Team site. In a Team and Channel, this site is used to keep all files, wikis, and OneNote stored for members of the group both external and internal to access. Every “Microsoft Teams” Team member has “Member” permissions to this SharePoint Team site by default. This is entirely appropriate under regular circumstances. This ability is also granted to Guest users that are added to your “Microsoft Teams” Team. In certain cases, you may desire a Microsoft Teams Team where internal users may communicate and exchange documents, but a Guest user should only be allowed to chat and call within the Team, safeguarding your internal data in a blanket manner. We have all the information available for you if you need to restrict users from file sharing with external users in Teams, follow the steps below to see how you can prevent file sharing with external users.
How to Prevent file sharing with external users in Teams
Solution 1: Use the Teams admin center
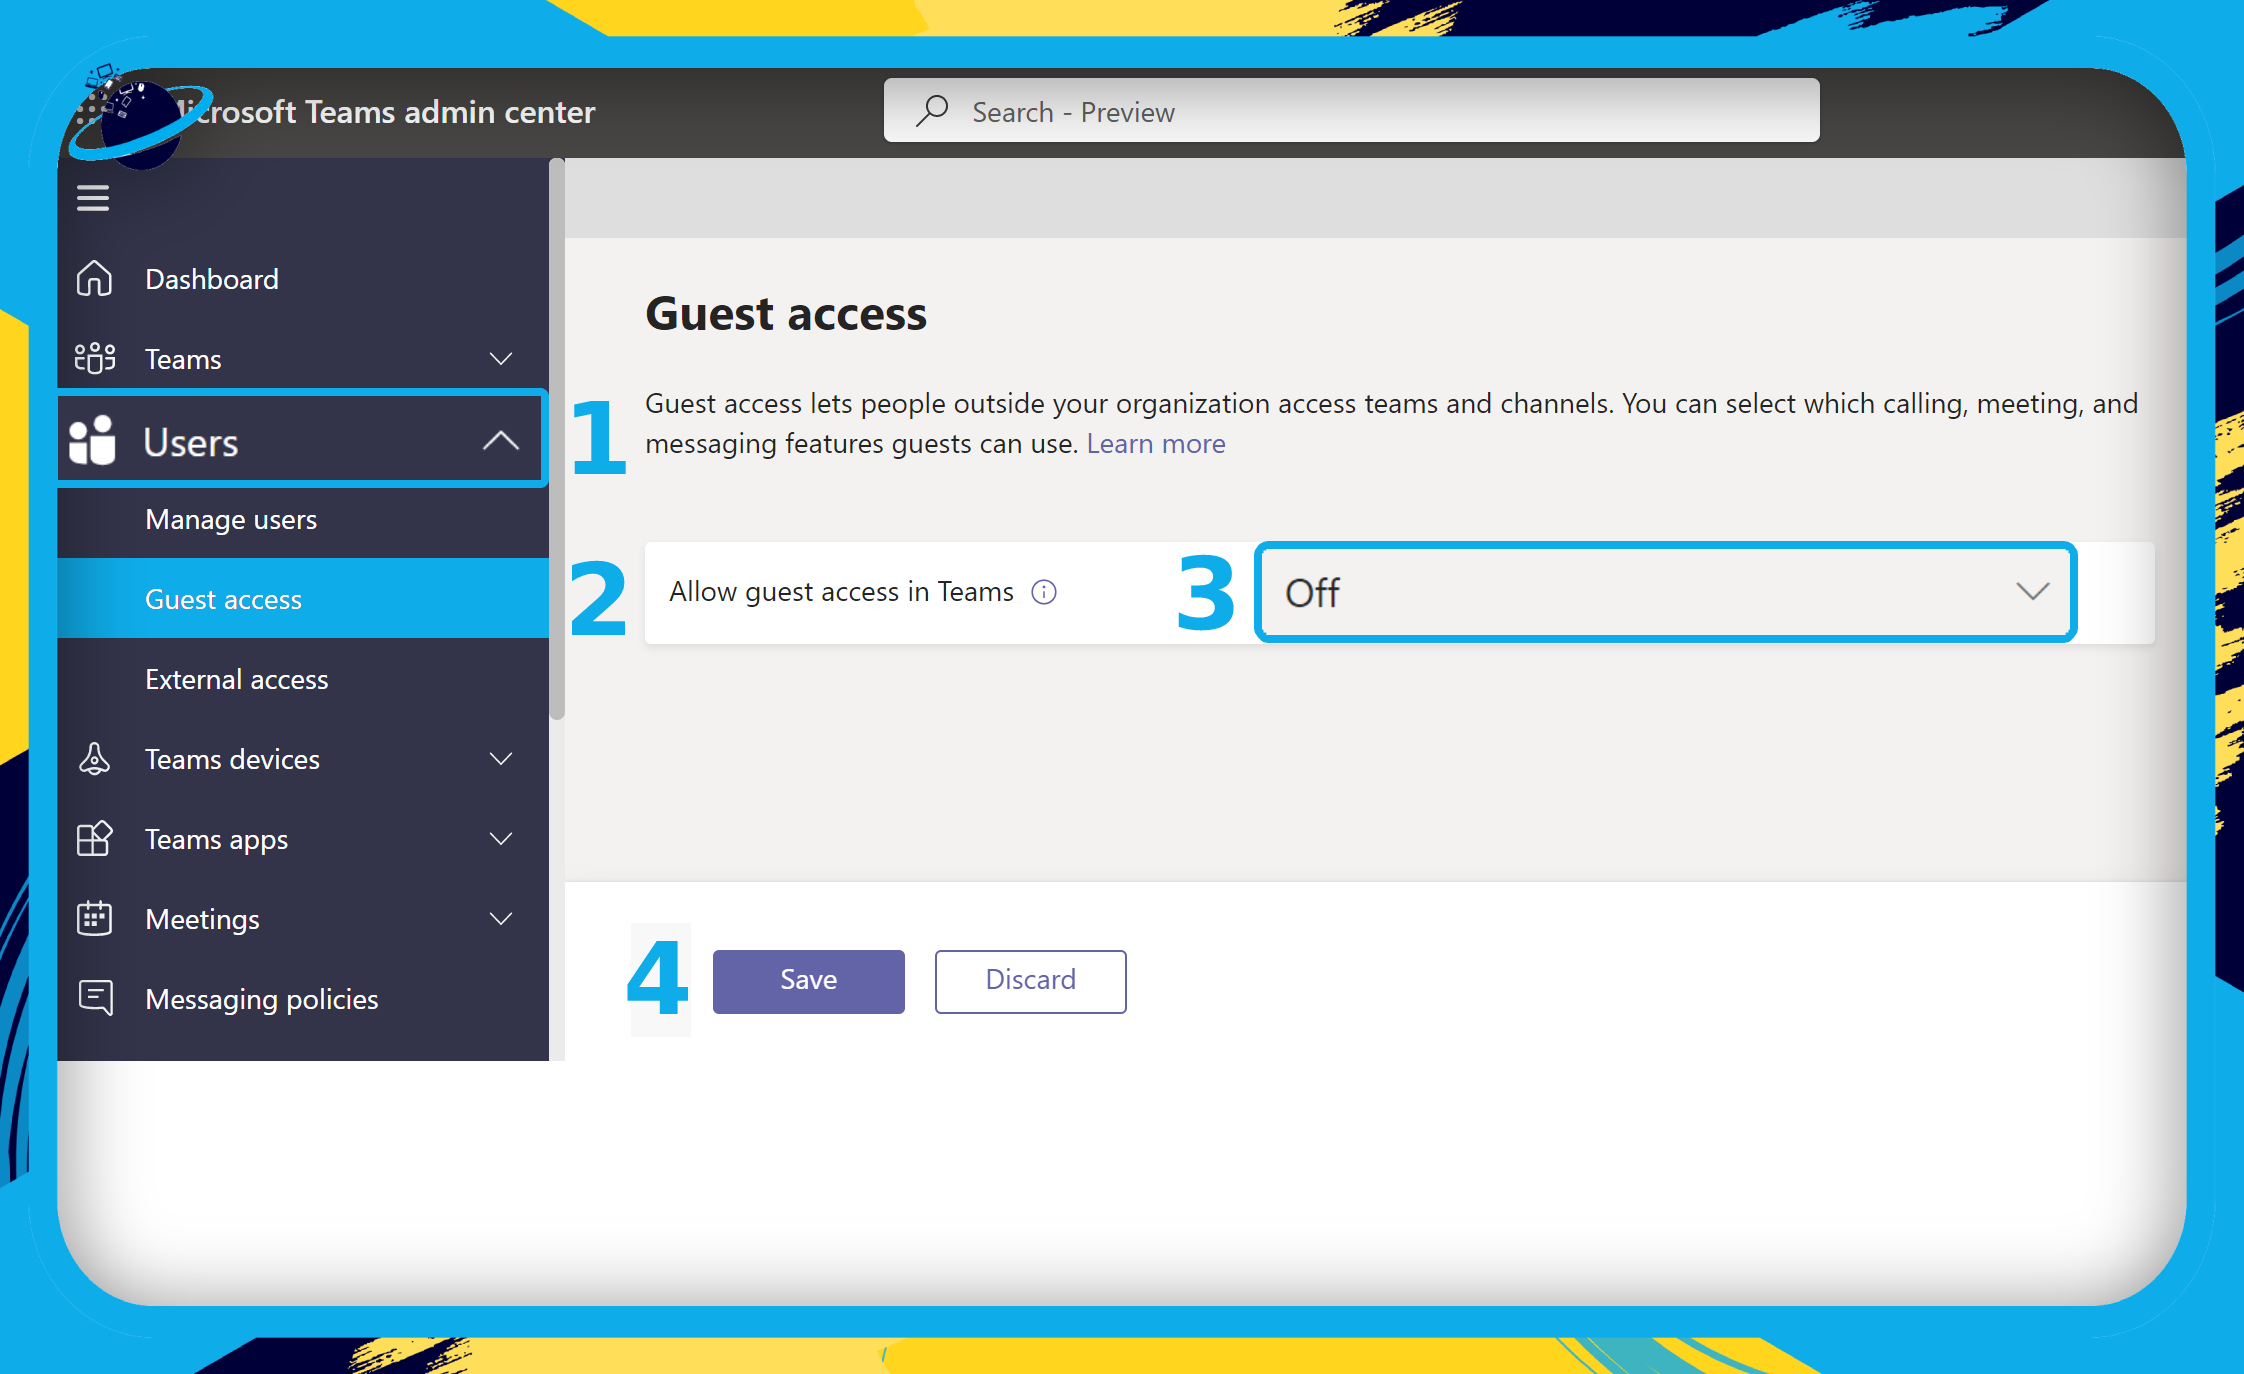
- First, open your Teams admin center.
- Click on “Users” in the left menu to reveal more options.
- Select “Guest access” from the revealed options.
- Click the select box next to “Allow guest access in Teams” and select “Off.”
- Then click the “Save” button.
Solution 2: Use SharePoint with admin permissions
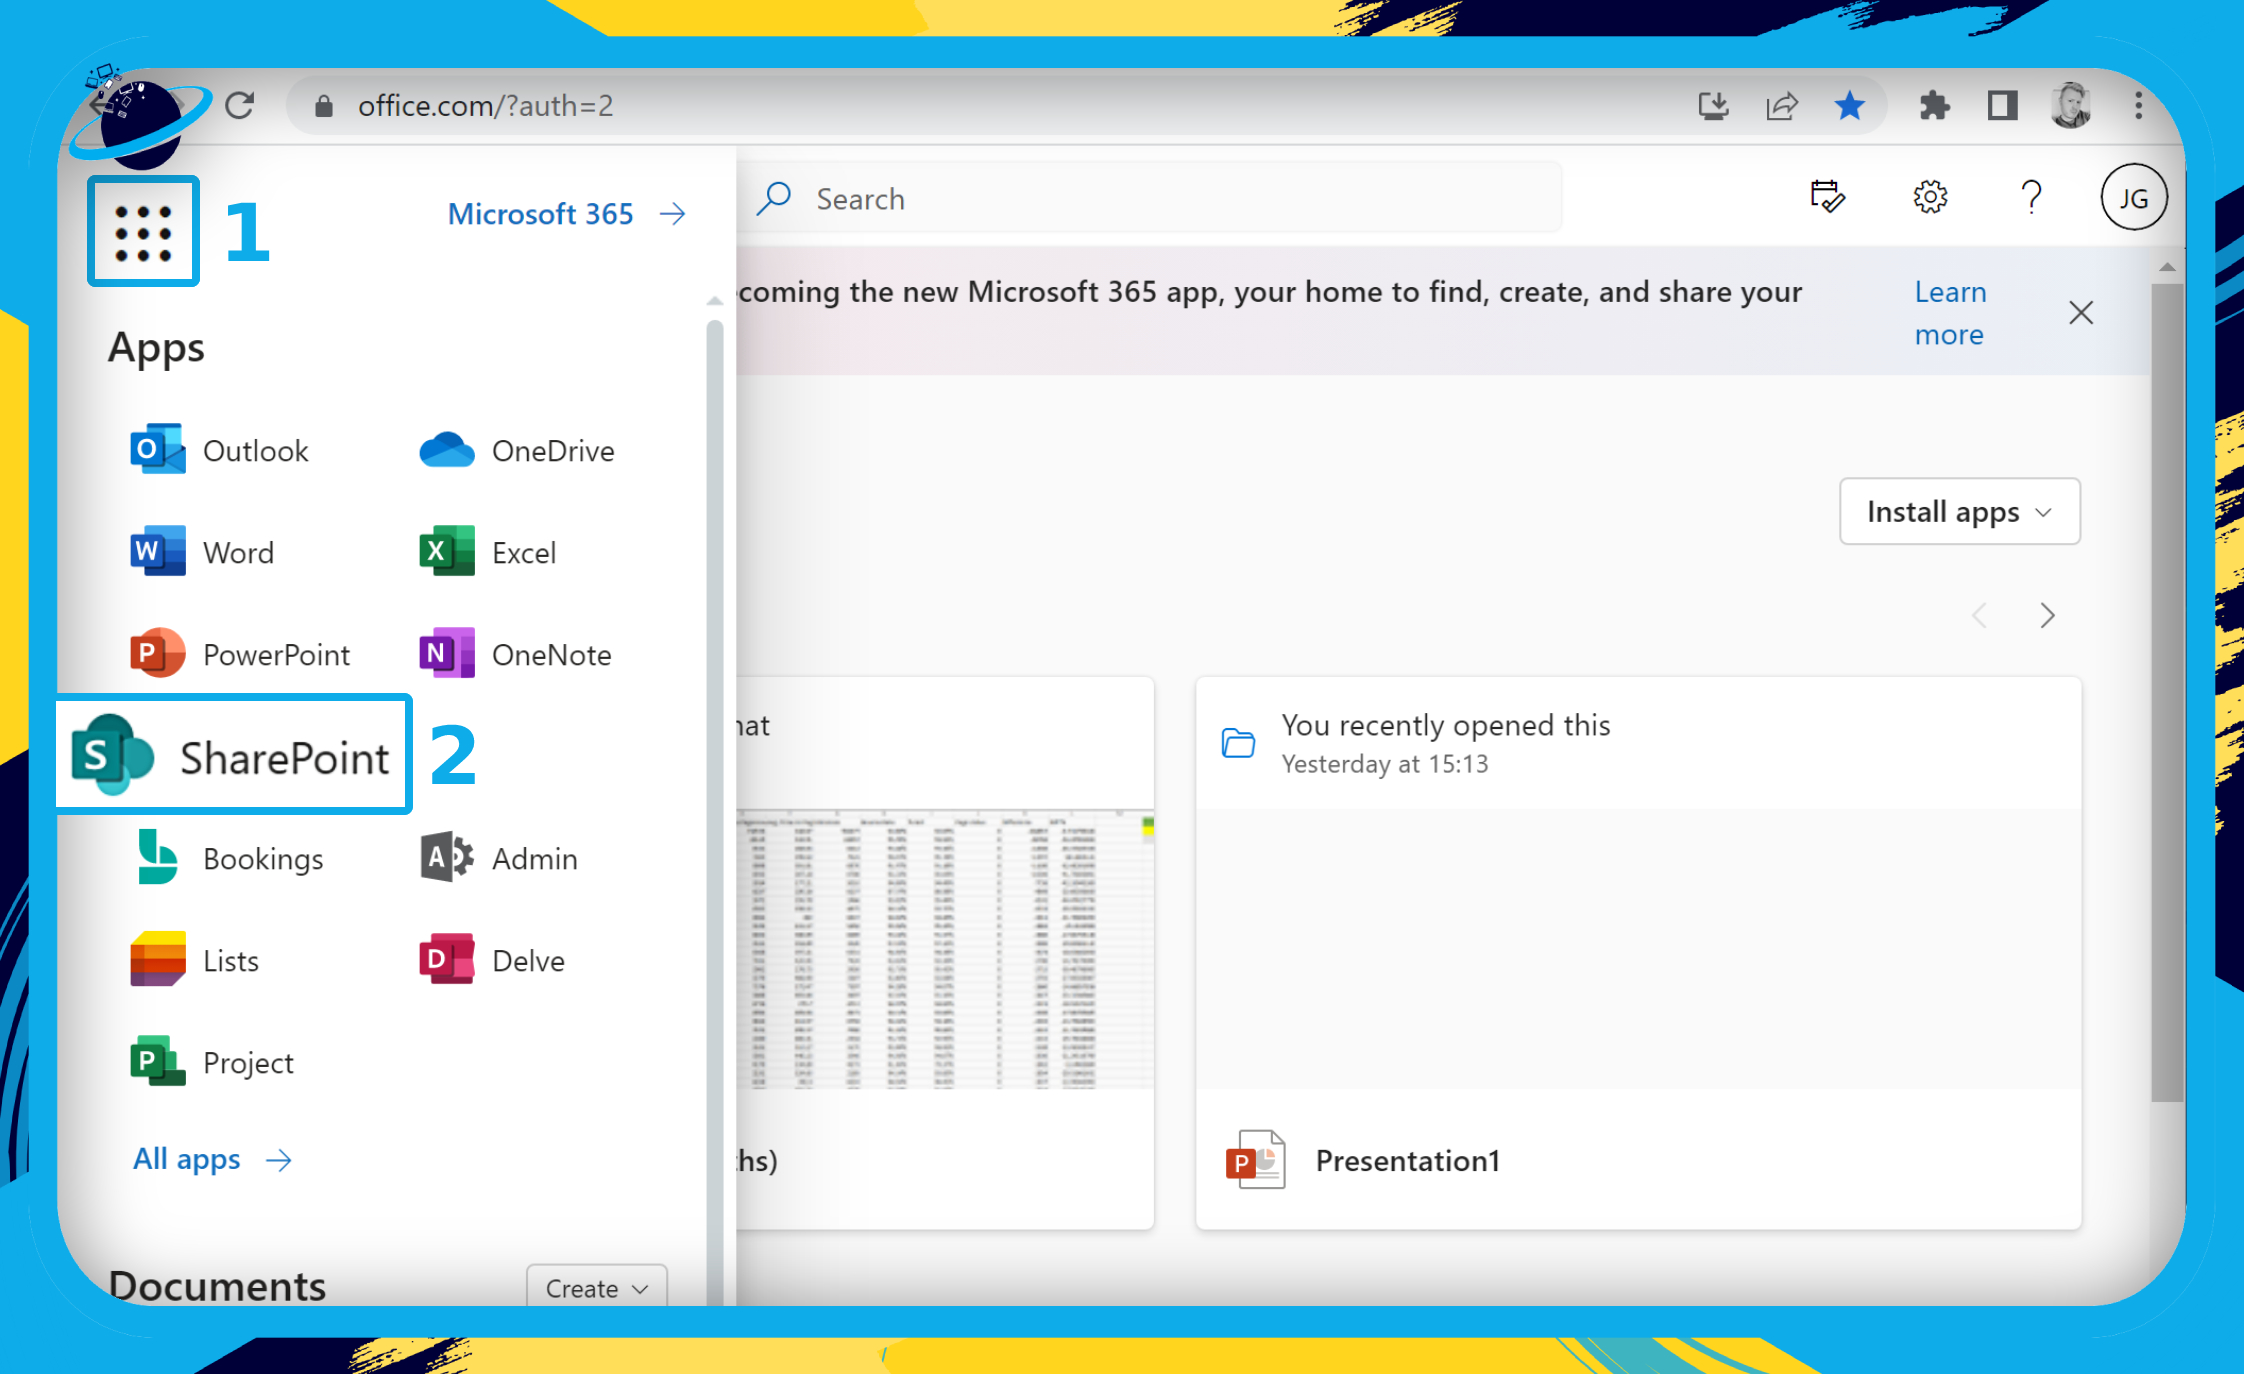
- First, sign in to Microsoft 365.
- Click the app launcher icon in the top left.
- Then click on “SharePoint.”
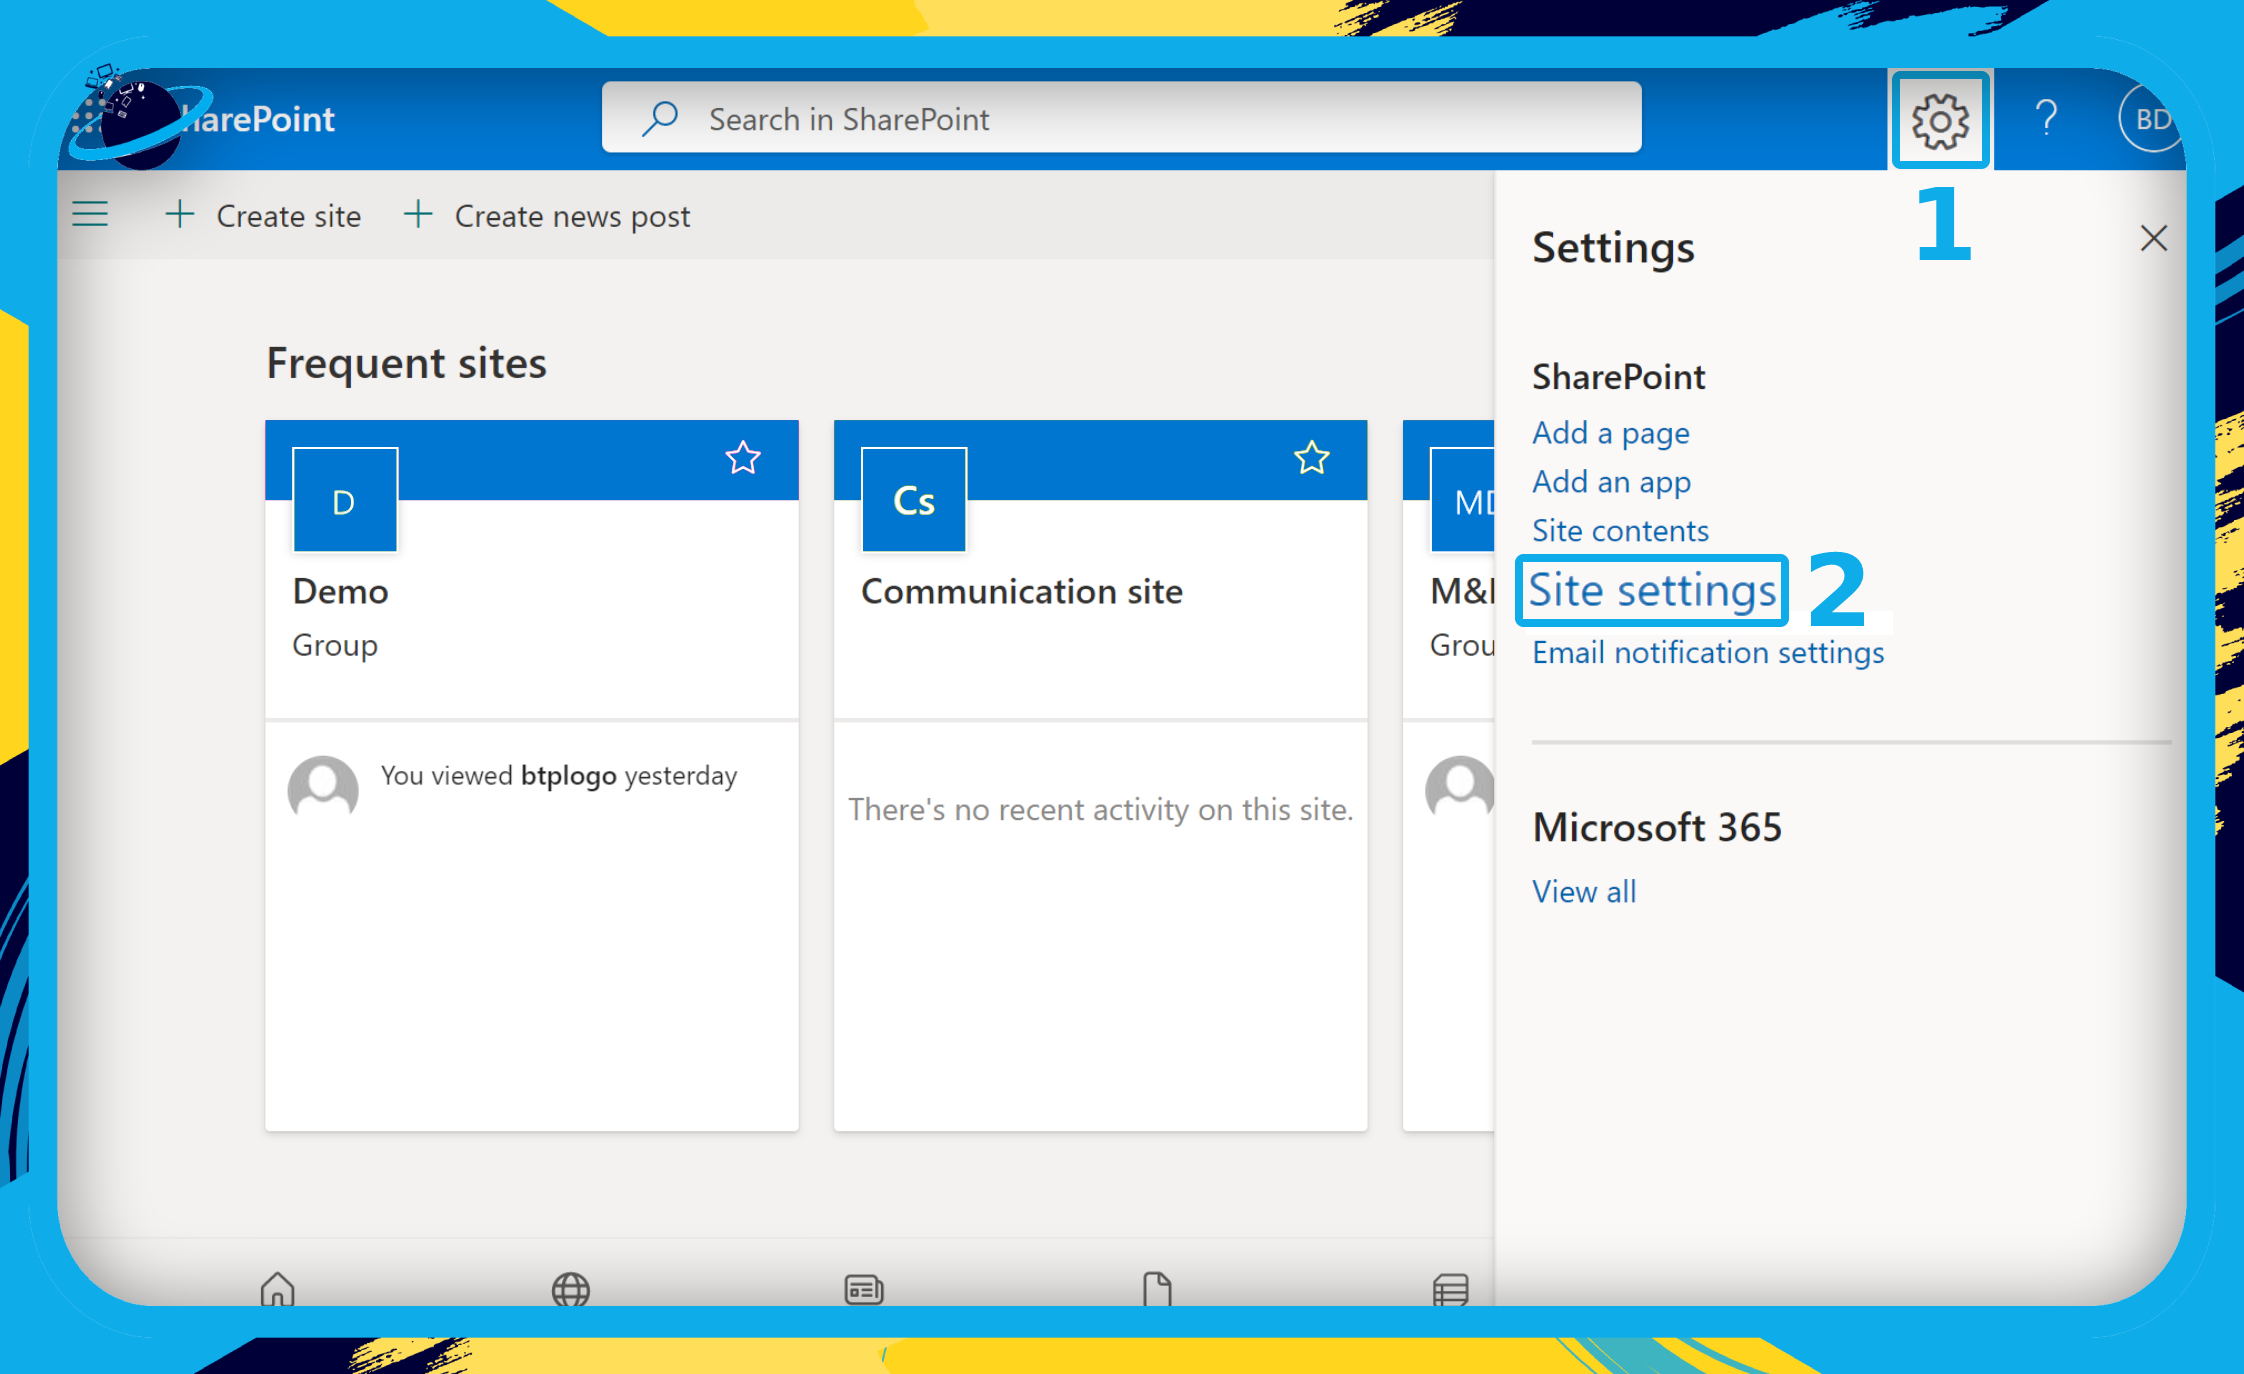
- In SharePoint, click on the
 gear icon in the top right to reveal the Settings menu.
 - Then select “Site settings” from the Settings menu.
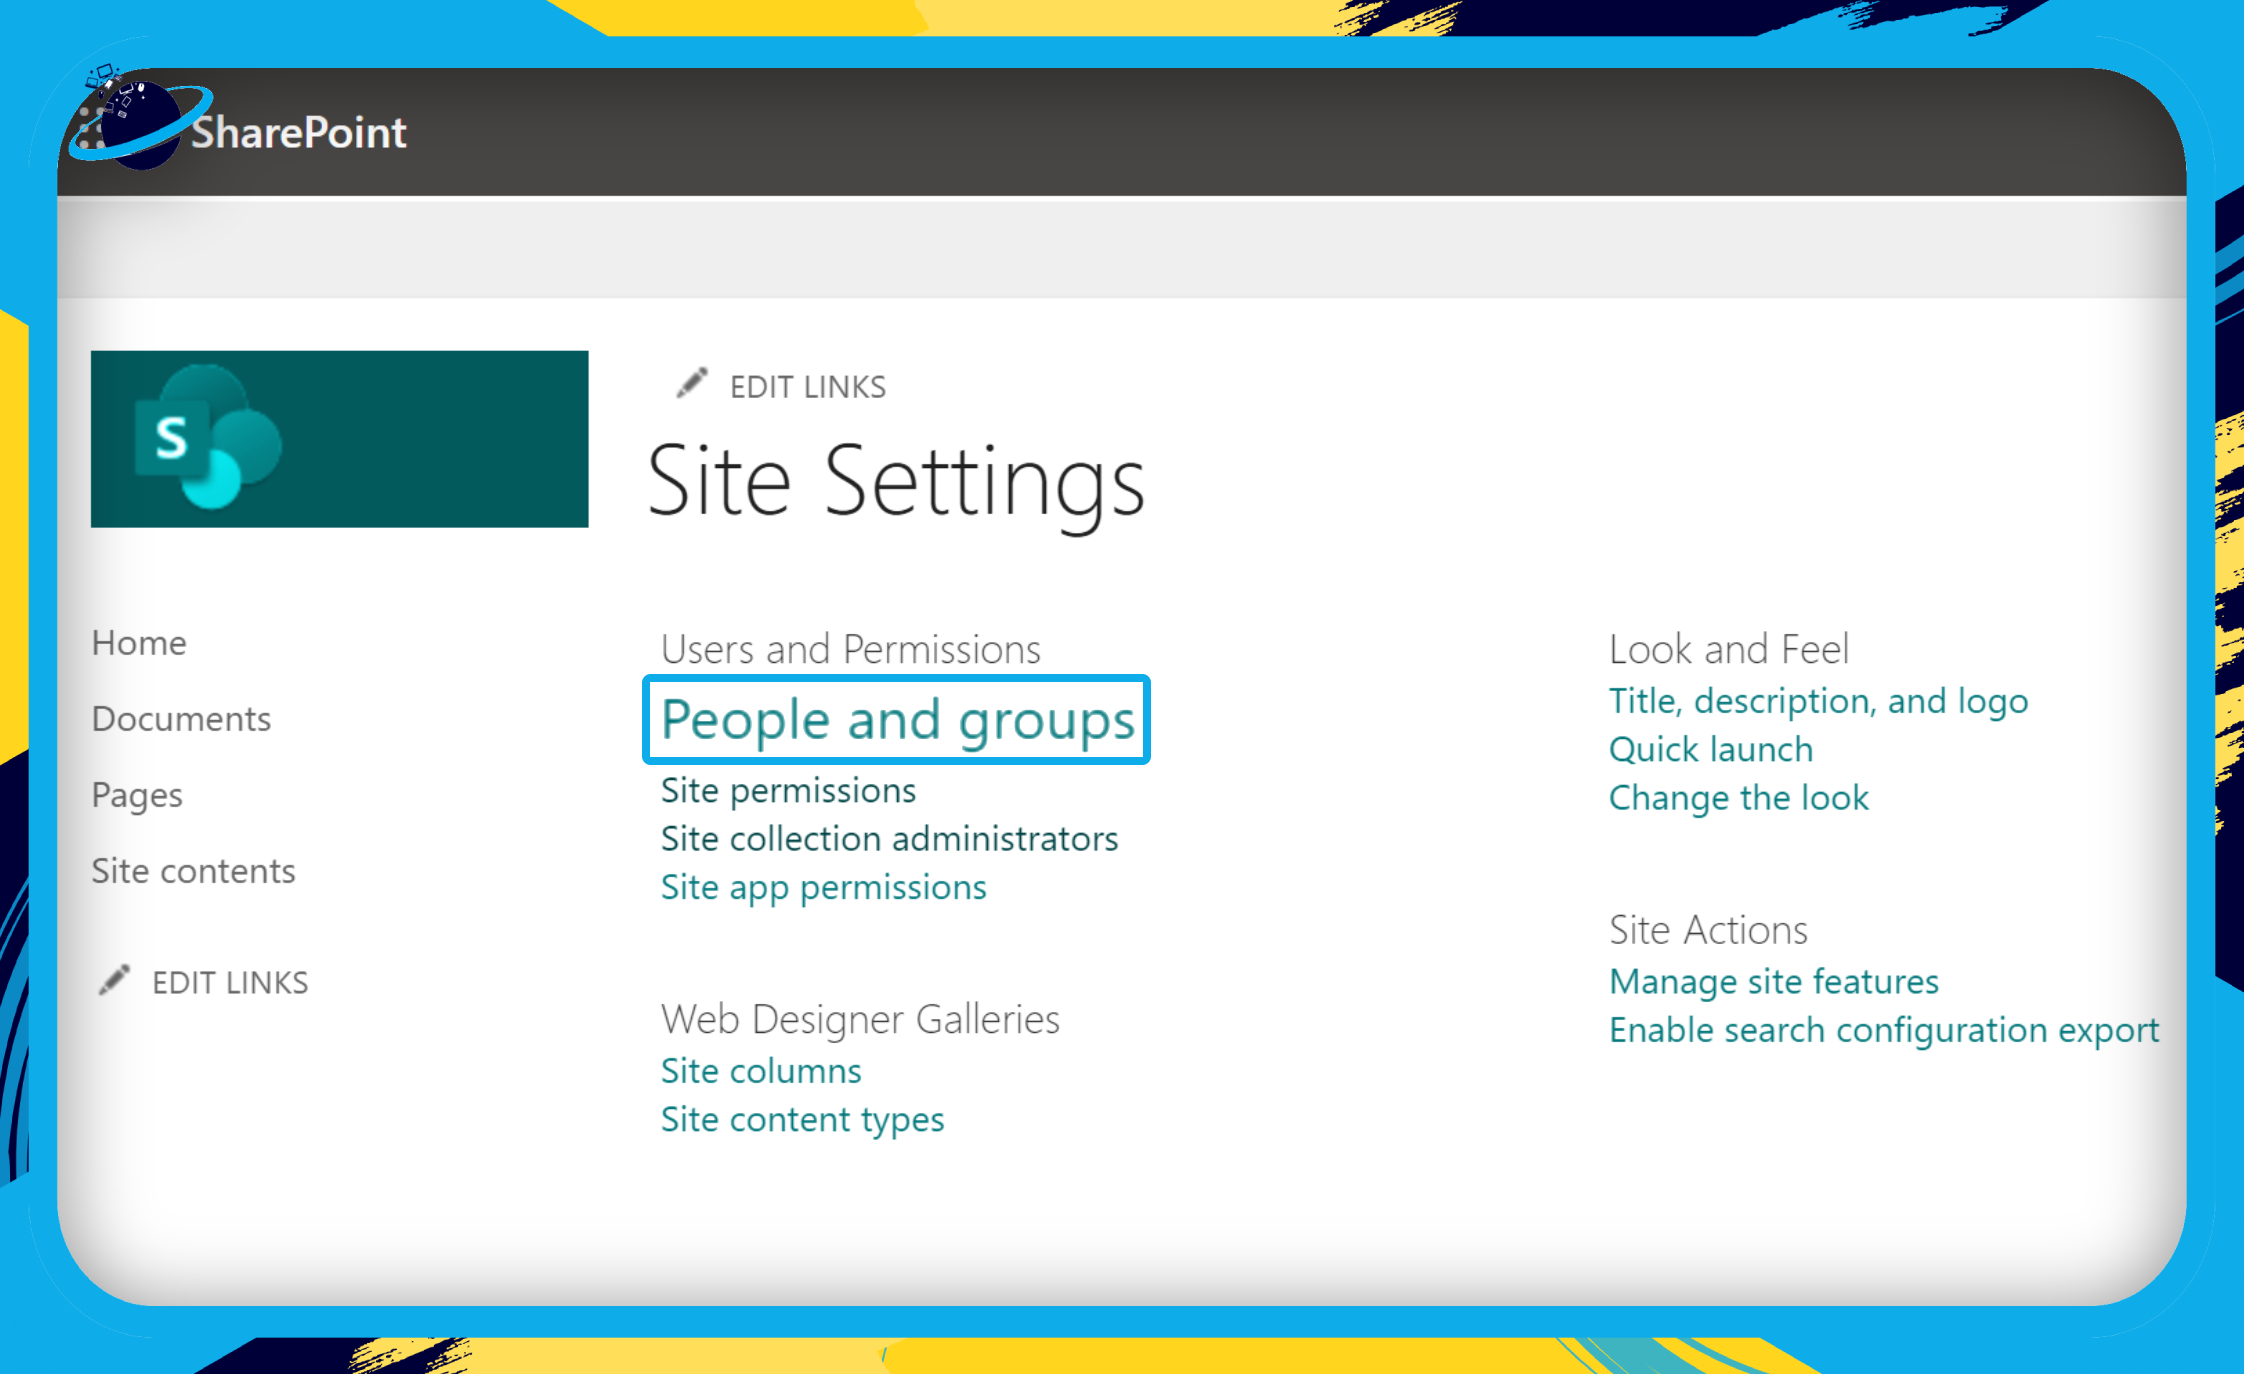
- Select “People and groups” under “Users and Permissions.”
- Go to “Communication site Visitors” on the left.
- Check the box for all visitors.
- Click “Actions.”
- Then click “Remove Users from Group.”
- Click on “New” to invite a new group.
- Type “Everyone except external users” into the first text box.
- Select “Everyone except external users” from the dropdown list.
- Then click the “Share” button.
- Return to the user administration page after that. You now wish to delete the Office 365 group from the list of access permissions.
That’s it, you have technically restricted file share for users external to your group members section. From now if any members of the group external to your group try to send content across externally, they will be restricted from doing so. You can go to Teams and run a demo meeting with an external user to see if the patch has successfully worked and that files are not being shared by an external user.

More information about file sharing on Teams with external users.
Why would you want to do this in terms of use cases? Your own information security rules and an evaluation of the possible danger of data leaking inside the Team are the answers. You still want them to connect with your team, but you don’t want them to collaborate or look at papers that are sensitive to outside access. Of course, this can be accomplished with contemporary management and Azure Information Protection with Azure AD Rights Management, but for organizations adopting Teams today and, as a result, undergoing tremendous change, it might be difficult to put trust in technology that they don’t fully comprehend. This might potentially be impeding the company’s efforts to enable Teams at the speed it requires.
The other scenario is when guest users need to communicate with an internal team on a frequent basis. Because these methods can’t yet be utilized to communicate with more than one person, multi-party chat with external users is limited to this method. This use case is, once again, linked to any overall data access policies you may have to deal with.
If this is the case, there is a way to enable external visitors and internal users to chat within a Team while limiting access to the SharePoint Team site. Because this is a retrospective change, you’ll need to know the name of the Team you’ll be restricting before you begin.
Use of policies to Prevent file sharing with external users
A rule can be used to satisfy a single protection requirement, and then a DLP policy can be used to bring together common protection requirements, such as all of the rules required to comply with a given regulation. External user inputs and outputs can likewise be restricted in this way.
If you opt to include certain distribution groups in Exchange, the DLP policy will only apply to those individuals. Similarly, removing a distribution group from policy evaluation will remove all members of that distribution group. You can target members of distribution lists, dynamic distribution groups, and security groups with a policy.
Your business requirements on your organization’s content are enforced through rules. A policy is made up of one or more rules, each of which is made up of conditions and acts. When the requirements for each rule are satisfied, the actions are executed automatically. Starting with the highest-priority rule in each policy, rules are performed in order.
In depth – Step by step process – Prevent file sharing with external users in Teams
Solution 1: Use the Teams Admin center
- First, open your Teams admin center.
- Click on “Users” in the left menu to reveal more options. (1)
- Select “Guest access” from the revealed options. (2)
- Click the select box next to “Allow guest access in Teams” and select “Off.” (3)
- Then click the “Save” button. (4)
Solution 2: Use SharePoint with admin permissions
- First, sign in to Microsoft 365.
- Click the app launcher icon in the top left. (1)
- Then click on “SharePoint.” (2)
- In SharePoint, click on the gear icon in the top right to reveal the Settings menu. (1)
- Then select “Site settings” from the Settings menu. (2)
- Select “People and groups” under “Users and Permissions.”
- Go to “Communication site Visitors” on the left. (1)
- Check the box for all visitors. (2)
- Click “Actions.” (3)
- Then click “Remove Users from Group.” (4)
The root SharePoint site was formerly a “Team site.” However, the root site is now a “Communication site.” As such, to make changes to visitors across the whole of your SharePoint sites, you can do that in the “Communication site Visitors” group.

- Click on “New” to invite a new group.
- Type “Everyone except external users” into the first text box.
- Select “Everyone except external users” from the dropdown list.
- Then click the “Share” button.

That’s all; you’ve now technically banned file sharing for people who aren’t members of your group. If any members of your group who are not members of your group try to transmit anything outside of your group, they will be blocked.
That’s it for this Blog thank you for taking time out to read our content, please feel free to email our team about how it went if you followed the steps or if you need more help with the questions we answered in this Blog.