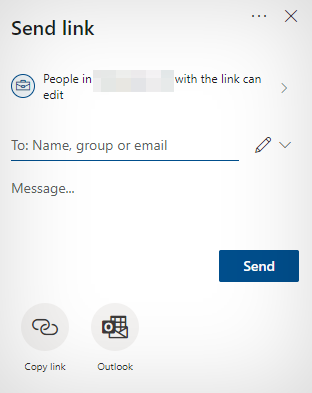
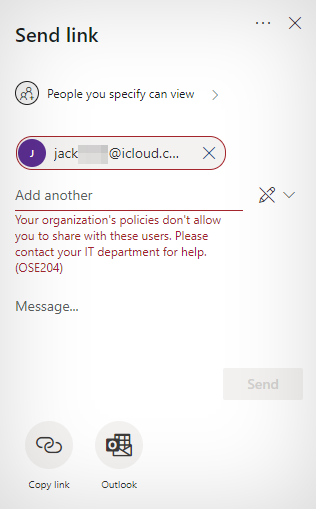
Have you tried sharing a file or your site with an external user only to get a message saying your organization’s policies don’t allow you to? There are two possible causes for this: external sharing being disabled at either organization or site level. I’ve written this blog post to explain how you can enable external sharing in SharePoint Online.
To enable external sharing in SharePoint Online, follow these steps:
- Enable external sharing at organization level
- Navigate to Office.com, sign in using your Microsoft credentials, and open the Admin app
- Open the SharePoint admin center
- Click Policies, then click Sharing
- Move the SharePoint slider to Anyone or New and existing guests
- Click Save
- Open your SharePoint site and try sharing your site or an item
- Enable external sharing at site level
- Navigate to Office.com, sign in using your Microsoft credentials, and open the Admin app
- Open the SharePoint admin center
- Click Sites, then click Active sites
- Select your site and click Sharing
- Select Anyone or New and existing guests, then click Save
We’ve also created a video that walks you through these steps. You can watch it here:
Enabling external sharing in SharePoint is a relatively simple process. However, you must be a SharePoint admin to follow the steps given above. If you aren’t, you cannot change your organization’s sharing policies.
The rest of this blog post is a walkthrough — with screenshots — of the steps given above. Please follow along to make sure you follow each step correctly!
  | |
 Compatible with Windows, Mac OS, and Android. Compatible with Windows, Mac OS, and Android. | FROM $6.00 user/month |
Step-by-step [with screenshots]: How to enable external sharing in SharePoint Online
As I said before, enabling sharing in SharePoint Online is a relatively simple process. That being said, you must be a SharePoint admin to follow the steps given below.
- Enable external sharing at organization level
- Navigate to Office.com, sign in using your Microsoft credentials, and open the Admin app
- Open the SharePoint admin center
- Click Policies, then click Sharing
- Move the SharePoint slider to Anyone or New and existing guests
- Click Save
- Open your SharePoint site and try sharing your site or an item
- Enable external sharing at site level
- Navigate to Office.com, sign in using your Microsoft credentials, and open the Admin app
- Open the SharePoint admin center
- Click Sites, then click Active sites
- Select your site and click Sharing
- Select Anyone or New and existing guests, then click Save
First, I’ll demonstrate enabling external sharing at organization level — because if sharing isn’t enabled at organization level, it is impossible to enable external sharing at site level.
   |
How to enable external sharing at organization level (SharePoint Online)
Follow the steps below to enable external sharing at organization level:
- Navigate to Office.com, sign in using your Microsoft credentials, and open the Admin app
- Open the SharePoint admin center
- Click Policies, then click Sharing
- Move the SharePoint slider to Anyone or New and existing guests
- Click Save
- Open your SharePoint site and try sharing your site or an item
1. Navigate to Office.com, sign in using your Microsoft credentials, and open the Admin app
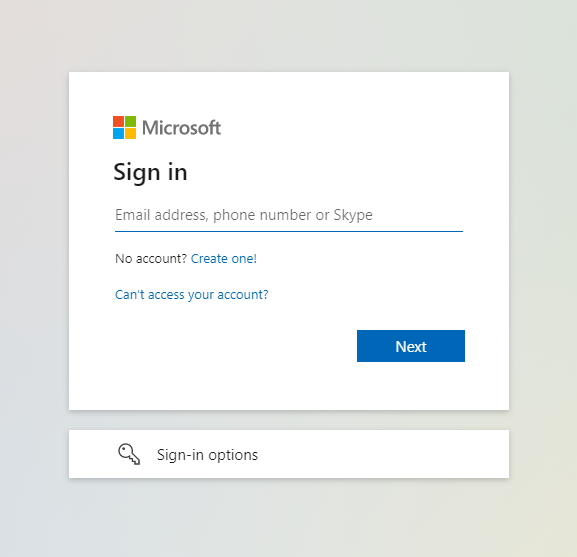
Navigate to Office.com using any browser, then sign in using your Microsoft 365 credentials.
If you’re unsure about your M365 credentials, it’s likely your business email and the password you use to sign into your organization devices.
After signing in, open the app launcher and open up the Admin application.
• Meetings automatically expire: Toggle “off” to stop new recorded meetings from expiring. • Default expiration time: The value is in days, and you can set it to between 1 and 99999. |
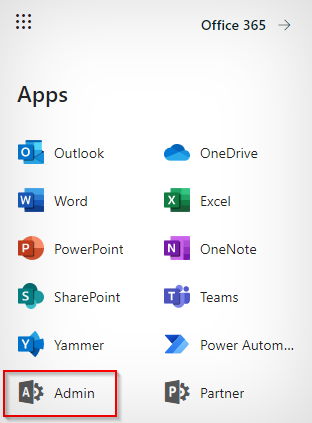
2. Open the SharePoint admin center
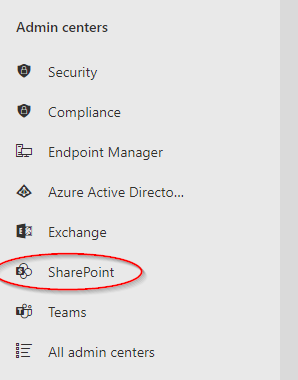
When you open the Admin application, there’ll be a list of the admin centers you have access to. Open up the SharePoint admin center.
3. Click Policies, then click Sharing
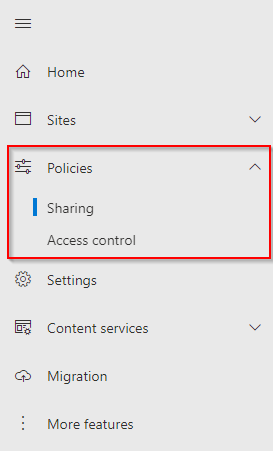
Policies — and ‘Sharing’ within it — is where you control your organization’s SharePoint settings. The changes you make in here affect all the sites within your organization, although you can also set sharing settings at site level.
4. Move the SharePoint slider to Anyone or New and existing guests
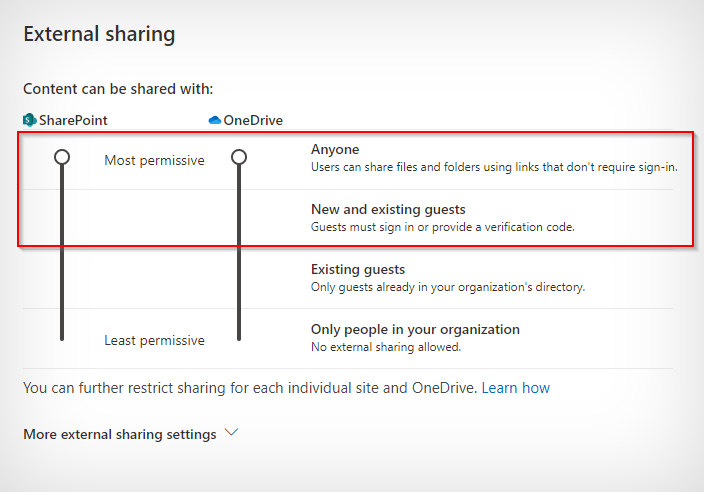
If your external settings are already set as you can see in the screenshot above, click here to skip to the next section of this blog post: customizing external sharing settings at site level.
In the sharing policies section of the SharePoint admin center, you control how your organization’s users can share data. As shown on the screenshot above, there are sliders for SharePoint and OneDrive where you can determine who users can share content — meaning sites and the items stored within — with. Your options are:
- Anyone: Users can share items with anyone — including external users — using links that don’t require people to complete any kind of verification.
- New and existing guests: With this option, your organization’s users can still share content stored in a SharePoint site/in OneDrive with anyone — including external users. However, guests must sign in or provide a verification code to prove their identity. Therefore, the people you send links to cannot simply pass the link on to other people.
- Existing guests: With this setting, users can only share content with existing guests — i.e., external users already in your organization’s directory.
- Only people in your organization: This setting — described on the screenshot above as least permissive — is exactly what it says on the tin. It stops your organization’s users sharing content with anyone outside of the organization — including existing guests.
I recommend you configure your organization’s sharing policies so that your users can share content with new and existing guests. However, you can configure sharing settings at site level too. So you could choose ‘anyone’ and then configure settings for individual sites — i.e., those that need greater security.
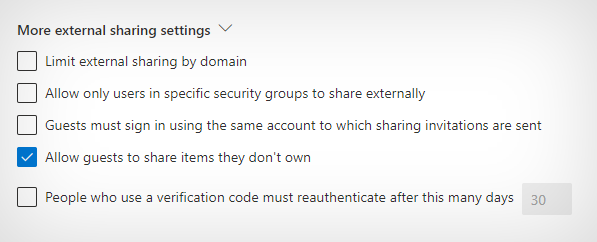
There are also a range of other external sharing settings that you can use. For example, you can:
- Limit external sharing by domain: This is a super handy feature where you can list domains you want to share with — perhaps the domain of a business partner you’ll regularly collaborate with — and limit external sharing to them. This will prevent your organization’s users from sharing your SharePoint content with anyone external outside of those domains.
- Allow guests to share items they don’t own: This setting is exactly what it says on the tin. Do you want guests to have the capability to share items they don’t own? I usually tick this option as I trust the users I’m sharing content with. However, if you’ve selected the Anyone with the link sharing option, you might want to be a little more careful.
- Reauthenticate: This setting can be used if you share your site/an item using the new and existing guests option. You can set it so your guests have to reauthenticate after a certain number of days. The default is 30 days, but you can change this should you wish.
5. Click Save
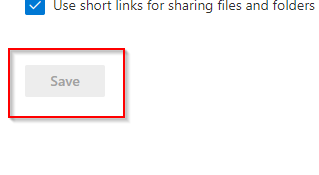
Right at the bottom of the sharing policies page, there is a save button. Click that to save your changes, then navigate over to your SharePoint site.
6. Open your SharePoint site and try sharing your site or an item
Once you’ve opened up your SharePoint site, try sharing the site or an item stored in the site. You want to try sharing with an external user to see whether it lets you.
If it lets you share with the site/item with an external user, changing sharing settings at organization level did the trick. If not, move onto the next section of this blog post where I explain configuring external sharing settings at site level.
How to enable external sharing at site level (SharePoint Online)
If you’ve checked your organization level settings are correct but SharePoint Online is still stopping you from sharing content with external users, the cause will be your site level sharing settings. Changing your external sharing settings at site level is a fairly simple process. Here’s how:
- Navigate to Office.com, sign in using your Microsoft credentials, and open the Admin app
- Open the SharePoint admin center
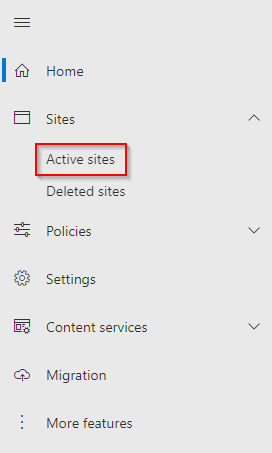
- Click Sites, then click Active sites
- Select your site and click Sharing
- Select Anyone or New and existing guests, then click Save
I’m going to demonstrate the process of enabling external sharing at site level now. Please note that you must be a SharePoint admin to follow these steps.
1. Navigate to Office.com, sign in using your Microsoft credentials, and open the Admin app
Navigate to Office.com using any browser, then sign in using your Microsoft 365 credentials.
If you’re unsure about your M365 credentials, it’s likely your business email and the password you use to sign into your organization devices.
After signing in, open the app launcher and open up the Admin application.
• Meetings automatically expire: Toggle “off” to stop new recorded meetings from expiring. • Default expiration time: The value is in days, and you can set it to between 1 and 99999. |
2. Open the SharePoint admin center
When you open the Admin application, there’ll be a list of the admin centers you have access to. Open up the SharePoint admin center.
3. Click Sites, then click Active sites
4. Select your site and click Sharing
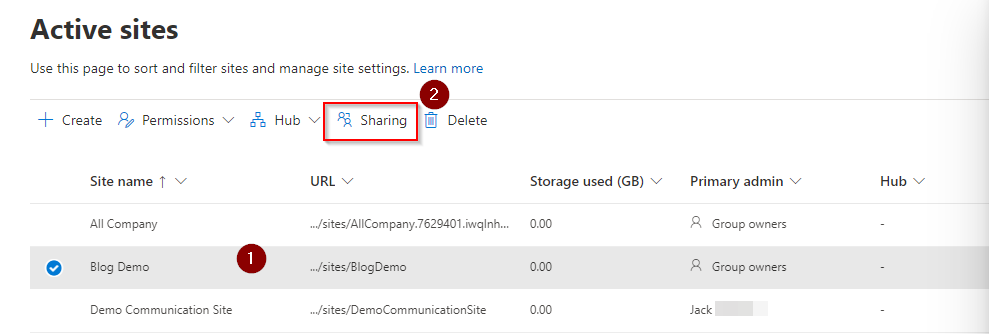
Locate the site that you want to change external sharing settings for and select it. The menu at the top will change with some new options appearing. Click Sharing to open up a new menu where you can customize the site’s external sharing settings.
5. Select Anyone or New and existing guests, then click Save
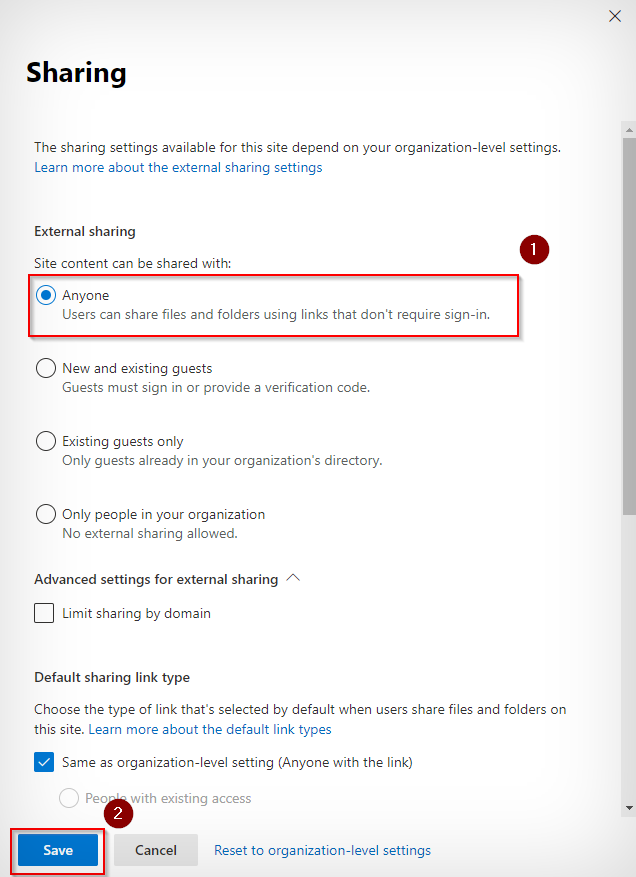
At default, sites will have their external sharing settings set to only people in your organization. To allow external sharing, I’d recommend changing this to either anyone or new and existing guests. The one you choose depends on the level of security you want. If you want users to verify their identity, choose new and existing guests. If you want anyone to access the content without verification, choose Anyone.
Once you’ve chosen who the site users can share content with, click Save.
Next, go to your SharePoint site and try to share either the site, a folder, or a file with an external user. Sharing with external users should now be possible!
Thanks for reading! I hope you’ve found this blog post useful. If you have any questions, please feel free to leave a comment below.