A lot can happen in the chatbox of a Microsoft Teams meeting. And sometimes, it’s helpful to save that information for future reference. But is it possible to save messages in Teams? The answer is yes. There are three ways of saving messages in Teams, and in this article, we’ll look at each method in detail.
- Method 1 – Hover over the message, click the three dots, then ‘Save this message.’
- Method 2 – Copy and paste the whole conversation.
- Method 3 – Run an eDiscovery search for instant messages.
Please continue reading our visual, step-by-step guide on how to keep meeting messages in Teams.
Method 1 – Save a single message
The most powerful method of saving a message in Microsoft Teams is using the inbuilt ‘Save this message‘ option. Start by entering a Teams meeting and writing a message in the chatbox. It’s quick and easy, and you don’t have to create any new files or folders as the message will be saved automatically within Teams.
Save the message
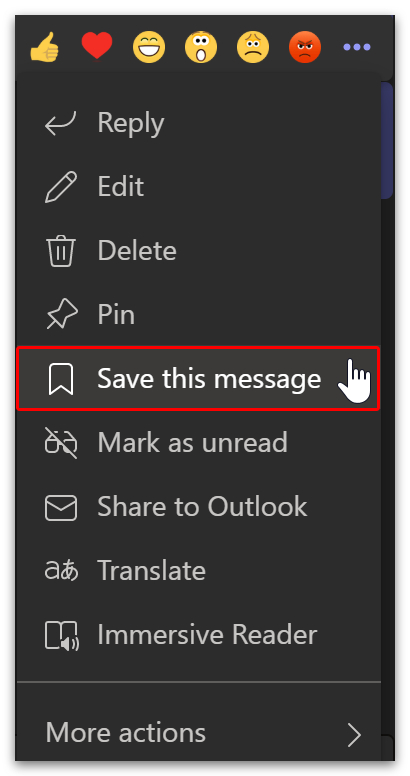
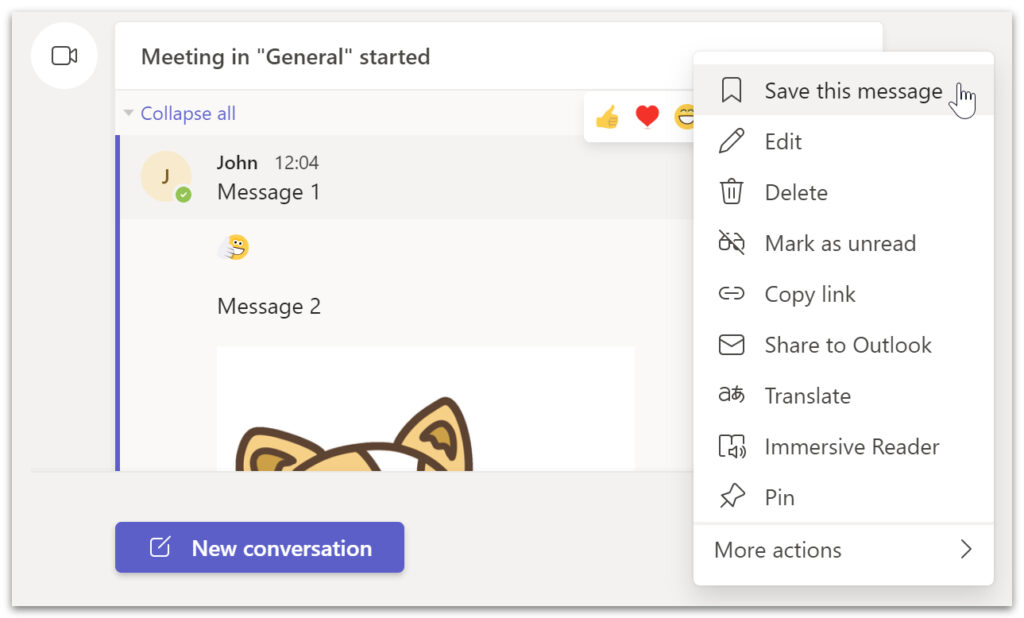
- Right-click the message you want to save, or…
- Hover over the message you would like to save.
- A small box will pop up containing Emojis and three dots at the end.
- Click the three dots.

- Then click ‘Save this message‘ on the drop-down menu.
After you’ve saved the message, you might want to schedule a follow-up or share the message on Twitter. So here’s a list of some of the actions you can perform with a Teams message:
 | Follow up on a message. |
 | Save a message to OneNote. |
 | Schedule a reply. |
 | Schedule a meeting from a message. |
 | Create an Azure DevOps work item from a message. |
 | Create a Planner task from a message. |
 | Create a new Trello card from a message. |
 | Create an Asana task from a message. |
 | Share a message to Yammer. |
 | Cross post a message to Slack. |
 | Share a message on Twitter. |
 | Create a Google task from a message. |
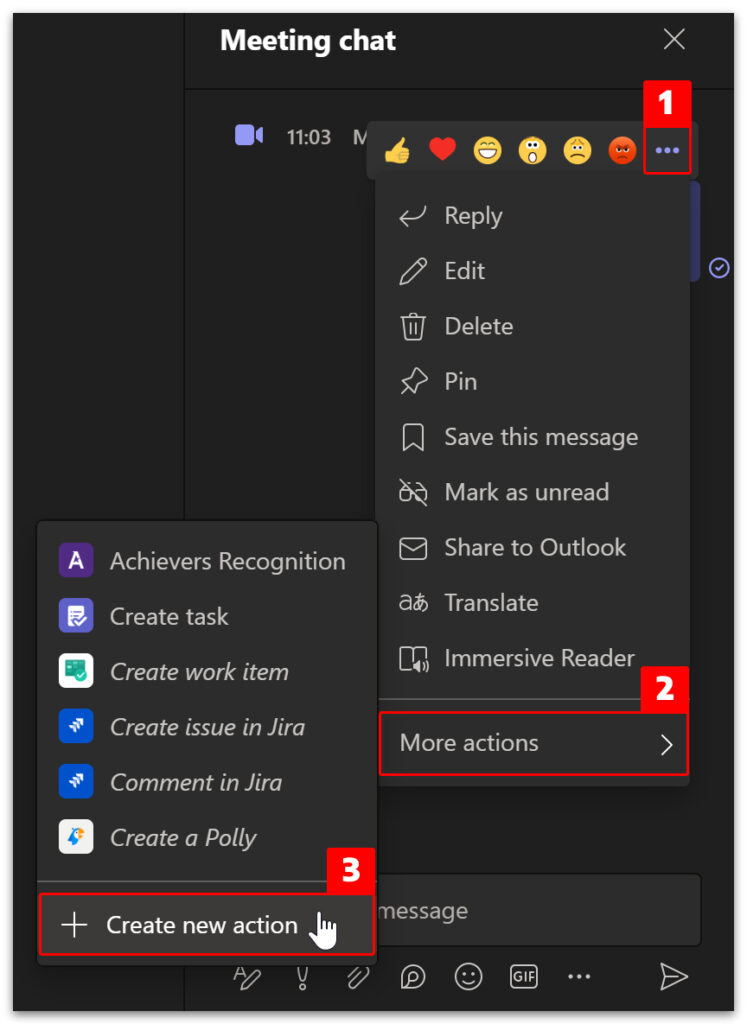
- Right-click the message or click the three dots to access the message options.
- This time, select ‘More actions‘ > ‘Create new action‘ from the drop-down menu.
View the message
When you save a message, the data is stored within Teams so that no other applications are required to view saved messages. To view the message, please follow the guide below.
- Click your user icon in the top-right of the Teams application.
- Then click on ‘Saved‘ in the drop-down menu.
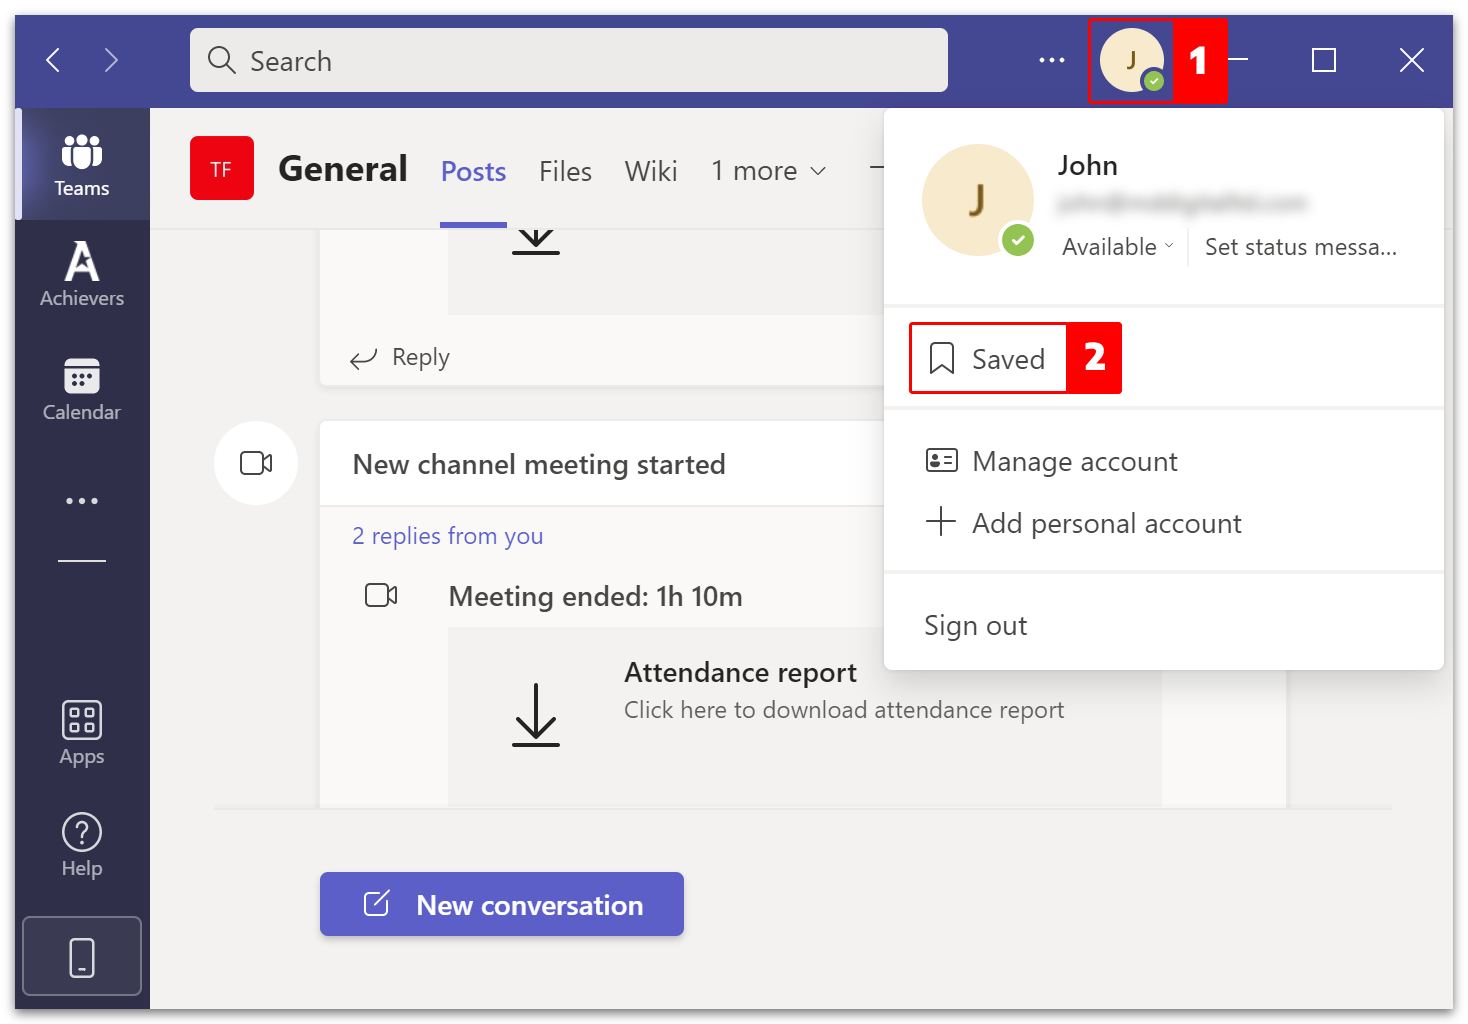
- From the ‘Teams‘ tab (top-left), go to ‘Posts.’
- Your saved message will now be displayed within the meeting box.

Method 2 – Copy and paste the conversation to save it
If you want to save multiple messages, you could find it time-consuming to save each message individually. A workaround is simply copying and pasting the whole conversation into a notepad or word processor. You will copy the author’s name and the time the author posted the message.
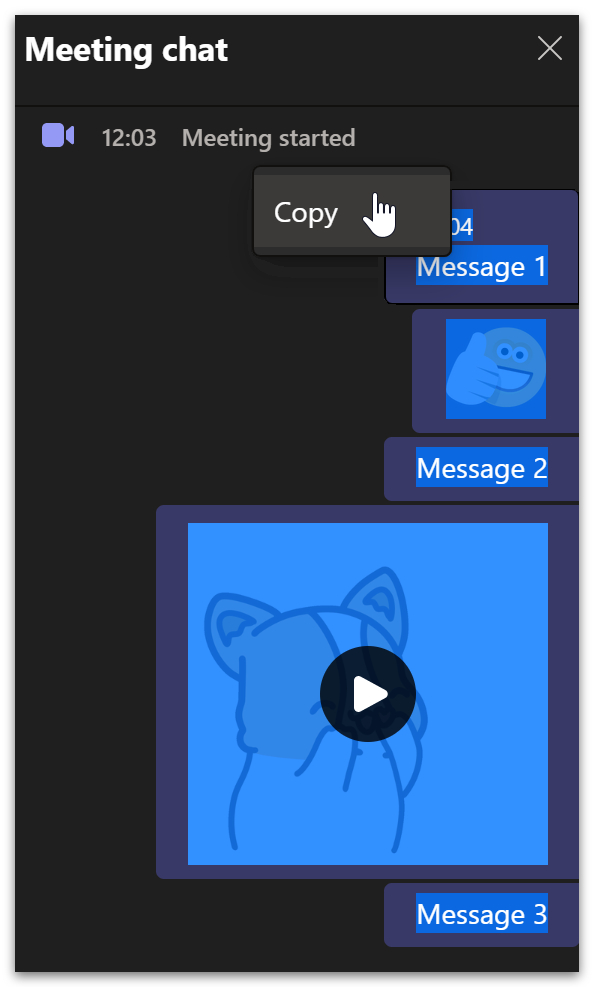
- Head to the chatbox and locate the most recent message at the bottom.
- Click the end of that message, hold the click down, and drag up the chatbox.
- Right-click when the whole conversation has been selected.
- Click ‘Copy.’
- Now open any word processor.
- The windows notepad will only display the text.
- You can view the images by opening a new Word document (or an equivalent application) and pasting the copied conversation inside.
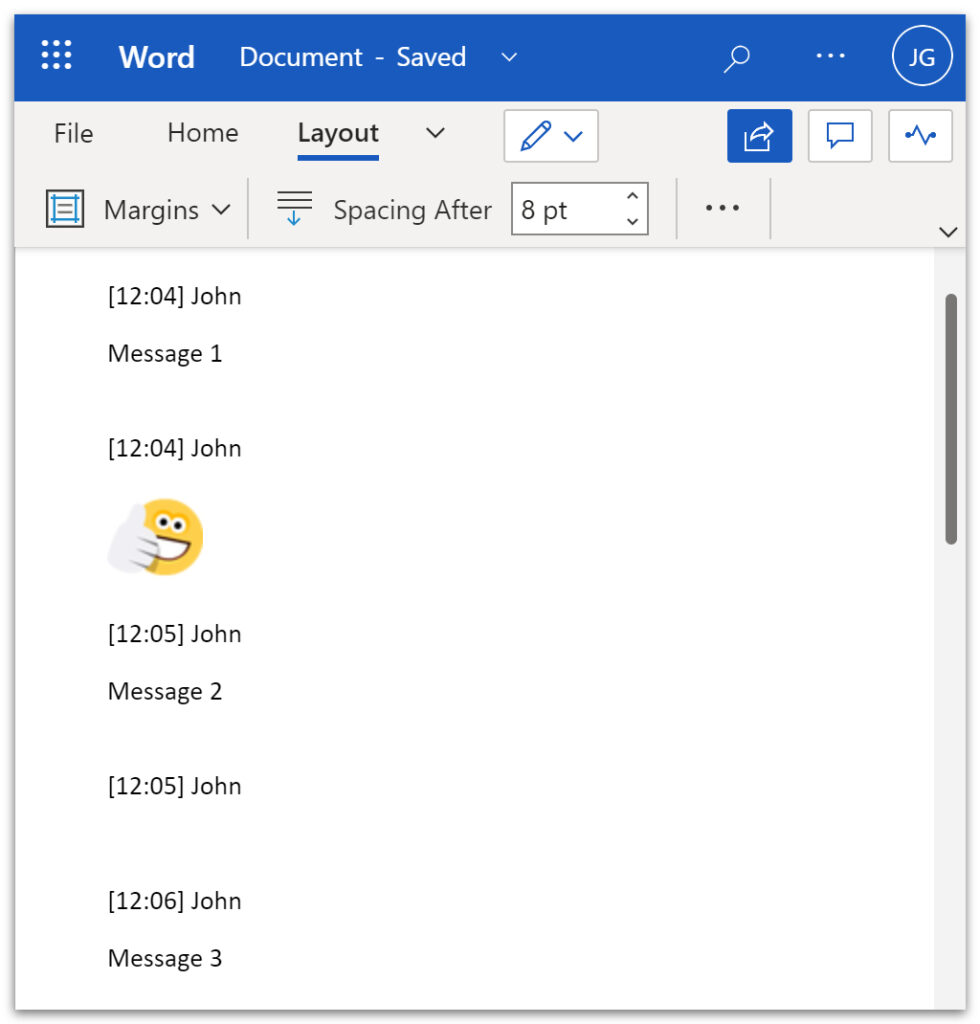
| Note: | Microsoft Word will not display the gifs. However, emojis and stickers will appear. |
| Idea: | Upload your conversation to a shared folder in OneDrive. That way, conversations can be viewed by team members who were not present at the meeting. |
Method 3 – Run an eDiscovery search to save chat messages
The eDiscovery tool is a powerful yet complex method for saving chat messages in Teams. With eDiscovery, you can access saved messages without attending the meeting yourself. To do this, you will have to be an eDiscovery manager.
Before you begin, please read our detailed guide to set up and run an eDiscovery search.
| Note: | To run an eDiscovery search, you will need one of the following: a Microsoft compliance certificate, an Office 365 E5 subscription, or an Office 365 E3 subscription with the advanced compliance add-on. |
A brief guide:
- Open your compliance portal.
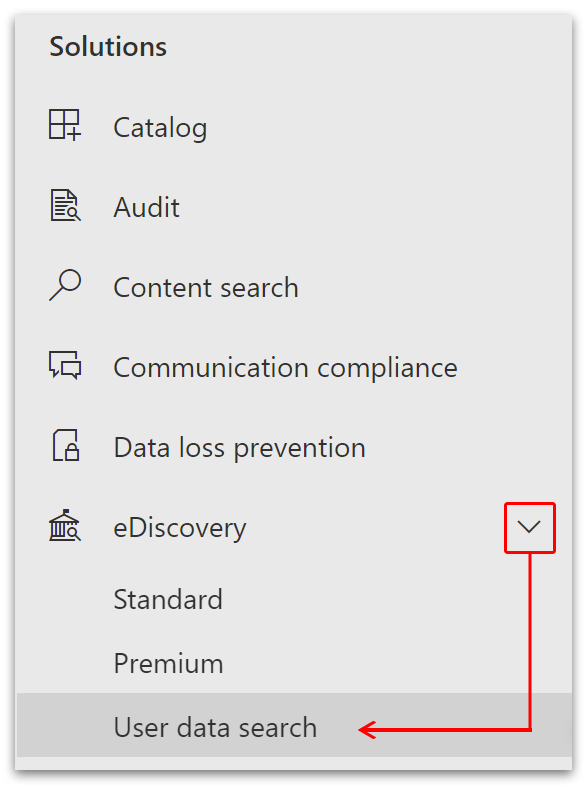
- Go to ‘eDiscovery‘ > ‘User data search.’
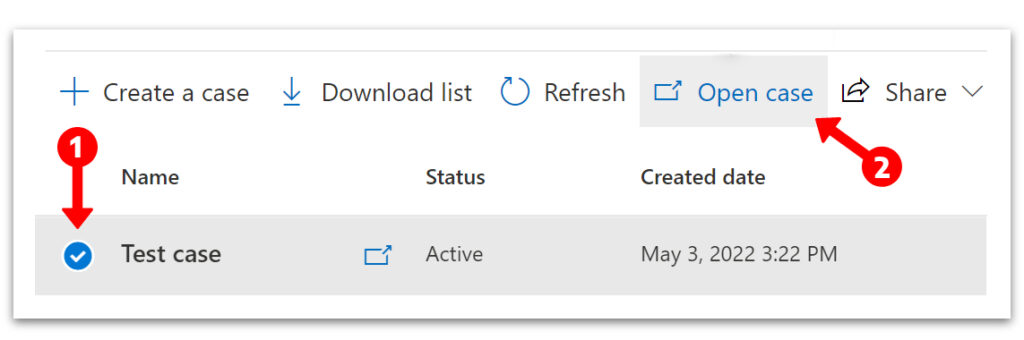
- ‘Create a case‘ or select an existing case.
- Click ‘Open case.’
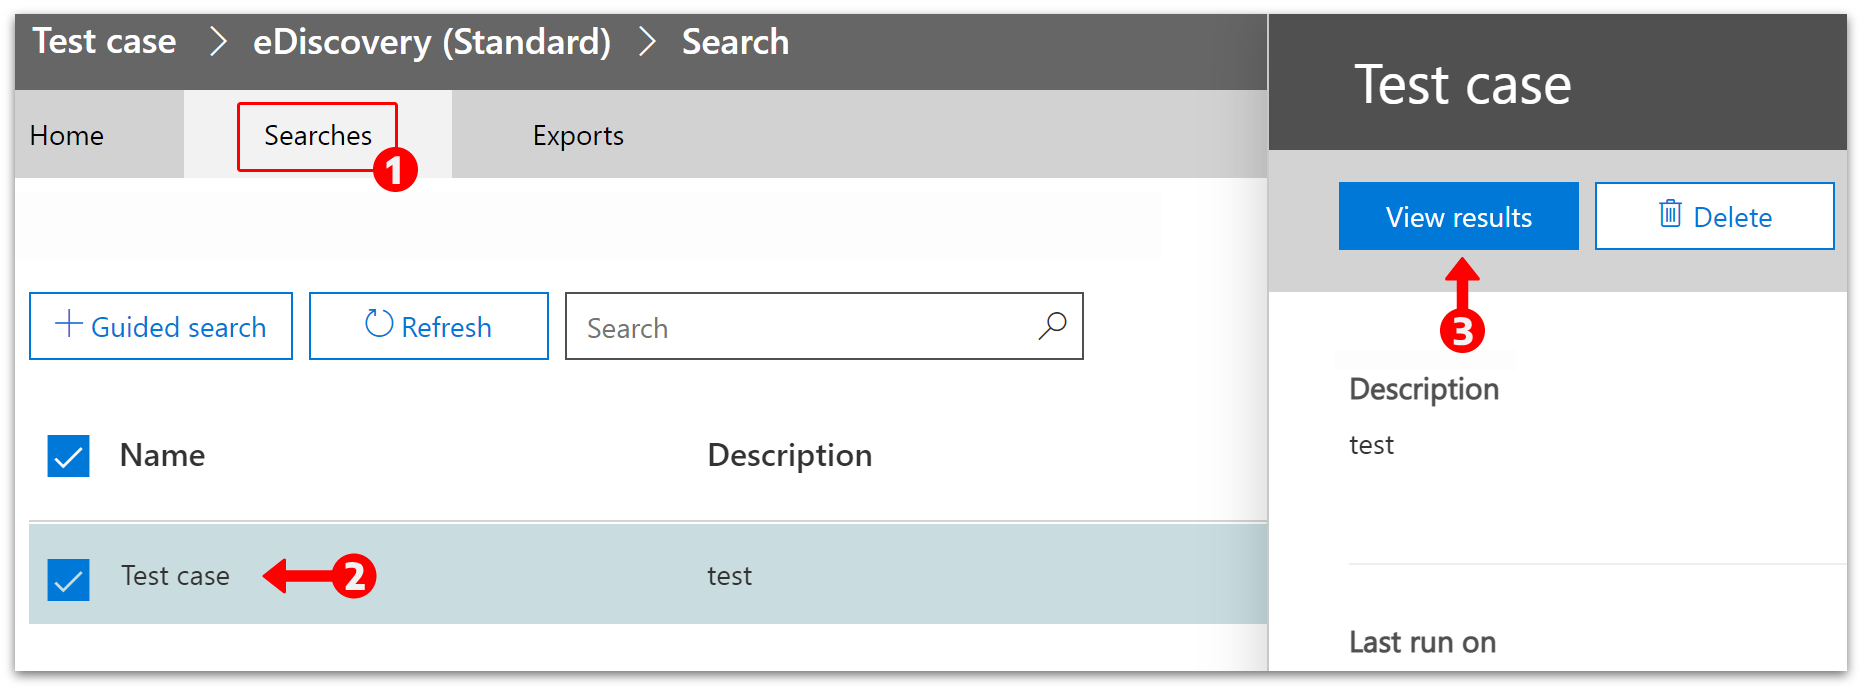
- Click on ‘Searches‘ in the top menu.
- Select your case.
- Click ‘View results‘ in the pop-up window.
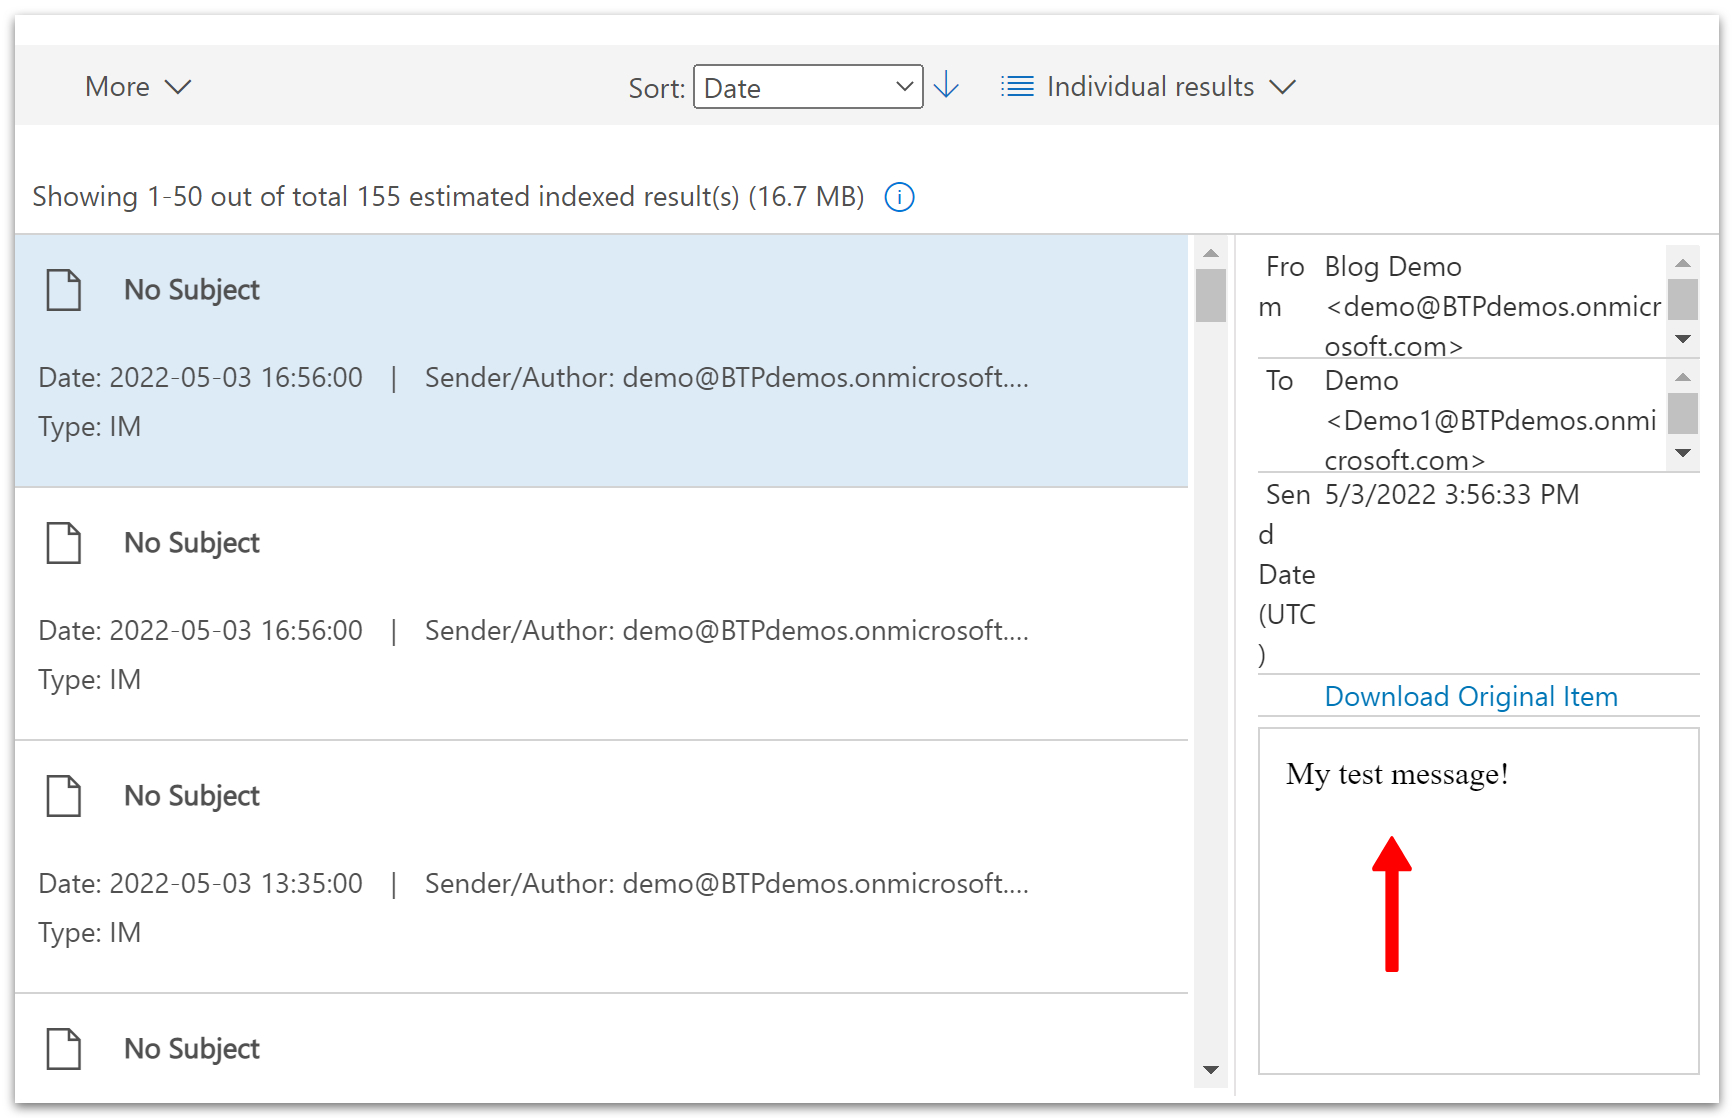
- When the results have been gathered, you will see a list of saved items.
- Items labeled ‘Type: IM‘ are instant messages from Teams.
- You can see the whole conversation, including edited messages.
Conclusion
Choosing the best method will depend on the outcome you are trying to achieve. If you want to save a single message and perform actions with that message, then Method 1 has everything you need.
If you want to record and share a whole conversation, then Method 2 is an easy way to make that happen. Just save your file and upload it to a shared folder in OneDrive.
However, if you need a more comprehensive dataset and want to see messages from meetings you could not attend, then Method 3 is the perfect solution. With eDiscovery, you can view messages from any meeting or by any author, and you can even view the edit history of messages.
A final note:
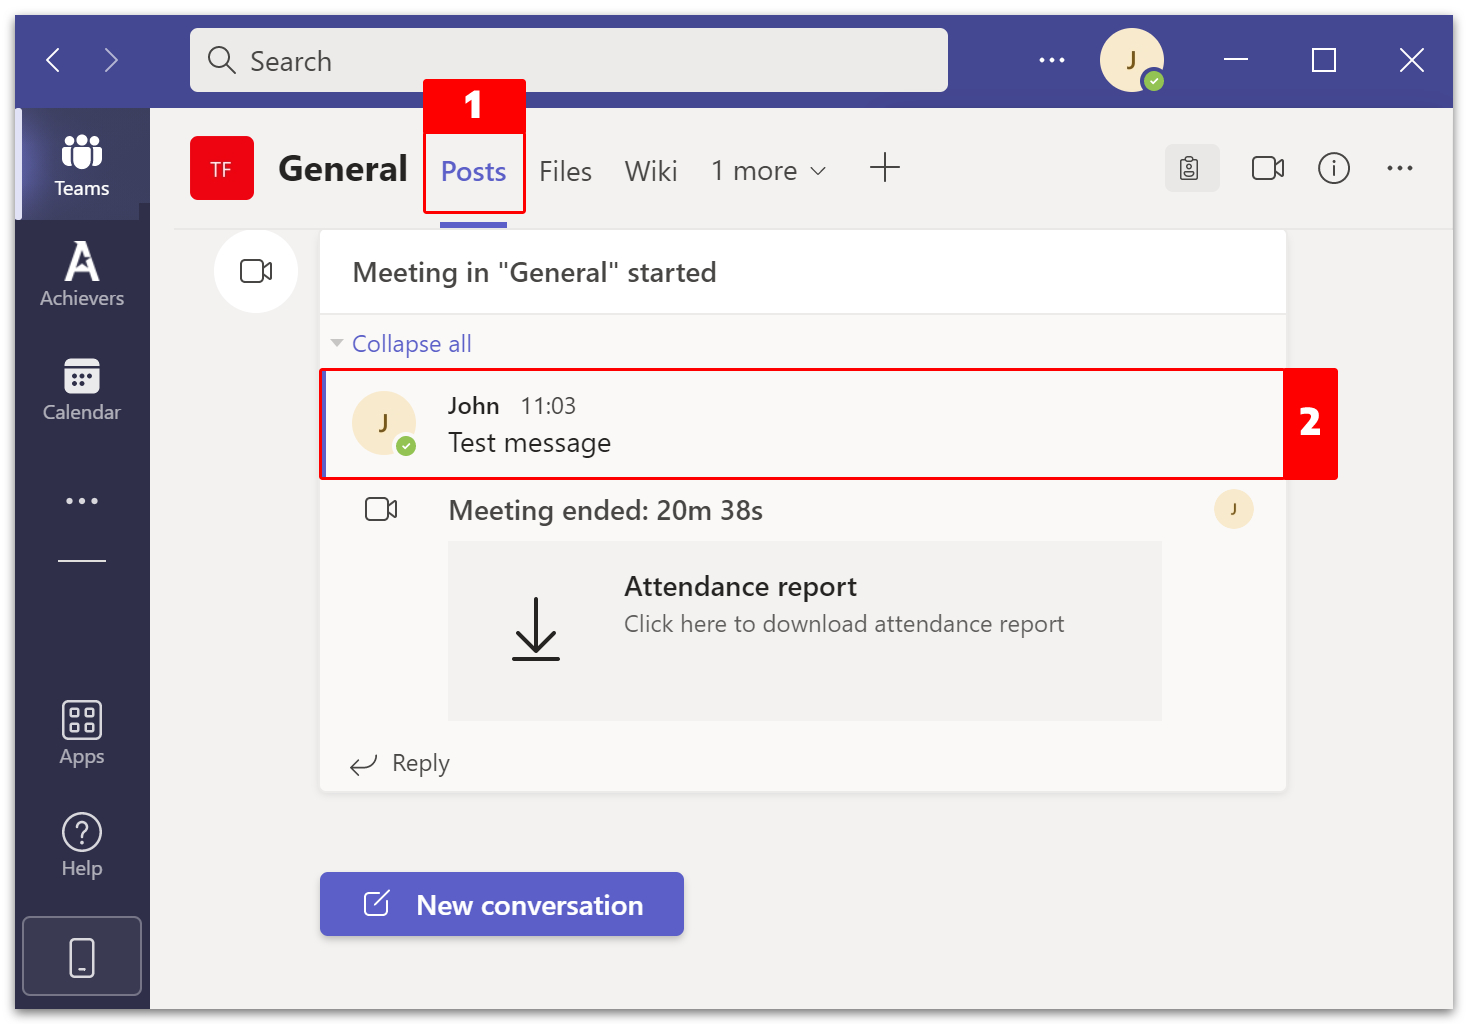
You can view your messages from the chatbox without manually saving the message. All your actions and messages are saved automatically and are viewable in the ‘Posts‘ section.
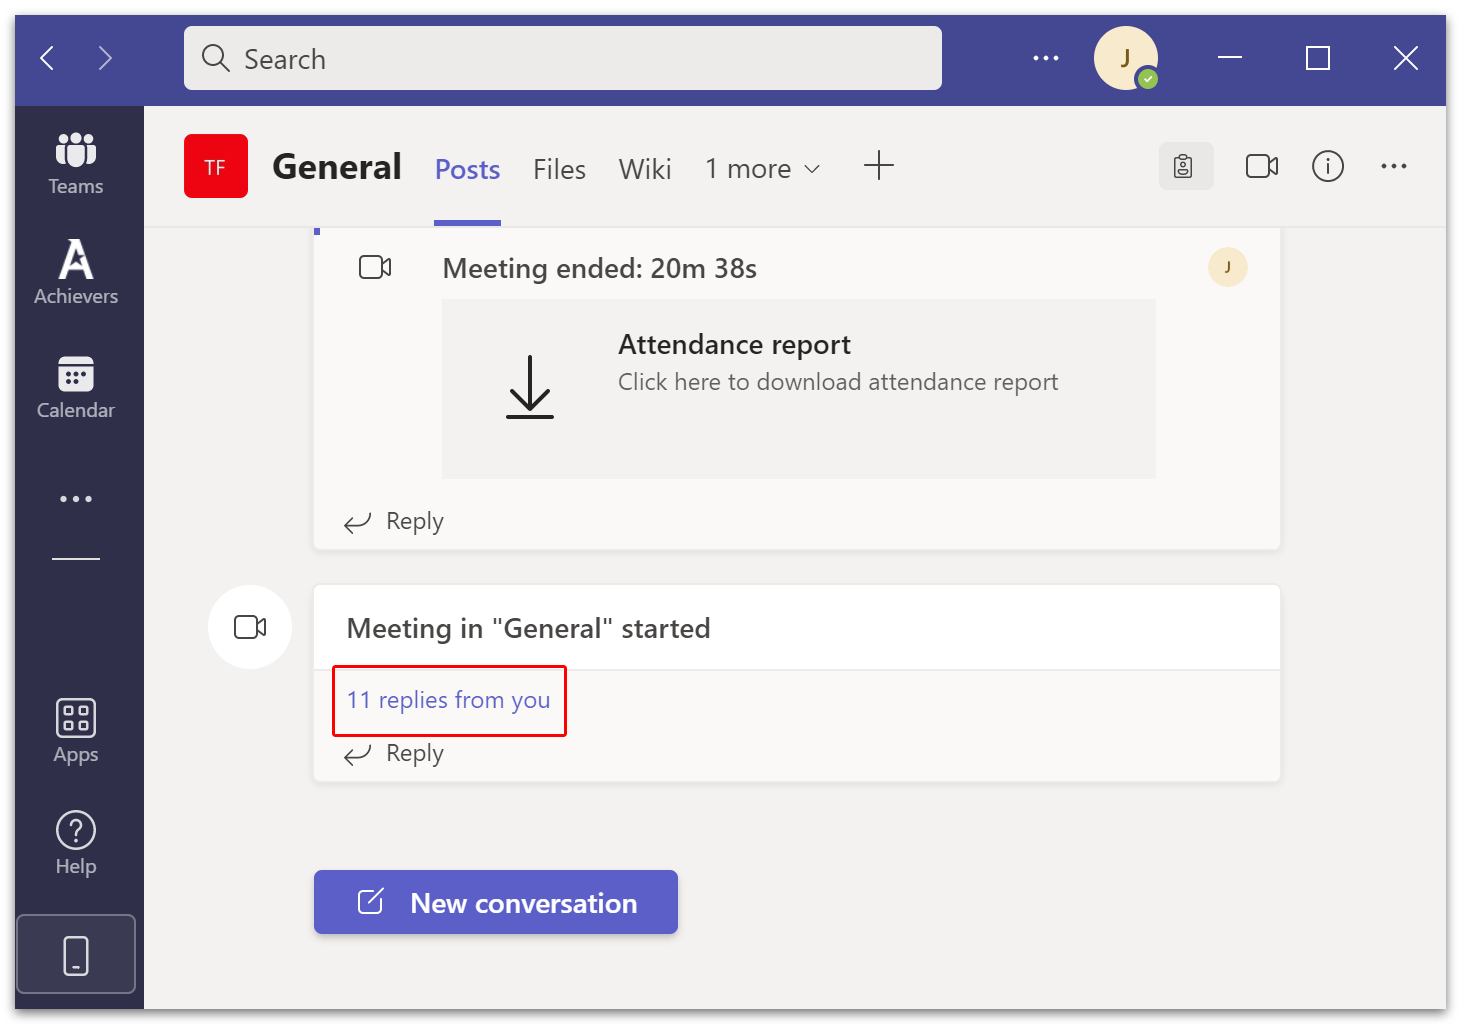
- Click the ‘Teams‘ tab (top-left) then click ‘Posts.’
- You will find the most recent meeting displayed at the bottom of the page.
- There, click the small blue text that reads: ‘replies from you.’
- You can save individual messages or create a new action for each message.
- Hover over a message and click the three dots on the Emoji bar.
- Click ‘Save this message‘ and/or ‘More actions‘ > ‘Create new action.’
Thanks for reading.