Have you seen the Microsoft AutoUpdate app when using your Mac? Do you ever get pop-up notifications from Microsoft AutoUpdate and have no idea what they’re for? Or can you see the software sucking up your Mac’s CPU in Activity Monitor at random? You might be wondering what Microsoft Update is and how to uninstall it from your Mac.
Microsoft used to send out a system notice that could be turned off. They now run the auto-update software once a day (interrupting whatever you’re doing to focus on the auto-update app — are you watching a show?).
But don’t worry, this article will cover all you need to know about Microsoft AutoUpdate on Mac. Follow through for more information on how to stop Microsoft Autoupdate from constantly popping up on Mac.
How to stop Microsoft AutoUpdate constantly popping up on Mac:
- Firstly, open Launchpad.
- Now navigate to “Activity Monitor” and open it.
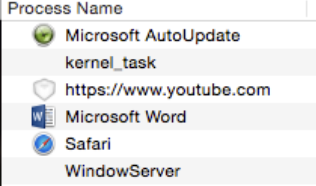
- Under the processor name find “Microsoft AutoUpdate”.
- Double click on it.
- Now click on “Quit”.
- Once quitted and its record on CPU is removed, close the monitor.
- Now navigate over to “Finder”.
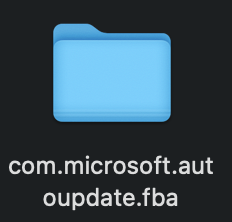
- Open “Finder” and use the search bar to find the folder called Microsoft AutoUpdate.
- Move the file to the bin.
- Finally, clear the bin to completely remove the auto-update folder.
That’s it, you will no longer be bothered by the AutoUpdate prompts on your computer, you can go about your day without having to show any concern for the auto-update prompt showing up on your notification prompt. Microsoft AutoUpdate is a simple tool with a single goal: to keep all Microsoft-made apps up to date on your Mac. It can become an annoyance under some circumstances, and you’ll want to get rid of it as soon as possible.
Below, you’ll learn what Microsoft AutoUpdate performs and why you would wish to disable it; nevertheless, the technique to disable the auto-update function as described above. You may be wondering well why quite the process of AutoUpdate before deleting the file. Quite simple really, as the process is running you can’t actually delete the folder or application.
You will receive this message if you try to delete active folders on an application, and logically speaking it is true you wouldn’t unplug a washing machine mid-cycle or turn the ignition off in a car while driving, it can use issues and potentially harm the computer if Apple allows those files to be deleted without being properly quitted.
You may also be wondering why can’t you just quit the auto-update feature, why delete the whole folder after?. Well quitting will only prevent updates from showing this one time, once you shut down and start the computer, the auto-update script will start and you will get the update messages again.
![]() You can get the new
You can get the new ![]() iPhone 14 from
iPhone 14 from 
Why is Microsoft Autoupdate constantly popping up on Mac?
If you have any ![]() Microsoft-developed product loaded on your Mac (think OneNote, Microsoft Word, Microsoft Edge, and so on), Microsoft AutoUpdate (MAU) is almost certainly installed as well.
Microsoft-developed product loaded on your Mac (think OneNote, Microsoft Word, Microsoft Edge, and so on), Microsoft AutoUpdate (MAU) is almost certainly installed as well.
The sole purpose of Microsoft AutoUpdate is to automatically update and maintain Microsoft programs on your Mac. Have you ever opened a Microsoft app and discovered that it already had a feature that had just been released? That was done by the Microsoft AutoUpdate program.
It also installs security and bug patches. So, if you had a random malfunction while using a Microsoft program and it went away after a while, Microsoft AutoUpdate most likely installed an update (in the background) that fixed the problem.

When to delete the autoupdate patch
You won’t locate Microsoft AutoUpdate in your Mac’s Launchpad or Applications folder, despite the fact that it is an app in and of itself. When you start getting unexpected ‘Required Data Notice’ messages from a strange Microsoft AutoUpdate software, it may get incredibly aggravating.
When you check your Activity Monitor, you may notice that the program is running in the background, consuming a significant amount of CPU resources.
Things are just going to get worse. Even if you don’t have any Microsoft apps installed on your Mac, the Microsoft AutoUpdate application continues to run. Isn’t that a little ridiculous?
So, if you don’t have any Microsoft software and it’s slowing down your Mac, you should uninstall Microsoft AutoUpdate.
Microsoft AutoUpdate should be turned off
Disabling Microsoft AutoUpdate in this sense implies prohibiting the software from completing its core function (i.e., automatically updating other Microsoft apps).
- In the search bar of Finder, type Microsoft auto-update.
- To open the program, double-click Microsoft AutoUpdate in the search results.
- Uncheck the option that says “Keep Microsoft applications up to date automatically.”
- To continue, tap Turn Off.
That’s all there is to it. Microsoft AutoUpdate will no longer run in the background on your Mac.
Should you delete the Microsoft AutoUpdate patch?
We hope you now have a better grasp of how Microsoft AutoUpdate works on your Mac and when it should be uninstalled or temporarily deactivated as a result of this new information. To summarize, if you don’t have any Microsoft apps installed on your PC, we recommend removing the software. Disabling it is a much better choice, as you can reduce the app’s high CPU usage as well as stopping the app’s frequent pop-up alerts. Do you have any further queries concerning Microsoft AutoUpdate? Leave a comment below, and we’ll get back to you as soon as possible.
How to stop Microsoft AutoUpdate constantly popping up on Mac (step-by-step)
Step by step breakdown
- Firstly, open Launchpad.

- Now navigate to “Activity Monitor” and open it.

The activity monitor app is located in the “Other” app folder, just open the folder and click on Activity monitor
- Under the processor name find “Microsoft AutoUpdate”.
- Double click on it.
- Now click on “Quit”.

- Once quitted and its record on CPU is removed, close the monitor.

Just right-click and press “Quit”.
- Now navigate over to “Finder”.

- Open “Finder” and use the search bar to find the folder called Microsoft AutoUpdate.
- Move the file to the bin.

Just select the folders and right-click on them. Then just click on “Move to Bin”.
- Finally, clear the bin to completely remove the auto-update folder.

Just open the bin and click on “Empty”.

Another popup will show here click on “Empty Bin” to finish the process.
That’s it for this Blog thank you for taking time out to read our content, please feel free to email our team about how it went if you followed the steps or if you need more help with the questions we answered in this Blog.