The co-authoring feature in SharePoint Online allows two or more users to work on a document at the same time, without interfering with each other’s edits and changes. There are a range of benefits that come with co-authoring such as efficiency and scalability, however, some organisations may have certain limitations when it comes to their hardware and may want to turn off co-authoring to minimise the impact it has on the performance of their server.
Unfortunately, there is no way to turn off the default co-authoring feature in Sharepoint Online as of yet. However, it is possible to check out a document in Sharepoint Online. The checkout option can be thought of as the opposite of co-authoring. It restricts multiple users from making edits or changes to the document at the same time as other users. This means that other users are prevented from making any changes to a document until the first user has finished and has checked the document back in. This blog post will demonstrate how to check out a document in SharePoint Online.
Checking out a document in Sharepoint Online:
- Sign into Office.com using your Microsoft credentials and go into SharePoint
- Go to the site where your document library is
- Enter the document library where the document or file that you want to check out is stored
- Right click on the document you want to check out and click on ‘More’ from the drop down list
- Then, select ‘Check out’
- A small window will appear on the right hand side of the screen notifying you that the document has been checked out.
Please note that other users cannot see the changes you have made to the document until you have checked the document back in. Therefore, once you have made the changes required, make sure to check the document in. To check the document back in, follow the steps above again, however instead of clicking ‘Check out’, select ‘Check in’.
Why checking out a document can be useful
Just like co-authoring has a number of advantages, so does utilising the check out feature on SharePoint Online. Firstly, it helps users to find out who is currently editing the document. Once you have checked out a document in SharePoint, other users trying to access the document will be told which user is currently making changes to the document, however, they will not be able to see the changes you have made until you have checked the document back in.
Checking out a document also gives users control over the version numbers of the document. While co-authoring, the document automatically saves itself after every minute or so to ensure that the most updated version of the document is being saved as multiple users are editing and making changes at the same time. This results in a large number of versions being saved after every minute. When a document is checked out, not as many versions need to be saved, as the document is not auto saving every minute.
The biggest benefit of using the check out feature on a document is that it only allows one user to edit the document at a time, as the other users will be able to access the document in a read only view until the document is checked in again. This can help prevent conflict in the long run when multiple users want to make changes at the same time as it requires them to let other users make changes before they can make changes themselves.

Step by step process of checking out a document in SharePoint Online:
- Sign into Office.com using your Microsoft credentials and go into SharePoint
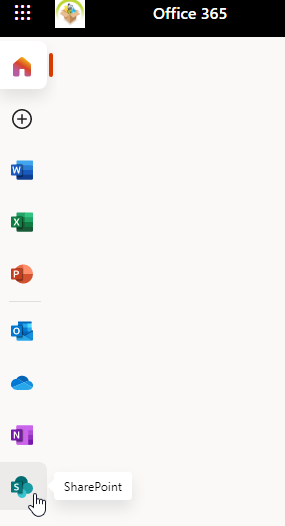
Click on the SharePoint logo and enter SharePoint.
- Go to the site where your document library is

For this tutorial, I will enter the Blog Demo site.
- Enter the document library where the document or file that you want to check out is stored

The document I want to check out for this tutorial is stored in the document library called ‘Documents’.
- Right click on the document you want to check out and click on ‘More’ from the drop down list

- Then, select ‘Check out’

- A small window will appear on the right hand side of the screen notifying you that the document has been checked out.

Your document has now been checked out and you can make changes and edit it without other users being able to see the changes until the document has been checked in.
How to check the document in again:
Once you have finished making the changes to your document, here’s how to check the document in again to ensure other users can have full access to it.
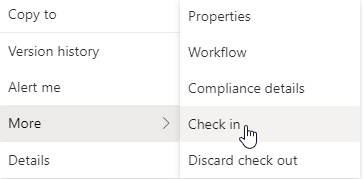
- Right click on the document you want to check in and click on ‘More’ from the drop down list
- Then, select ‘Check in’
- A window will appear on screen asking you to add any comments about the changes you have made to the document.
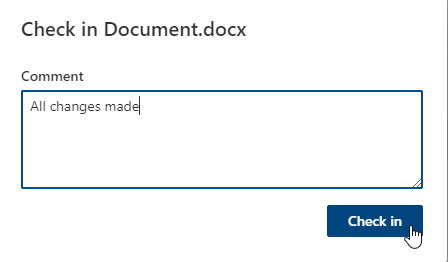
This comment section is designed to help you communicate the changes you have made to other users. For this tutorial, I have commented ‘All changes made’. This is an optional step, if you do not wish to add any comments you can skip to the next step.
- A small window will appear on the right hand side of the screen notifying you that the document has been checked out.

Thank you for reading. If you have any further questions or any comments about checking out your documents to disable co-authoring, feel free to leave a comment below and we’ll be happy to help.