 Key Takeaways
 Loop components consist of one or more elements or building blocks. You can create elements by typing a forward slash / and selecting an element or template from a list.
You can then convert your elements into a sharable Loop component by clicking the ![]() six dots in the top left and selecting
six dots in the top left and selecting ![]() “Create Loop component.”
“Create Loop component.”
 You can share Loop components by clicking the
 ![]() copy icon in the top right. You can then paste the link into apps such as Microsoft Teams and the message section of a new mail in Outlook.
copy icon in the top right. You can then paste the link into apps such as Microsoft Teams and the message section of a new mail in Outlook.

Now that Microsoft Loop is in public preview, our readers want to know how to use components. So in this guide, we’ll show you how to build components using the available building blocks, such as tables, lists, and templates.
Microsoft Loop Components: A complete guide on how to use them:
- General

 Tables
 Lists
Lists Headers & Dividers
- Communication
 Person
 Emojis
 Date
Date Labels
- Media
 Images
 Videos
- Template
 Task List
 Voting Table
 Progress Tracker
Please note that the items listed above are not “Loop components” themselves, but are elements that can be converted into Loop components. A Loop component may consist of one or numerous elements or building blocks, which can then be shared and edited in realtime by allocated team members.
We’ve also created a video to show you how to use Loop Components in Microsoft Teams:
 Overview: What are Loop Components?
Components in Microsoft Loop are sharable elements, such as tables, lists, and images. What makes Loop components unique is that you can embed them directly into other Microsoft 365 apps — currently ![]() Teams,
Teams, ![]() Outlook,
Outlook, ![]() Whiteboard, and
Whiteboard, and ![]() Word for the web.
Word for the web.
When you embed a Loop component in a Teams chat, members can add to and modify the elements directly from Teams, and truly collaborate in real time.
Where ever you see a speech bubble, you can add comments and react to elements within the component, offering feedback as you build.
In Loop, you can create a component by hitting forward slash “/” and selecting an element from the popup list. You can then convert the element or elements into a Loop component by clicking the ![]() six dots in the top left and selecting
six dots in the top left and selecting ![]() “Create Loop component.”
“Create Loop component.”
Once created, the components are saved in OneDrive as .fluid files.
Sharing your Loop components is simple. Just click the ![]() copy icon in the top right and paste it into a new Outlook mail or a Teams chat.
copy icon in the top right and paste it into a new Outlook mail or a Teams chat.
![]() Notes:
Notes:
If you can’t embed your component link in Teams, it’s possible that your organization hasn’t enabled Loop, or hasn’t added you to the security group.
To learn more, please read ![]() How to enable and access Microsoft Loop for your organization.
How to enable and access Microsoft Loop for your organization.
Also, components won’t embed if you’ve pasted it as an unsent message in a different chat. So check all your chats to make sure the component isn’t open in a new, unsent chat message.

 General Components
Tables in Microsoft Loop
In this section, we’ll show you how to use a table and integrate other components to build an effective collaboration tool.
Tables are perhaps the most powerful components for building tools in Microsoft Loop. You can also incorporate other elements into tables, such as votes and labels. But let’s start with the basics.
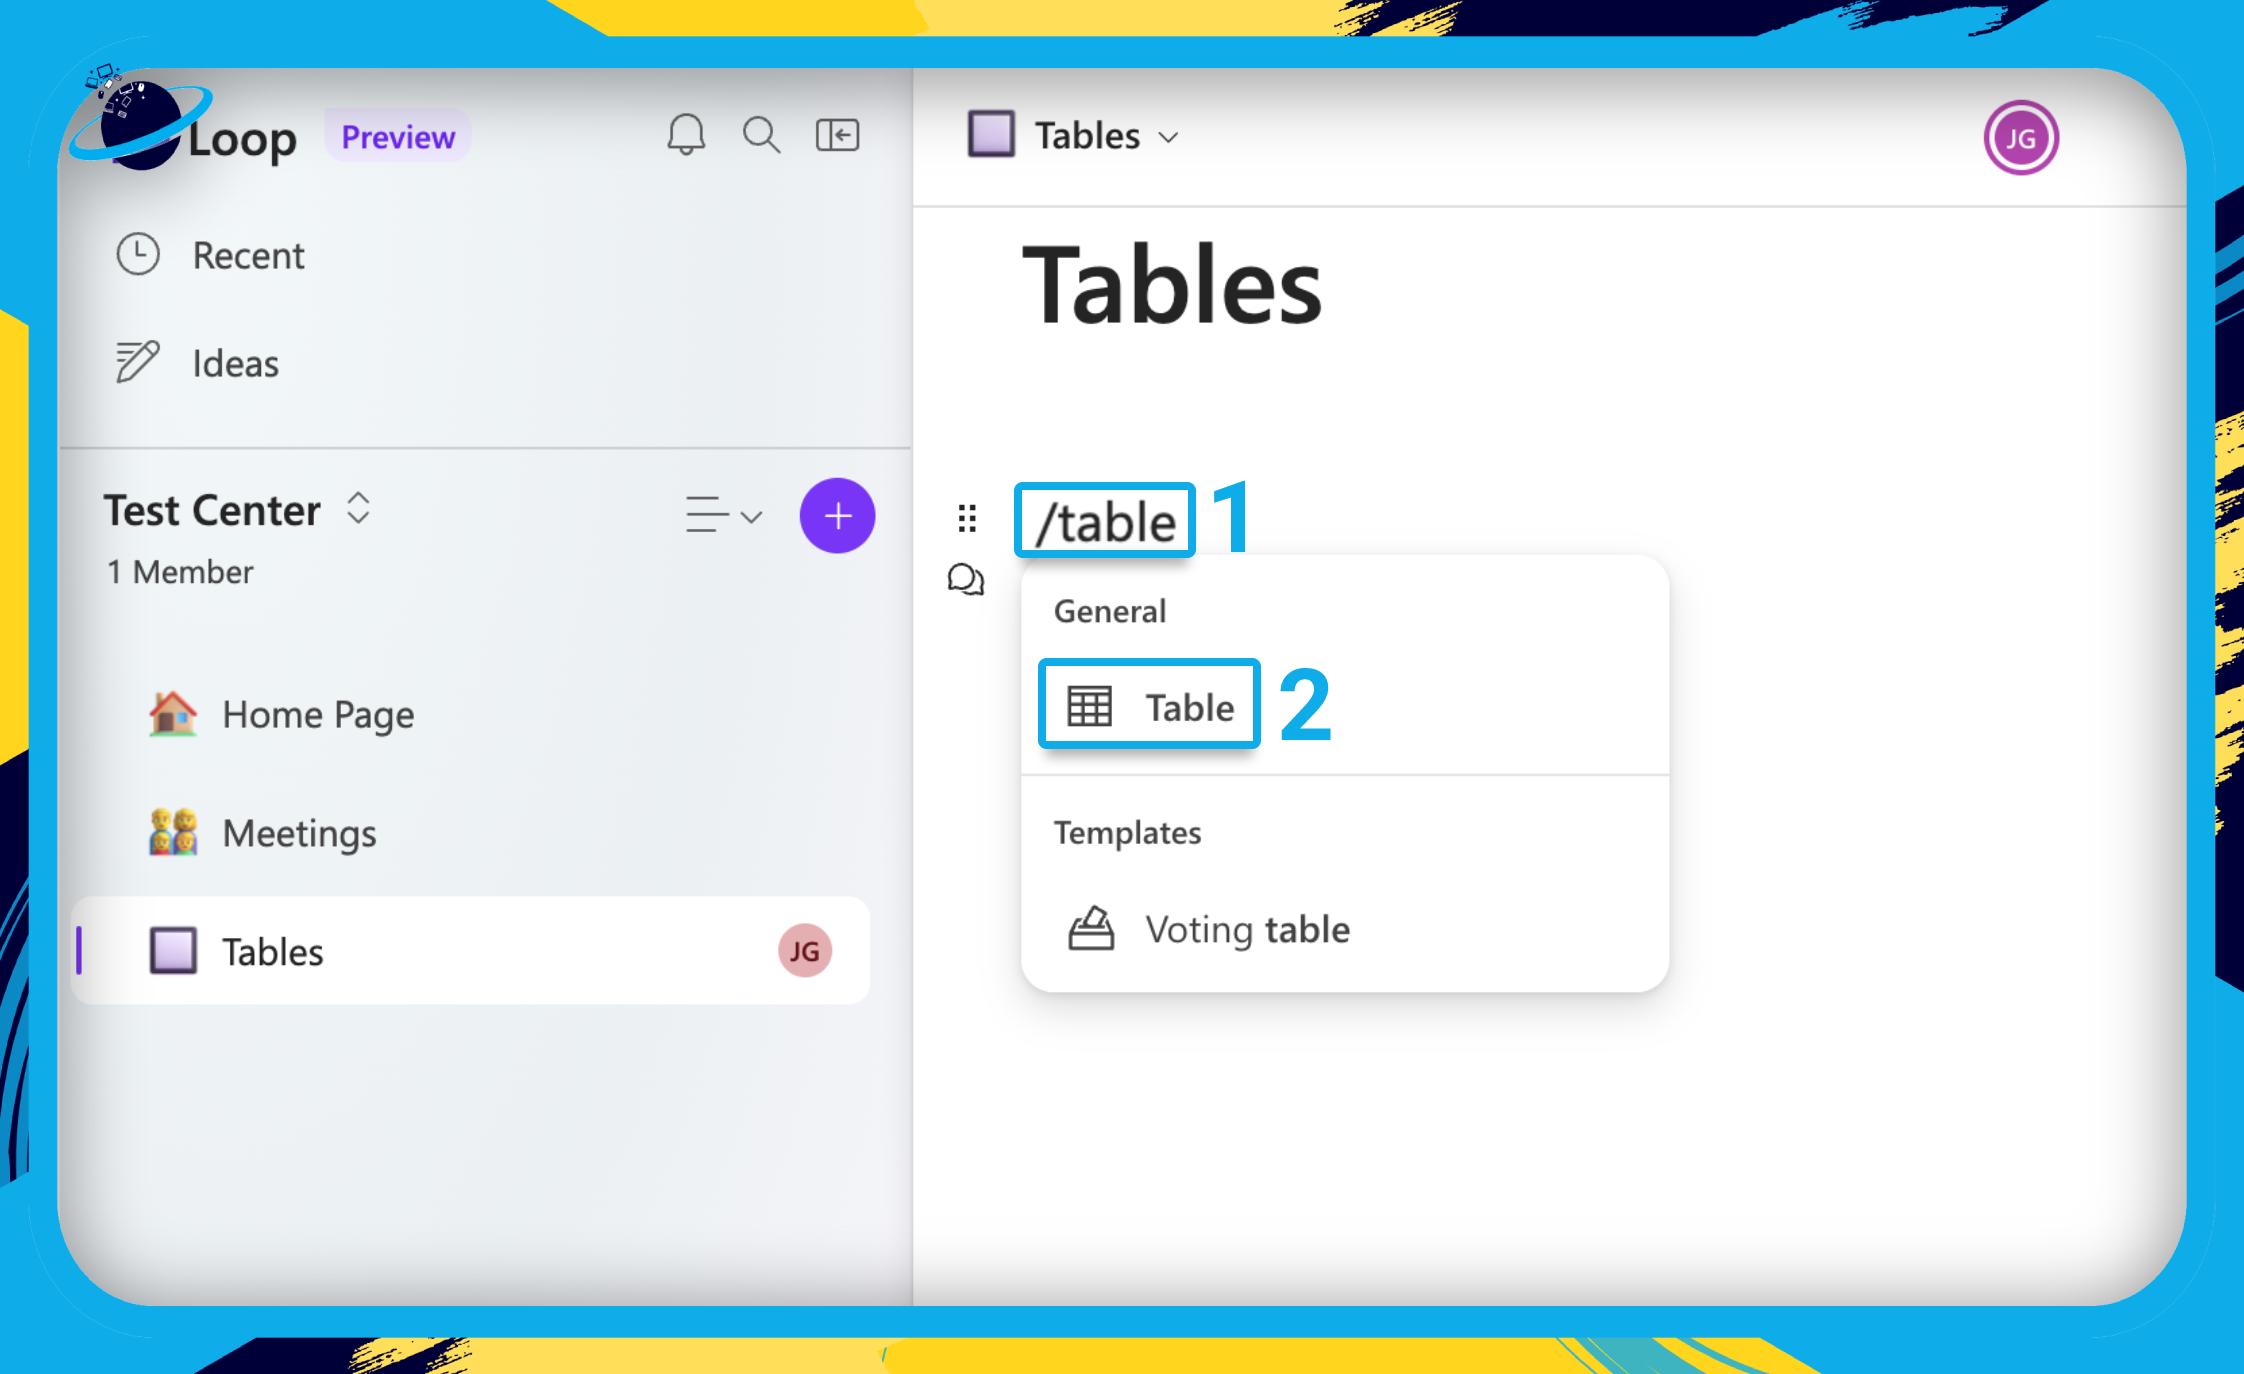
- To start, open a page in Loop and type “/table” anywhere below the title. [1]
- Then select “Table” from the popup. [2]
- You can also hit ⏎ Enter or ⏎ Return on the keyboard to select Table.
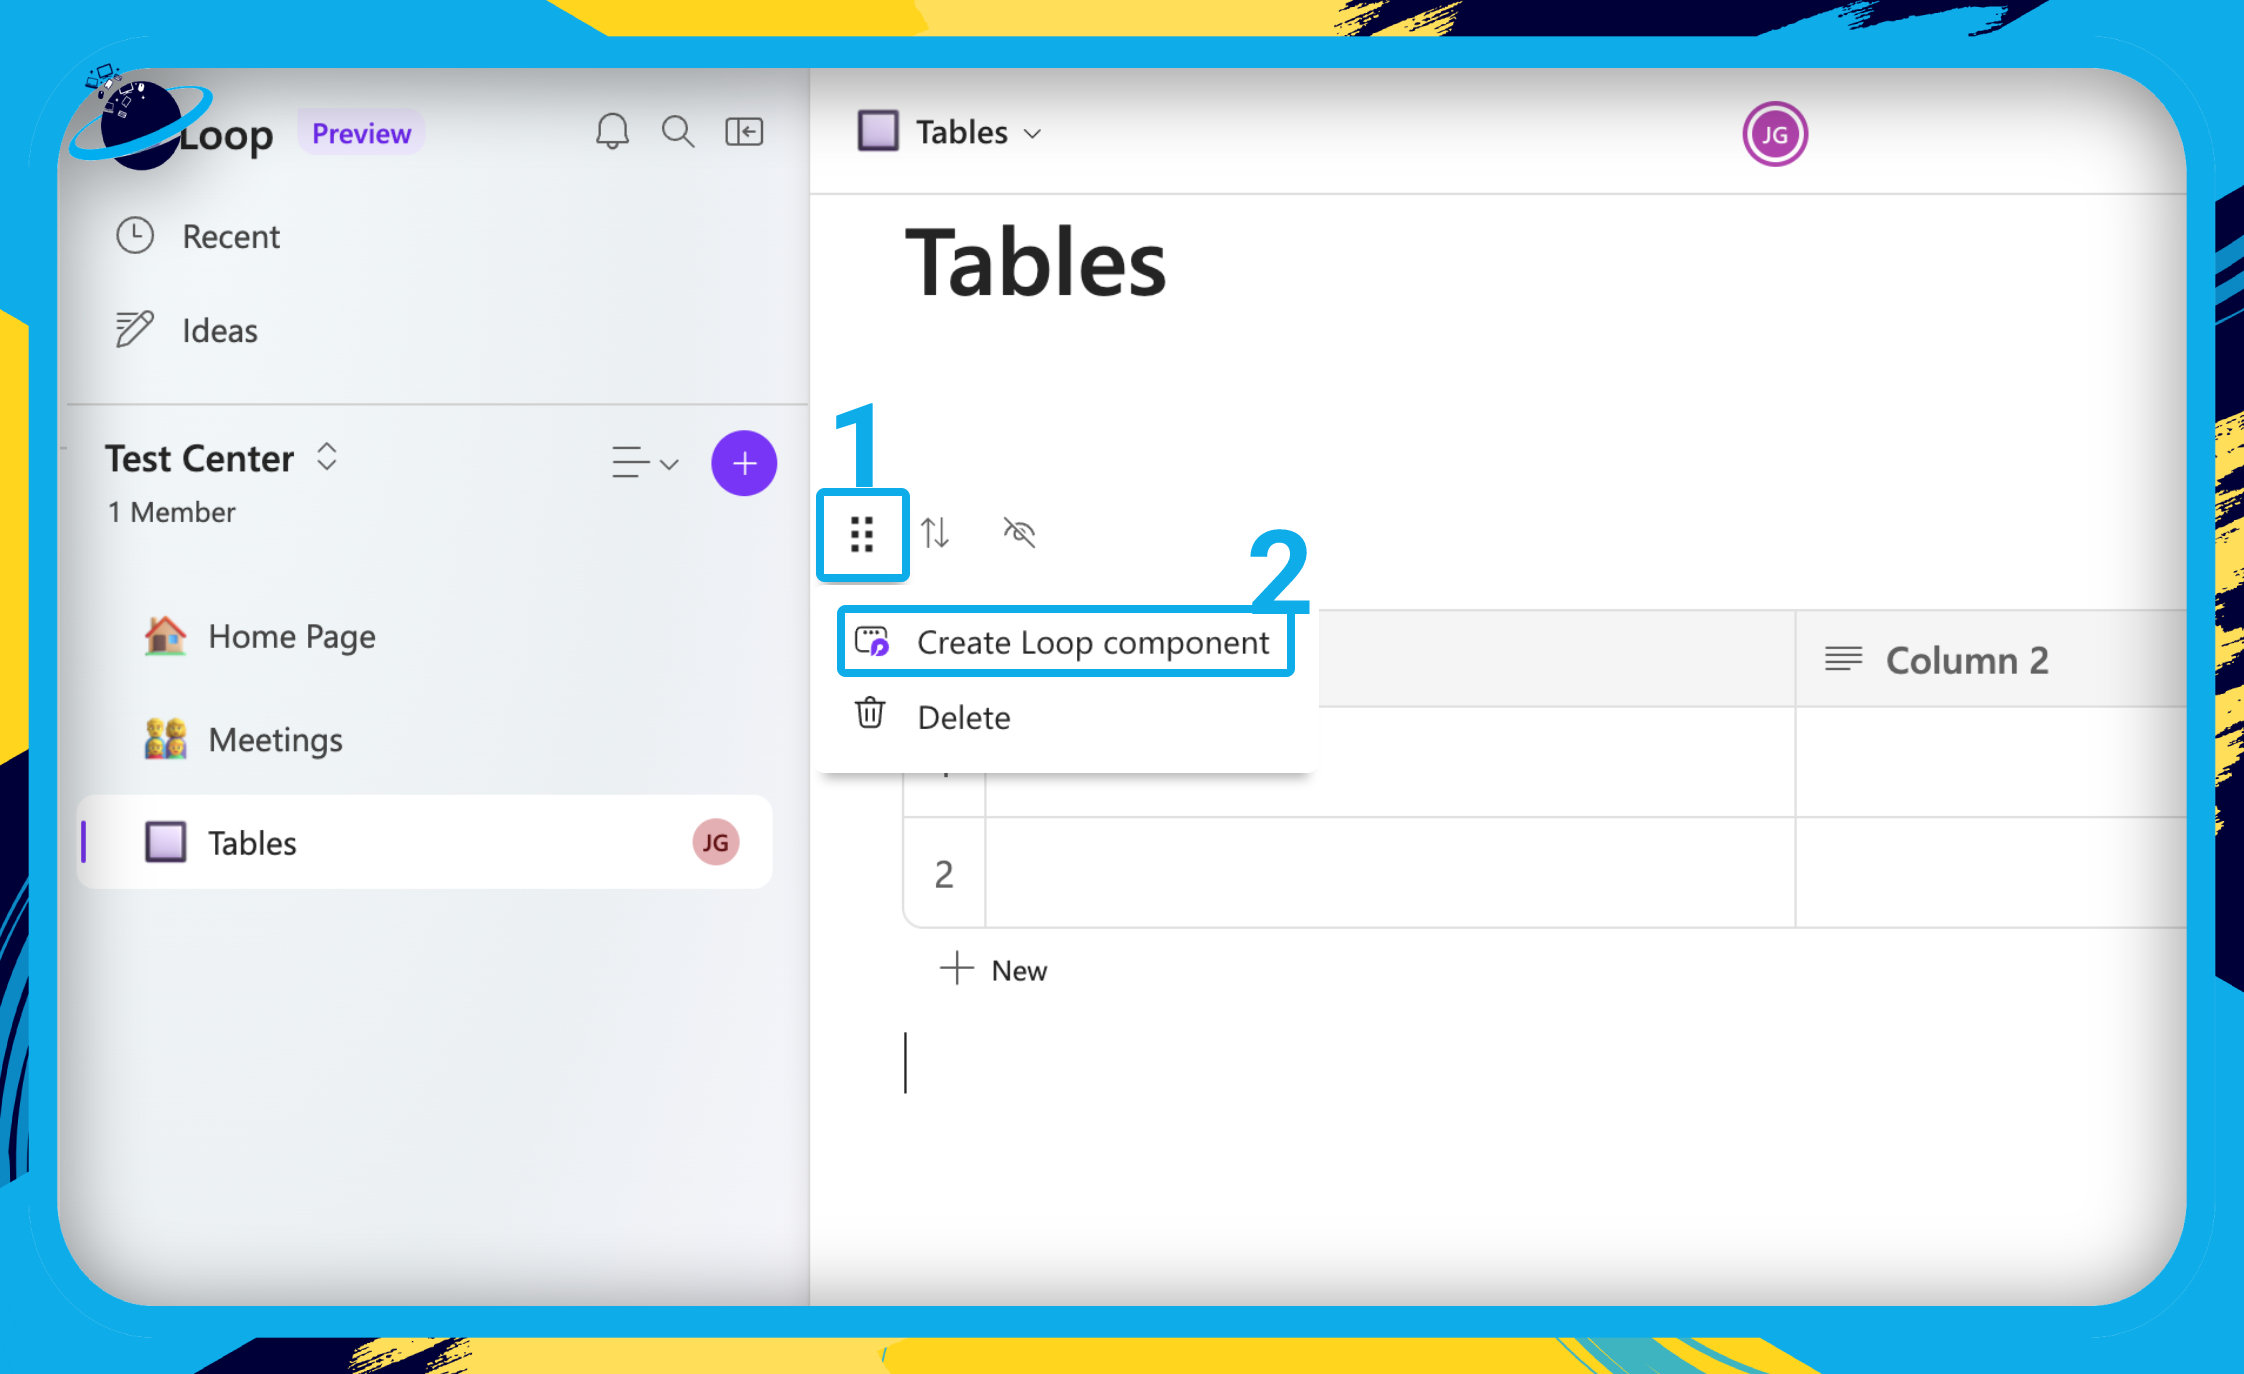
Convert the table to a Loop component
- Click the
 six dots icon at the top left of the table.
- If you can’t see the six dots, click anywhere above the table.
- Then select
 “Create Loop component” in the popup box.
How to add new rows and columns
- A standard table has two columns and two rows.
- To add new rows, click
 “New” at the bottom.
 - Or, hover between the row numbers on the left and click the
 plus icon.
 - To add new columns, hover above the column border and click the plus icon.
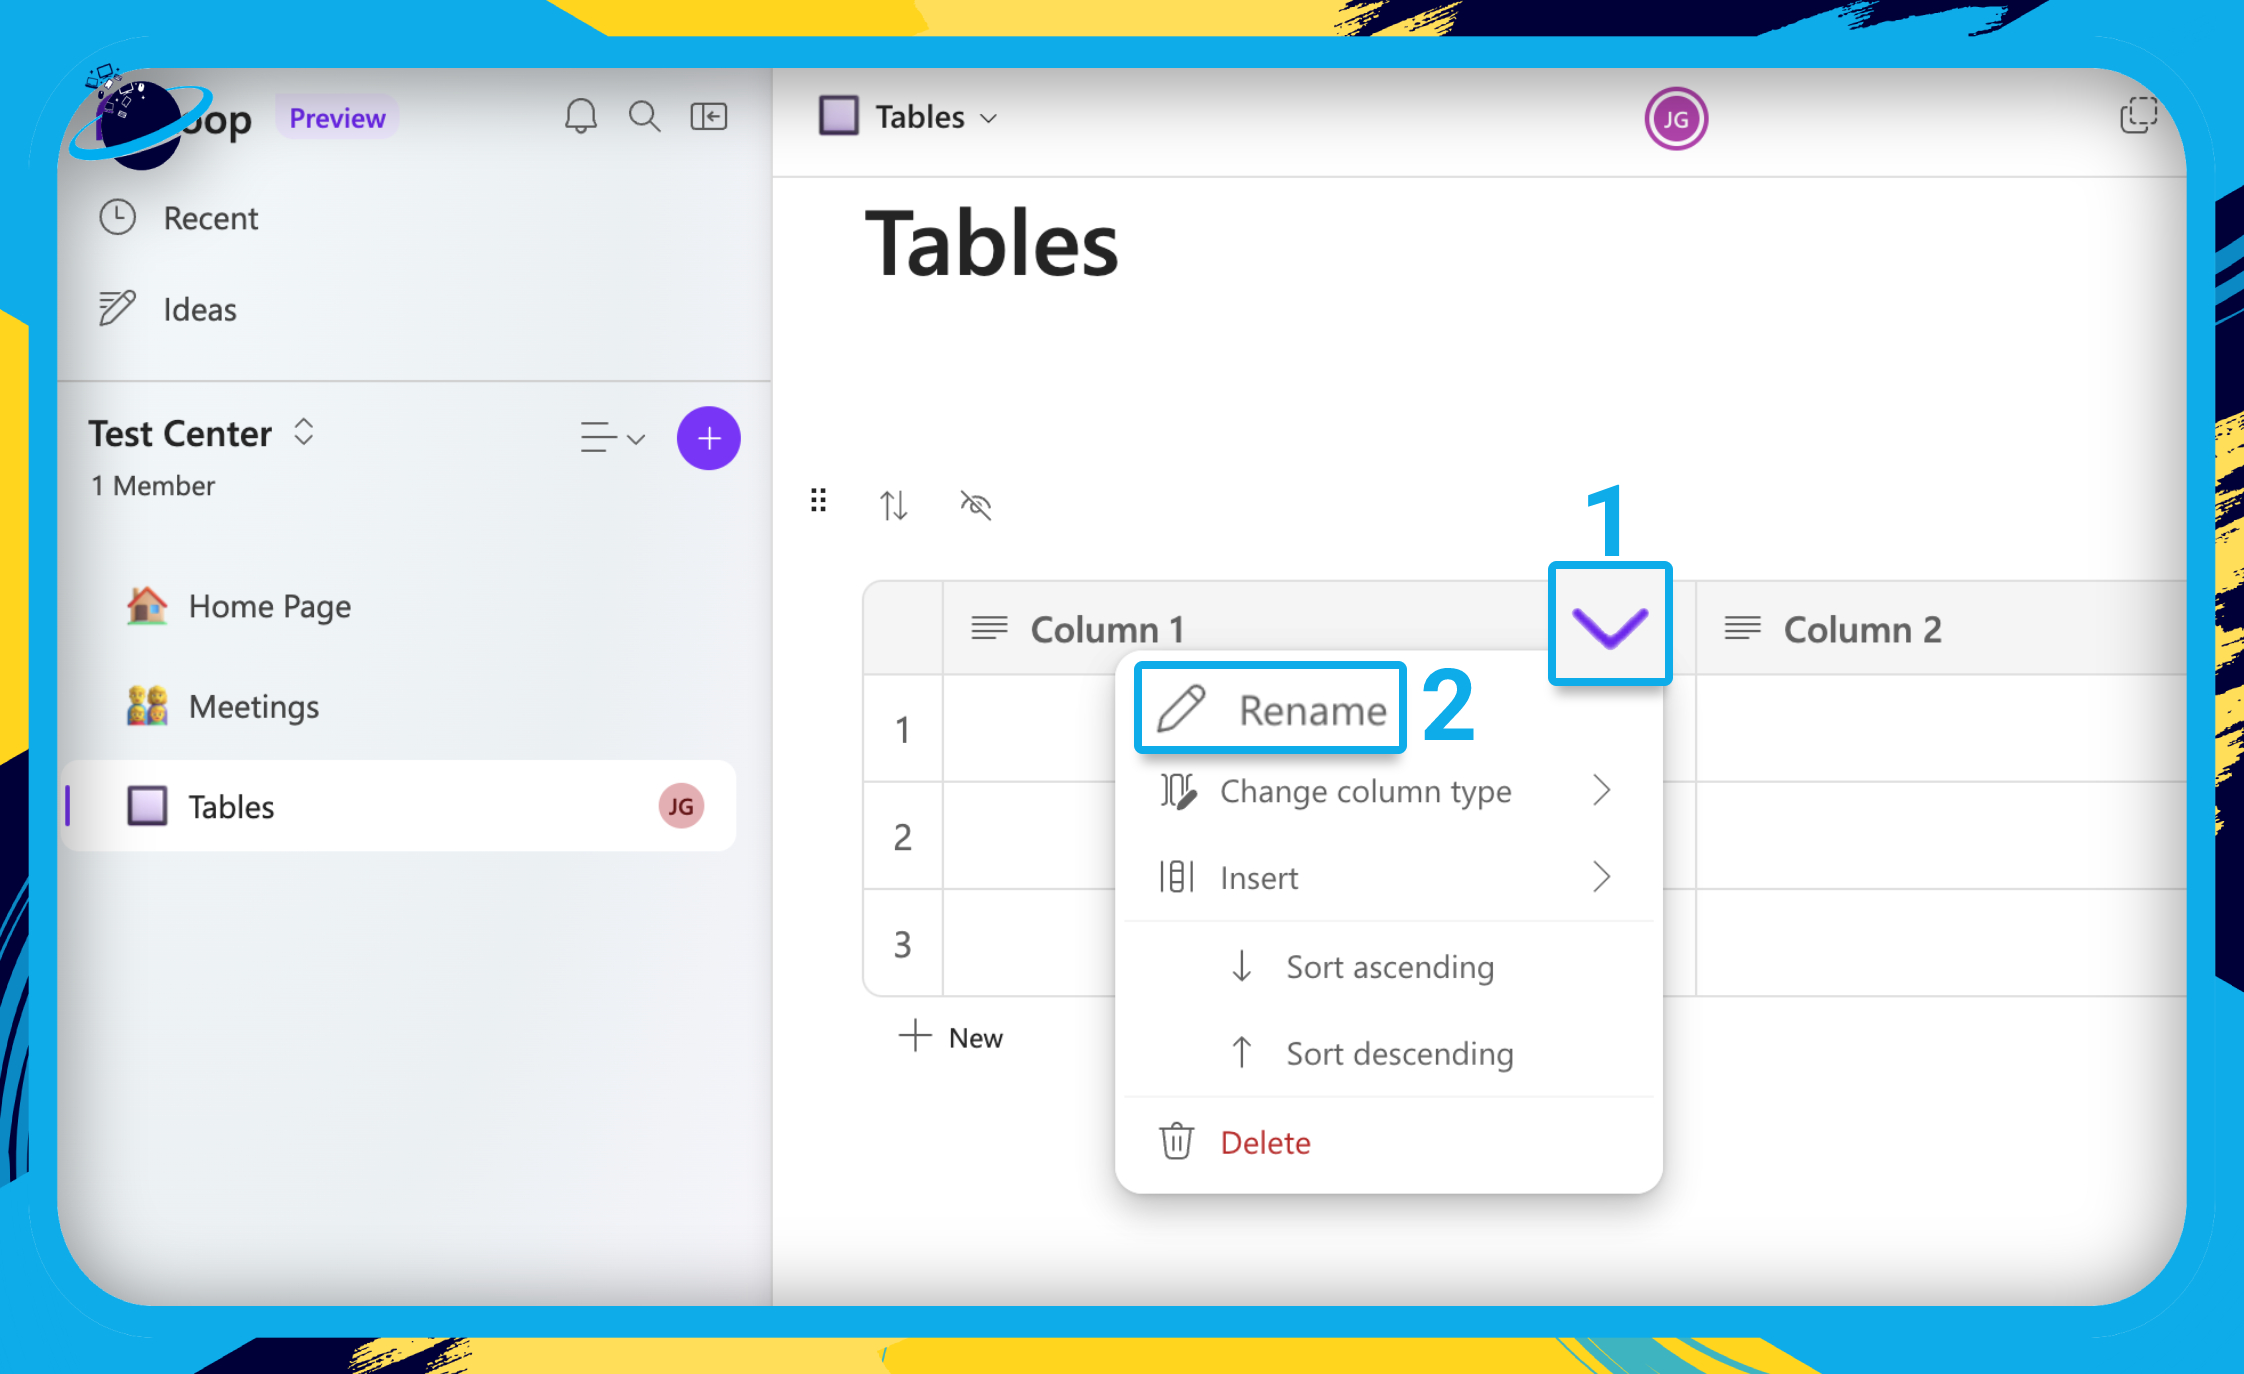
How to rename a column
- To rename a column, double-click the column name, hit delete, and rename.
- Or, click the down-arrow in the column header [1] and select
 “Rename.” [2]
How to resize the columns
- Hover over the boarder between the columns until you see the
 resize icon.
 - Then click and drag the resize icon to the left or right.
How to reorder the rows and columns
- For columns, hover above the column header, then click and drag the six dots.
- For rows, hover over the row number, then click and drag the six dots.

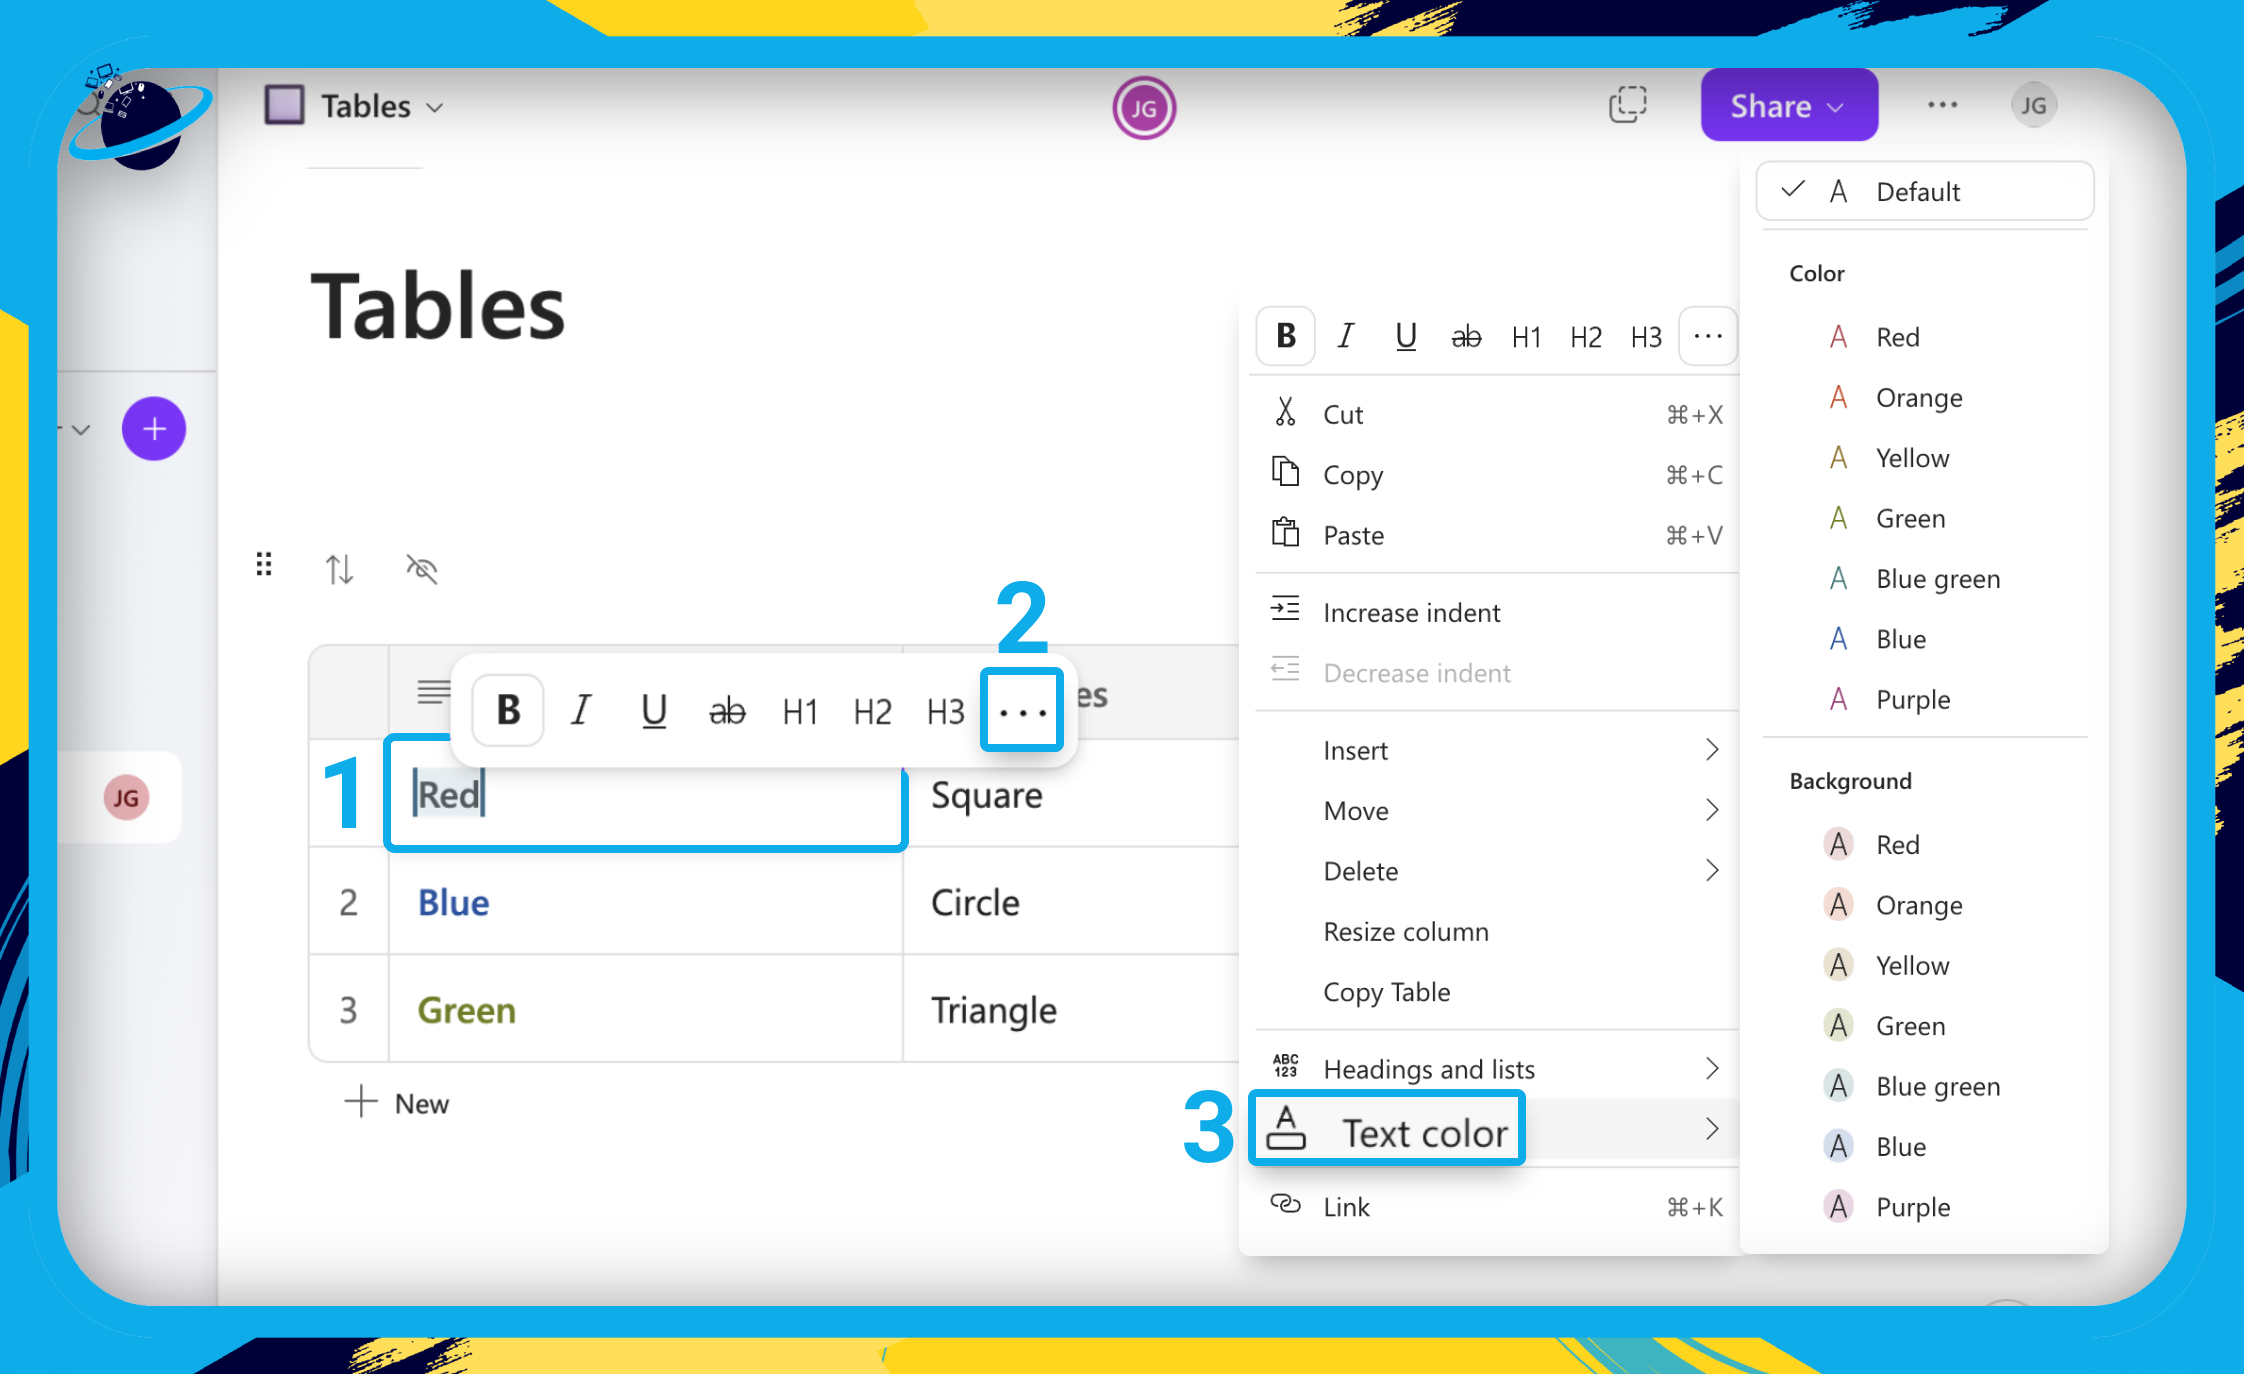
How to change the text format
- To change all the text in the cell, right-click the cell.
- Or, double-click the cell and click the three dots in the format bar.
- Then go to
 “Text color” in the popup menu.
- To change specific text, highlight the text you want to change. [1]
- Then right-click or click the three dots in the format bar. [2]
- Then go to “Text color” in the popup menu. [3]
- There, you’ll be able to select a text color or background color.
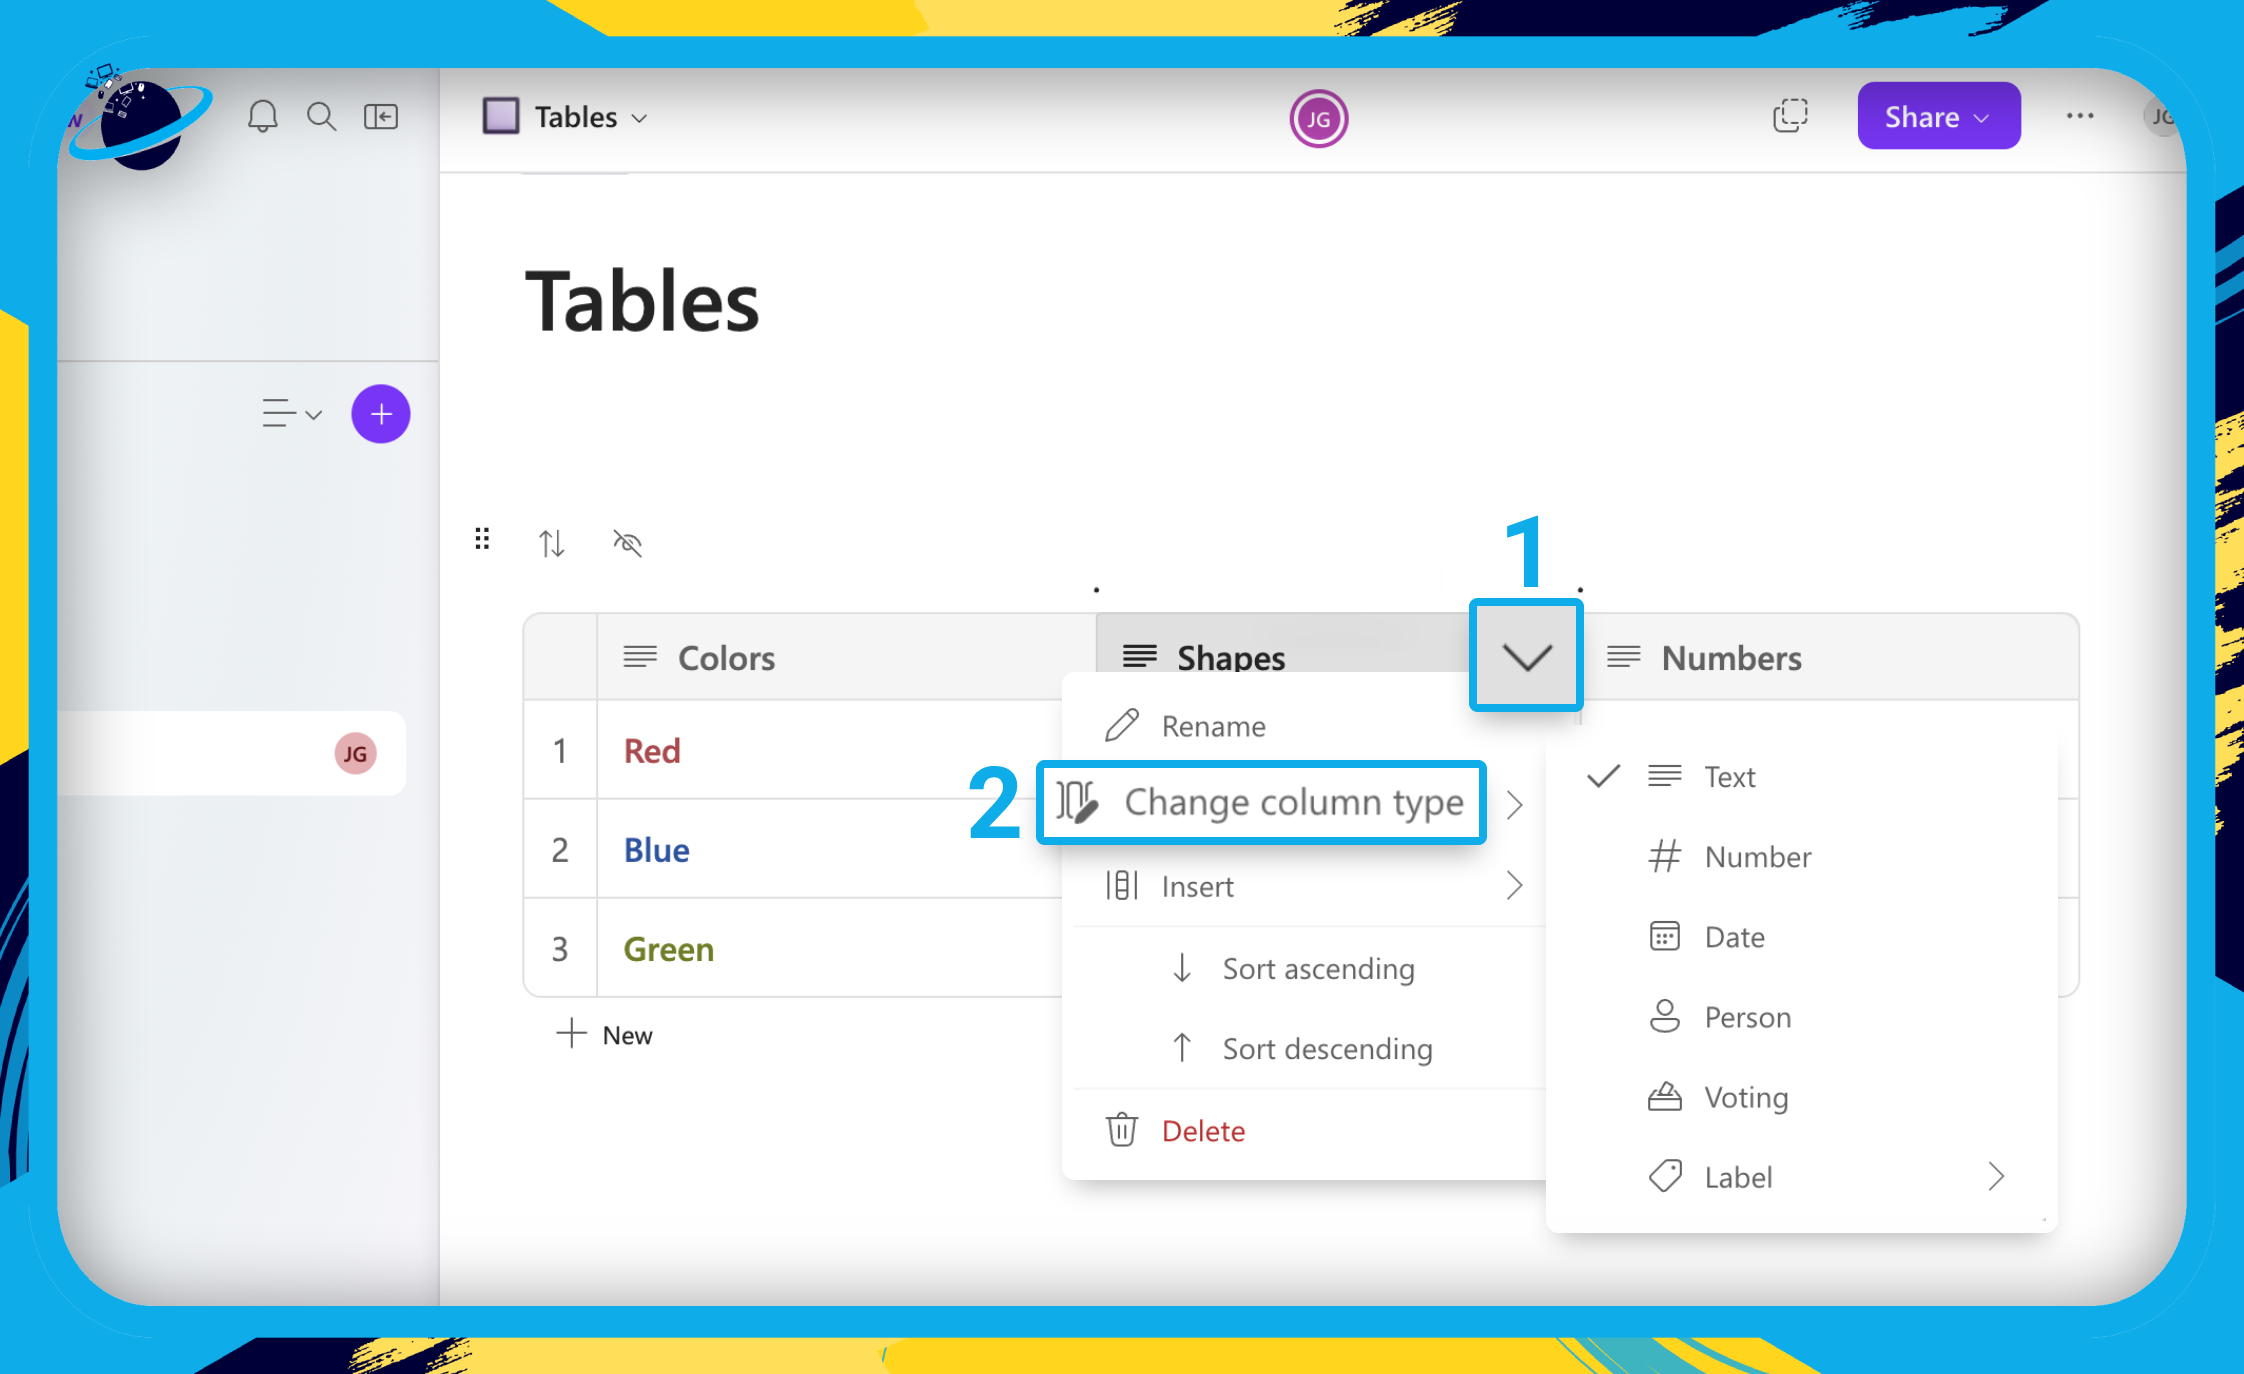
How to change the column type
- Click the down-arrow in the column header. [1]
- Then go to
 “Change column type” in the dropdown. [2]
 - There, you can select from the following types:
 Text (default)
 Number
 Date
Date Person
- Voting
- Label
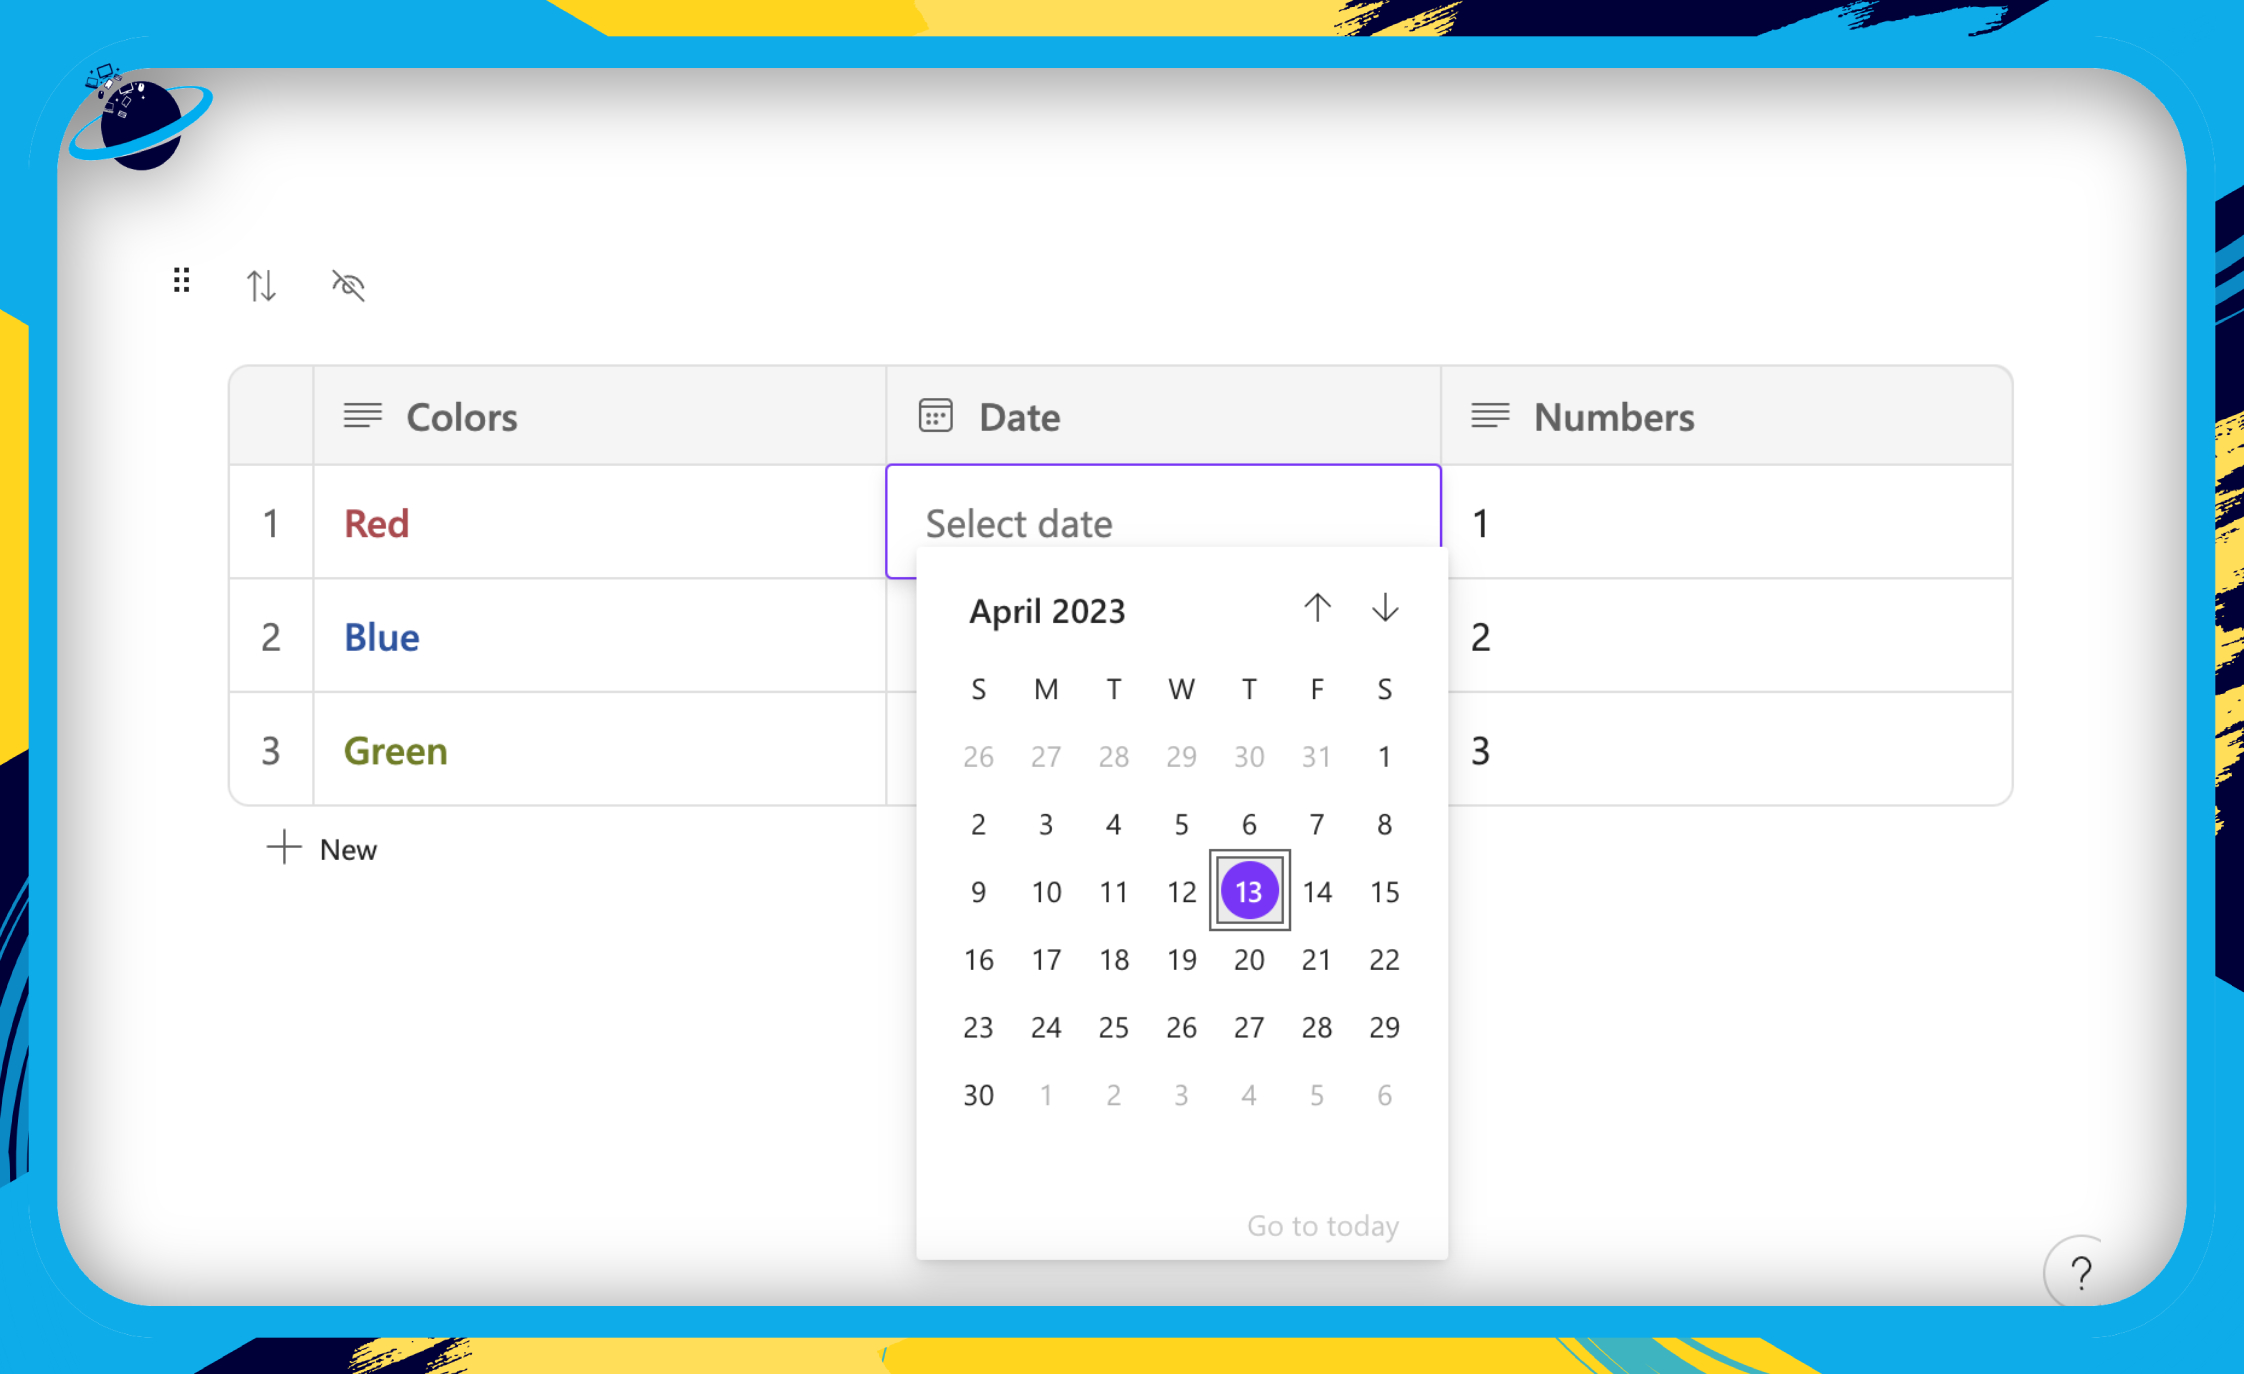
We selected “Date” — now, we can choose a date by clicking the cells.
How to add components to a table
- To add other components, type a forward slash / inside any cell.
- Then select a component from the popup list.
Update: Expandable Tables
You can now expand tables to the full width of the screen by clicking the ![]() arrows icon. Although this functionality was available prior to June 2023, it was announced by Microsoft as a new update in June.
arrows icon. Although this functionality was available prior to June 2023, it was announced by Microsoft as a new update in June.
Update: Table summary
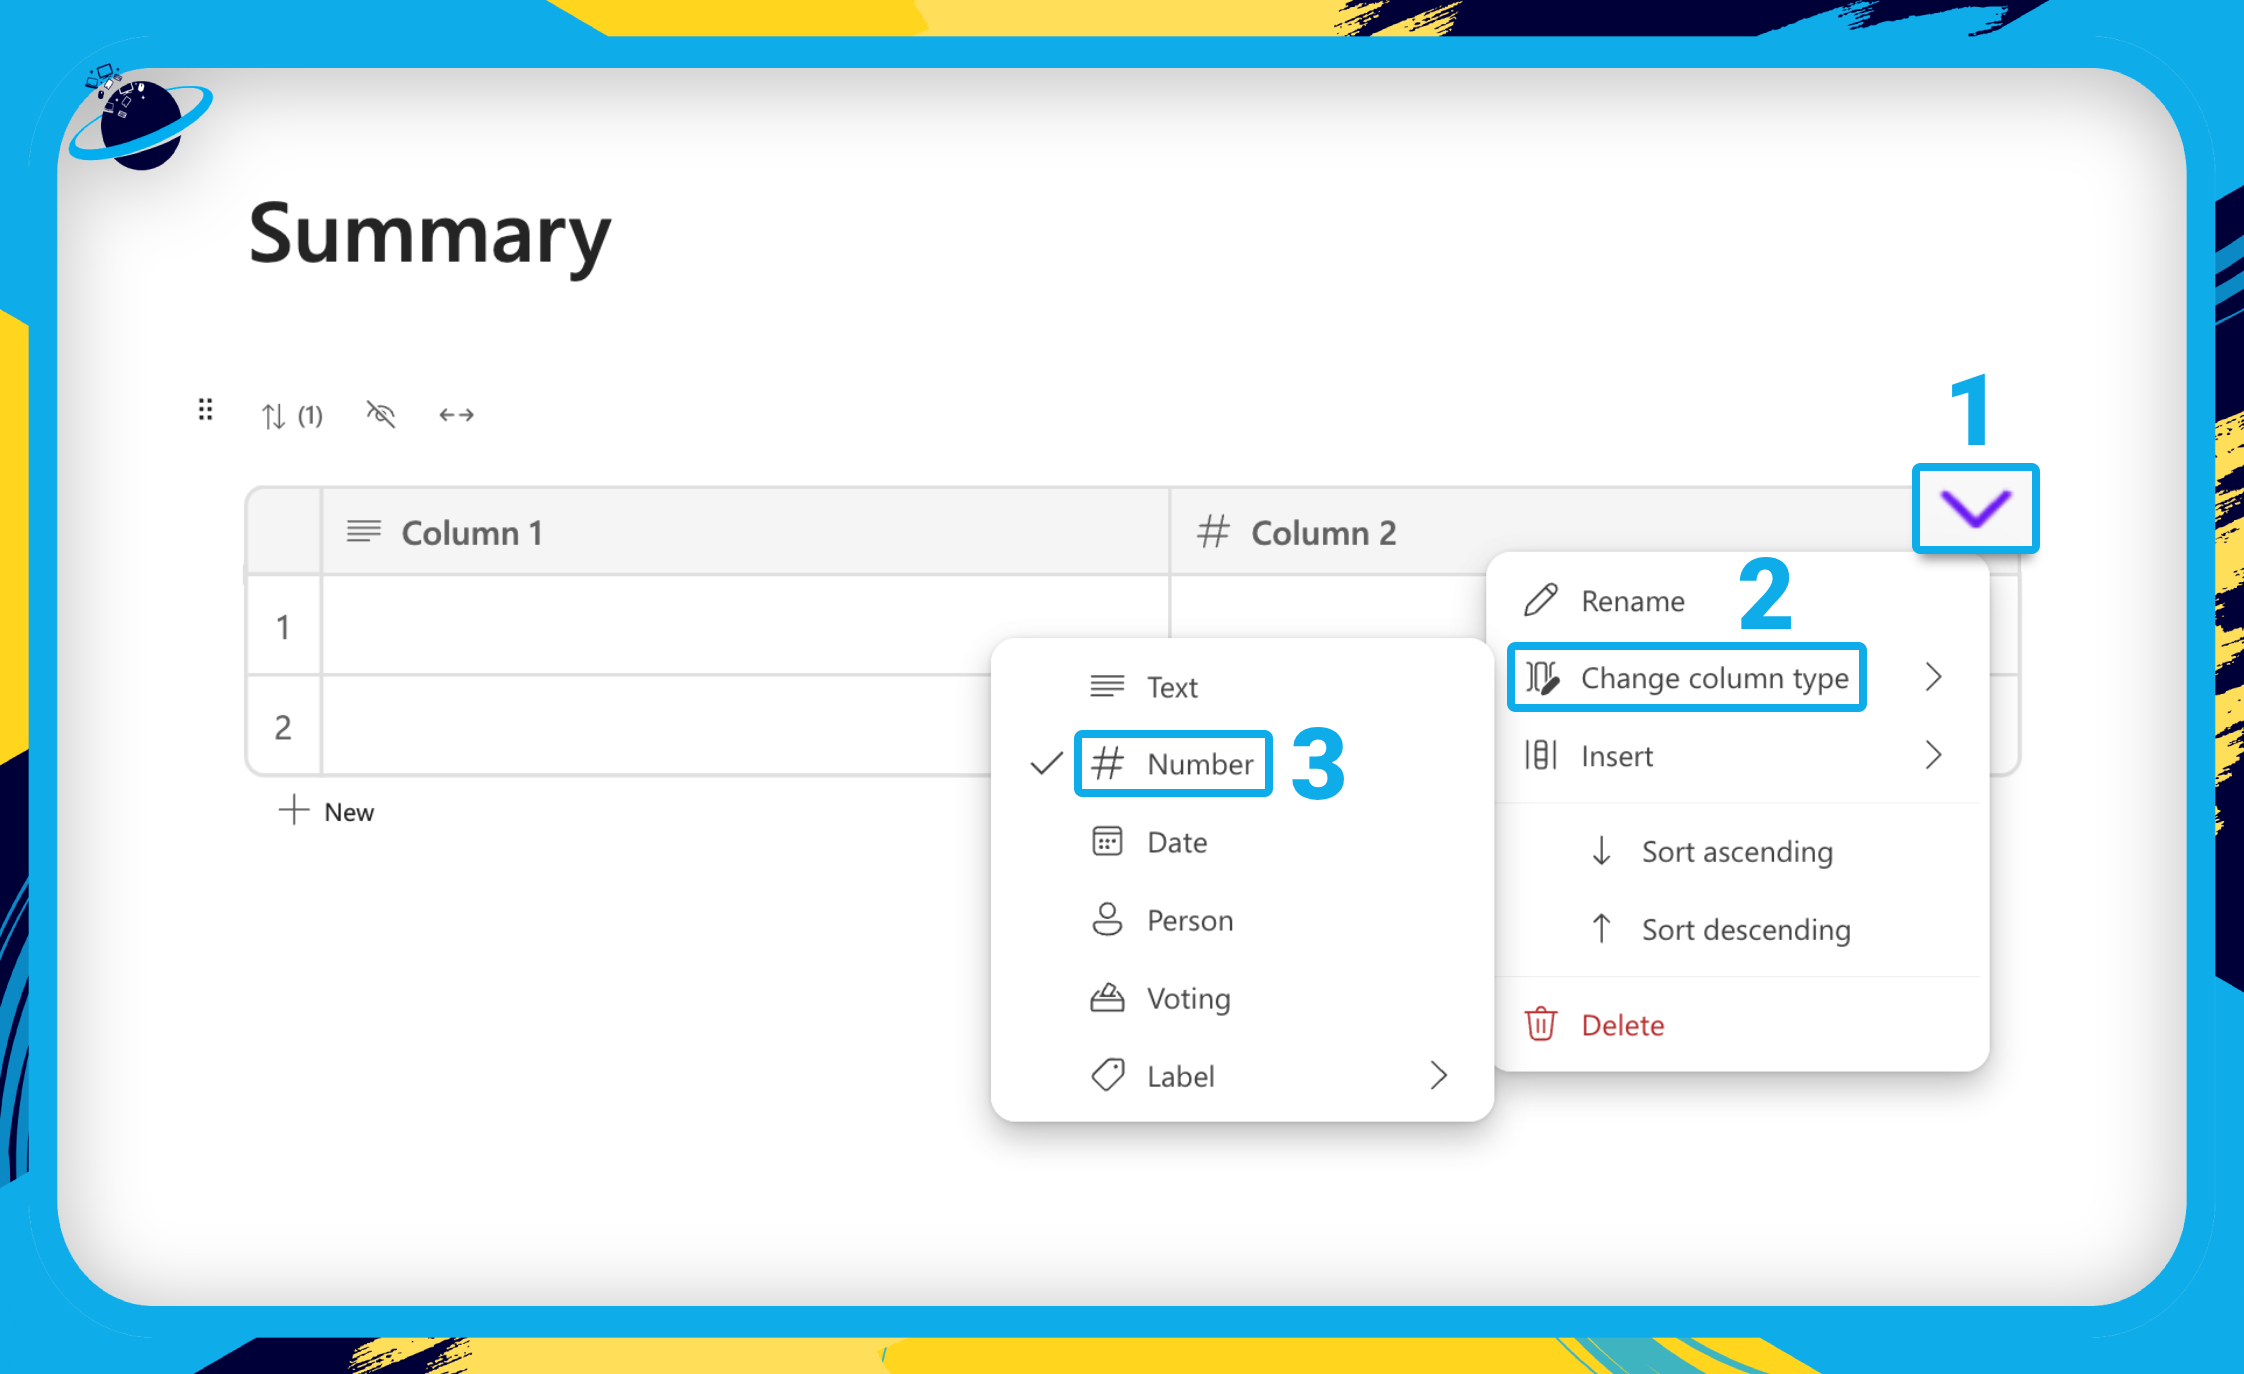
By changing a column type to “Number” you can sum the contents of the column. Follow the steps below to do that:
- Create a table, then click the down arrow in either column header. [1]
- Go to “Change column type.” [2]
- Then select “Number” from the list of options. [3]
Summary also works with the ![]() “Person” column type. The total number of times the person is mentioned in the table will be shown at the bottom.
“Person” column type. The total number of times the person is mentioned in the table will be shown at the bottom.
- Now enter some numbers into the column’s rows.
By default, the table will sum all the numbers in the column and give you the total at the bottom. But you can also choose “Average” or “Count” by clicking “Sum” at the bottom.
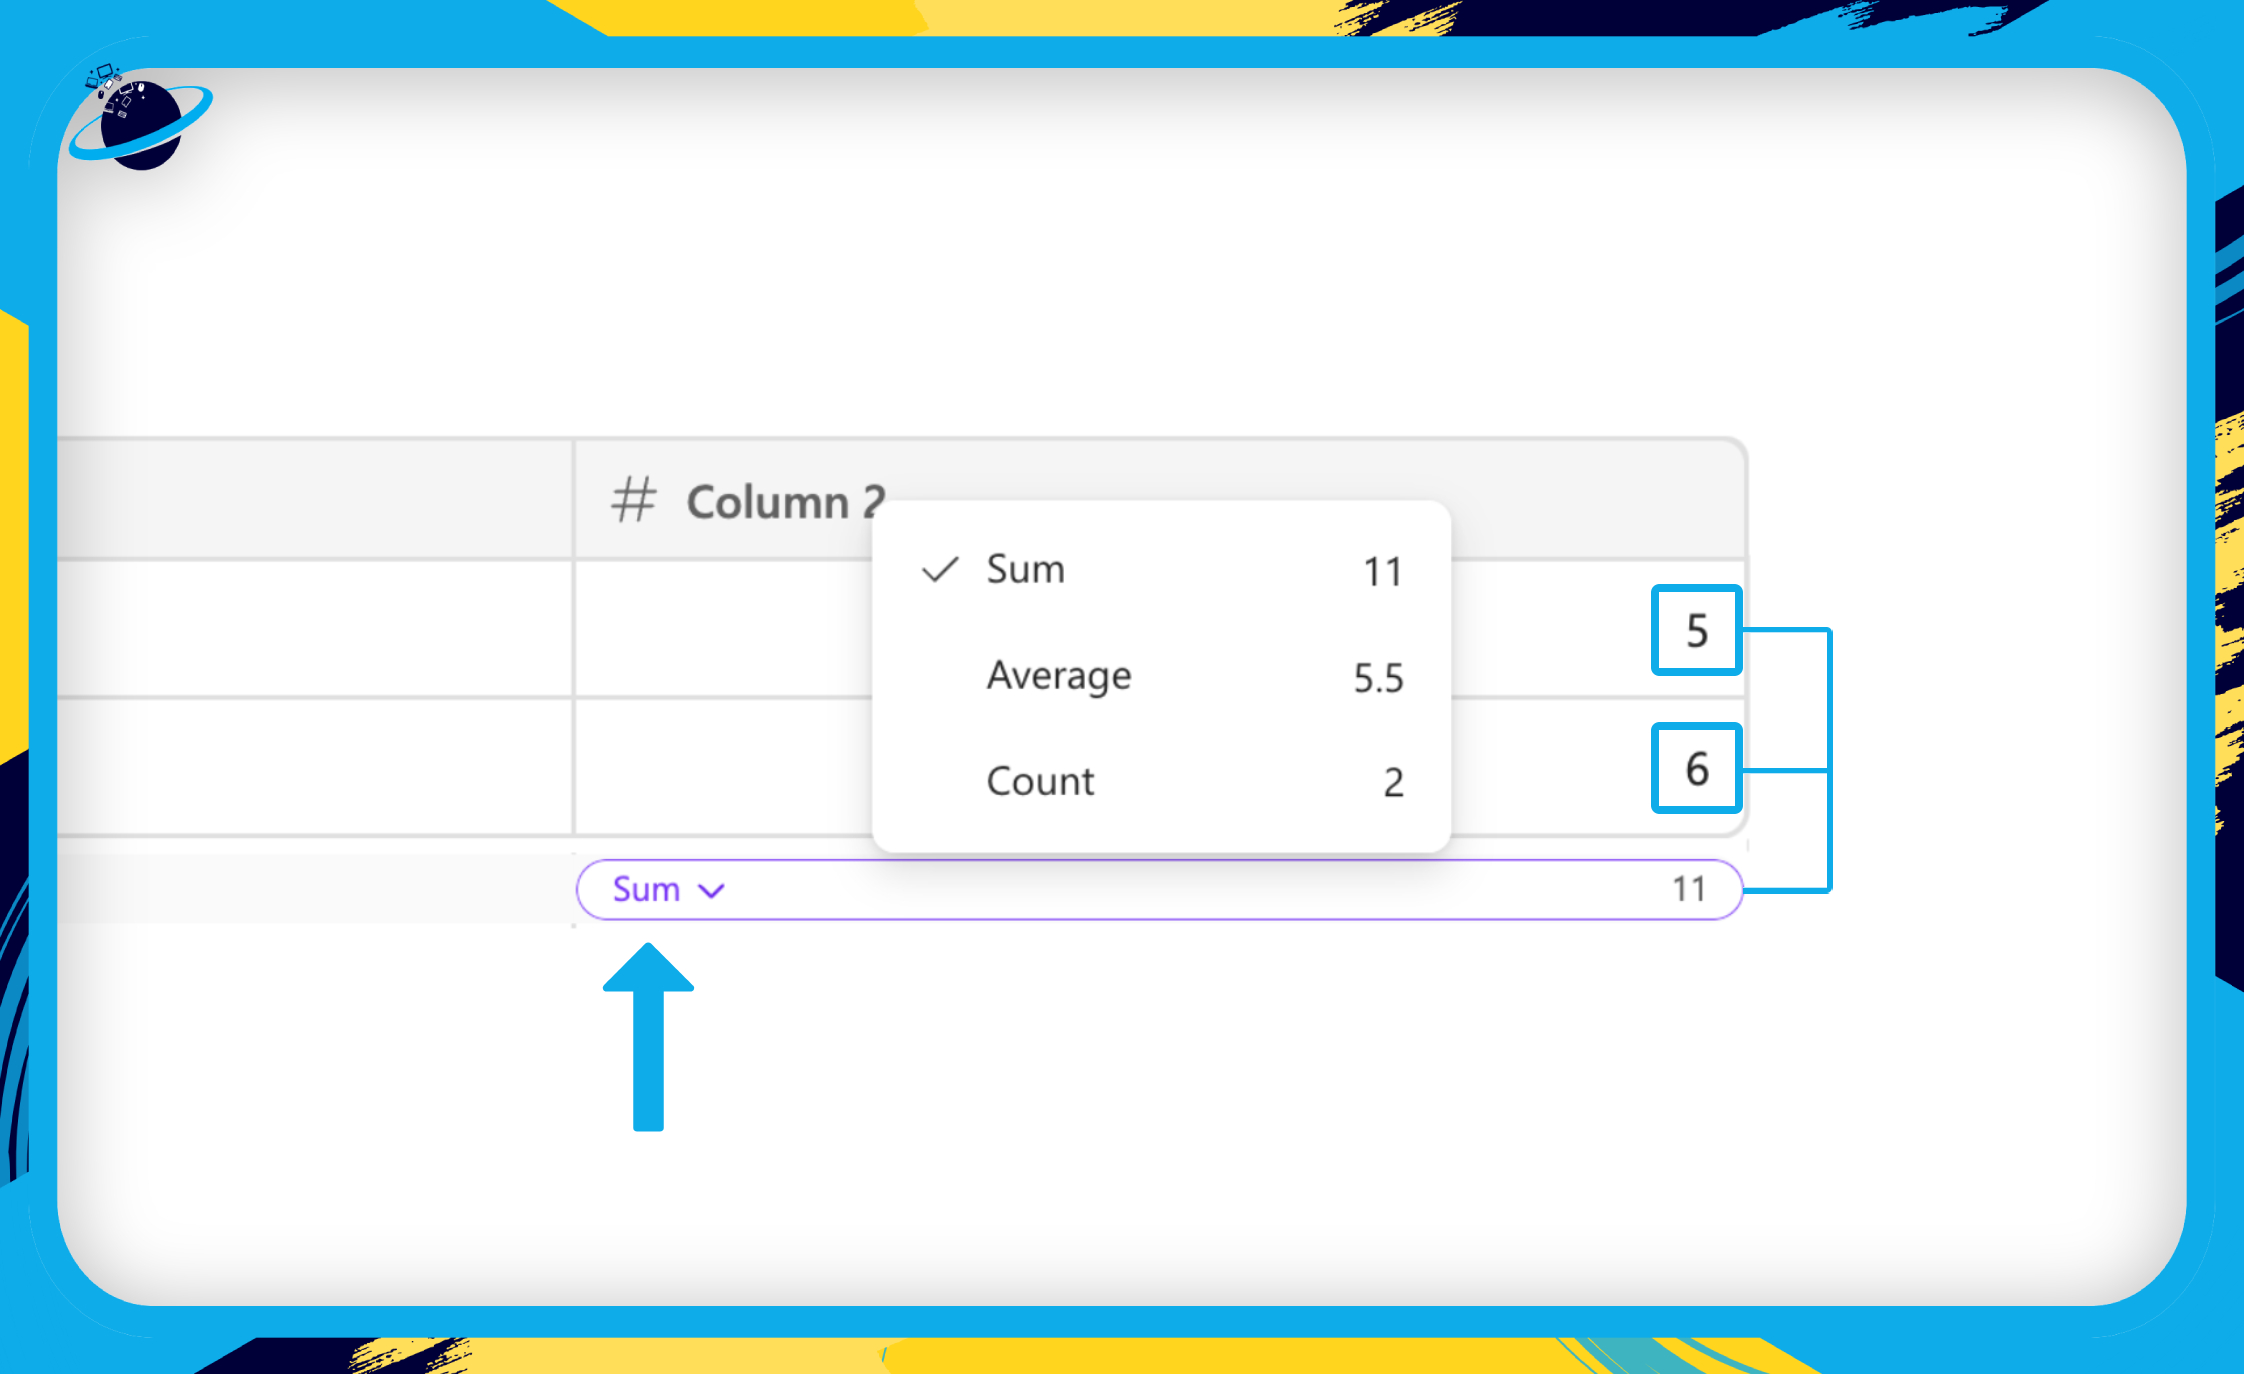
- Sum: Adds all the values in the column.
- Average: Adds all the values in the column and divides the result by the number of rows.
- Count: The number of inputs in the column (the number 0 counts as an input).
Lists in Microsoft Loop
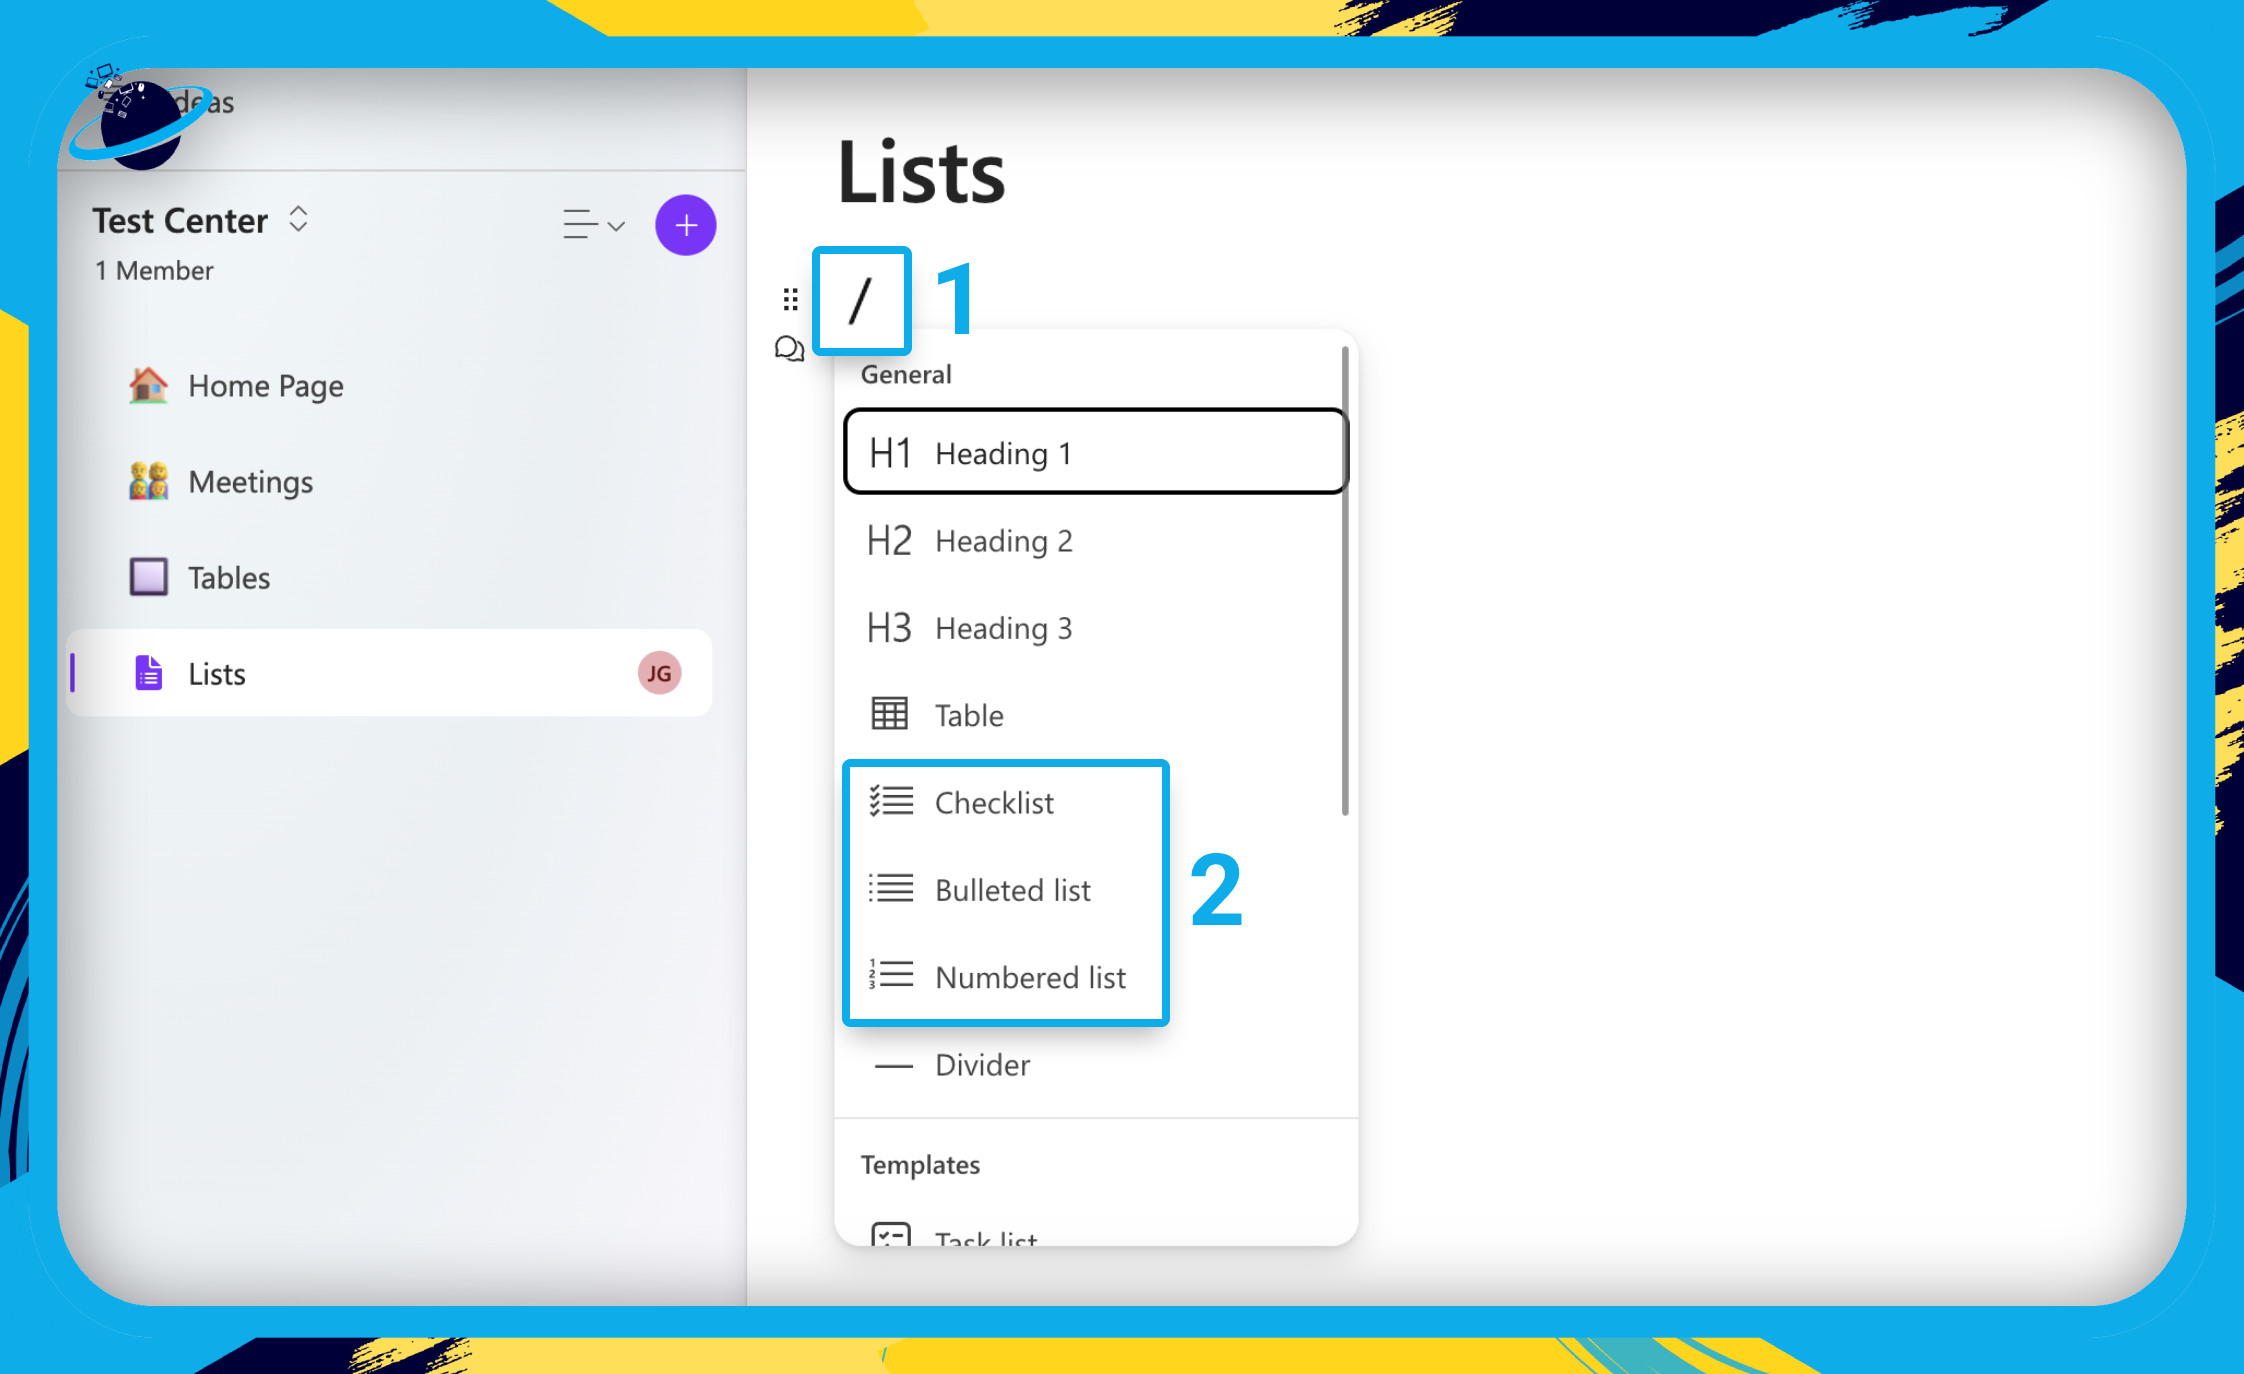
In this section, we’ll show you how to use a checklist, bullet list, and numbered list.
There are three kinds of lists in Microsoft Loop, namely checklists, bulleted lists, and numbered lists. There are also task lists, but because the structure and functionality is different, we’ll look at them in more detail later on.
We’ll look specifically at checklists in this guide. However, the three lists share the same functionality, so the methods here will apply to all three.
- To start, type a forward slash / [1] and select any type of list. [2]
If you want to share this list, it’s a good idea to turn it into a Loop component.
- To do that, click the six dots icon at the top left of the list.
- Then select “Create Loop component” in the popup box.
For demonstration purposes, we’ll make a week’s schedule using a checklist.
- For the first item, type a forward slash / [1] and select “Date” from the popup. [2]
- You can also hit ⏎ Enter or ⏎ Return on the keyboard to select Date.
- Now select the next Monday from the calendar.
- Select the date and use Ctrl + C or Command + C to copy it.
- Now hit ⏎ Enter or ⏎ Return on your keyboard and paste the date into the next item.
- Repeat the process to create five workdays.
- You can now change each date to a different day of the week.
- Once complete, click after the first date and hit ⏎ Enter or ⏎ Return on your keyboard.
- Next, press the ↹ “tab” key on your keyboard to increase the indent.
- Use Shift + ↹ “tab” to decrease the indent as required.
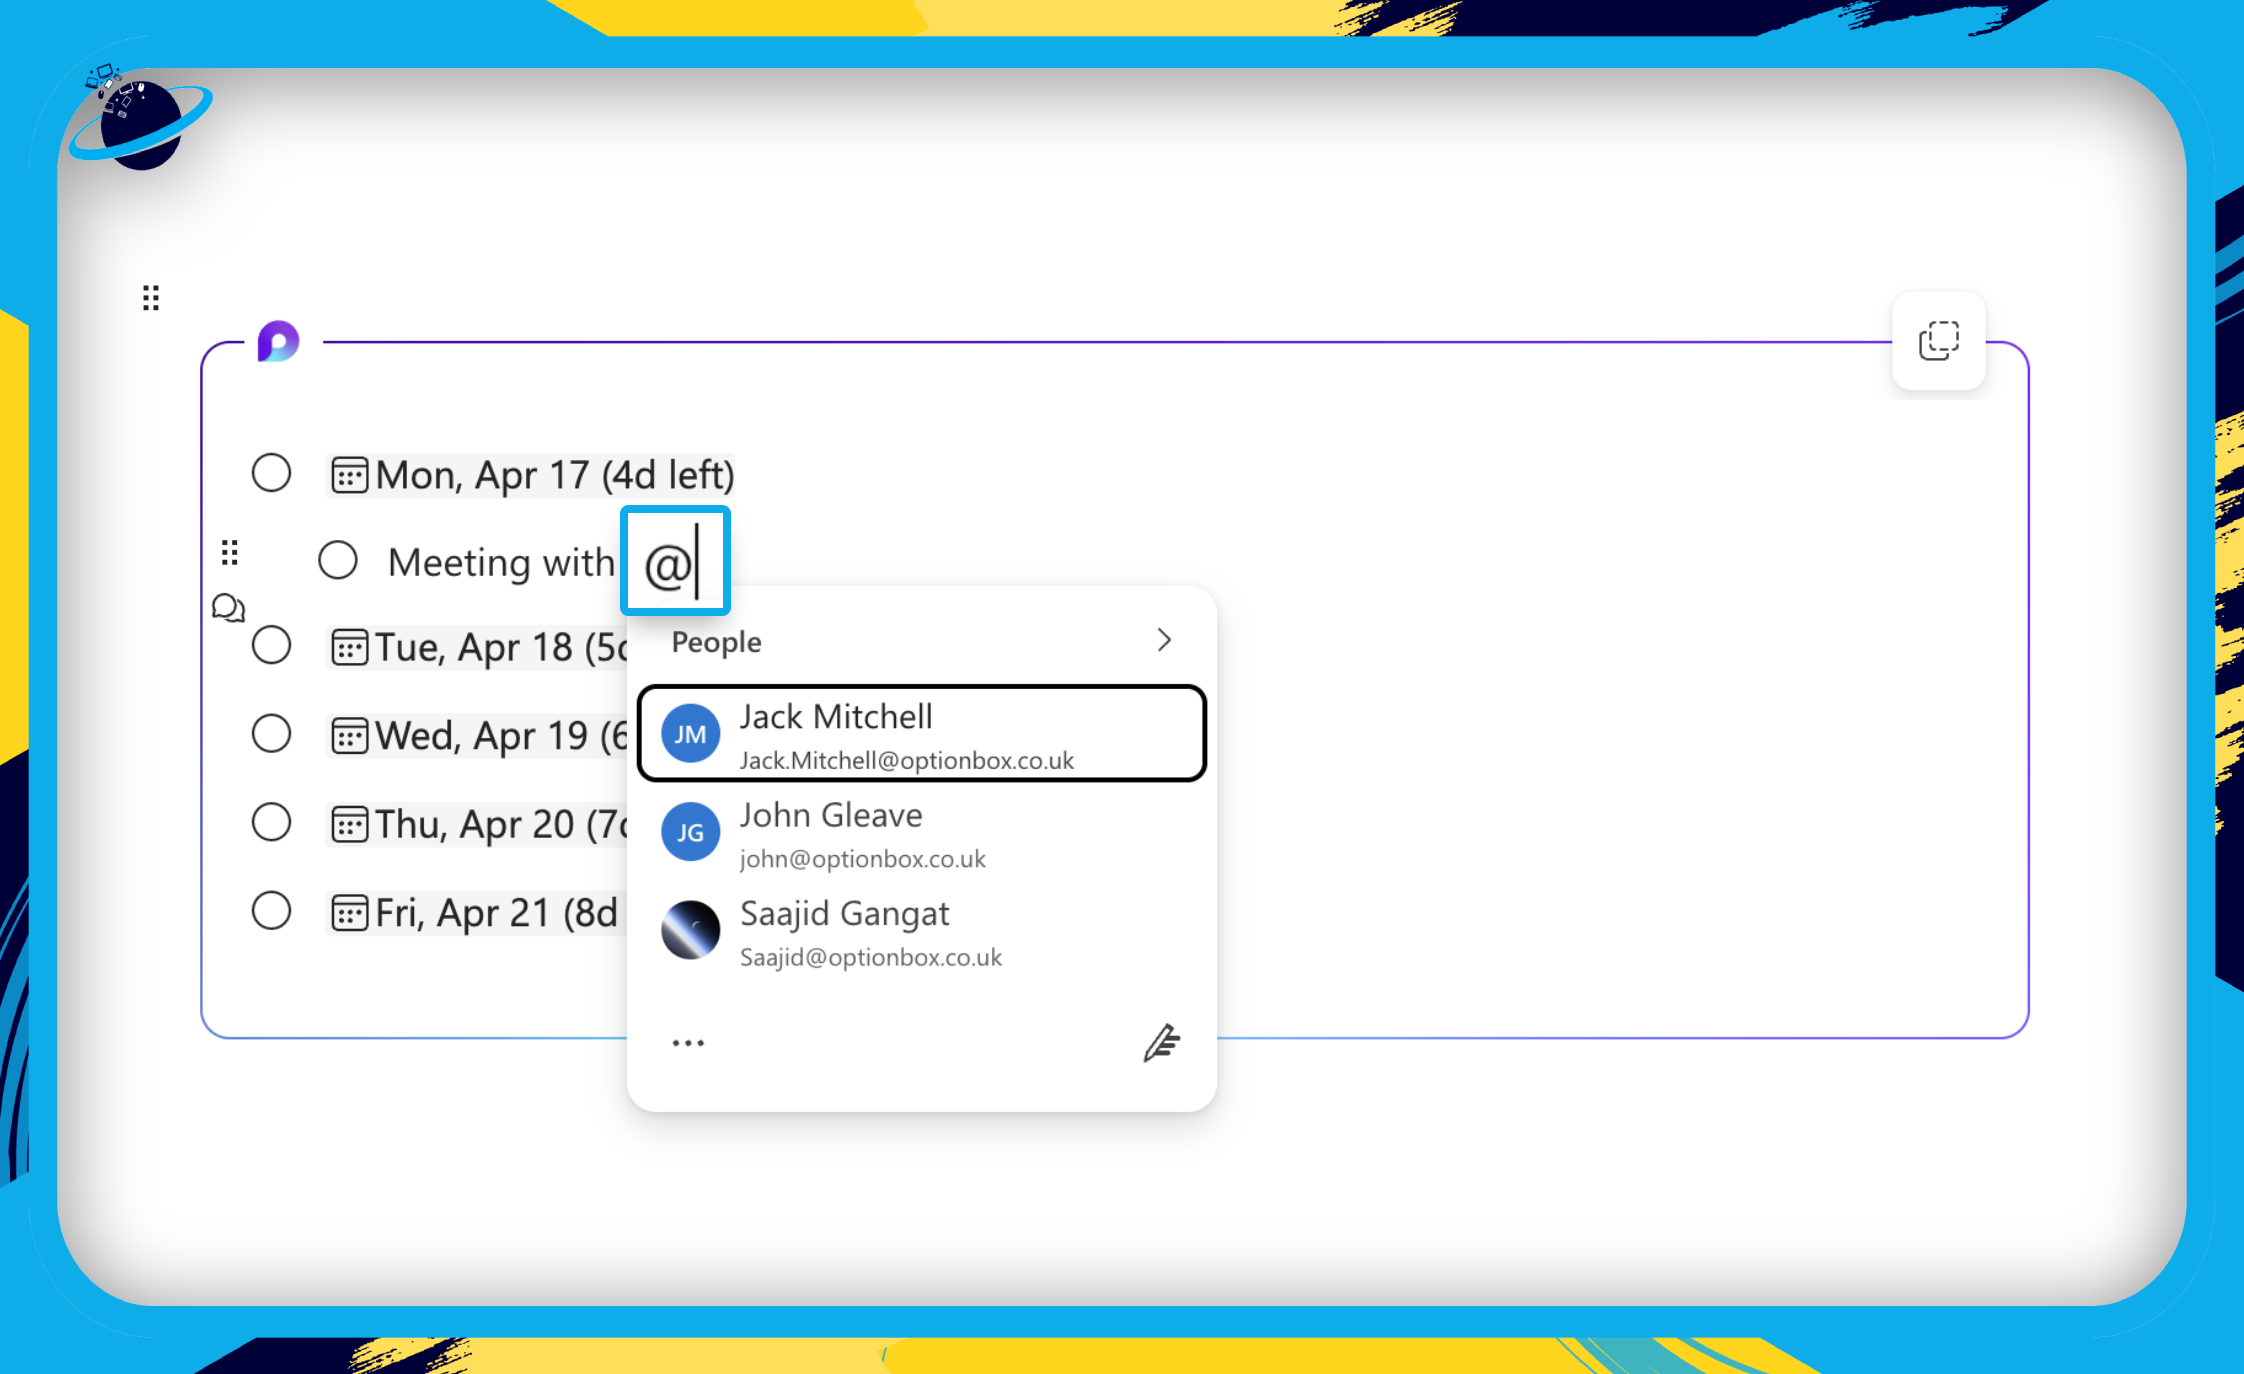
You can now begin adding a schedule.
- We’re adding a meeting by typing @ followed by who we’re meeting with.
- We can also add a document by typing @ followed by the document name.
You can even prioritise or track progress of your schedule.
- To do that, type “/label” [1] and select “Label” from the popup. [2]
- You can also hit ⏎ Enter or ⏎ Return on the keyboard to select Label.
- Then select a priority or progress status.

To reorder your list, simply click the ![]() six dots next to the list item and drag it up or down.
six dots next to the list item and drag it up or down.
For optimal task tracking, it’s better to use a task list, which we’ll look at later on. However, the guide above gives you a rough outline of what can be achieved with a simple checklist.
![]() Note: In Loop, you can mix lists together into a hybrid list and share them with your team members. For more information on how to do this, please read our dedicated blog post on Lists:
Note: In Loop, you can mix lists together into a hybrid list and share them with your team members. For more information on how to do this, please read our dedicated blog post on Lists:![]() [ Coming soon ]
[ Coming soon ]
Headers & Dividers in Microsoft Loop
In this section, we’ll show you how to use headers to properly format your pages, and dividers to effectively demarcate your content.
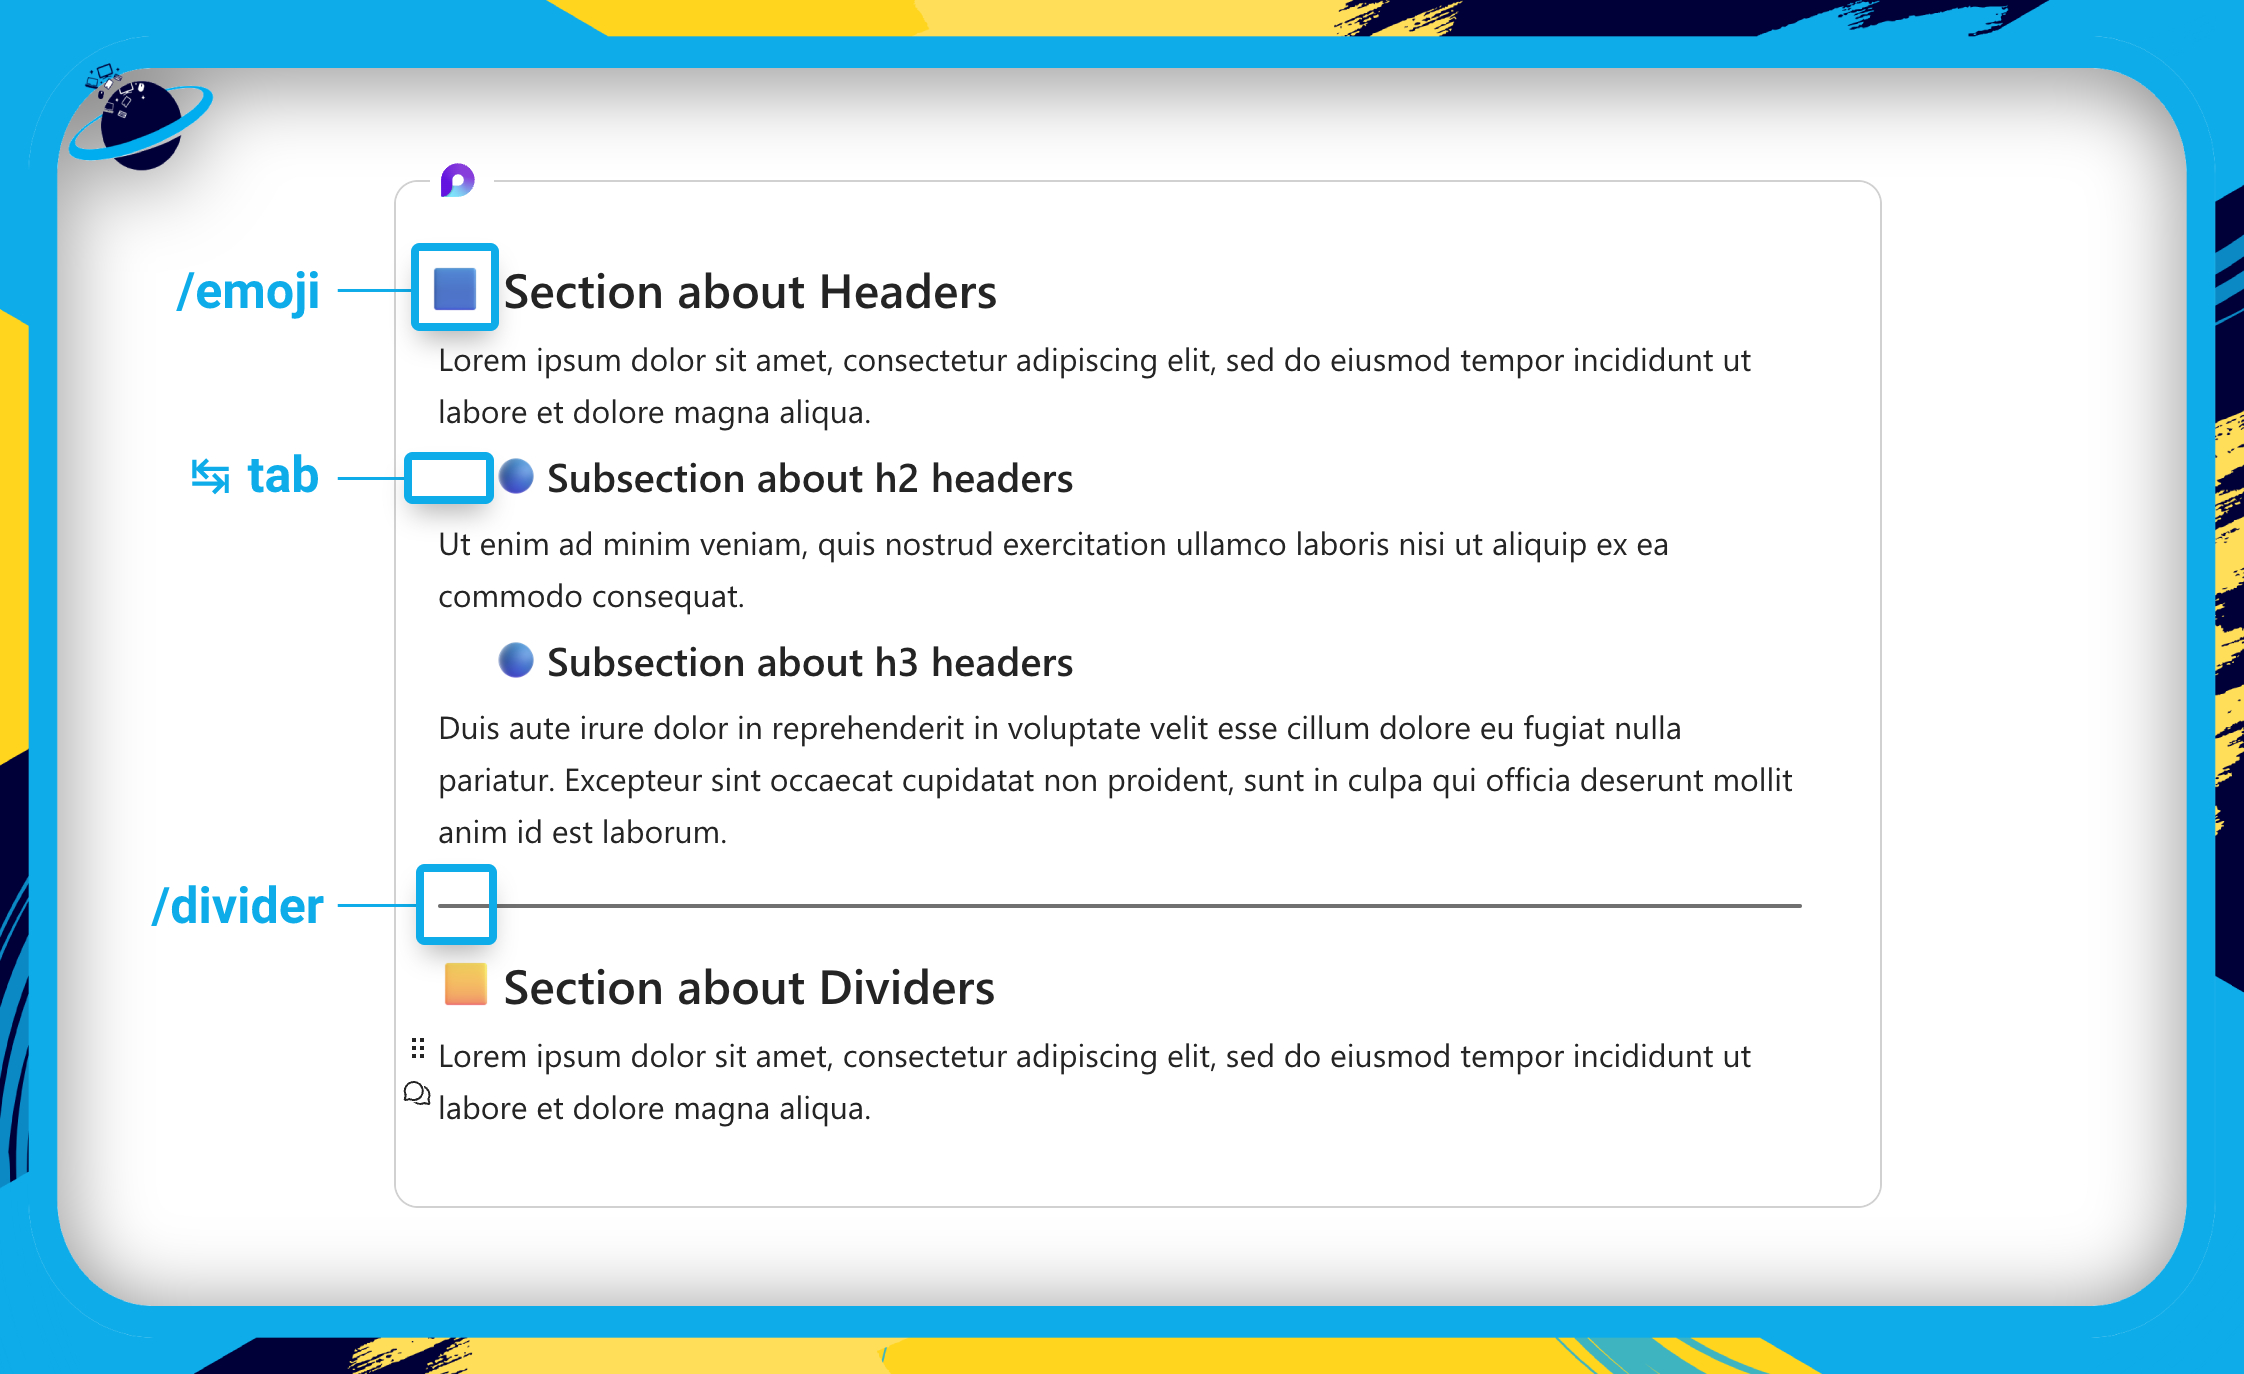
Headers should be used to categorize the content of your page or component. Generally, the H1 tag is reserved for the title of a page and H2 tags are subtitles, which may contain H3 tags. You could separate H2 tags with dividers to achieve the following look:
 Communication Components
Tag People in Microsoft Loop
In this section, we’ll show you how to tag people and files into a Loop component using the @ symbol.
Currently, you can only tag people and files in Microsoft Loop. To tag a person or file, simply type an @ symbol [1] and start typing the name of the person or file. You will be able to select the person or file from a popup list. [2]

When you tag someone in Loop, they will receive an email notification, provided that you have granted them access to the workspace, page, or component. If you haven’t granted them access, you will see a ![]() plus icon next to the name. To grant access, simply click the plus icon [3] and hit the “Share and notify” button in the dialog box. [4]
plus icon next to the name. To grant access, simply click the plus icon [3] and hit the “Share and notify” button in the dialog box. [4]
Tags are excellent elements to use within Loop components to keep people informed of updates and assignments.
Links in Microsoft Loop
In this section, we’ll show you how to use links.
There are currently two display types for links in Microsoft Loop: “URL” and “Link preview.” However, the “Link preview” display type is only available for links outside of tables.
- To add a link, type out any text you like.
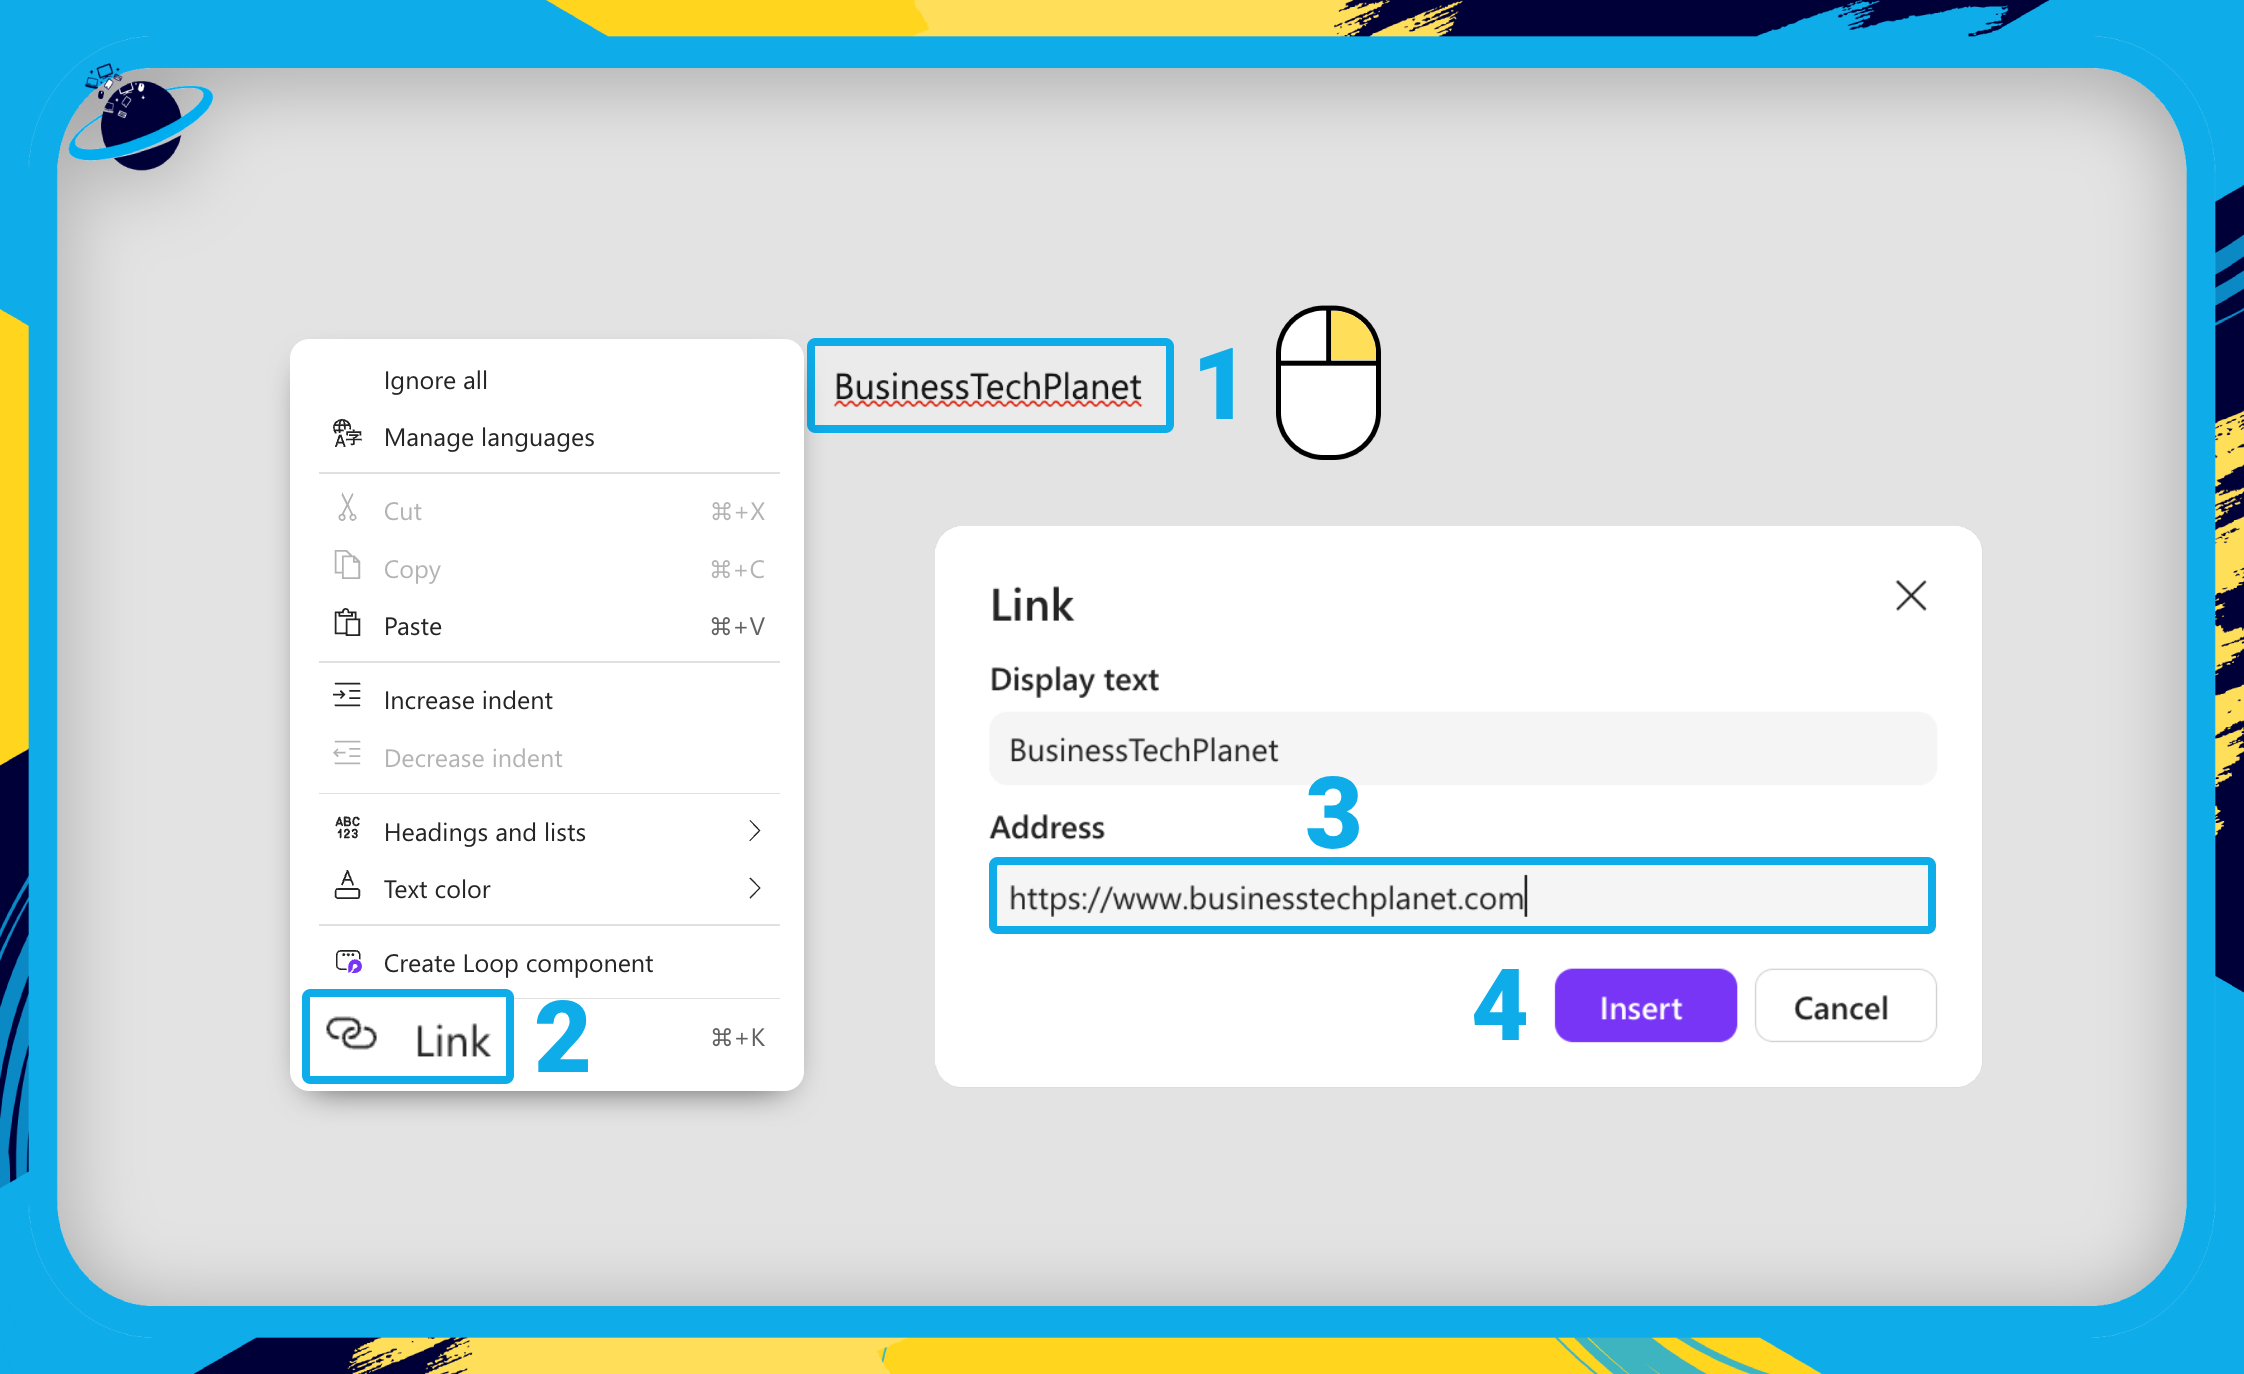
- Then right-click the text, or highlight the text and press Ctrl + K on your keyboard. [1]
- If you right-clicked the text, select
 “Link” from the popup menu. [2]
- If you right-clicked the text, select
- Alternatively, if you have the URL copied, highlight the text and press Ctrl + V.
- Now type or paste your URL into the “Address” box. [3]
- Then hit “Insert.” [4]
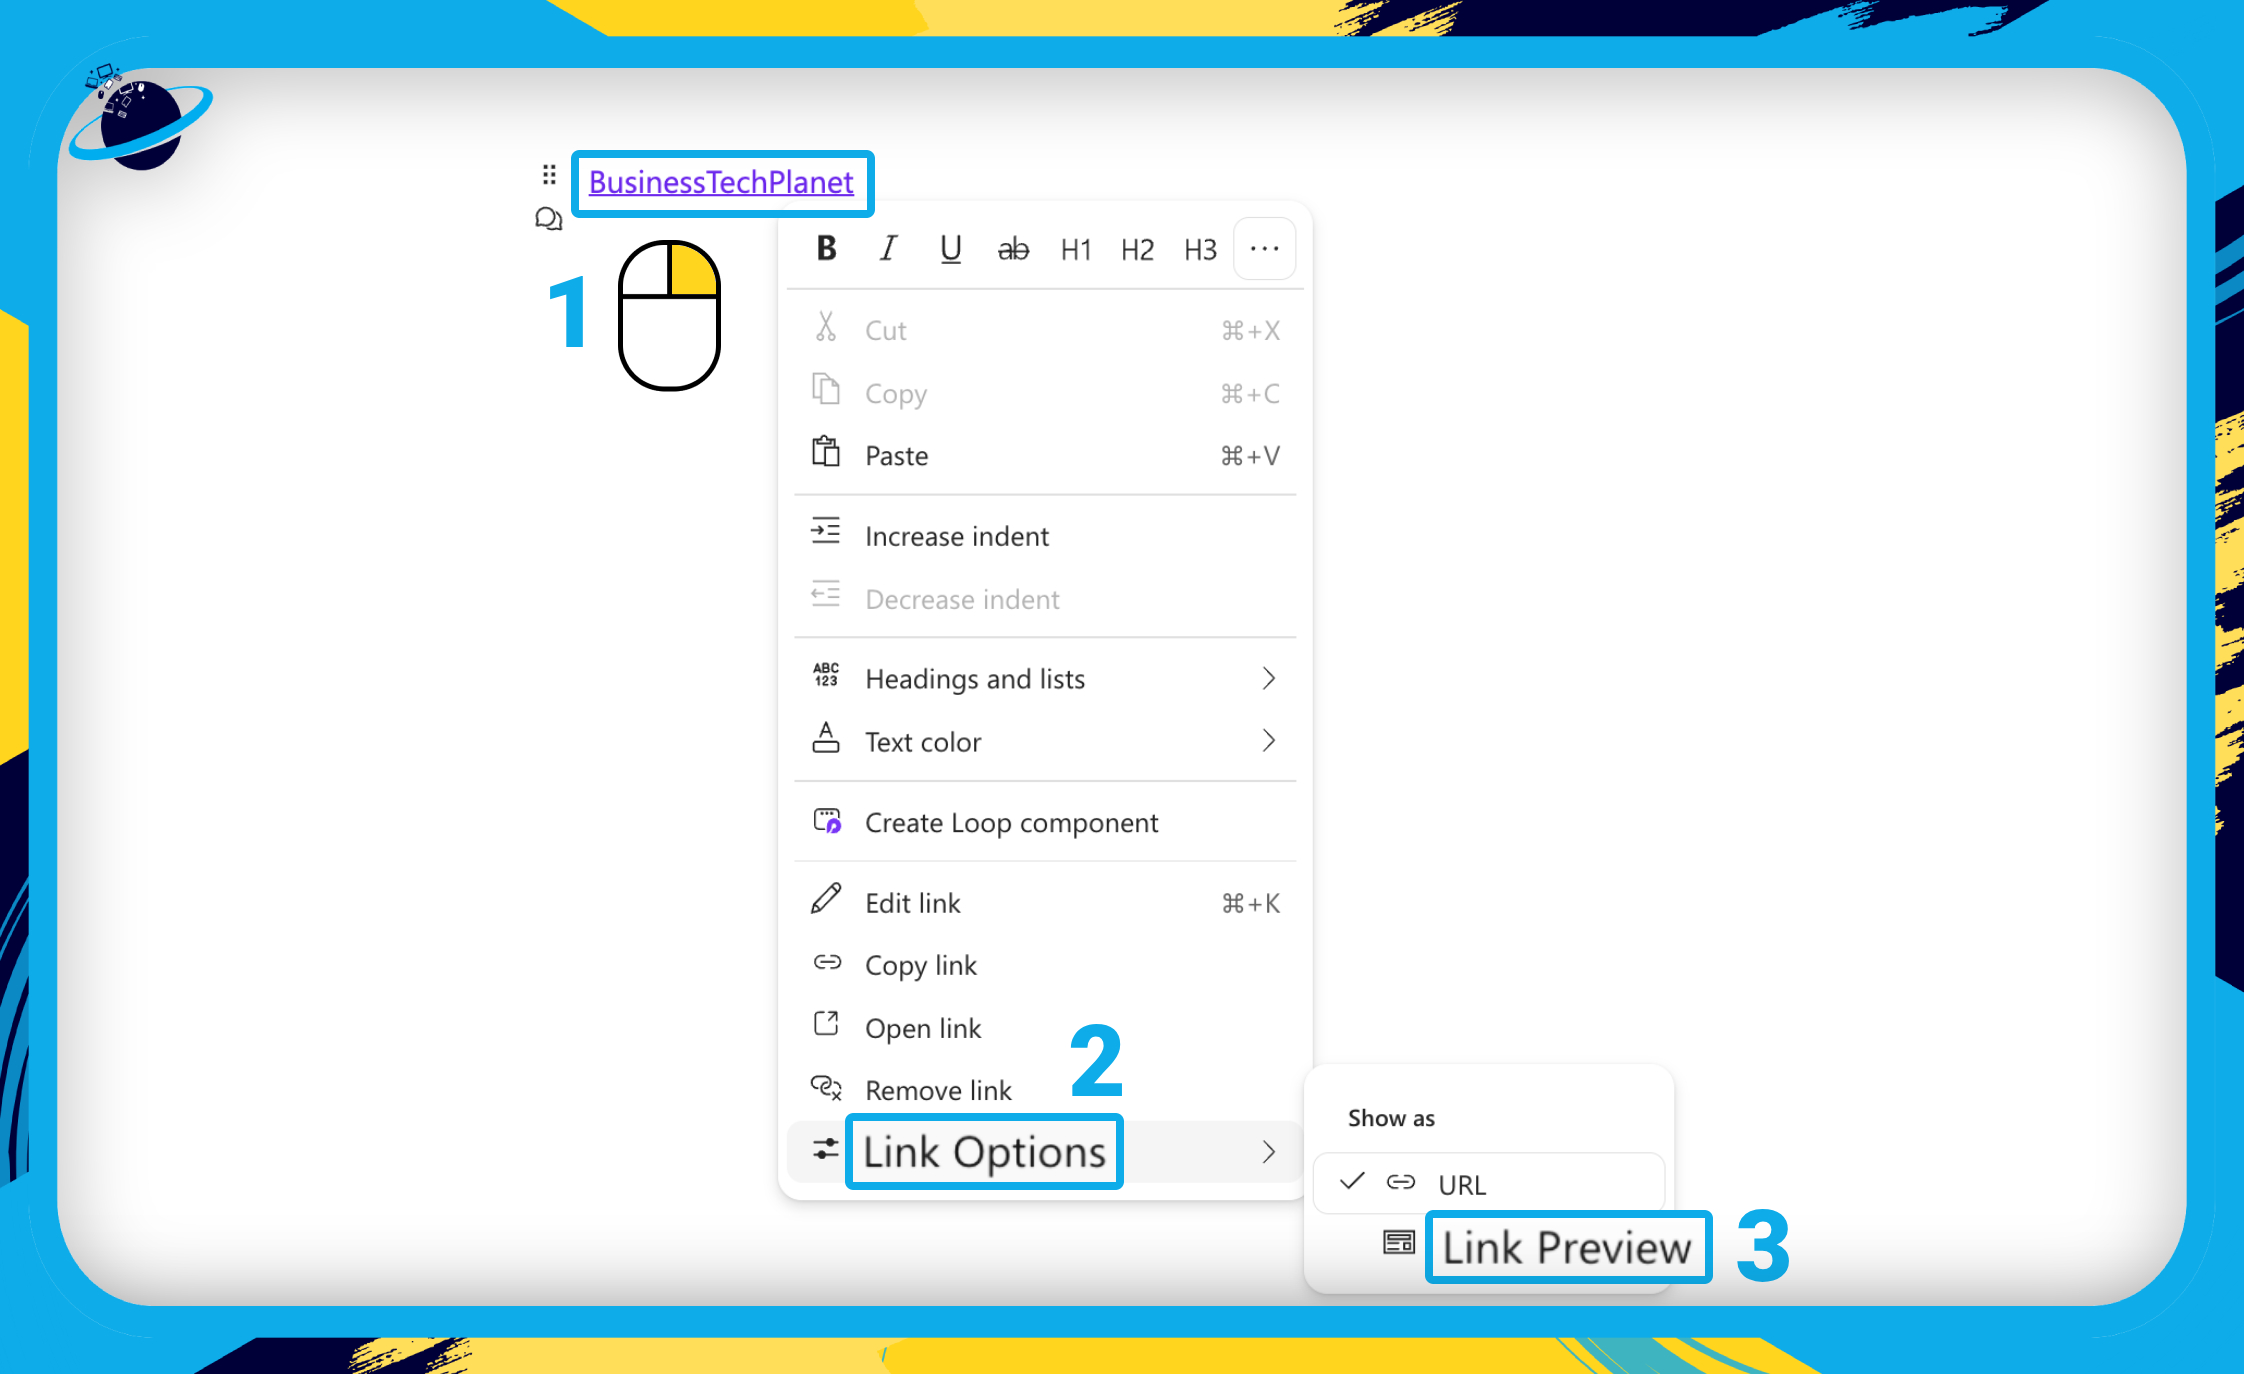
- To change the display type, right click your link. [1]
- Then go to “Link options” in the popup menu. [2]
- Then select “Link preview.” [3]
![]() Note: Link previews are also available for files that you link to using the @ symbol.
Note: Link previews are also available for files that you link to using the @ symbol.
Emojis in Microsoft Loop
In this section, we’ll show you how to find the emoji picker and how to access it quickly by using a colon.
Like tagging, emojis are useful elements to add to a Loop component. They can express, describe, and denote different sections to improve navigation.
- Start by typing “/emoji” [1] then select “Emoji picker” from the popup. [2]
- You can also hit ⏎ Enter or ⏎ Return on the keyboard to select Emoji picker.
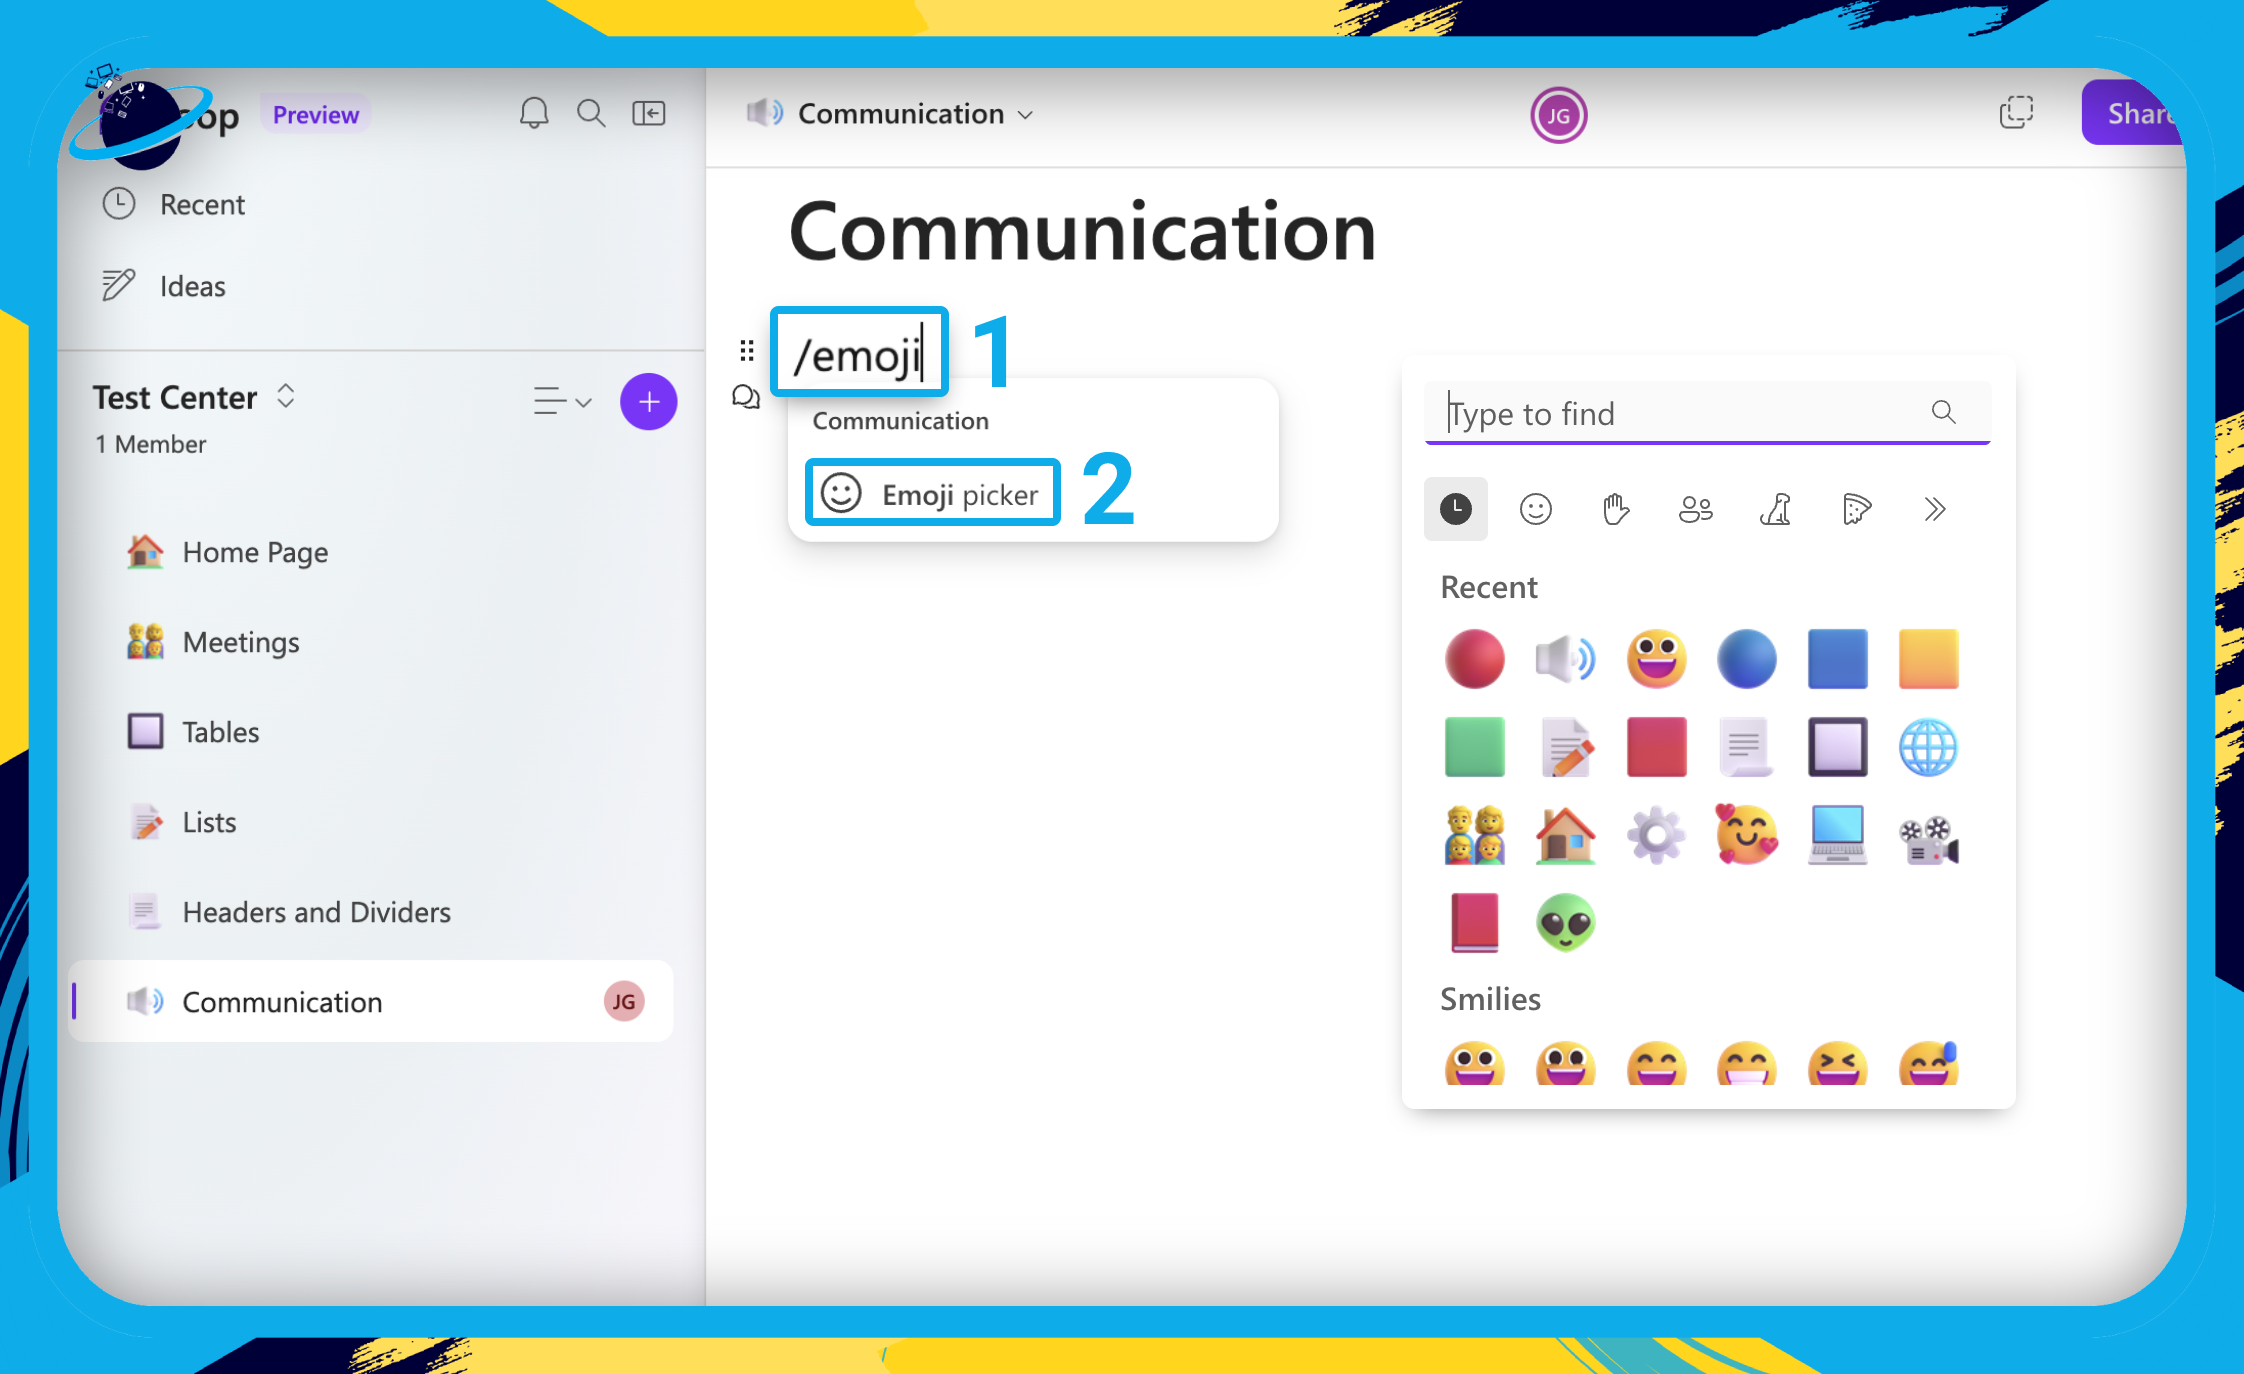
- For fast access to the emoji picker, type a colon : and select an emoji.
- Loop will use anything you type immediately after the colon as a search term.
- For example :red will produce all emojis related to “red.”

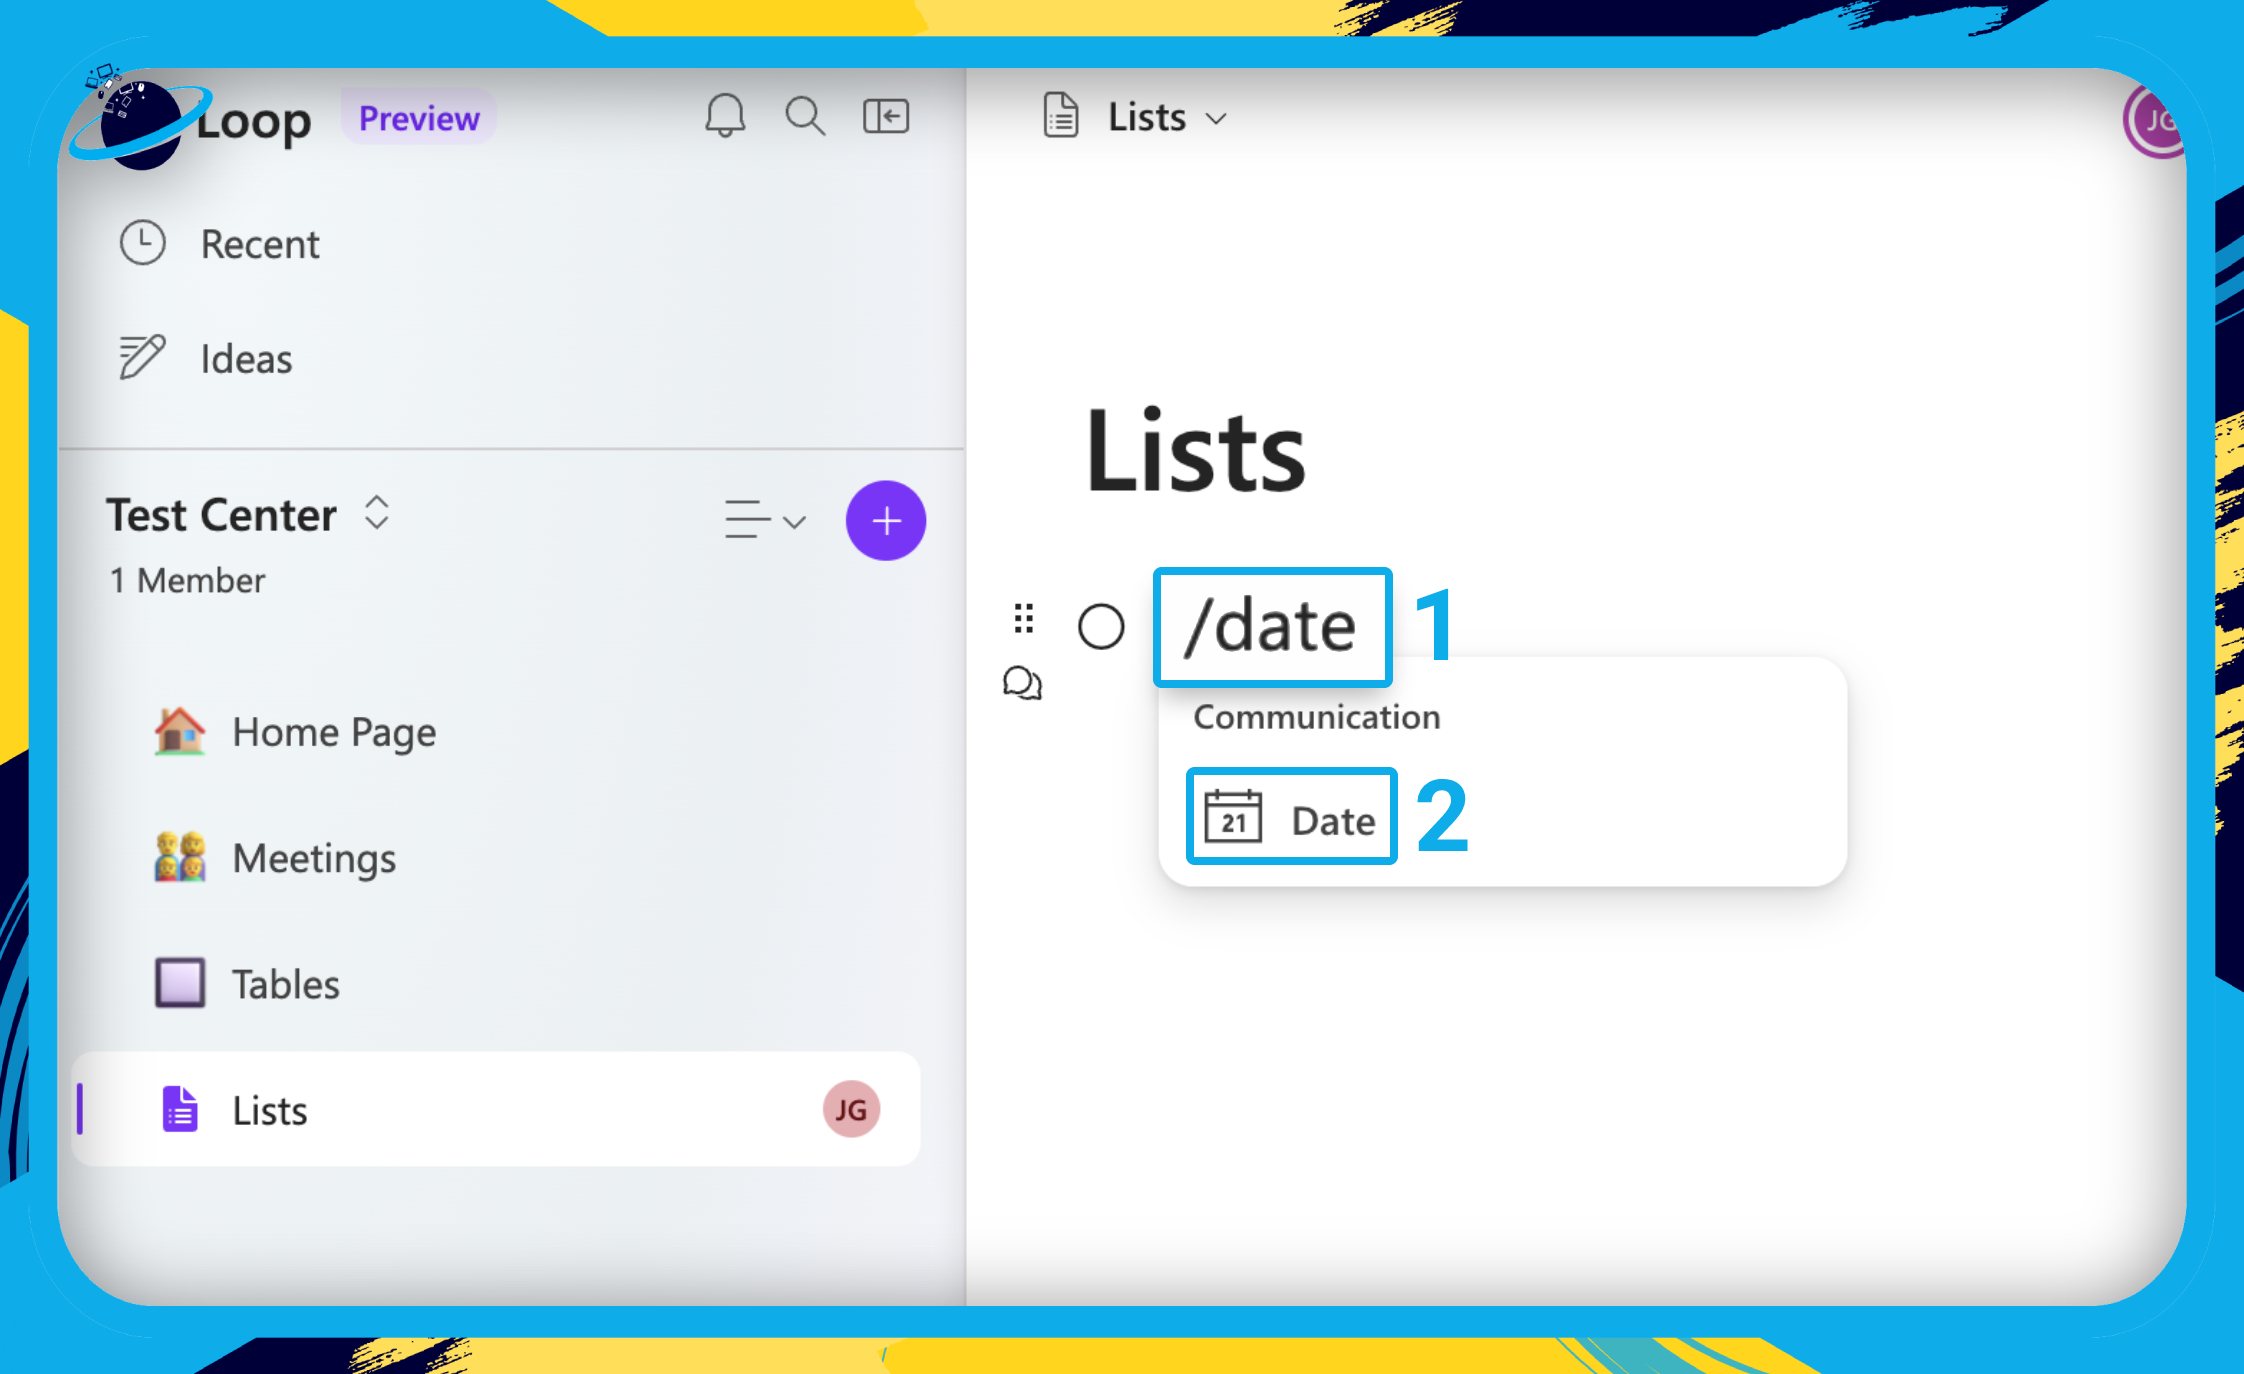
Dates in Microsoft Loop
In this section, we’ll show you how to access dates.
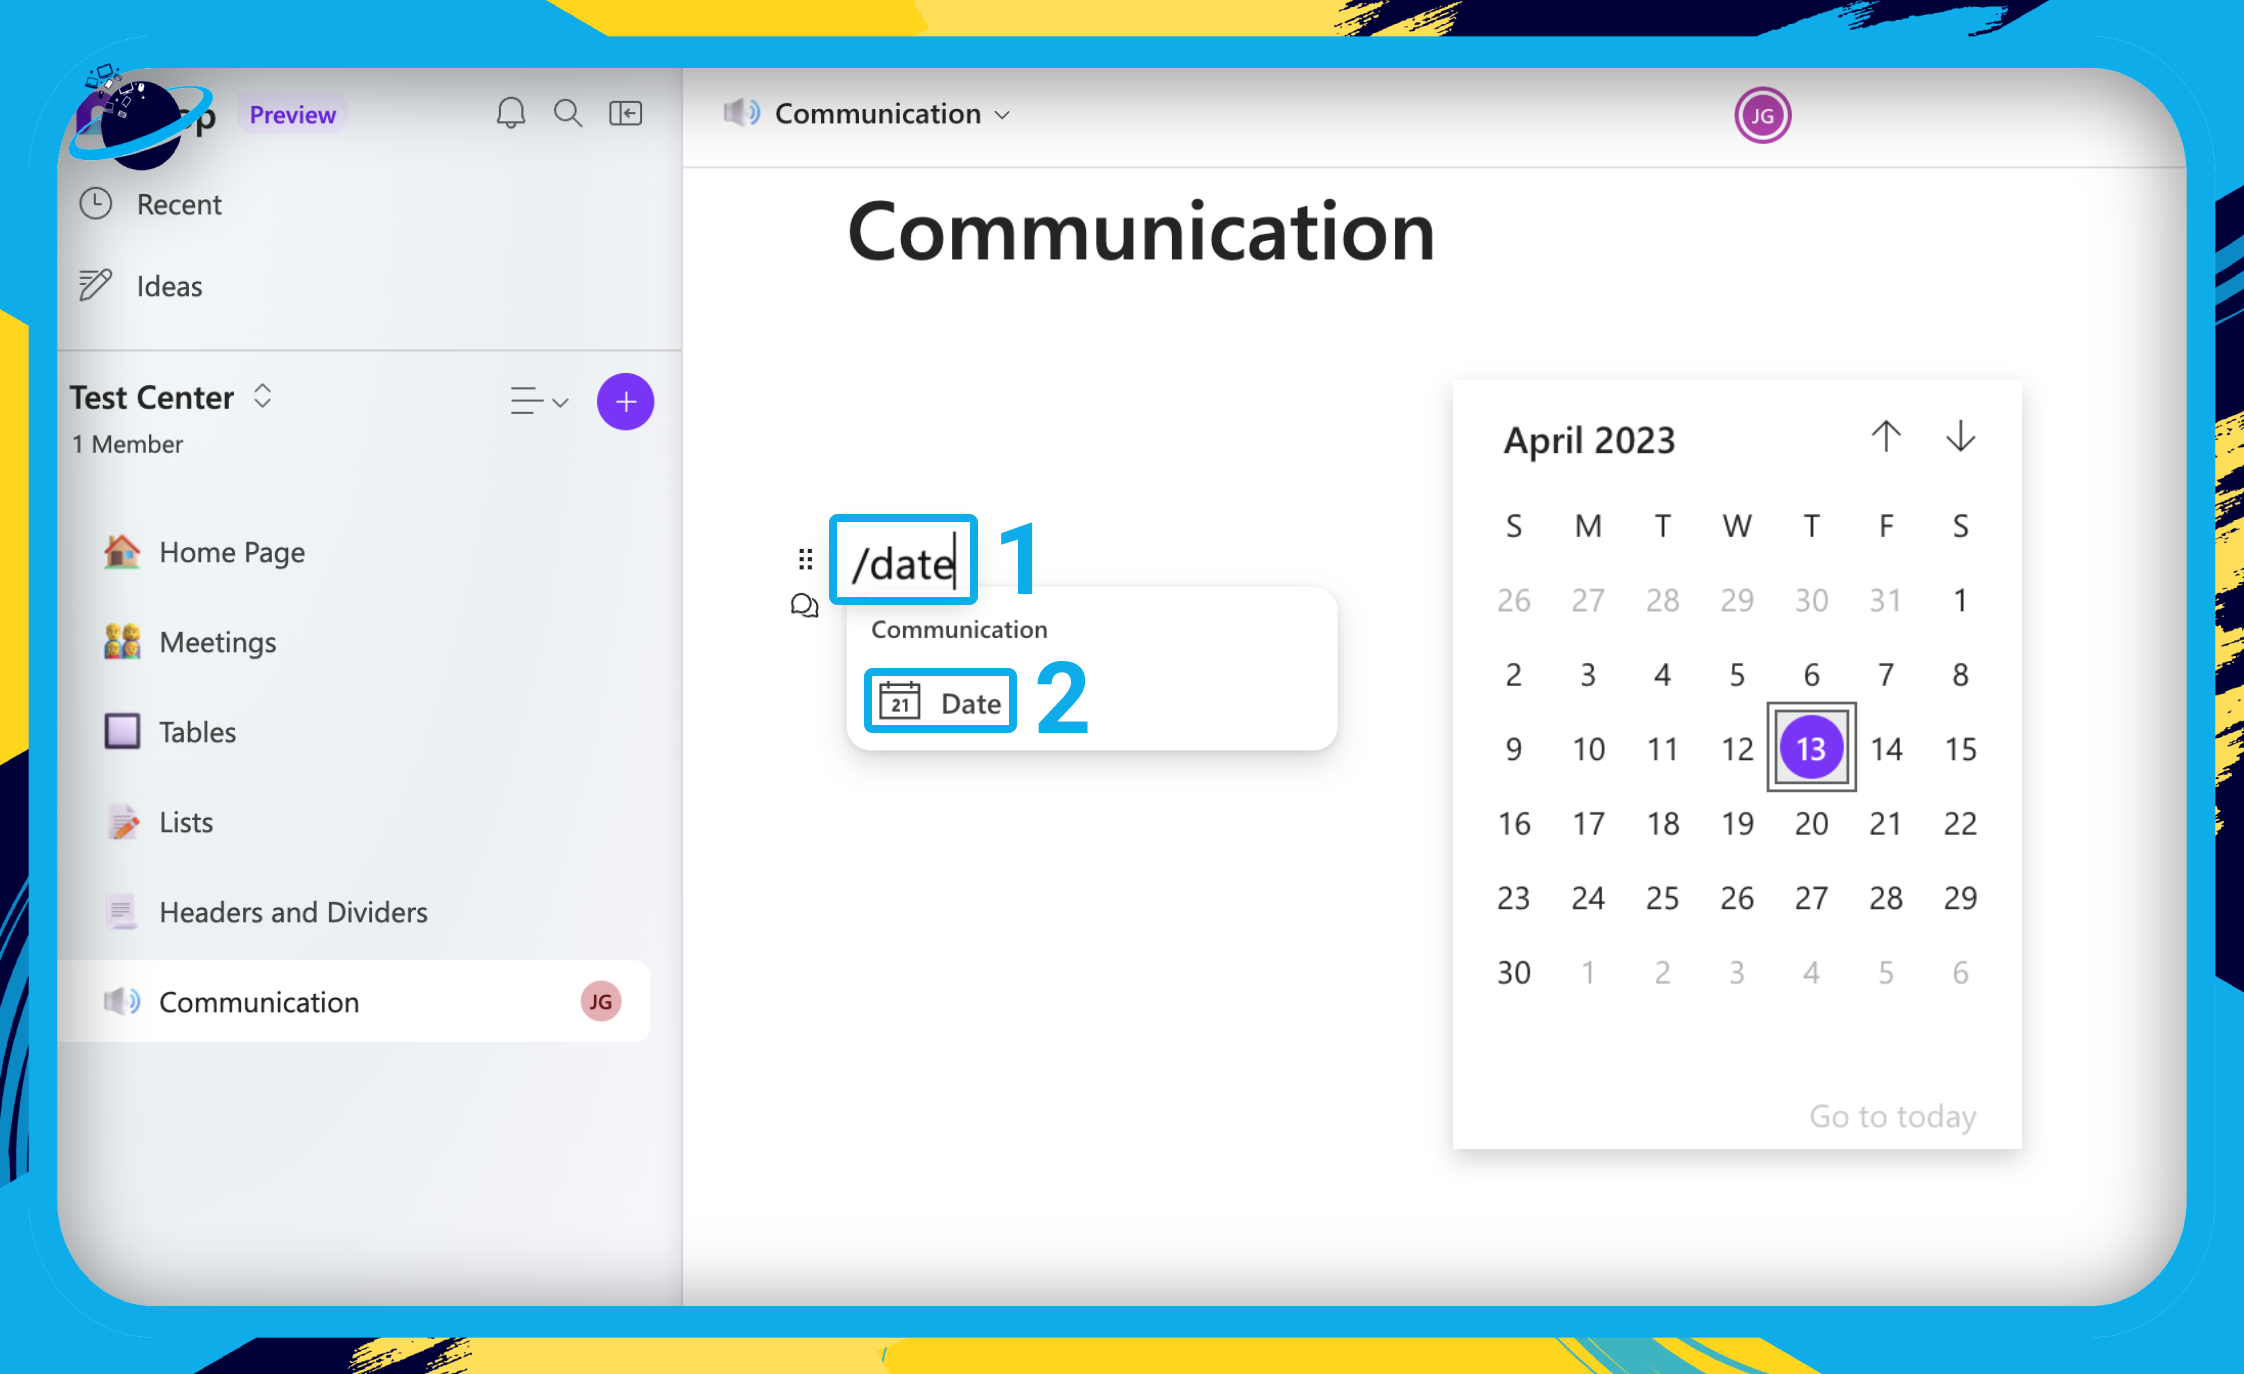
Dates are simple elements that display a long format date including the day name. While there is currently no option to set a time, it will display the number of days remaining until the date you selected.
- Start by typing “/date” [1] then select “Date” from the popup. [2]
- You can also hit ⏎ Enter or ⏎ Return on the keyboard to select Date.
Labels in Microsoft Loop
In this section, we’ll show you how to access labels add how to add priority labels to a table column.
Labels in Microsoft Loop are a highly customizable way of marking different elements within your component. There are two presets: “Progress” and “Priority.” However, it’s easy to create your own label group. We’ll show you how to do that in the steps below.
For this demonstration, we’ve created a table containing questions asked by our staff. We want our staff to be able to prioritise the questions that require urgent answers.
- Create a column for your priority status and click the down arrow in the header. [1]
- Go to “Change column type” from the popup. [2]
- Then head to “Label” [3] and select “Priority.” [4]
![]() Note: For more information on how to create a label group and order them correctly within a table, please read our dedicated blog post on Labels:
Note: For more information on how to create a label group and order them correctly within a table, please read our dedicated blog post on Labels:![]() [ Coming soon ]
[ Coming soon ]
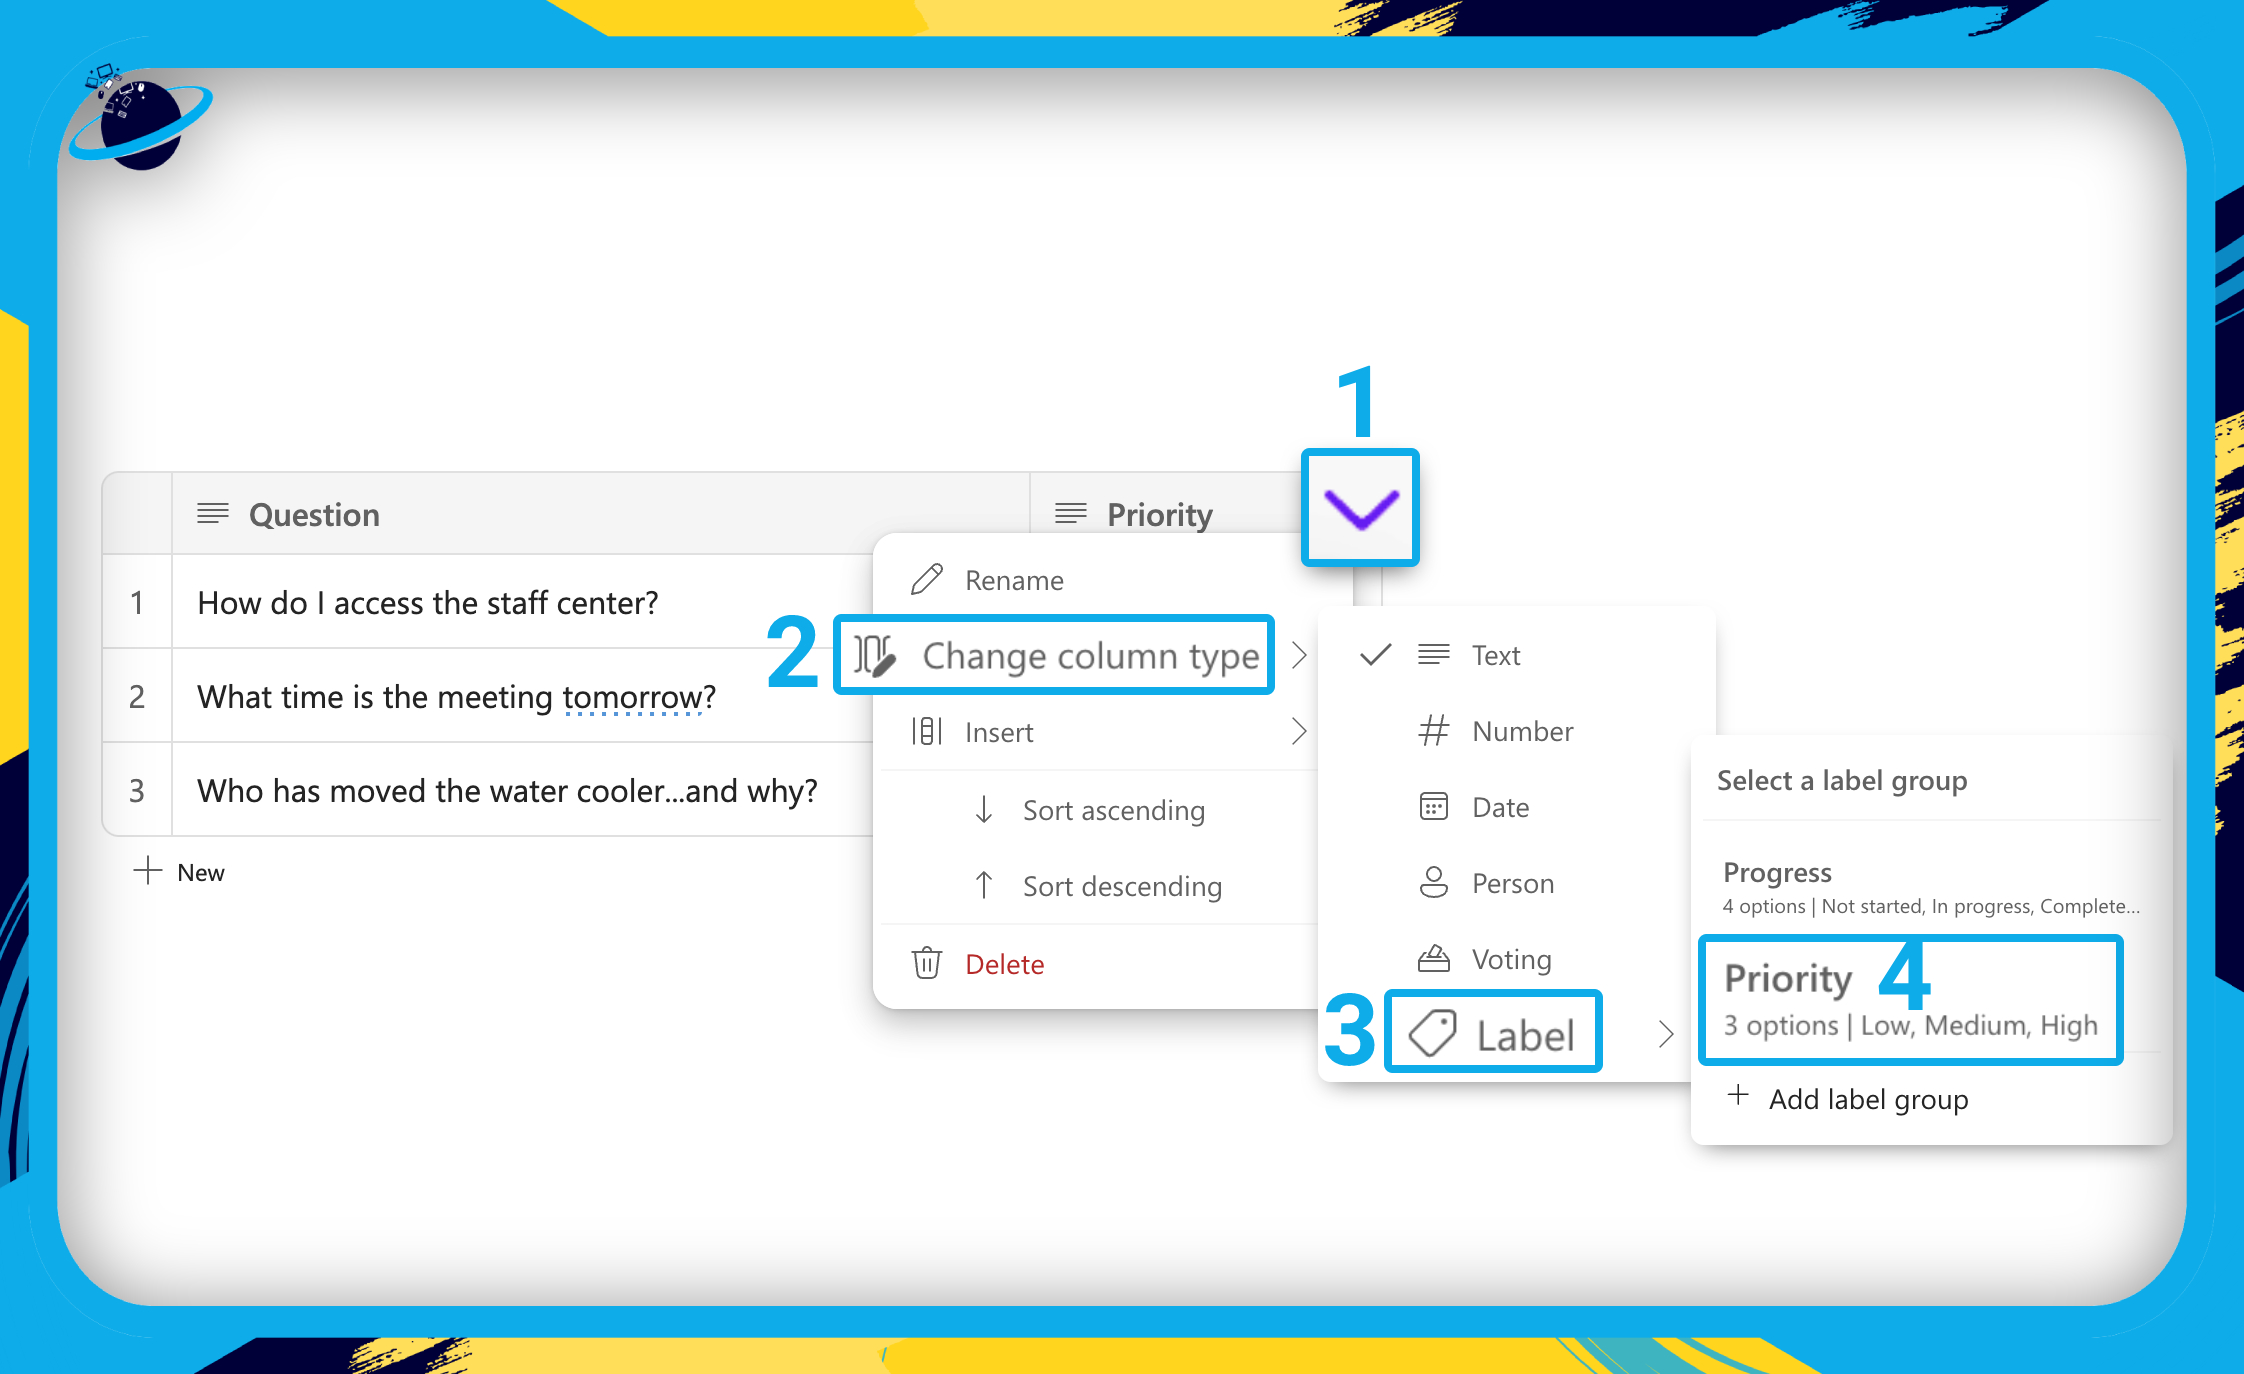
- We can now click each cell to select its priority level.
 Media Components
Images in Microsoft Loop
In this section, we’ll show you how to use a table and integrate other components to build an effective collaboration tool.
While you can easily open or paste images into your Loop page, your editing options are limited. But you can resize the image and add alt tags to aid people using screen readers.
Unfortunately, there is no alignment property, which may cause issues when aligning images with text. However, you can add images to tables and list items.
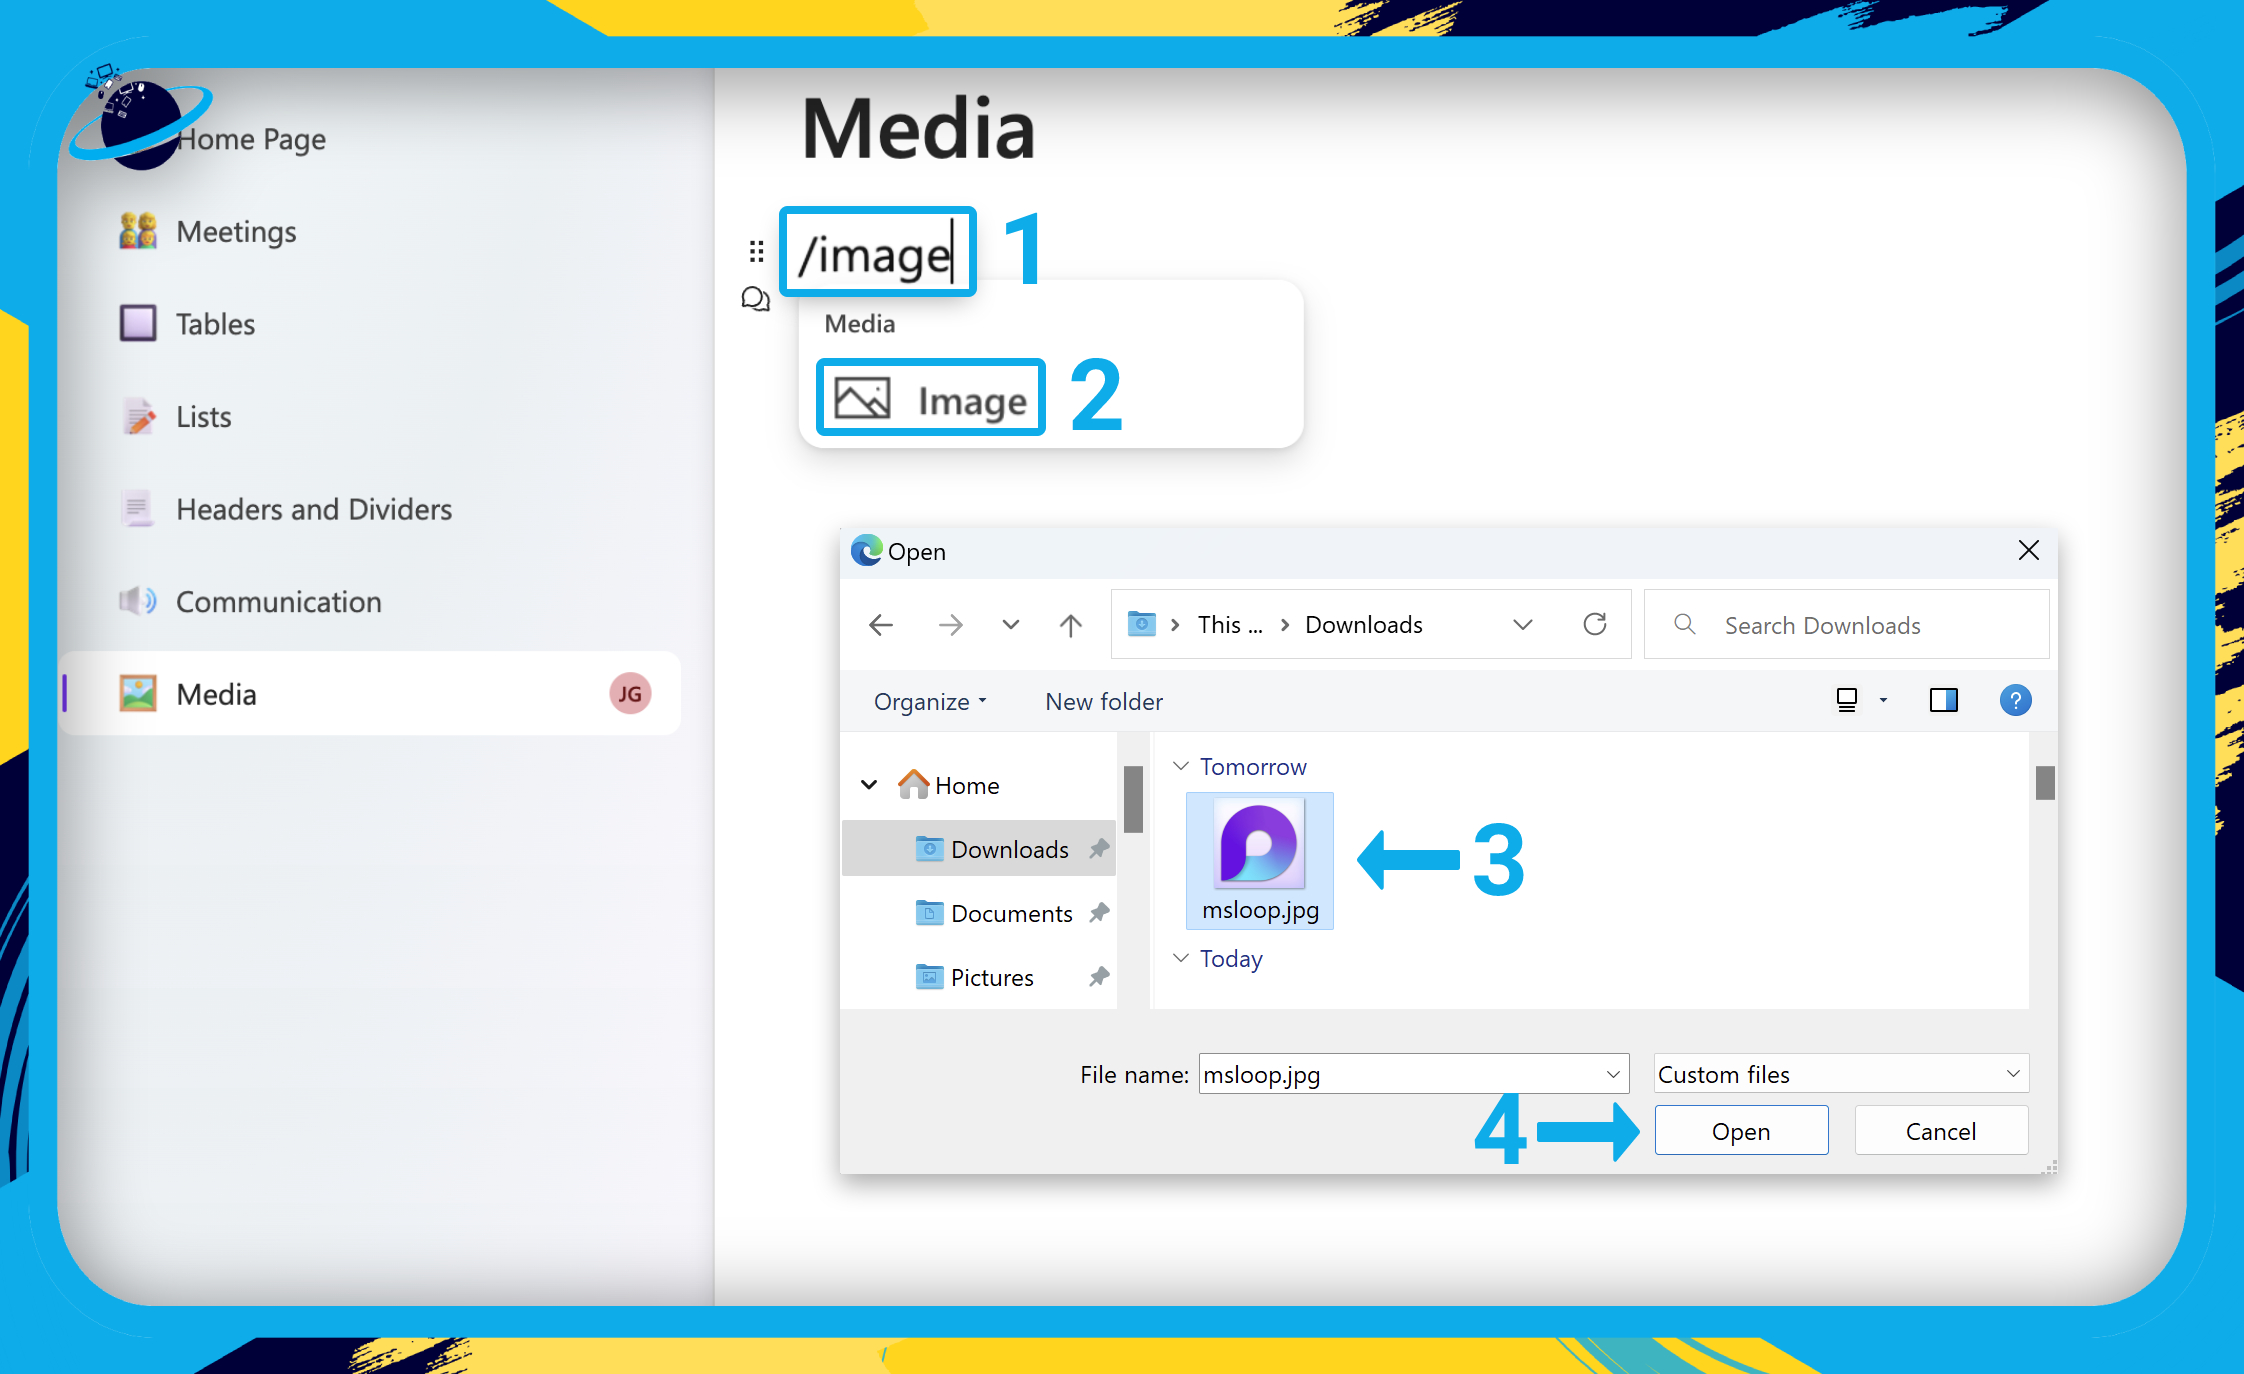
- To add an image, copy and paste it into your Loop page.
- Or type “/image” [1] then select “Image” from the popup. [2]
- You can also hit ⏎ Enter or ⏎ Return on the keyboard to select Image.
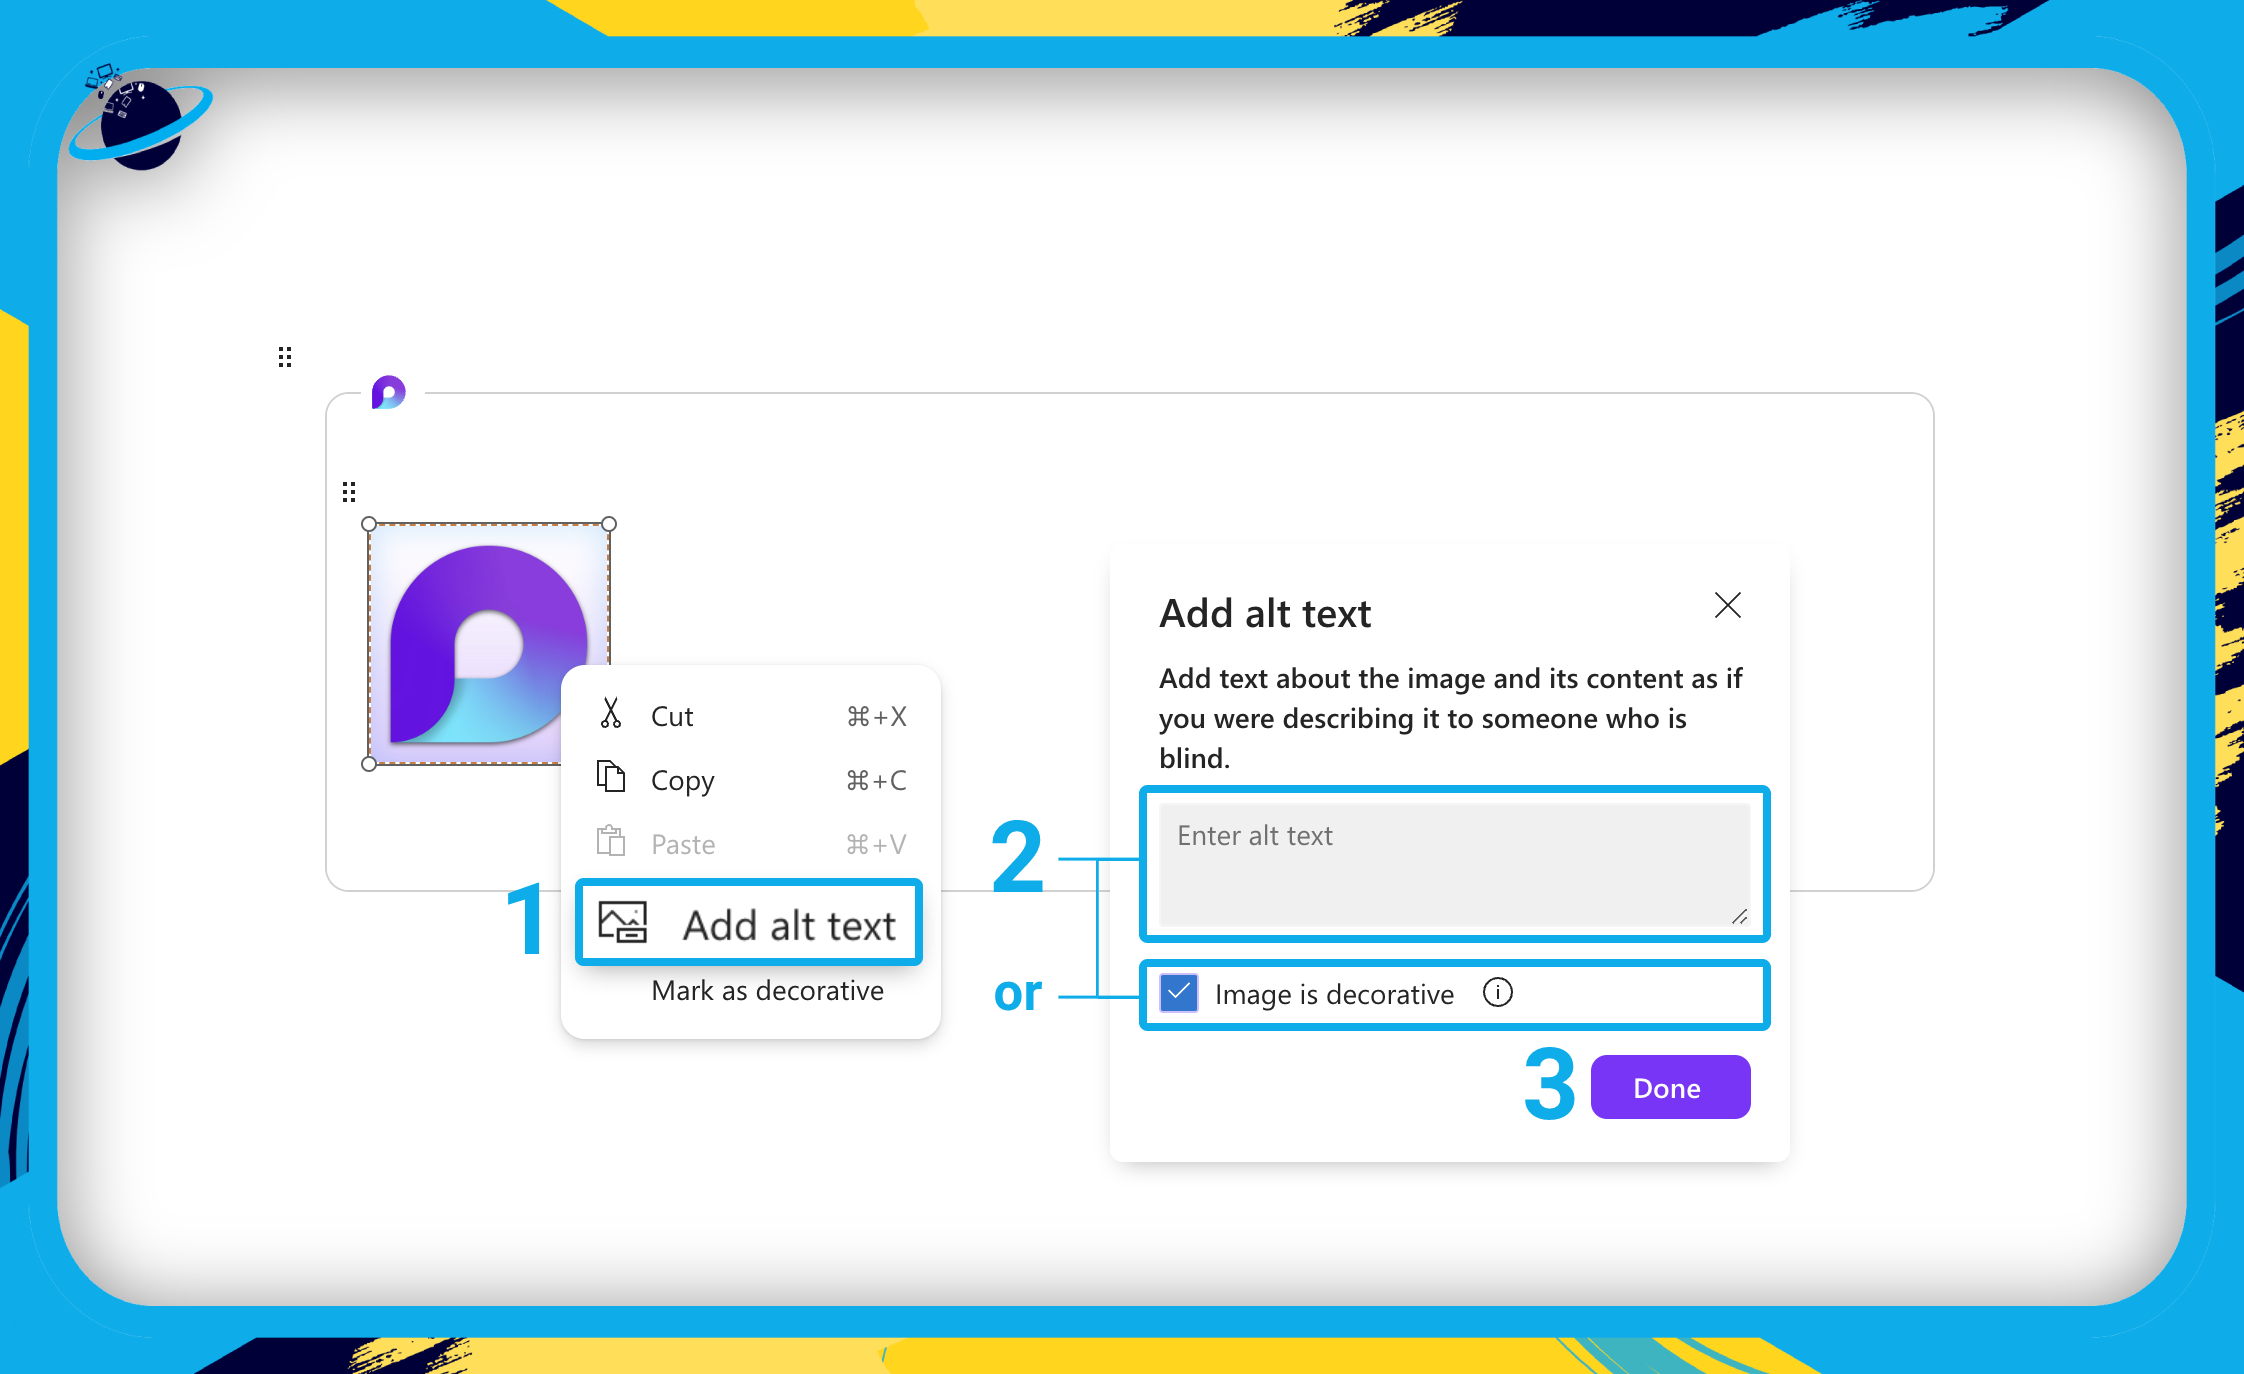
- Right-click the image and click
 “Add alt text.” [1]
 - Add a description of your image in the text box if it contains relevant information. [2]
- Otherwise, check the box next to “Image is decorative” so screen readers overlook them.
- When you’re finished, hit “Done.” [3]
You can also add gif images to your Loop components, which you can pause and play like a video. That is ideal as videos are not currently supported in Loop components. If you need to convert a video to a gif, you can do so at ![]() ezgif.com.
ezgif.com.
Videos in Microsoft Loop
In this section, we’ll show you how to use a table and integrate other components to build an effective collaboration tool.
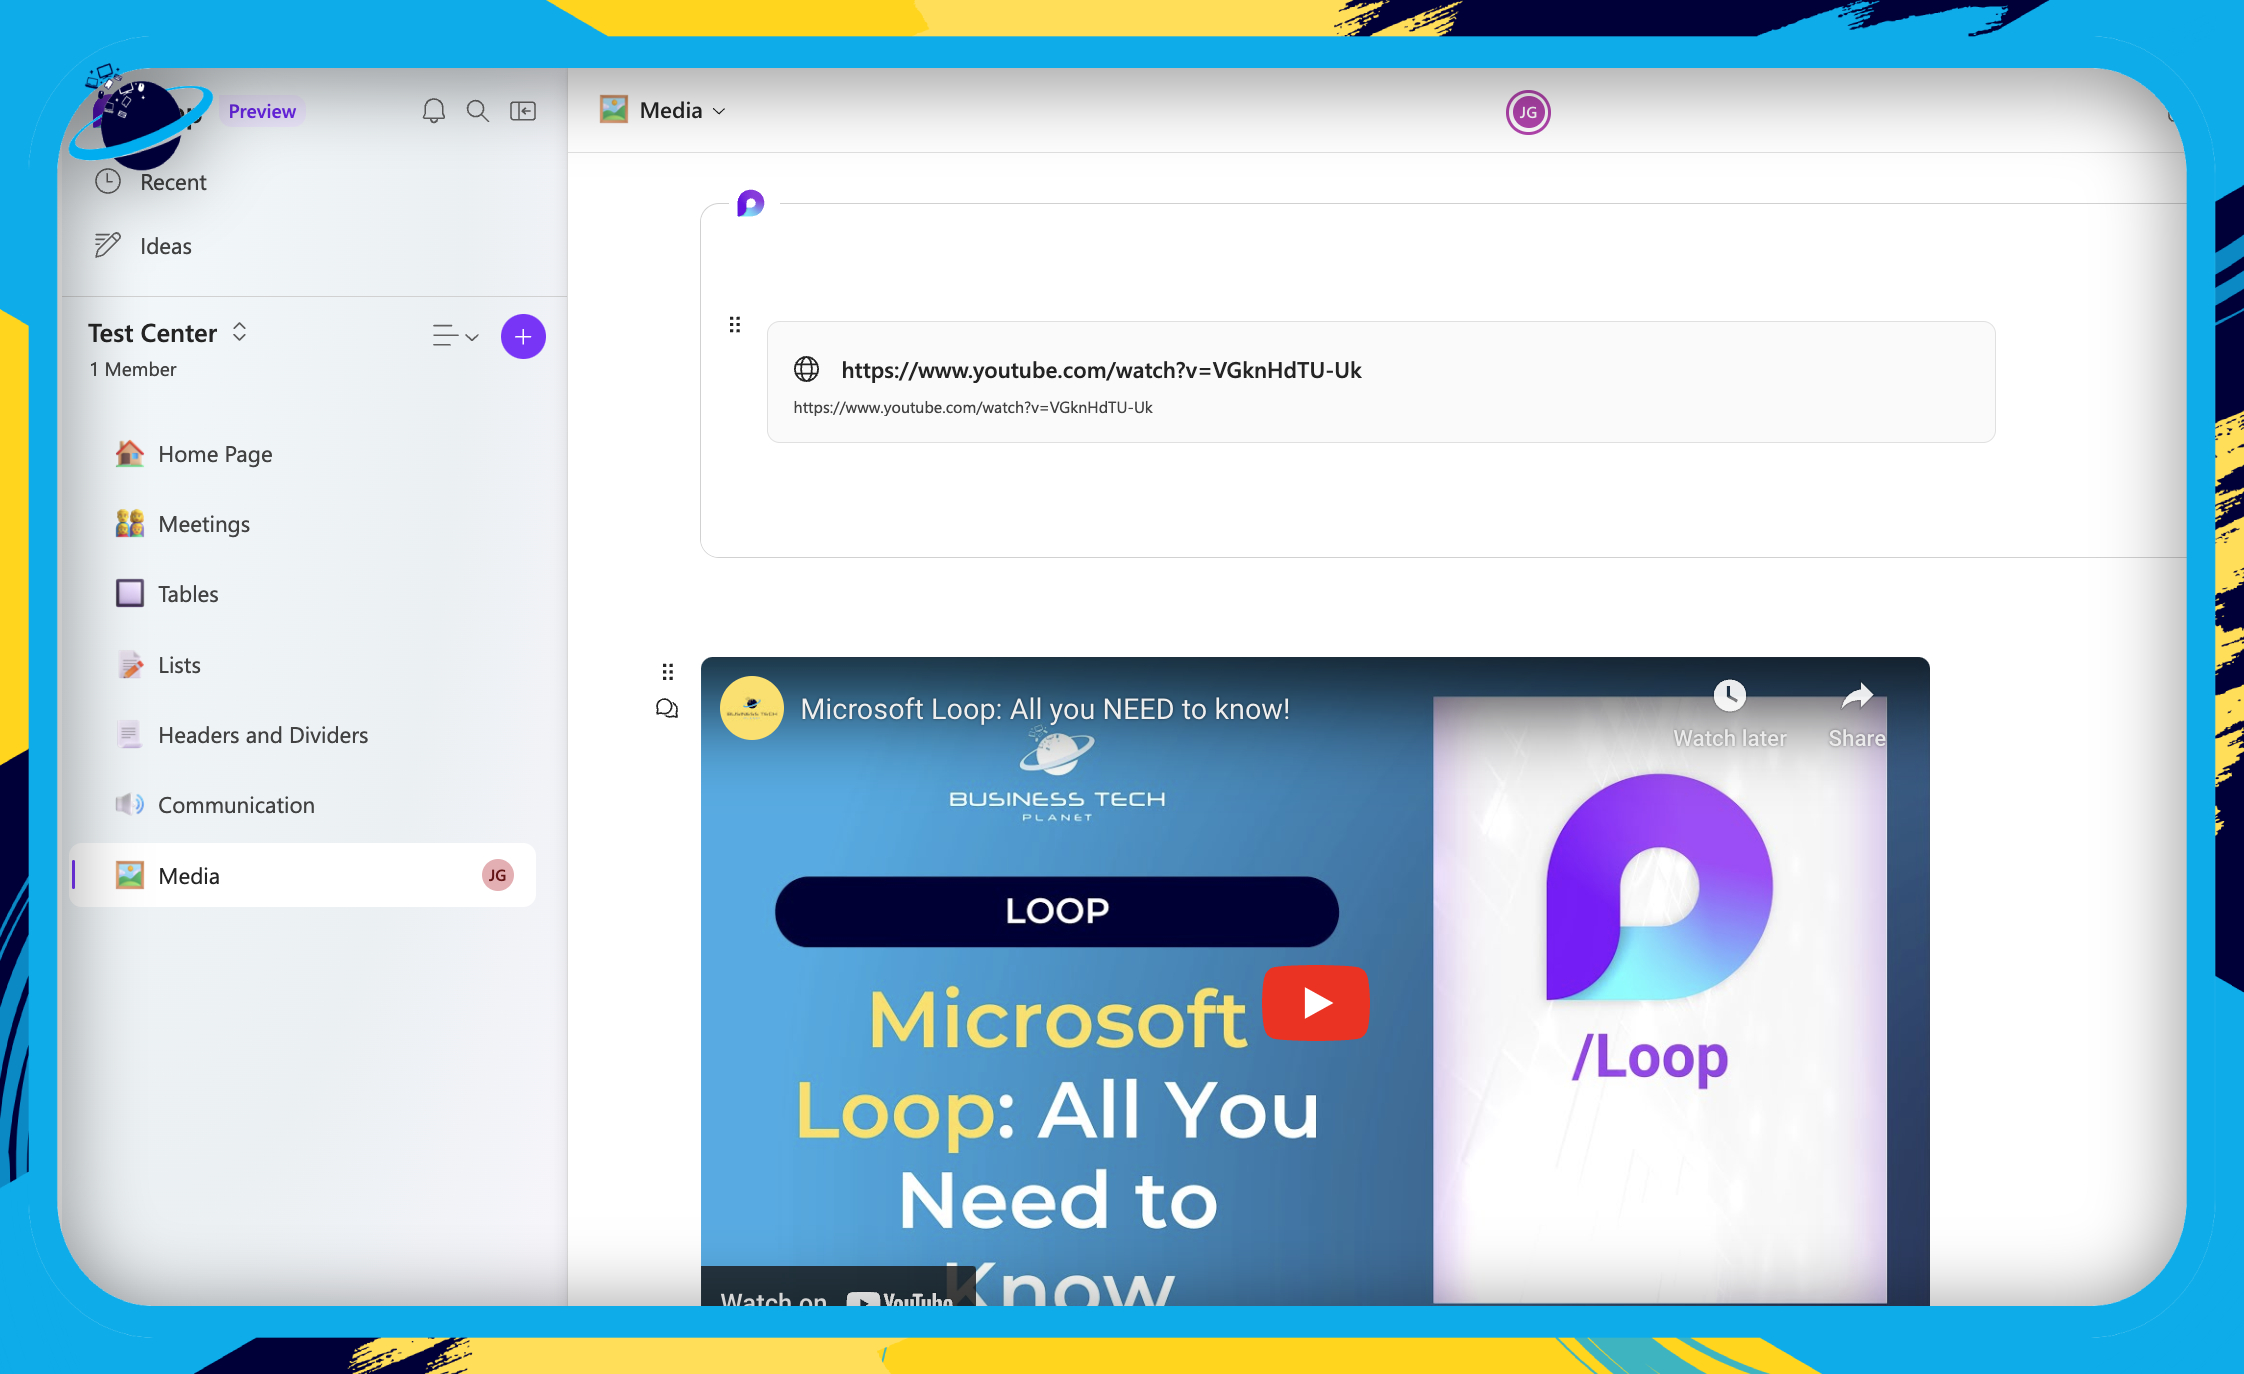
Videos are not currently supported in Loop components. However, you can view videos by pasting the video link into a Loop page. If you attempt to convert a video to a Loop component, or paste a video link into an existing component, it will only display as a clickable URL tab.
The image below shows a video inside a Loop component (top) and outside (bottom):
 Template Components
Task Lists in Microsoft Loop
In this section, we’ll show you how to use, modify, and sort task lists.
Task lists are useful templates that interface with Microsoft’s To Do, and provide reminders to assignees when due dates are approaching. Unlike tables, you can’t add additional columns to the template. But you can add new tasks and reorder them as you prefer.
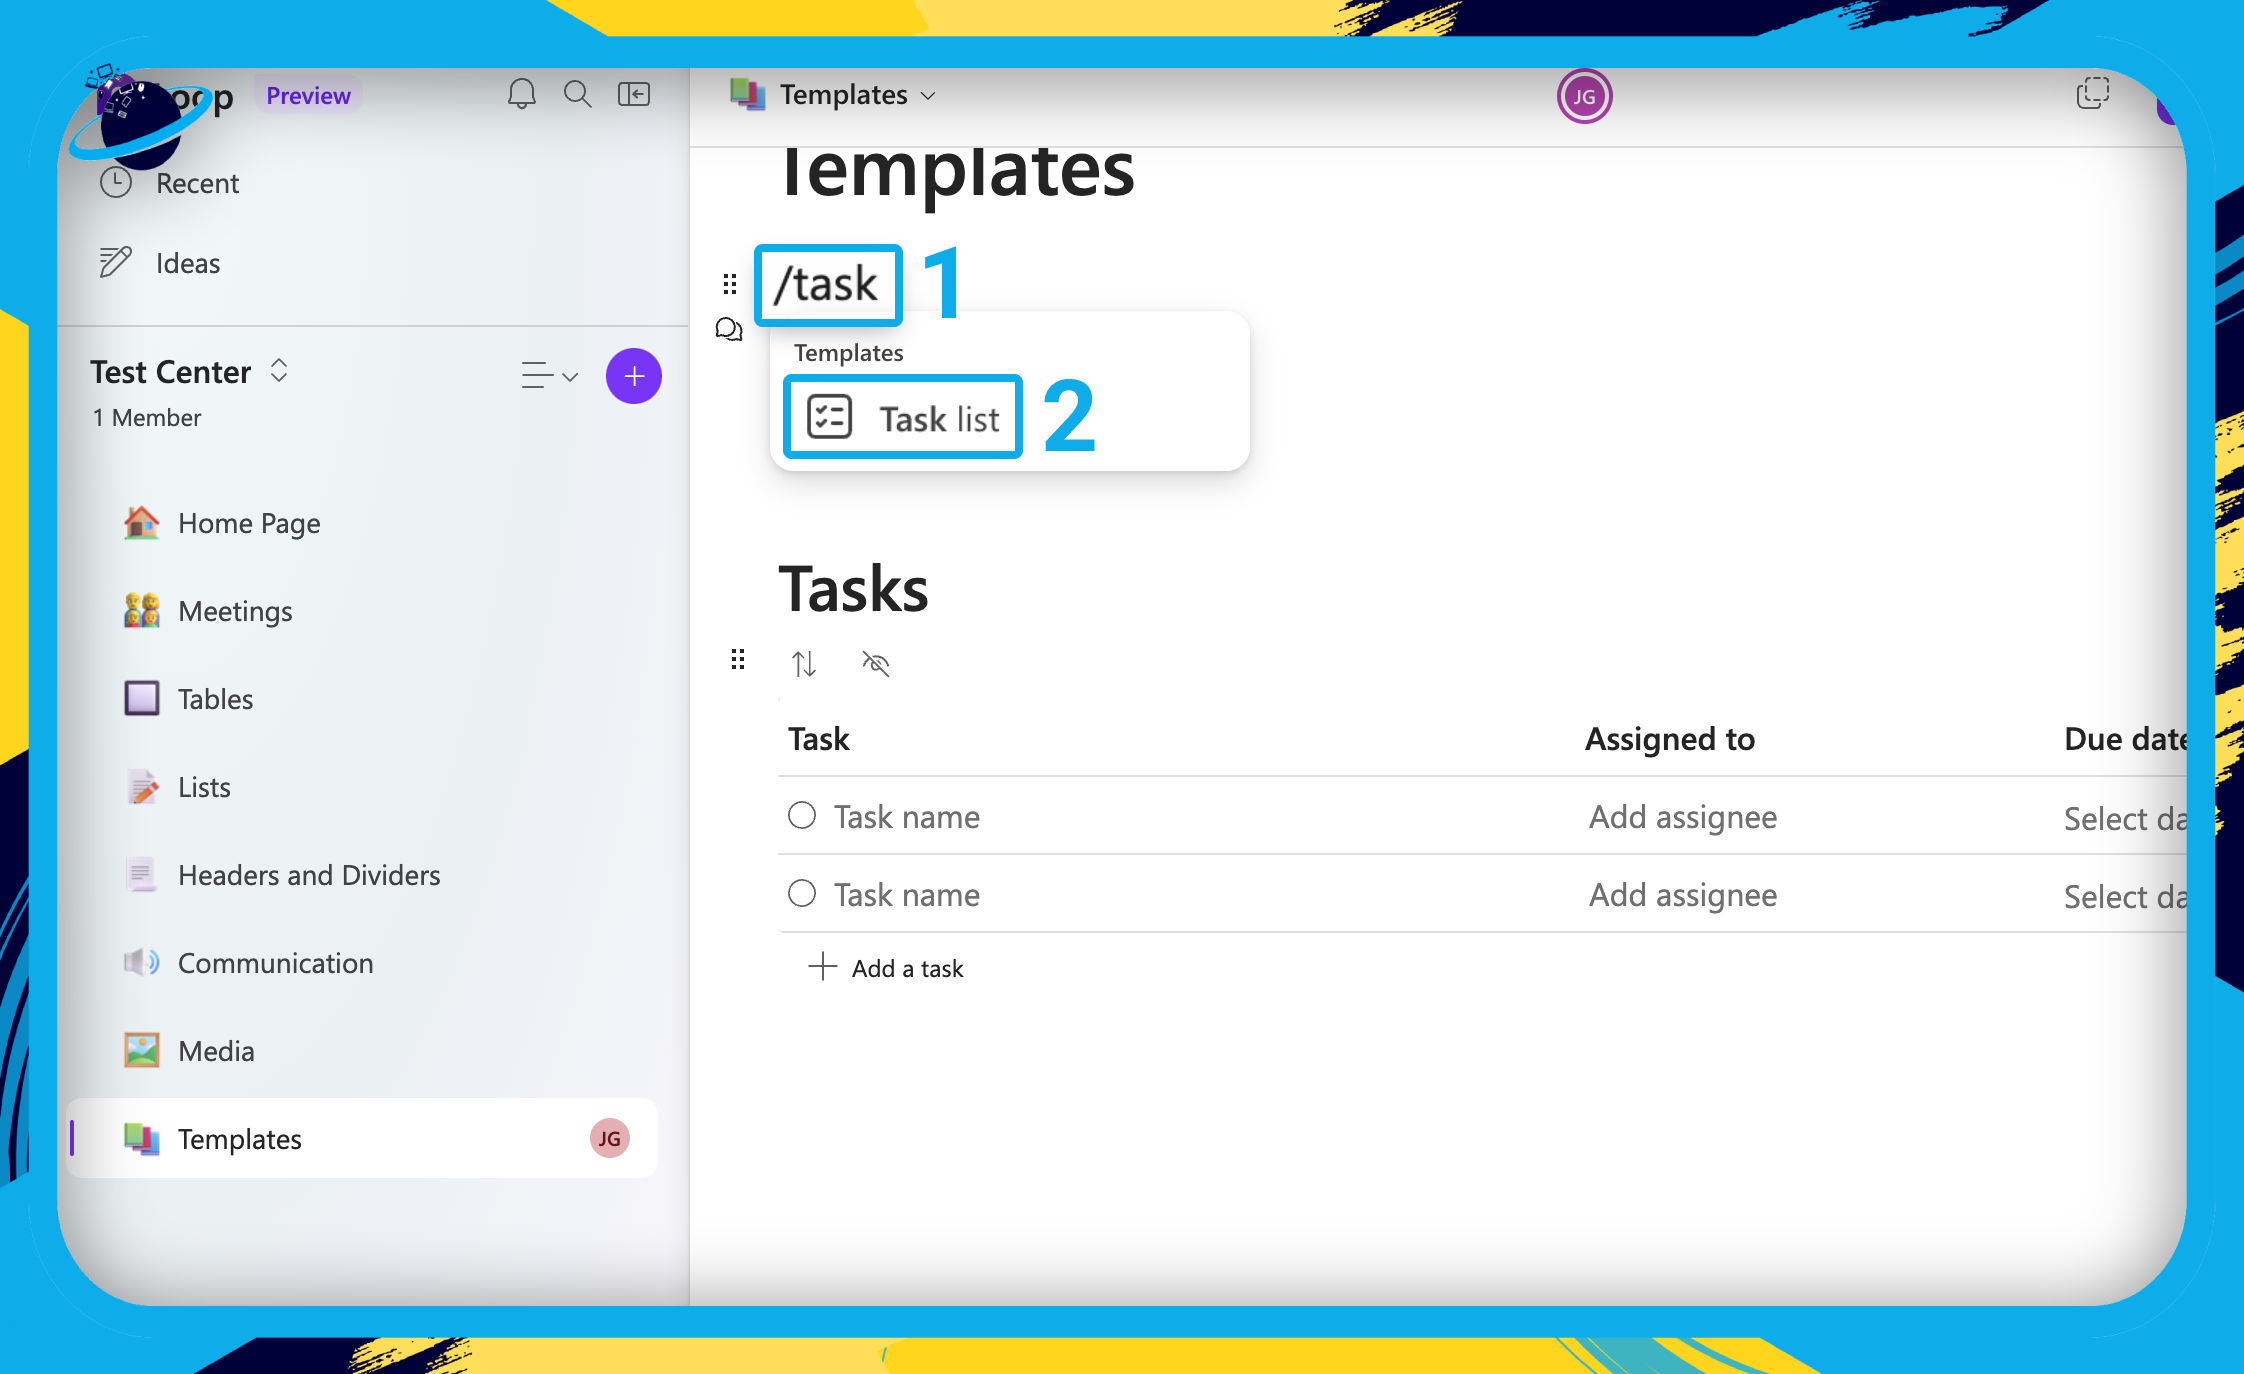
- To build a task list, start by typing “/task” [1] then select “Task list” from the popup. [2]
- You can also hit ⏎ Enter or ⏎ Return on the keyboard to select Task list.
We’re starting this guide using a task list that we’ve converted into a Loop component. To do that, simply click the ![]() six dots to the top left of the task list and select
six dots to the top left of the task list and select ![]() “Create Loop component” from the popup.
“Create Loop component” from the popup.
How to resize the task list
- Right-click any of the columns and select “Resize column” from the popup.
- You can use the left and right arrow keys to resize the column, or click and drag the boarders.
How to Add new tasks
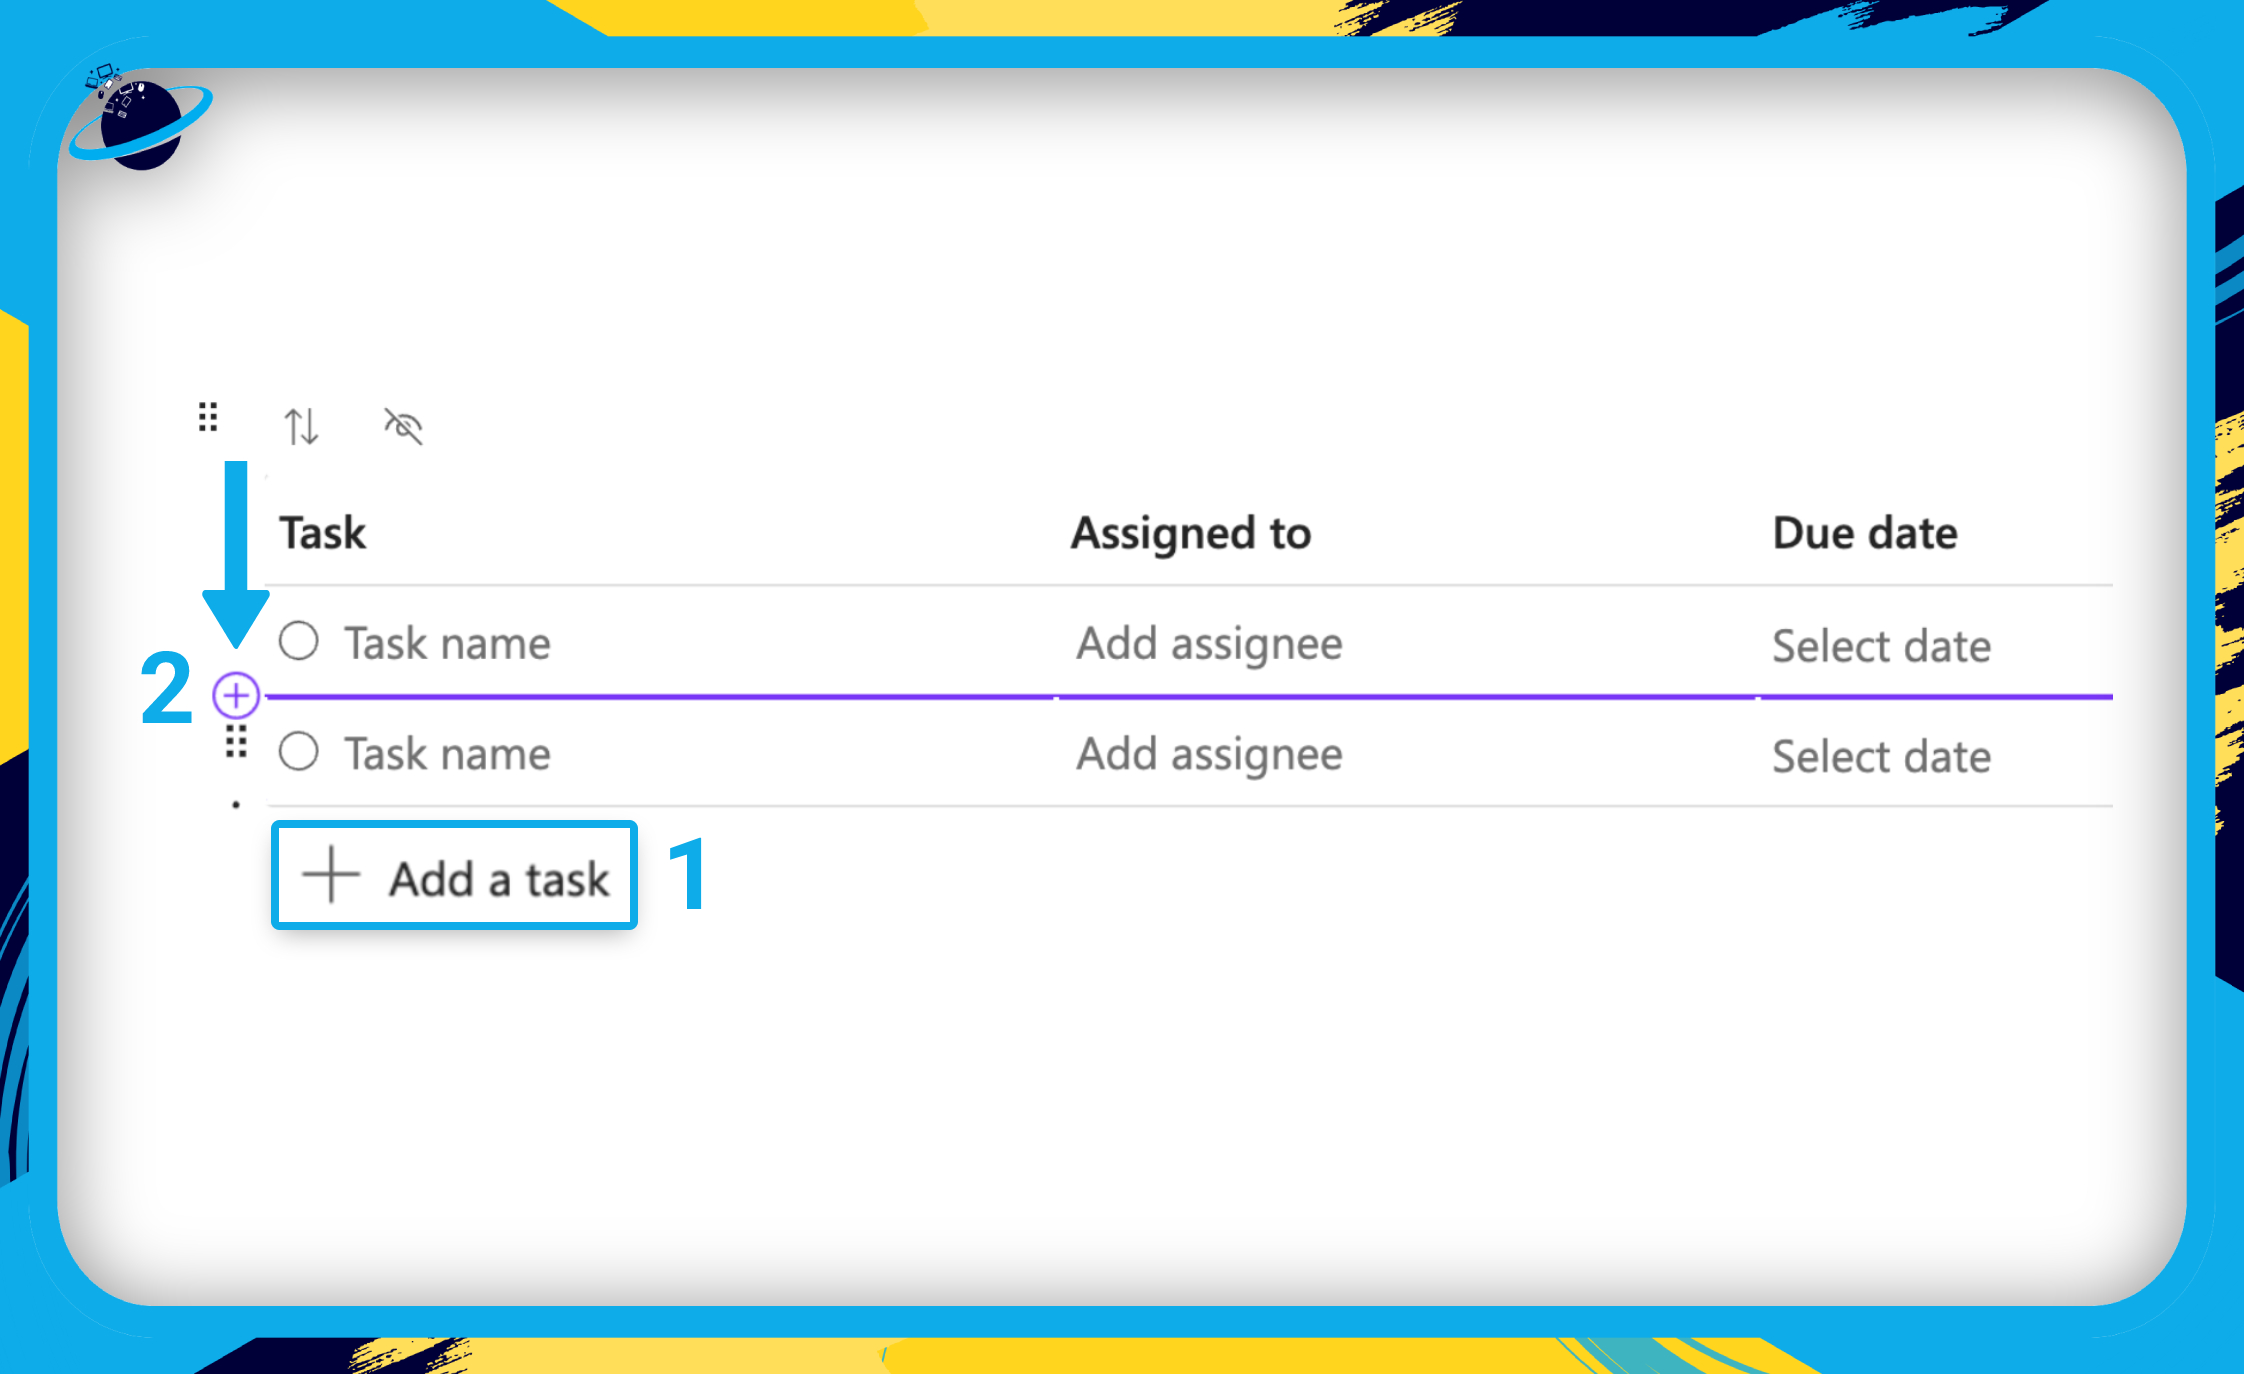
- Add a new task at the bottom of the list by clicking “Add a task.” [1]
- To add a new task anywhere in the list, hover between and left of the task names.
- Then click the plus icon. [2]
- You can also right-click any task and go to “Insert.”
- Then choose to add a new task “Above” or “Below” the selected task.
How to reorder tasks
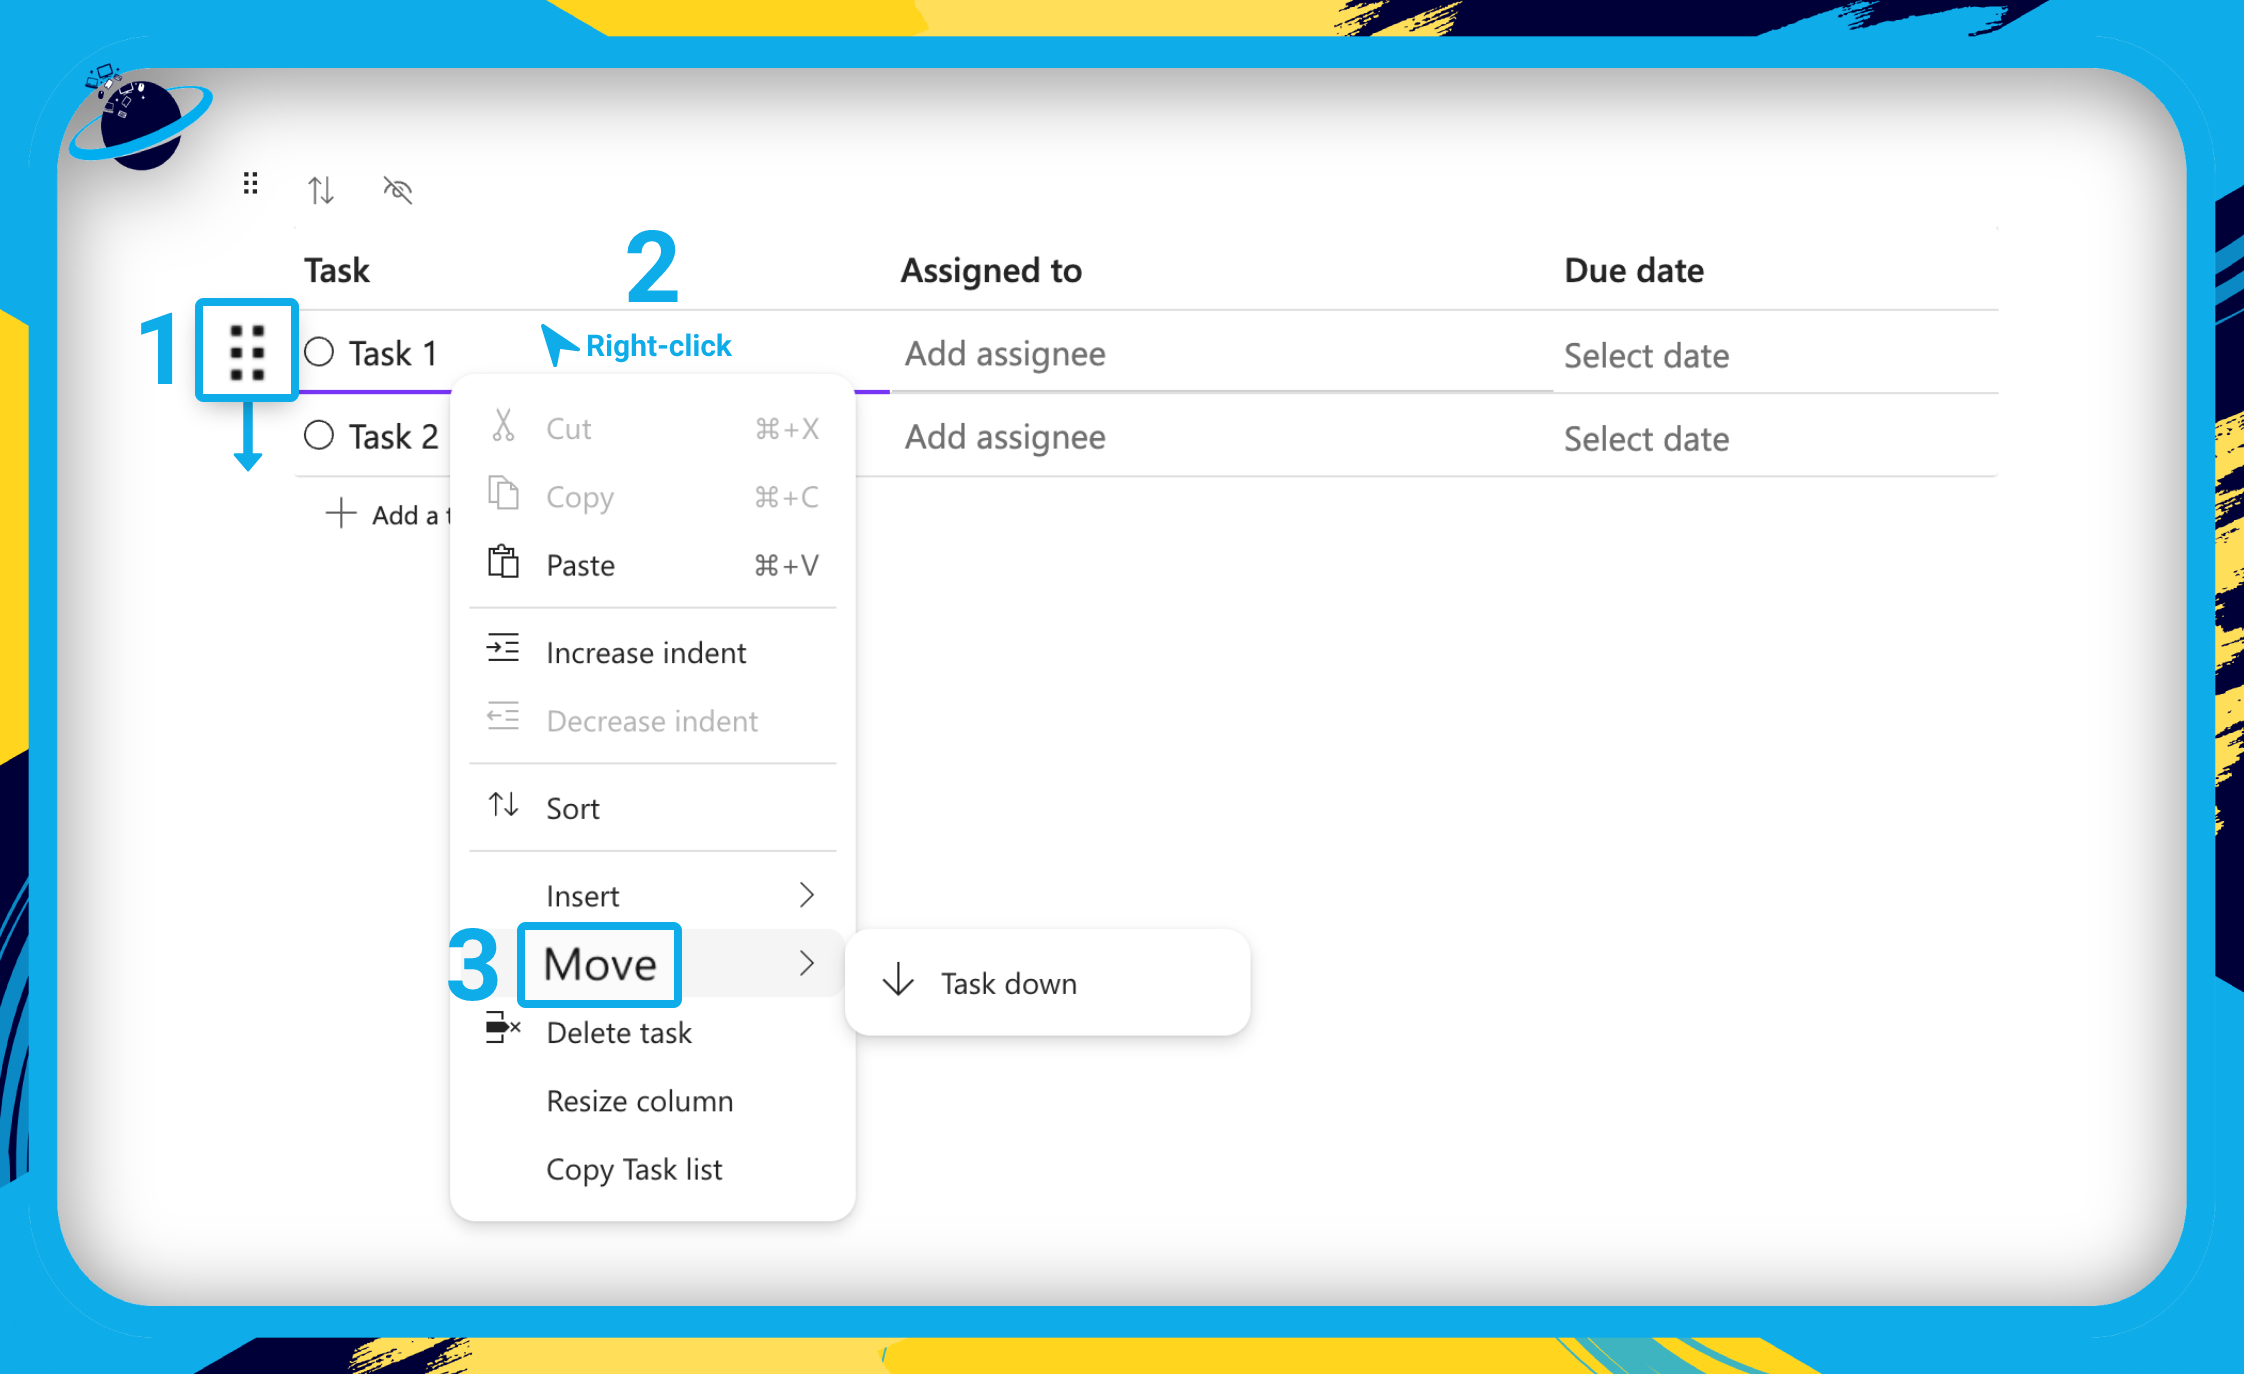
In Microsoft Loop, you can move any element or component by clicking and dragging the ![]() six dots icon that is associated with the particular item you want to move. [1]
six dots icon that is associated with the particular item you want to move. [1]
- You can also right-click the task you want to move. [2]
- Head to “Move” in the dropdown. [3]
- Then choose to move your “Task down” or “Task up.”
How to set tasks as completed
The obvious way to set a task as completed is to click the circular checkbox next to the task. But if you’ve been assigned a task, you can mark it as completed in Microsoft ![]()
![]() To Do, which you can also access through Outlook.
To Do, which you can also access through Outlook.
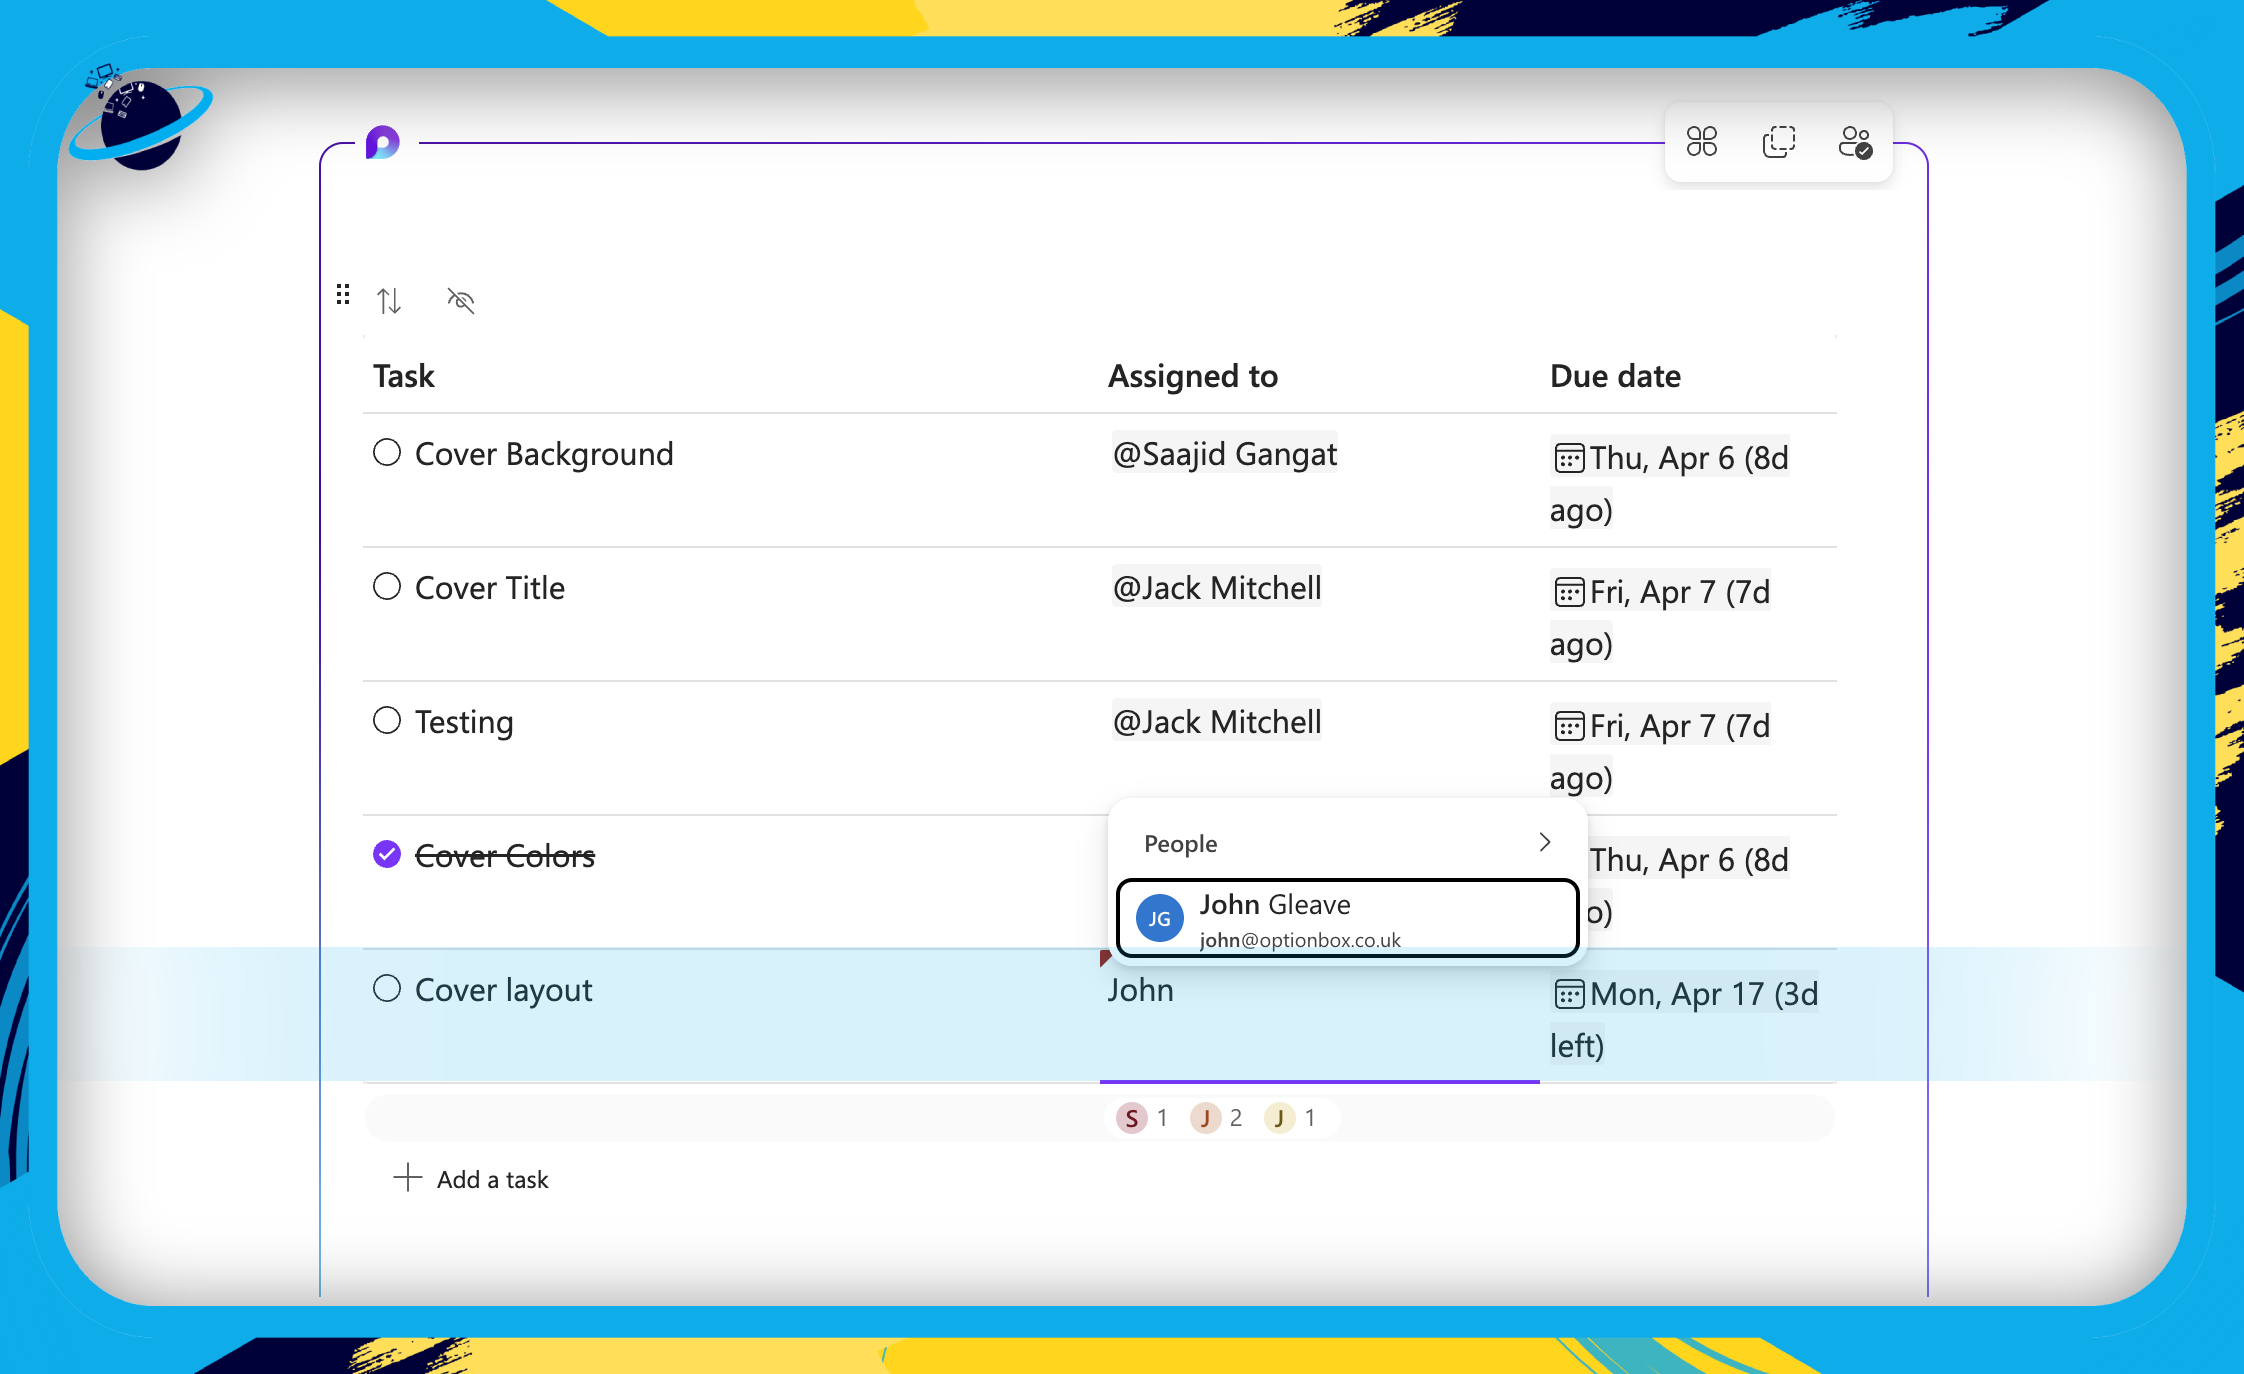
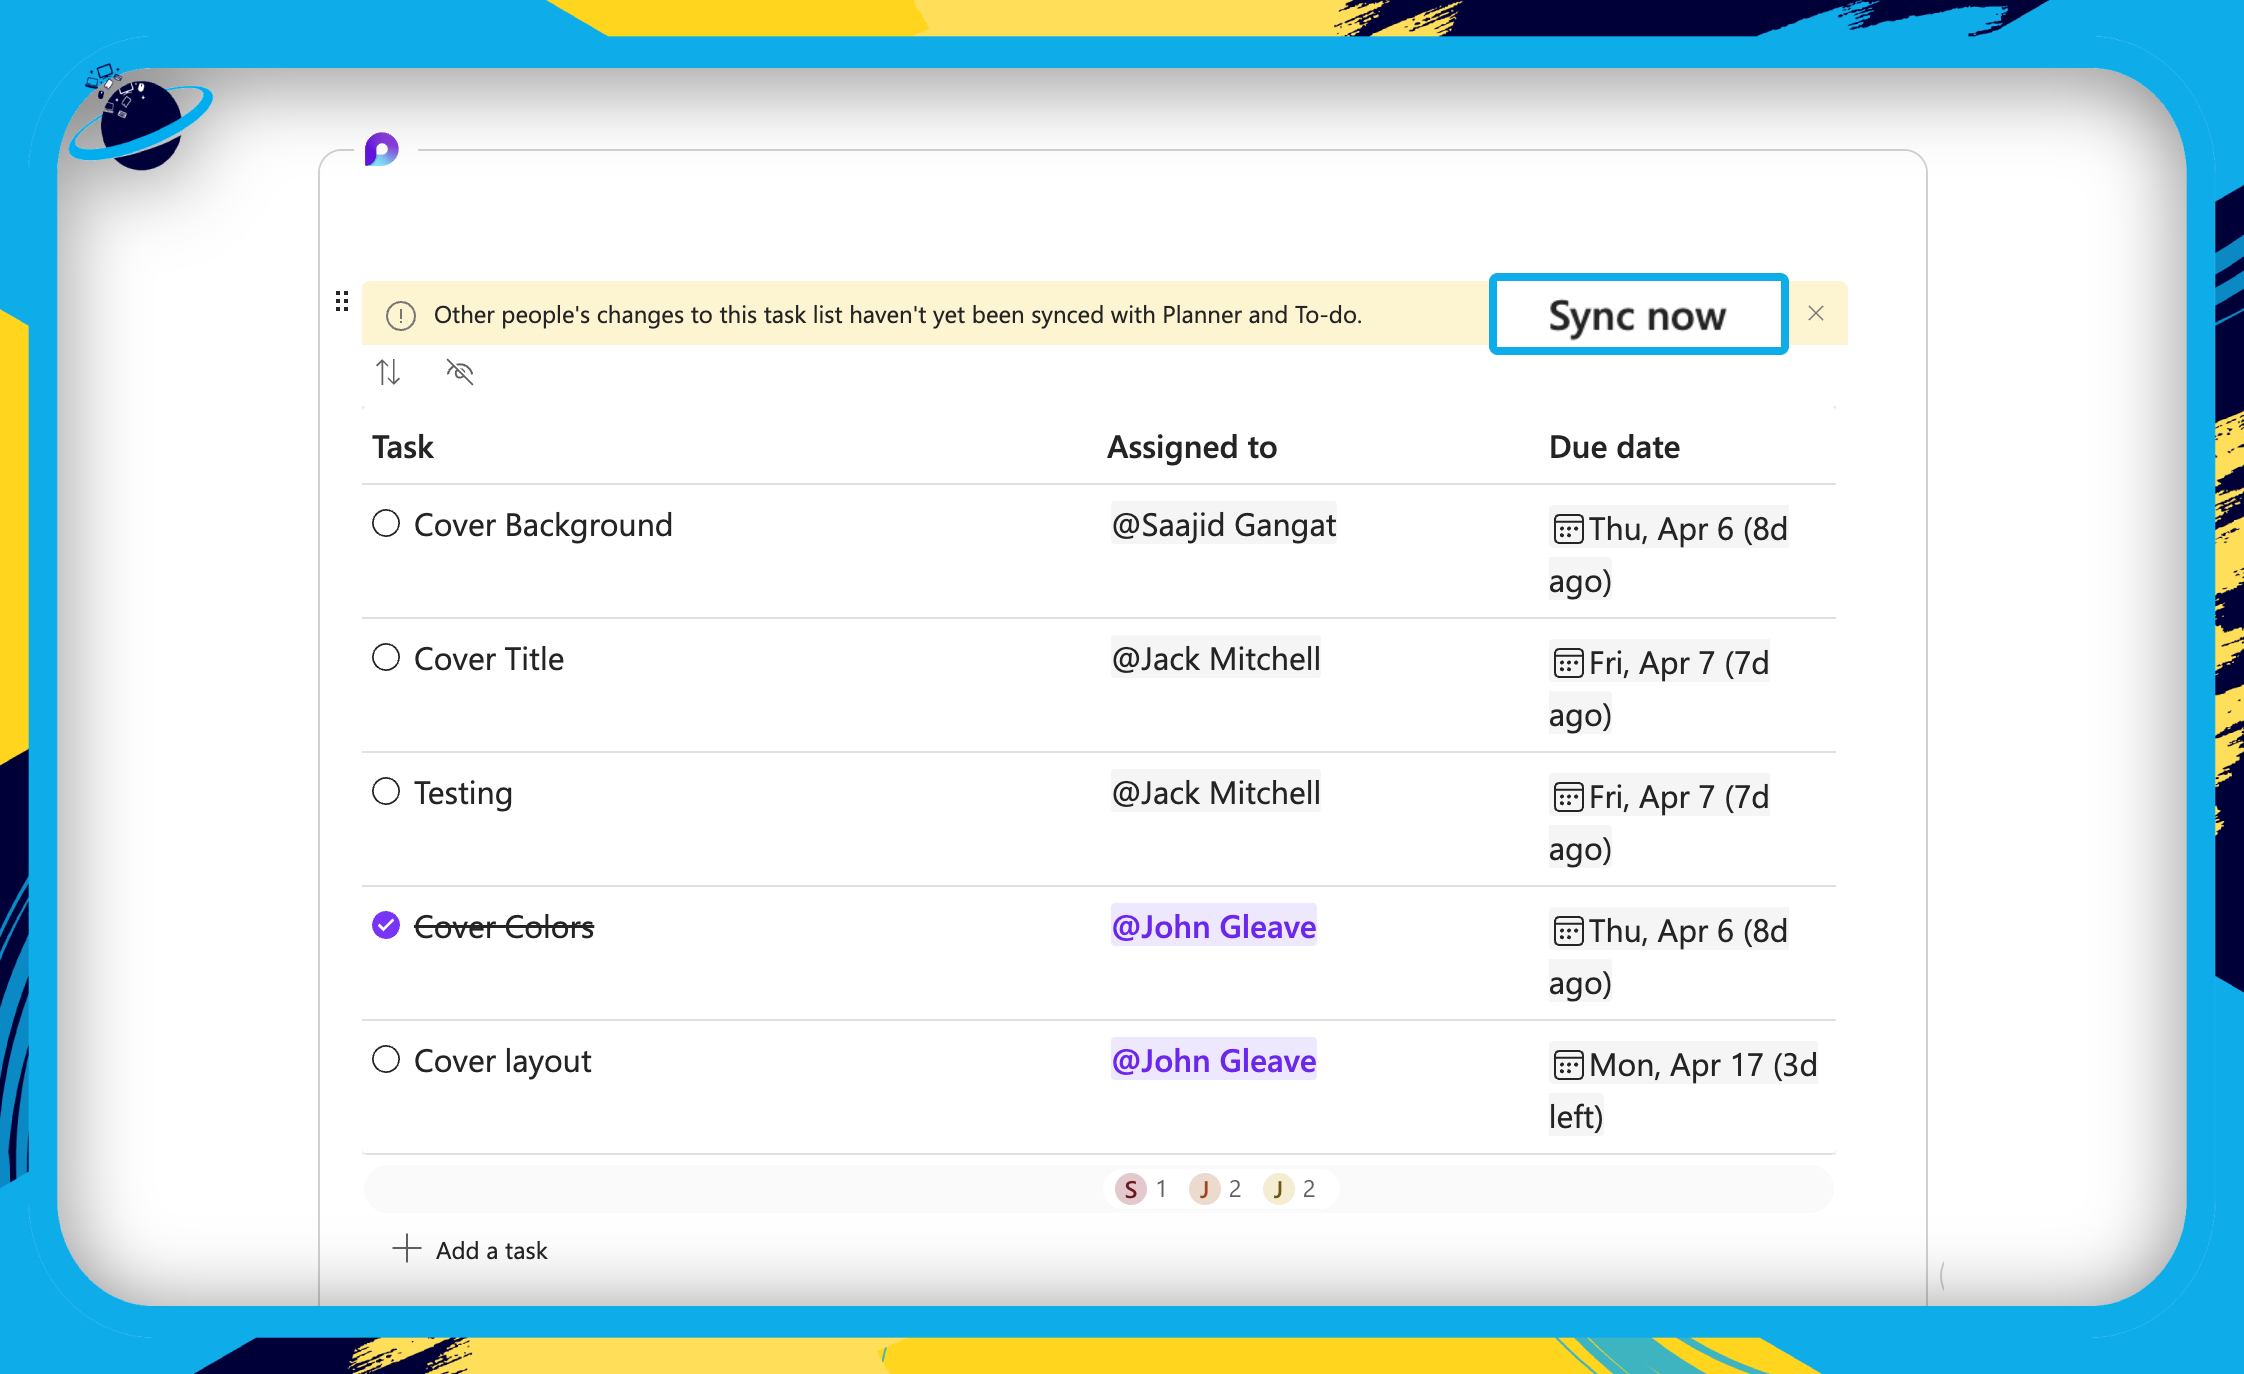
To demonstrate, let’s first assign a task to ourselves. We’ve created a new task called “Cover layout” in an existing task list. The task name in Microsoft Loop has a 255 character limit.
- Type your name into the “Assigned to” column.
- Then select your name from the popup list.
- You’ll get a notification at the top If changes haven’t been synced with Planner and To Do.
- If so, click the “Sync now” button.
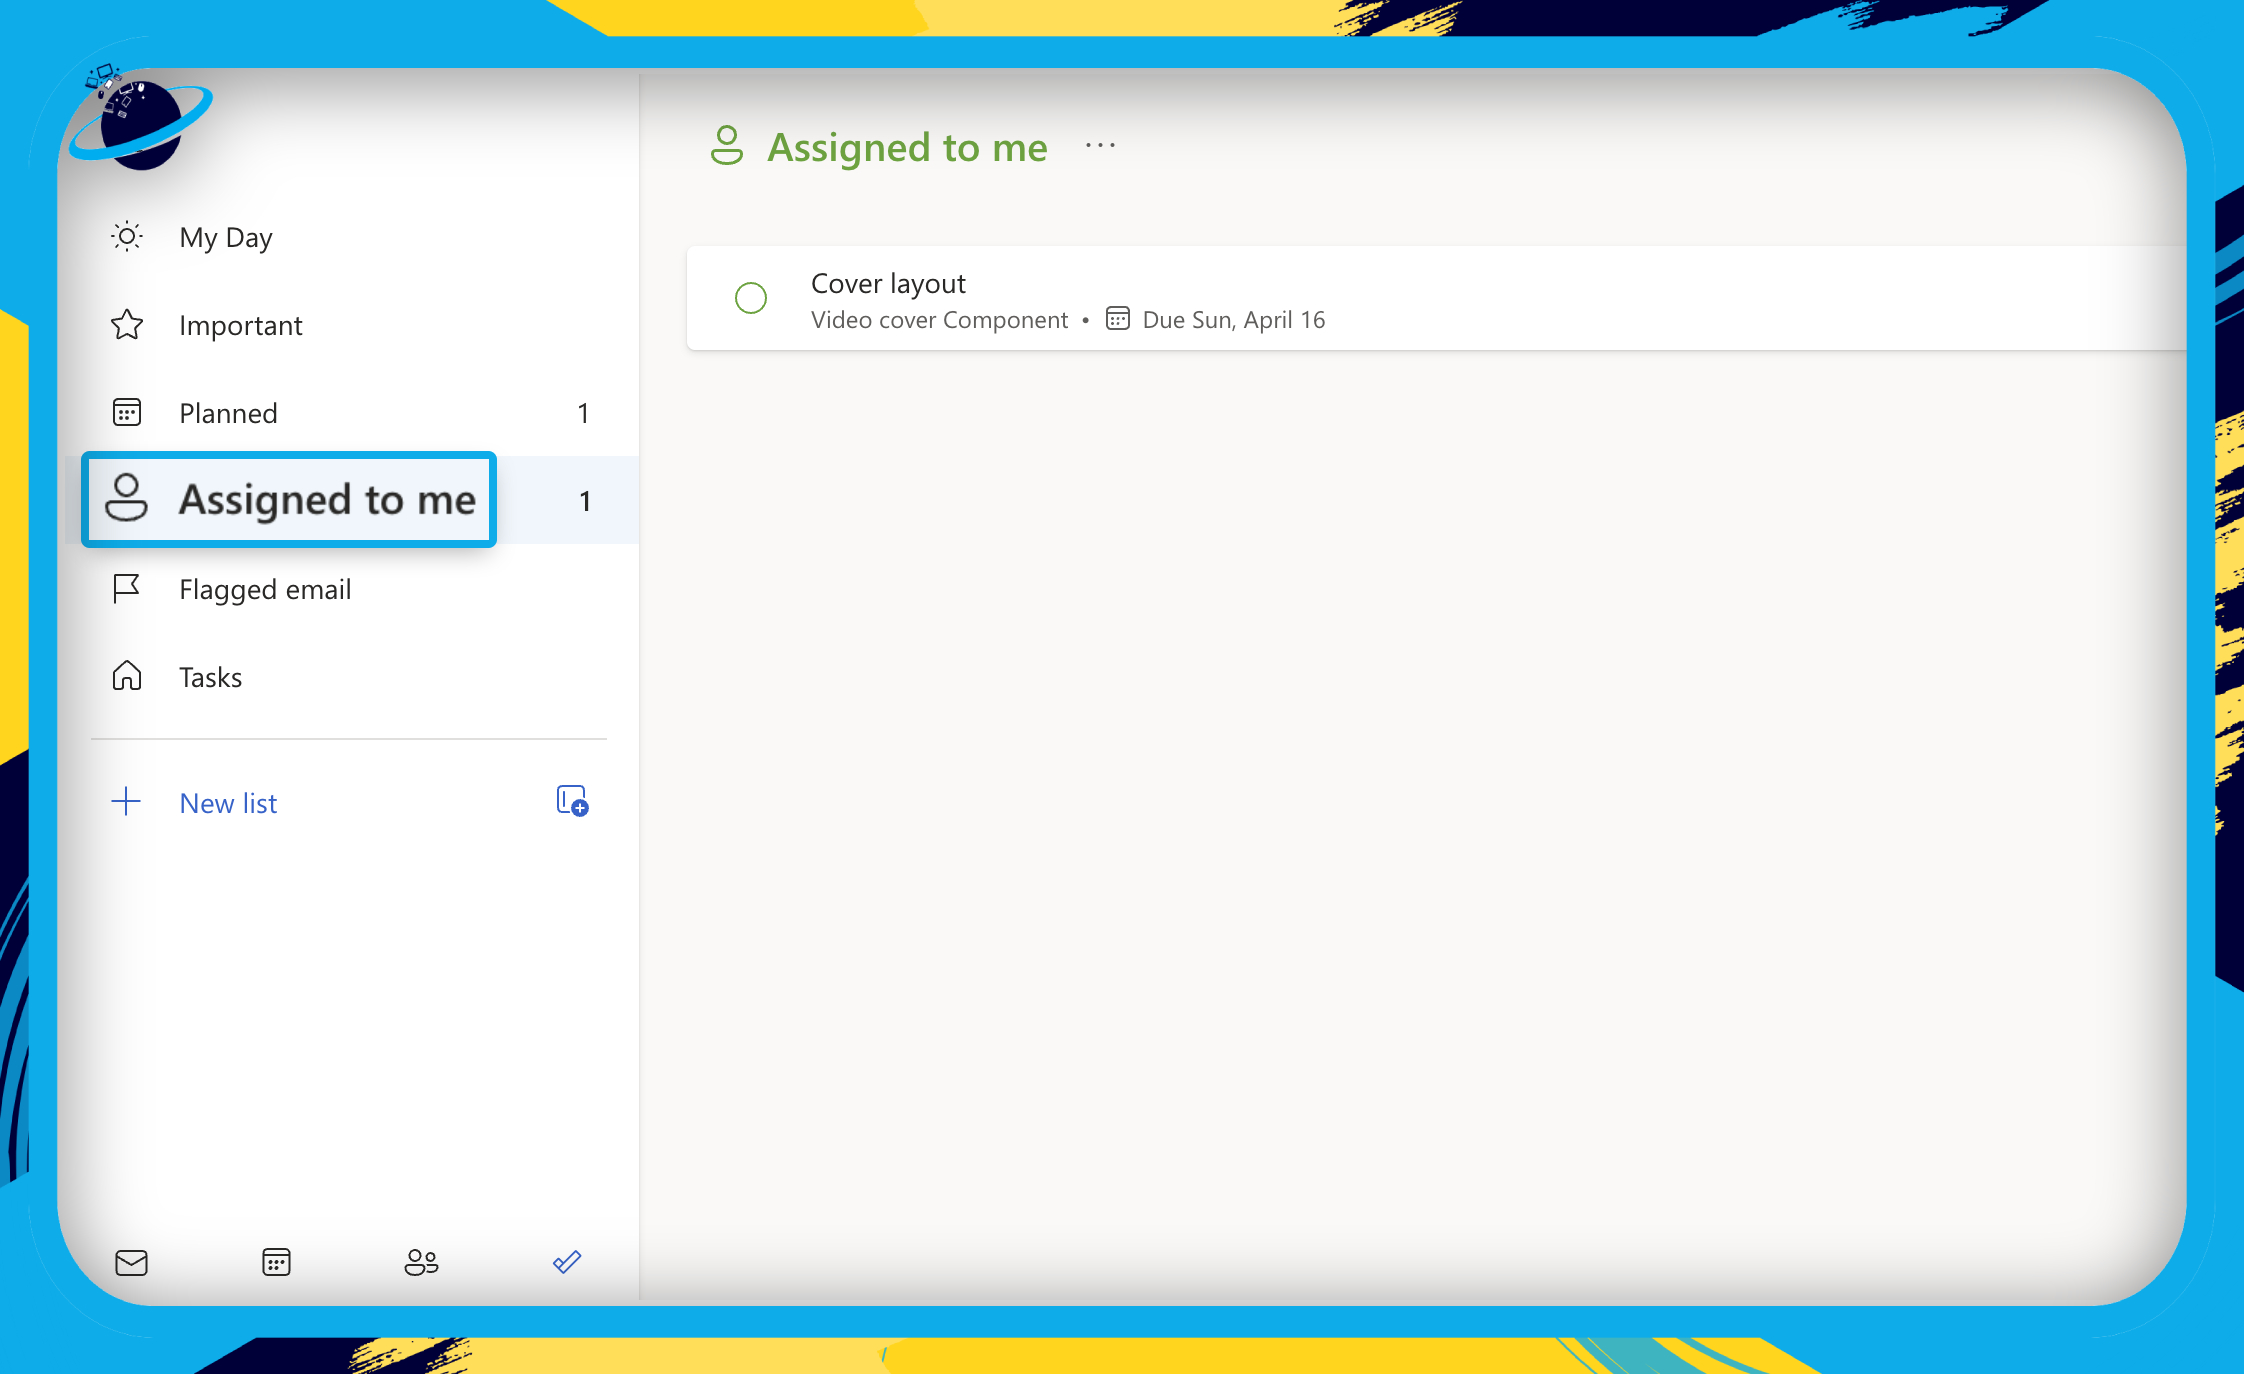
- Now open

 To Do and click “Assigned to me” on the left.
 - There, you can view and mark tasks as complete.
![]() Notes:
Notes:
# Marking an item as complete in Loop will cross out the item in To Do. However, marking an item as complete in To Do will not cross out the item in Loop.
# You may find that Loop’s interface with To Do is unreliable. If your tasks are not appearing in To Do, ensure that the task list has been converted to a Loop component. Alternatively, create the task list in the first workspace you created, as problems with building task lists in multiple pages and workspaces has resulted in problems during testing.
How to sort task items
- You can sort task items by clicking the
 sort icon in the top left. [1]
 - Next, click “Add a sort.” [2]
- Then choose to sort by Task name, Assignee, and Due date.
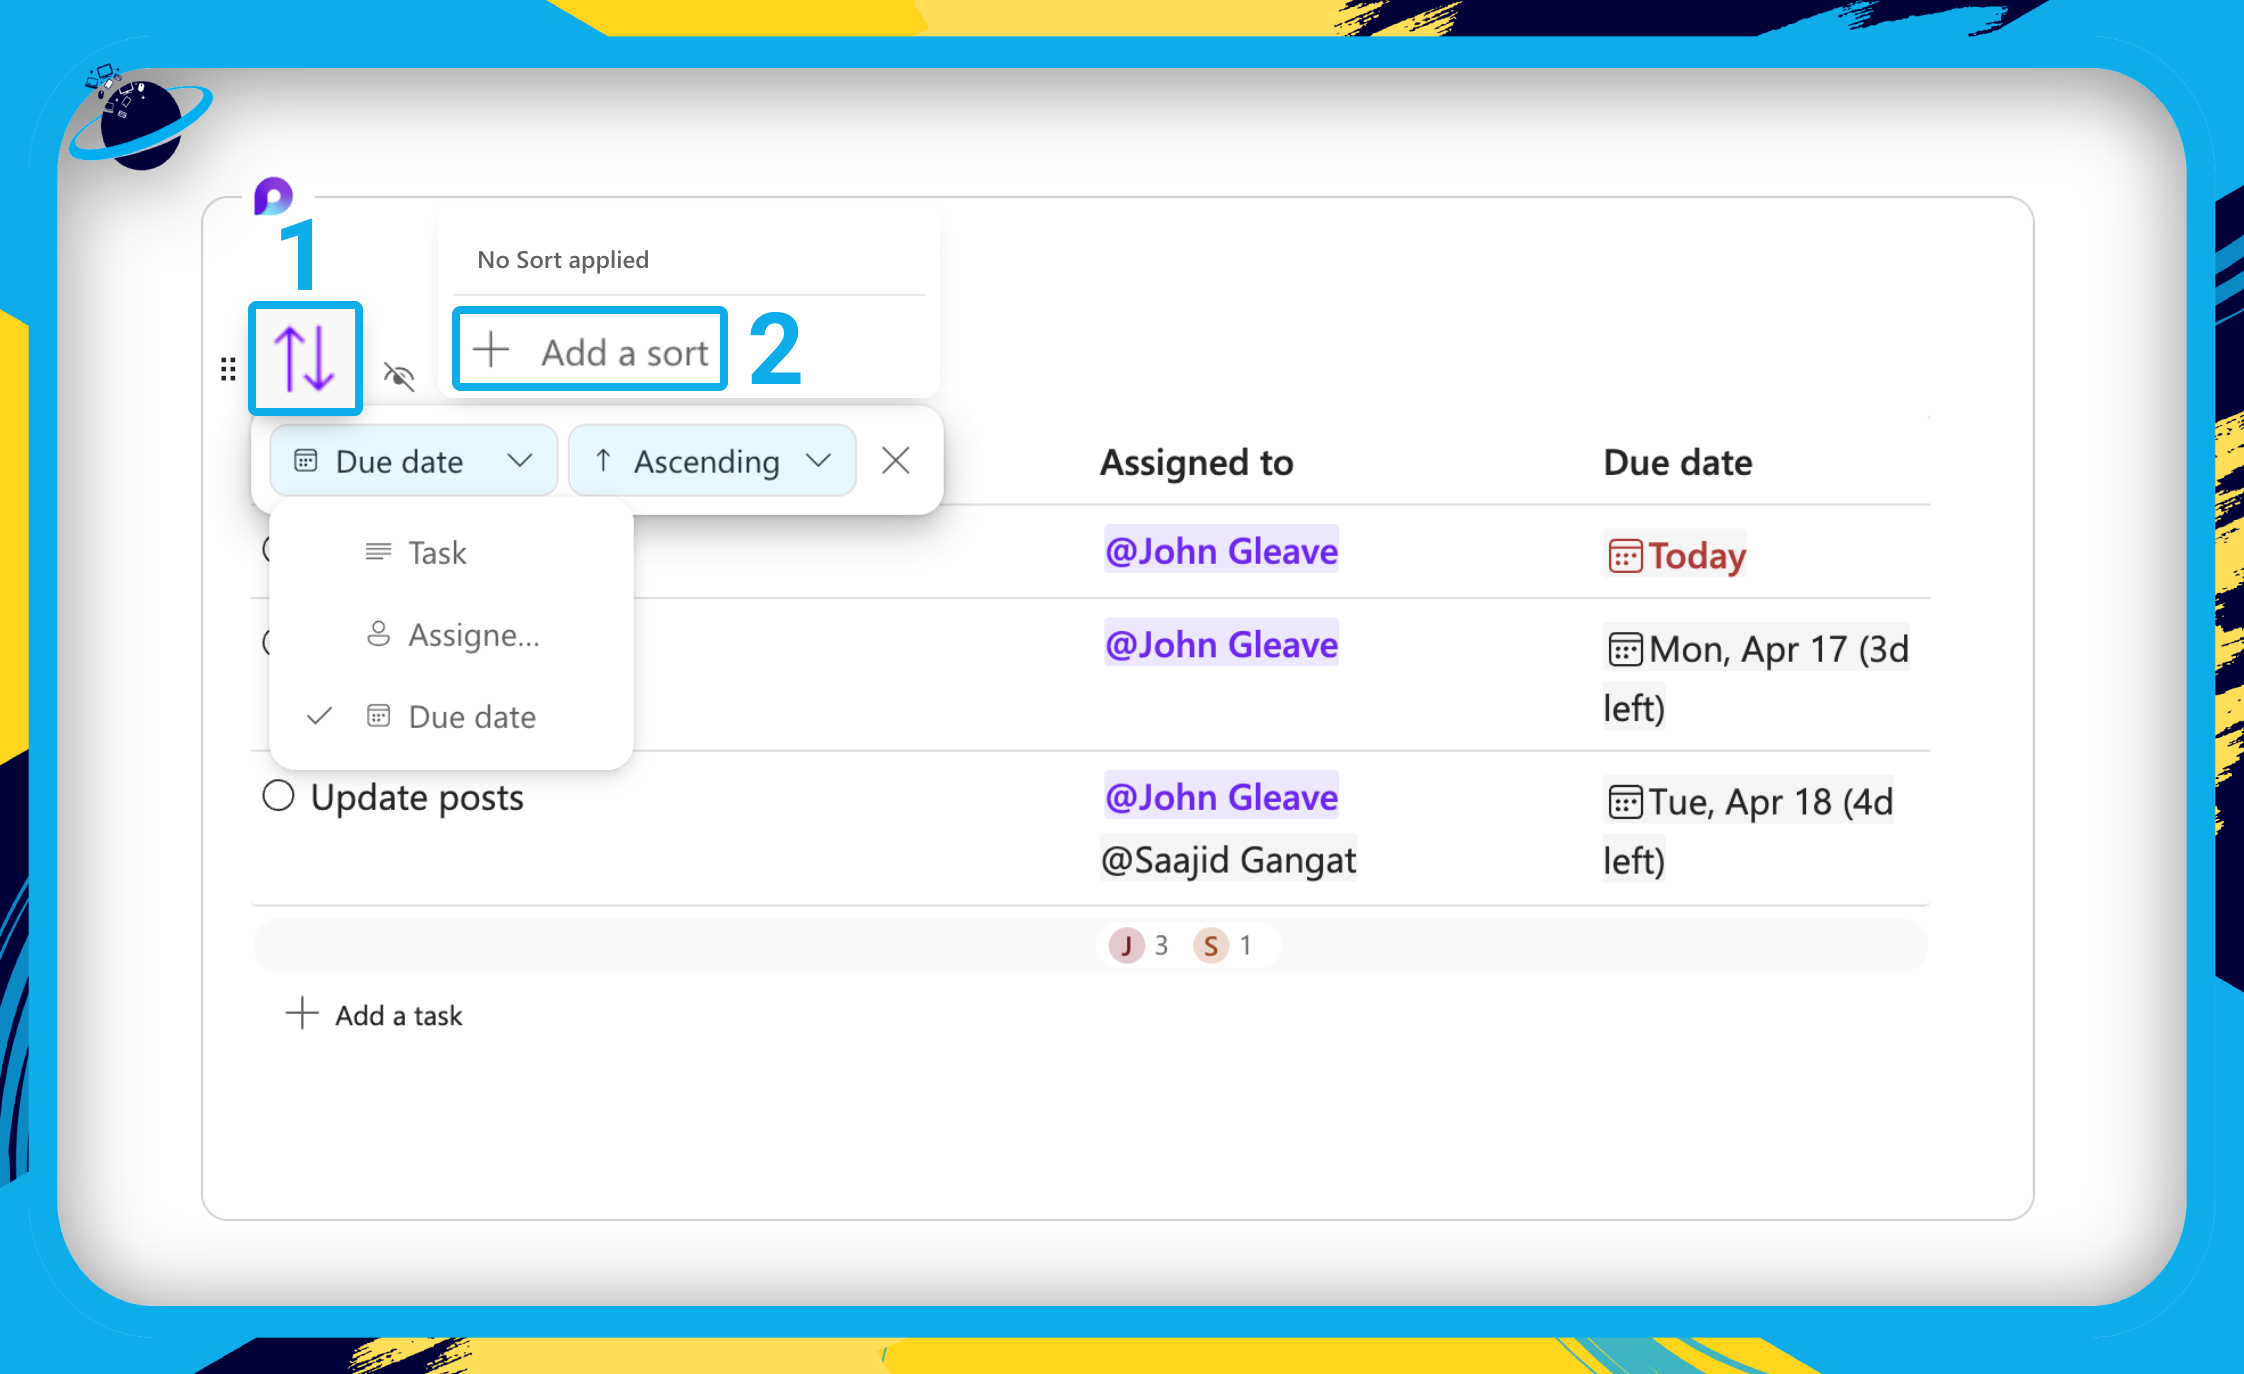
A good idea is to sort by “Due date” and “Ascending,” which places the tasks with the nearest due dates at the top.
Voting Tables in Microsoft Loop
In this section, we’ll show you how to build a voting table, and how to add a voting column to any table.
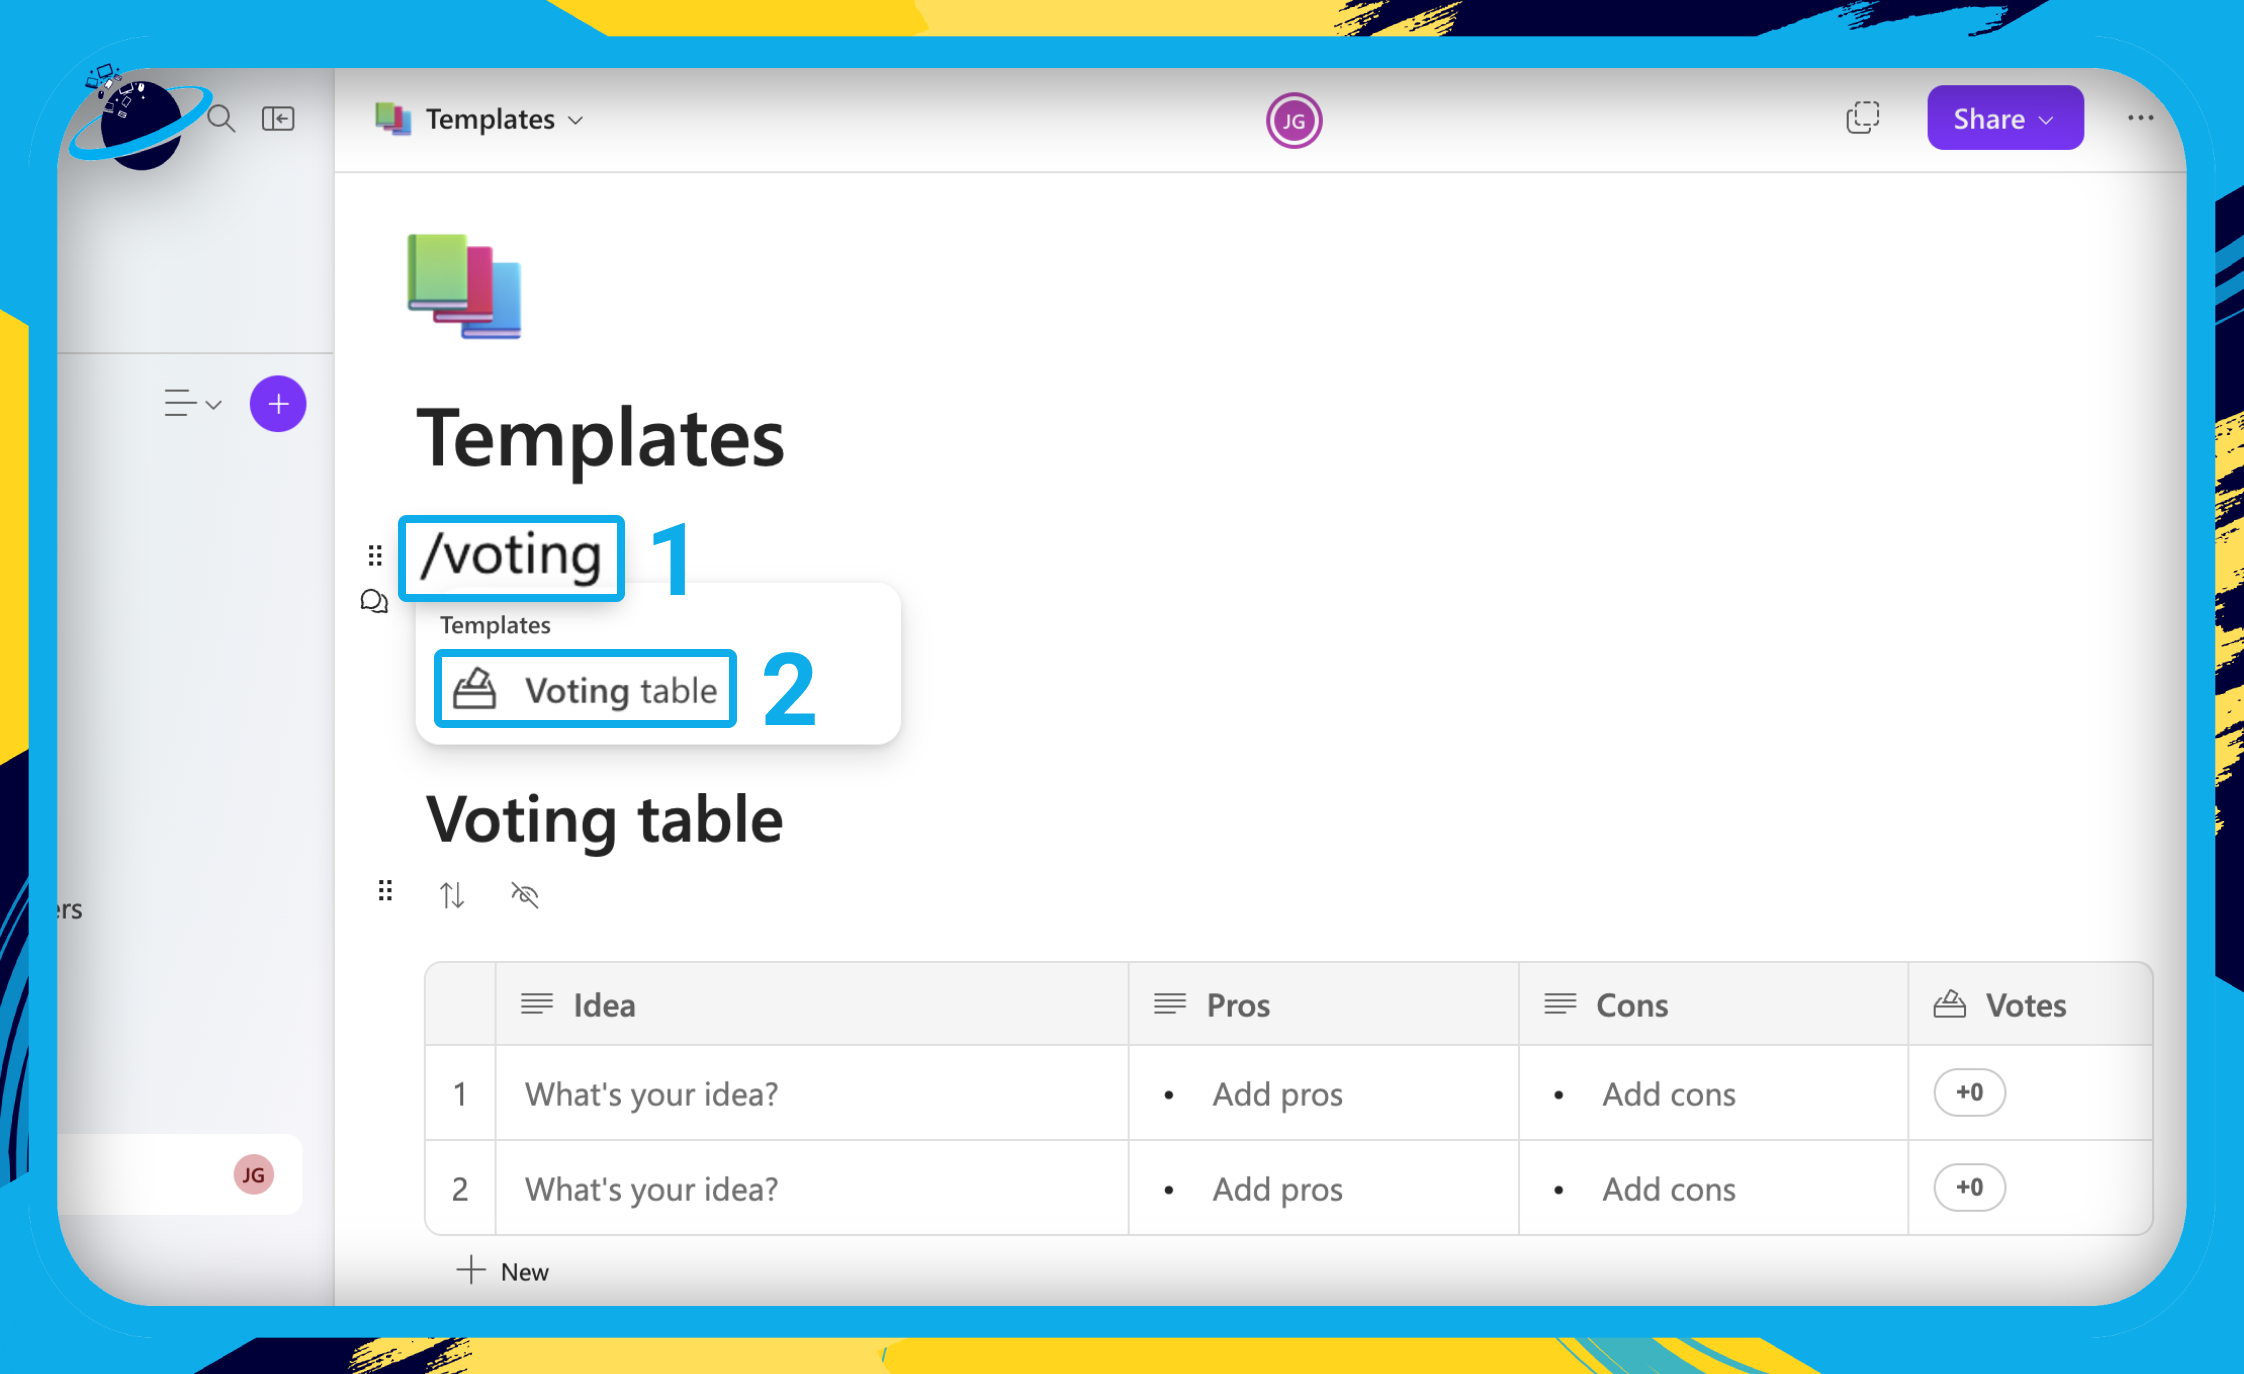
Voting tables function just the same as regular tables. However, the template comes with a voting column, and two columns for “Pros” and “Cons,” each containing a bulleted list.
- To build a voting table, start by typing “/voting” [1] then select “Voting table.” [2]
- You can also hit ⏎ Enter or ⏎ Return on the keyboard to select Voting table.
You can convert any table to a voting table by adding a voting column.
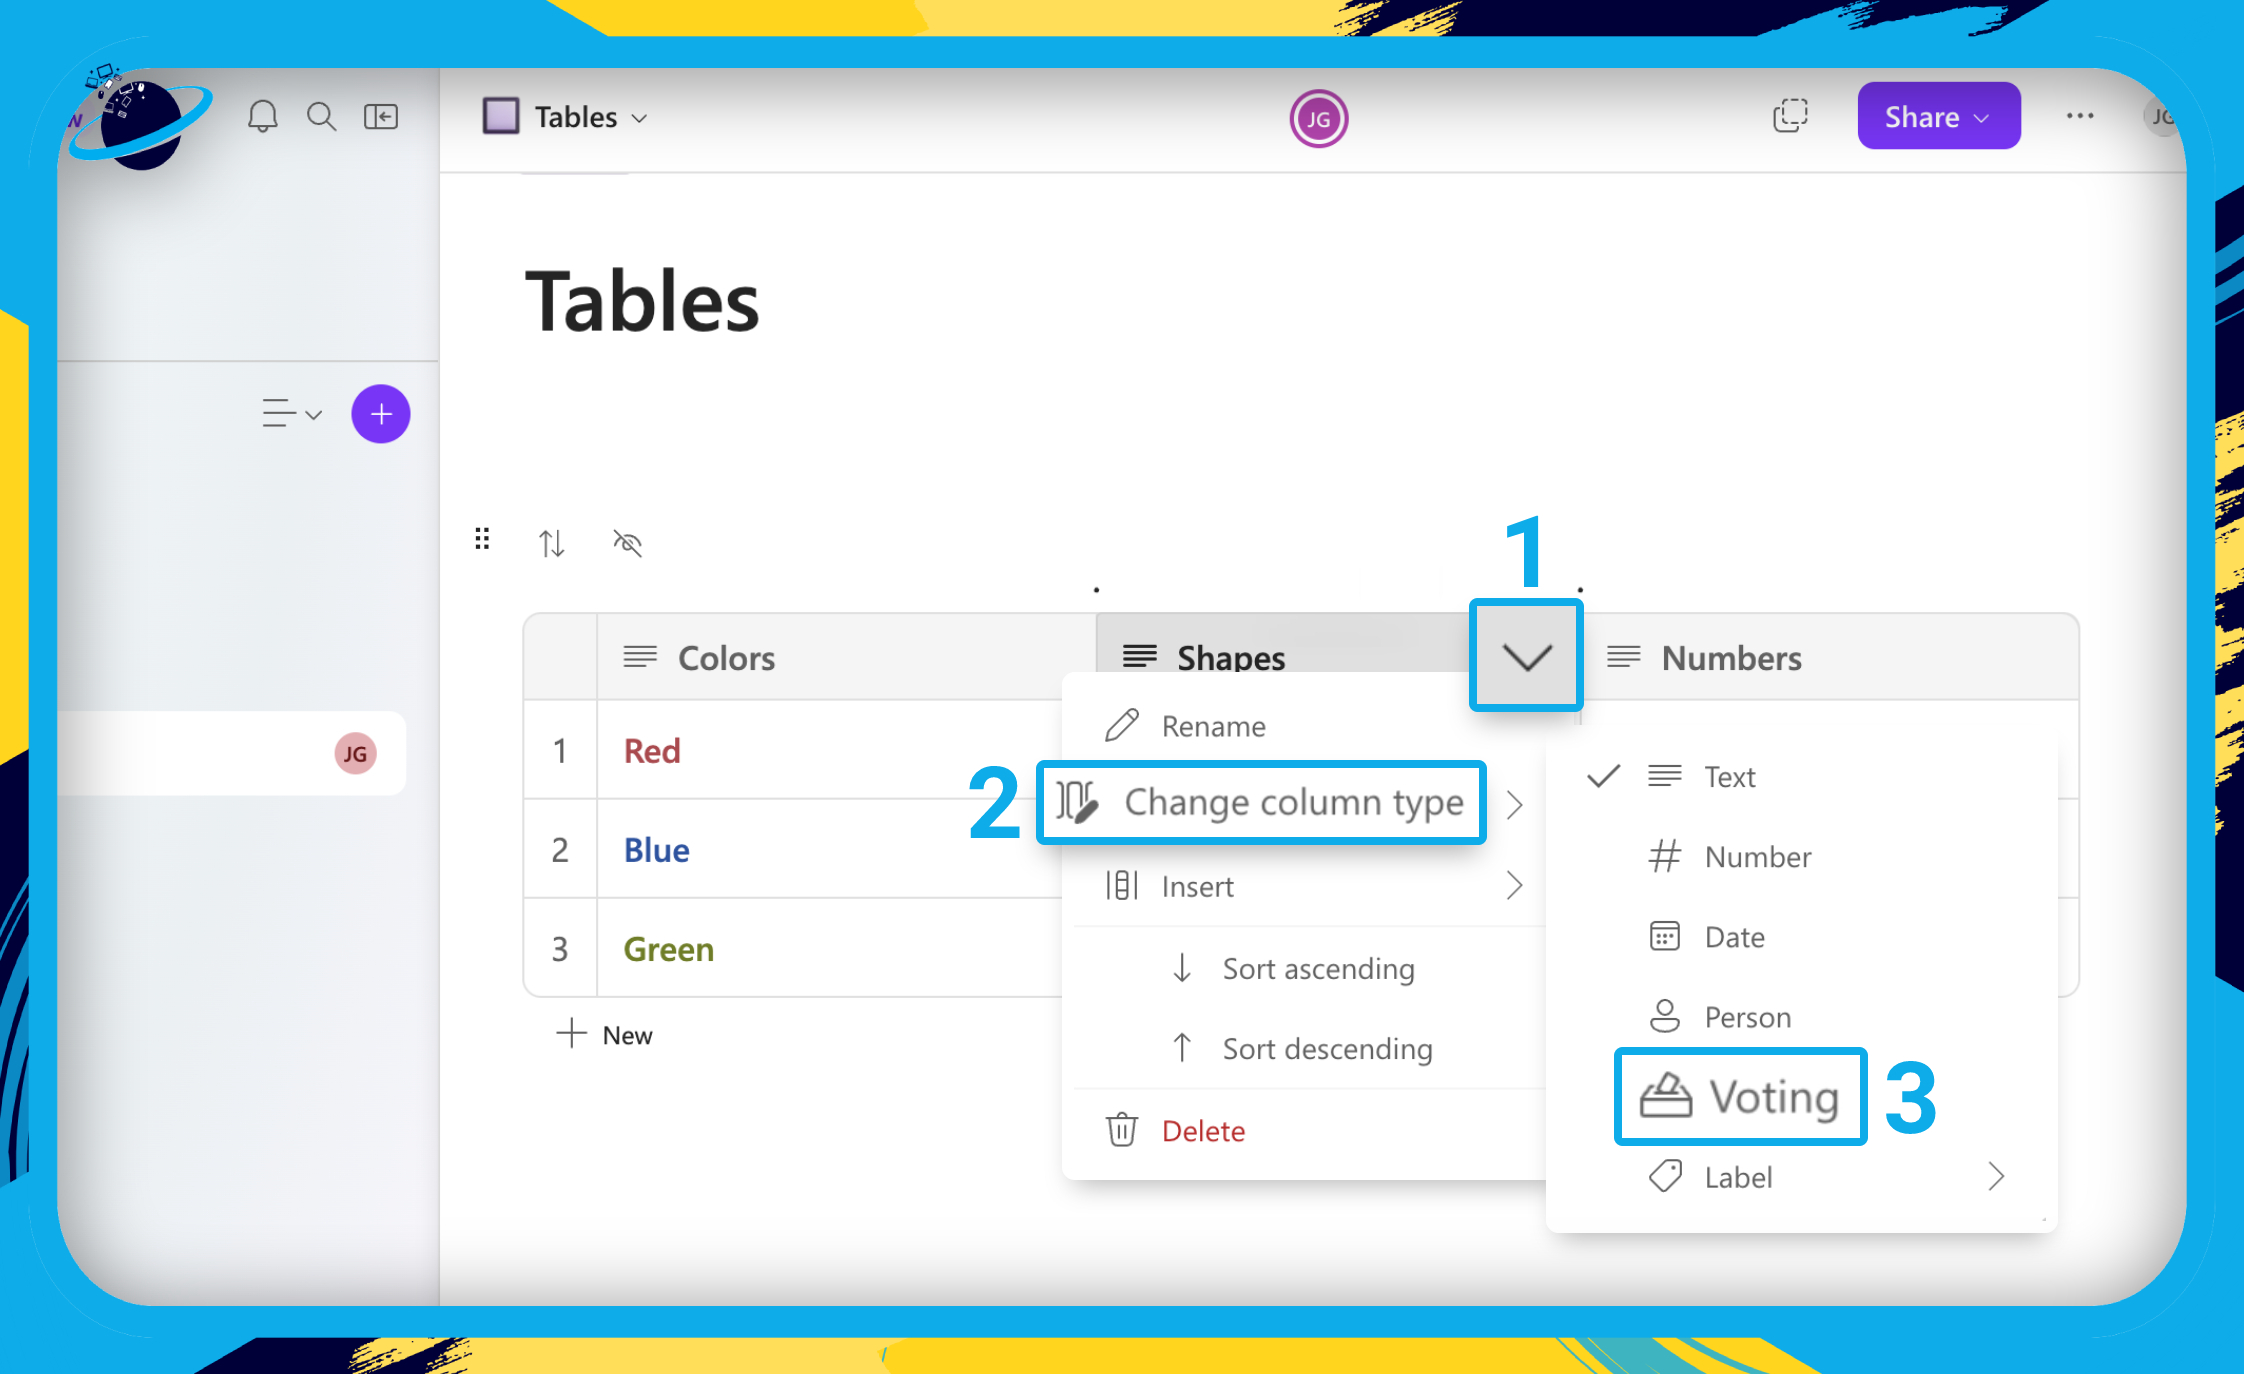
- To add a voting column to any table, click the down-arrow in the column header. [1]
- Head to “Change column type” in the dropdown. [2]
- Then select “Voting.” [3]
A good idea is to sort the voting table by the number of votes. To do that, click the ![]() sort icon in the top left and
sort icon in the top left and ![]() “Add a sort.” Then choose “Votes” and “Descending.”
“Add a sort.” Then choose “Votes” and “Descending.”
Progress Trackers in Microsoft Loop
In this section, we’ll show you how to build a progress tracker.
Like voting tables, progress trackers are essentially modified tables. They come with columns to add project owners, progress, due dates, and “blockers,” which is a checklist of items to be completed before the project is complete.
- To build a progress tracker, type “/progress” [1] then select “Progress tracker.” [2]
- You can also hit ⏎ Enter or ⏎ Return on the keyboard to select Progress tracker.
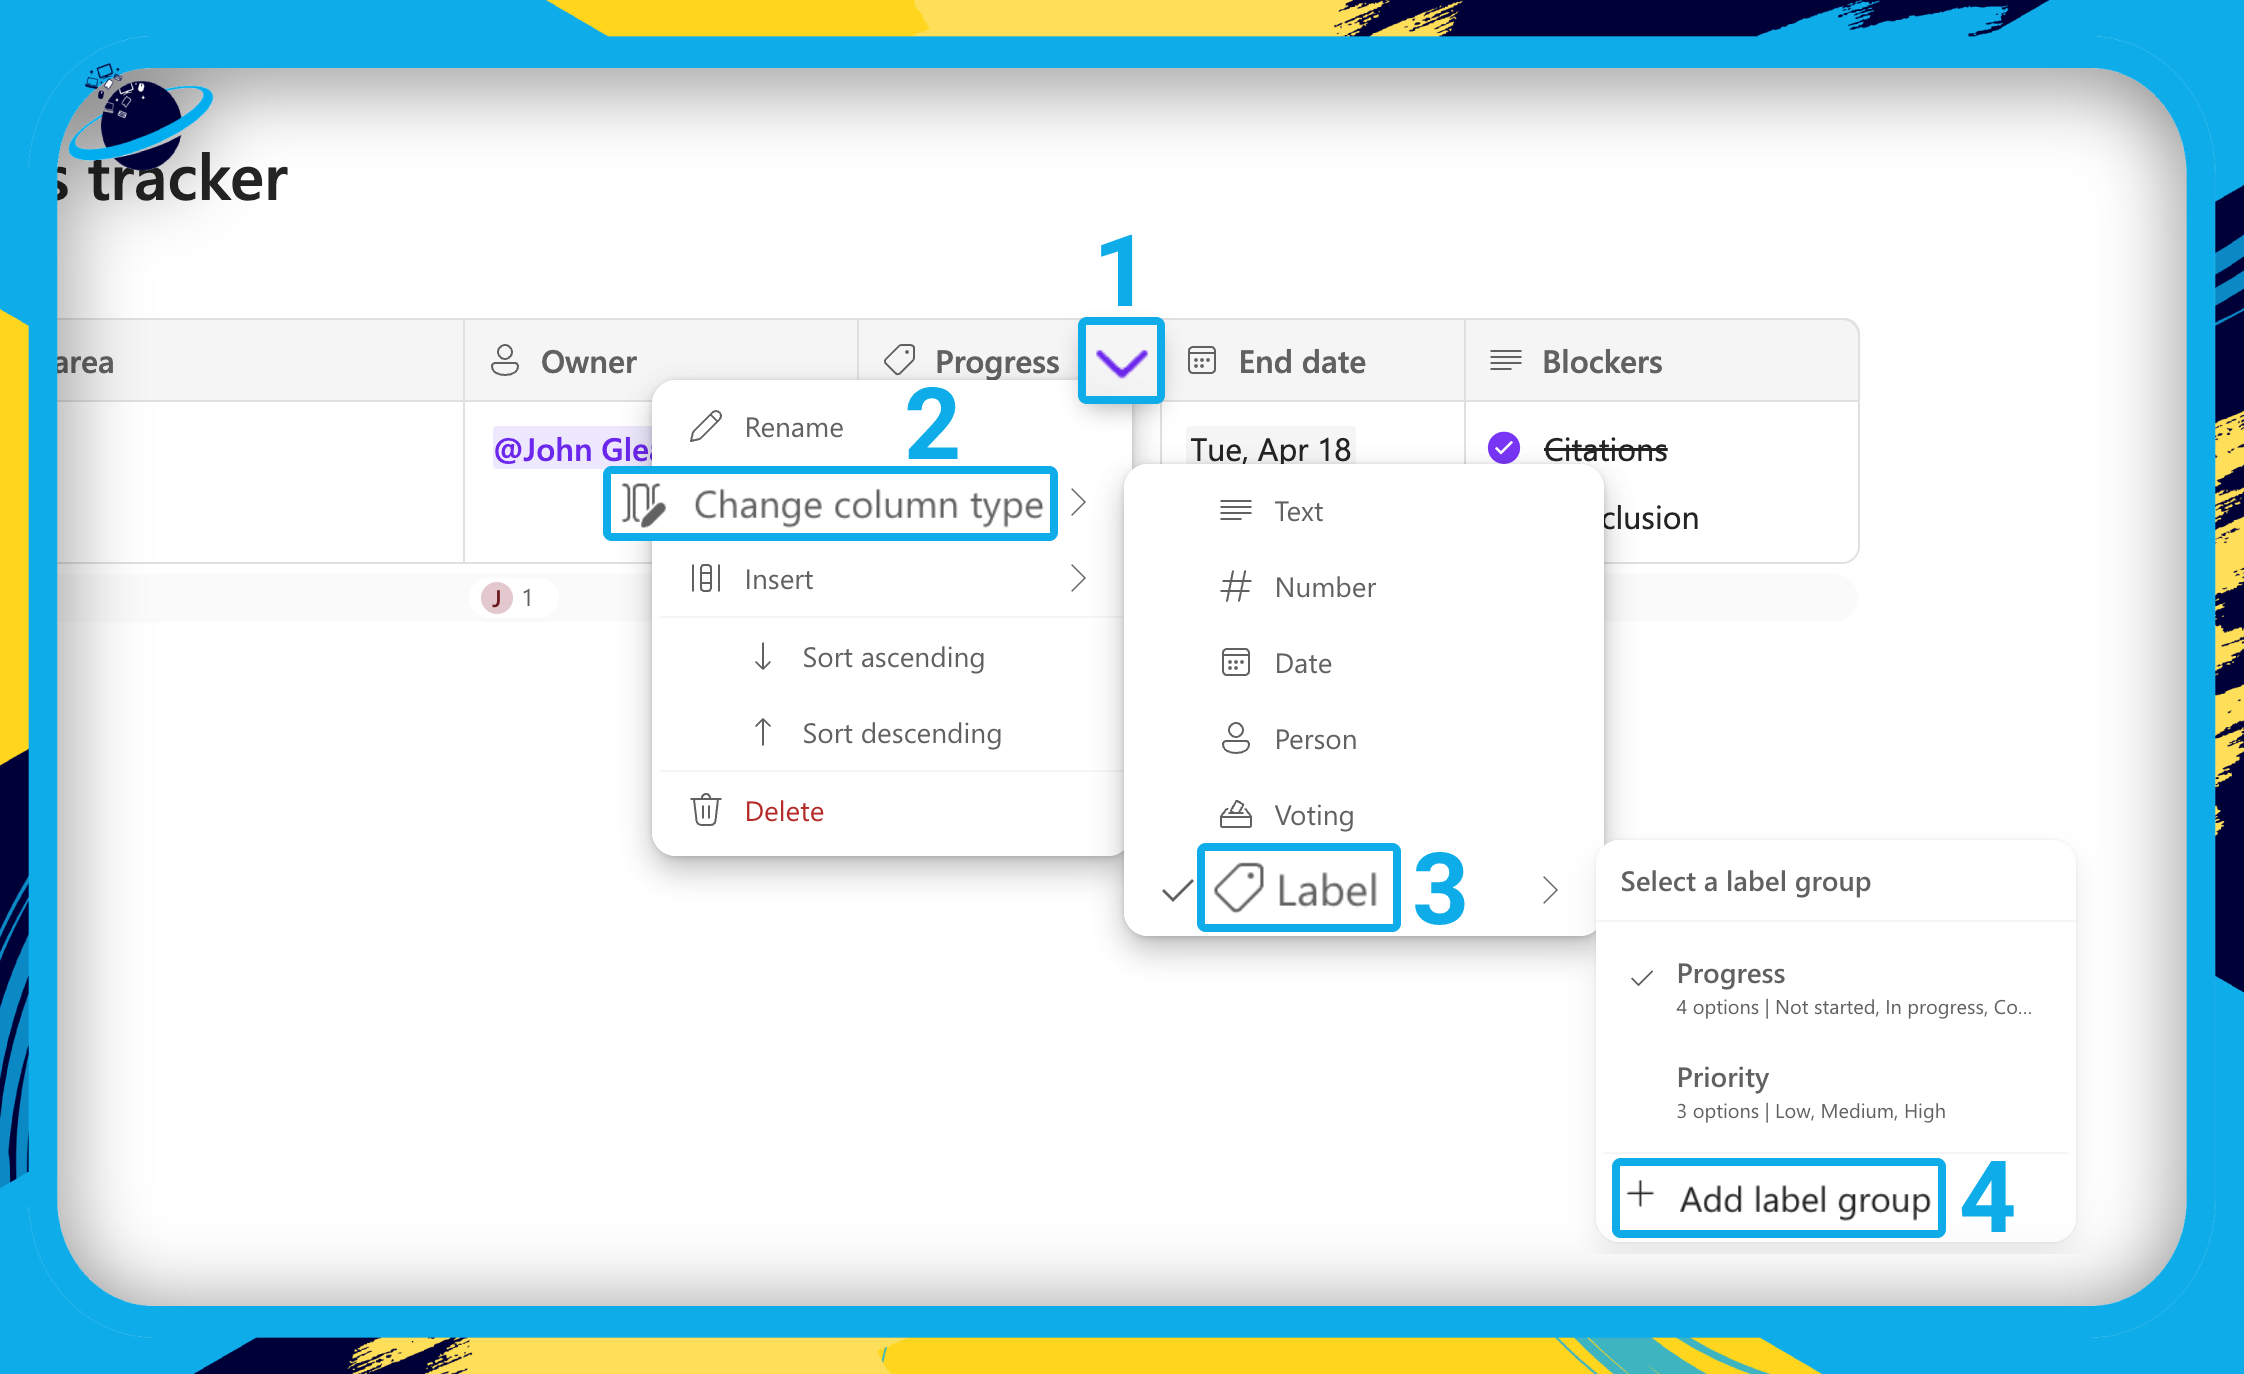
If you want to offer more progress information, you could add additional text columns or add a custom progress status, such as percentages.
- To do that, click the down arrow in the “Progress” column header. [1]
- Then go to “Change column type.” [2]
- Then “Label.” [3]
- And click “Add label group.” [4]
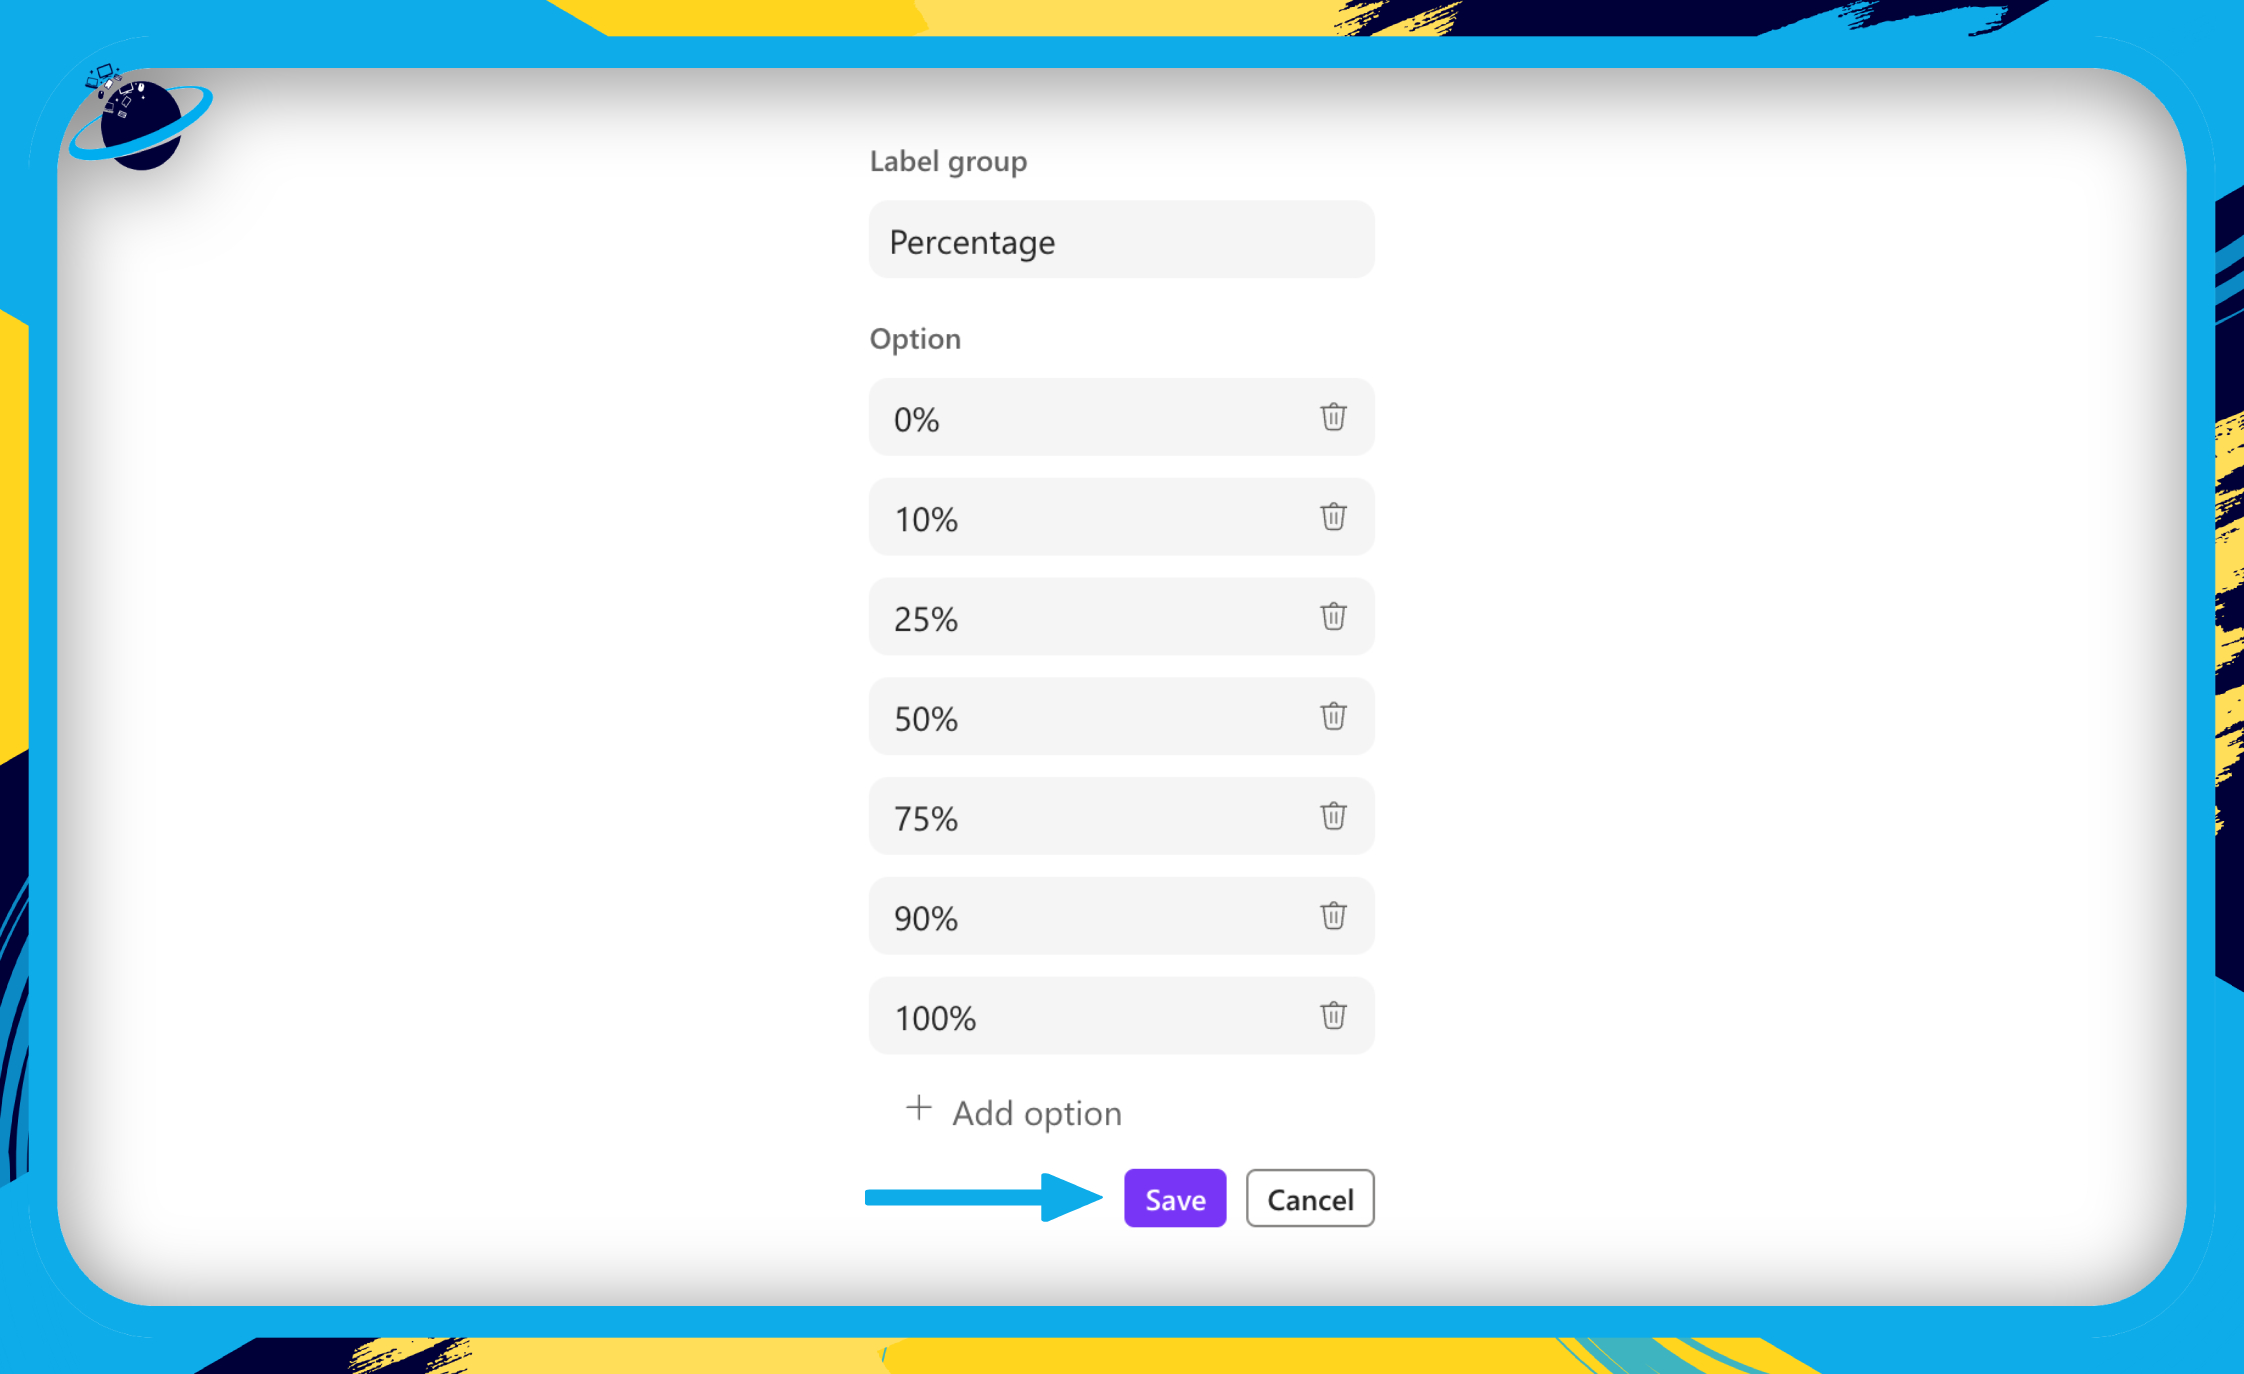
- Add your title at the top and any percentages you’d like.
- When you’re finished, hit “Save” at the bottom.
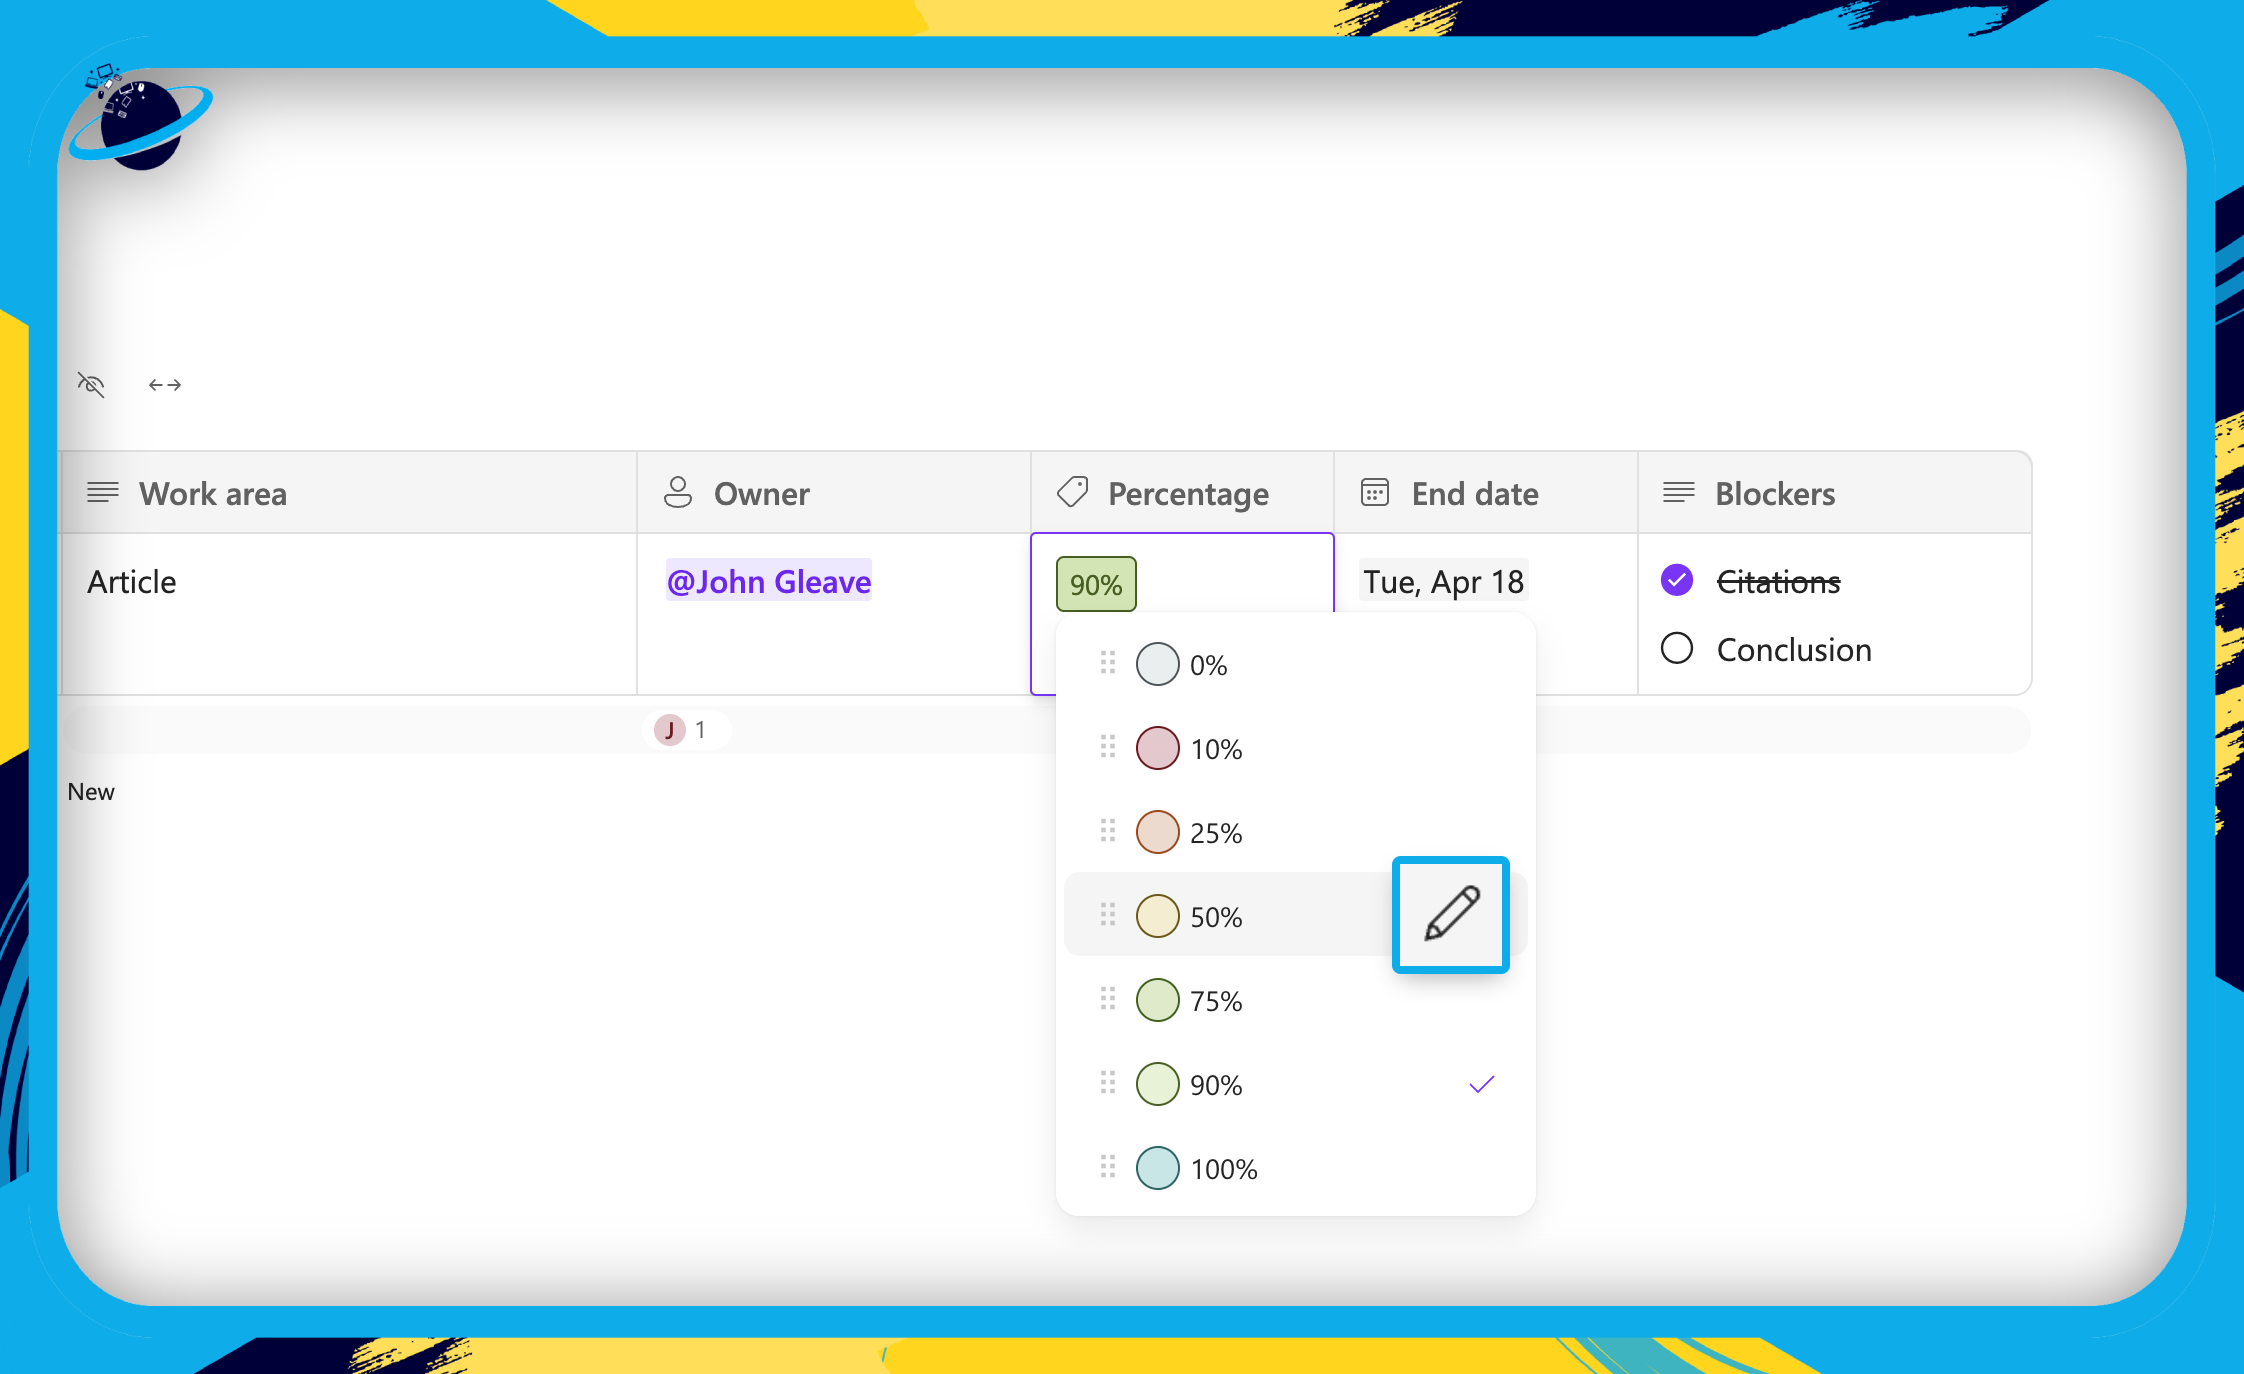
You can also color coordinate your labels by clicking the pen icon on the right and selecting from the color options.
Q&A in Microsoft Loop
In this section, we’ll show you how to use a Q&A template.
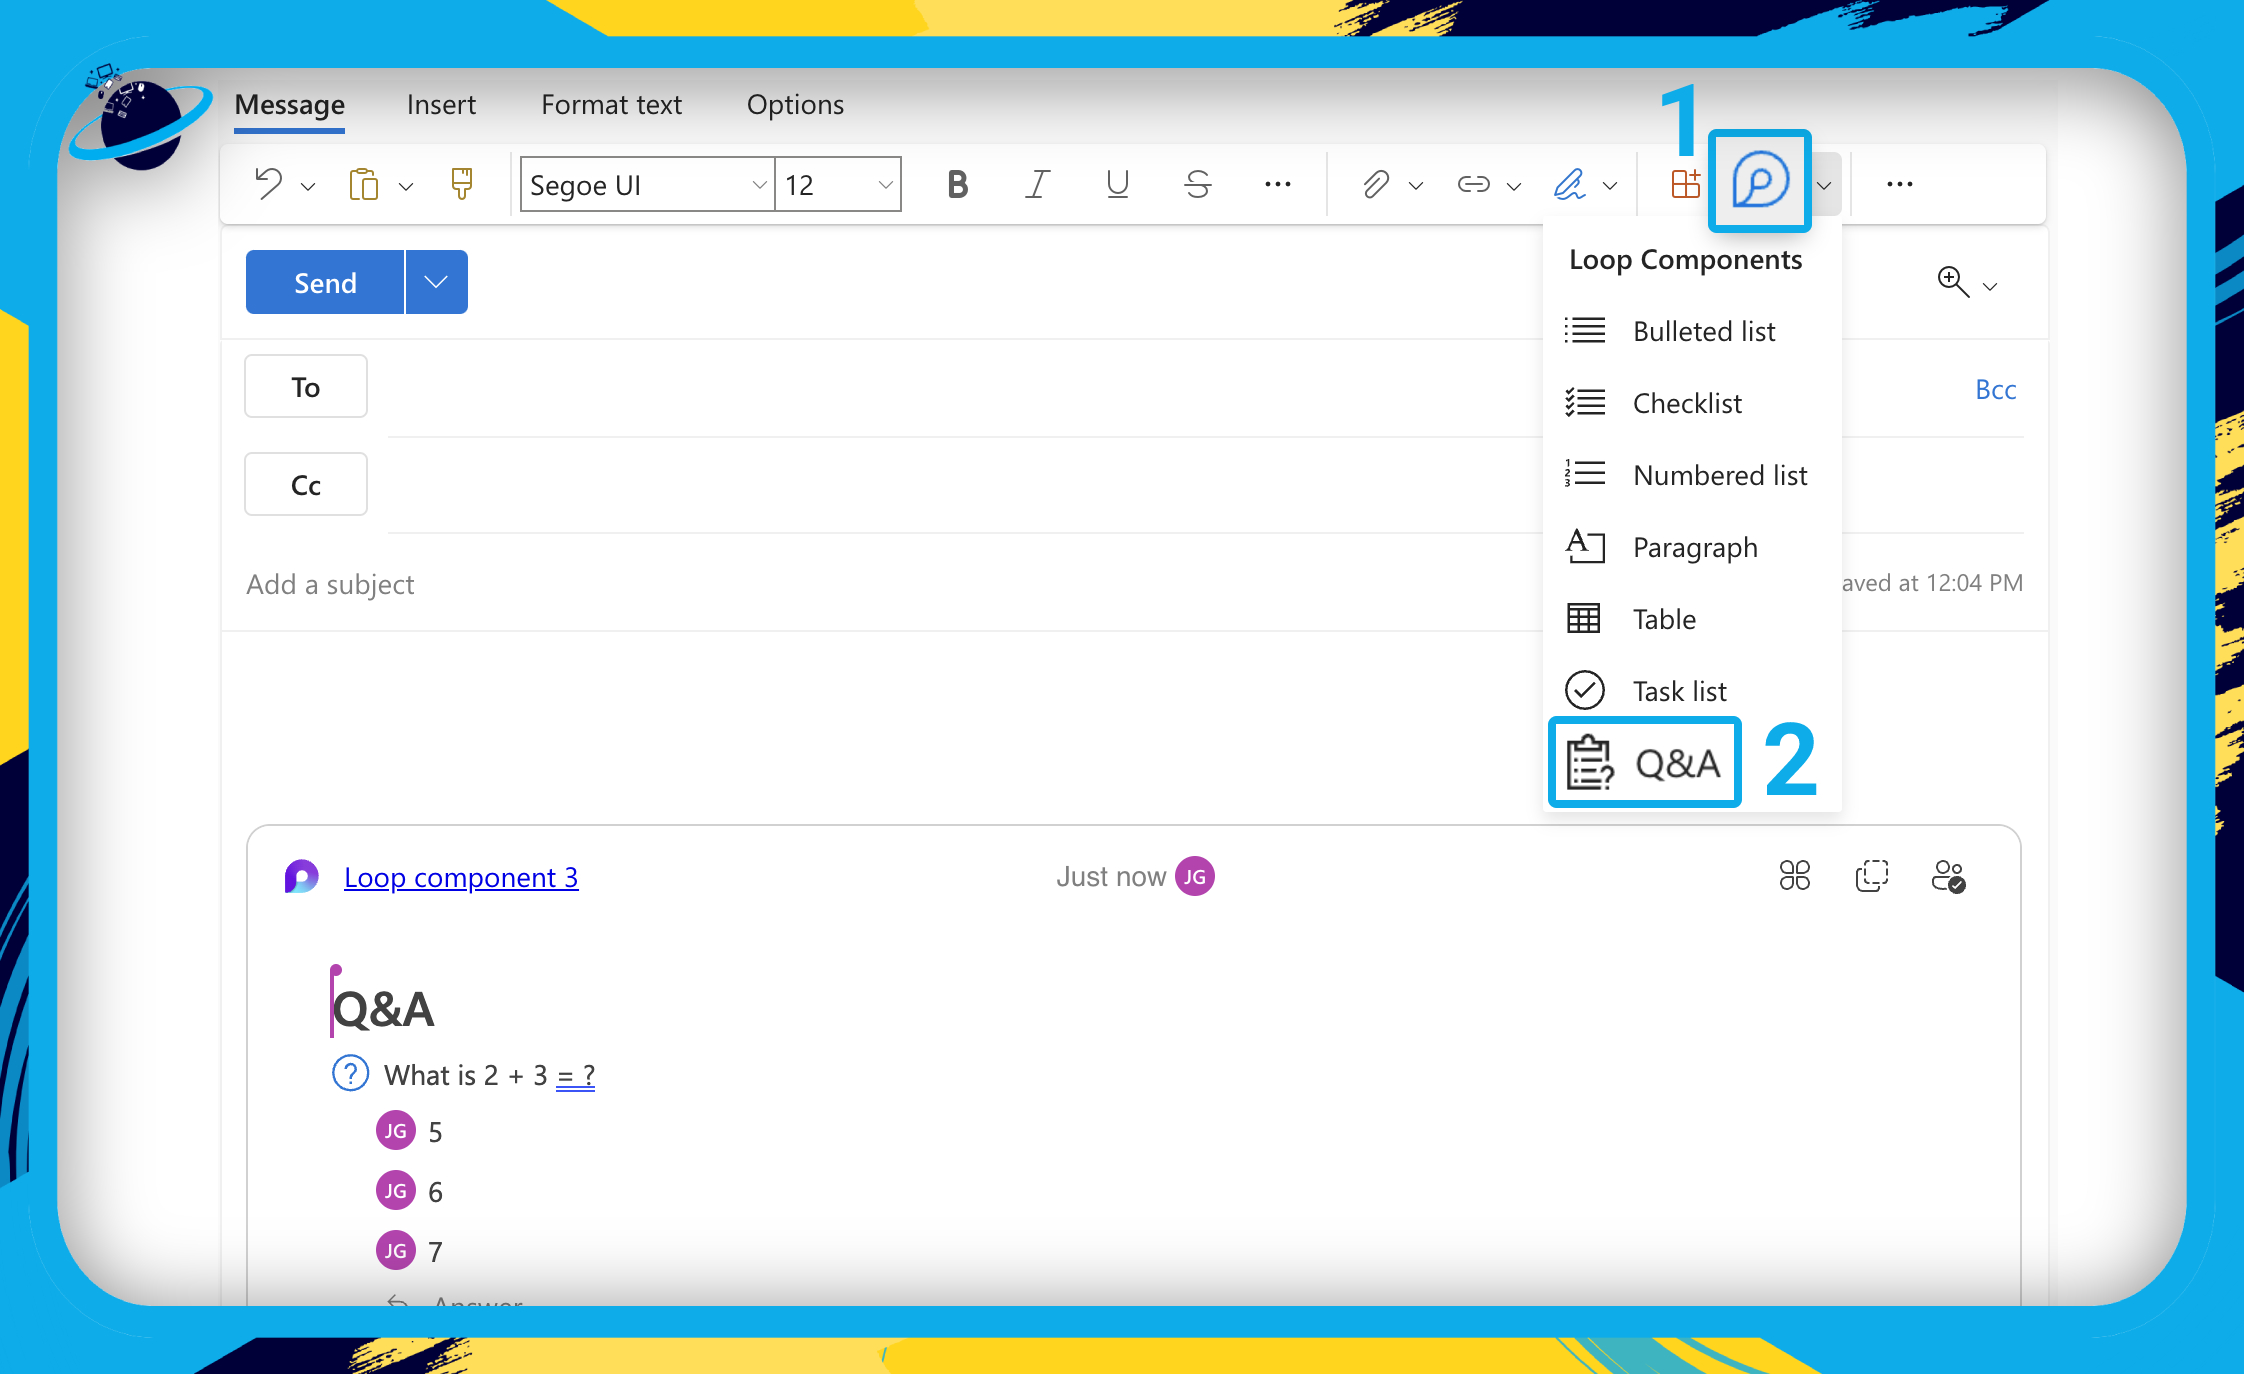
Q&A templates and components are not currently available in Microsoft Loop. However, you can create a Q&A component in Outlook while writing a new mail.
- Create a new mail in
 Outlook and click the message section, then the
  Loop icon. [1]
 - Select
 “Q&A” from the dropdown. [2]
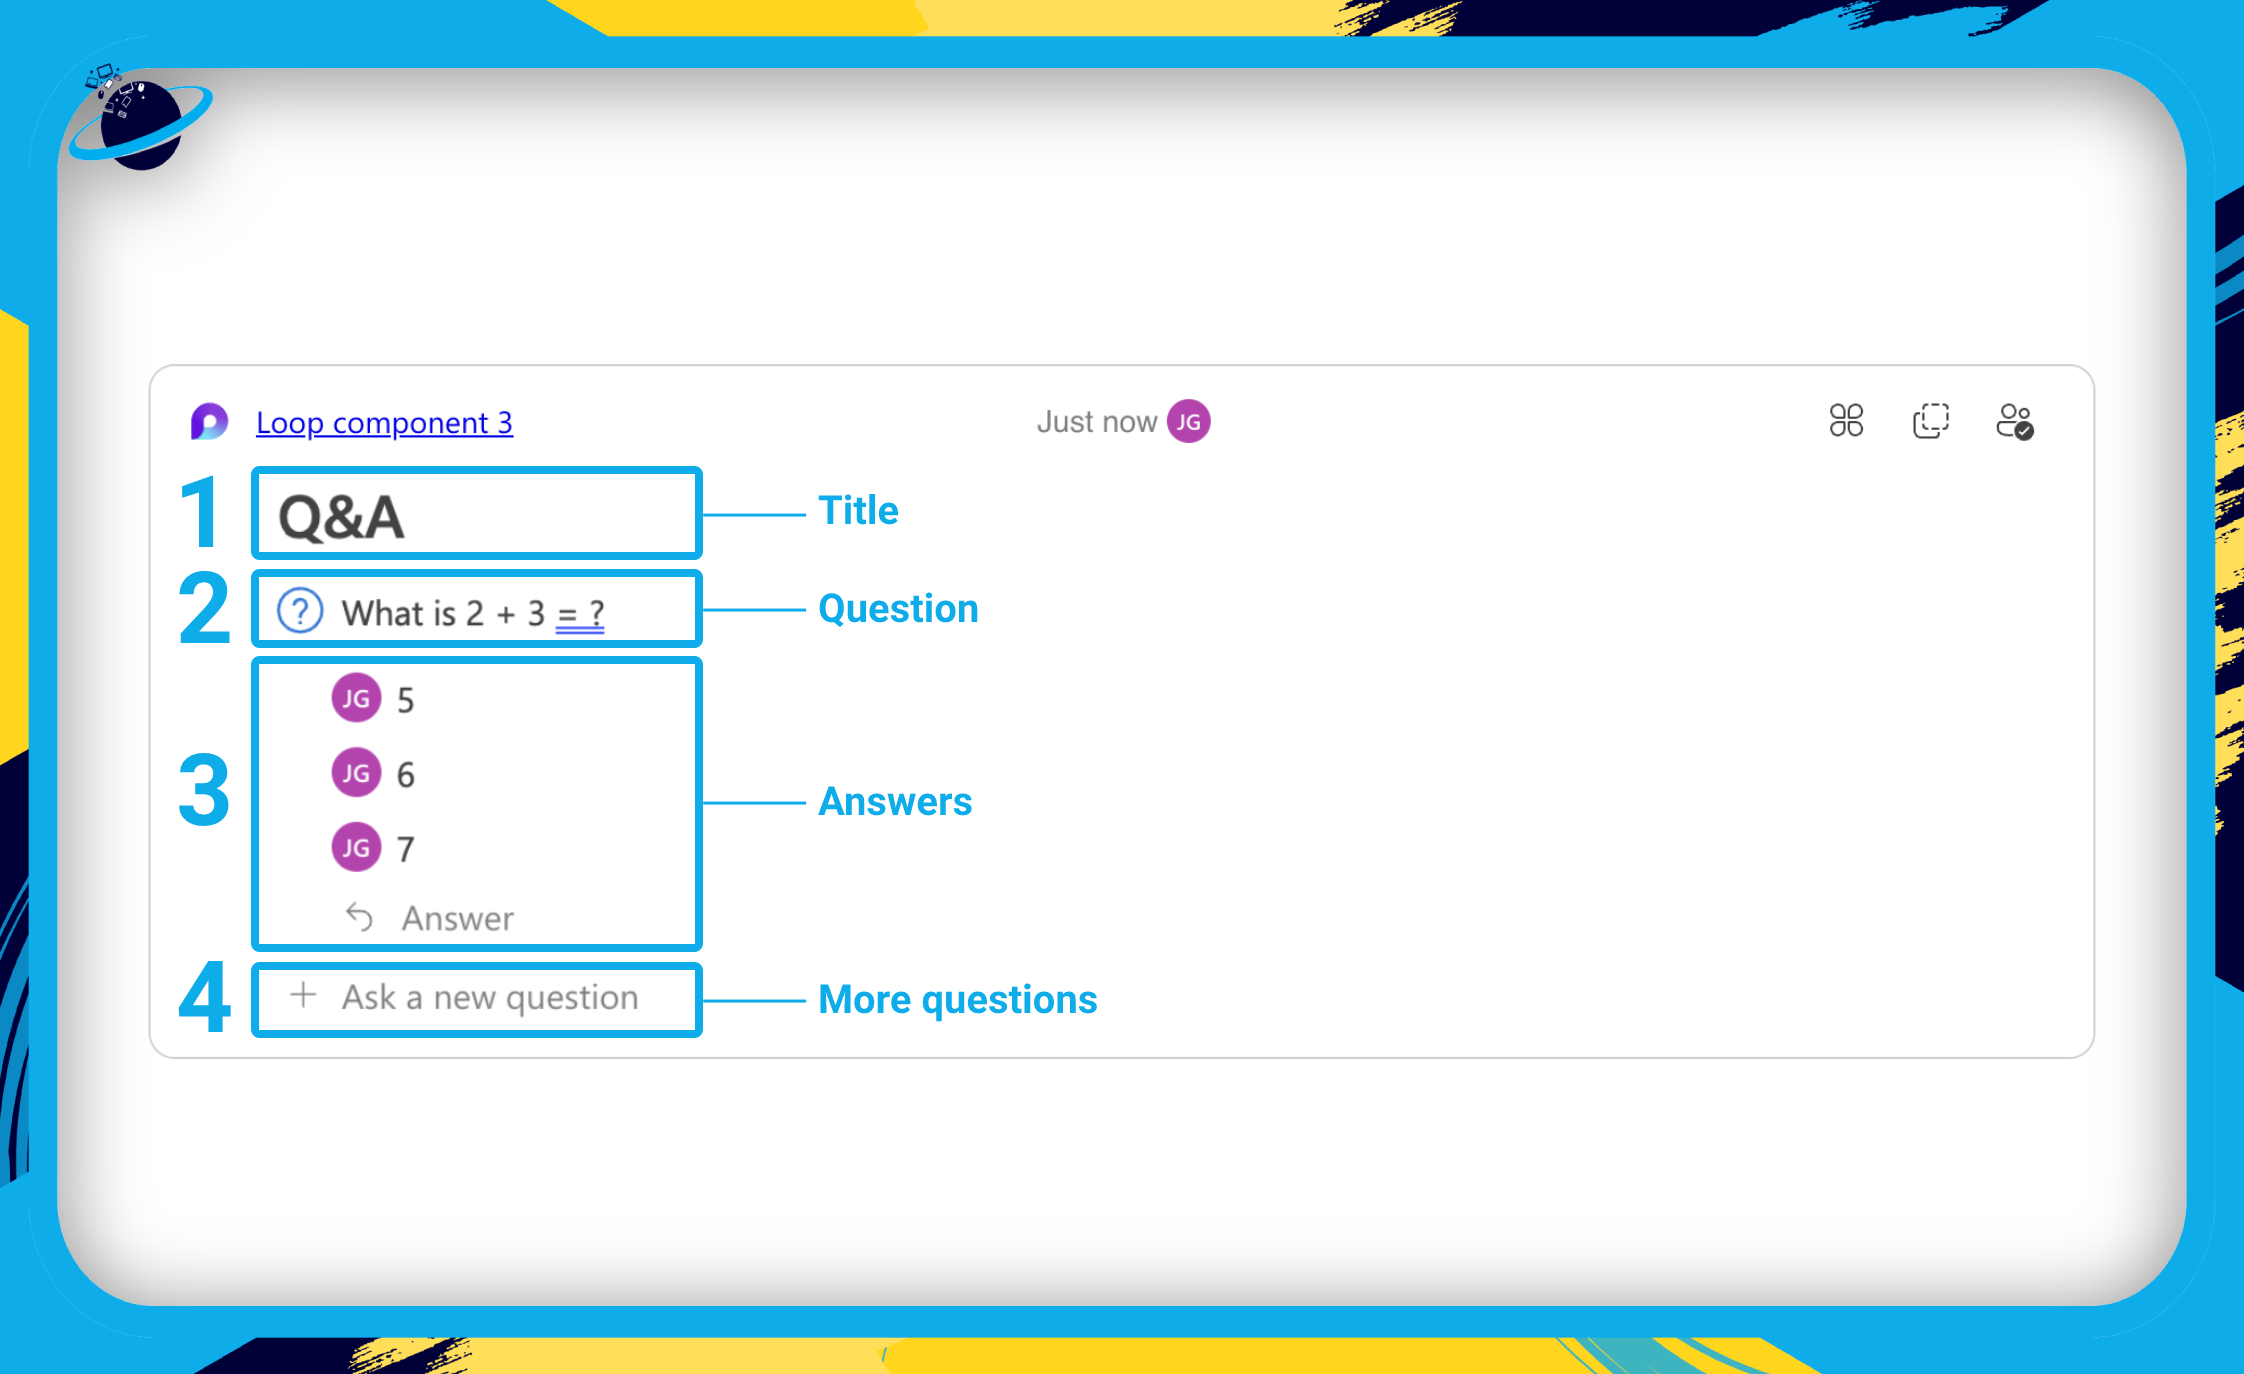
- Add a title for your questions. [1]
- Add a question. [2]
- Add answers and click
 “Answer” to add more answers. [3]
 - Click “Ask a new question” to add more questions. [4]
When you’re finished, you can send the mail to a recipient, or you can copy the link the component and share it. If you want to work on a Q&A template in Microsoft Loop, you need to paste the component link into your Loop page.
Frequently Asked Questions (FAQ)
 What do Loop components do in Microsoft Teams?
When you share a Loop component in a Microsoft Teams chat, all members of the chat with access to the component can edit the elements in real-time.
What are Loop components in Outlook?
In Outlook, you can paste a link to your Loop component into the message section of a new mail. You can also click the ![]() Loop icon at the top of the new mail to start building components in Outlook.
Loop icon at the top of the new mail to start building components in Outlook.

 Conclusion
Loop components are sharable, editable blocks, such as tables, lists, and images. You can share these components across a range of Microsoft 365 applications, which is currently limited to Teams, Outlook, Whiteboard, and Word for the web.
The best aspect of Loop components, aside from the ability to share individual elements of a page, is that you can work on the components as a team in real-time. The updates are almost instant, and it creates a powerful and unique collaborative experience.
Thanks for reading!