While you may have considered using Excel to manipulate data for your business, you may not have previously considered using Excel to calculate employee hours. Or as an employee, plan new hours.
Solution:
- Set aside three cells
- Input your start time into the first cell with the type Time
- Input your finish time into the second cell with the type Time
- Use =({start cell}-{finish cell})*24 in the third cell with the type Number
Within this post you’ll learn to calculate your total hours worked using your starting and finish time. To help, we’ve provided image aids within our step-by-step guide. Stick around to learn how you can calculate your (untaxed) wage too!
Buy Microsoft 365, offering an email inbox, OneDrive storage, world-class security, and the Office suite (Excel included) for as little as $6.99 per month. Use this link for the best pricing, straight from Microsoft directly.
Contents:
Calculating hours worked in Excel
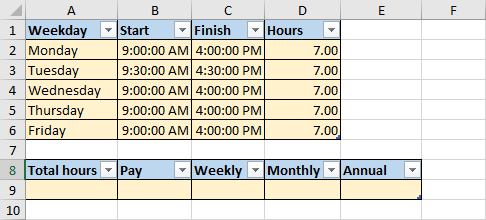
Please remember that cells containing start or finish times should be of the Time data type. On the other hand, your cells containing hours should have the Number data type.
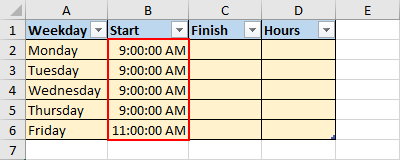
Step 1 – Input your start time
Enter your start times into your start column with the format HH:MM:SS AM/PM. For example, if you start at 9:30am you would enter 9:00:00 AM.
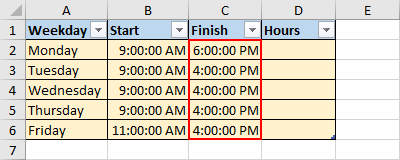
Step 2 – Input your finish time
Enter your start times into your start column with the format HH:MM:SS AM/PM. For example, if you finish at 5:30pm you would enter 5:30:00 PM.
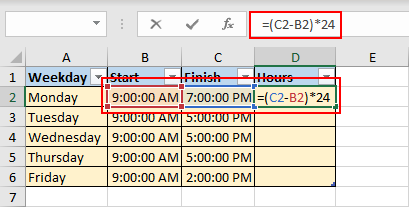
Step 3 – Input the formulae
Within your hours column enter the following formulae, ({start time cell}-{finish time cell})*24. If you’re uncertain, refer to the image below.
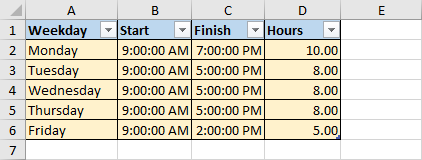
Step 4 – Review your output
Provided everything worked correctly, your output should look similar to ours. If anything isn’t right, ensure each cell has the correct data type and that the formulae was input correctly.

Calculating untaxed wage in Excel
Step 1 – Setting up your table
Prepare a table with the following columns in order: Total hours, Pay, Weekly, Monthly, Annual. As you can see below, we’ve done the same.
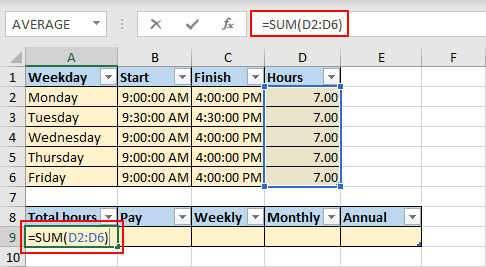
Step 2 – Calculating your total hours
Use the sum function and input your the start of your hours column, followed by a colon with the end of the column after it. If this is unclear, consult the image below for further clarity.
Step 3 – Calculating weekly pay
First enter your hourly pay into the Pay column, followed by a formulae in the Weekly column. The formulae is as follows: ={pay}*{total hours}. In our case that would be =B9*A9. This is demonstrated below.

Step 4 – Calculating monthly pay
Use the following in your Monthly column: ={weekly}*{4.28}. In our case that would be =C9*4.28. This is demonstrated below.

Step 5 – Calculating annual pay
Use the following in your Annual column: ={monthly}*{12}. In our case that would be =D9*12. This is demonstrated below.

End note
Buy Microsoft 365, offering an email inbox, OneDrive storage, world-class security, and the Office suite (Excel included) for as little as $6.99 per month. Use this link for the best pricing, straight from Microsoft directly.
Recap
Excels basic calculation functions can be utilised to display your working hours. This information can be combined with your hourly ray to quickly generate a dynamic table presenting your earnings.
Farewell
As usual, this section is dedicated to thanking readers for their support. We’d be pleased to know you found this post useful and/or informative. If you have any more Office 365 related queries, please consult our related articles (listed below). However, if you have other queries, consider looking at the rest of the site. We’re frequently posting new stuff each week and may just have the guide or troubleshooting tips you need. Regardless, we wish you a good day/night. Farewell readers.
Our related articles:
- Excel won’t allow insert row: Troubleshooting guide – Microsoft Excel offers tables as a means to structure our data and accelerate the process of adding additional data. Unfortunately, this does not always operate correctly- sometimes in such a way that we can’t find a cause. That much is true for your newfound inability to insert new rows (or perhaps even columns) to your tables. If you are looking for a guide on preventing row insertion failures, then this post is ideal. Here we will be providing a step-by-step guide with pictures for two solutions to this problem.
- Excel: How to get day of week from date – If you’re working on scheduling or tracking data involving dates, you might want to include the day. Of course, that doesn’t sound particularly straightforward- at least not initially. Fortunately, it’s really quite simple. In this post we will be walking you through getting the day of week from a date in Excel. We hope you find this step-by-step guide useful.
- Can’t click into cells in Excel: Troubleshooting tips – Microsoft Excel is powered by cells. Cells store values, functions and formulae we use within Excel. Due to this, a failure in their operation is detrimental to your experience with Excel. To make matters worse, this issue has more than once cause. Despite this, you needn’t worry, for we’ve means to resolve the issues you may be facing. In this post we’ll be guiding you on each of the solutions to each of the aforementioned problems- in which you may find yourself unable to click your cells. Each guide will provide additional assistance to readers via images at the end of each step. If you’re ready, follow along and let’s get started.
- Excel isn’t returning the sum of cells: Troubleshooting guide – Calculation play a large part in may Excel user’s worksheets. Despite this, they are not excused from behaving unexpectadely. The SUM function in particular can be quite problematic — having multiple means to cease functioning correctly. In this post, we’ll be instructing you how to go about fixing each of the causes for SUM to operate incorrectly. First off, resolving a potential calculation configuration mistake, second updating a cell’s content type, and lastly, changing the Windows display language.