Both Word and OneNote allow users to edit and format text; however, only Word is considered the text editor of the Office suite. OneNote prioritizes note-taking, not writing. In contrast, Word enables users to produce short and long-form content alike — with extensive formatting! Despite this, Word undermines basic formatting options such as colored text with automated decision making; thus, ruining a superb user experience.
Solution:
- Open the template of your choice
- Enter the home tab
- Open the font settings window
- Select a font color from the font colors dropdown
- Click set as default
- Pick the most suitable option
- Click OK
We’ve also created a YouTube video that walks you through changing the default text color in Word. Give it a watch here:
This post instructs you on preventing Word from altering your desired text color; it’s intended to be as comprehensive and straightforward as possible — so anyone can use it. The method involves setting a default text color for your template; this way, when Word intends to recolor your text, it will select the color you intended. Once ready, follow along.
Contents:
Guide | Establishing a default text color in Word
Step 1 – Open the template you often use
You must open the template you most often use by left-clicking it- twice in rapid succession. If you repeatedly switch between templates, you may want to consider repeating the process on each template; there is no other way.

Step 2 – Open the font settings window
Begin by clicking the “Home” tab from the upper ribbon to open it; from there, we may access the font settings window. We can achieve this by clicking the dropdown icon at the bottom of the “Font” category.

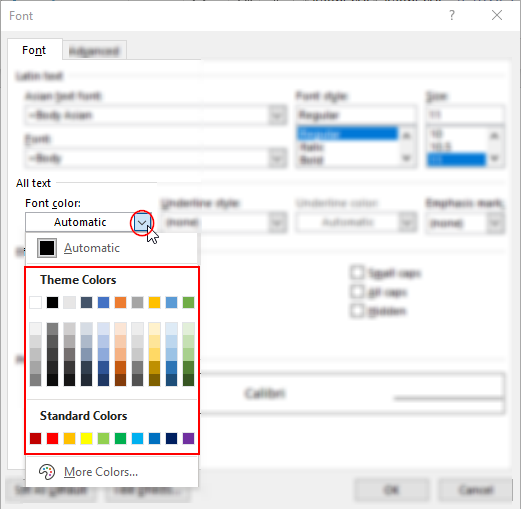
Step 3 – Pick a default color
The font color selection box has a dropdown button attached at the end. You can click on it to reveal a series of colors. Now, please choose your preferred color from the selection; this will be your default text color.
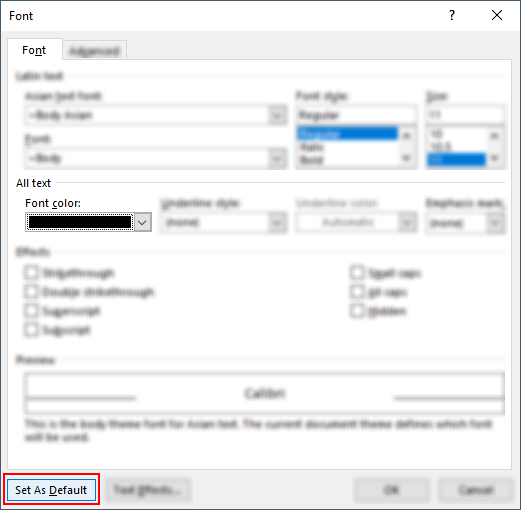
Step 4 – Open the default settings
You can find a button labeled “Set As Default” at the bottom of the window; you should click it to continue.
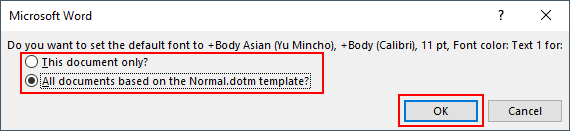
Step 5 – Choose the most suitable option
In the following window, you have been shown two options:
- Select the first option if you’d like to apply your changes to current document exclusively.
- Select the second option if you wish to apply your settings to all documents with the same template.

Endnote | Recap & Farewell
Recap
When writing, your formatting settings can suddenly change. This issue results from an automated choice made by Word, using your default settings. Thus, we resolve this issue by altering our default settings to align with our preferences.
Farewell
As usual, offering thanks to our readers for their support is the intention of our closing section. We’d be pleased to know you found this post helpful and informative. If you have any more Office 365 related queries, please consult our related articles (listed below). However, if you have other questions, consider looking at the rest of the site. We frequently post new stuff each week and may have the guide or troubleshooting tips you need. Regardless, we wish you a good day/night- farewell, readers.
Our related articles:
- How to unsync SharePoint folder from desktop – When a user uses the OneDrive sync client to synchronize a SharePoint Document library, the whole library of files and folders is transferred to the user’s PC. It is not, however, simply replicated. Between the user’s PC and SharePoint, a two-way relationship is formed. Any changes in one location are immediately reflected in the other. This is unwanted behavior if you intend to merely copy. As such we’ll be showing you how to unsync SharePoint.
- A guide to checking the size of a folder in SharePoint – SharePoint sites contain a lot of data. All of which takes up space. Due to this, the importance of tracking folder storage consumption is high. Despite this, not many know how to check a folder’s size. This post aims to change that.
- SharePoint: can’t add site members: Causes and fixes – SharePoint servers as a collaborative document manager. As such, the collaboration-based functionality is about as important as the management functionality. Despite that, SharePoint may on occasion run into issues adding site members- in this blog we’ll be running through some causes and discussing fixes.
- What is the simplest way to transfer files from Google Suite to SharePoint? – If you’ve decided on switching from the Google Suite to the Office 365 Suite, you may be a little baffled as to how to go about it. Fortunately for you, we’ve got a better method than re-downloading and uploading everything one-by-one. Have a read to find out more.