More and more people are realizing Microsoft OneDrive provides much more than additional space for files. In fact, OneDrive offers several additional functions. One such feature would be file-sharing. File or folder sharing allows us to access a colleague or friend’s documents without expending our own cloud space.
I have provided a short guide on how you can create a shared folder in OneDrive. You can find my guide below.
- Select your OneDrive icon
- Click Open folder
- Hit
Ctrl+Shift+N - Name the folder
- Right-click the folder
- Select Share
- Copy the link
- Distribute the link
I’m aware the guide above is brief. If you need further support, I recommend checking out the in-depth, step-by-step guides below. I have covered the above steps in extensive detail— this includes the addition of screenshots. Below, you will find a desktop and browser method.
The following links will allow you to access relevant content quickly:
- How to share a OneDrive folder in Windows
- How to share a OneDrive folder in OneDrive (online)
- Blog post recap
How to share a OneDrive folder in Windows
If you prefer to use OneDrive on your desktop, you’ll be glad to hear it supports native file-sharing. In short, you won’t need to worry about opening up Office in your browser.
You may not be able to complete this guide if you’re using a device running macOS.
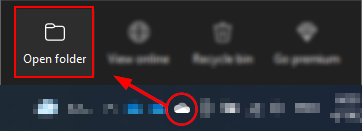
Step 1 — Open your OneDrive folder
We’re now ready to begin the process. Look for your OneDrive account’s icon. If you have a business account, the icon should resemble a blue cloud; personal accounts use a white cloud. After clicking the OneDrive icon, select “Open folder” via the OneDrive application menu.
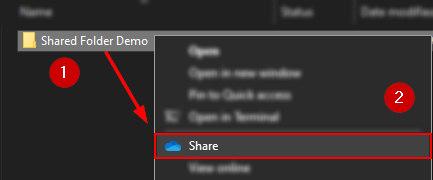
Step 2— Create a new folder
Before we can share a folder, we must create it. On Windows, you can use the Ctrl+Shift+N shortcut to generate a new folder. In the example below, I have named the folder “Shared Folder Demo.”

Step 3 — Select the folder’s share option
After creating your folder, right-click it to reveal a context menu. Select the “Share” option in the context menu— this is prefixed with a blue OneDrive icon.
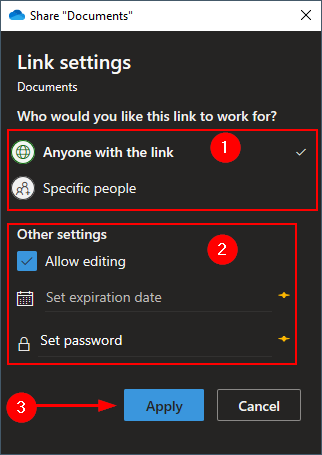
Step 4 — Configure your link
In the resulting window, you will have the opportunity to configure how you’d like to share your content. In the section marked “1,” you can control who may use your link. Selecting “Anyone with the link” will make your folder accessible to anyone who uses your link— regardless of their association with your organization. In contrast, selecting “Specific people” will ensure the link only works for users you specify. In the section marked “2,” you can enable or disable user editing. You will allow those with the link to change your folder’s contents by enabling user editing.
Free users cannot do the following:
- Set an expiration date
- The data will be inaccessible when the expiration date is met
- Set a password
- The data requires the use of a password to be accessed
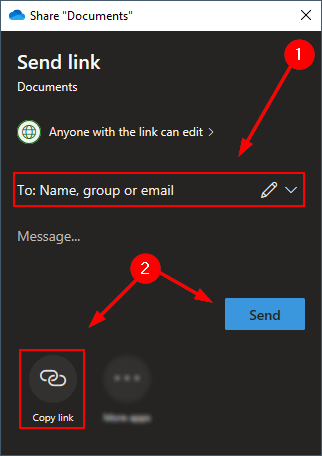
Step 5 — Distribute your link
Although you’ve configured your link, you’ve yet to distribute it. Albeit, you ought to consider how you’ll manage that. In the area marked 1, you can specify users or groups you’d like to send the link to. However, you can also copy your link via the share icon in the bottom left.
Step 6 — (Optionally) manually distribute your link
Paste the copied link where you see fit.
You can skip this step if you did not specify specific recipients for your link

How to share a OneDrive folder in OneDrive (online)
If you have not installed OneDrive locally, you will need to use OneDrive online to access and share your OneDrive documents.
The following guide can be applied by Windows and macOS users alike.
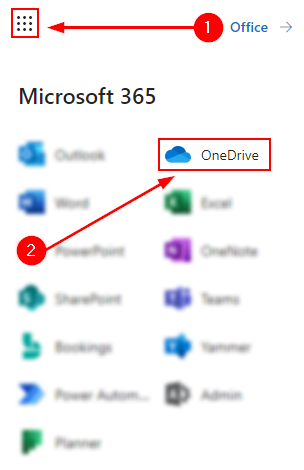
Step 1 — Open OneDrive via the app launcher
To start, open Office on your desktop or within your browser. You will find the app launcher on the top left of the Microsoft 365 homepage; the icon is best described as an assortment of dots resembling a square.
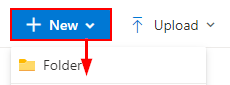
Step 2— Create a folder
Under “New,” select Folder.” You will need to specify a name for your folder— you will not be able to proceed until you have done so. Although nothing stops you from using a foolish name, it’s generally disadvised.
Step 3 — Initiate the sharing process
Hover over your folder in the file space. You should notice a share icon appear; you need to click it— this will produce a pop-out menu.

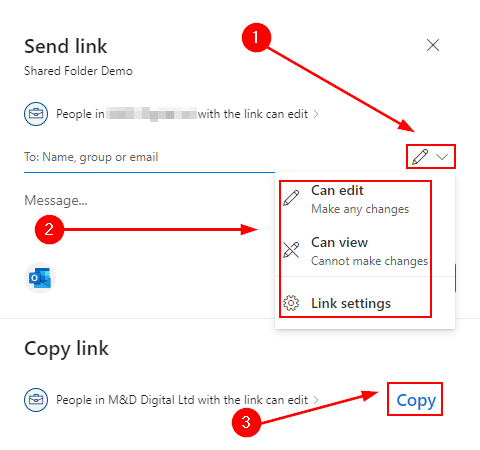
Step 4 — Configure your link
You can configure a OneDrive link in several ways:
- Link usability
- Anyone: No affiliation with the sender or their organization is required to use the link
- Specific people: Only users you explicitly specify can use your link
- Only people inside my organization: Only members of your organization may use your link
- Permissions
- Can view: Users can see what’s in the folder; they cannot change what’s in the folder
- Can edit: Users can see and change what’s in the folder
Although we can specify who we’d like to send our link to (via email), we can also utilize the copy function. The copy function allows us to distribute our link in third-party applications manually.
Blog post recap
OneDrive allows its users to share their folders with one another. When you share a OneDrive folder, your recipient may access its content without expending their own cloud storage. The saved space is helpful within growing organizations where several team members may require access to the same documents. You can share a folder via the OneDrive desktop application; however, you can also share a folder via OneDrive in your browser. Although you can limit recipients to exclusively viewing your folder or restrict the extent to which anyone can view your folder, OneDrive offers several paid functions intended to protect your documents better.
If you found this post helpful, you may be interested in the following related posts: