Microsoft Teams allows you to record meetings so absentees can catch up at any time. The app will automatically save the record in your organization’s shared OneDrive libraries and SharePoint sites. But finding the exact location of the recorded meeting may require a detailed explanation, which you’ll find later in this article.
You can find your recorded Teams meetings within your OneDrive shared library/SharePoint site. To find them, go to “Documents -> General -> Recordings.” You will find a file with the same name as your meeting’s title, date, and time. If you haven’t recorded a meeting yet, use the instructions below.
- Launch the Microsoft Teams client
- Start a meeting
- Set up your input and output devices
- Join your meeting
- Open the options menu
- Find and select “Start recording”
- End your meeting
- Open the uploaded recording
- Close the media player
If you’ve recorded a meeting or two in the past but wish to remove or recover them, you might have wondered where they go. Or perhaps, you’ve not created your first recording yet, and you’re curious. Either way, you’ll find this post helpful. I will be covering how you can record a meeting and how you can find a recorded meeting file.
Although today’s post features a small selection of sub-topics, I understand that you might not want to read each and every one. So, I have provided several shortcuts below. Click a link to access content relevant to you quickly.
What cannot be recorded during a Teams meeting?
During a Teams meeting, you cannot record whiteboards, annotations, shared notes, or embedded videos and animations in PowerPoint Live presentations. If you try to present using a whiteboard, you will see the following message:

A workaround for this problem is to open the browser version of Whiteboard and present from there. However, support for Whiteboard is in the pipeline.

How to record a Teams meeting
If you’d like to host a digital conference, meeting, or team-catch-up with style, you’ll want to use a Teams meeting. Why? So you can record and commemorate it, of course. If you don’t know how to record a Teams meeting, you’ll find this guide to be a blast!
If you follow this guide during an actual meeting, I’d like to clarify one thing. You must inform each meeting participant that you will be recording them throughout the duration of the meeting. This precaution is because some countries prohibit their citizens from recording one another secretively. Failure to do so could land you in trouble. In short, ensure each member understands that what they say and do with their microphones and active webcams will be logged.
Step 1 — Launch Microsoft Teams
Start out by launching Microsoft Teams. You should be able to follow along via the web service or native application without issue. However, I recommend using the web service (linked here) instead. Otherwise, tap the “Start” key, type “Teams,” and hit “Enter.”
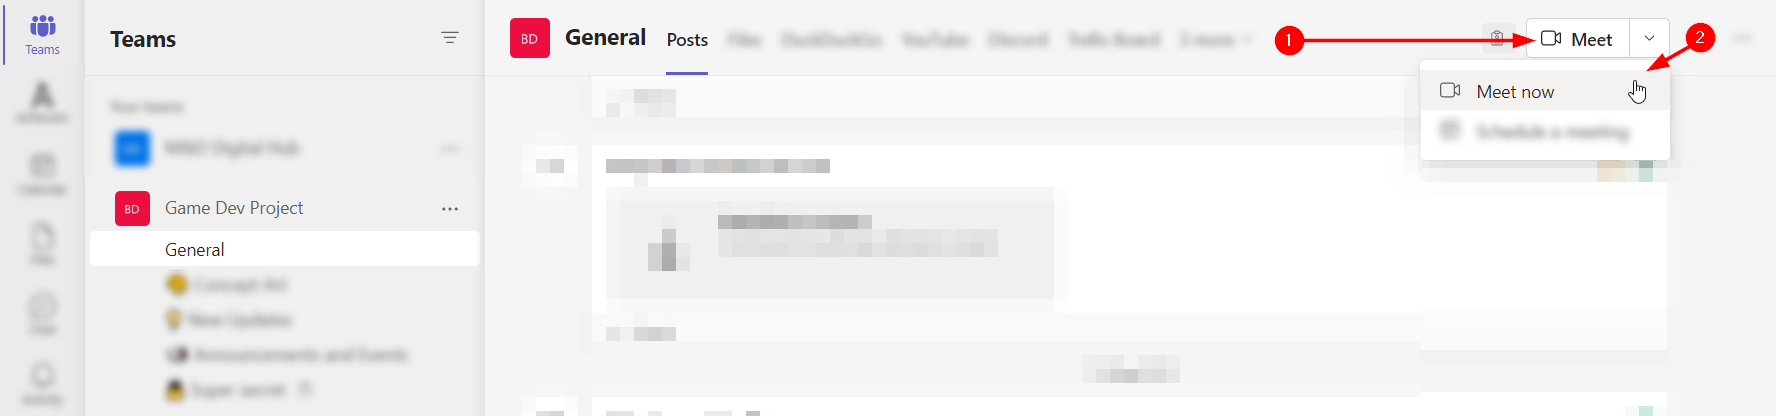
Step 2 — Initiate a meeting
Once you’re on Teams, you’ll want to start a meeting. First, head to your desired Team via the left sidebar and side panel. Then, in the top right, open the “Meet” dropdown. There are two options: “Meet now” and “Schedule a meeting.” I select “Meet now” in the example below because it’s easier to set up. If you choose to schedule a meeting, you will need to specify when your meeting shall take place.
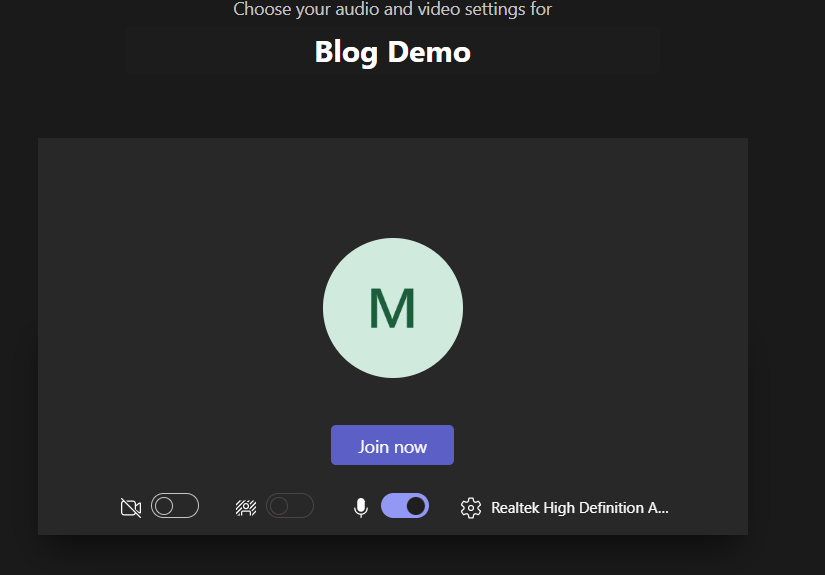
Step 3 — Join your Teams meeting
Once you’re meeting is set up, you can join it via the purple “Join now” button. But first, I recommend selecting the cog icon and ensuring you’re using the correct input and output devices. If you choose to schedule a meeting, you must find it within your Teams or Outlook calendar.
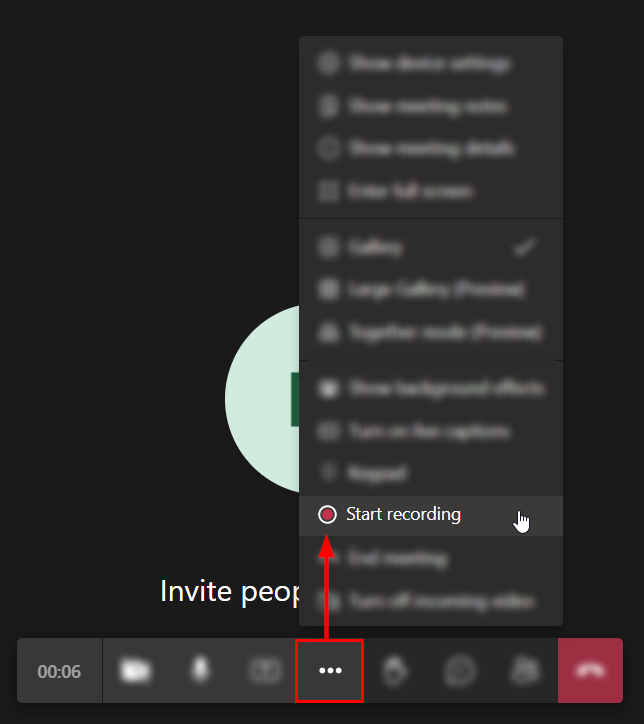
Step 4 — Start a recording
Open the options (...) menu when your meeting has begun. Then, in the dropdown menu, find and select “Start recording.” It might stand out due to the red and white recording icon that prefixes its name. If you’re not alone in the meeting, you should ensure all participants know you’re recording the meeting.
How to find a Teams meeting recording
Recording a meeting opens up many options concerning editing and logging; however, it means nothing if you can’t find the recording’s file. Luckily for us, Teams can point us straight to it.
Some users have reported that only a meeting’s organizer can download a meeting’s recording. If you would like a copy, consult the organizer about receiving one.
Step 1 — Open your meeting
After your meeting concludes, you will find a new message in the host channel— this is where Teams links your recording. By clicking on the meeting’s recording, we’re able to launch a new window containing SharePoint’s media player, wherein one might watch their recording.
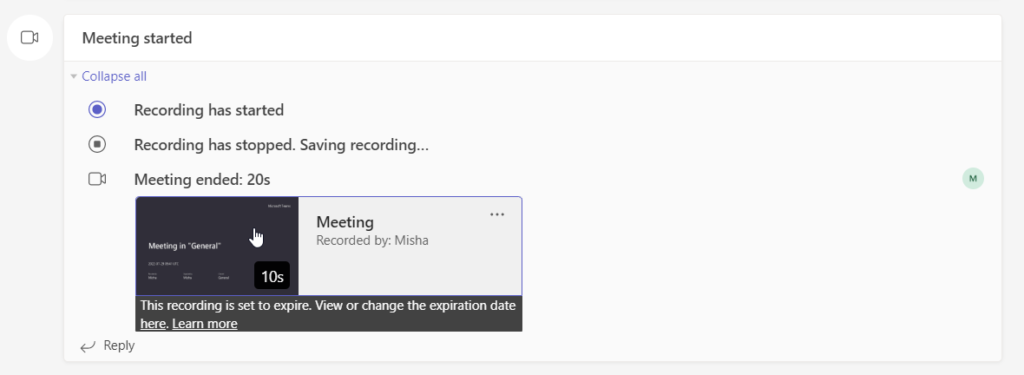
Step 2 — Close the media player
While you may wish to watch your recording, that is not our objective. Select the “X” in the top right corner of the media player. In doing so, you will close the interface and reveal the recording’s SharePoint site file directory.

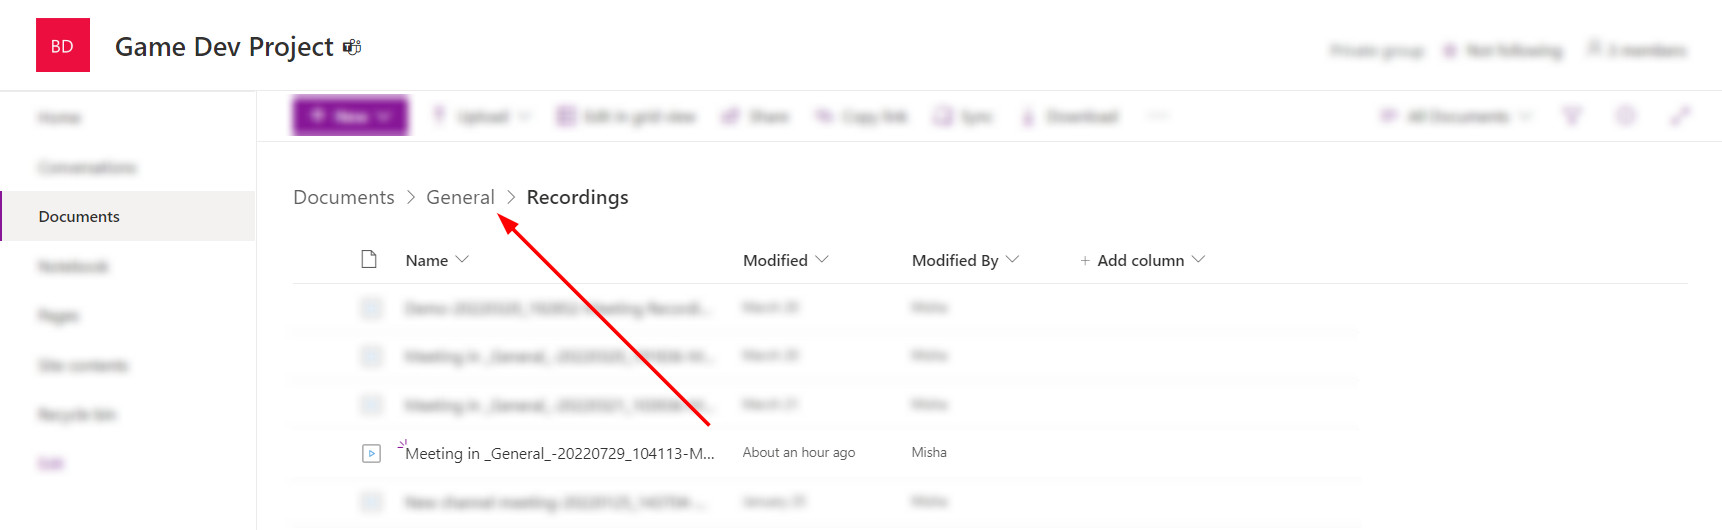
Step 3 — Check the file directory
Scan the file directory for the latest file. It will likely be the newest file that was last modified by you. However, that won’t be the case if someone else creates the meeting. Above the file list, you will find your active directory— in the example below, that would be “Documents > General > Recordings.”
Do recorded Teams meetings last forever?
By default, new recordings will expire after 120 days. That’s because, on average, most recordings are not watched beyond that timeframe. However, the expiration of new recordings for A1 users is 30 days. If you want to retain recordings for longer, you can change that in your Teams admin center.
How to change the expiration of recorded Teams meetings
Before you begin, it’s important to note that changing the default expiration date for new recordings will not affect existing recordings. The new setting will only affect new recordings you make after the change is implemented. Furthermore, your compliance policy settings will override the default expiration settings you set in your Teams admin center.
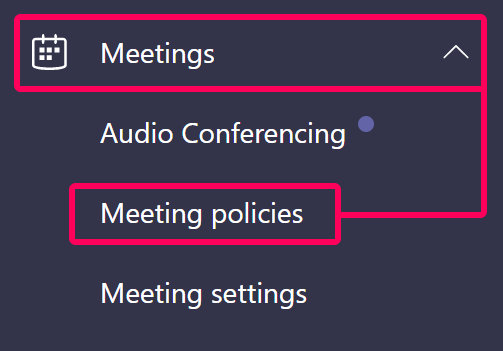
- First, open your Teams admin center and click on “Meetings” on the left menu.
- Then click on “Meeting policies.”
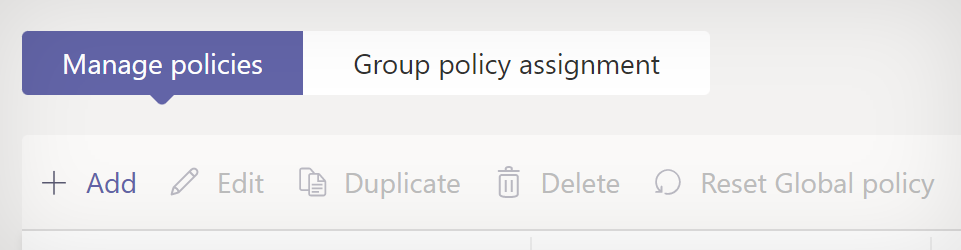
- Click on “+ Add” under “Manage policies.”
- Add a name and description at the top.
- Then scroll down to the “Recording & transcription” header.
- You can stop new recordings from expiring or add a custom expiration time in days.
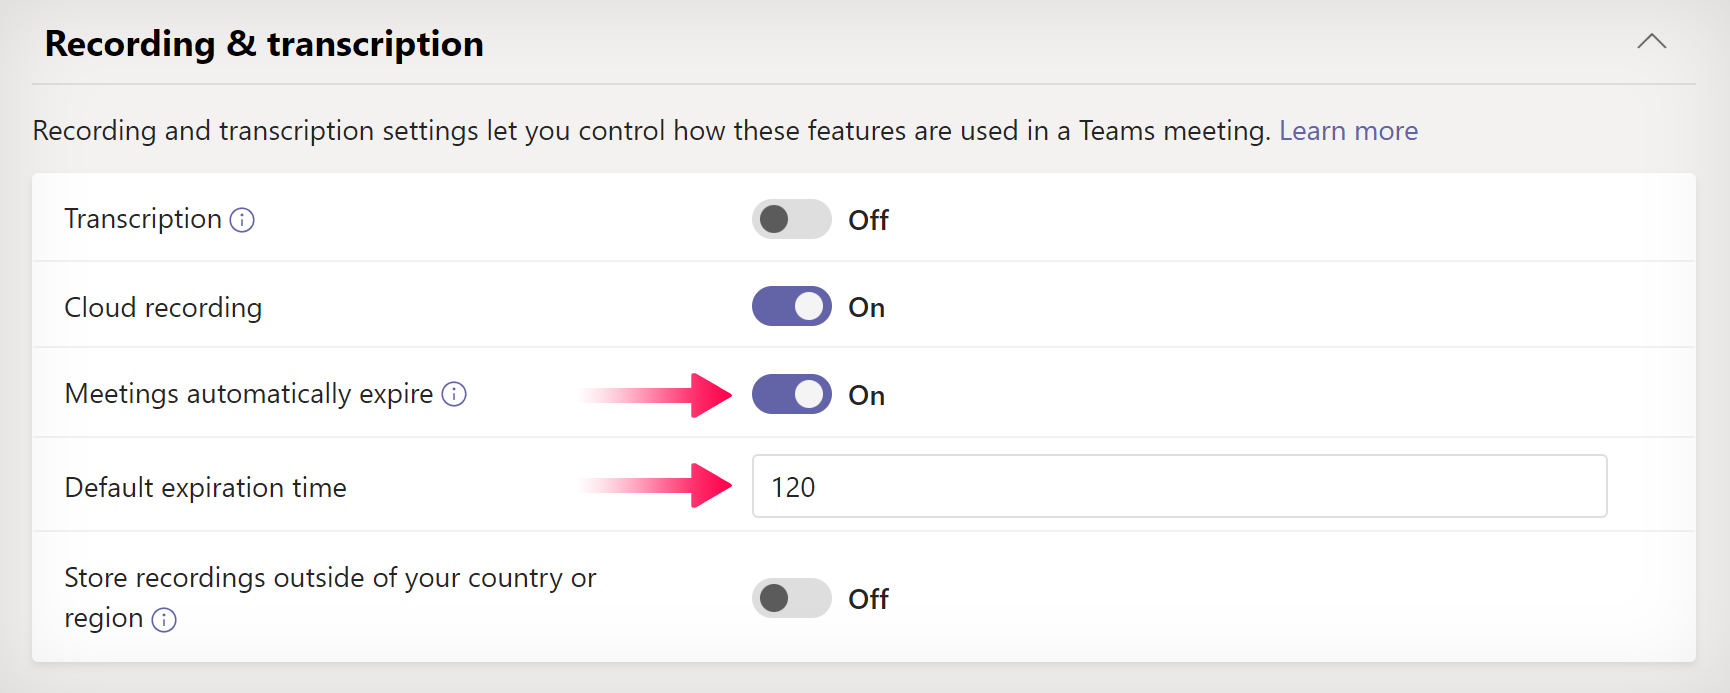
• Meetings automatically expire: Toggle “off” to stop new recorded meetings from expiring. • Default expiration time: The value is in days, and you can set it to between 1 and 99999. |
Blog post recap
A Teams meeting is a viable means to gather and discuss topics, ideas, and events digitally with the added bonus of being replayable. By that, I mean that you can record a Teams meeting; though, you should not record a meeting without informing each of its participants. After a recorded meeting ends, you will find a link to the said recording in your meeting’s channel. In addition, you can use the link to find your recording’s file location within SharePoint/OneDrive.
Hey, don’t go just yet. I’d like to thank you for reading this far. Business Tech Planet is dedicated to building a dependable resource for all problems and queries concerning Microsoft 365. With that in mind, it would mean a lot if you were to use our solutions more often. Below, you will find a list of related posts you may find interesting.