View our latest articles

What is an expired email in Outlook?

It’s part of Microsoft Outlook’s new ways for giving users more control over the material they transmit to others, adding an extra degree of protection to email sending. This includes the option to password secure emails, unsubscribe from mailing lists, and prohibit others from forwarding, printing, copying, or downloading messages. Messages that vanish are made possible by the option to specify expiration dates for emails, which means they will no longer be visible in your inboxes after a certain period of time. To set an expiration date on Outlook mail, you will need to carry out a few functional changes on the specific email that you’re sending. Follow the steps below to see how you can set an expiration date for an email.

Step by step process: How to set an email so they expire in Outlook?

  1. First sign into Outlook.
  2. Compose a new email that you want to send to someone.
  3. Navigate to “message” using the top menu bar.
  4. Under “Tags” click the little expansion icon.
  5. The Properties panel will open, here check the box that says “Expires after”.
  6. Set a time for expiration.
  7. You don’t have to save anything this will automatically alter, simply close the panel.

The message stays displayed in the message list with a strikethrough after the expiration date has passed. The message can still be accessed, but the strikethrough indicates that it is out of date or no longer relevant.

If you’ve received one or more messages that have already expired and are marked with a strikethrough in your message list, you may remove them by selecting them and using the Delete key on the keyboard or choosing Delete on the ribbon. There is no method to automatically remove emails that have passed their expiration date.

security office365 windows 11
info Recommended Software

Purposes of mail expiration in Outlook

Outlook uses expiration dates in a number of ways to help you focus on what’s essential. Because emails that have expired are usually less essential than those that haven’t, Outlook formats expired emails differently.

This informs you that the email has passed its expiration date, allowing you to prioritize more essential communications. If you send an email with an expiration date, it will be formatted in the recipient’s Outlook, but other email clients, such as Thunderbird, or online applications like Gmail or Yahoo! Mail will disregard the date and do nothing with it.

You may also add a column to a folder that displays the email’s expiration date. Click “Field Chooser” after right-clicking a column heading in the folder to which you wish to add the column.

Manage email with expiration dates:

Expiration dates are also used by several of Outlook’s built-in features. You may have seen an option to “Delete expired items (email folder only)” if you’ve set up AutoArchiving in Outlook.

Auto Archive:

If this particular option is enabled, AutoArchive will remove or relocate any emails that have passed their expiration date (depending on the other settings enabled like mail retention policies inhibiting the deletion of email-based content). This is quite an effective method to automatically delete expired emails and prevent them from clogging up your inbox.

Mail synchronisation:

If you don’t want your expired emails erased or transferred, but you also don’t want to view them in Outlook, you may use the synchronization rules in Outlook to block them from being downloaded from the Exchange email server.

This will filter any expired tasks such that if they were due to expire yesterday or earlier, they will not be synced with Outlook and will not display in your inbox. If you wish to see them, they’ll still be available on the Outlook web app. Follow the steps below to activate the sync filter.

  • In Outlook go to “Folder” > “Folder Properties”.
  • Go to the “synchronisation ” tab.
  • Fill out the “Message” panel and click on “OK”.
  • As this will have changes to your mailbox or domain you will be prompted with a warning, when it shows click “OK” if you want to proceed.

More information:

You can’t set up rules to automatically add expiration dates to incoming emails or build a fast step that does so at the touch of a button, but you may add an expiration date to all outgoing emails. Scroll down to Send Messages and turn on “Mark emails have expired after this many days.”

Expiration dates are a useful way of managing your priorities and your mailbox by low-lighting messages that are no longer relevant and allowing you to use Outlook tools to delete or hide messages you don’t need anymore. It’s one more tool in the fight to prevent your mailbox from getting out of control and a very useful tool at that.

surface pro 8Surface Go 3surface pro 8

In depth step by step process: How to set an email so they expire in Outlook?

Step by step – breakdown:

  • First sign into Outlook.

Sign in with your regular credentials which are also set with your Office 365 account.

  • Compose a new email that you want to send to someone.

This mail could be to a colleague with the subject being a timed event and the content being some information that is only required until just after the event where its presence is no longer necessary and therefore it expires.

  • Navigate to “message” using the top menu bar.

The “Message” tab will be located in the top menu bar, and by default, may even be selected upon the composition of a new email.

  • Under “Tags” click the little expansion icon.

The expansion icon will bring up more properties for you to access and it will allow you to also set the expiration mail as the settings for this are located within the tag area.

  • The Properties panel will open, here check the box that says “Expires after”.

Here all you need to do is select the checkbox and type out the expiry information, Such as the time and date of expiry (Box that says “None” is where the date will go if nothing is selected the mail will expire on the current day at the time set).

  • You don’t have to save anything this will automatically alter, simply close the panel.

That’s it for this Blog — thank you for taking time out to read our content. Please feel free to email our team about how it went if you followed the steps or if you need more help with the questions we answered in this Blog.

Send automatic replies to external users only: Office 365

Many users have pondered if auto-replies in Outlook can be set to only external users. Many individuals have a selection of shared mailboxes where automatic replies as acknowledgements to other users can be set up easily. However, there may be instances where users do not wish to send automatic replies to internal users of the company but only to external members of a company. While Outlook does offer users the option to turn it on auto-replies for external members, however, according to some users, this is not possible because there is not an option to disable the auto-reply feature for internal members. The only option is to both able and disables auto-reply for external members only. However, there are some unconventional workarounds Microsoft Outlook offers to allow for this scenario where auto-replies are set to external members only, Such as creating a new rule to allow for external auto-replies only.

Step by step process: How to send automatic replies to external only Office 365?

  • First, sign into Office 365 using your sign in details.
  • Navigate to “Outlook” using the “app launcher”.
  • In Outlook go to “Settings”.
  • Click on “View all Outlook Settings”.
  • In “Settings” go to “Email” > “Automatic Replies”
  • Turn on auto replies.
  • Check the bot that says “send replies outside your organisation”.
  • Press “Save”.
  • Now go back to the Office 365 Dashboard and use the app launcher to find “Admin.”
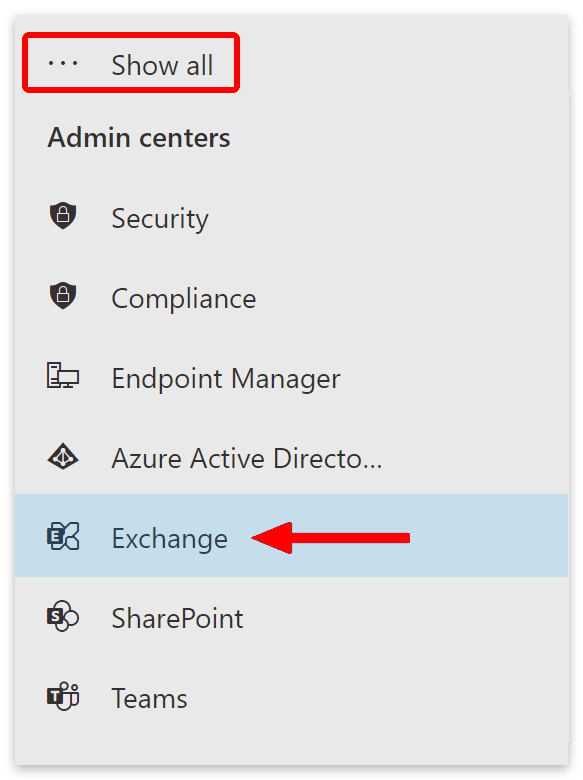
  • Under “Admin Centers” click on “Exchange”.
  • Under “Mail Flow” click on “Rules”.
  • Click the “+” to create a new rule for Outlook Mail.
  • Type out the details in the screenshot below,(type it out the way it’s shown as each phrase used is altered as a code).
  • Click on “Finish” when you are finished typing out the rule.

While not the most convenient method in terms of functionality, it’s the most effective way to attain the results required to ensure only external members receive auto-replies. To make the “Have server reply using a specified message” action function for external senders, you may need to make small adjustments on your Exchange server. 

The Out of Office Auto-Reply feature in Outlook / Exchange allows you to send automated responses to either internal and external senders inside My Organization or both internal and external senders outside My Organization. It is not possible to send auto-replies exclusively to external senders. As a result, the approach described above was employed.

Users of Outlook for Windows who have Office 365 Business or Exchange accounts should follow this instruction. Only Office 365 Business and Exchange users have access to Outlook’s out-of-office messaging functionality. If you use Outlook with Office 365 Home, Outlook.com, Hotmail, or Gmail, you may find an out-of-office “hack” on Microsoft’s Office support site, which is a bit of a pain but gets the job done.

get office app-icons
compatible Compatible with Windows, Mac OS, and Android.FROM $6.00 user/month

Why send auto replies to external members only:

With its astonishingly vast degree of productivity, Microsoft 365 (formerly known as Office 365), aims to break down the traditional business email platforms that inhibit content sharing and collaboration. The collaboration capabilities of SharePoint Online and OneDrive for Business allow users to collaborate with a wide range of colleagues from both inside and outside their organization. However, while it offers a better range of tools for users, it still lacks a few features that may prevent users from taking full advantage of the Office Outlook suite. Outlook, while it offers the option to send to external members or not, the same preferences cannot be applied to the internal members, at least not natively.

One main reason users may not want to have internal members receive auto-replies, only for external members, is to reduce the amount of unnecessary mail-based content taking up storage space, especially if there is media-based content within the email. External members may require a more concise set of instructions or information booklets that internal members may not want so having the auto-replies feature enabled to only send to external members will most certainly reduce the number of unwanted emails being sent.

Another reason is to reduce the amount of spam-based content being sent to users who do not require it. For example, auto-replies can be used to send updated pricing lists for clients from time to time and internal members may not require its usage as they may already have a copy on demand in for example SharePoint. So natively allowing for auto-replies being sent to external members will also send it to internal members which can potentially create a lot of unnecessary spam-like content.

surface pro 8Surface Go 3surface pro 8

In depth step by step process: How to send automatic replies to external only Office 365?

Step by step breakdown:

  • Sign into Office 365.
  • Use the app launcher to navigate to “Outlook”.

The app launcher is illustrated by nine dots on the top left side of the display. You need to click on this to access the Admin portal.

  • Click on “Settings”.

Settings are illustrated by a gear icon click on it for the next step.

  • Now click on “View all Outlook Settings”

This is where most of the Outlook settings reside and here you will be able to see will be able to edit notifications.

  • In “Settings” go to “Email” > “Automatic Replies”
  • Turn on auto replies.

If the auto-reply feature is turned off you can turn it on by clicking the button.

  • Check the box that says “send replies outside your organisation”.
  • Press “Save”.

Use your account details or if you have a current Skype account with the Office account in question, you can use this.

  • Use the application launcher to navigate towards “Admin”.

The launcher is illustrated by nine dots in the right corner, click on it and find “Admin” as shown above.

  • In the Admin dashboard, under “Admin centers”, click on “Exchange”(you may need to click “Show all” to access).
  • Then click on “Rules” under “Mail Flow” in the Exchange admin center.
  • Click the “+” to create a new rule for Outlook Mail.
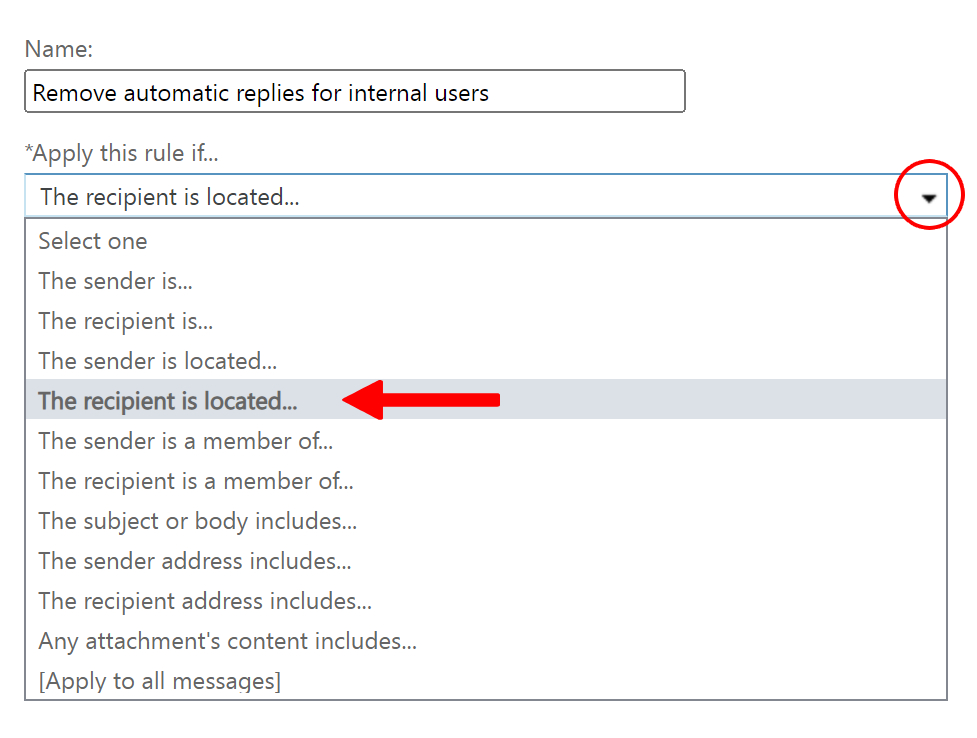
  • Select “The recipient is located…” from the “Apply this rule if…” menu.
  • Select “Inside the organization” and click the “OK” button.
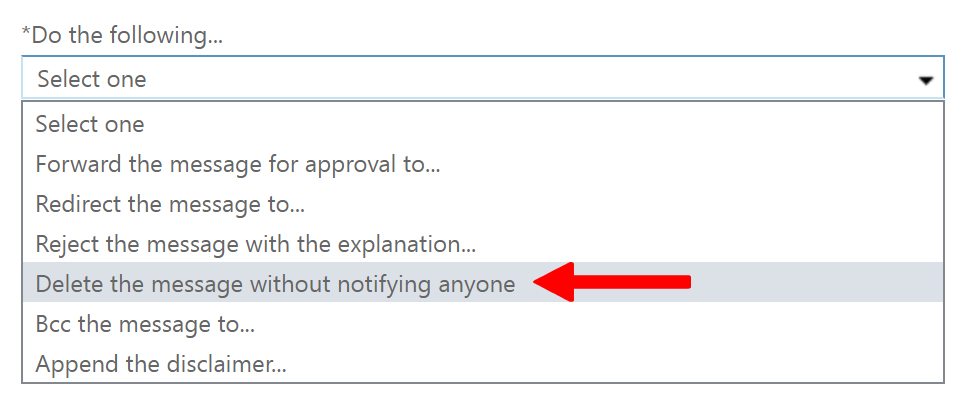
  • Then select “Delete the message without notifying anyone” from the “Do the following…” menu.
  • Finally, click on “Save”.

That’s it for this Blog — thank you for taking time out to read our content. Please feel free to email our team about how it went if you followed the steps or if you need more help with the questions we answered in this Blog.
How to set up a message expiration date in Outlook

It’s one of Microsoft Outlook’s new features that give users more control over what they send to others and adds an extra layer of security to email sending. This includes the ability to encrypt emails with a password, unsubscribe from mailing lists, and prevent others from forwarding, printing, copying, or downloading them. Messages that vanish are made possible by the ability to set expiration dates for emails, which means they will no longer be accessible in your inboxes once a specific amount of time has passed. You’ll need to make a few functional modifications to the individual email you’re sending to establish an expiration date in Outlook mail. To learn how to establish an expiration date for an email, follow the instructions below.

Step by step process: How to set an expiration date in Outlook?

  1. First sign into Outlook.
  2. Compose a new email that you want to send to someone.
  3. Navigate to “message” using the top menu bar.
  4. Under “Tags” click the little expansion icon.
  5. The Properties panel will open, here check the box that says “Expires after”.
  6. Set a time for expiration.
  7. You don’t have to save anything this will automatically alter, simply close the panel.

After the expiration date has gone, the message remains in the message list with a strikethrough. The message is still accessible, but the strikethrough signals that it is no longer relevant or up to date.

If you have one or more messages in your message list that have already expired and are indicated with a strikethrough, you may delete them by selecting them and pressing the Delete key on the keyboard or selecting Delete on the ribbon. There is no way to delete emails that have passed their expiration date automatically.

Purposes of mail expiration in Outlook:

Expiration dates are used by Outlook in a variety of ways to help you focus on what’s important. Because expired emails are typically less important than those that haven’t, Outlook presents them differently.

This lets you know that the email has passed its expiration date, allowing you to focus on other important messages. If you send an email with an expiration date, it will be formatted in the recipient’s Outlook, but it will be ignored by other email clients like Thunderbird or online programs like Gmail or Yahoo! Mail.

A column that indicates the email’s expiration date may likewise be added to a folder. After right-clicking a column heading in the folder to which you want to add the column, select “Field Chooser.”

Manage email with expiration dates in Outlook:

Expiration dates are also used by several of Outlook’s built-in features. You may have seen an option to “Delete expired items (email folder only)” if you’ve set up AutoArchiving in Outlook.

Mail synchronisation:

If you don’t want your expired emails deleted or moved but still want to view them in Outlook, you may use Outlook’s synchronization rules to prevent them from being downloaded from the Exchange email server.

This will filter any expired tasks so that they are not synchronized with Outlook and do not appear in your inbox if they were scheduled to expire yesterday or earlier. They’ll still be available on the Outlook web app if you want to look at them. To enable the sync filter, follow the instructions below.

  • In Outlook go to “Folder” > “Folder Properties”.
  • Go to the “synchronisation ” tab.
  • Fill out the “Message” panel and click on “OK”.
  • As this will have changes to your mailbox or domain you will be prompted with a warning, when it shows click “OK” if you want to proceed.

Auto Archive:

If this particular option is enabled, AutoArchive will remove or relocate any emails that have passed their expiration date (depending on the other settings enabled like mail retention policies inhibiting the deletion of email-based content). This is quite an effective method to automatically delete expired emails and prevent them from clogging up your inbox.

More information:

You can’t set up rules to add expiration dates to incoming emails or create a quick step that does so at the push of a button, but you may do so for all outgoing emails. Turn on “Mark emails have expired after this many days” in the Send Messages section.

Expiration dates are a helpful method to manage your priorities and your inbox by highlighting messages that are no longer relevant and allowing you to delete or conceal communications you don’t need anymore using Outlook features. It’s yet another weapon in the effort to keep your mailbox under control and a very helpful one at that.

In depth step by step process: How to set an email so they expire in Outlook?

Step by step – breakdown:

  • First sign into Outlook.

Sign in with your regular credentials which are also set with your Office 365 account.

  • Compose a new email that you want to send to someone.

This mail could be to a colleague with the subject being a timed event and the content being some information that is only required until just after the event where its presence is no longer necessary and therefore it expires.

  • Navigate to “message” using the top menu bar.

The “Message” tab will be located in the top menu bar, and by default, may even be selected upon the composition of a new email.

  • Under “Tags” click the little expansion icon.

The expansion icon will bring up more properties for you to access and it will allow you to also set the expiration mail as the settings for this are located within the tag area.

  • The Properties panel will open, here check the box that says “Expires after”.

Here all you need to do is select the checkbox and type out the expiry information, Such as the time and date of expiry (Box that says “None” is where the date will go if nothing is selected the mail will expire on the current day at the time set).

  • You don’t have to save anything this will automatically alter, simply close the panel.

That’s it for this Blog — thank you for taking time out to read our content. Please feel free to email our team about how it went if you followed the steps or if you need more help with the questions we answered in this Blog.
How to add a read receipt in Outlook

Microsoft Outlook offers a mail tracking system that helps users track sent mail to see if it has reached the end-user or not. This form of tracking documentation is called delivery receipts, and they are used to verify that your email message was sent to the recipient’s inbox, but it does not imply that the recipient has seen or read it. Microsoft Outlook will state that the message was opened, as evidenced by a read receipt displayed to you. The message receiver in Outlook has the option to opt-out of receiving read receipts. Read receipts are also not delivered in other cases, such as when the recipient’s email software does not support them. A receiver cannot be forced to send a read receipt. So how do you add a read receipt? Follow the steps below to see exactly how.

Step by step process: How to add a read receipt in Outlook?

  • Firstly, sign into Outlook.
  • Now go to “File”.
  • From there go to “Options”.
  • You now need to go to “Mail”.
  • Under “Tracking”, select “Read receipt confirming the recipient viewed the message” check box.
  • Click OK to apply your changes.

A delivery receipt verifies that your email message was sent to the recipient’s inbox, but it does not imply that the recipient has seen or read it. Your message was opened, as evidenced by a read receipt.

The message receiver in Microsoft Outlook can opt out of receiving read receipts. Read receipts are also not delivered in other cases, such as when the recipient’s email software does not support them.

Mail Delivery reports to add a read receipt in Outlook:

For e-mail communications you send to other individuals, Outlook allows you to request delivery and read receipts. Microsoft Outlook 2010 and subsequent versions of Outlook allow you to select how you wish to respond to read receipt requests that are delivered to you with e-mail communications.

Step by step: Enable mail delivery reports:

  • To enable a delivery report for a single email, go to the settings tab and tick the box next to “Request a Delivery Report” under tracking. Your email will now include a delivery report option.
  • To see the delivery reports, open the email message from your sent items folder, click the file tab, and then pick Info from the drop-down menu. The ability to open a delivery report may be found under Info.
  • When you access the delivery report, it will provide information on the message delivery.

Get mail confirmation:

A delivery receipt verifies that your email message was sent to the recipient’s inbox, but it does not imply that the recipient has seen or read it. Your message was opened, as evidenced by a read receipt.

The message receiver in Microsoft Outlook can opt out of receiving read receipts. Read receipts are also not delivered in other cases, such as when the recipient’s email software does not support them.

Get Mail tracking in Outlook to add a read receipt in Outlook:

As well as adding a read receipt to confirm emails being received by the recipient you can also set up tracking to ensure the user displayed as the recipient has actually viewed the sent email. Follow the instructions below to see how you can set up email tracking.

Consider monitoring just important communications rather than all messages as a best practice. Recipients who are notified only infrequently that a read receipt is required on your message are more likely to send one than those who are alerted every time they get a message from you.

Step by step: How to set up mail tracking

  • Select File from the drop-down menu.
  • Select Options from the dropdown menu.
  • Select Mail.
  • Select the Delivery receipt proving the message was sent to the recipient’s email server or the Delivery confirmation certifying the message was delivered to the recipient’s email server under Tracking. Check the box to ensure the recipient saw the message on the read receipt.

Track only one mail:

Select the Request a Delivery Receipt or Request a Read Receipt check box on the message’s Options tab, Tracking group.

Response receipt tracking:

  • Open the original message you sent with a delivery or read receipt request. The Sent Items folder is generally where you’ll see this message.
  • Click Tracking in the Show group on the Message tab.

The tracking feature isn’t available until at least one receipt has been received. It may take several minutes for the Tracking button to appear once you receive the first receipt in your Inbox.

In depth step by step process: How to disable the auto-complete feature in Outlook?

Step by step breakdown:

  • First, sign into Outlook.

You will need to sign in with the application version as this process will only work on the application version of Outlook.

  • Go to “file” in the toolbar at the top.

As mentioned above the file option and the application version are the only ways to edit the add-ins as the web version does not directly sync add-in data with your desktop as there is no connected output, unlike the application version.

  • From there visit “options”.

Options are located at the bottom of the menu bar on the left side.

  • You now need to go to “Mail”.

Mail is the option where you will be able to manage email-based including the auto-complete feature.

  • Under “Tracking”, select “Read receipt confirming the recipient viewed the message” check box.

Selecting “Read receipt confirming the recipient viewed the message” will allow users to receive a confirmation receipt that the mail has been viewed by the recipient. The one above can also be selected and what this will do is allow for the sender to receive a confirmation that the sent email or message via email has been successfully delivered to the recipient’s email address or company-associated mailbox.

  • Click OK to apply your changes.

That’s it for this Blog — thank you for taking time out to read our content. Please feel free to email our team about how it went if you followed the steps or if you need more help with the questions we answered in this Blog.
How to give read-only access to a shared mailbox Microsoft 365?

A shared mailbox is one that may be used by numerous individuals to read and send email messages. A shared mailbox is a sort of user mailbox that does not have its own username and password. It can also be used to provide a single calendar, allowing several users to arrange and view vacation time or work shifts. As a result, users are unable to access them directly. You can allow other people to receive and respond to email messages and meeting requests sent to an Office 365 shared mailbox if you’re the administrator of the mailbox. You decide on their level of access. You can give them access to read items in the mailbox as well as create, modify, and remove items. Follow the steps below to see how.

How to give read-only access to a shared mailbox in Outlook (Microsoft 365):

  1. Sign into Office 365 and navigate to Outlook
  2. Login to an Outlook account that has full access permissions to a shared mailbox.
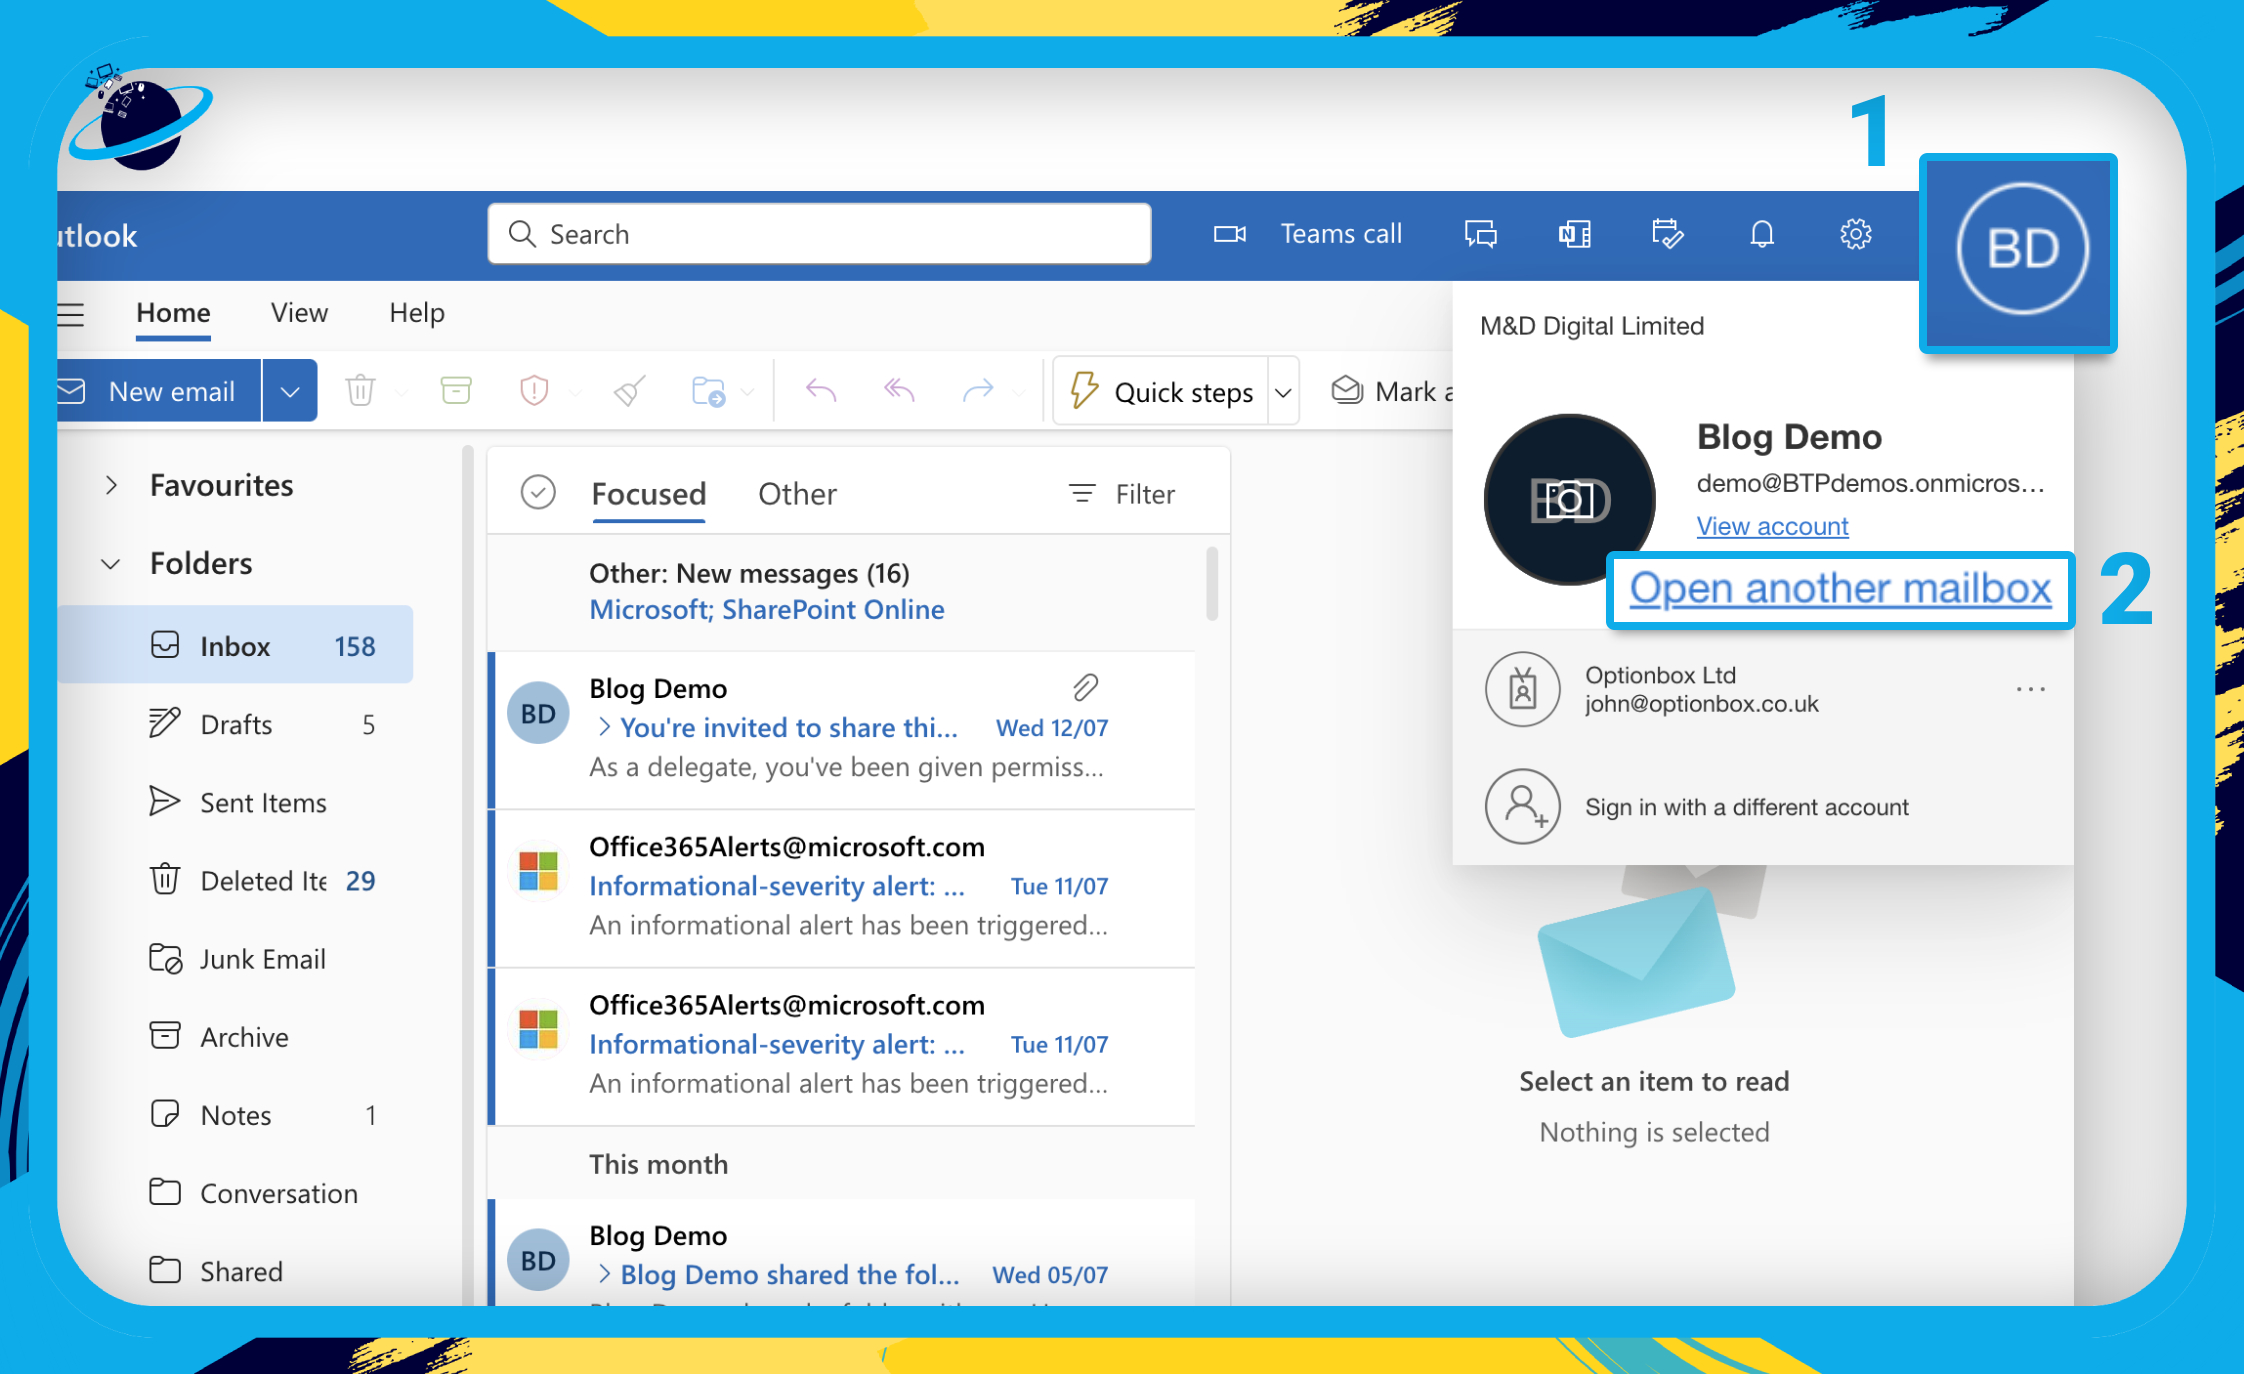
  3. Visit the profile by clicking on the profile picture.
  4. Click on “open another mailbox”.
  5. Right-click the shared mailbox’s primary folder, then choose permissions.
  6. As seen in the image below, add the user to the box and then grant reviewer authority to the user.

Shared mailboxes allow a group of individuals in your organization to easily monitor and send email from a single account, such as [email protected] or [email protected]. When a group member answers to an email sent to the shared mailbox, the email seems to have been sent by the shared mailbox rather than by the individual user.

We’ve also created a video to help guide you through the steps:

get office app-icons
compatible Compatible with Windows, Mac OS, and Android.FROM $6.00 user/month

Shared Mailbox permissions for Outlook in Microsoft 365 to give read-only access

Send on Behalf:

  • The Send on Behalf ability allows a user to send email on behalf of a shared mailbox. If user one enters into the shared mailbox and sends an email, the message seems to have been sent “on behalf of the Mailbox.” You must use a Set-Mailbox instead of the EAC to give Send on Behalf rights.

Send As:

  • When sending mail, the Send As permission allows a user to mimic the shared mailbox. If user 1 logs into the shared mailbox Marketing Department and sends an email, it will appear that the email was sent by the Marketing Department.

Full Access:

  • This permission allows a user to open a shared mailbox and behave as the mailbox’s owner. A user can add calendar items, read, view, delete, and edit email messages, and create tasks and calendar contacts after gaining access to the shared mailbox. However, unless they also have Send As or Send on Behalf access, a user with Full Access can’t send email from the shared mailbox.

Note that Users will really send as the mailbox owner if full access rights and Send on Behalf permissions are provided to a mailbox. Full access rights allow a user to sign in to a mailbox using Outlook or Outlook Web Access and then add that mailbox to Outlook as a secondary mailbox. Full access rights, on the other hand, prevent the user from sending as or on behalf of the mailbox. Those permits are given on a case-by-case basis.

Only when adding a delegate via Outlook may end users grant send on behalf. Delegates can be given folder rights, receive meeting invitations, and have sent on Behalf permissions for the mailbox. Users can set delegates in Outlook only for their own mailboxes starting with Exchange 2010. Users are unable to assign delegates to shared mailboxes.

surface pro 8Surface Go 3surface pro 8

Outlook permission categories in Microsoft 365

PermissionDescription
OwnerAll objects and files may be created, read, modified, and deleted, as well as subfolders. You can alter the permission levels that other users have for the folder as the folder owner. (Note that this does not apply to delegates.)
Publishing editorAll documents and files may be created, read, modified, and deleted, as well as subfolders. (Note that this does not apply to delegates.)
EditorAll things and files may be created, read, modified, and deleted.
Publishing AuthorCreate and read things and files, as well as subfolders, as well as change and remove items and files. (Note that this does not apply to delegates.)
AuthorCreate, read, and change things and files, as well as remove items and files you’ve created.
Nonediting AuthorNon-editing Authors can create and read files, but can’t modify or delete them.
ReviewerOnly read objects and files.
ContributorOnly create objects and files. The folder’s contents do not appear. (Note that this does not apply to delegates.)
NoneYou do not have authorization. You are unable to open the folder.
CustomCarry out the tasks specified by the folder’s owner. (Note that this does not apply to delegates.)

Licenses: You can keep up to 50GB of data in your shared mailbox without assigning it a license. After that, you’ll need to give the mailbox a license so it can hold more data. Please visit Exchange Online Limits for additional information on shared mailbox licensing. You’ll be able to receive an email for a while after a shared mailbox exceeds its storage limit, but you won’t be able to send a new email. After then, it will cease to receive email. A non-delivery receipt will be sent to those who send mail to the mailbox.
Use with Outlook: You can access shared mailboxes using the Outlook for iOS or Android apps, in addition to using Outlook on the web from your browser.

How to give read only access to a shared mailbox in Outlook (Microsoft 365)

Step by step Breakdown:

  • First, Sign into Microsoft 365 and open Outlook.
  • Click your profile image in the top right. [1]
  • Then select “Open another mailbox” from the dropdown. [2]
  • Now right-click the shared mailbox’s “Inbox” folder. [1]
  • Select “Sharing and permissions” from the popup menu. [2]
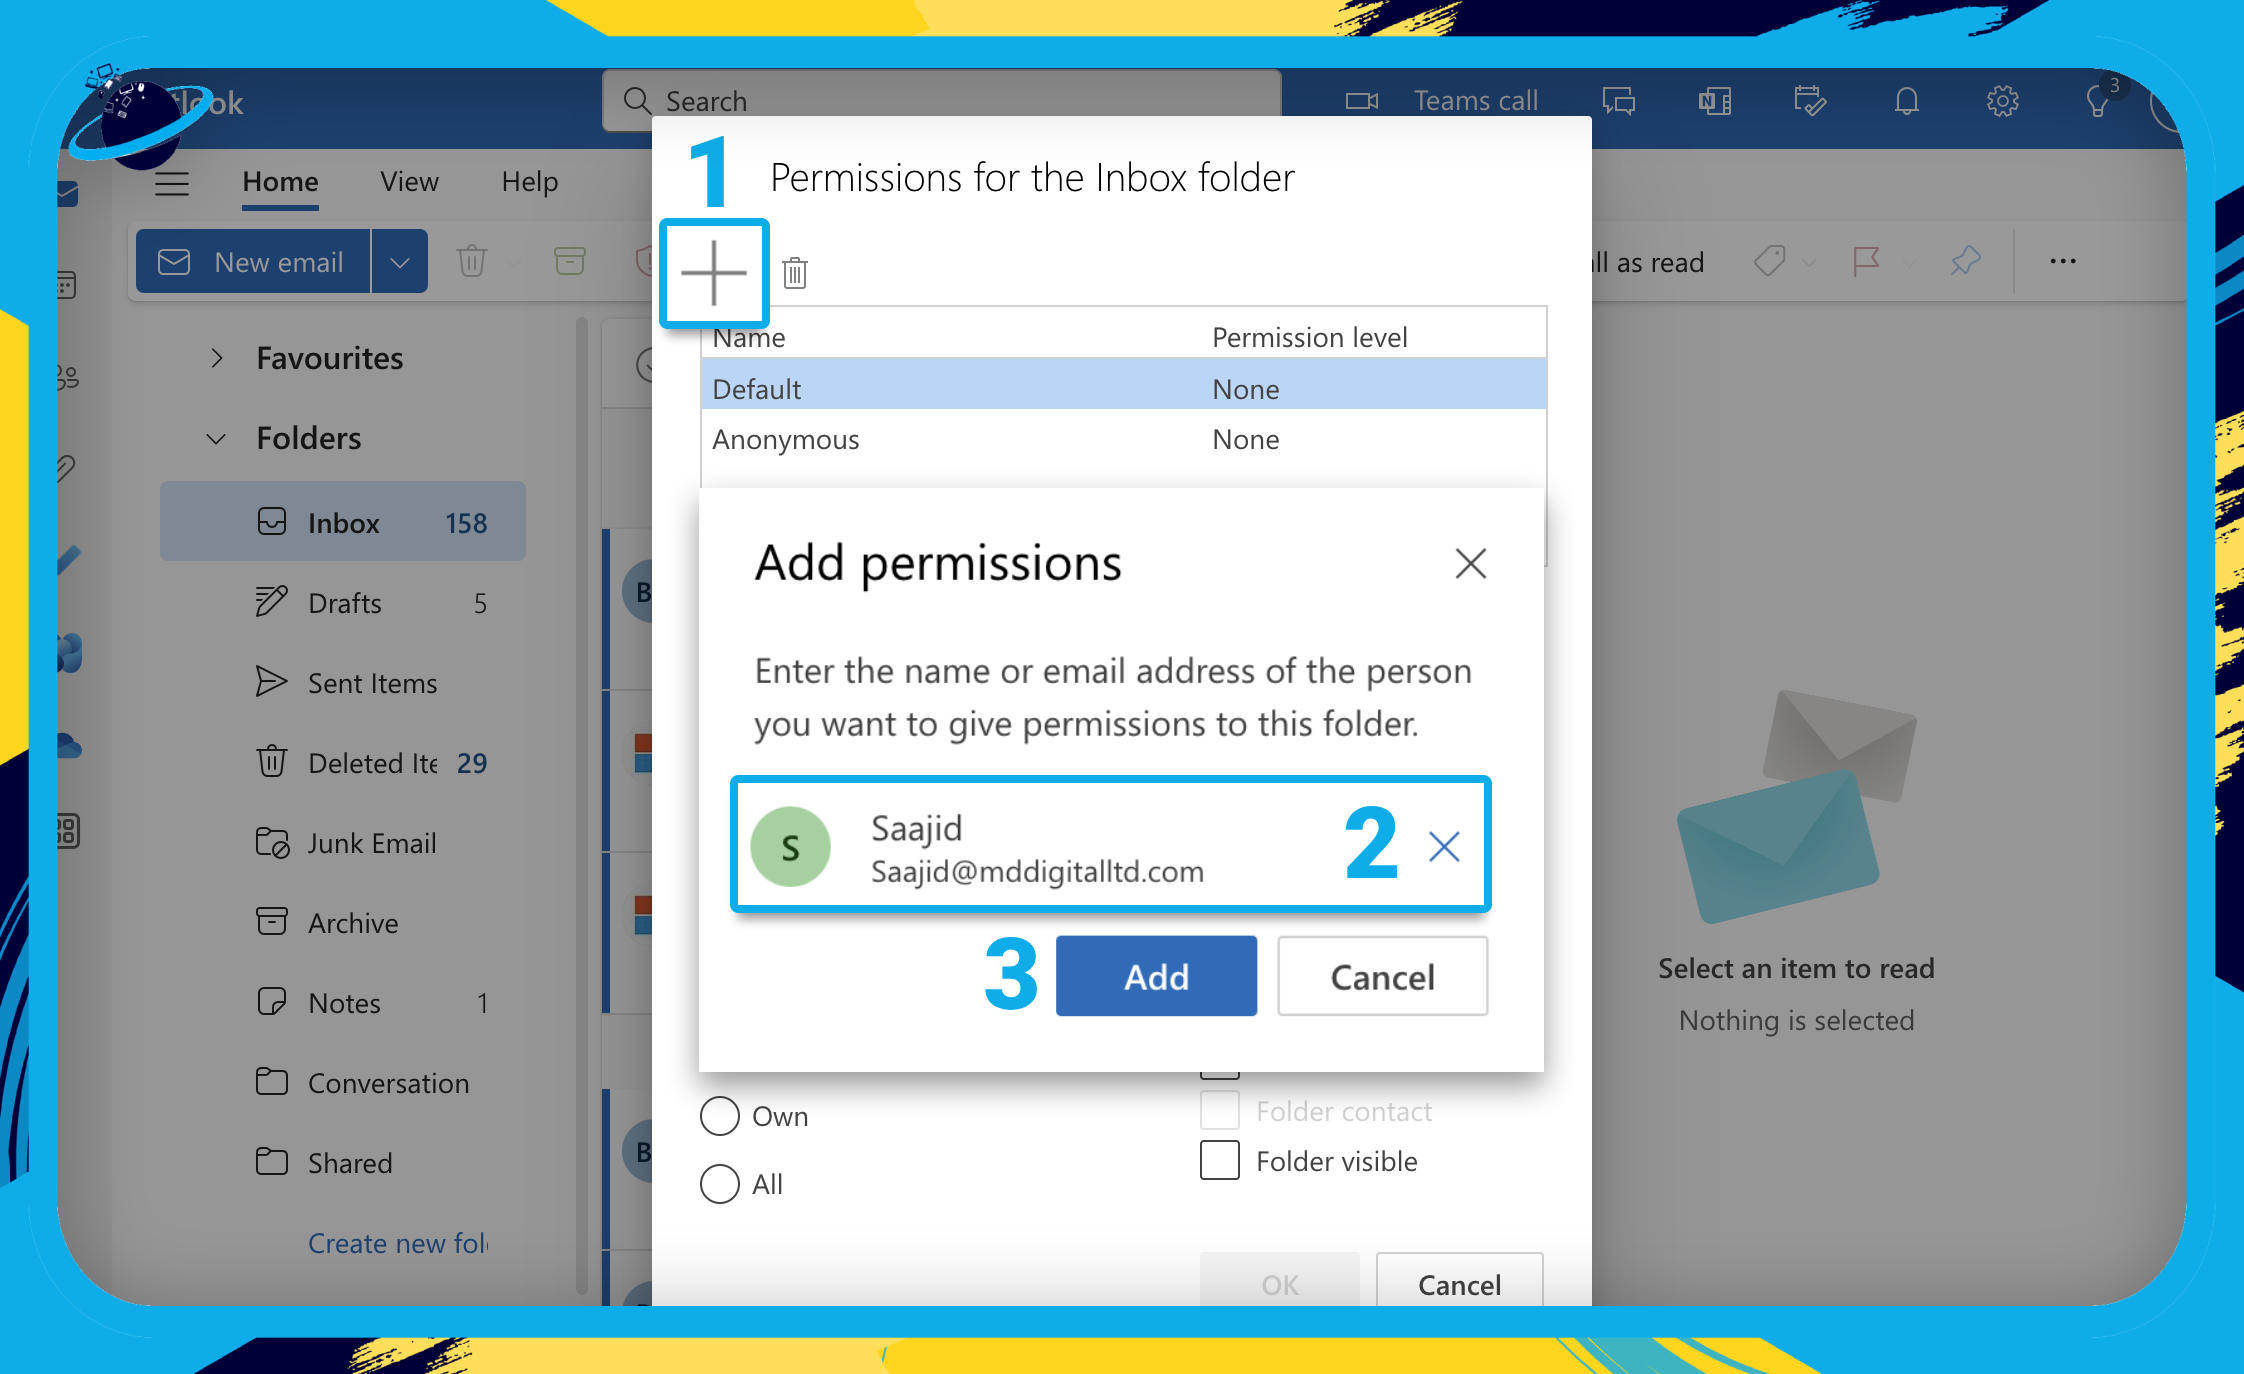
  • Click the plus icon in the top left of the permissions dialog box. [1]
  • Enter and select the name of whoever you want to add. [2]
  • Click the “Add” button. [3]
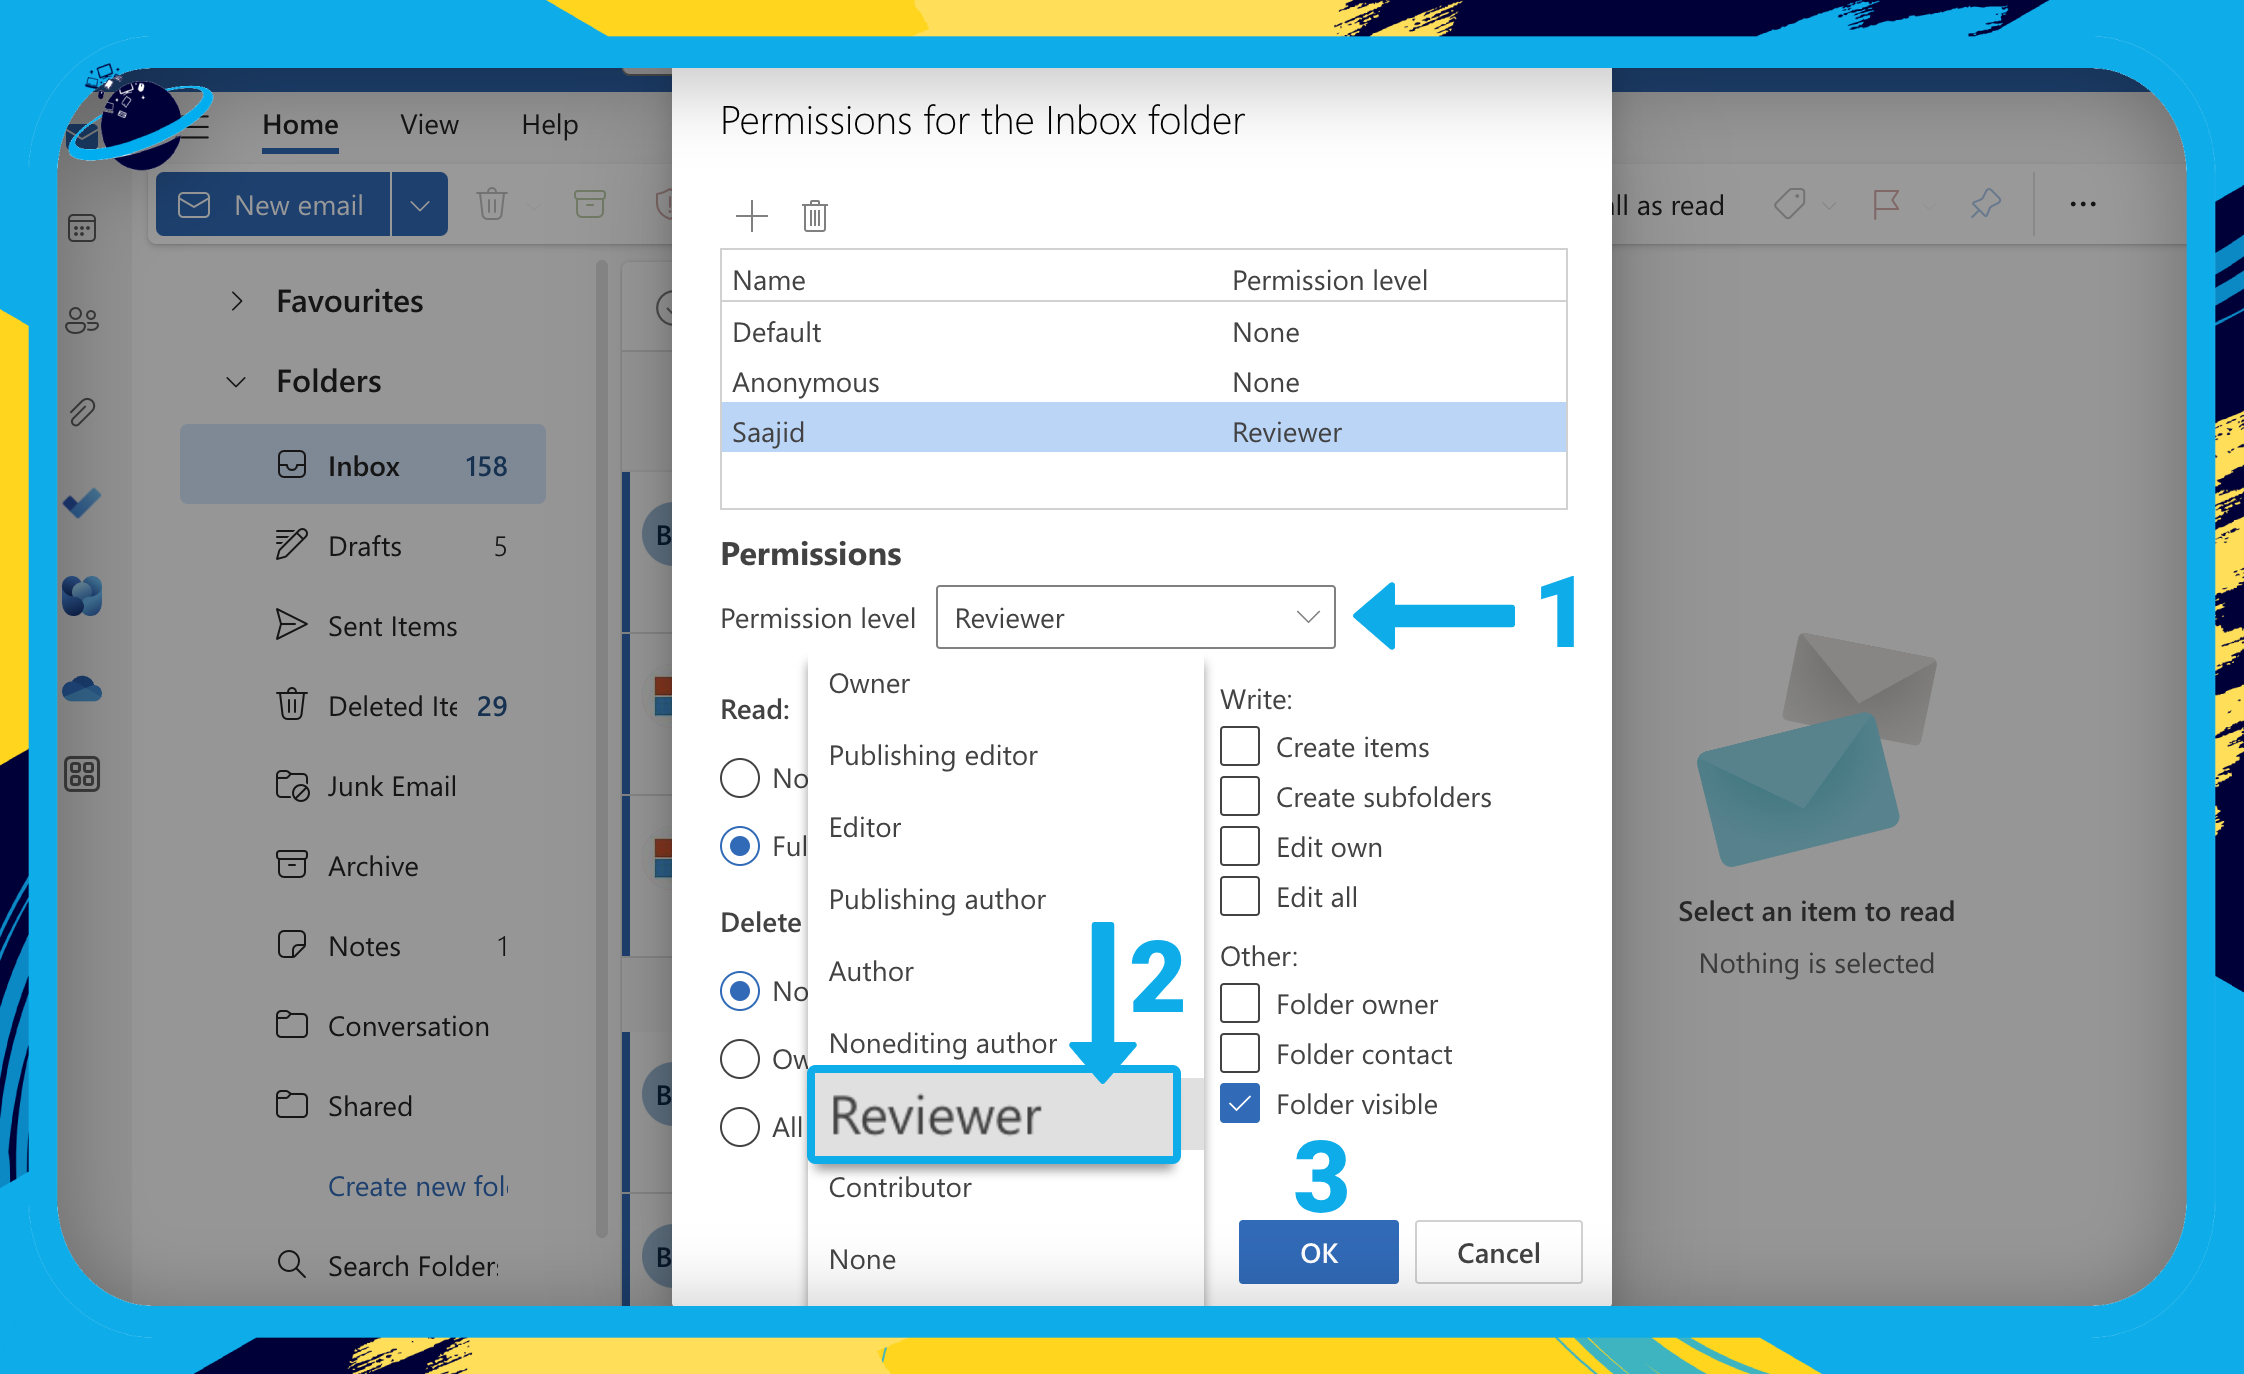
  • Click the select box next to “Permission level.” [1]
  • Select “Reviewer” from the dropdown. [2]
  • Finally, hit “OK.” [3]

Conclusion

In conclusion, a shared mailbox in Outlook (Microsoft 365) offers a convenient way for multiple users to access and manage email messages collectively. By following a few simple steps, you can grant read-only access to a shared mailbox, allowing others to view and respond to emails and meeting requests. This level of access can be customized based on individual needs and responsibilities within your organization.

Additionally, permissions such as “Send on Behalf,” “Send As,” and “Full Access” provide further flexibility in managing shared mailboxes. It’s important to note that these permissions are granted on a case-by-case basis, ensuring proper control and security.

Shared mailboxes enhance collaboration and streamline communication, making them an invaluable tool for efficient teamwork. So, give your team the advantage of a shared mailbox in Outlook and simplify your email management process.

Thank you for reading!

How to block domains in Microsoft Exchange Online admin center?

Exchange users now allow users to block and reject unwanted sender domains and emails or even specific email clients. What this allows for is the user more flexibility in configuring extra spam protection in addition to certain types of filters that may be present on Exchange, in case any spam-related content goes through the systems made for spam protection. An exchange global or network administrative body can block the pass-through of certain types of email-based content from certain external domains or addresses to the user mailboxes using native protection software such as PowerShell.

To block domains in Microsoft Exchange you need to create a new rule. Follow the steps below.

  1. Firstly, sign into Office 365 using your normal login details.
  2. Now go to the admin section using the app launcher (illustrated by nine dots).
  3. Under “Admin centers,” click on “Exchange.” You may need to click “Show all.”
  4. Under “Mail Flow” click on “Rules.”
  5. Next a command panel will show and here click on the “+” symbol.
  6. Then click “Create a new rule.”
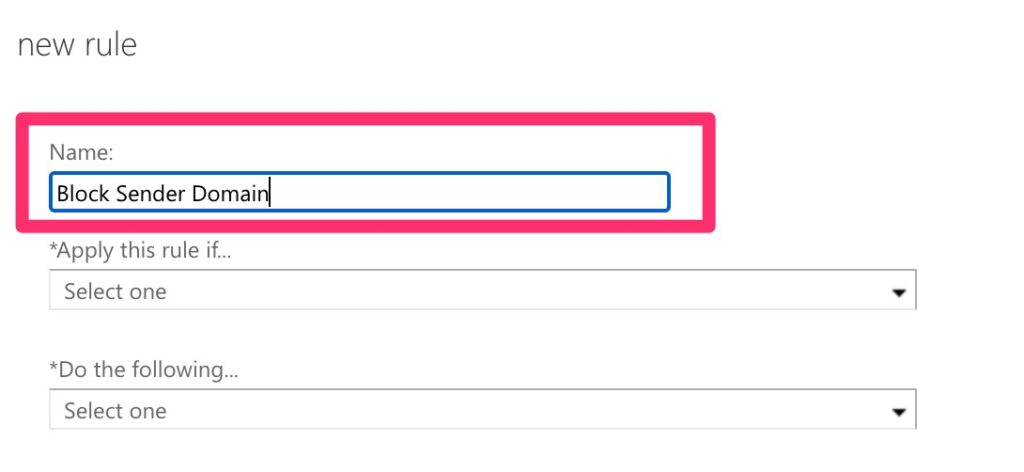
  7. In the “name” box make sure you type out “Block Sender Domain.”
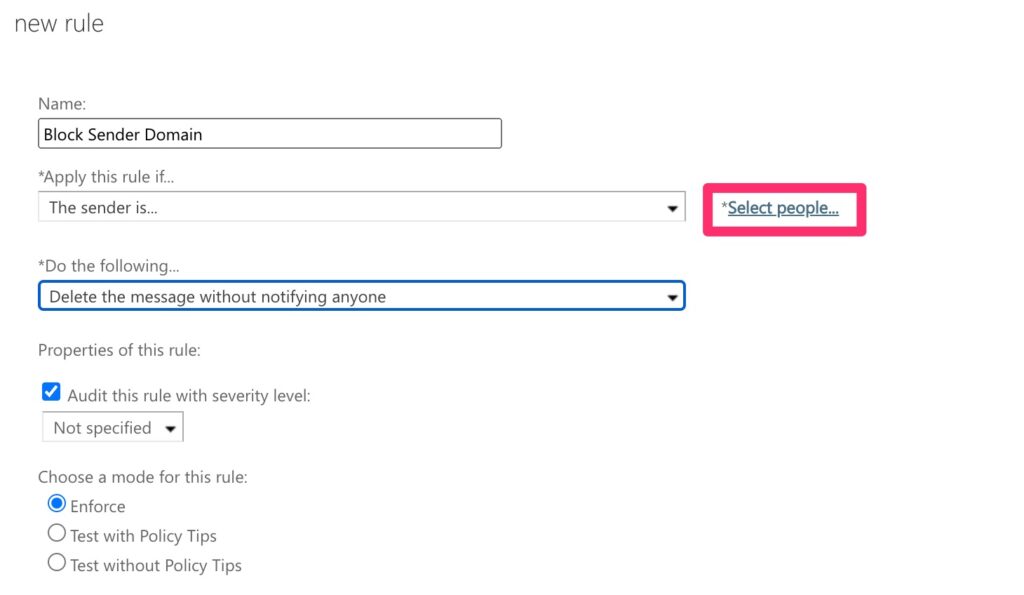
  8. Fill out the information panel with the domain you wish to block.
  9. Make sure “Rule mode” is set to “Enforce.”
  10. Then click on “Save.”

To assist prevent email spam from being forwarded to a user’s inbox, an administrator can utilise numerous Office 365 spam filter settings. If you apply the parameters given below, the Office 365 spam filter will be better equipped to stop email spam and prevent false negative messages. A false negative in this context refers to email spam or trash messages that are sent to a user’s inbox.

get office app-icons
compatible Compatible with Windows, Mac OS, and Android.FROM $6.00 user/month

Bulk mail blocking in Microsoft Outlook:

If the spam is mostly mass mail, such as newsletters or promotions, you may configure Office 365’s spam filter to prevent bulk mail. The administrator can accomplish this by employing transport rules to filter bulk email communications aggressively.

You can add additional conditions to limit the application of transport restrictions to certain receivers inside your company. The harsh bulk email filtering settings will only apply to a few highly targeted individuals, while the majority of your users (who primarily receive the bulk email they signed up for) will be unaffected.

  • In the Exchange admin centre, go to Mail flow > Rules.
  • Click Add, and then select Create a new rule.
  • Specify a name for the rule this can be the one stated above for rule.
  • Click More options then, under Apply this rule if, select the subject or body > subject or body matches the domain you want to block.
  • In the specified words or phrases dialog box, add some regular expressions commonly found in bulk emails.

You may configure your spam filter rules to add the sender address or domain to the spam filter’s sender block list or domain block list. Spam will be noted on emails from senders or domains on a spam filter block list.

All configuration parameters display on a single screen when establishing a new policy, however, when modifying a policy, you must travel through many panels. The settings are the same in both cases, but the rest of this method explains how to update a policy and access these options.

surface pro 8Surface Go 3surface pro 8

Why would you want to block domains?

Domains have an effective approach in allowing you to link your Outlook platform with DNS approved domains. However, there may be certain times where you don’t require this service and therefore, will have the need to block their users from sending emails to domain names that they consider untrustworthy. Exchange makes this possible through the use of transport rules, also known as mail flow rules. You can use transport rules in Exchange on-premises as well as Exchange Online.

Another reason why you may wish to block a domain off exchange is spam based content. Spam is unsolicited electronic junk mail delivered in bulk via the internet or via any electronic message system.

Things to look out for when making a new transport rule

A misconfigured transport rule may easily result in your organization’s outgoing email being refused. Always test your transport rules in a lab first, and then apply them in test mode for a period of time in production to see how they affect things.

Blocking based on domain names does not always address the problem of an unsecured or untrustworthy email service. Many additional domain names housed on Yahoo email servers are not blocked by a restriction like the one above in the case of some mail providers like Yahoo. And who’s to say a trustworthy partner’s email system hasn’t already been hacked, or that confidential emails won’t be viewed by unauthorised individuals after they leave your company.

By forwarding an email to another address, such as a Gmail account, and then sending it to Yahoo from there, domain-based banning may be readily avoided.

In-depth step by step process: How to block domains in Microsoft Exchange Online admin center?

windows 11

Breakdown of steps:

  • First, you need to sign into Office 365 using your normal login details.

Use your details associated with your Office account for example email, Phone even your associated skype account.

  • Use the app launcher to navigate to “Admin”.

The app launcher is illustrated by nine dots on the top left side of the display. You need to click on this to access the Admin portal.

  • Under the Admin center click on Exchange.

In this example “Exchange” was pinned so it was on the main menu panel on the left if it isn’t for you. Click on “show all” and this will bring up the “Admin centre” and here you want to find and click on “Exchange.”

  • Then under “Mail Flow” click on “Rules”.

As mentioned earlier in the blog the rules section needs to be addressed properly as it may affect how the content of your Exchange account flows with different users.

  • Next a command panel will show and here click on the “+”.
  • In the “name” box make sure you type out “Block Sender Domain”.
  • Fill out the information panel with the domain you wish to block.

Finally, click on save to save the presets as default.

That’s it for this blog post — thank you for taking time out to read our content. Please feel free to email our team about how it went if you followed the steps or if you need more help with the questions we answered in this Blog.