View our latest articles

Customize document library view SharePoint Online

To show items in a way that makes sense for you, you can construct custom views of a document library. You can, for example, choose which columns to display and arrange them in any order you choose. You can also construct a display that meets your needs by sorting, filtering, or grouping items. Give the view a name and save it when you are finished. In the top right corner of the document library page where you created the view, a link to the custom view will appear in the view menu.

Step by step process, Create a view – Edit a view:

How to create a new view:

  • Firstly, log into Office 365 >> go to Sharepoint >> Your Sharepoint site.
  • Next click on settings illustrated by a gear icon on the top right side of the dashboard setting bar.
  • In settings click on “Library settings”.
  • At the bottom of “Library Settings” click on “Create view”.
  • Choose the view type you want and click on it.
  • Name the view and change the presets to ensure you get exactly what you require.
  • Once you have edited the presets you can now click on “OK” to save the new default presets.

How to customize library view:

  • On the tab above your document library, you will see a list of different functions related to the document library, Including the switch view options where you can change and edit views when needed, click on this box.
  • Now select the view you made if it’s not set as default.
  • Once this is done click on “edit current view”
  • Now you can edit the settings the way to need them to appear in the library.
  • Once this is complete you can now click on OK and it will save the setting presets and allow you to use your view sets the way you want to.

Something you might want to do is limit the number of items displayed on a certain view. It is just like with Google Search, not many people go past page 2 or 3 of search results. Same with large SharePoint lists, people may refrain or get frustrated from using the next button repeatedly to attain the required information.

Why would you want to customize the view,

SharePoint lists and libraries can display data in a variety of ways and in various views. “All Items” in lists and “All Documents” in libraries are the default views provided by SharePoint. It’s a simple view, but you can customize it by adding new views and using filters, styles, and grouping to organize data in ways that work for your company.

If you’re working with businesses in SharePoint Online and trying to transition from a classic to a modern list/library experience, you could encounter some resistance from information workers or members of your organization. Editing the view and customizing it in a way that benefits your company allows you to create multiple views in a library suited to the way everyone in a company likes. This way everyone in a company can be more productive and locate information a lot quicker opposed to the predefined setting of just one user.

In-depth step by step process:

  • In order to properly customize the view settings, you need to first create a view setting, to do this, Firstly log into Office 365 associated with the network you need to edit the SharePoint preferences for the document library view.
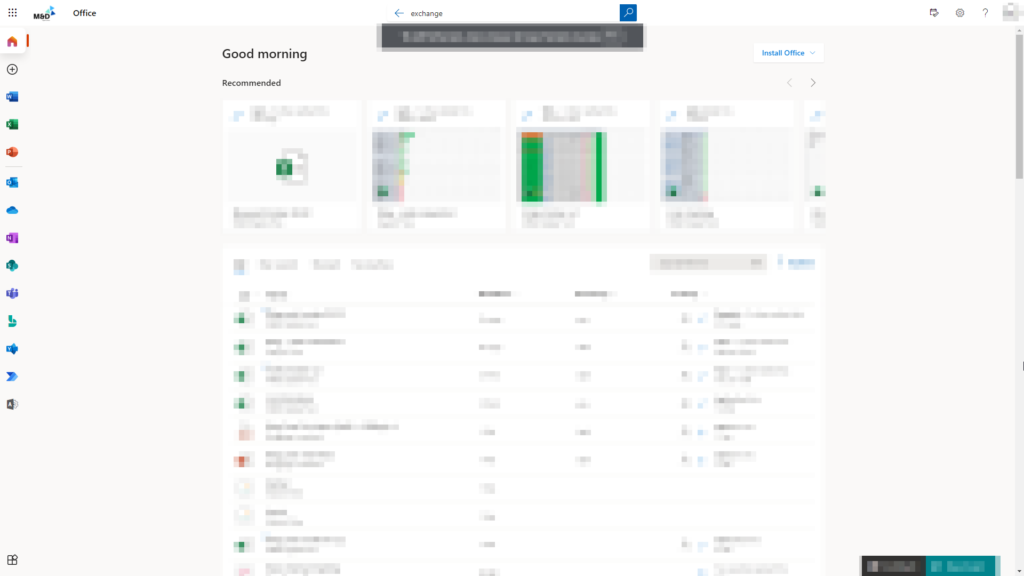
  • Next, using the settings bar on the left side of the display you want to locate SharePoint, then click on it, if it’s not in the left side toolbar click on the app launcher illustrated by 9 dots.
  • You now need to visit your SharePoint site linked with presets you wish to edit, once you have found the site you need to click on it. For instance here the selected site is called “Testsite-Misha” which is a group site meaning it has more than one member associated with it.
  • Click on “document” to follow, this will bring up all the documents associated with the site, here you can also find the documents library you wish to edit.
  • Click on settings illustrated by a gear icon and click on library settings.
  • Now click on “create view” which is at the bottom of the page.
  • Now select the view type you want in this case we’re going to select “standard view” 
  • Now edit the presets the way you want them to appear once the document is complete.
    • For instance, the name of the view, here you may want to have the names of associates to the organization or names of individuals who have an importance to the company. You will want to edit this information and ensure it’s the way you want.
    • You can now edit the audience if you need to keep it personal you can select the tab which says personal view and if you want other members to know you can click on public view and everyone associated will be able to see your view settings.
    • Column settings will allow you to adjust category information which by defaults are in columns. You can edit this information and sort it the way you want to change the position value of the Name you can edit these features and ensure it’s right.
    • You can even edit the sort so how you want the content to be displayed in the library. For instance, you can edit the document to be displayed with names going from A-Z or the opposite.
  • Once this is done you can click on the OK button which will save your preferences.
  • To further edit you can click on “Switch view options” and click on “edit current view”

Edit the settings and click on OK, similar to the previous settings related to the creation of the document viewer.

How to apply a retention policy to a mailbox Exchange Online.

Every company organization, large or small, must deal with ever-increasing amounts of data daily. Data gets harder to manage as it grows in bulk. For the following reasons, a company’s ability to handle such a massive volume of data is critical. Exchange Retention is the ability to retain and delete information in exchange online. Having this in place allows companies more flexibility in how the data is managed and allows them to stay more organized by allowing simple management of data.

Step by Step process, How to apply a retention policy?

  • First login to Office 365 and login to the admin portal using the launcher,
  • Next under Admin Center click on “Exchange” which will bring you to the Exchange admin center.
  • Under roles click on Admin Roles.
  • After that click on “Compliance Management”.
  • Then click on “Permissions”.
  • Scroll down and click on “Retention Management”.
  • Once you’re in the retention panel click on the “+” symbol.
  • Provide a name to the policy and click + the option to add the desired tags.
  • Here you can also select more than one retention tag using the add button, and then click OK.
  • Click the Save button.
  • A new retention policy is created.

The data is unaffected by the retention policies. In fact, once data is placed in a retention policy, it remains there. The user will be able to work with the data with ease, and no obvious modifications to the data or its characteristics will occur. When a user deletes data, whether intentionally or unintentionally, a copy of the data is immediately saved.

A copy of the deleted data is saved in the Protection Hold library for sites, and a copy of the deleted data is saved in the Recoverable Items folder for messages and public folders. Both locations are entirely safe, and the majority of users are absolutely unaware of their existence.

The retention policy works for a set amount of time and then deletes all copies of the data. The deleted data will not be recovered if you use Office 365 services and your retention policy has expired. There is a manual approach for transferring emails from Office 365 to Outlook, but you may utilize a professional backup that can save data to a secure location to boost data protection and make it stay forever.

The 2 ways you can apply Exchange Retention: 

There are 2 ways you can apply retention to an Exchange account for management, both of these methods can work together, and you don’t have to choose one or the other.

  • MMR or Messaging Retention Management.
    • which allows you to store, archive, and remove data in exchange mailboxes. This method works for versions 2010, 2013, 2016, and 2019 of Exchange Online and Exchange on-premises.
  • Office 365 Retention Labels and Retention Policies.
    • The security and compliance center has a lot of capability. This technique manages retention, deletion, disposition reviews, event-based retention, and more using a single label. This is applicable to Exchange Online as well as other Office 365 services.

Alternative outputs:

  • If you wish to use the expanded archive feature in your organization, you’ll need to use MRM to automatically moving messages from email inboxes, set items, folders, and other places to the expanding archive. In-Office 365, that feature isn’t available.
  • You should look at Office 365 policies if you want to develop a single retention policy that works across all of the key Office 365 workloads. Office 365 retention is also useful if you want to have several policies for a single Exchange mailbox.
  • Next, Office 365 retention is your only choice for retaining data in inactive mailboxes. If you employ MRM retention, you’ll need to put them on legal hold in the active mailbox to avoid accidentally deleting data.
  • Finally, MRM and Office 365 both have capabilities for managing retention for mail, calendar, public folders, conversation history, and other items.

Using delegated administration, you can apply this policy to all users. This script does not currently support two-factor authentication for delegated administrator accounts. Before attempting to apply retention on anything other than Exchange, this will normally verify whether a customer has a SharePoint URL.

In-depth Step by step process:

  • Firstly, log in to Office 365, associated with the Exchange account you wish to apply retention too.
  • Next click on Show all to access the admin center section where all the admin dashboards for Office Suite software are located. Sometimes the Admin Center content may be pinned to the main menu panel in this case if you find “Exchange” click on it, If not click on Show all and then click on Exchange under Admin center.
  • You will now enter the admin dashboard where you can access admin-related settings made for Exchange. The admin panel will be users who need more authority over the network and therefore will be able to control more of what happens in the network associated with a business. In the admin menu panel under “roles” click on Admin Roles.
  • Once you’re in the Admin Role section you now need to click on Compliance Management “This role group will allow a specified user, responsible for the compliance, to properly configure and manage compliance settings within Exchange in accordance with their policy.”
  • Next click on “Permissions” this is where all the authorized content for management is located you will find the tab for retention here. You may need to scroll to find the tab however since it’s alphabetical you should not have an issue locating the tab.
  • Next, you need to click on “retention tag”  and here you will add your new retention policies to either delete after a given period or archive for any length of time. On the new panel click the “+” symbol which is where you can add and apply new retention policies.
  • Finally, a new dialogue box will open and here you click on the “Plus” symbol where you add the retention policy. In the example below a command set up to retain the content for 5 days then delete it. You can choose what preferences you need for instance archive for as long as necessary or delete after a certain length of time. If the action is set to delete will delete the associated content within the allotted time frame in this case 5 days. You can of course edit and refine the Retention command to suit your preferences whenever up until the time is over.

How to prevent file deletion in SharePoint?

Deletion of a file in Sharepoint is an intentional removal of a file or document which allows users to both maintain and organize content by preventing a mass backlog of unwanted files and increases the amount of storage space on a SharePoint account that is useful for additional files. Accidental deletion of information that subsequently proves to be crucial is a common concern with removing files. Backing up files on a regular basis is one technique to deal with this. So how would you prevent the deletion of files? 

Step by step process – How to prevent deletion of files in SharePoint?

  • First, sign into your Microsoft 365 account.
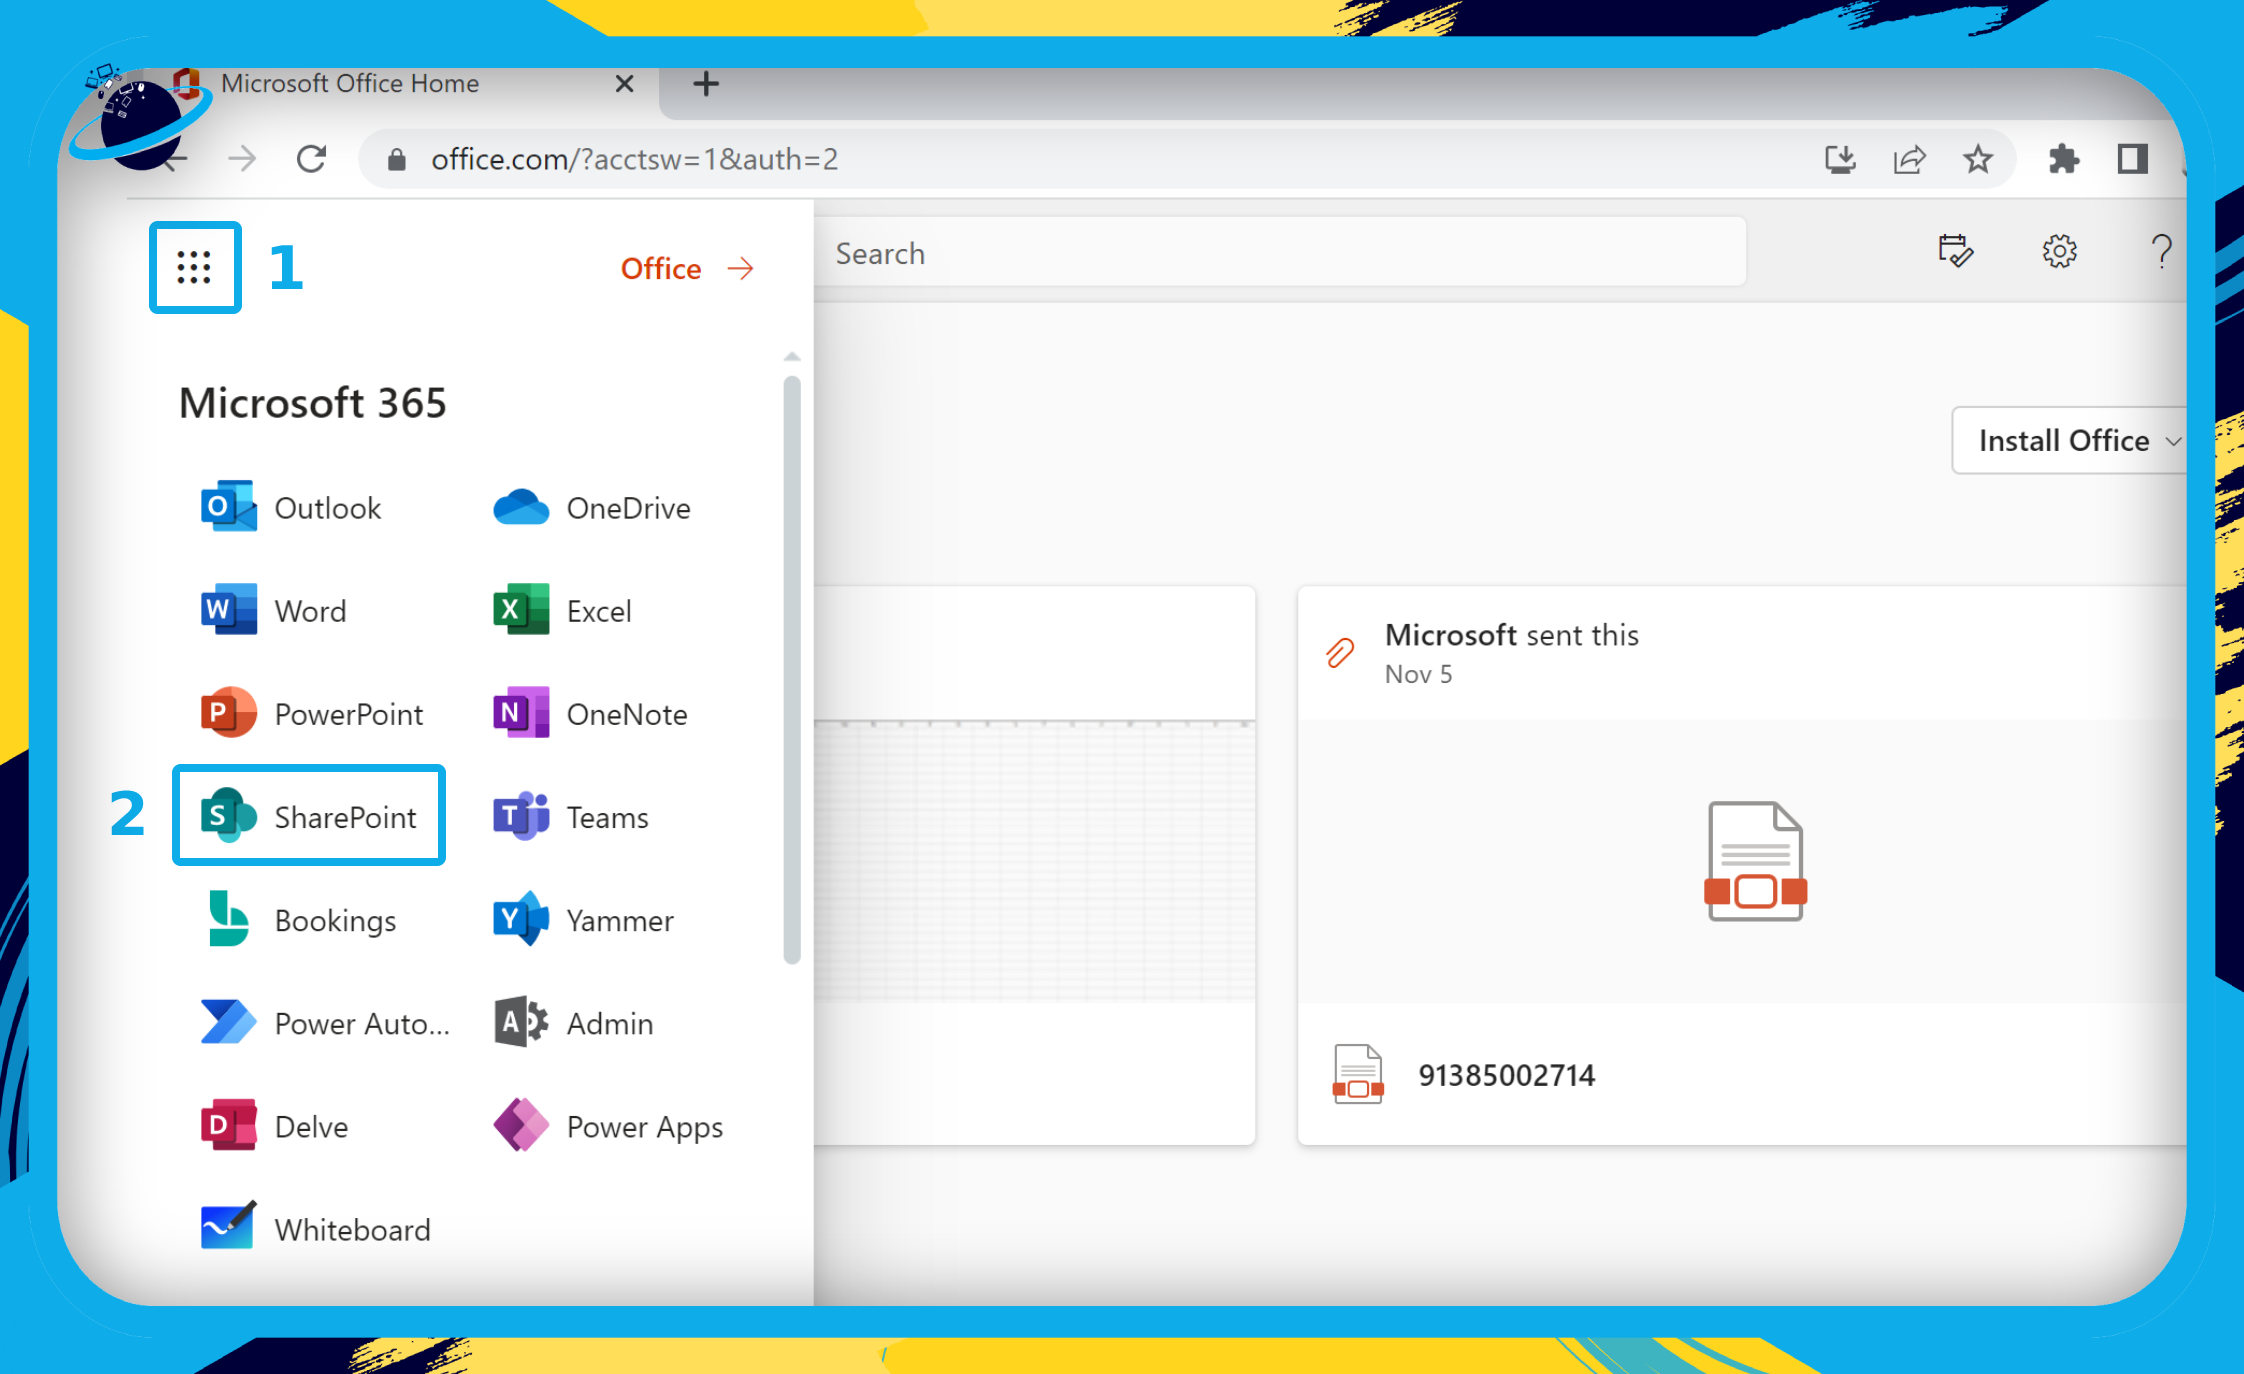
  • Click the app launcher icon located in the top left.
  • Select “SharePoint” from the list of applications.
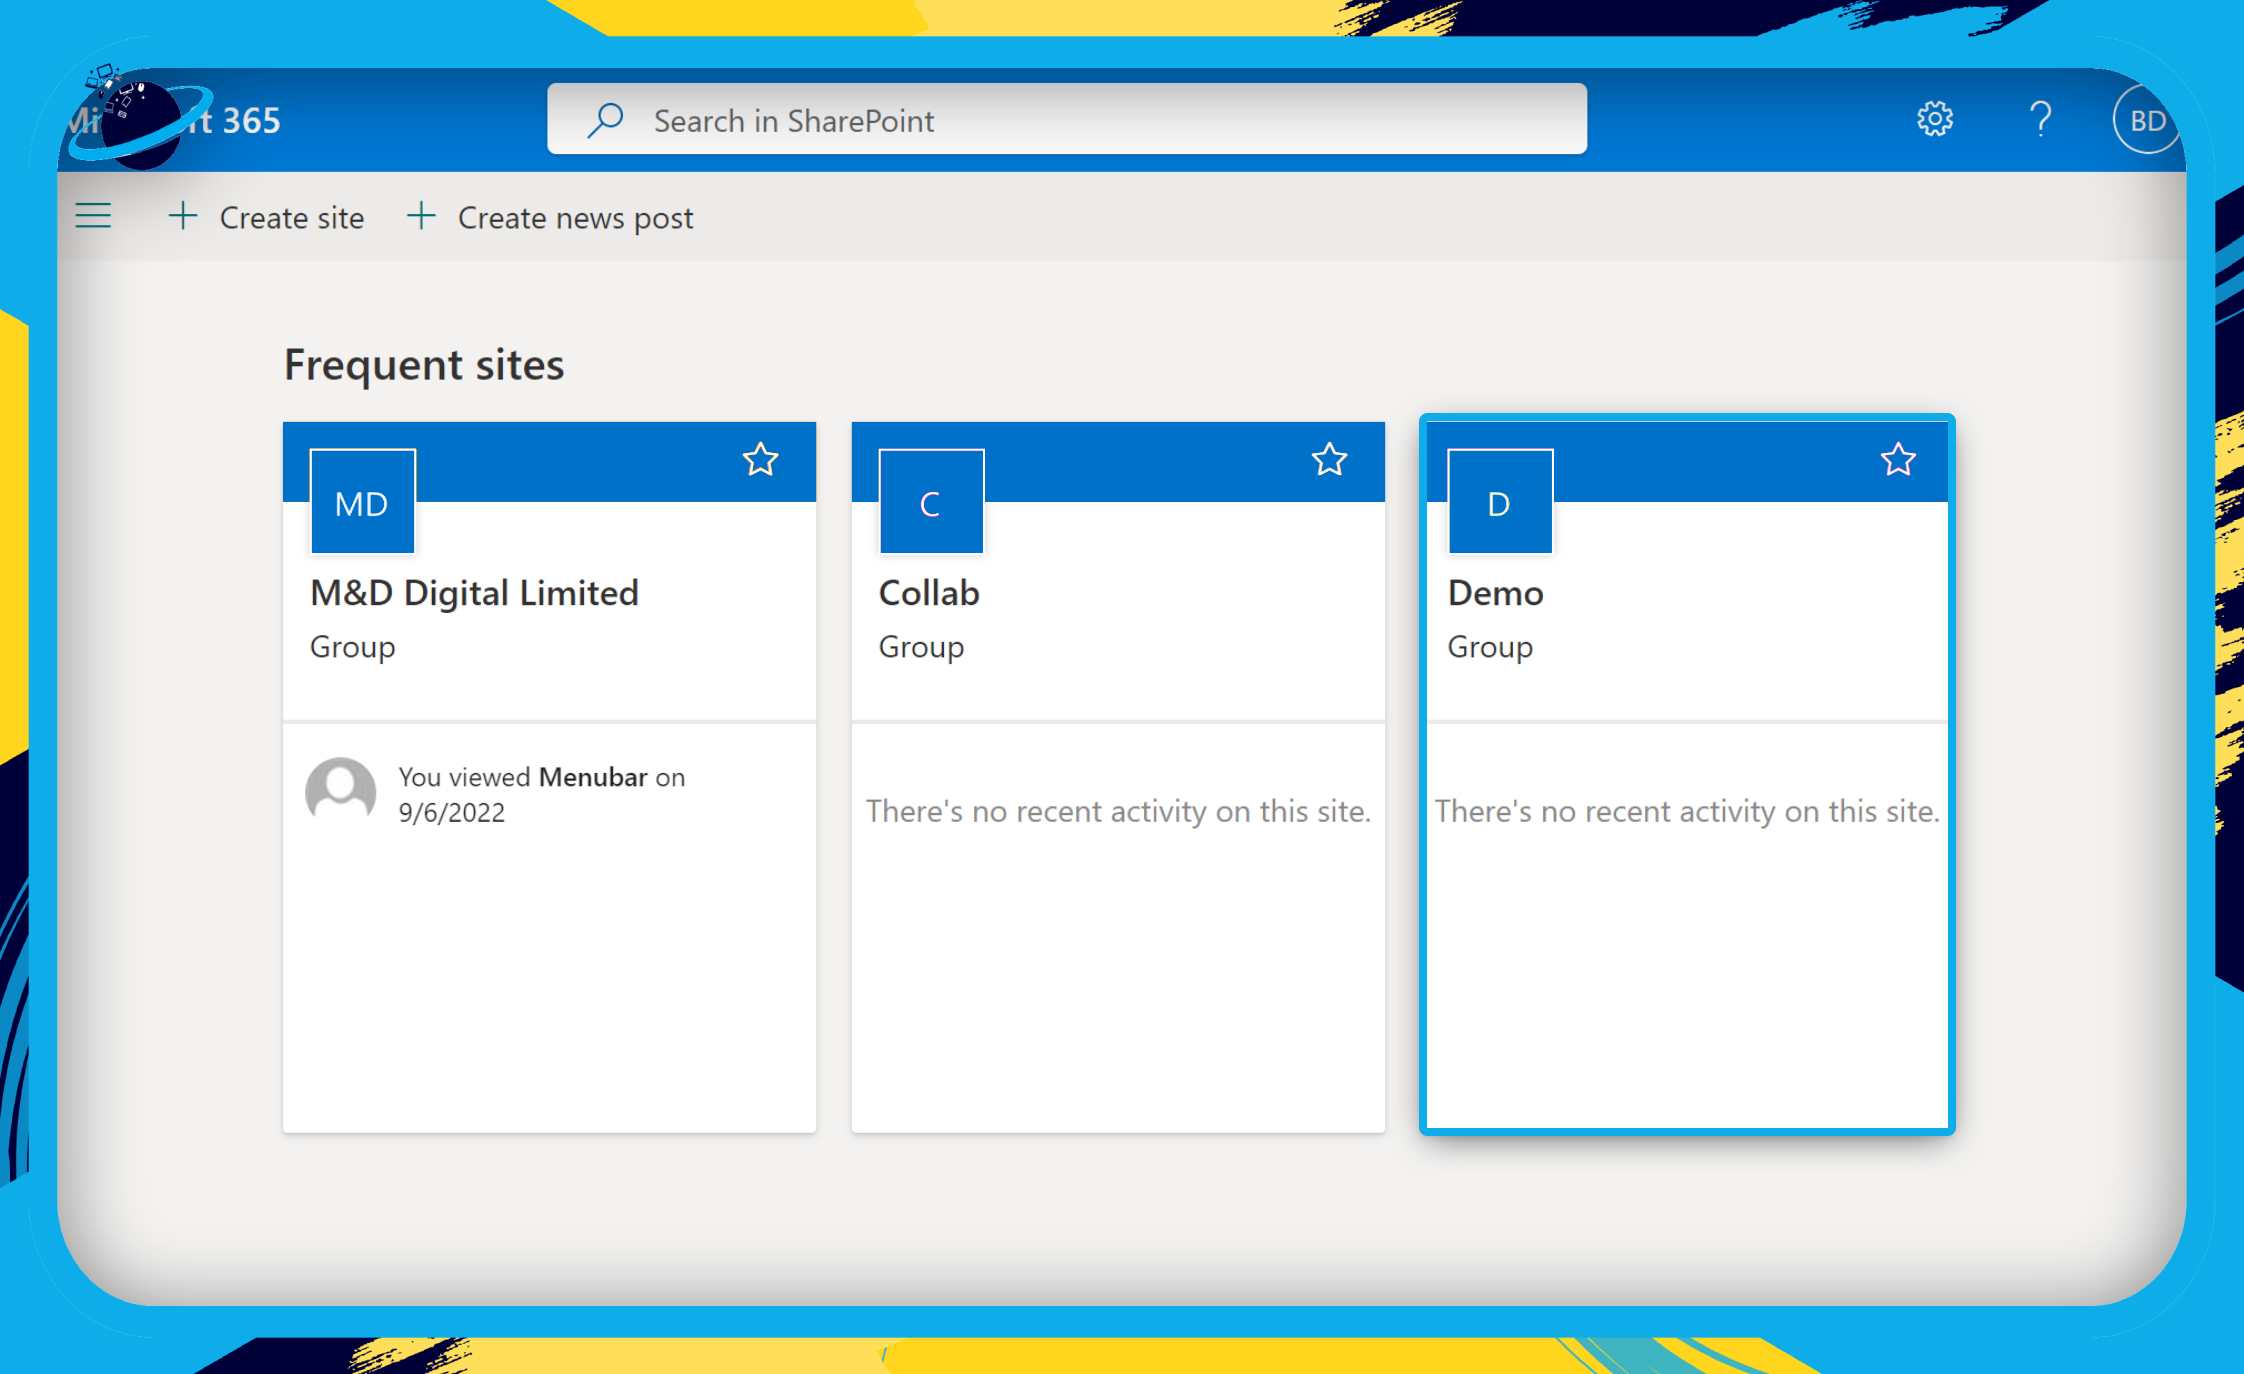
  • Go to the site where the file you want to protect is located.
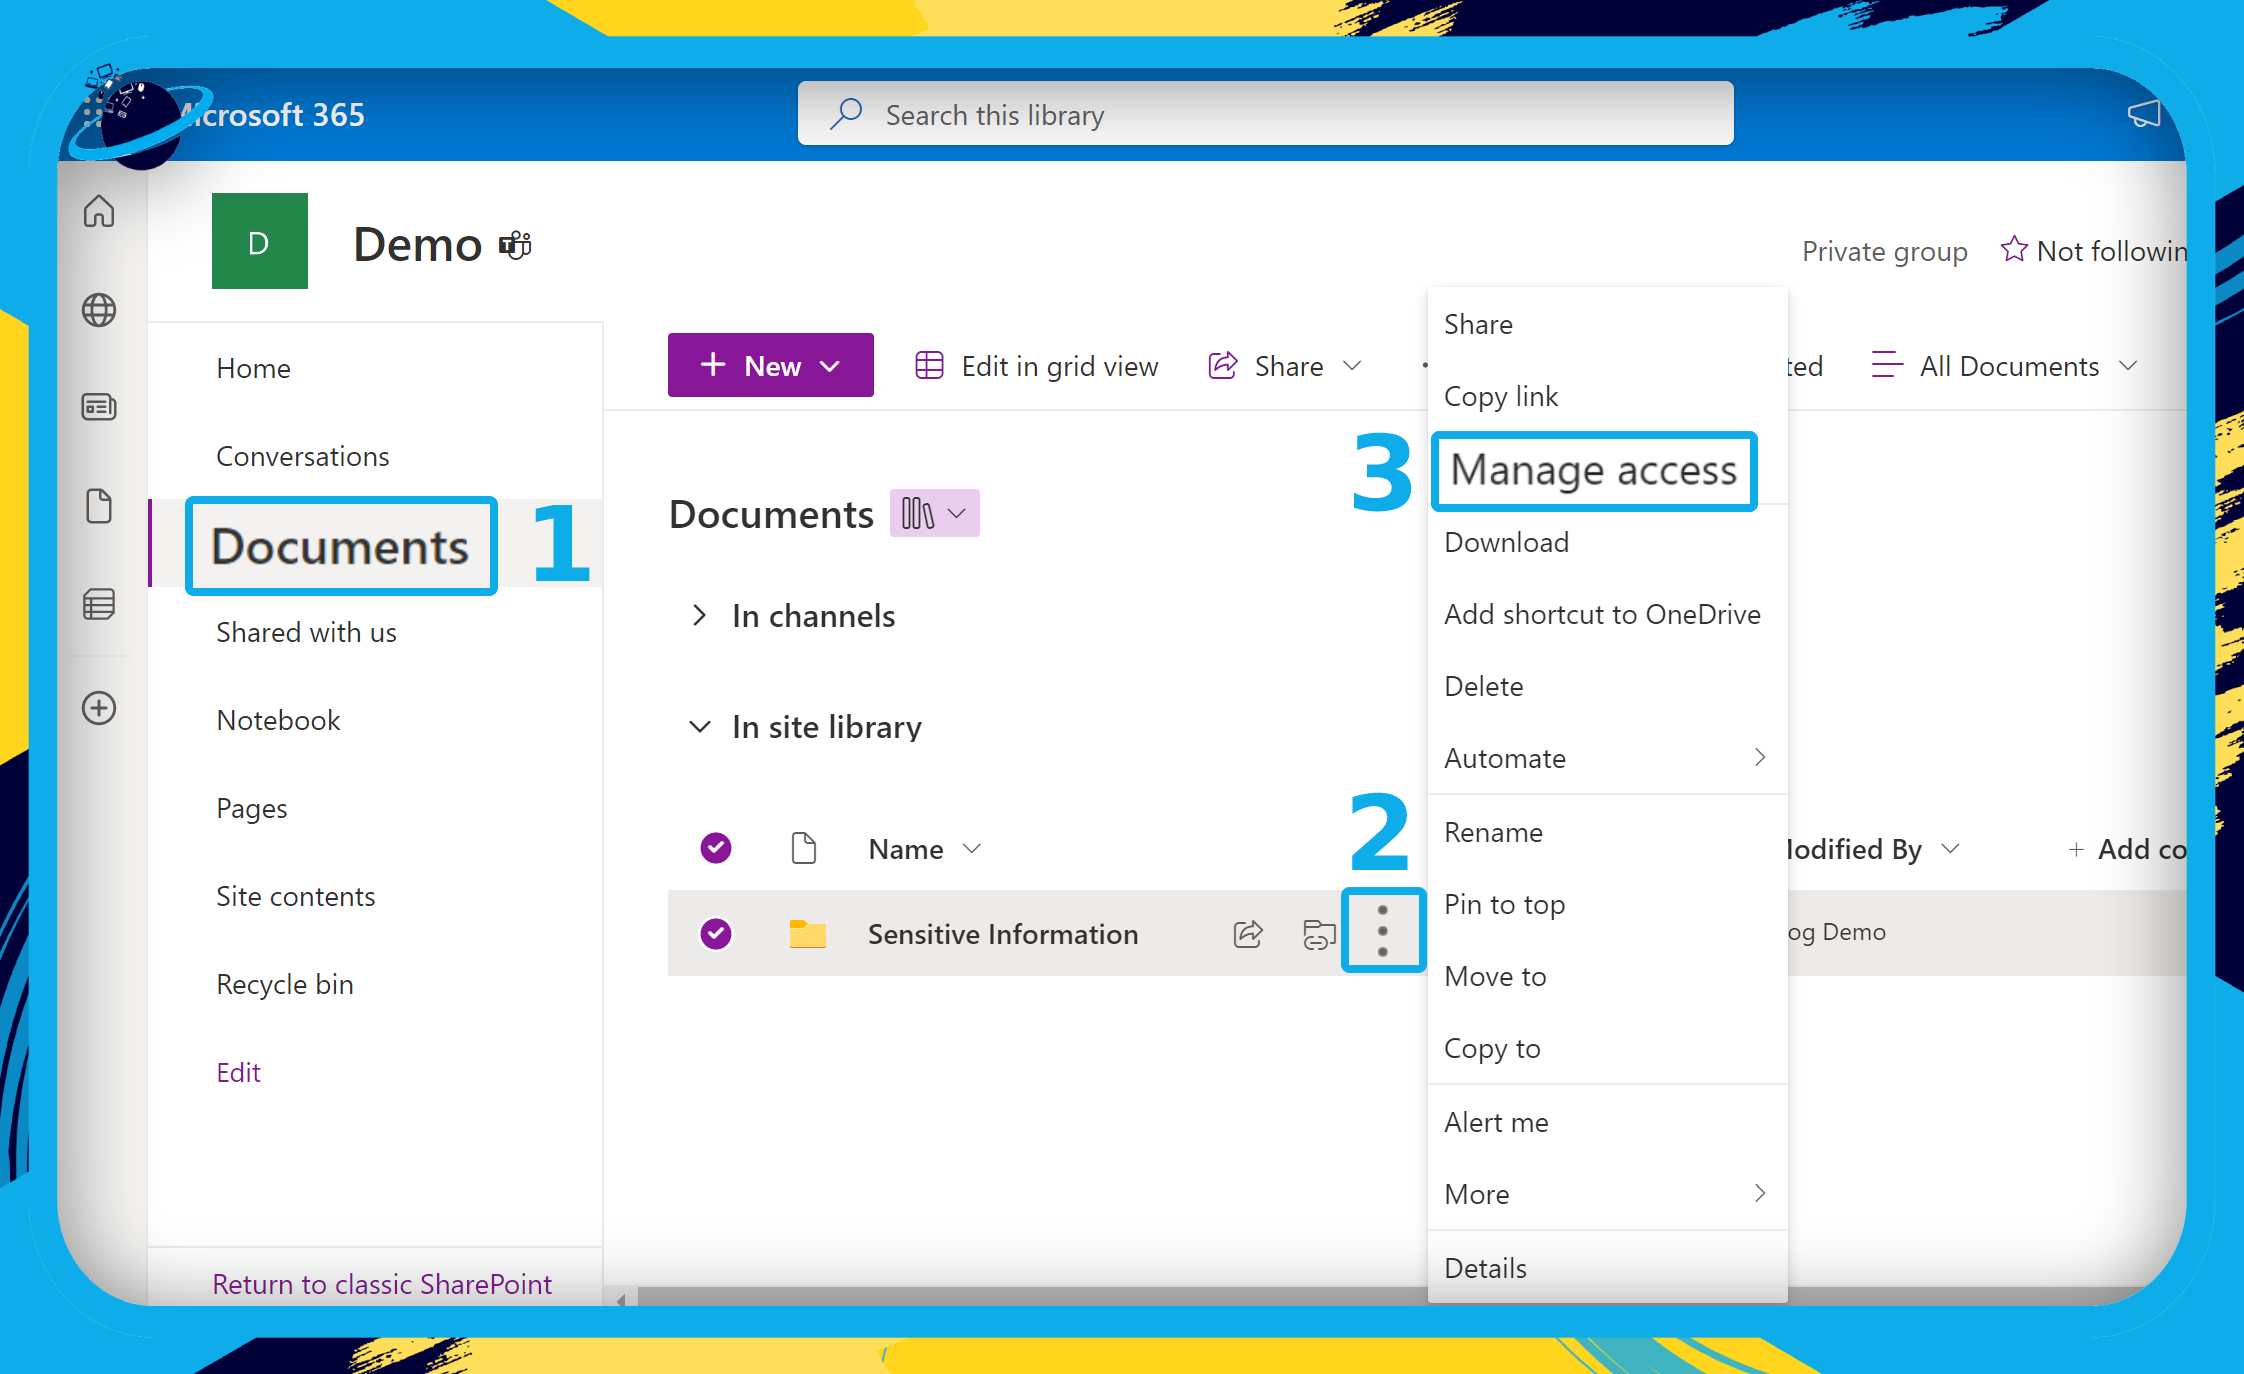
  • Go to “Documents” in the left menu.
  • Click the ⋮ three vertical dots next to the file or folder you wish to protect.
  • Then select “Manage access” from the popup menu.
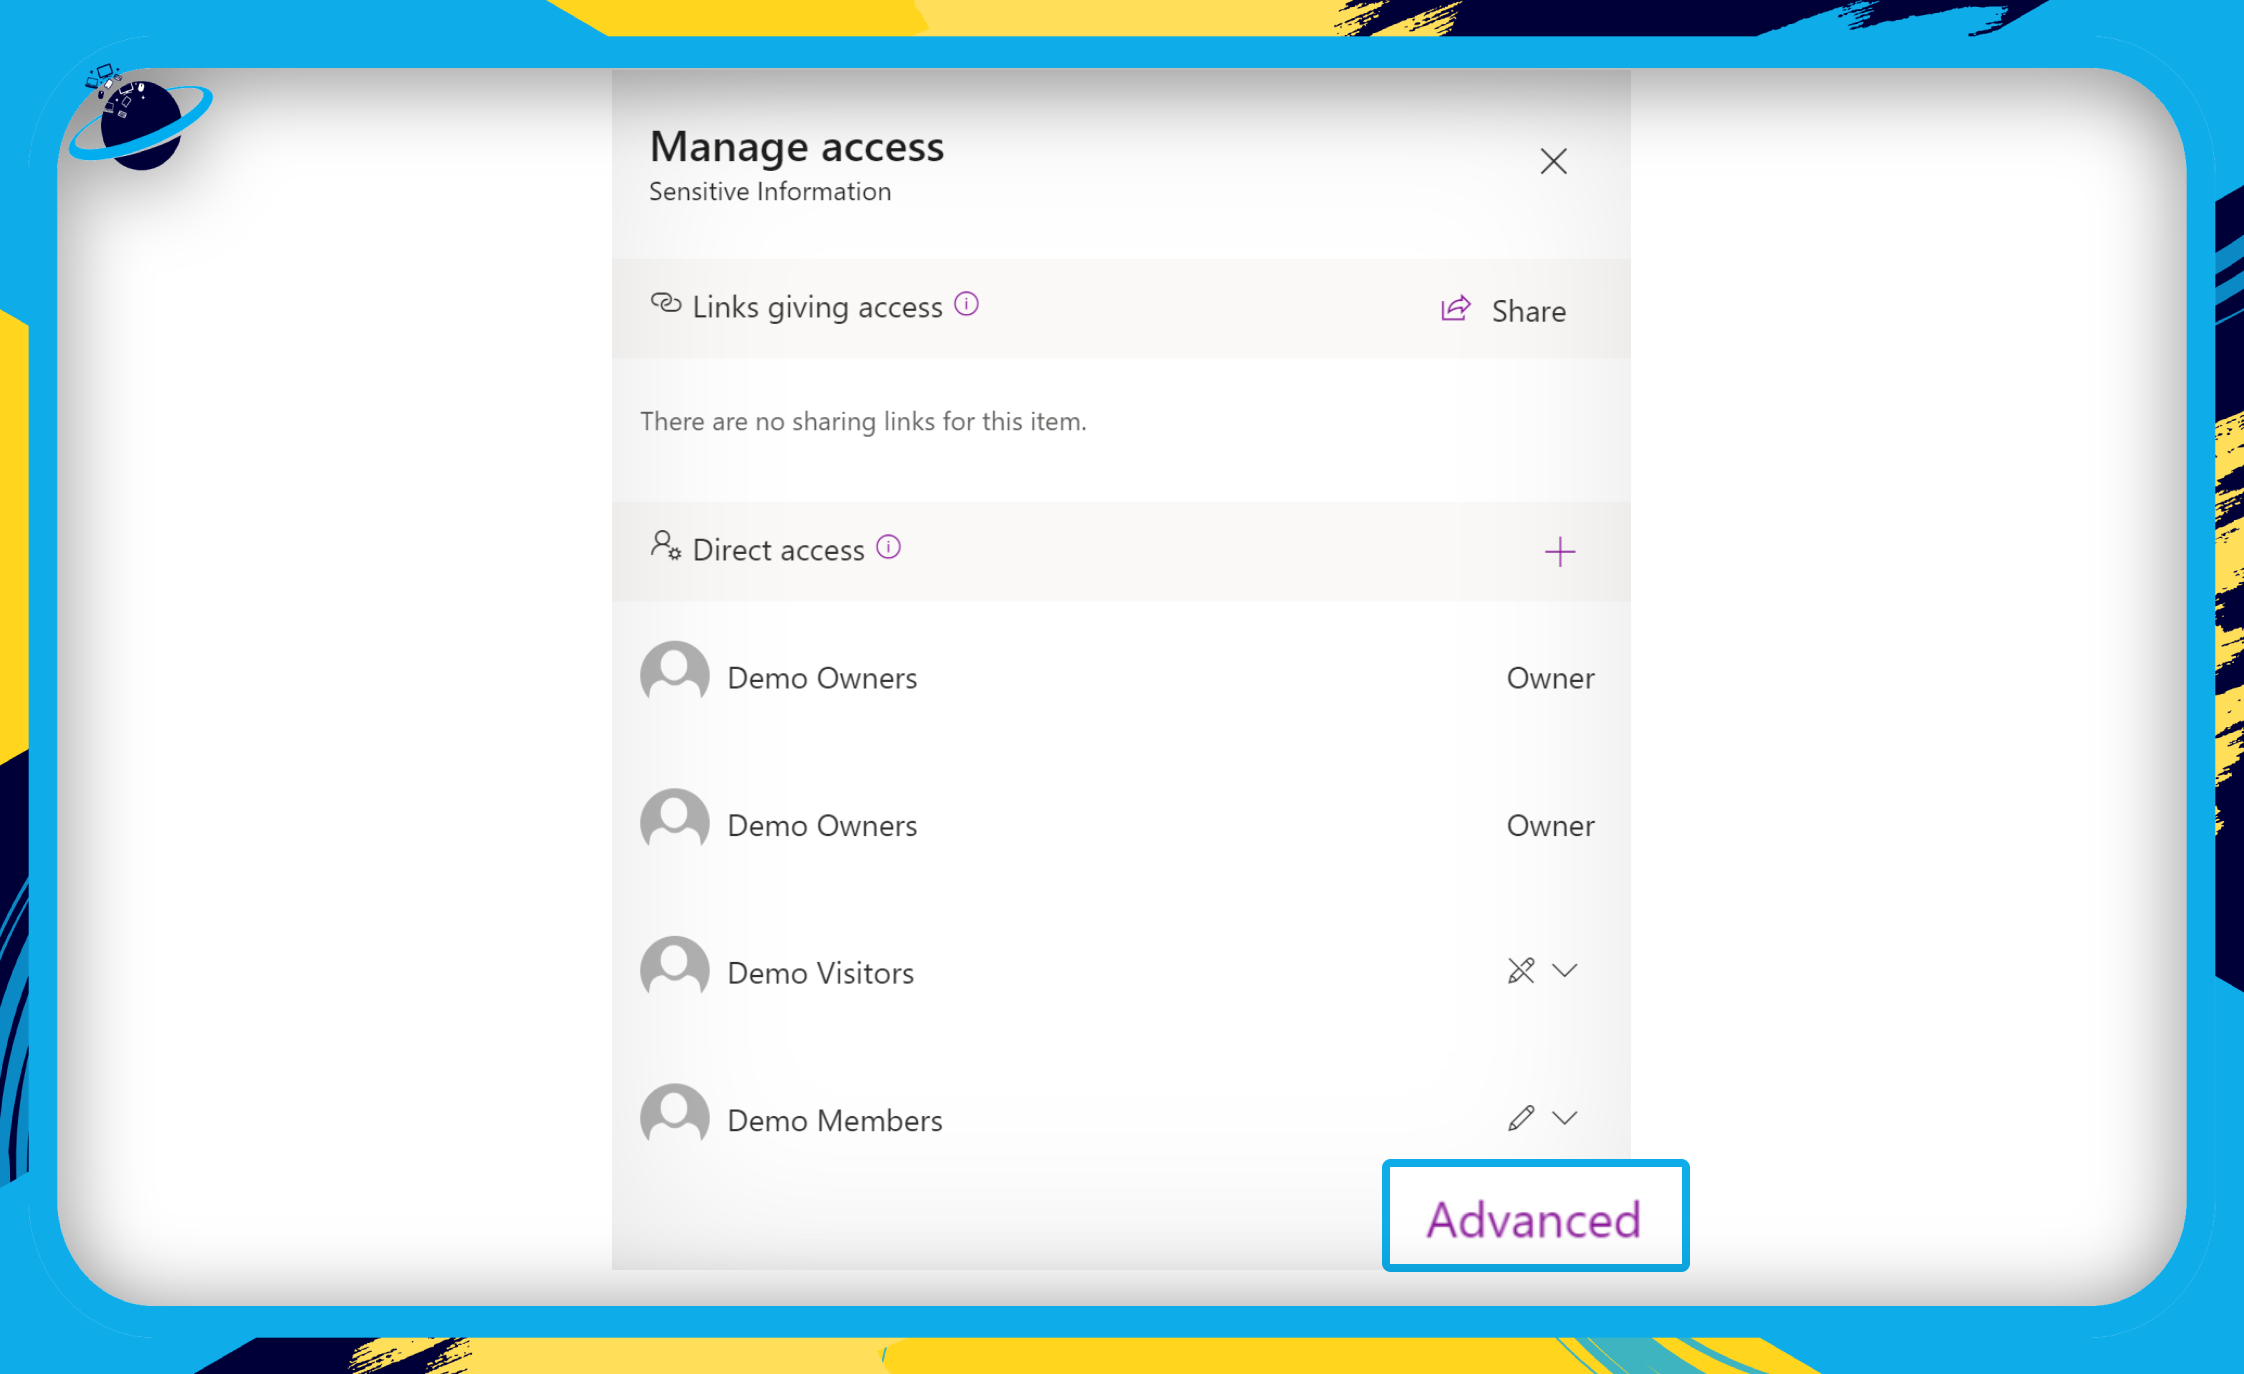
  • Click on “Advanced” at the bottom of the “Manage access” dialog box.
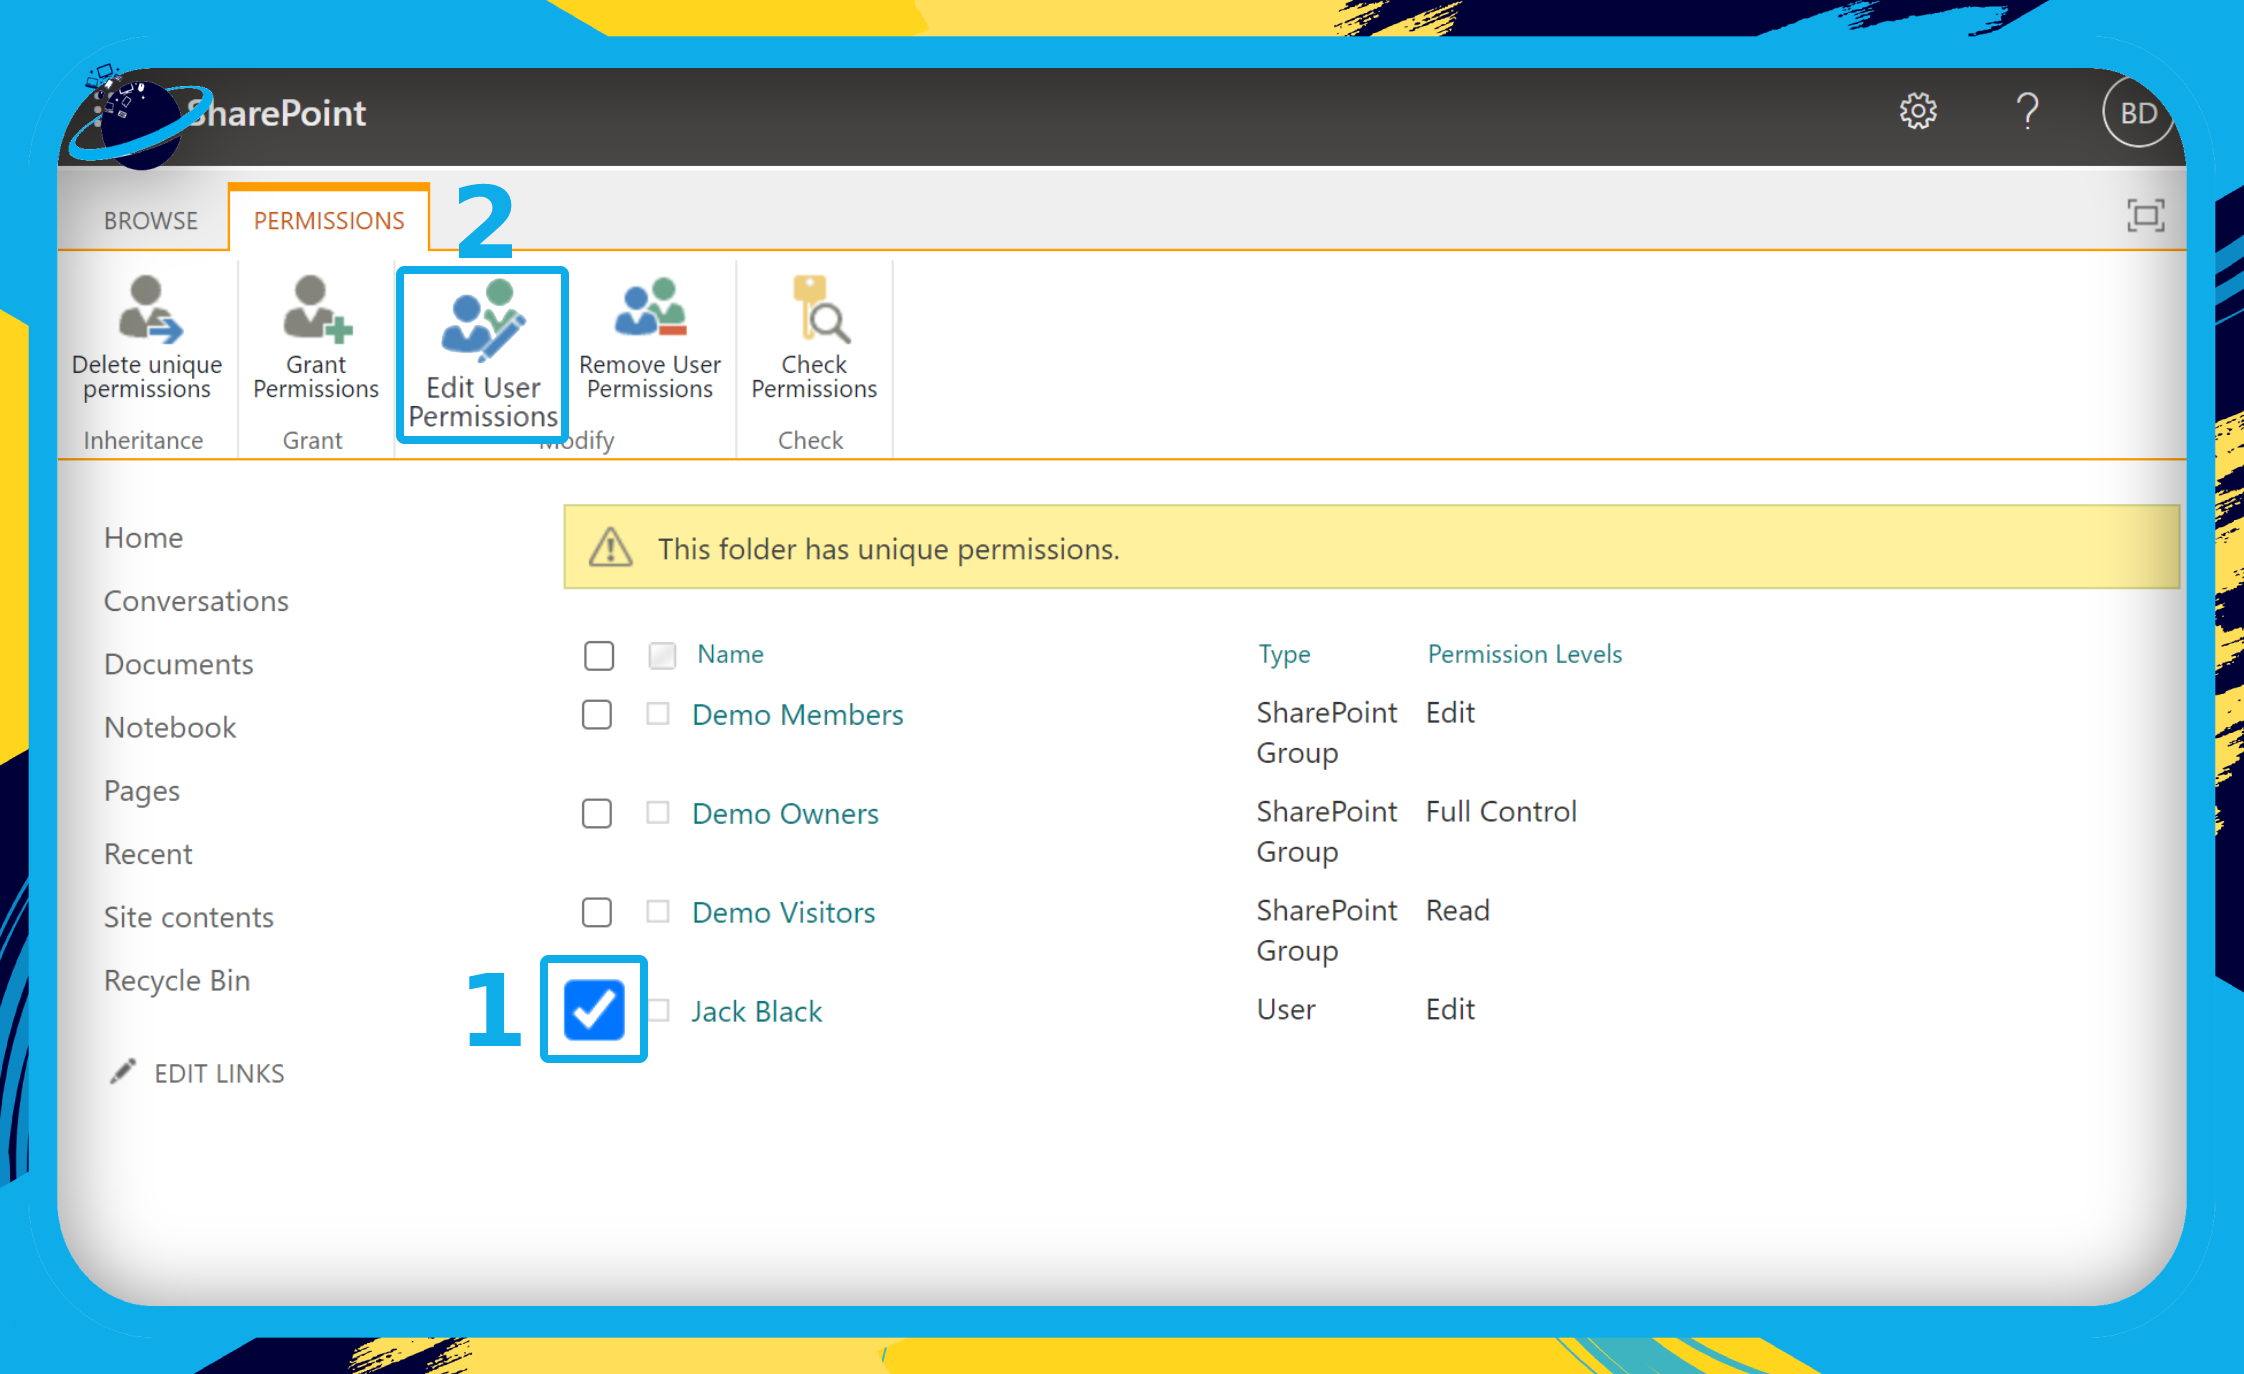
  • Select the users or groups you wish to limit access to.
  • Then click “Edit User Permissions” at the top.
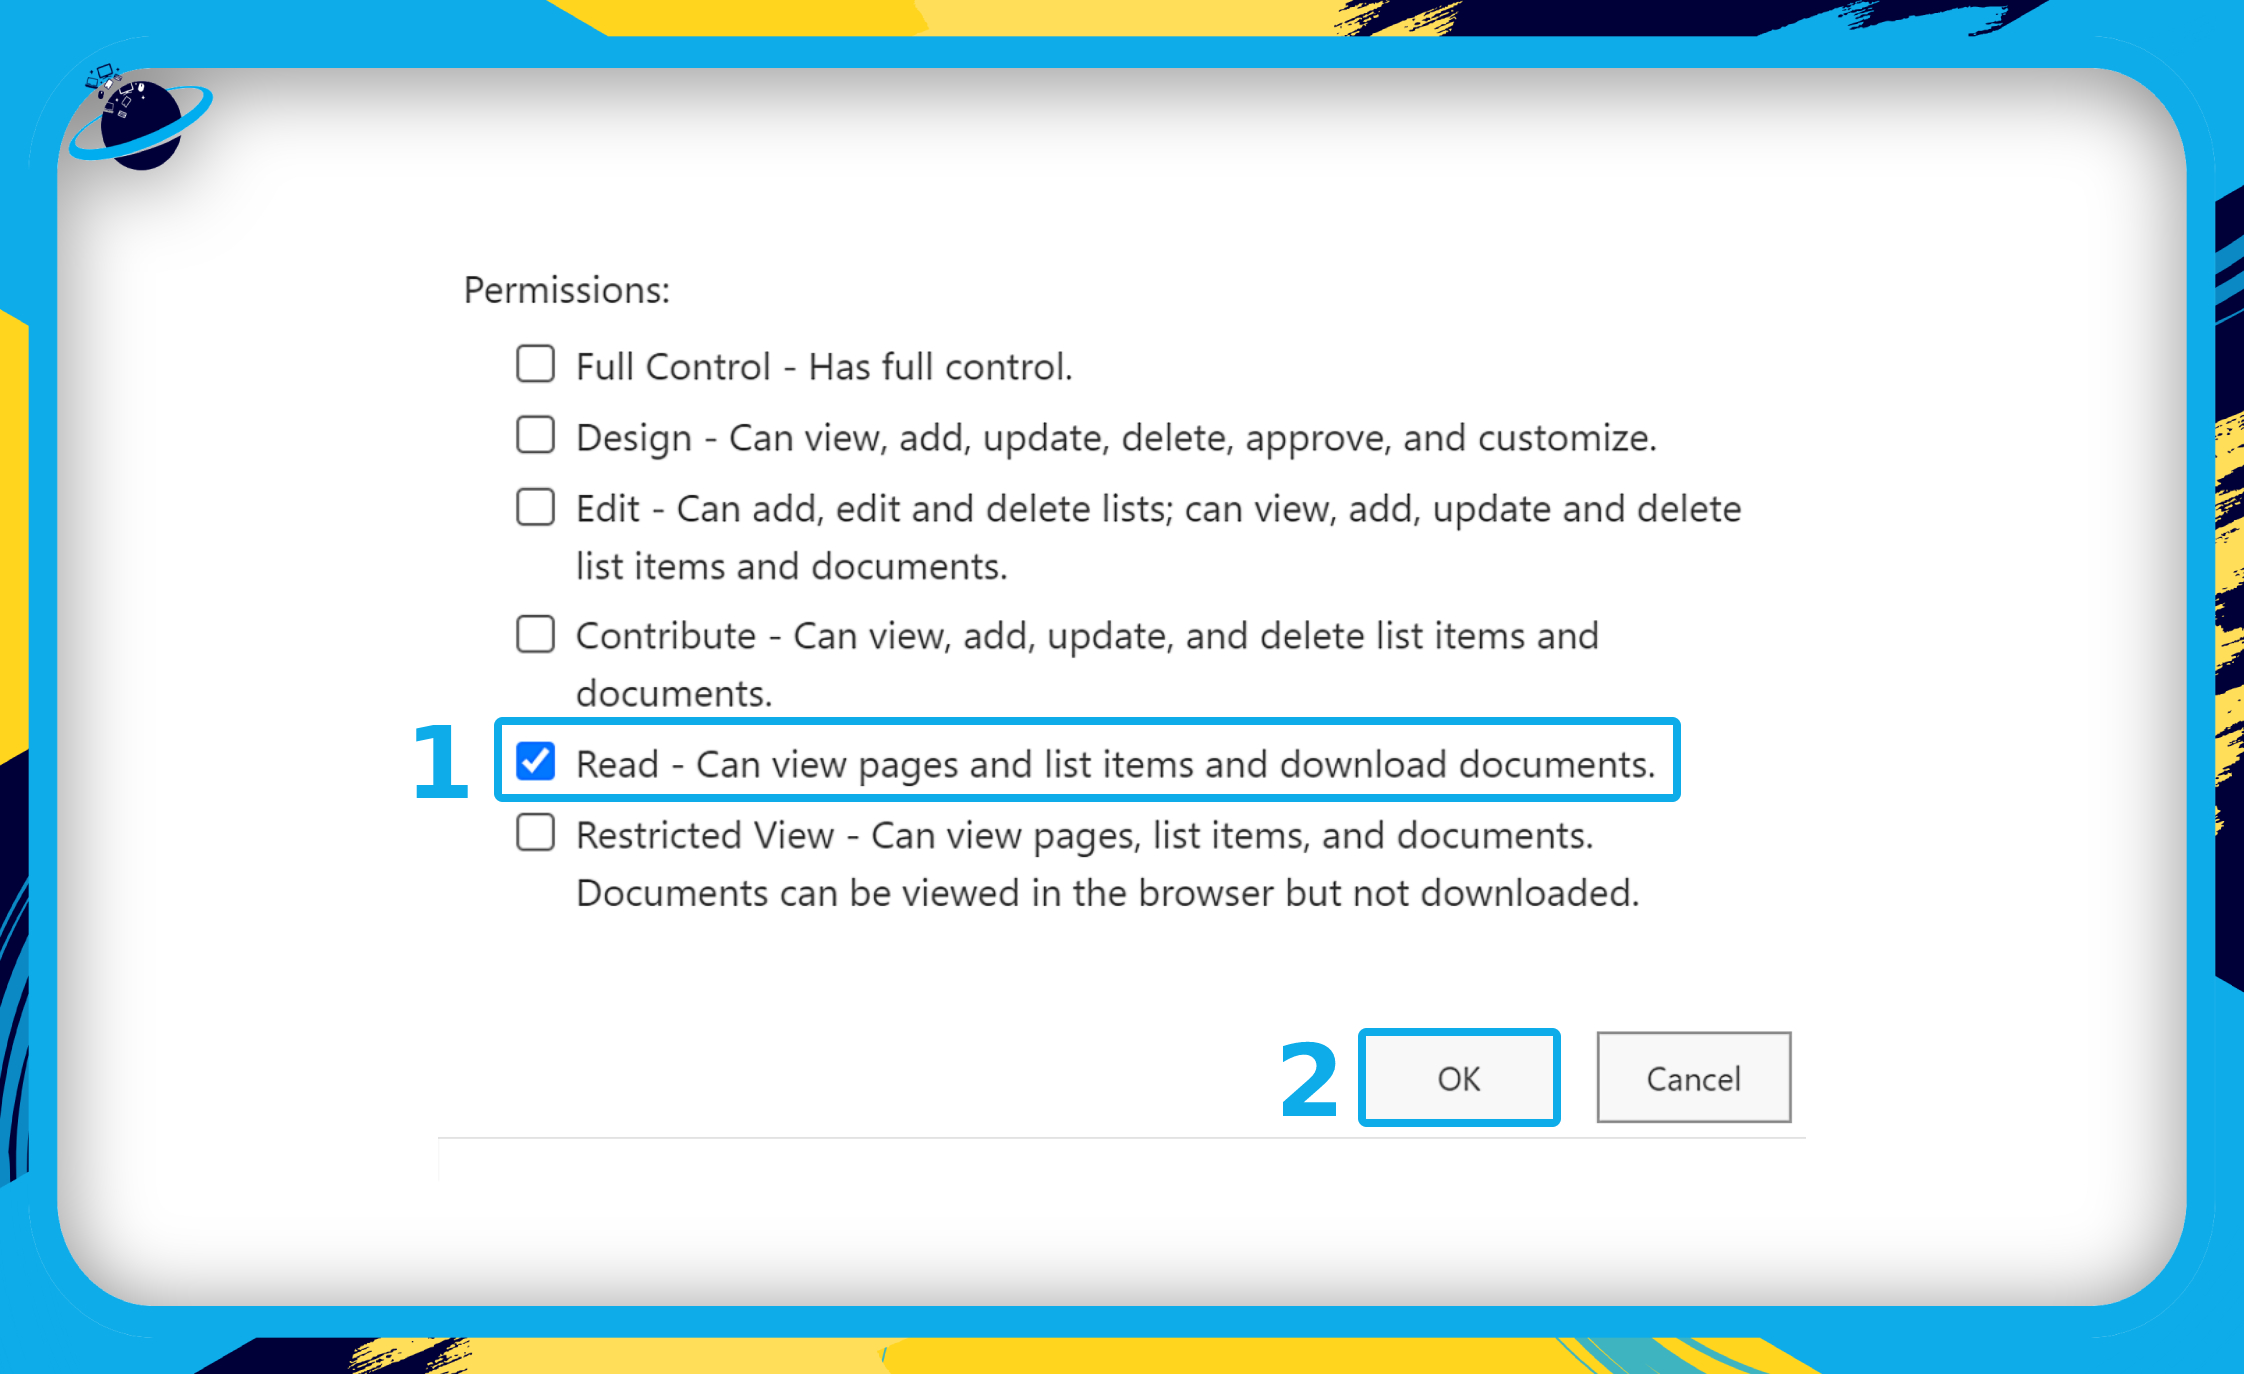
  • Select “Read” to prevent the user or group from being able to delete files.
  • Then click the “OK” button.

When you share a critical file on a team’s channel, you don’t want it to be mistakenly or maliciously deleted. If we’re talking about a critical file like a common style guide, you’ll want to make sure no one can destroy it. Let’s look at how to turn off the delete option in Teams.

It’s quite an effective SharePoint resource, but if the Member with Contribute rights tries to delete the folder either intentionally or by accident (even when appearing empty) they will be told the folder has a file checked out for editing and they cannot delete the folder. 

Why would you want to prevent the deletion of a file?

Safeguarding files of significant importance is quite essential for large organizations and companies who require a safe and effective long-term solution to ensure the most important files remain safe. This includes the prevention of file deletion at any given time by anyone. Although SharePoint does not protect your files by default from members within your group who have permission to edit, it does offer an option that helps protect your files from any deletion attempts. In fact, there are multiple ways both in-built as well as third-party ones that help keep your files from getting modified on your account. Companies will find this effective as they have an effective approach to long-time file storage on an online platform synced directly with their Office desktop account.

Create new permissions:

A slightly less effective method is creating new permission that specifically prevents the deletion of files. This can include creating permissions to only allow the viewing of certain elements of the site and not others and preventing the viewing of other members on the site. You can even completely restrict access to the selected files for other users. This will add more security to the selected files and prevent their deletion.

Step by step process:

  • First, log into Office 365 and visit SharePoint.
  • Now open the site where the file or document is located.
  • Use the steps mentioned above and navigate to the site permissions page.
  • Click on “Permission level” in the SharePoint permission ribbon.
  • This will take you to a page that lists all of the permission levels that have been created on the site. Each permission level’s description may be found here.
  • Now select all the relevant permissions that prevent users from deleting a page or file. Here you can also change permissions to allow viewing instead of deleting the files.
  • Once the correct permissions are set you can click on “submit” and it will make the new permission.
  • Now select the users you want to add the new permissions to and save the changes.

In-depth step by step process:

  • Go to the site where the file you want to protect is located.
  • Go to “Documents” in the left menu. (1)
  • Click the three vertical dots next to the file or folder you wish to protect. (2)
  • Then select “Manage access” from the popup menu. (3)
  • Click on “Advanced” at the bottom of the “Manage access” dialog box.
  • Here you will see a list of users and groups.
  • Select the users or groups you wish to limit access to. (1)
  • Then click “Edit User Permissions” at the top. (2)
  • Select “Read” to prevent the user or group from being able to delete files.
  • Then click the “OK” button.

It’s critical to prevent users from removing valuable files shared on Teams channels. Set up appropriate library settings or create a unique SharePoint permission level for that user group to accomplish this.

Are there any other options for preventing Teams users from removing files? Please feel free to leave a list of the measures to do in the comments section below.

How to share files and folders only with external users: SharePoint Online

SharePoint has been the preferred collaboration platform for businesses all around the world for quite an extensive length of time. The platform’s sophisticated capabilities provide a secure environment for data capture, document sharing, and information exchange. You can open a SharePoint file even if you aren’t a normal user thanks to one of these features. We’ll talk about externally sharing files and folders with SharePoint online users in this blog.

The platform is well-suited to exchanging files in a variety of formats. The process is straightforward due to the user interface’s ease of use. Here’s how to use SharePoint to exchange documents externally with SharePoint online:

  • Go to Office 365 using your browser. Use your email, phone number, or Skype profile to log in to your Microsoft account.
  • Use the app launcher to navigate to SharePoint; the app launcher is illustrated by nine dots.
  • Go to the site where the file or document is located.
  • Highlight the ones you want to share. SharePoint also allows you to select entire folders. Click the “Share” button in the top-left corner.
  • You now need to change the Share preferences to “Specific people” – what this will do is allow you to refine your share link to only those who have access whether external or internal within your organisation. Only the external members selected can view the document.
  • Click on “apply” once you have selected the “specific people” box.
  • A new box will show and here type out the names of the members you wish to share the content with.
  • Once this is complete you can either click “send” to send the link directly (if they have a Microsoft account) or click on “copy link” if you want to send the link on a third party platform like Gmail.

The method above is an effective approach as the link share method allows users to effectively transfer documents and files with external users without the inconvenience of having internal members look at the file. If the link is in the wrong domain it won’t open as you’ve set the share settings to “Specific people” only.

Manage SharePoint guests to share files and folders only with external users:

You have the power to change the sharing settings for the whole company if you’re a global or SharePoint admin. That implies you get to choose the amount of Guest user engagement on the SharePoint server. Depending on your needs, you may pick from a variety of sharing options.

Here’s how to edit the guest share feature:

  • Visit your Office 365 Admin section by using the app launcher.
  • Open the “External Sharing” tab.
  • Select the desired sharing level for your organization. Usually, the default setting is “Anyone.”

A multitude of different share settings allows for the admin status users to refine the settings to the preferences they require. If you’re an admin user all you need to do is make sure to choose one that corresponds to the type of document you’re sharing. 

Below are the settings you change to.

  • Anyone:
    • Users can use this option to distribute URLs that do not require authentication. As a result, they may distribute it to both existing and new guests. You may specify an expiration date for each link as an administrator.
  • New & Existing guests:
    • Guests must check in with their Microsoft account to access the URL with this setting. They can also use their User ID from school or work. This is due to the fact that these sorts of linkages necessitate the usage of identity verification codes.
  • Only Existing Guests:
    • You’ll be able to share files from your directory with Guests this way. This includes anybody who has already accepted your invites. It also refers to Guests you personally added using Azure B2B or other collaboration tools.
  • Only members of your organization:
    • Choose this option if you wish to restrict external users from viewing your directory. It prohibits external sharing and retains all of your files within your company.

Guests who were previously allowed access can still join the server if you stop external sharing and then enable it again. If you don’t want Guests to be able to access certain sites again, you must disable the option for each site separately.

Control over external sharing – How to turn on and off? 

Everyone with site permission has access to the files you save on your SharePoint server. You may, however, want to share specific files with folks who don’t use SharePoint on a daily basis. This is when the capability of external sharing comes in handy.

You must be a SharePoint admin in Microsoft 365 to enable the setting. External sharing cannot be enabled or disabled by site administrators. Here’s how to go about it:

  • Go to the SharePoint admin center’s web page and log in.
  • Next you need to go to the left-hand column and choose a website from that list.
  • Toggle the sharing option you wish to activate by clicking the circle next to it.

The available alternatives are determined at the corporate level. Any links you shared on that site will no longer work if you disable external sharing on that site.

Indepth step by step process – Here’s how to use SharePoint to exchange documents externally with SharePoint Online

  • Go to Office 365 using your browser. Use your email, phone number, or Skype profile to log in to your Microsoft account. Create an account using your preferred information if you haven’t already.
  • Next you need to navigate to the SharePoint dashboard by first clicking on the app launcher which is illustrated by nine dots and then clicking on SharePoint.
  • You now need to visit the site where the file or document is located.
  • Now click on documents listed in the left hand corner menu.
  • You will now be presented with a list of files and documents and from here select the ones that you need to share, the “Share” symbol is highlighted below click on it to share the document to the specific user.
  • A new box will open and here you need to click on “specific people” which will allow you to select individuals who can receive the link to view or edit the content.
  • Finally click on “Apply” which will save the new Share settings.
  • After that you need to type out the name of the individual you want to share the file with and click “send”. This will then send the user the final link.
  • Alternatively you can click on “copy link” which will copy the link and you can now send it to users who have an external platform such as Gmail. As the normal send link method only sends to Microsoft account users only.

Thanks for reading! We hope you’ve found this blog post useful. If you have any other questions, please feel free to leave a comment below and I would be more than happy to help.

SharePoint co-authoring not working: How to fix

The default co-authoring feature on SharePoint allows multiple users to work together in one document simultaneously without interrupting each other’s edits and changes. Most of the time, the co-authoring feature works well and runs smoothly. However there are a number of situations that can block or prevent you from co-authoring with others. In this blog post I’ll share a few of the most common reasons why co-authoring might not be working for you and how you can resolve the issues.

Common reasons why your co-authoring may not be working:

  1. AutoSave is turned off
  2. You’re not using the right document format 
  3. Co-authors are using different versions of the application 
  4. Co-authors are accessing the document from different applications 
  5. You’re using feature that don’t support co-authoring 
  6. The document has been checked out  

These are just some of the most common reasons as to why co-authoring may not be working for you in SharePoint. It is important to note that there are still many other technical reasons why co-authoring may be having issues. For a full list of other reasons as to why co-authoring may not be working for you and how to solve these issues, please visit the Microsoft Office Support webpage and read about Troubleshooting co-authoring.

Resolving issues with co-authoring

AutoSave is turned off

To automatically save your work and any edits and changes you make to a document, you have ensured that AutoSave is turned on. When turned on, this feature ensures all your changes are saved to the cloud as you are working on the changes and lets other co-workers and users see the changes you are making in real time. Therefore it is vital to ensure AutoSave is turned on when working collaboratively. The AutoSave button can be found at the top left hand corner in Excel, Word and PowerPoint. 

You’re not using the right document format 

The co-authoring feature in SharePoint is not supported by all types of documents. Only certain types of document allow co- authoring, therofer it is important to ensure that your documents and files are saved in the correct format. The table below shows the correct formatting for each type of file: 

File typeCorrect format
Word.docx.doc .docm
Excel.xlsx .xlsm.xlsb
PowerPoint.pptx.ppt.pps

Co-authors are using different versions of the application 

Co-authoring often fails when one user has opened up the document using a version of the application that does not support co-authoring. This is a common issue as even if just one of the co-authors opens the document using a different version, then all the other co-authors will receive an error message. Therofer it is important to ensure that all co-authors are using the same version of the application to avoid getting such error messages. 

Please note that co-authoring is supported in Word and PowerPoint in versions that are more recent than Office 2010, and Excel supports co-authoring in the latest version as well as the mobile app.

Co-authors are accessing the document from different applications 

There may be times when co-authors are accessing the same document via different cloud storage spaces. For example, one co-author may be accessing it through SharePoint, whereas another co-author may be accessing it from OneDrive. In such cases, the co-authoring feature may end up crashing due to the pressures on the server and may stop its co-authoring functions. To prevent this from happening it is important to communicate with all co-authors and ensure that they all know which cloud storage space to access the document from.

You’re using feature that don’t support co-authoring 

Another thing that can cause problems with the co-authoring feature on SharePoint is if a co-author uses a feature that is not co-authoring friendly. For example, features such as tracking do not support co-authoring and cand temporarily stop the process of co-authoring. When you access a document, ensure that the ‘Track Changes’ feature is turned off.

The document has been checked out 

When a document is checked out, it means that a co-author has temporarily disabled co-authoring while they work on changes to a document. This may be because they want to make changes separately before allowing other co-authors to make changes as it helps to keep the version number of the document to a minimum. Once the co-author who checked the document out checks it in again, co-authoring will automatically start to work again.

Thank you for reading. We hope that this blog post has helped to solve any co-authoring issues you have been experiencing.

 If you have any question, feel free to leave a comment below and we’ll get back to you as soon as we can or, read over our other blog posts that cover other issues you may be experiencing in SharePoint Online:

This blog post demonstrates how to add members or users to a group by changing preferences to ensure they can properly access SharePoint Online services.

Learn how to adjust file settings for libraries, folders and individual documents to ensure you have greater control over the contents of your SharePoint sites.

To get the most out of your SharePoint document library, it’s important to manage your document library and the activities connected to it. This blog post demonstrates how to create new document libraries to keep your files well organised. 

SharePoint’s ability to collaborate with other users is one of its biggest advantages that drives many people to use the tool. This blog post looks atg how to interact with external members without a Microsoft account.

How to turn off co-authoring in SharePoint Online

The co-authoring feature in SharePoint Online allows two or more users to work on a document at the same time, without interfering with each other’s edits and changes. There are a range of benefits that come with co-authoring such as efficiency and scalability, however, some organisations may have certain limitations when it comes to their hardware and may want to turn off co-authoring to minimise the impact it has on the performance of their server.

Unfortunately, there is no way to turn off the default co-authoring feature in Sharepoint Online as of yet. However, it is possible to check out a document in Sharepoint Online. The checkout option can be thought of as the opposite of co-authoring. It restricts multiple users from making edits or changes to the document at the same time as other users. This means that other users are prevented from making any changes to a document until the first user has finished and has checked the document back in. This blog post will demonstrate how to check out a document in SharePoint Online.

Checking out a document in Sharepoint Online:

  1. Sign into Office.com using your Microsoft credentials and go into SharePoint
  2. Go to the site where your document library is 
  3. Enter the document library where the document or file that you want to check out is stored
  4. Right click on the document you want to check out and click on ‘More’ from the drop down list
  5. Then, select ‘Check out’
  6. A small window will appear on the right hand side of the screen notifying you that the document has been checked out.

Please note that other users cannot see the changes you have made to the document until you have checked the document back in. Therefore, once you have made the changes required, make sure to check the document in. To check the document back in, follow the steps above again, however instead of clicking ‘Check out’, select ‘Check in’.

Why checking out a document can be useful

Just like co-authoring has a number of advantages, so does utilising the check out feature on SharePoint Online. Firstly, it helps users to find out who is currently editing the document. Once you have checked out a document in SharePoint, other users trying to access the document will be told which user is currently making changes to the document, however, they will not be able to see the changes you have made until you have checked the document back in. 

Checking out a document also gives users control over the version numbers of the document. While co-authoring, the document automatically saves itself after every minute or so to ensure that the most updated version of the document is being saved as multiple users are editing and making changes at the same time. This results in a large number of versions being saved after every minute. When a document is checked out, not as many versions need to be saved, as the document is not auto saving every minute. 

The biggest benefit of using the check out feature on a document is that it only allows one user to edit the document at a time, as the other users will be able to access the document in a read only view until the document is checked in again. This can help prevent conflict in the long run when multiple users want to make changes at the same time as it requires them to let other users make changes before they can make changes themselves.

Step by step process of checking out a document in SharePoint Online:

  1. Sign into Office.com using your Microsoft credentials and go into SharePoint

Click on the SharePoint logo and enter SharePoint.

  1. Go to the site where your document library is

For this tutorial, I will enter the Blog Demo site.

  1. Enter the document library where the document or file that you want to check out is stored

The document I want to check out for this tutorial is stored in the document library called ‘Documents’.

  1. Right click on the document you want to check out and click on ‘More’ from the drop down list
  1. Then, select ‘Check out’
  1. A small window will appear on the right hand side of the screen notifying you that the document has been checked out.

Your document has now been checked out and you can make changes and edit it without other users being able to see the changes until the document has been checked in.

How to check the document in again:

Once you have finished making the changes to your document, here’s how to check the document in again to ensure other users can have full access to it.

  1. Right click on the document you want to check in and click on ‘More’ from the drop down list
  1. Then, select ‘Check in’
  1. A window will appear on screen asking you to add any comments about the changes you have made to the document.

This comment section is designed to help you communicate the changes you have made to other users. For this tutorial, I have commented ‘All changes made’. This is an optional step, if you do not wish to add any comments you can skip to the next step.

  1. A small window will appear on the right hand side of the screen notifying you that the document has been checked out.

Thank you for reading. If you have any further questions or any comments about checking out your documents to disable co-authoring, feel free to leave a comment below and we’ll be happy to help.